Configuration Category: WooCommerce Email Template Customizer
WooCommerce Coupon Box
The plugin has been integrated the feature to build and customize the coupon emails of the WooCommerce Coupon Box plugin, that help to sent the coupon email after the customers subscribe.
A. How to send coupon emails of WooCommerce Coupon Box using the WooCommerce Email Template Customizer plugin.
Step 1. Activate the WooCommerce Coupon Box premium version and WooCommerce Email Template Customizer free or premium version.
Step 2. Choose available coupon templates of WooCommerce Coupon Box in the Email template option that are designed in the WooCommerce Email Template Customizer plugin.
B. How to build and customize coupon email templates for WooCommerce Coupon Box in the WooCommerce Email Template Customizer plugin.
You can build unlimited coupon email templates using layouts and elements of WooCommerce Email Template Customizer, and shortcodes designed uniquely for WooCommerce Coupon Box. You can read how to build email templates here, how to customize available email templates here . After building an coupon email template, save that email template under “WooCommerce Coupon Box” type.
C. Shortcodes for the coupon emails
{wcb_coupon_value}{wcb_coupon_code}{wcb_customer_name}{wcb_date_expires}{wcb_last_valid_date}{wcb_site_title}
WooCommerce Abandoned Cart Recovery
The plugin has been integrated the feature to build and customize the abandoned cart recovery emails of the WooCommerce Abandoned Cart Recovery plugin, that help to sent the abandoned cart email to customers.
A. How to send abandoned cart emails using the WooCommerce Email Template Customizer plugin.
Step 1. Activate the WooCommerce Abandoned Cart Recovery premium version and WooCommerce Email Template Customizer free or premium version.
Step 2. Choose available abandoned cart templates in the Email template option that are designed in the WooCommerce Email Template Customizer plugin.
B. How to build and customize abandoned cart email templates in the WooCommerce Email Template Customizer plugin.
You can build unlimited abandoned cart email templates using layouts and elements of WooCommerce Email Template Customizer, and shortcodes designed uniquely for WooCommerce Abandoned Cart Recovery. You can read how to build email templates here, how to customize available email templates here . After building an abandoned cart template, save that email template under “WC Abandoned Cart” type.
C. Shortcodes for the abandoned cart emails
{wacv_customer_name}{wacv_unsubscribe_link}
D. WC abandoned cart element
The WC abandoned cart element will appear in the WooCommerce Email Template Customizer plugin when both WooCommerce Abandoned Cart Recovery premium version and WooCommerce Email Template Customizer activated, that helps to display abandoned items in order in abandoned cart email template.
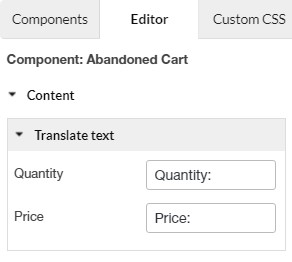

D1. You can translate the quantity and price text of abandoned items in the content section.
D2. In the style section, you can style how abandoned items, product name, product quantity, product price display in email.
WooCommerce Orders Tracking
If you’re using both WooCommerce Orders Tracking plugin and this plugin, there’s email settings in the order tracking plugin and you can use this email customizer plugin to manage that and make the email looks beautiful with the tracking info.
|
WooCommerce Email Template Customizer or Email Template Customizer for WooCommerce can: |
|
|
|
|
|
A. Build, Edit & Assign WooCommerce Orders Tracking email template
Step 1: Build an email template
Follow this documentation for how to create new template with the ETC plugin. You can create a whole new template, or select our built-in design “WooCommerce Orders Tracking email” in available Sample
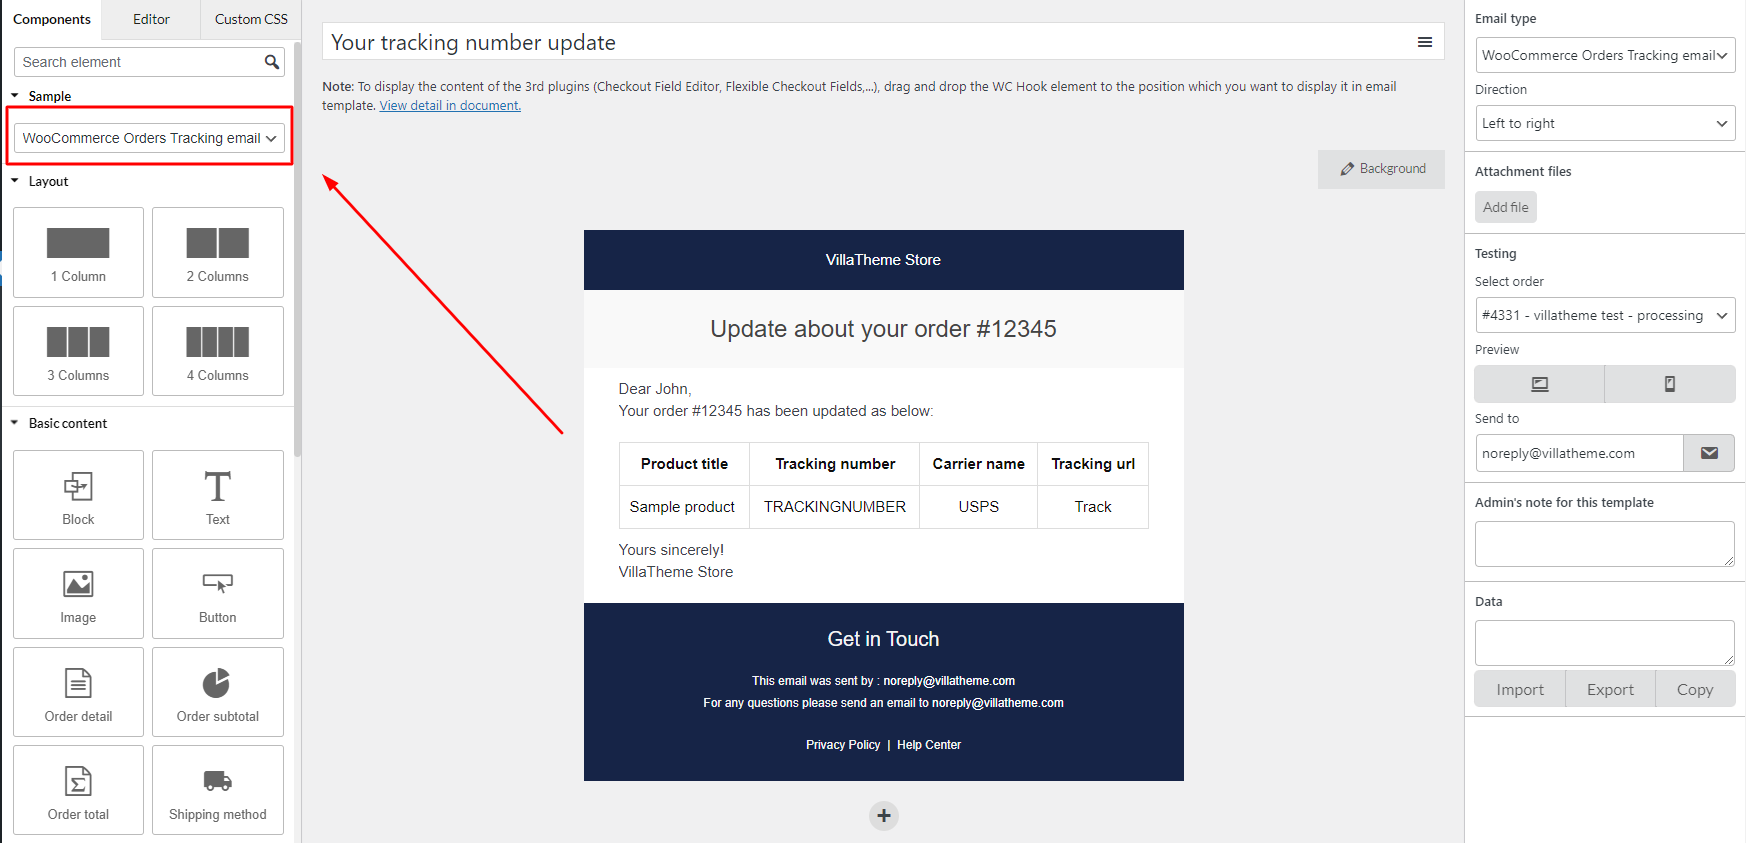
You must ensure the email template is saved under “WooCommerce Orders Tracking email” type. More info in this documentation.
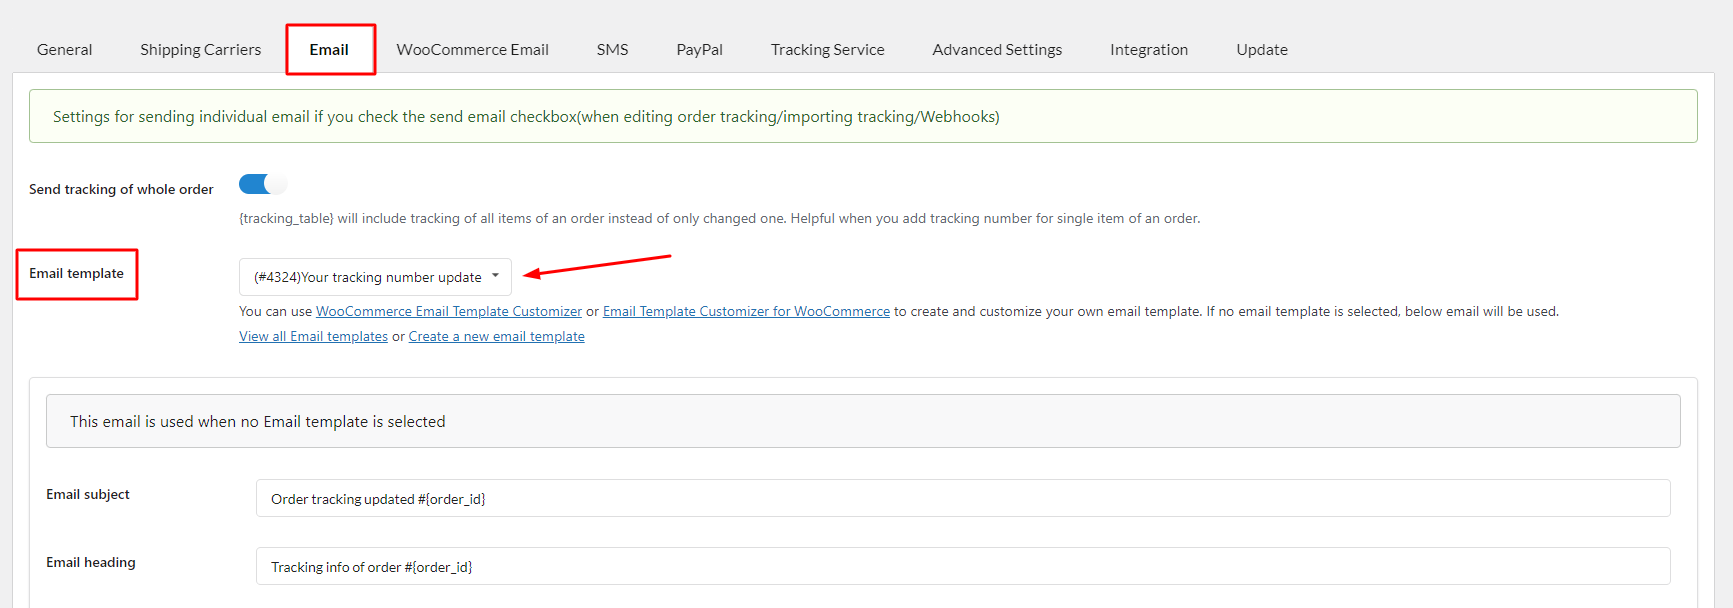
Step 2: Assign the template
You must select a template in the Email settings tab of WooCommerce Orders Tracking plugin. Only templates saved as “WooCommerce Orders Tracking email” can be selected there
If you don’t select the custom template, the email will automatically be displayed in “Default Template”. If there’s no “Default Template”, the email will be in its original WooCommerce email design.
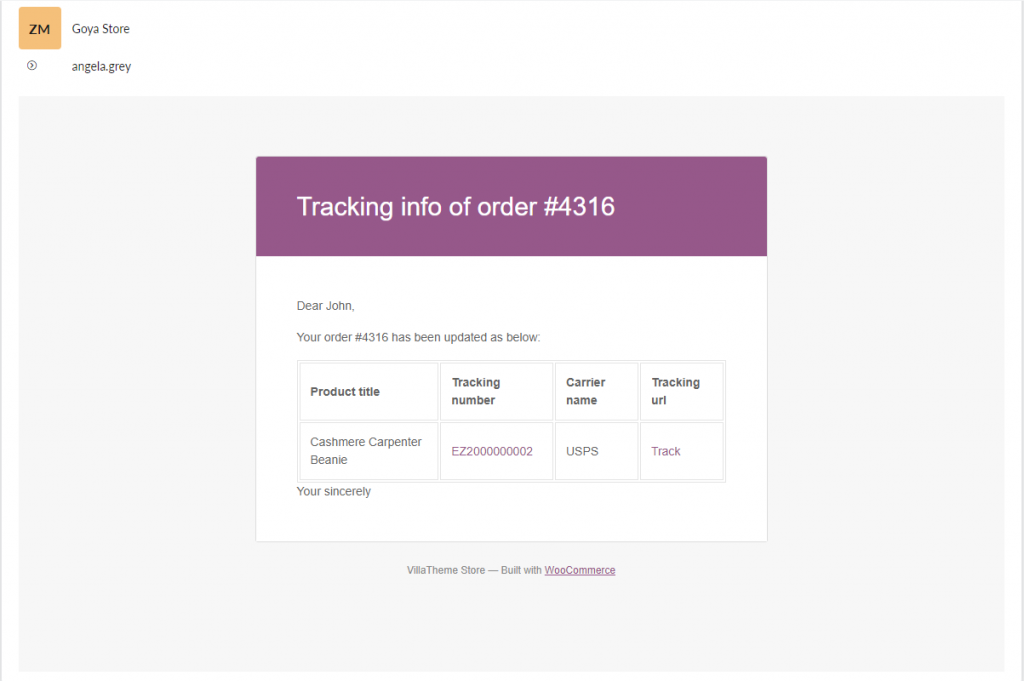
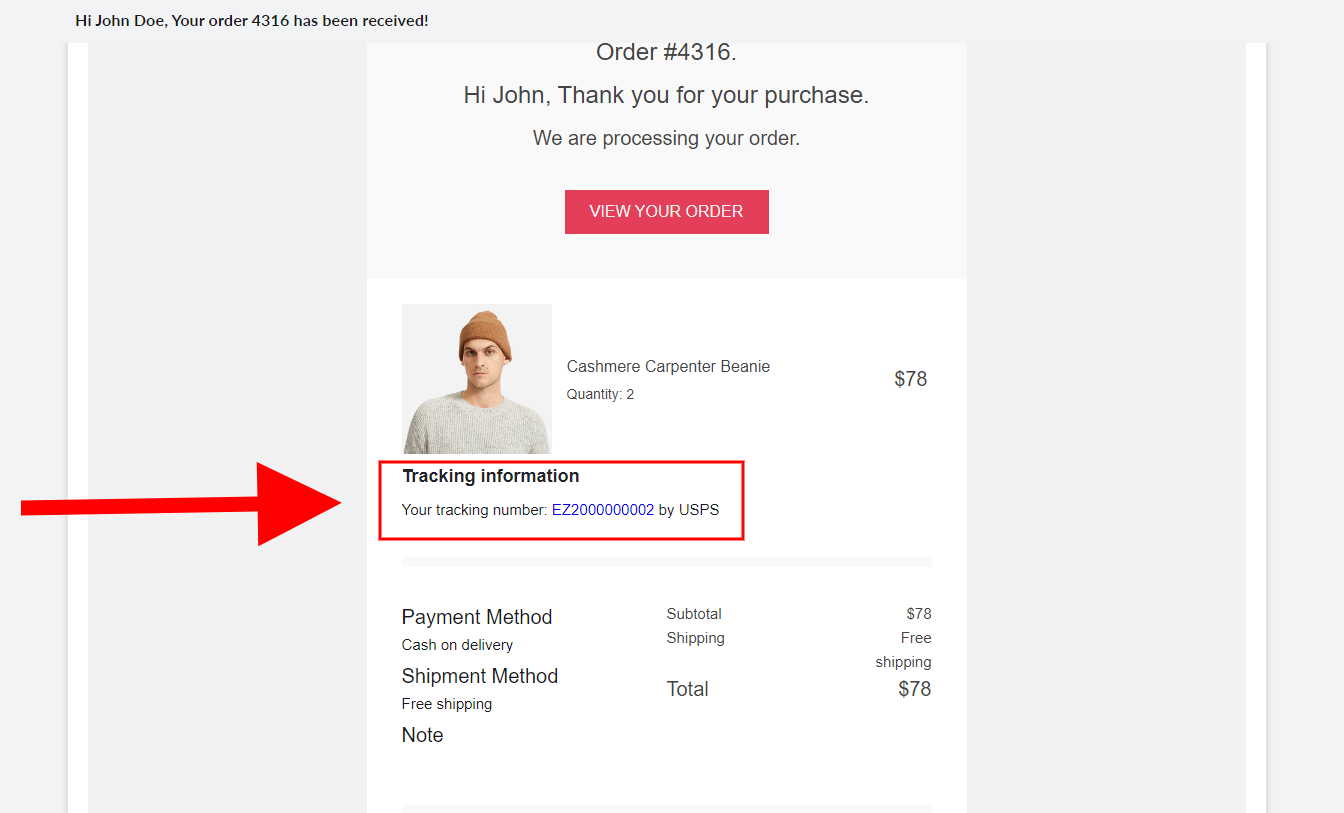
Result:

B. Attach tracking info to WooCommerce order emails in ETC templates
Step 1: Select the order status to include the tracking info. The templates assigned to the corresponding email types will display the info.
Step 2: Choose a position to place the tracking information.
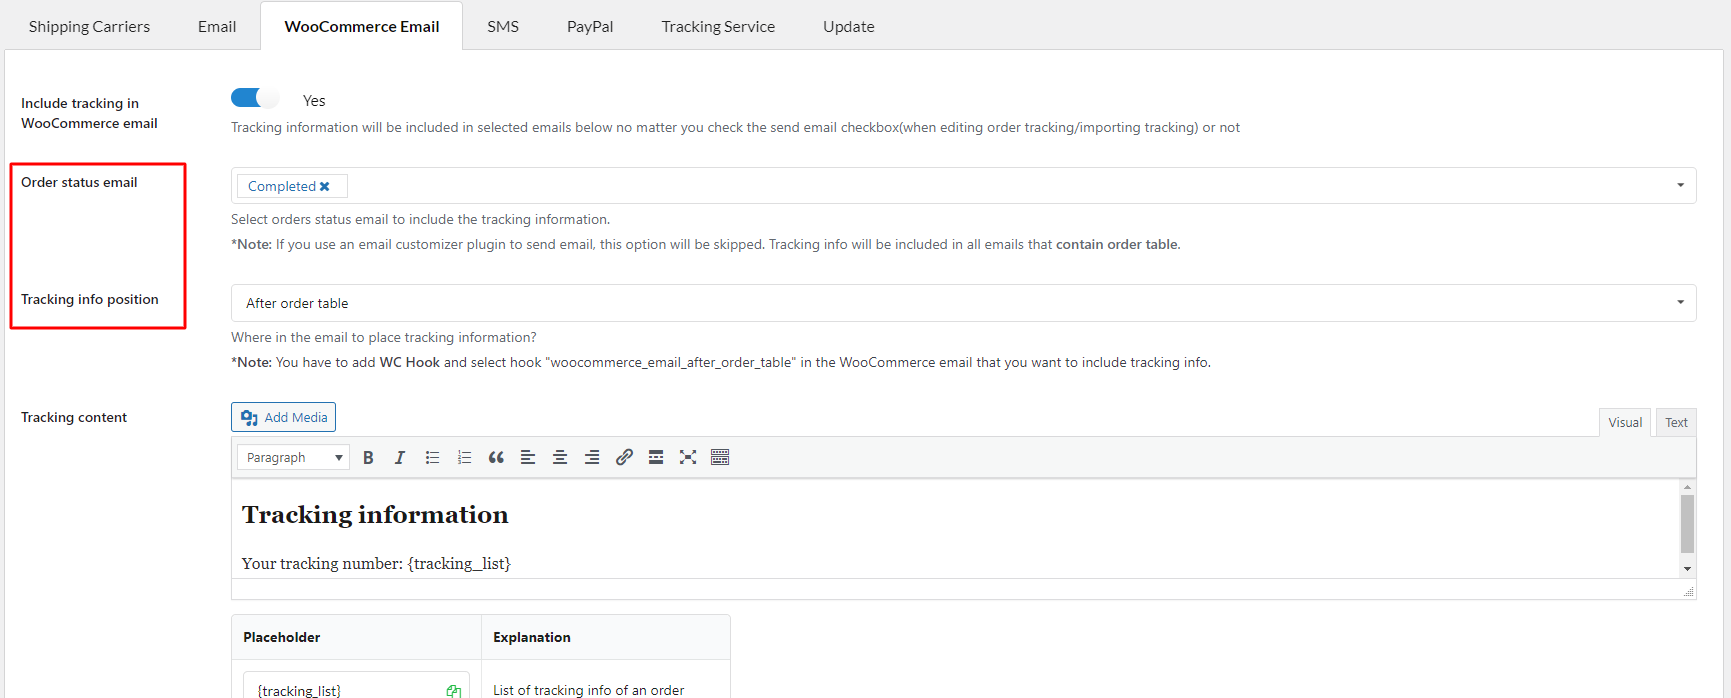
Step 3: Now, go to the editor page of the email templates you select in the step 2. Add the hook to the selected position. For how to use the correct hook, please see this documentation.
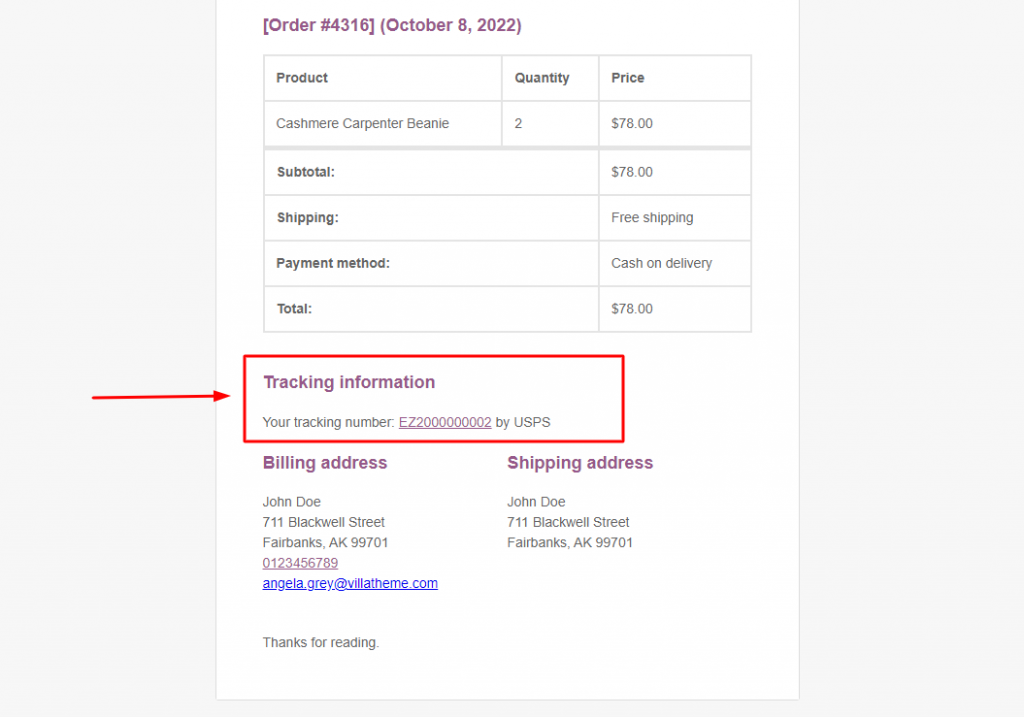
Result:
C. Shortcodes for the order tracking emails
{wot_billing_first_name}{wot_billing_last_name}{wot_tracking_number}{wot_tracking_url}{wot_carrier_name}{wot_carrier_url}
D. Orders Tracking element
The Orders Tracking element will appear in the WooCommerce Email Template Customizer plugin when both WooCommerce Orders Tracking premium version and WooCommerce Email Template Customizer activated, that helps to display tracking information in order tracking email template.
![]()
D1. Orders Tracking content:
You can choose available shortcodes for order tracking columns, remove any columns you want by leaving empty the content field of that column.
D2. Style:
You can style text in tracking table including: Font size (px); Color; Line height (px).
The plugin has been integrated the feature to build and customize the order tracking emails of the WooCommerce Orders Tracking plugin, that help to sent the tracking updates to customers.
Learn how to build WooCommerce Orders Tracking email with WooCommerce Email Template Customizer in this short video
Default template
If you are using a 3rd plugin such as: WooCommerce Subscription; WooCommerce Product Vendors … and the email contents of this 3rd plugin is not attached in WooCommerce default emails, but they create their own email templates. In this case, you can use the default template type.
This template can help to keep the email form of the email template plugin including the header, footer, suggested products and socials, and load all email contents of the 3rd plugin inside.
All email contents of the 3rd plugin will keep it initial format and can not be customized by WooCommerce Email Template Customizer plugin.
For example, you are using WooCommerce Product Vendors and want to show all email contents of this plugin. You can see the default email template can load the contents of WooCommerce Product Vendors and also display core design of WooCommerce Email Template Customizer:
WooCommerce Lucky Wheel
If you’re using WooCommerce Lucky Wheel and WooCommerce Email Template Customizer, or Email Template Customizer for WooCommerce, you can:
- Customize emails that inform users the wheel spinning result
- Create different limitless templates and assign the template to each wheel segment >> This function lets you manage the email content to each result.

How to send Lucky wheel emails using the WooCommerce Email Template Customizer plugin.
Step 1. Build templates for informing result.
Follow this documentation for how to create new template with the ETC plugin. You can create a whole new template, or select our built-in design “WooCommerce Lucky Wheel – Coupon Email” in available Sample
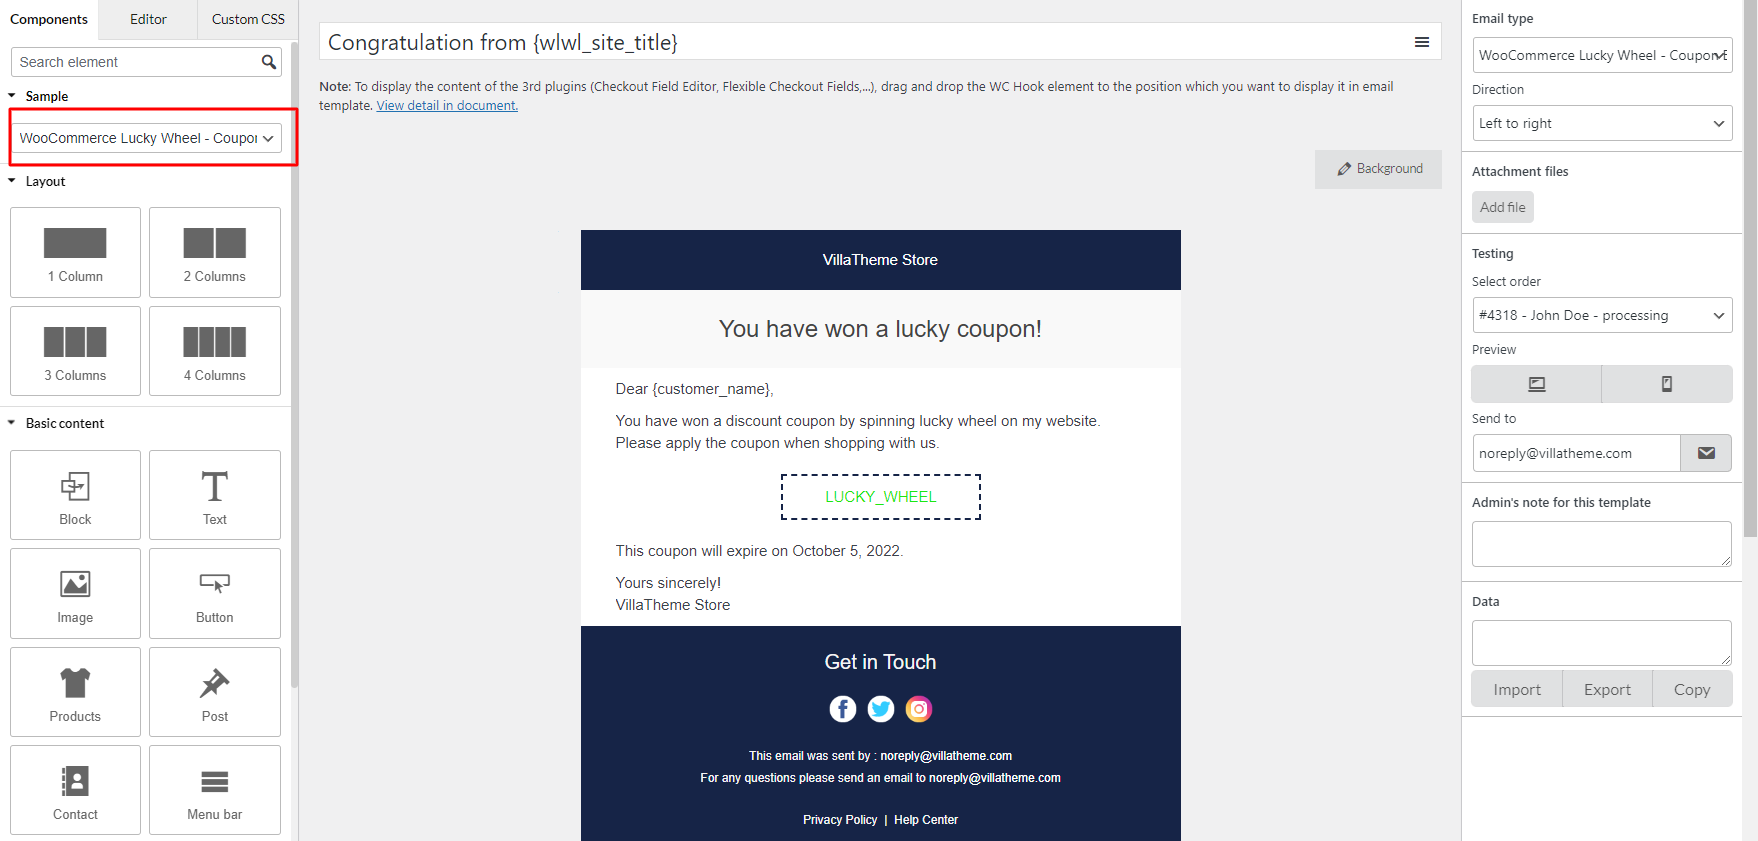
You must ensure the email template is saved under “WooCommerce Lucky Wheel – Coupon Email” type. More info in this documentation.
Step 2. Assign email to each index
Now after you’re happy with the email design, go to WC Lucky Wheel >> Wheel Settings >> and assign the template to the segment with prize
You may create different template for different prize notification, and assign them separately.

Shortcodes for the lucky wheel emails
{wlwl_coupon_label}
{wlwl_site_title}
{wlwl_coupon_code}
{wlwl_customer_name}
{wlwl_customer_email}
{wlwl_customer_mobile}
{wlwl_date_expires}
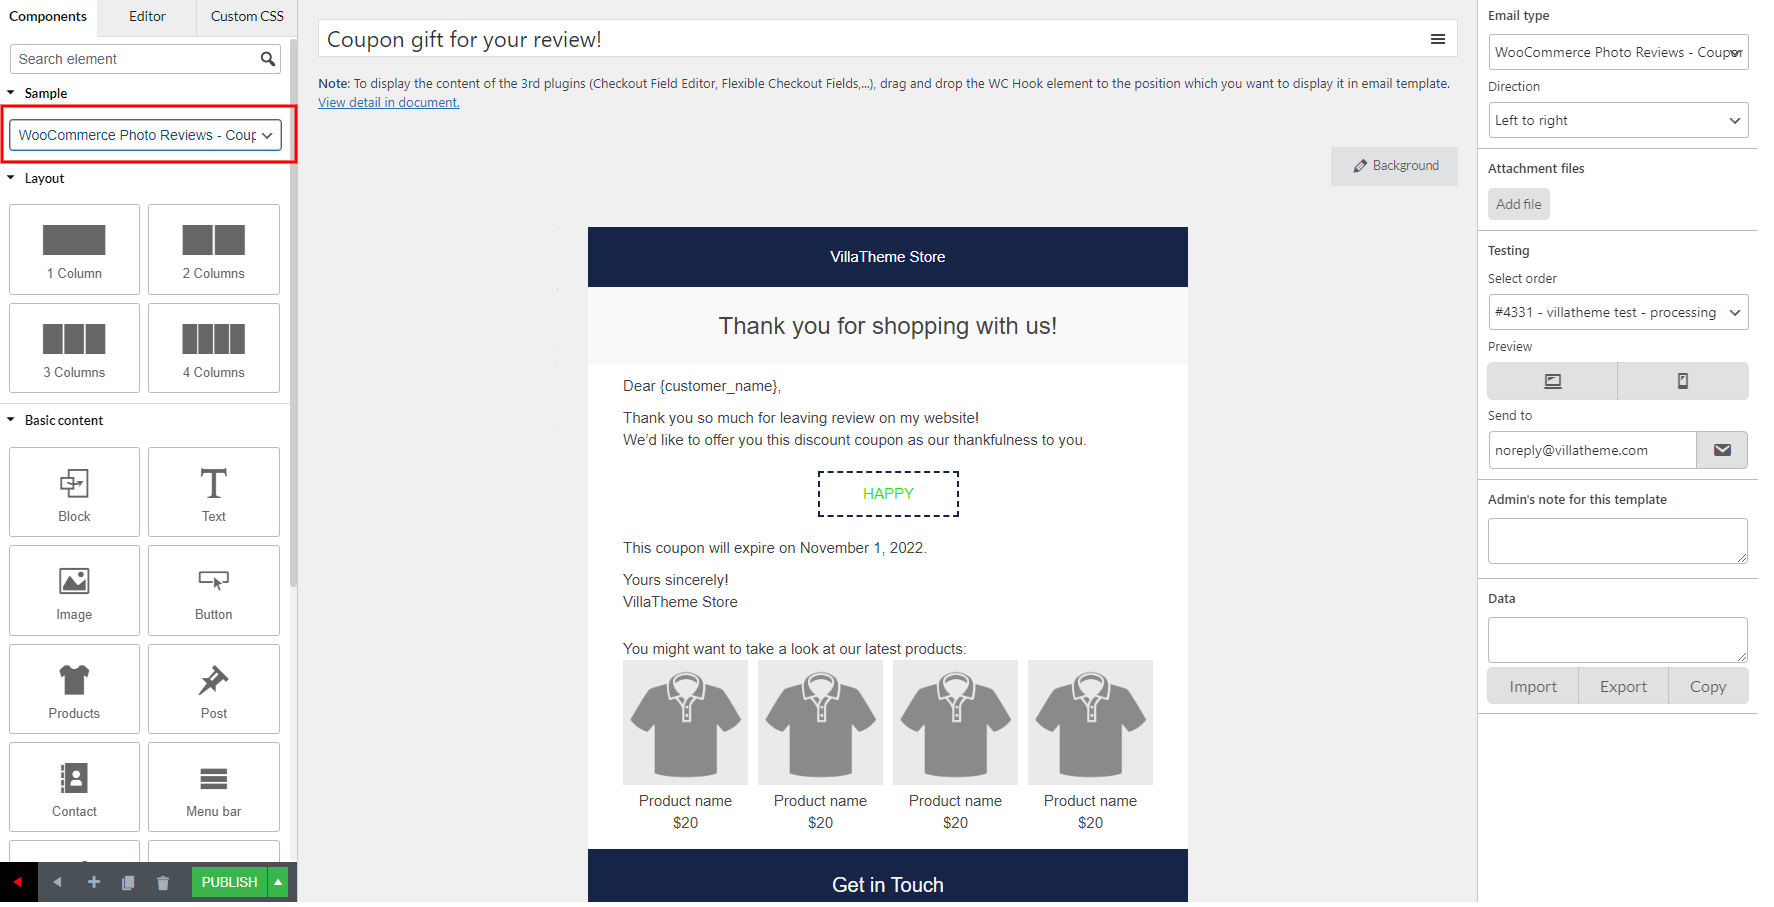
WooCommerce Photo Reviews
WooCommerce Photo Reviews can send 2 emails: Review Reminder email and Coupon email. By default, they’re displayed in the WooCommerce original email design.
You can use WooCommerce Email Template Customizer or Email Template Customizer for WooCommerce to customize these 2 emails.
Step 1: Build email template
Follow this documentation to build email template using email customizer plugin. You may build your own email templates, or select our built-in templates in the available Sample
C. Shortcodes for Photo review emails
c1. Shortcodes for Review reminder:
{wcpr_order_id}
{wcpr_customer_name}
{wcpr_order_date_create}
{wcpr_order_date_complete}
c2. Shortcodes Coupon for review:
{wcpr_coupon_code}
{wcpr_customer_name}
{wcpr_date_expires}
D. Products to Review element
The Products to Review element will appear in the WooCommerce Email Template Customizer plugin when both WooCommerce Photo Reviews premium version and WooCommerce Email Template Customizer are activated, that helps to display purchased products along with the review buttons in the review reminder email template, so purchased customers can click and redirect to the purchased product pages and write reviews.
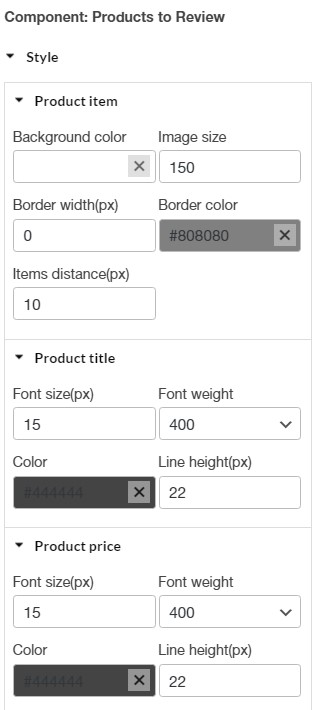
- Product item: Background color, Image size, Border width (px), Border color, Item distance (px)
- Product title: Font size (px), Font weight, Color, Line weight (px).
- Product price: Font size (px), Font weight, Color, Line weight (px)
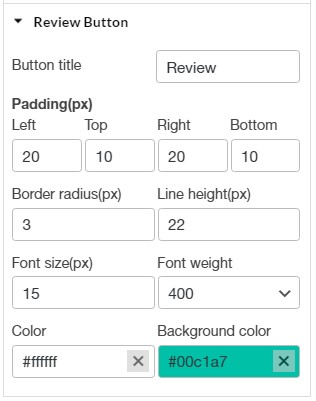
- Review button: Button title; Padding (px): Left, Top, Right, Bottom; Border radius(px); Line height(px); Font size (px); Font weigh; Color; Background color.
WC hook
The WC hook element is integrated in the email that allows you to insert custom code at points wherever the hook is run.

A. Content
- Select hook: You can choose one of positions to display custom code wherever the hook is run:
- woocommerce_email_before_order_table
- woocommerce_email_after_order_table
- woocommerce_email_order_details
- woocommerce_email_order_meta
B. Style
- Heading: Style the overall table layout by setting the font size, line height, and padding to create consistent spacing and improve readability.
- Table: Style the overall table layout by setting the font size, line height, and padding to create consistent spacing and improve readability.
- Table head: Design the header row of the table by customizing the text color, background color, border color, border style (e.g., solid, dashed), and border width
- Table body: Adjust the table body appearance by setting the text color, background color, border color, border style, and border width
- Class & id: Specify a class and/or ID for the component. Each component can have only one ID, but you can assign multiple classes, just separate them with spaces
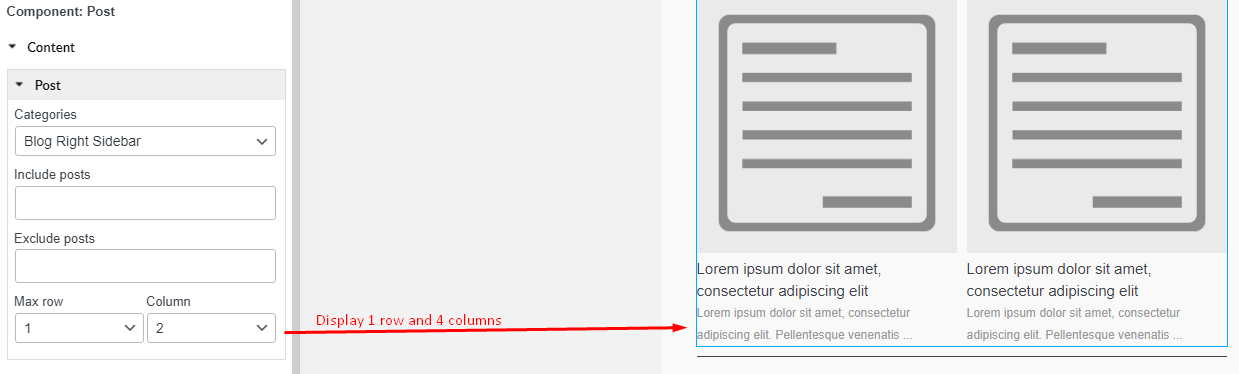
Post
The Post element helps you display your posts in the email template and link to those posts in your store.

A. Content
– Categories: Select one or more categories to pull posts from. Only posts within the chosen categories will be displayed in the email template.
– Include posts: Manually choose specific posts to always include in the post list
– Exclude posts: Select specific posts that should be excluded from display, even if they belong to the selected categories
– Max row: Select the number of the suggest product rows, max row is 10.
– Column: Select the number of the suggest product columns, max column is 4.
* For example:
B. Style
– Post title:
- Limit the number of character on the post title.
- Text: Font size (px); Font weight; Color;
– Post content: Font size (px); Font weight; Color;
– Post distance (px): The distance among post images in vertical.
– Class & id: Specify a class and/or ID for the component. Each component can have only one ID, but you can assign multiple classes, just separate them with spaces
– Alignment: Align the content to the left, right, center, or justified
– Background: Set Image and color for Product background.
– Border: Control the color, style, width and radius of border.
– Padding: Type space between the border of and the content inside it.
– Margin (px): Left; Top; Right; Bottom.
Coupons
The Coupon element helps you display a coupon that customers get and display on the email template. Customers can copy the coupon and apply for their order.
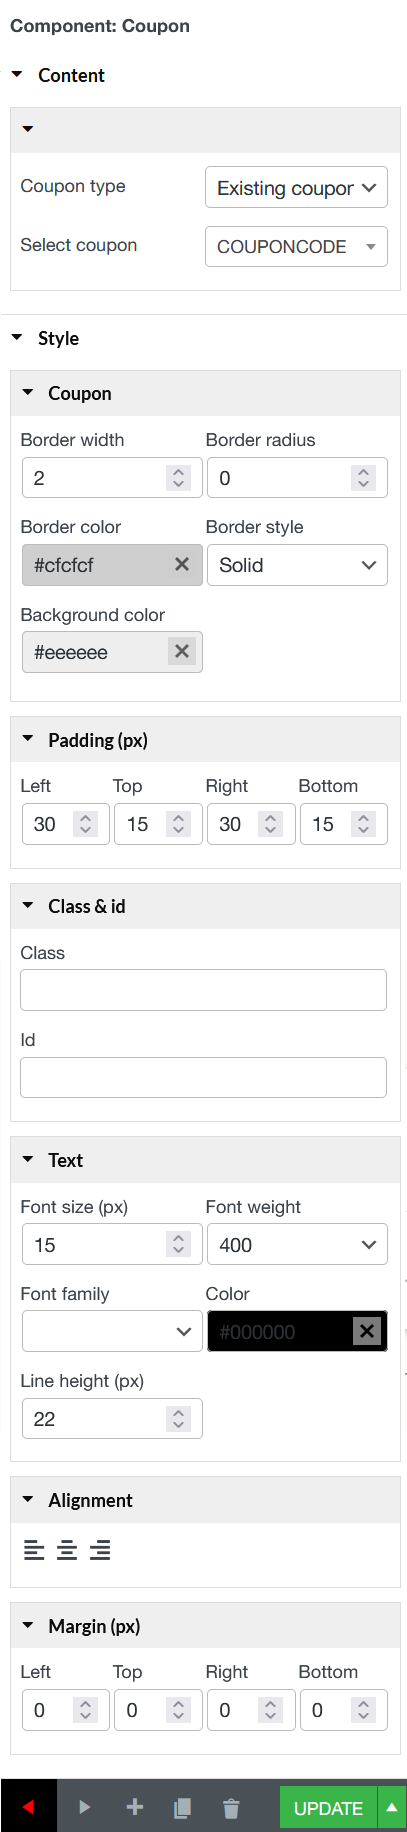
A. Content
In the coupon setting, you can choose type of coupon, they can be Existing coupon or Generate coupon.
a. Existing coupon: This type of coupon is WooCommerce Coupon, the plugin will link to available coupons that have been generated in WooCommerce. You can learn how to manage this type of coupon in this document.
- Coupon type: Choose Existing coupon.
- Select coupon: Type 2 or more characters of WooCommerce coupon to apply in the email template.
b. Generate coupon: You can generate new coupons and set their own coupon’s rules.
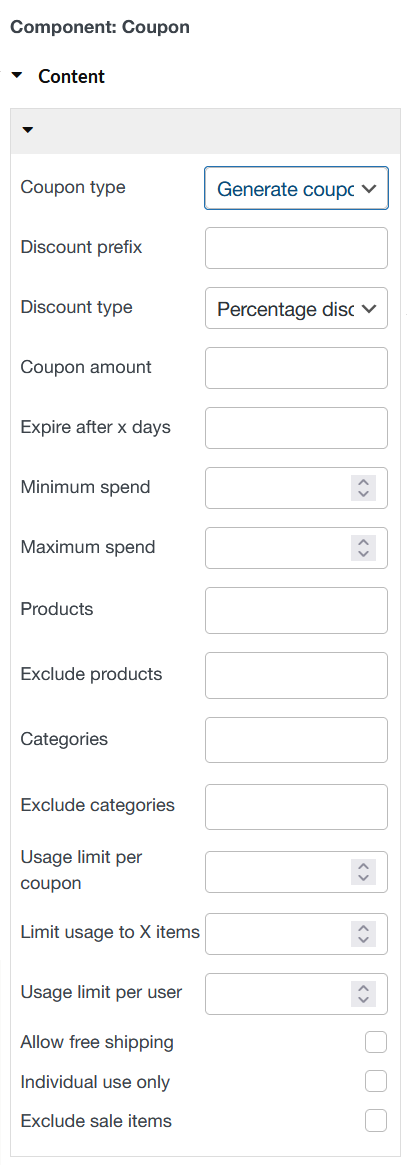
- Coupon type: Choose Generate coupon.
- Discount type: You can select type of discount: Percentage discount; Fixed cart discount or Fixed product discount.
- Coupon amount: Fixed value or percentage, depending on discount type you choose. Entered without a currency unit or a percent sign, which are added automatically, e.g., Enter ’10’ for £10 or 10%.
- Expired date: Date the coupon should expire and can no longer be used. Expiry happens at 12:00 am or 00:00 on the date chosen. If you want a coupon to be valid through Christmas Day but invalid the moment Christmas is over, set the expiration date to YYYY-12-26 as it will expire on YYYY-12-26 00:00. It uses your site’s time zone setting at Settings > General > Timezone in WordPress.
- Minimum spend – Allows you to set the minimum subtotal needed to use the coupon. Note: The sum of the cart subtotal + tax is used to determine the minimum amount.
- Maximum spend – Allows you to set the maximum subtotal allowed when using the coupon.
- Products – Products that the coupon will be applied to, or that need to be in the cart in order for the fixed or percentage discount to be applied.
- Exclude products – Products that the coupon will not be applied to, or that cannot be in the cart in order for the “Fixed cart discount” to be applied.
- Categories – Product categories that the coupon will be applied to, or that need to be in the cart in order for the fixed or percentage discount to be applied.
- Exclude categories – Product categories that the coupon will not be applied to, or that cannot be in the cart in order for the “Fixed cart discount” to be applied.
- Usage limit per coupon – How many times a coupon can be used by all customers before being invalid.
- Limit usage to X items – How many items the coupon can be applied to before being invalid. This field is only displayed if there is one or more products that the coupon can be used with, and is configured under the Usage Restrictions.
- Usage limit per user – How many times a coupon can be used by each customer before being invalid for that customer.
- Allow free shipping – Removes shipping cost when coupon is used. Requires Free Shipping to be enabled.
- Individual use only – Tick the box if you don’t want this coupon to be used in combination with other coupons.
- Exclude sale items – Tick the box if you don’t want this coupon to apply to products on sale. Per-cart coupons do not work if a sale item is added afterward.
B. Style
- Coupon: Control the thickness of the coupon border and choose the border color.
- Padding: Type space between the border of and the content inside it.
- Class & id: Specify a class and/or ID for the component. Each component can have only one ID, but you can assign multiple classes, just separate them with spaces
- Text: Font size (px); Font weight; Color;
- Alignment: Align the coupon content to the left, right, center.
- Margin: Set the space between the border of coupon column and the next element in pixel including: Left; Top; Right; Bottom.