- Start
- FILE INCLUDES
- INSTRUCTION
- INSTALLATION
- HOW TO USE
- HOW DOES IT WORK
- Compatibility
- Exmage – WordPress Image Links
- Extra Information
Copyright Villatheme 2015-2026
Created: 2019.05
Latest updated: 2026.06 – Updated version: 1.4.6
By: VillaTheme
Thank you for purchasing our plugin. If you have any questions that are beyond the scope of this documentation, please feel free to request support at our Support Forum. Thanks so much!
System Requires:
Make sure that those limits are to a minimum as follows for free-trouble while installing:
Recommended:
Download plugin
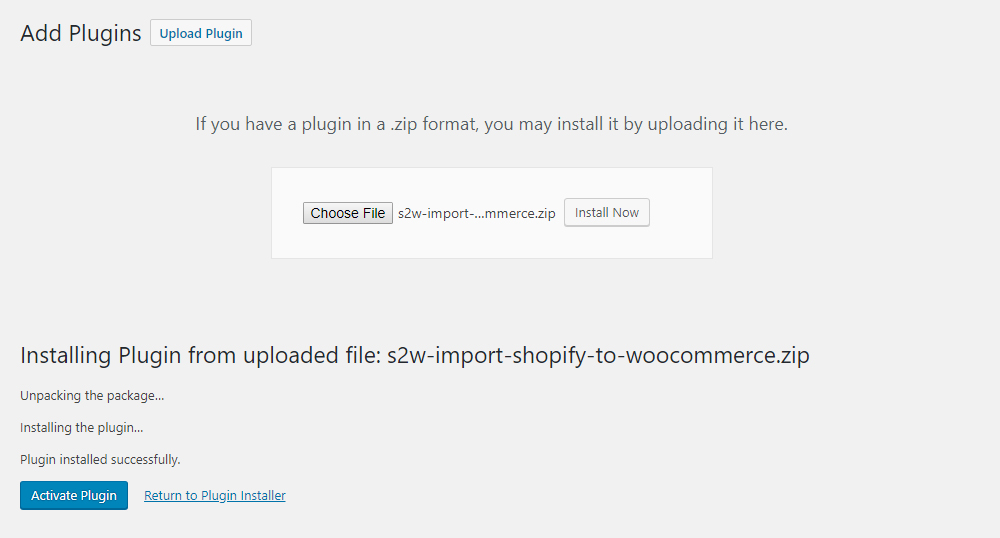
Go to Plugin/Add New /Upload Plugin/Choose file/ select the plugin file installable zip file s2w-import-shopify-to-woocommerce.zip / Install Now/Active Plugin
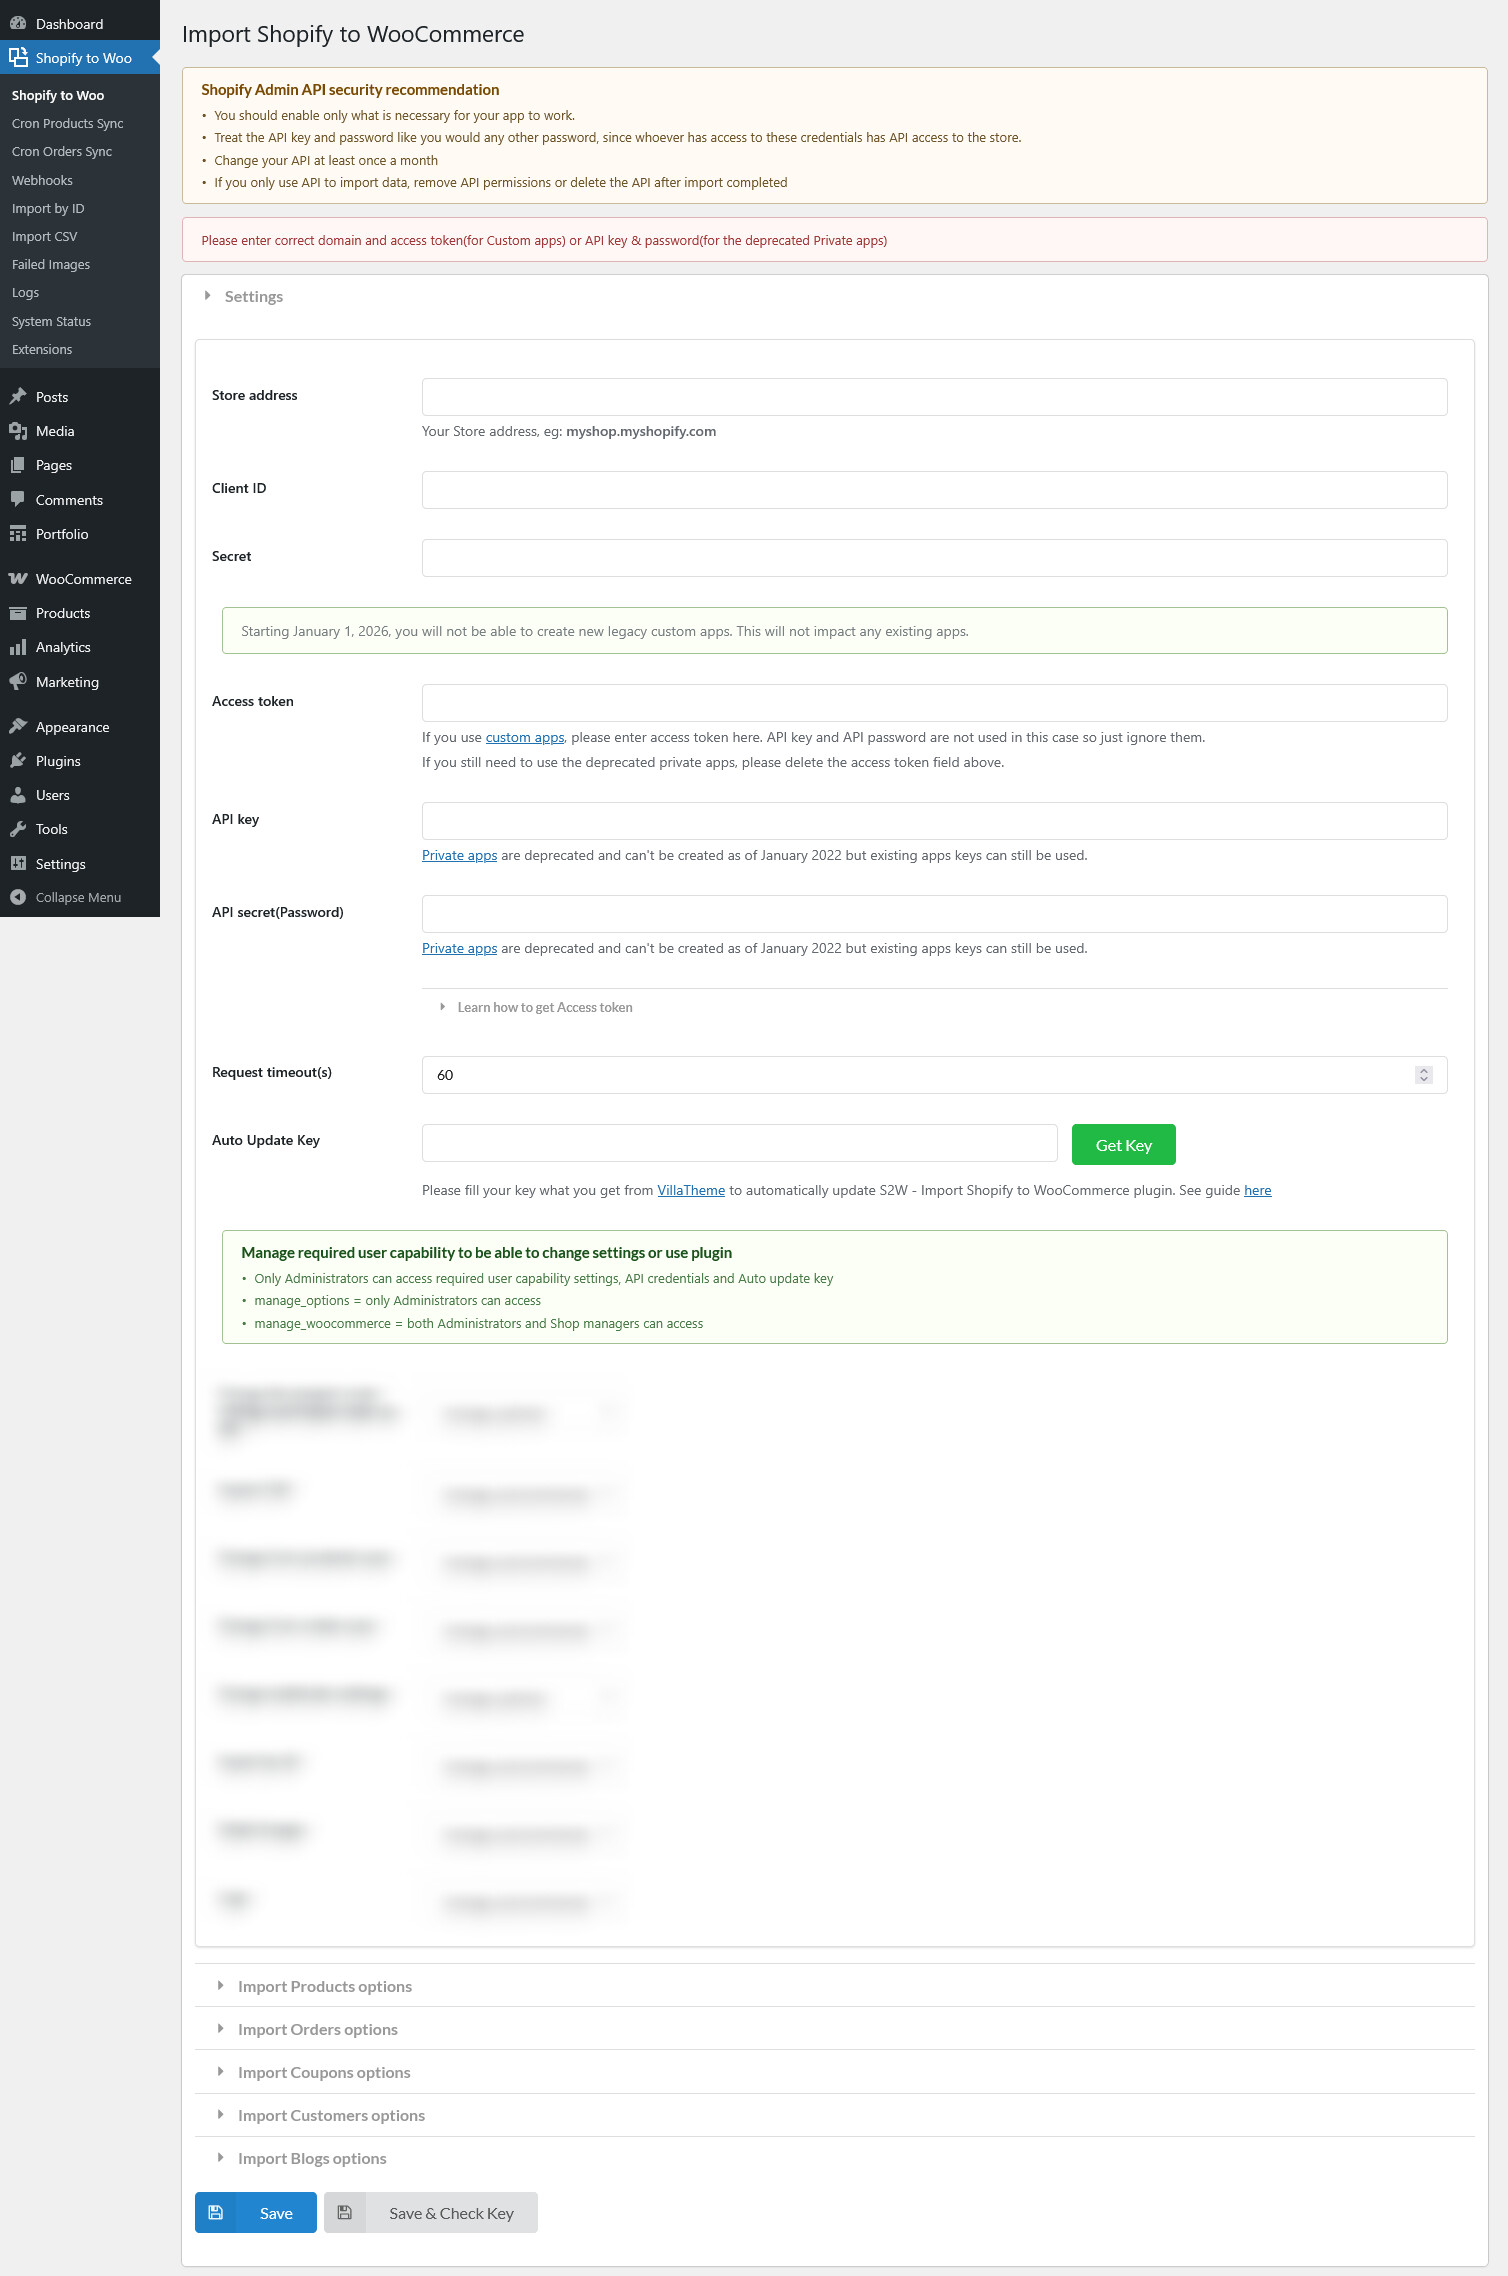
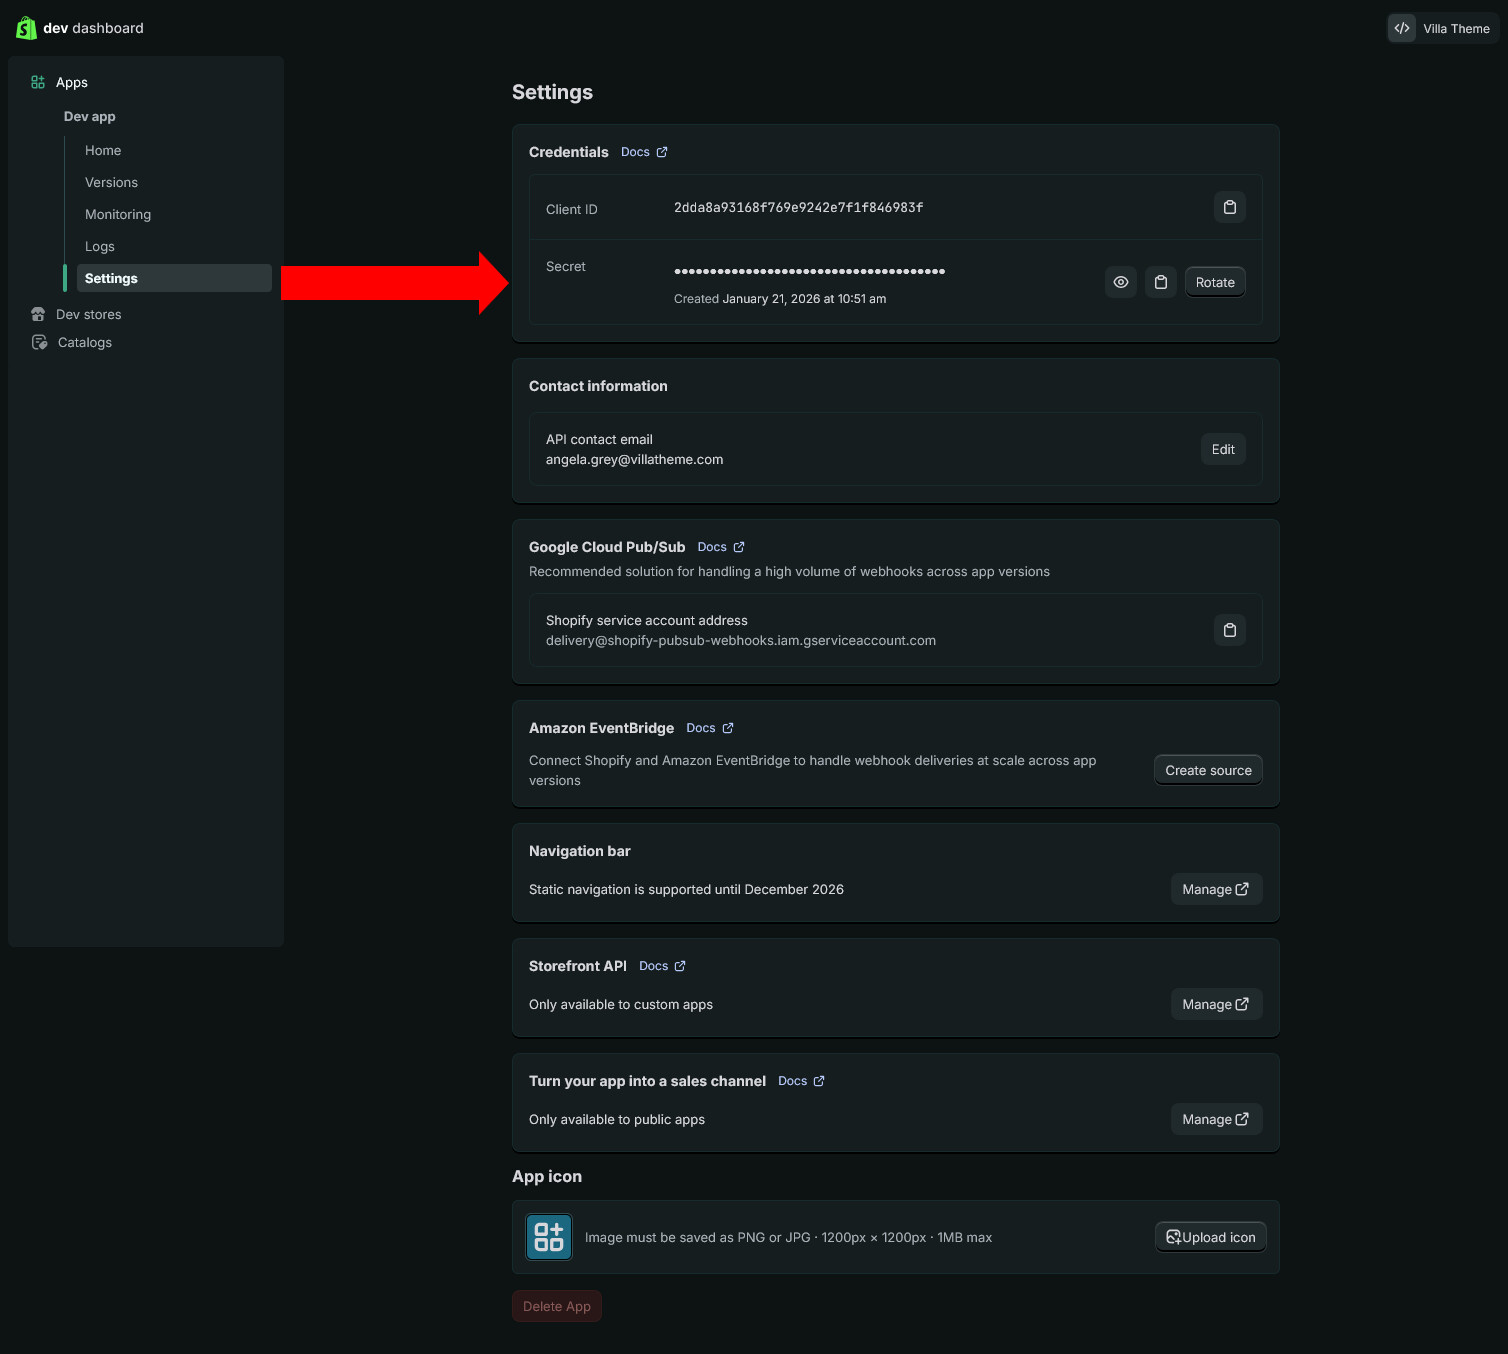
To import data from Shopify to WooCommerce, you need to fill in your Shopify API information. You’ll need the following:
Note:
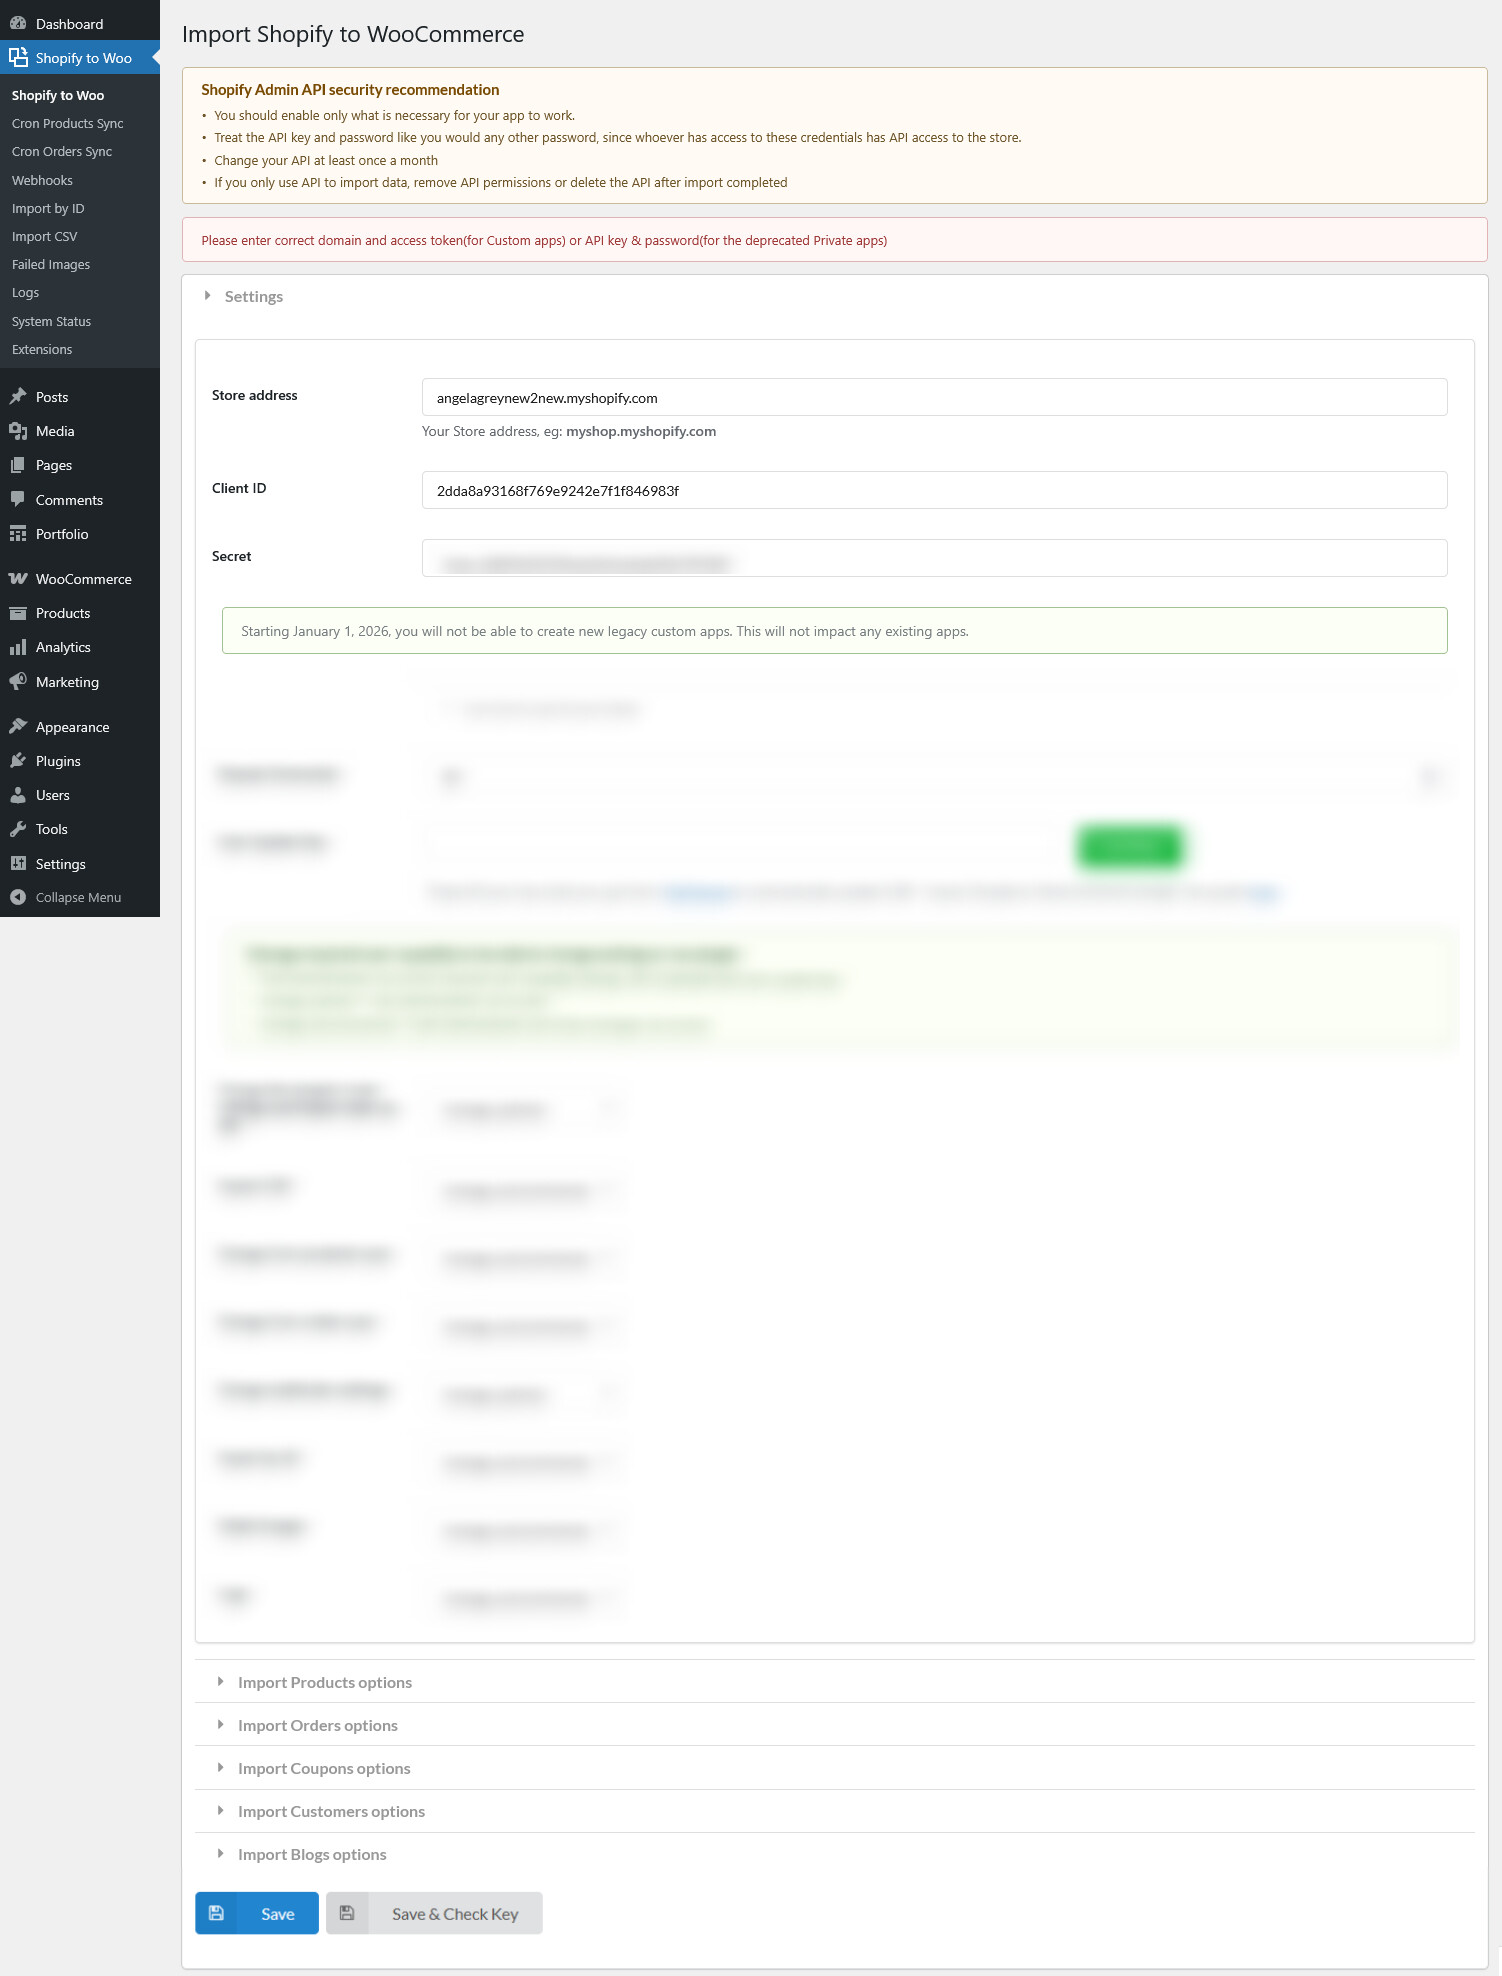
Once you’ve obtained the Client ID and Client Secret and the connection is successful, you can start importing data from Shopify to WooCommerce
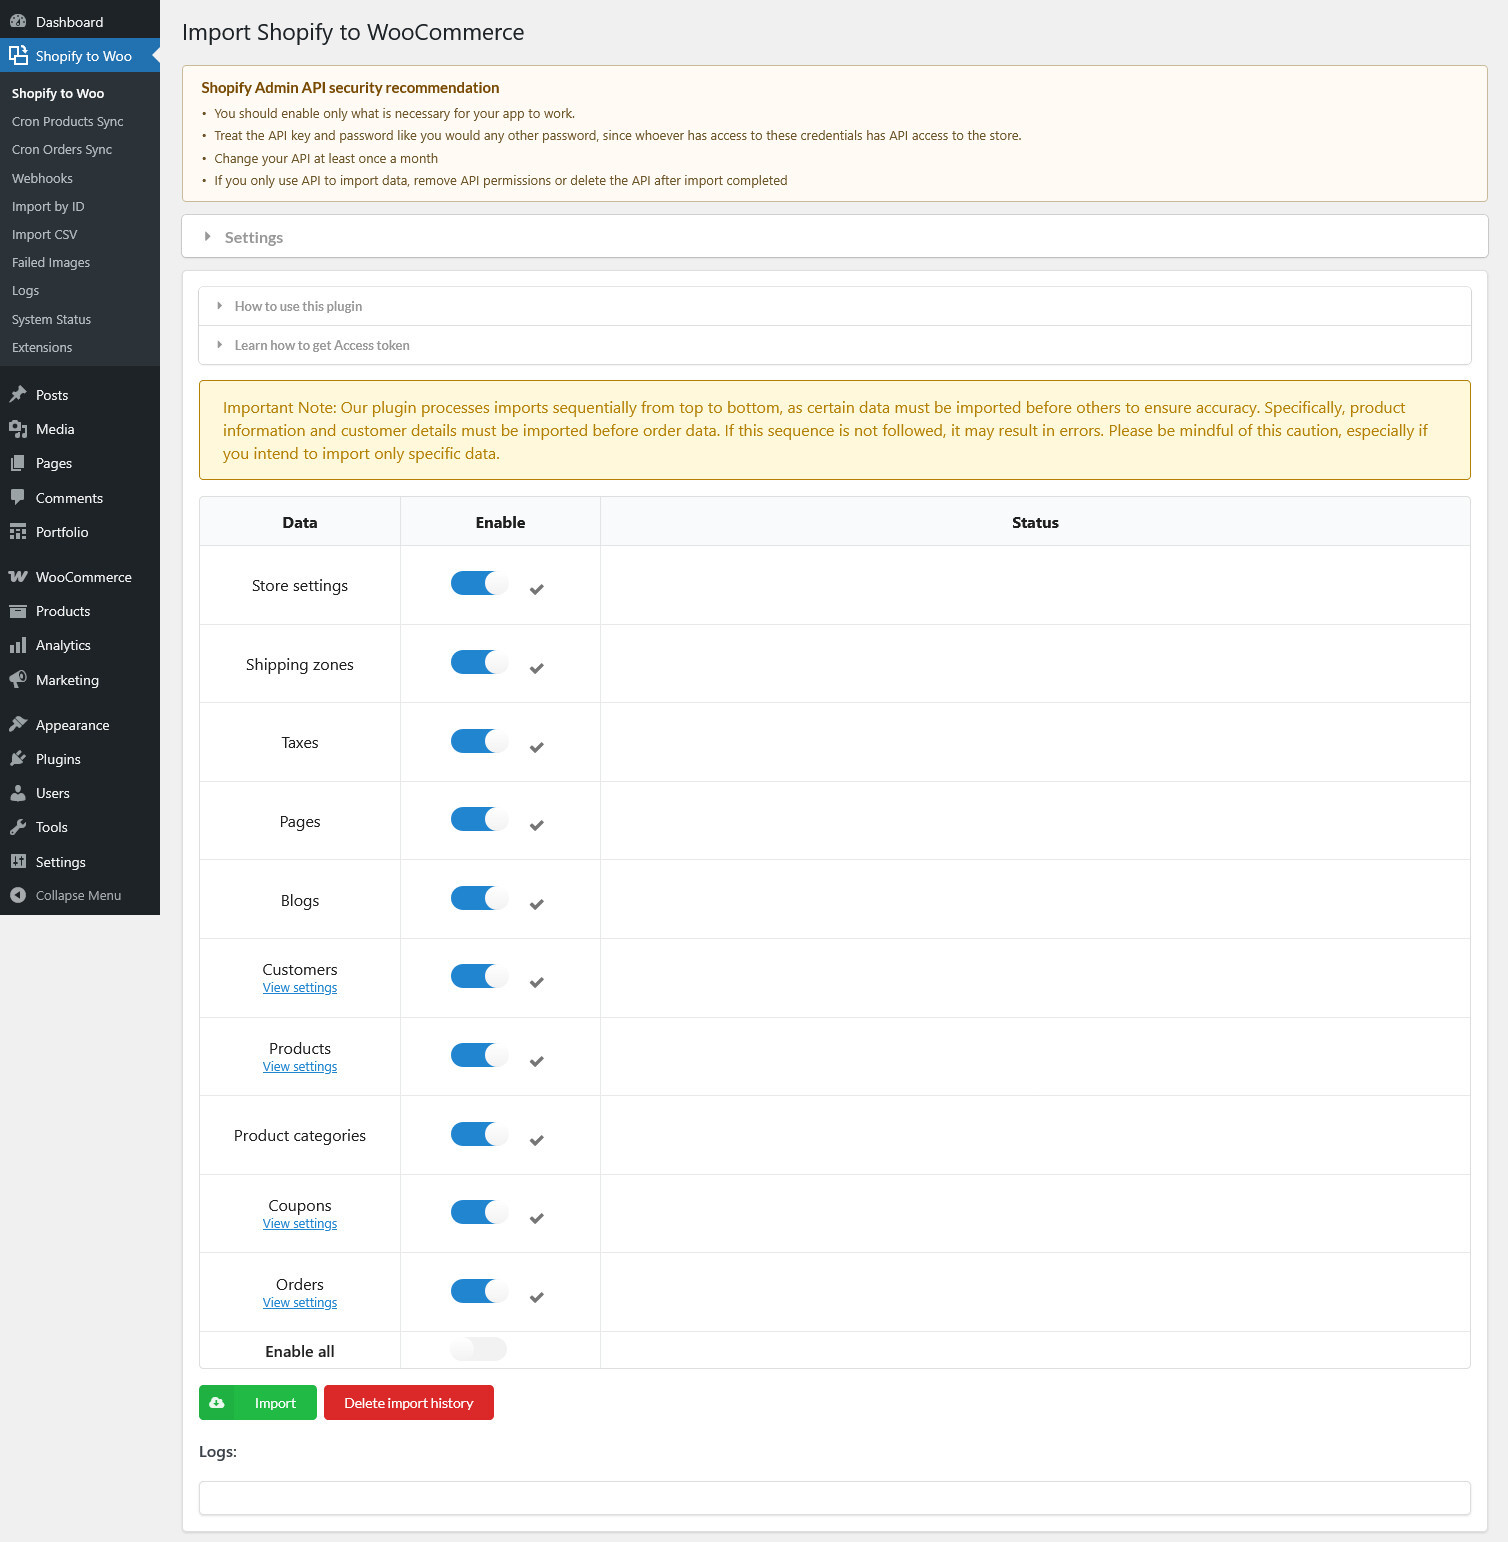
If you want to check again the settings you configured for a particular store, no need to scroll up and find them manually, simply click View settings.
Once you click “Import”, the plugin will import the data to all Shopify stores, if you want to leave out some stores, do it with “Enable all”
This document focuses on creating a new custom app using Shopify’s latest updates. You can learn the video on how to create a custom app and connect Shopify API.
Shopify Custom App Changes (Effective January 1, 2026)
From January 1, 2026, merchants can no longer create legacy custom apps. All new custom apps must be created and managed through the Shopify Developer Dashboard. This change does not affect existing custom apps that were created earlier.
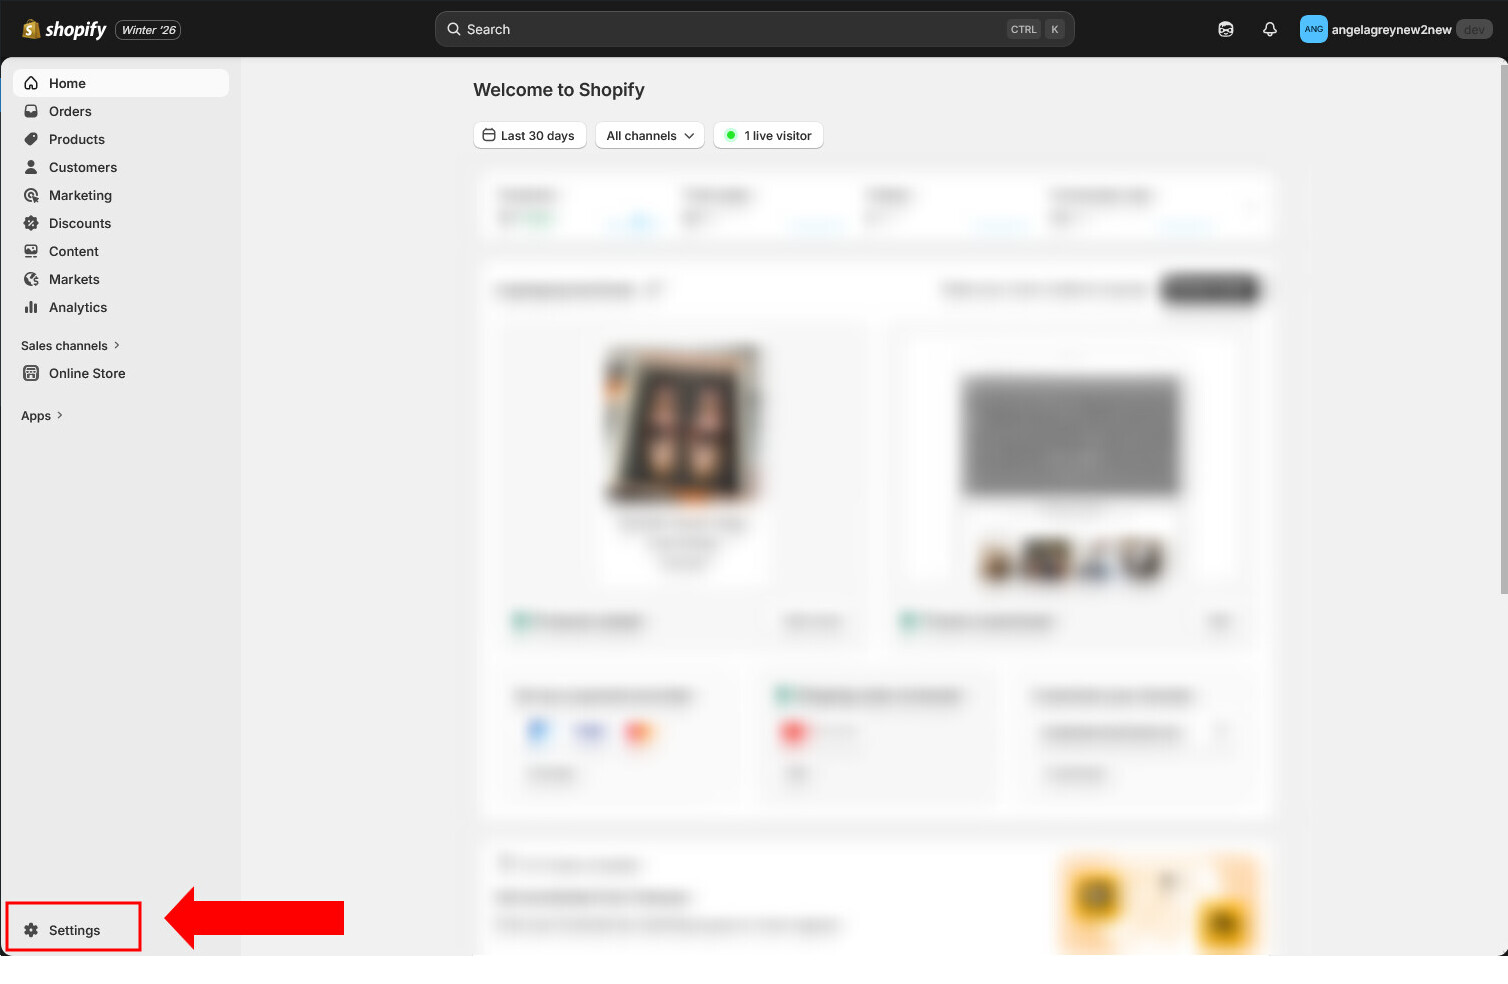
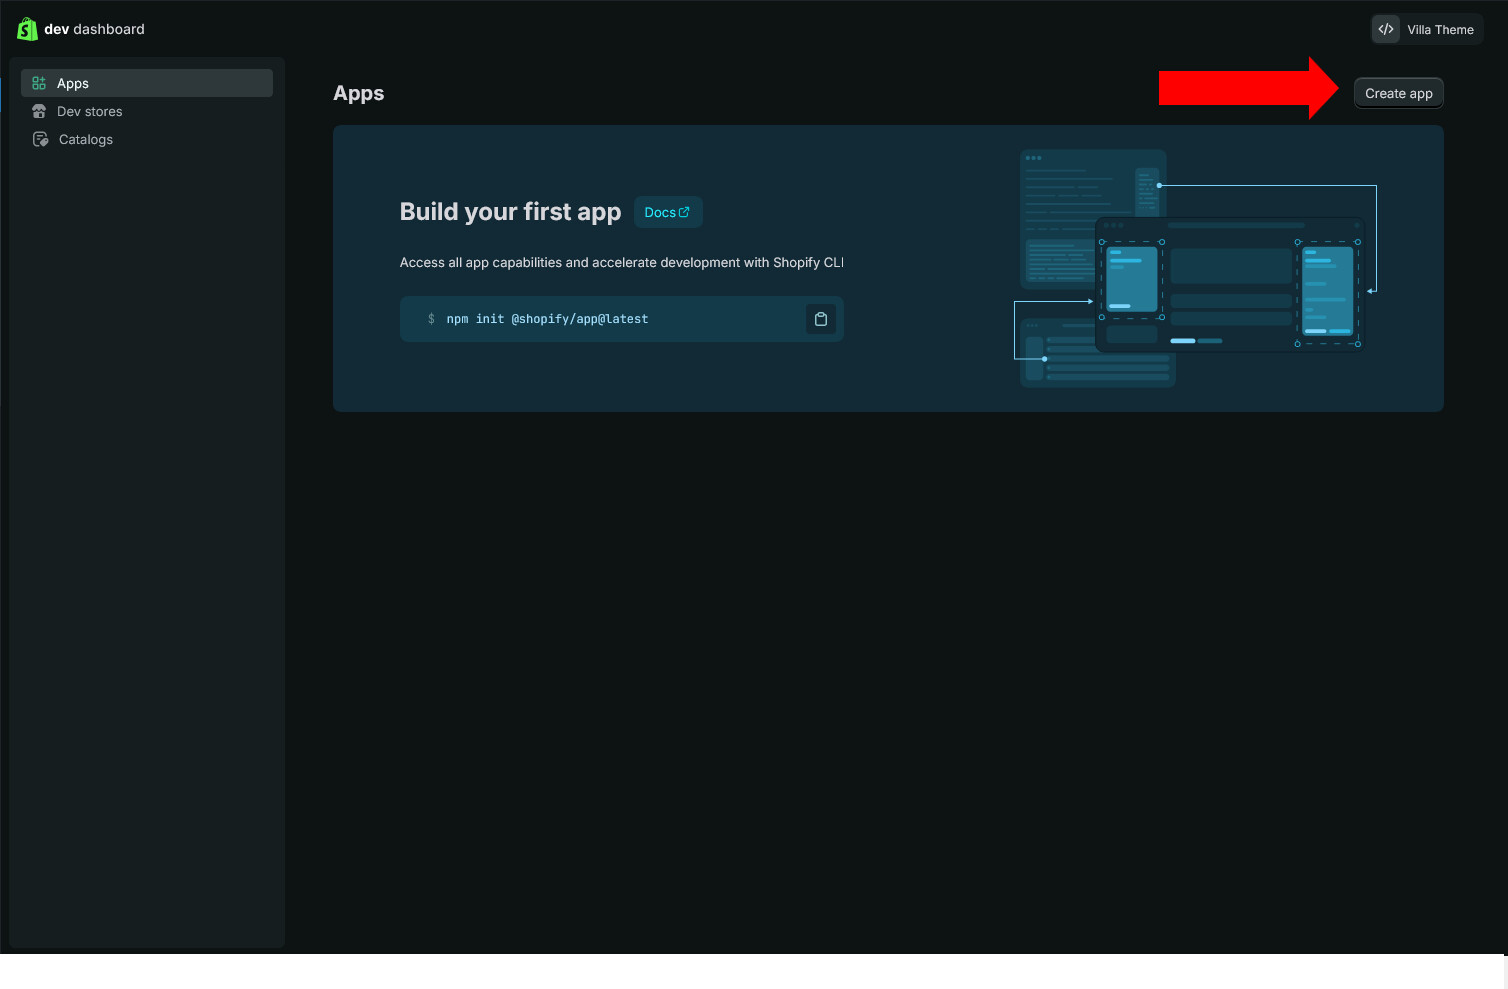
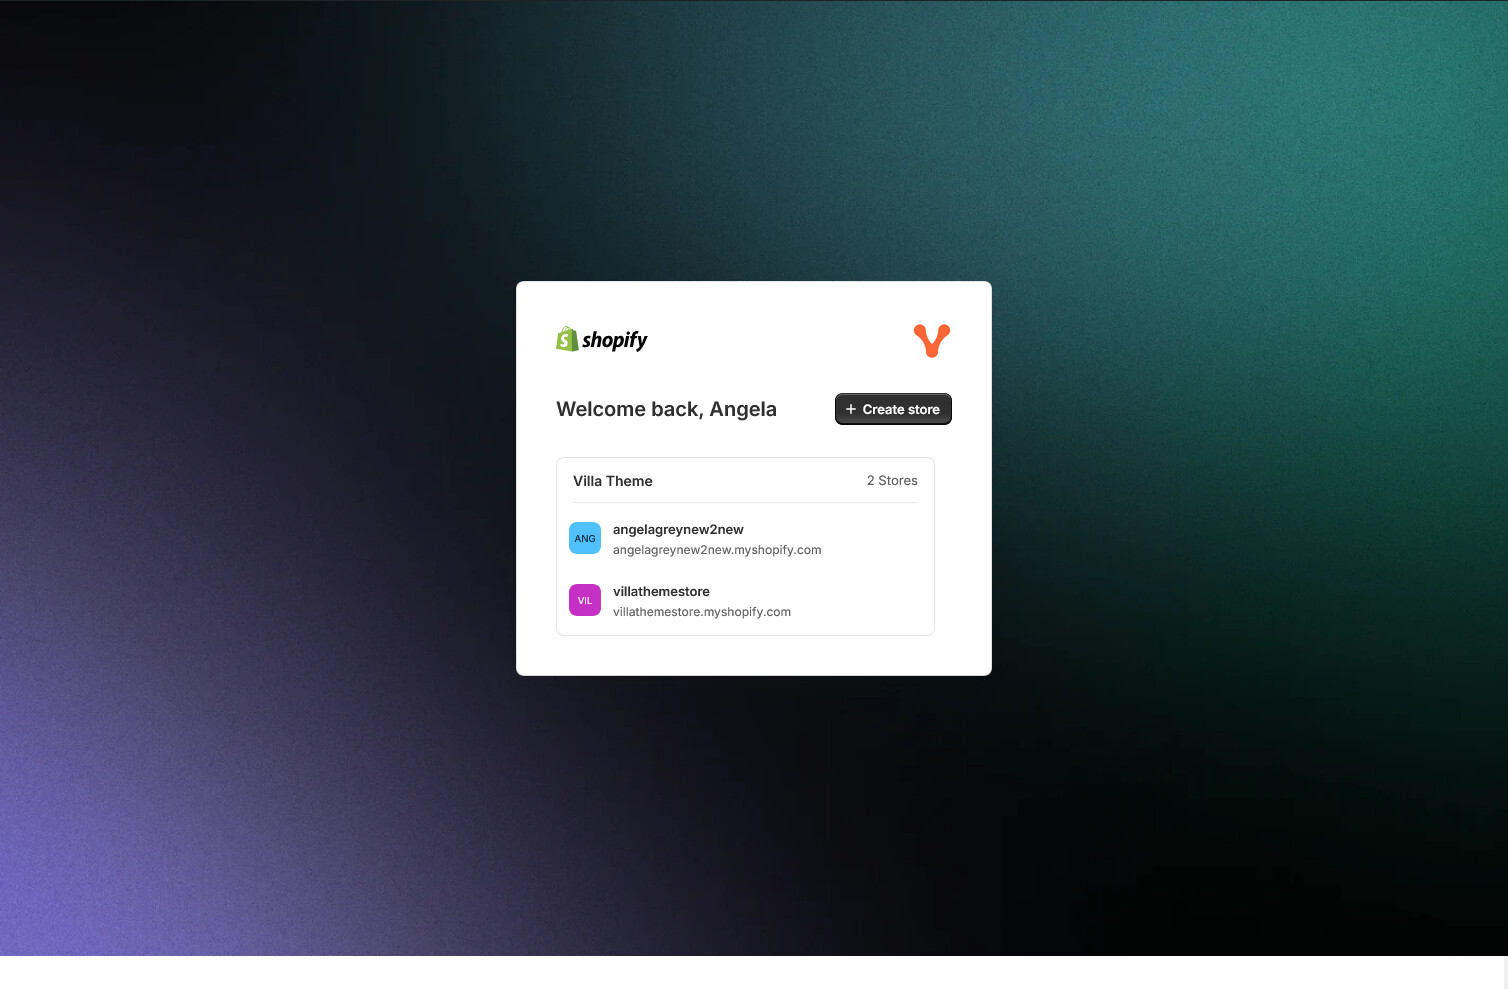
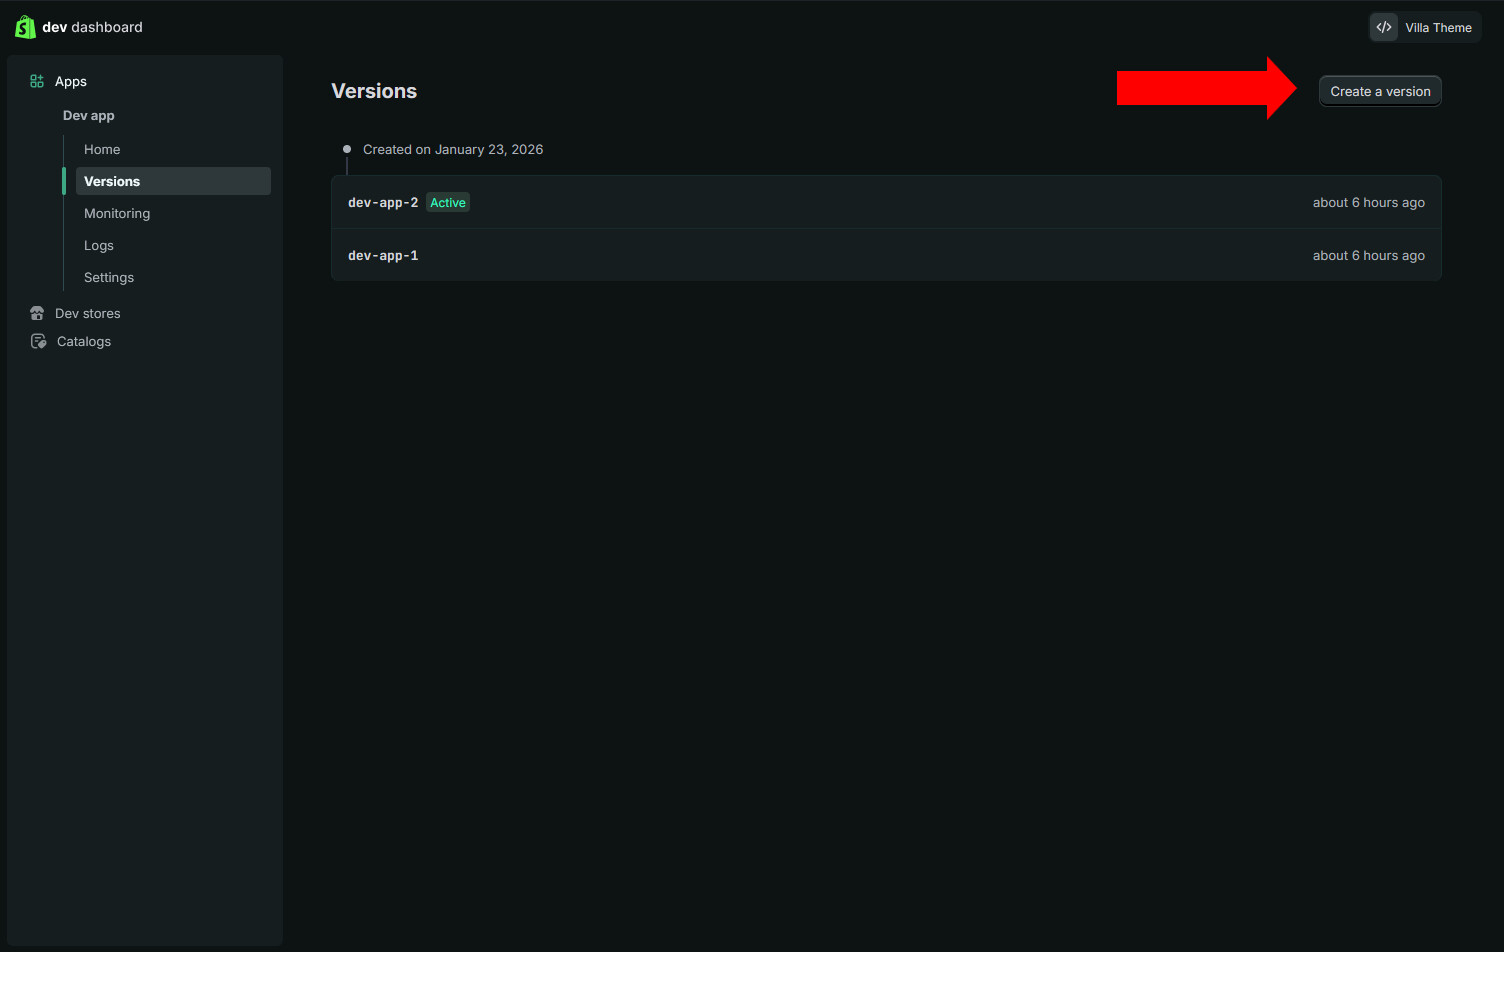
Step 1: Access the App dashboard
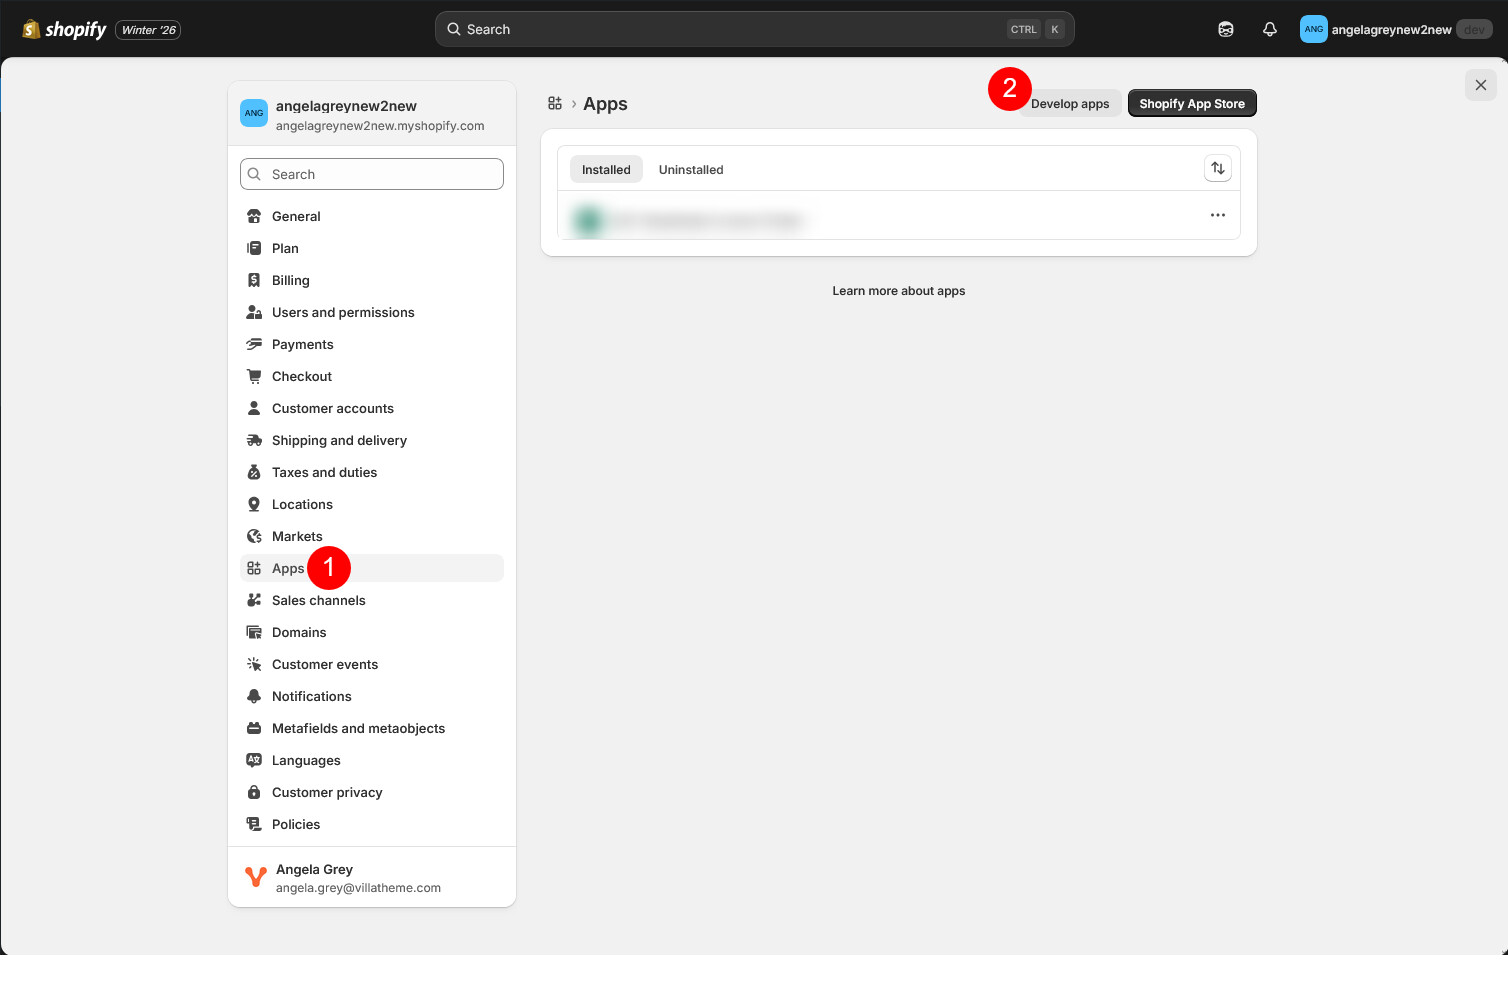
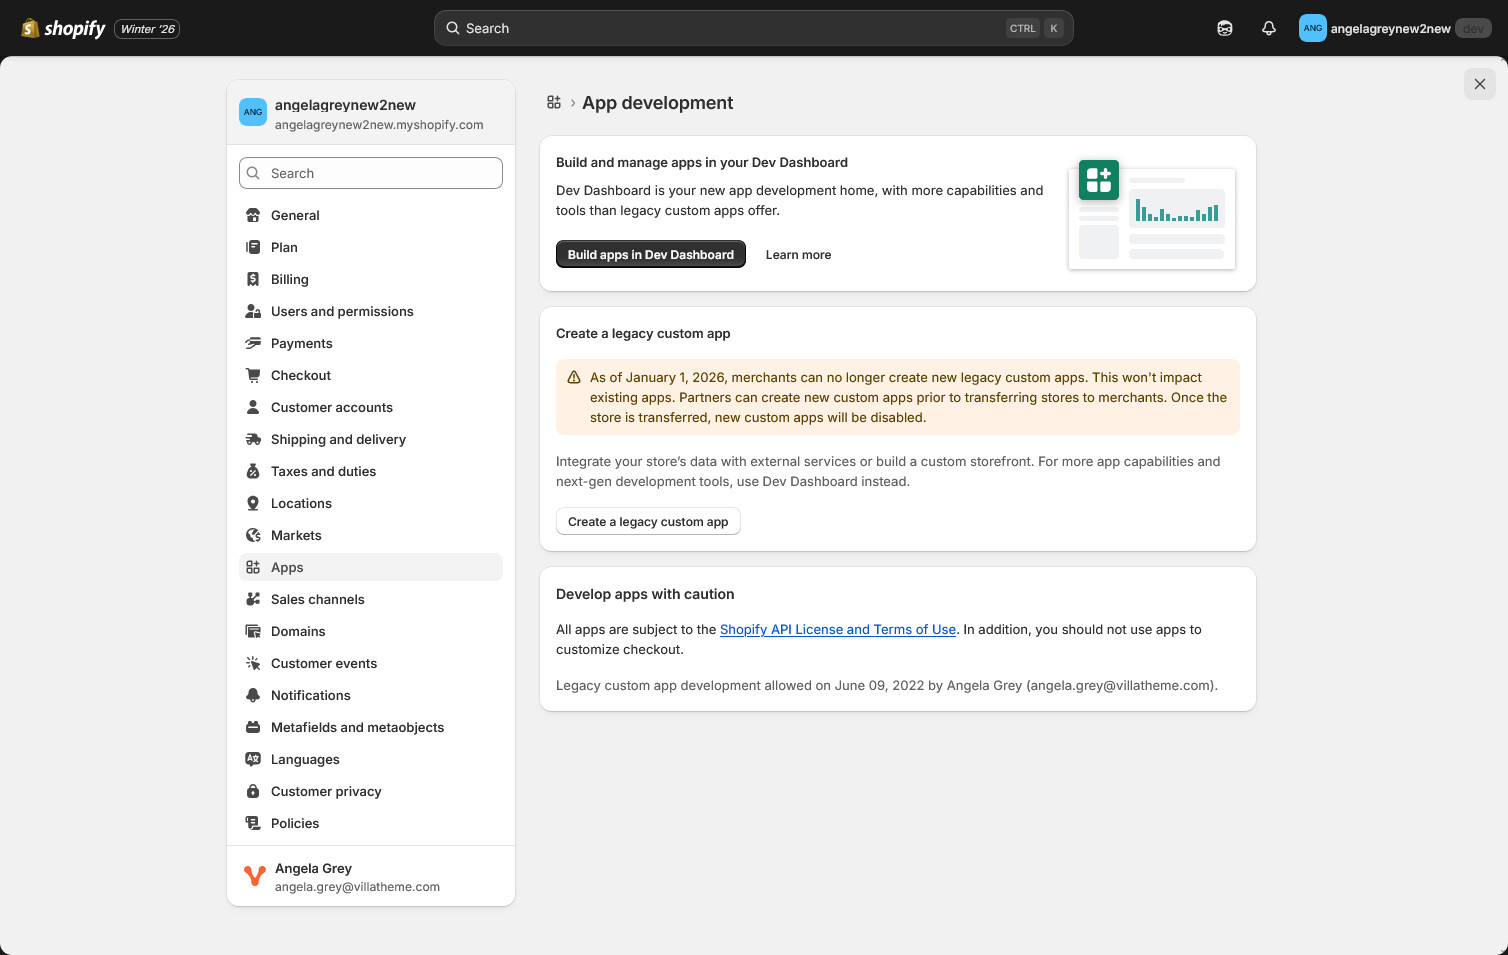
Step 2: Create the App
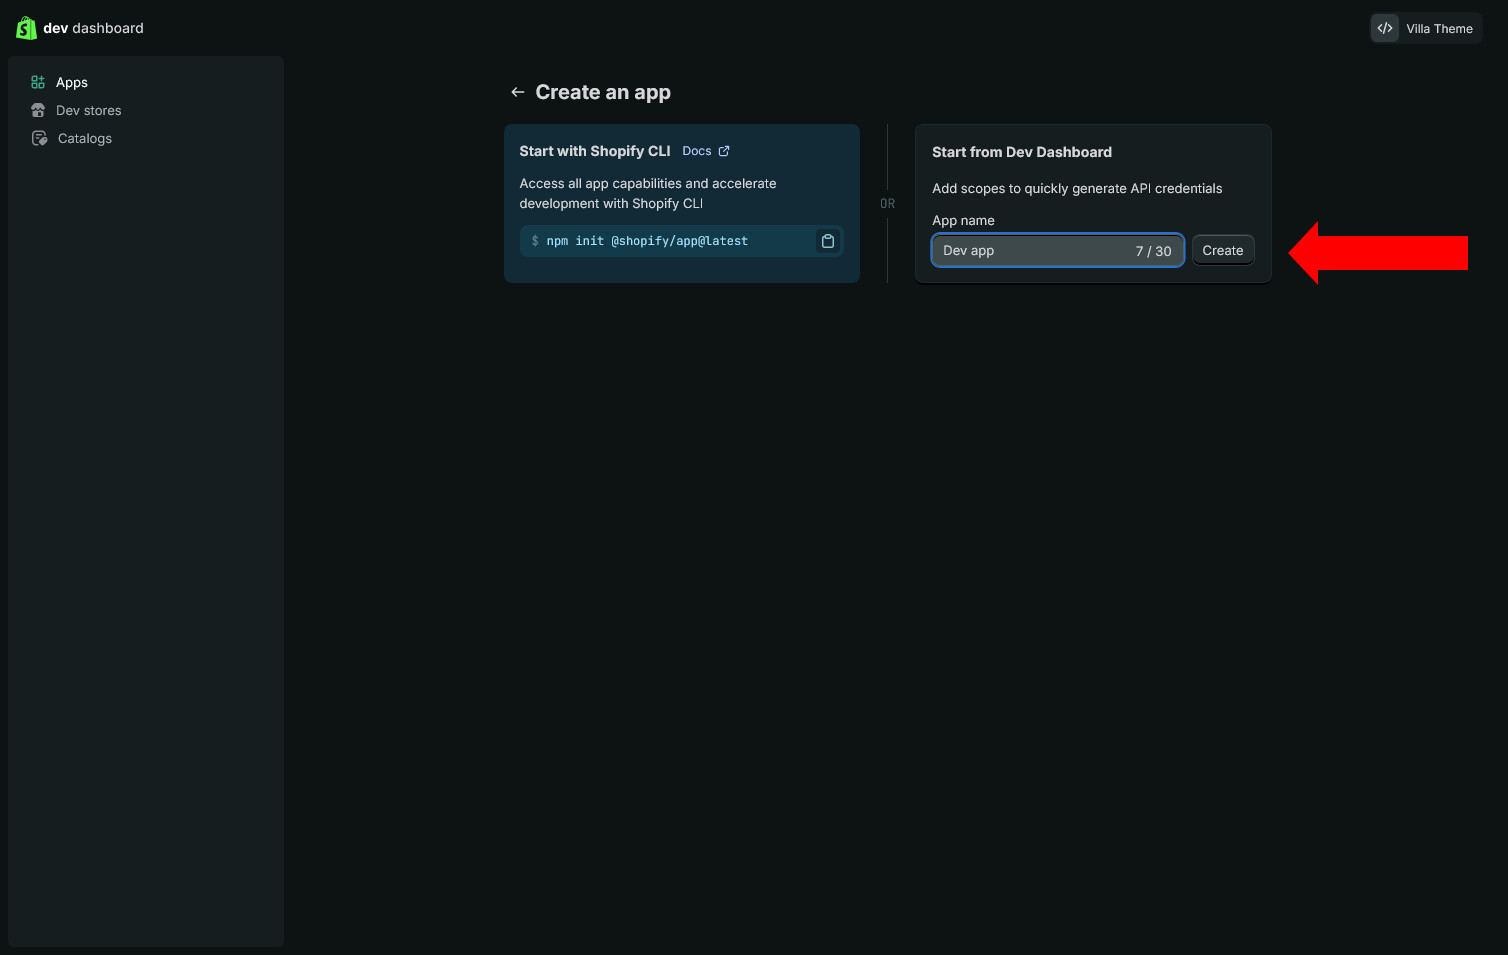
Click “Create” and you’ll be redirected to the app’s Versions dashboard.
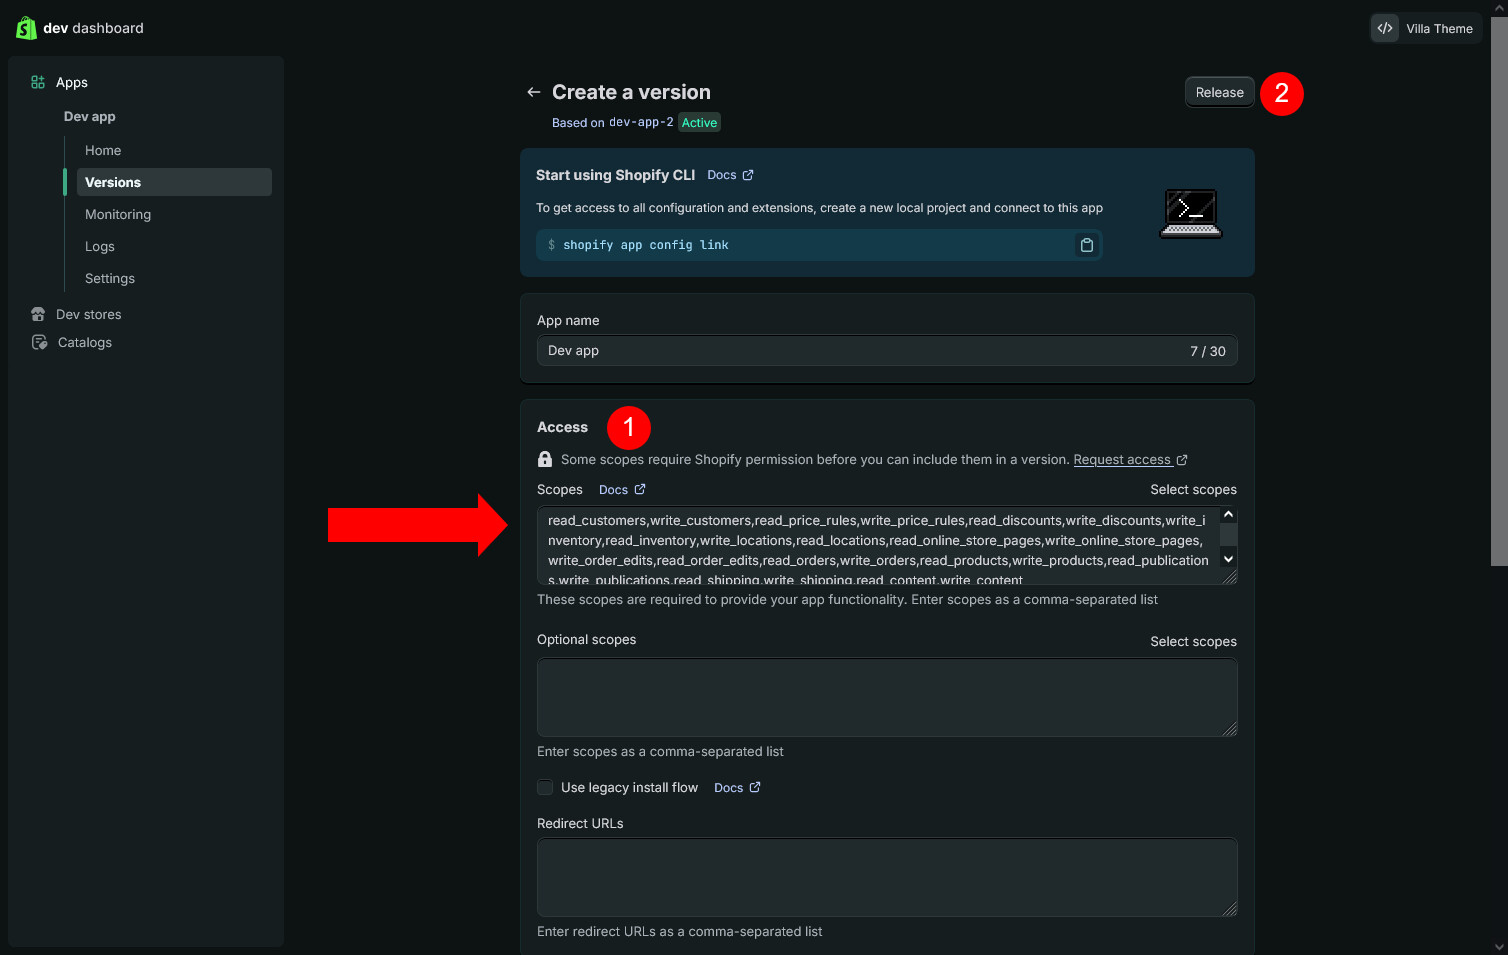
Step 3: Configure App Settings
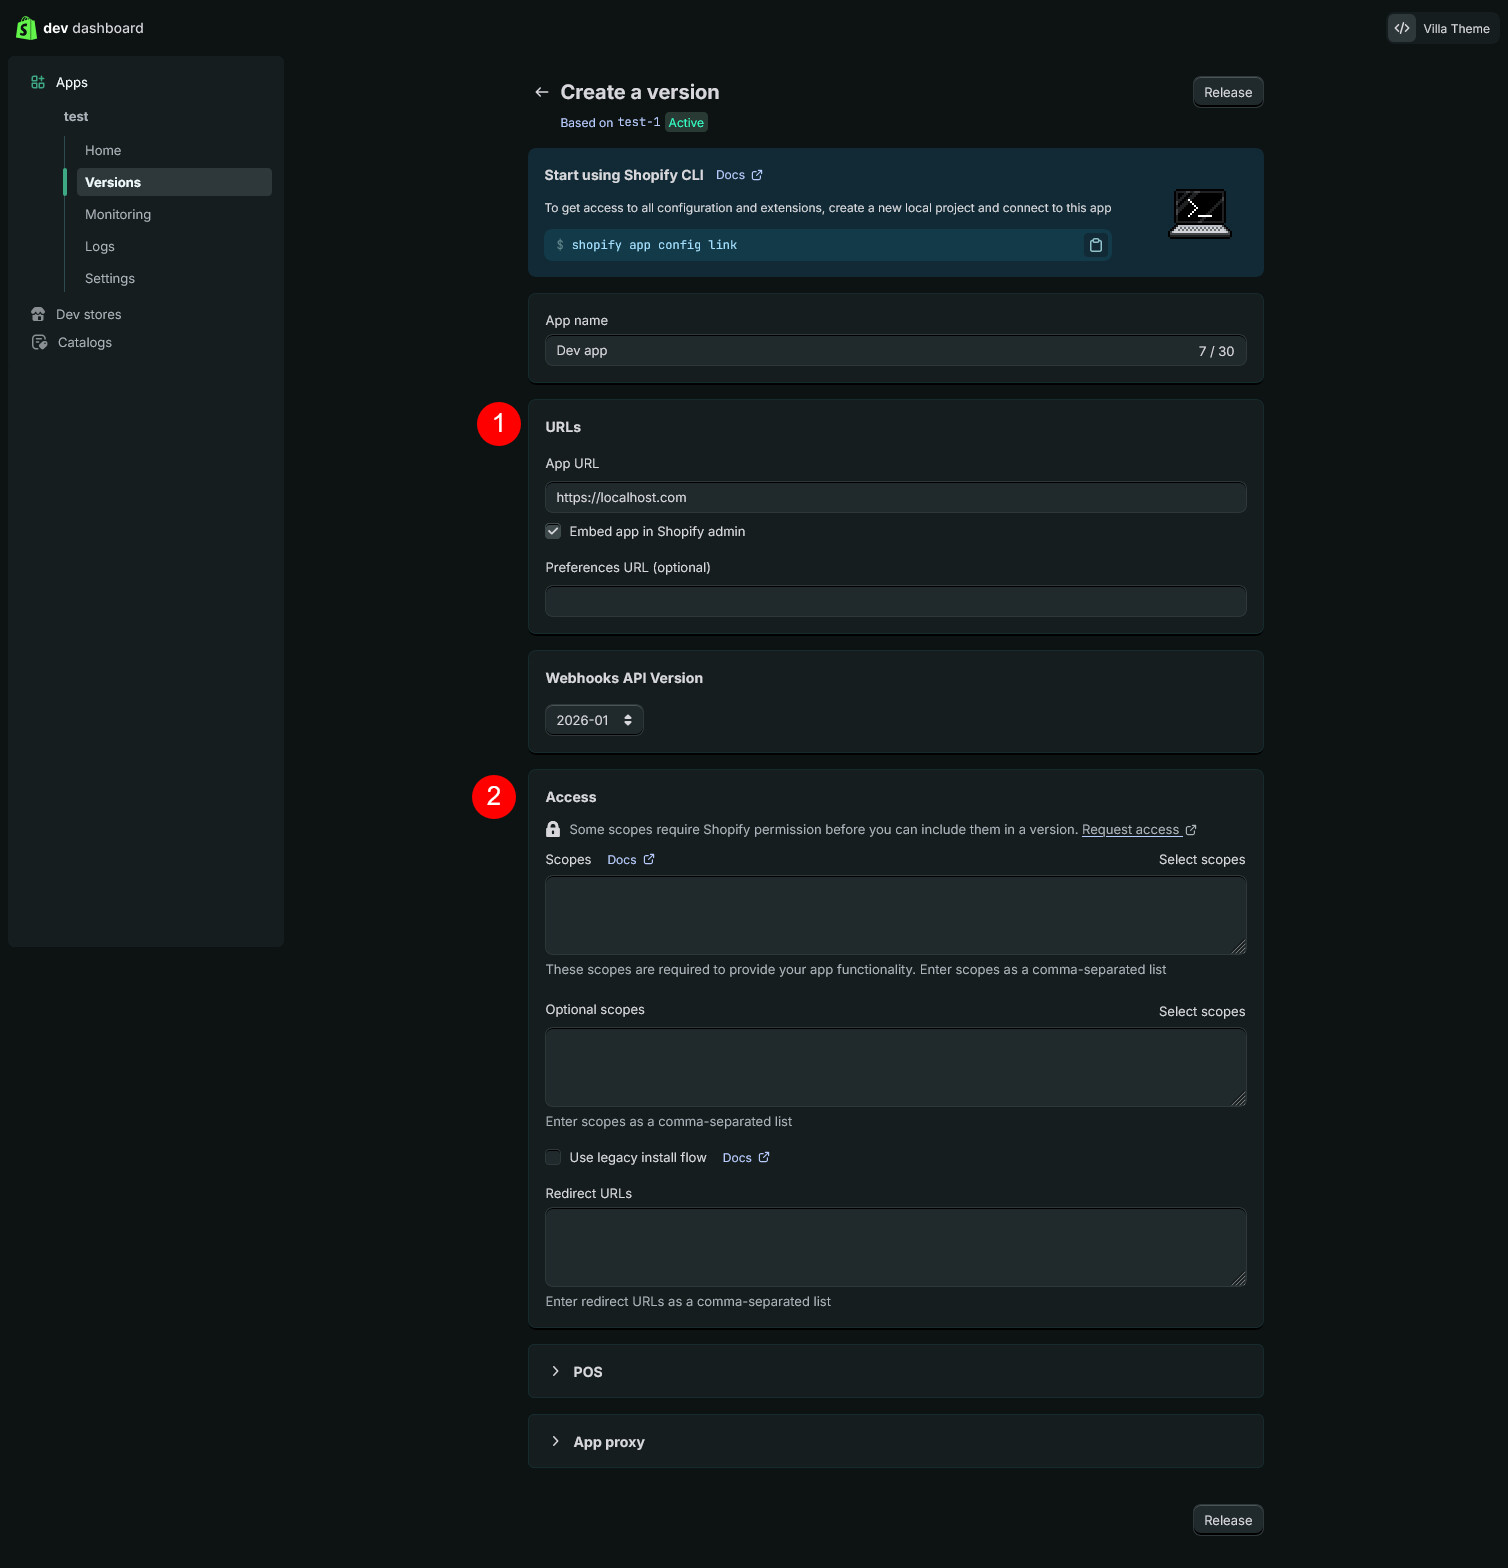
Click Select scopes to choose permissions, or manually enter them as a comma-separated list
Scope selection tip: If you only want to import products from Shopify to WooCommerce, you can limit permissions to product-related scopes only (for example: read_products, write_products).
Full scopes for importing all data:
read_customers,write_customers,read_price_rules,write_price_rules,read_discounts,write_discounts,write_inventory,read_inventory,
write_locations,read_locations,read_online_store_pages,write_online_store_pages,write_order_edits,read_order_edits,read_orders,
write_orders,read_products,write_products,read_publications,write_publications,read_shipping,write_shipping,read_content,write_content
You can copy and paste this list directly into the Scopes input field.
Step 4: Release the App Version
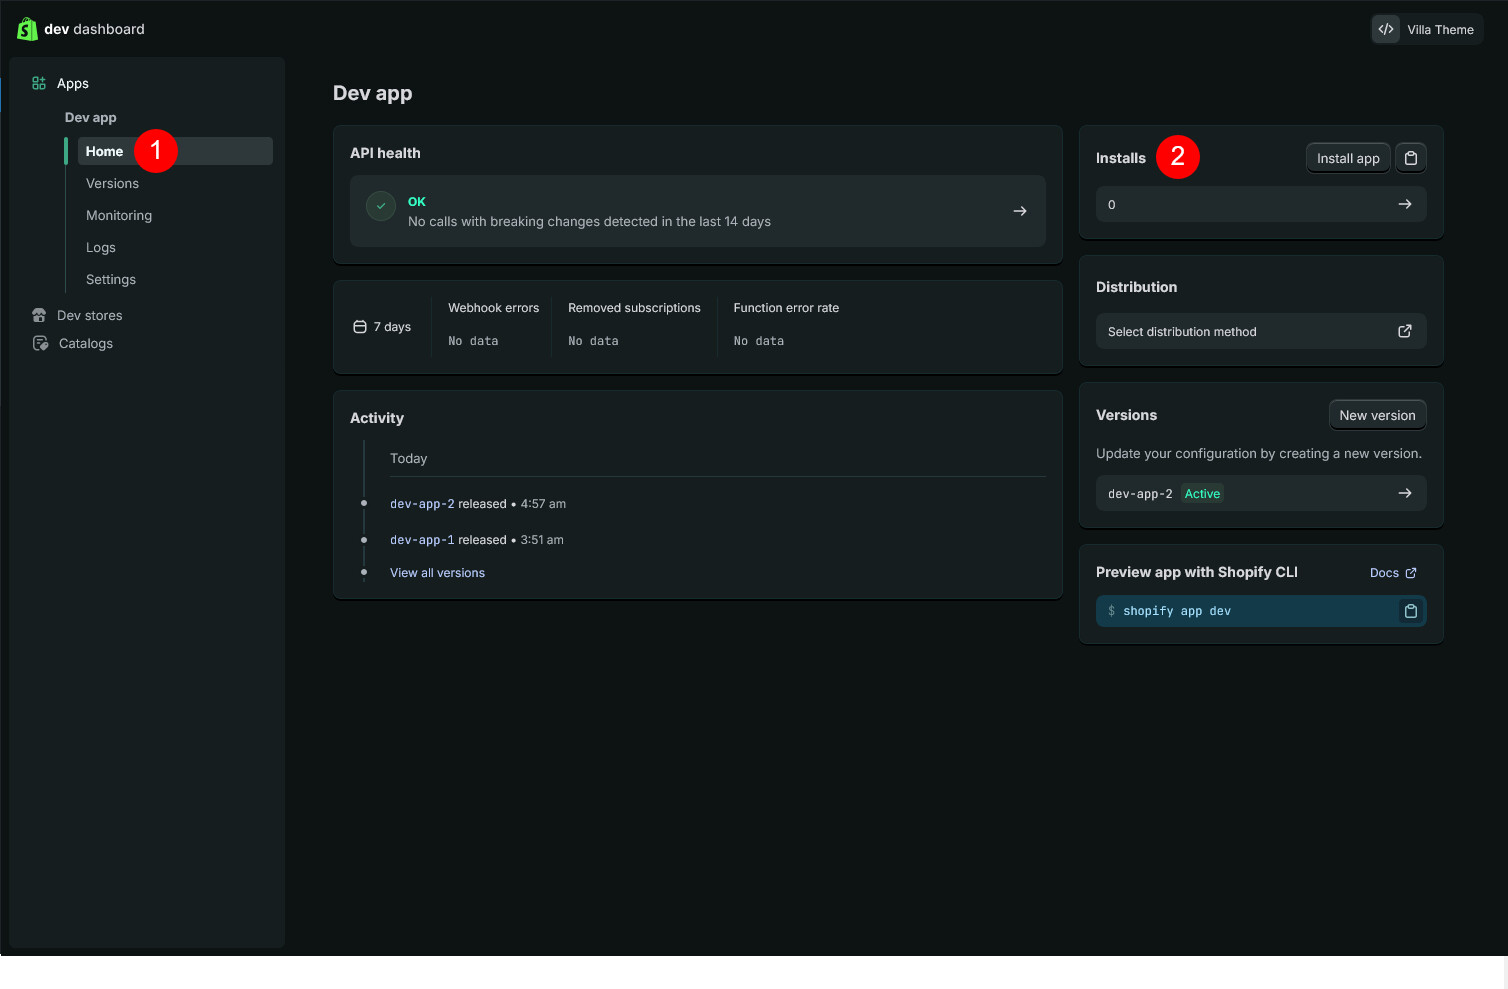
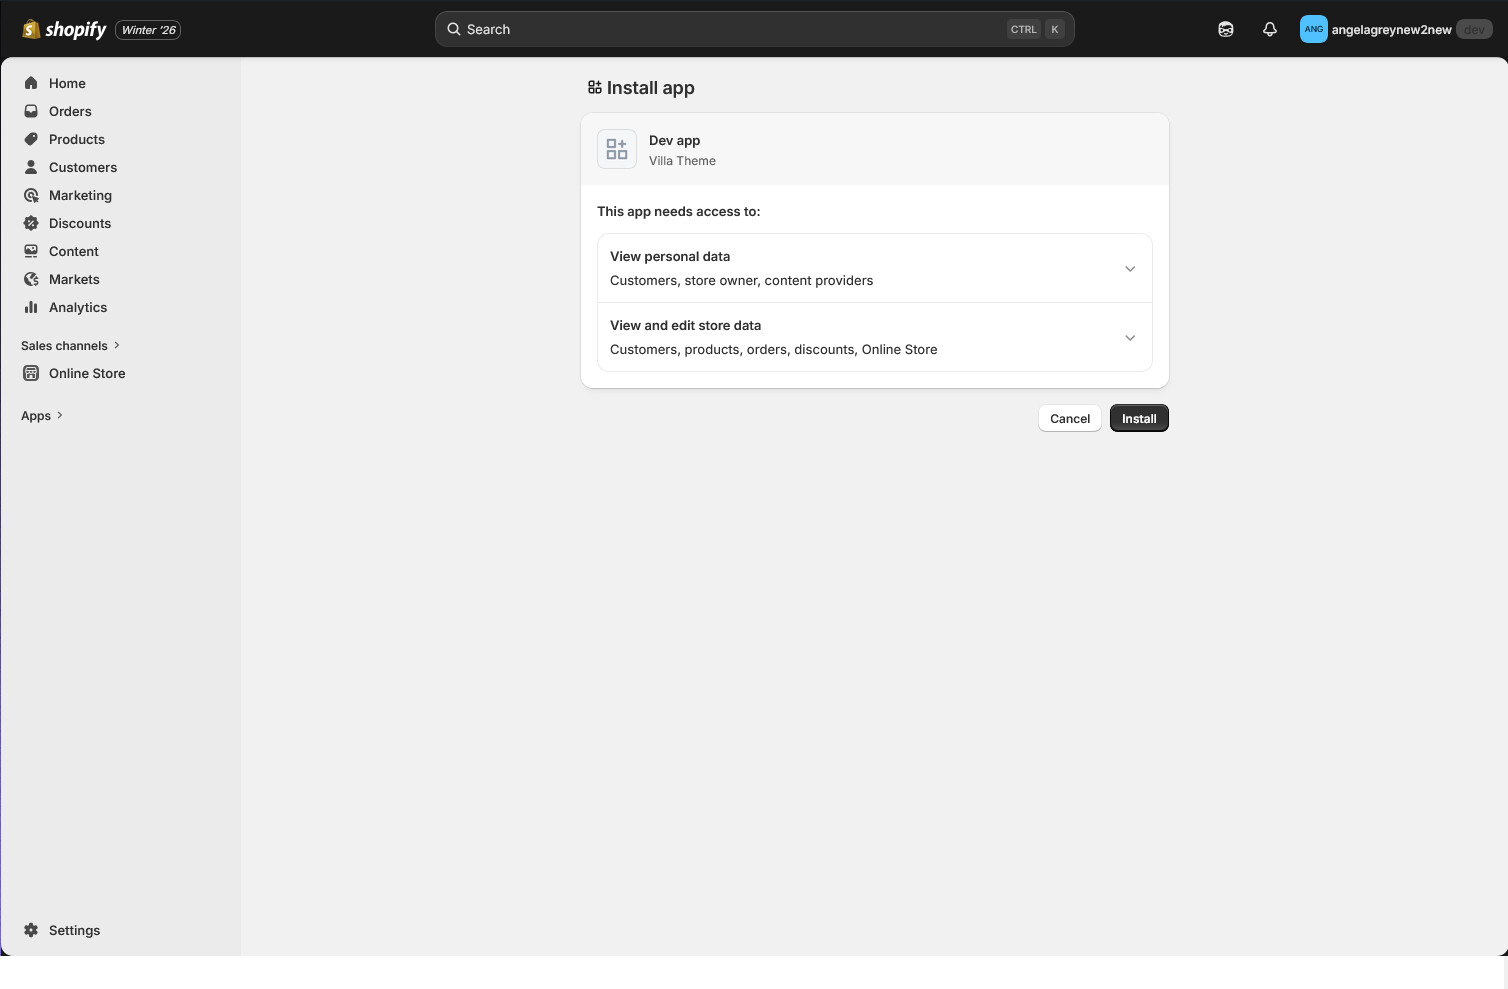
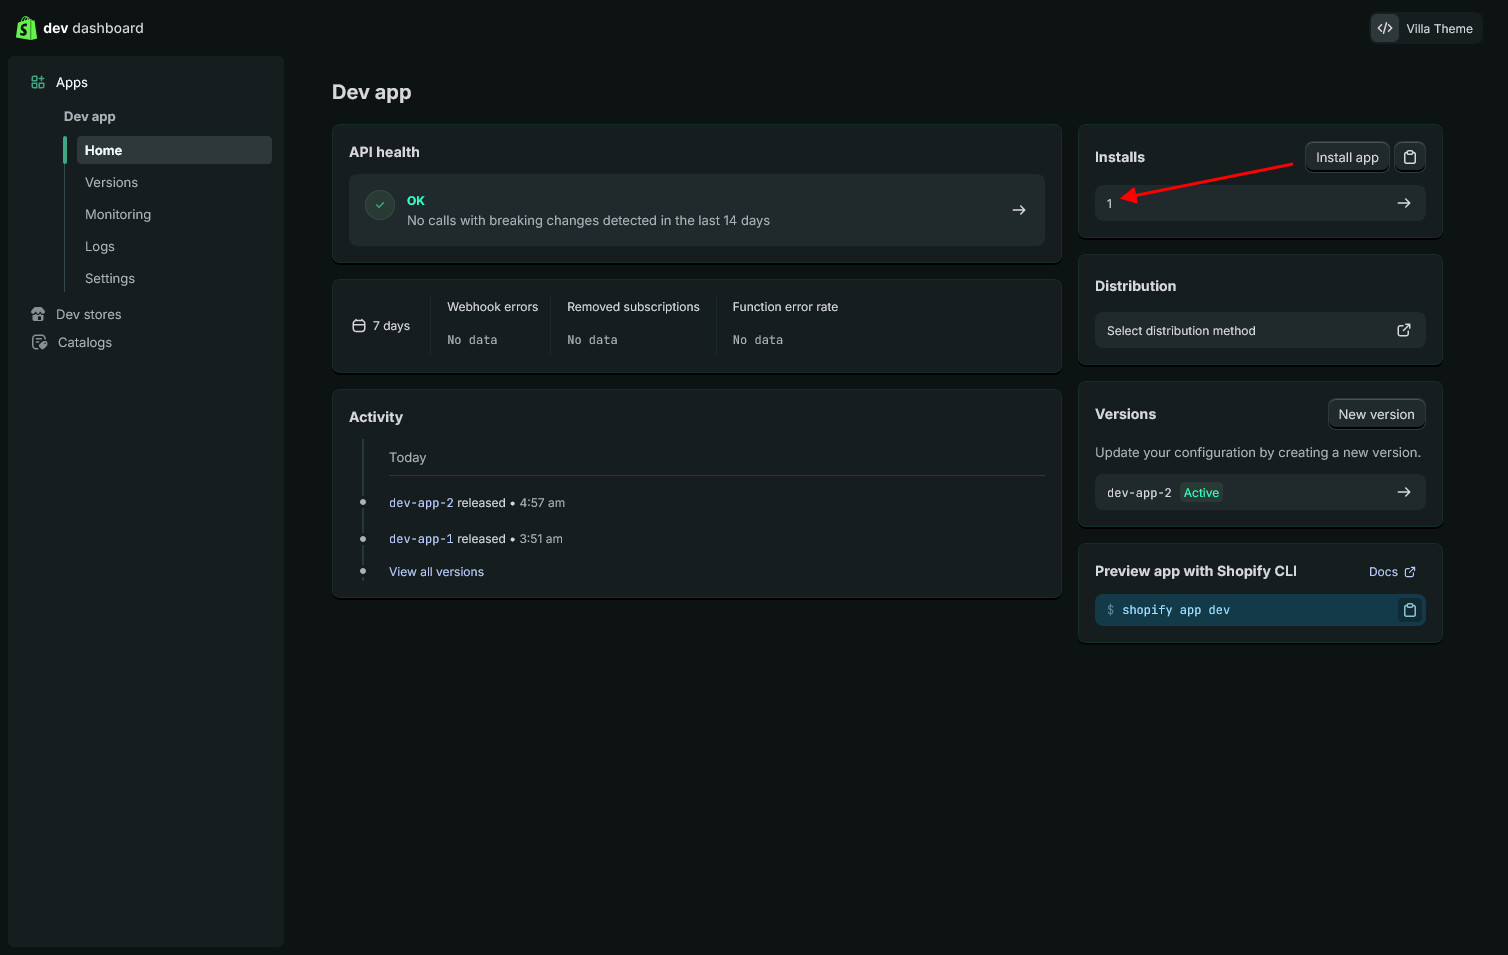
After the app is installed:
To update the API scopes for your Shopify custom app:
Step 1:
Step 2:
That’s it. The updated scopes will take effect after the new version is released.
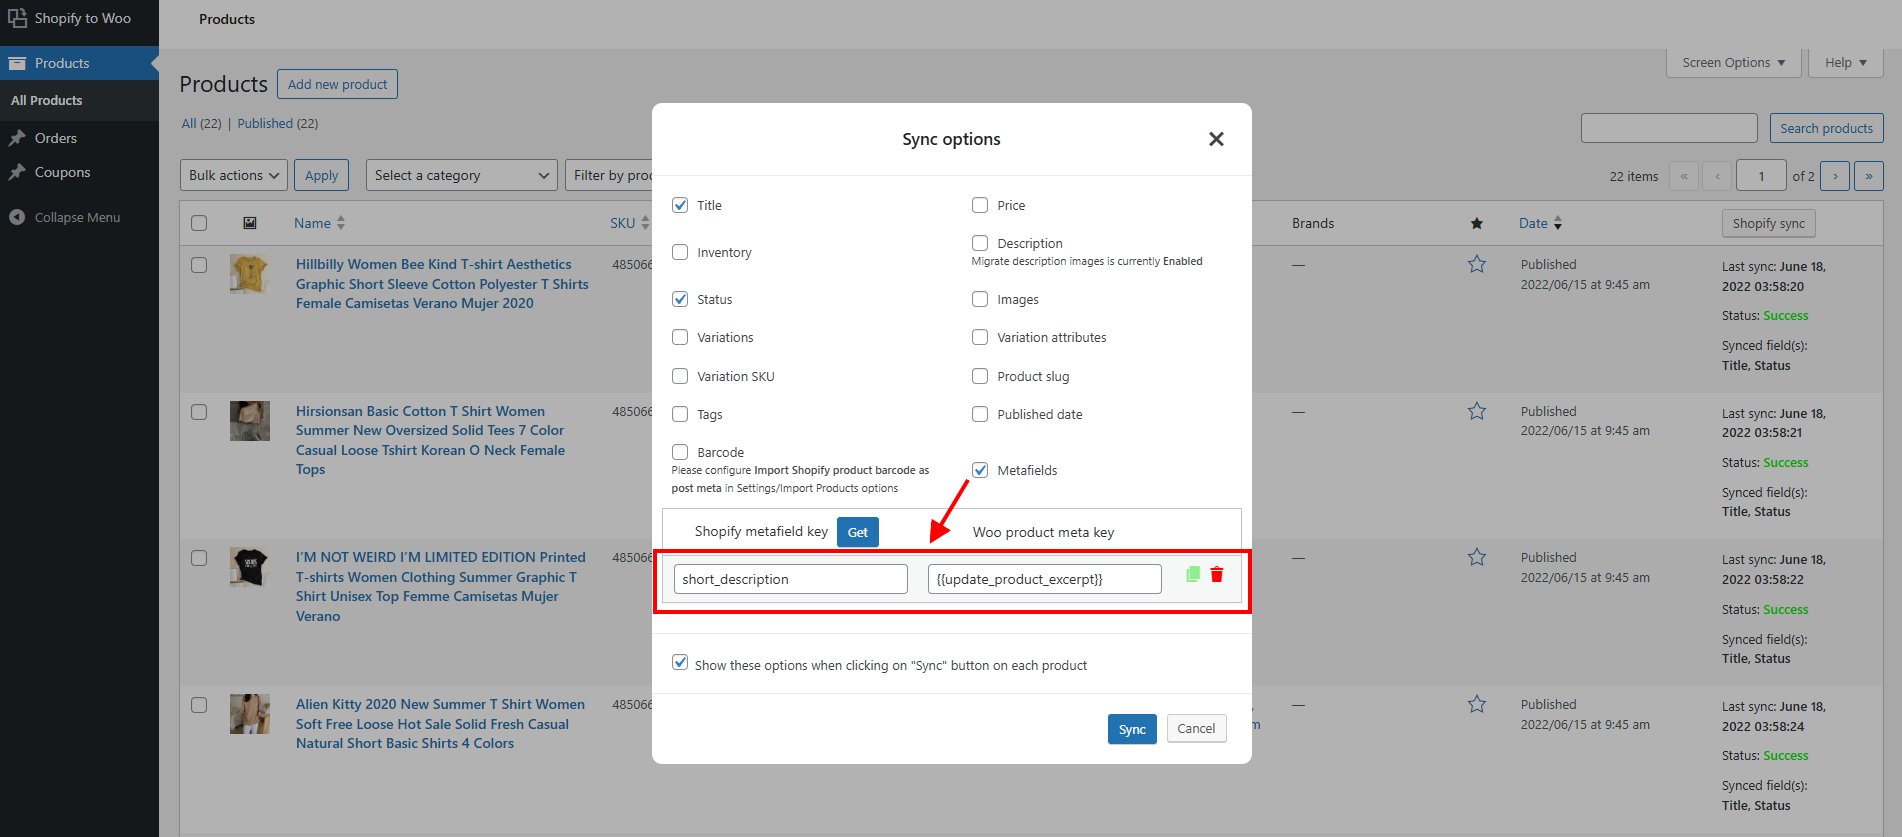
You already know this plugin allows you to sync metadata from Shopify products to their corresponding WooCommerce product metadata – See this documentation for details. And, you might be wondering how to sync Shopify metadata to the WooCommerce short description.
While the short description isn’t technically metadata, we’ve provided a special key to make this possible. Simply enter the following into the “Woo product meta key” field:
{{update_product_excerpt}}
For the “Shopify metafield key”, make sure to enter only the key – excluding the namespace. See the example below:

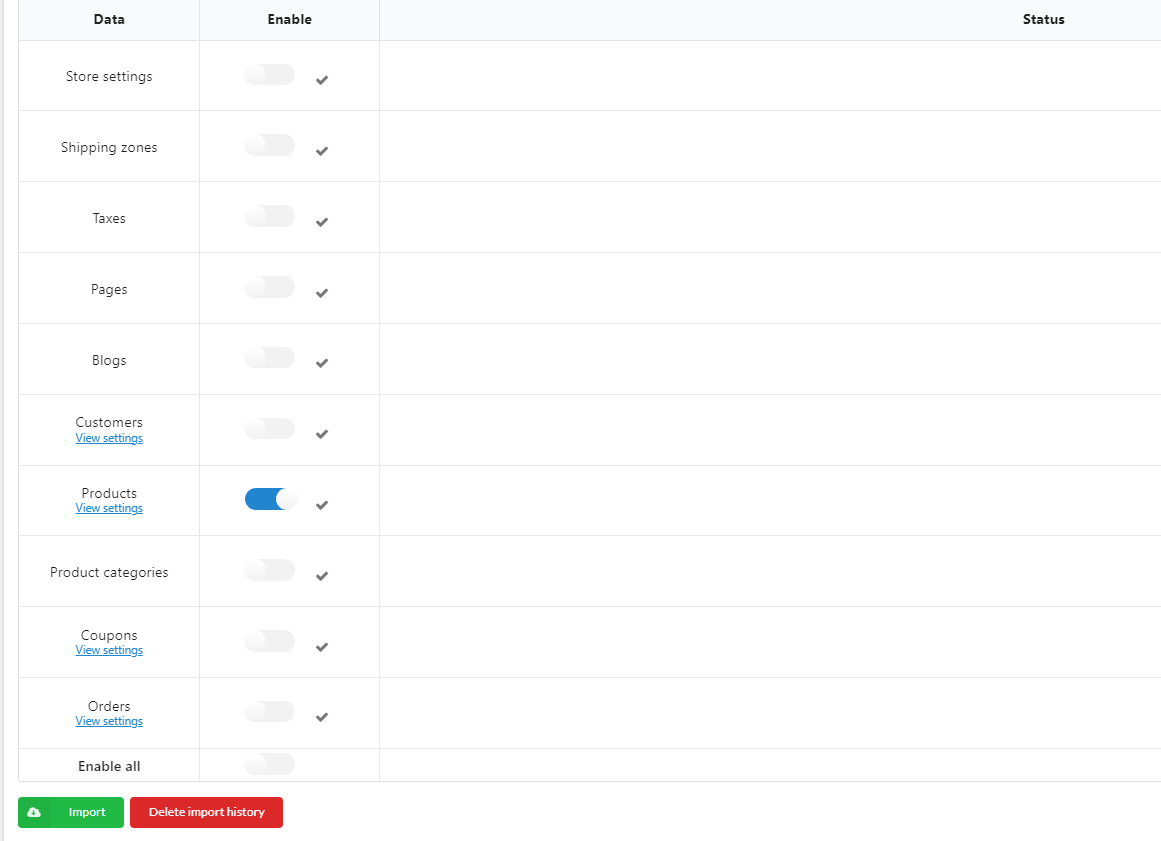
After filling in the necessary information and click Save. A list will appear for you to select which data you want to import from Shopify to WooCommerce. Select date you want to import and click the “Import” button. The import progress will take several hours, please be patient. Products name, description.. will be imported first. Product images will be imported later in the background so don’t be surprised when some product does not have pictures.
Important note: Our plugin processes imports sequentially from top to bottom, as certain data must be imported before others to ensure accuracy. Specifically, Product, Customer and Coupon information must be imported before order data. If this sequence is not followed, it may result in errors. Please be mindful of this caution, especially if you intend to import only specific data.
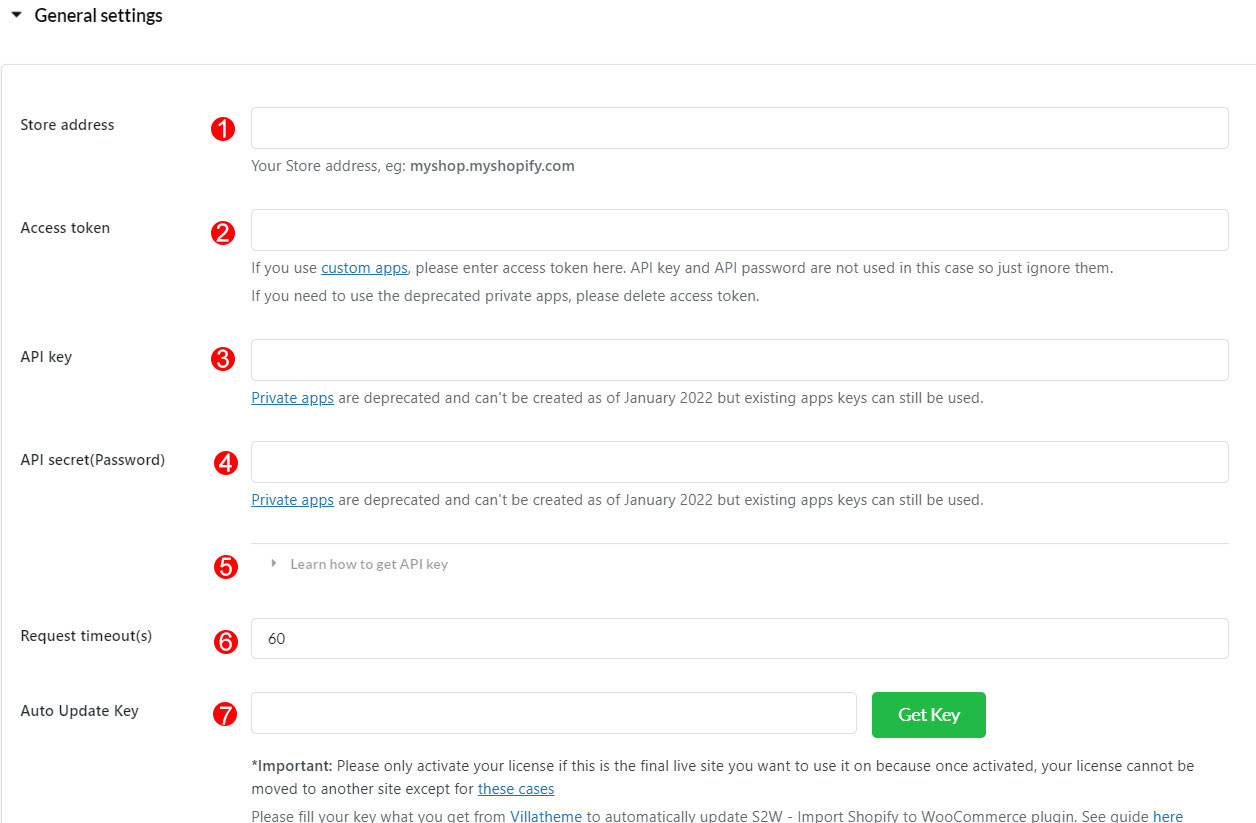
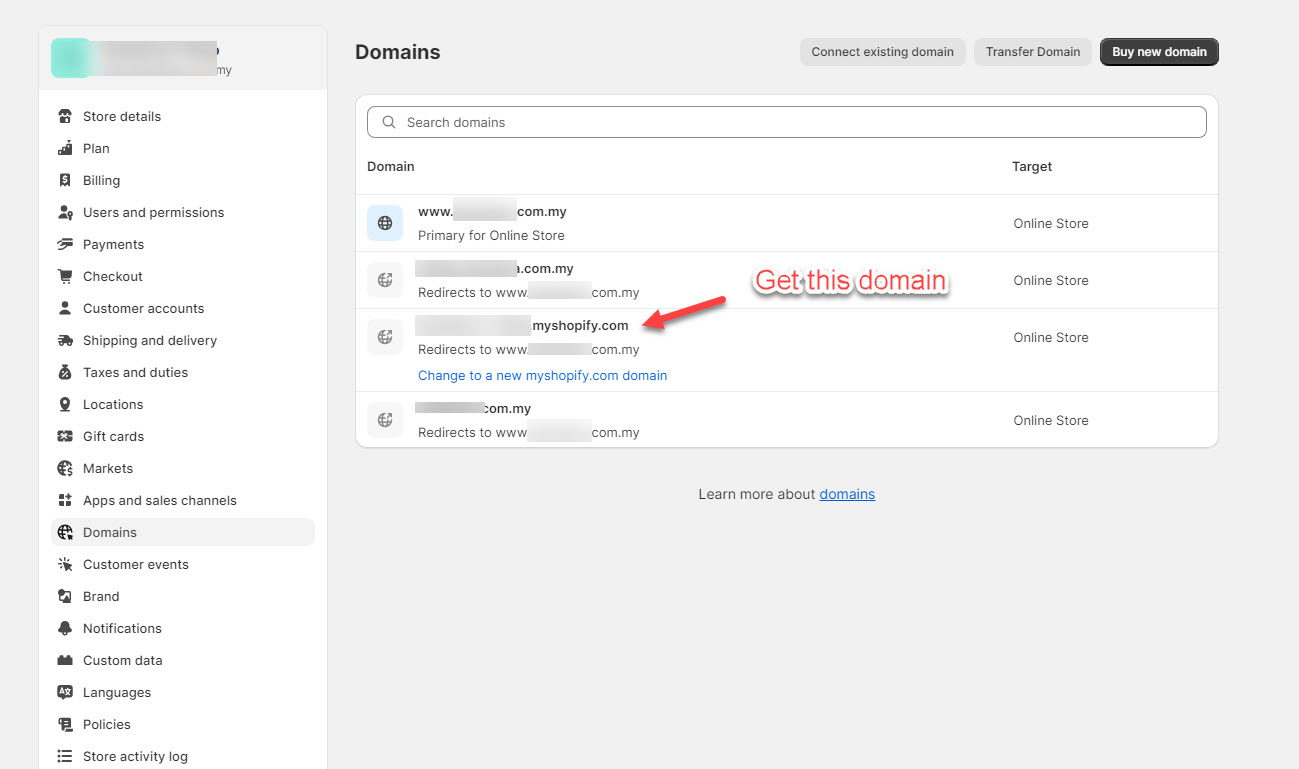
1. Store address: Fill in your Shopify store URL, it should look like myshop.myshopify.com.
Please go to Shopify admin > Settings > Domains > Get the store domain

Important note: Since 2022, Shopify had a change in connecting Shopify API. Creating a Custom App using an Access token will be used instead of the private app which is no longer deprecated. Therefore, new Shopify customers will connect to Shopify API via a custom app.
2. Access token: Get Access token in your Shopify custom app and paste in the Access token field of this plugin.
For the former Shopify customers, you can keep using the private app to connect the Shopify API. (options 3 and 4)
3. API key: Fill in your Shopify private app API key.
4. API secret (Password): Fill in your Shopify private app API secret (password).
5. Learn how to get an API key: Click to see the video on how to create a custom app and connect Shopify API using an Access token.
6. Request timeout(s): an option helps to increase the request timeout(s) of your website. Increase this number when you get the request timeout(s) error while importing products.
7. Fill in your Auto Update key to enable the auto-update key feature.
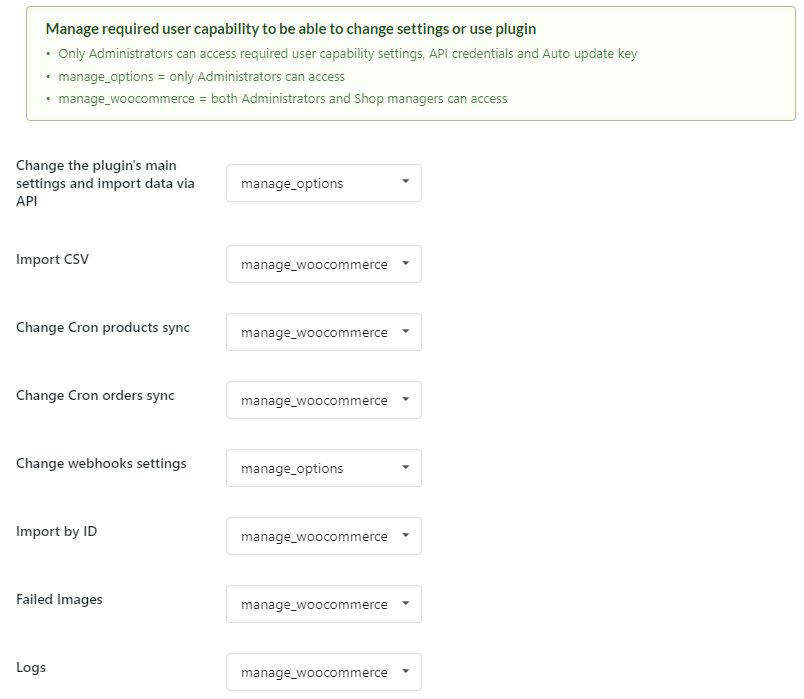
You can manage who can be able to change settings or use plugin using the user capability feature.
The plugin’s settings can be managed including: Change the plugin’s main settings and import data via API, Import CSV, Change Cron product sync, Change Cron orders sync, Change webhooks settings, Import by ID, Failed Images, Logs.
A. Below the General options, you can configure the import product options.
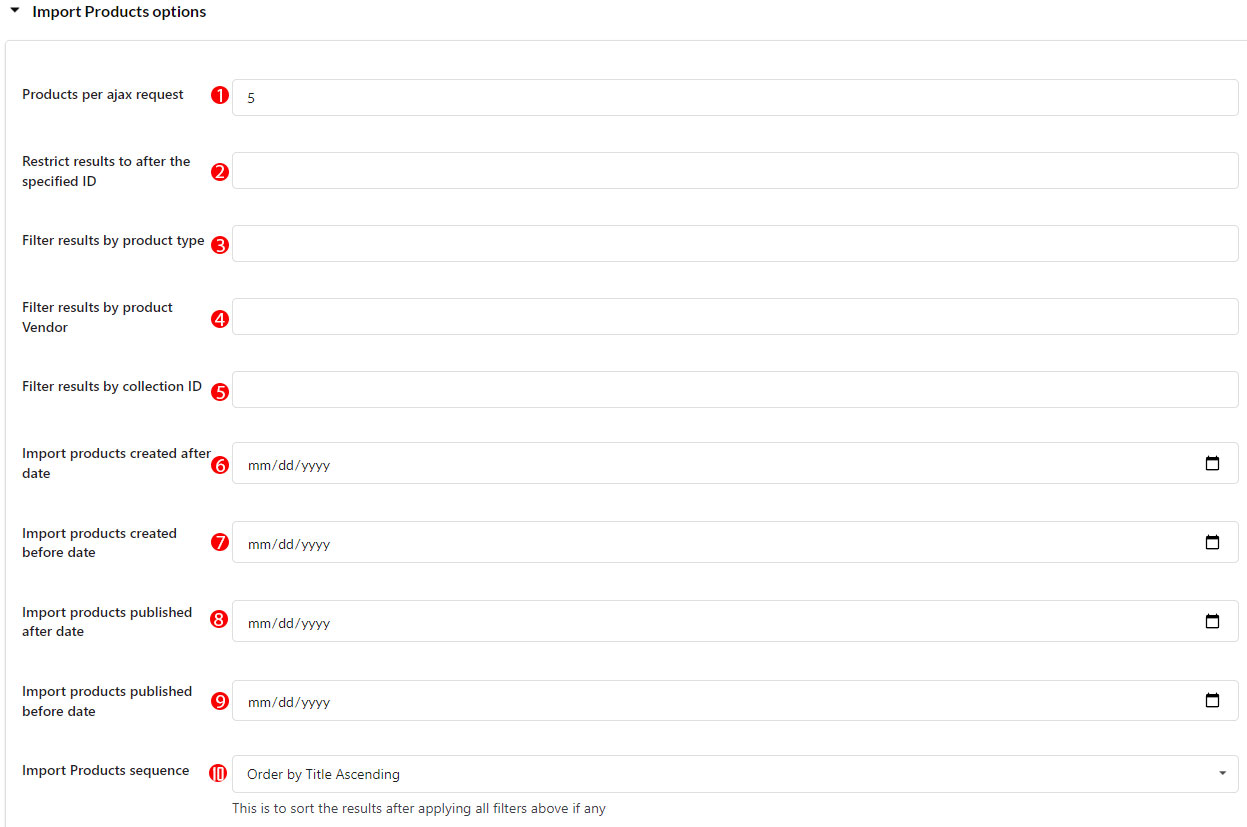
1. Products per AJAX request: this option allows you to choose how many will be imported with a single AJAX request.
2. Restrict results to after the specified ID: Shopify product IDs go bigger (1,2,3,4…), this option allows you to choose import product from a specific ID (4,5,6…)
3. Filter results by product type: choose to import a specific product type by entering the product type in this field.
4. Filter results by product Vendor: choose to import a specific vendor. Similar to the import product type option, you just need to enter the Vendor into this field.
5. Filter results by Collection ID: choose to import a specific collection ID. Similar to the import product type option, you just need to enter the Collection ID into this field.
6. Import products created after date: Enter the date you want to import the product created after that date.
7. Import products created before date: Enter the date you want to import the product created before that date.
8. Import products published after date: Enter the date you want to import the product published after that date.
9. Import products published before date: Enter the date you want to import the product published before that date.
10. Import Products sequence: choose a sequence for imported products. There are 6 options for you to select “Order by Title Ascending”, “Order by Title Descending”, “Order by Created Date Ascending”, “Order by Created Date Descending”, “Order by Updated Date Ascending”, “Order by Updated Date Descending”.
B. Options below allow when you import/update products with other methods such as webhook, CSV…
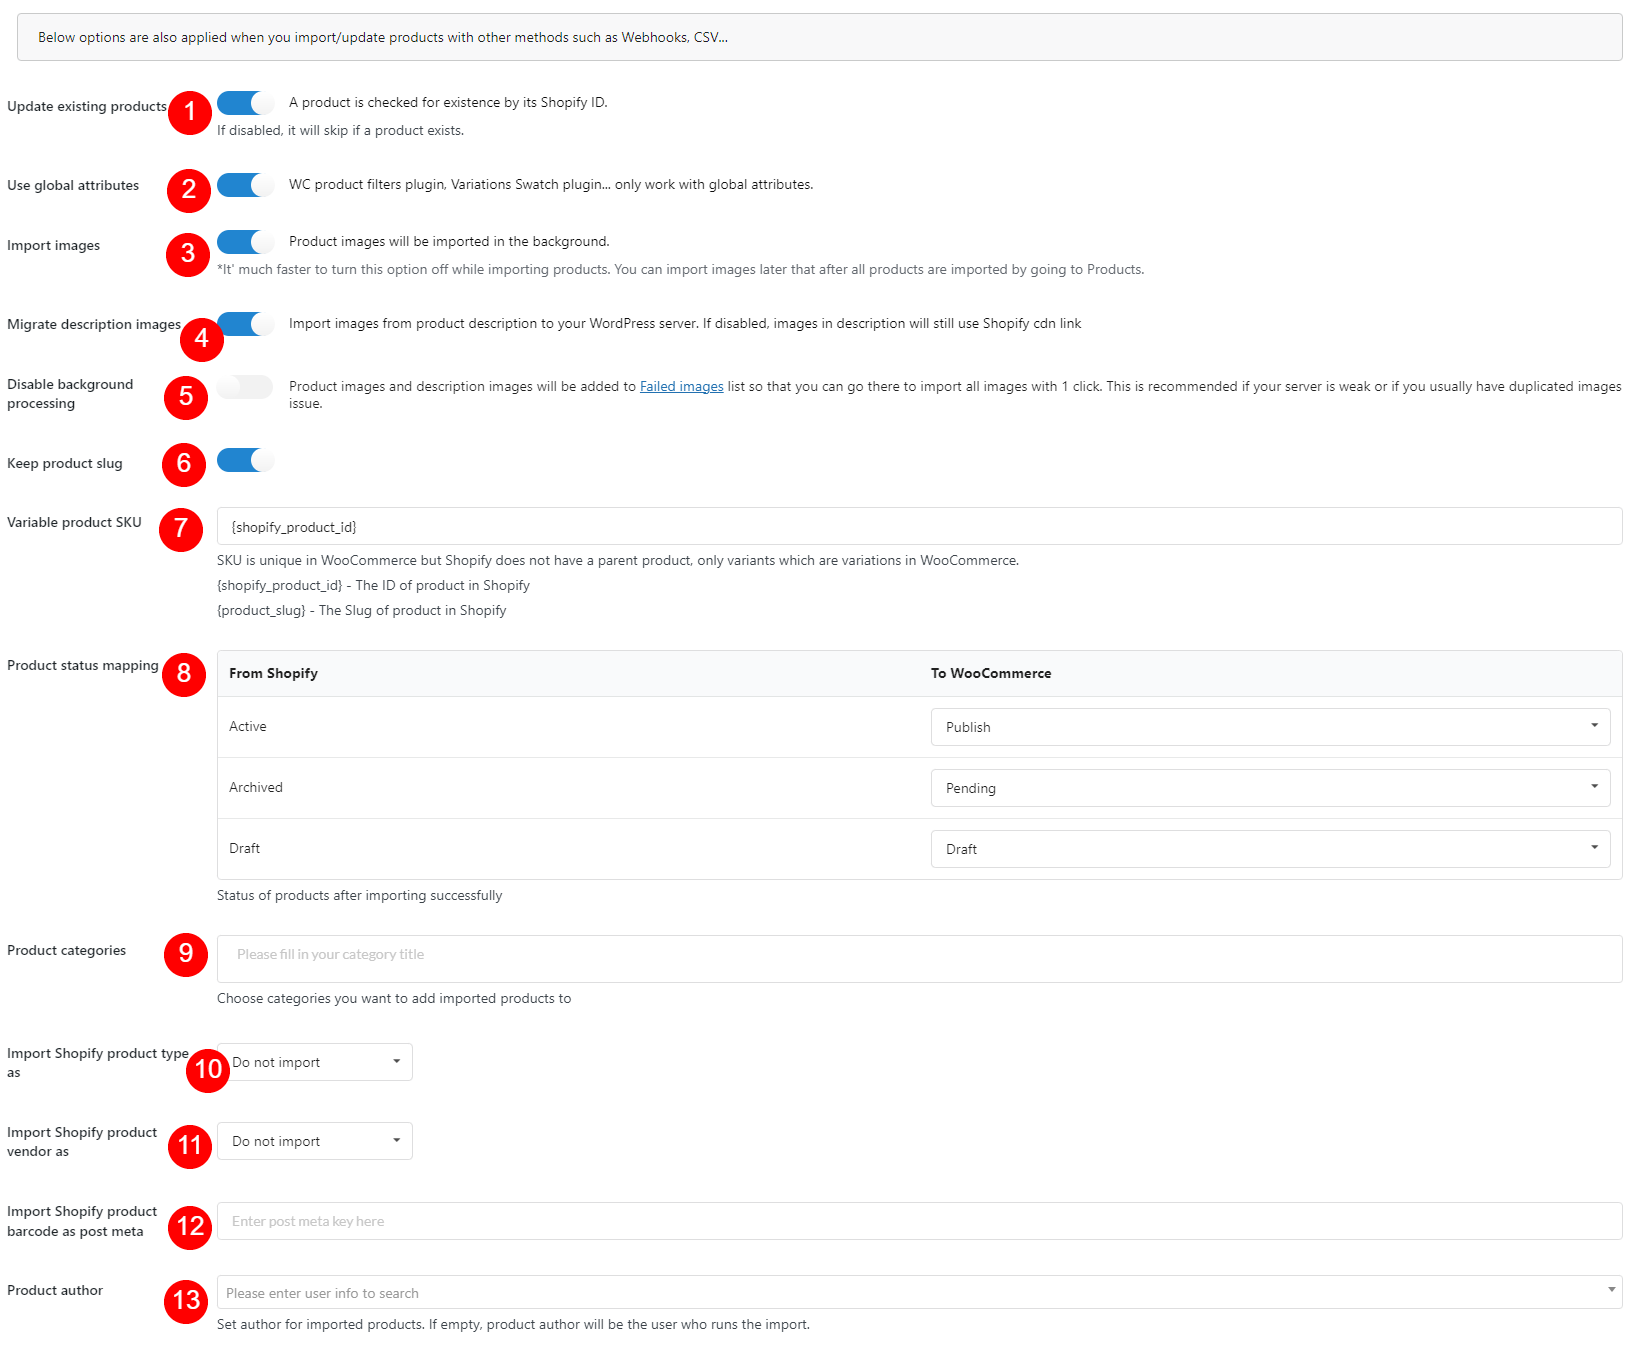
1. Update existing products: If enabled, a product will be checked if existed by its Shopify ID
2. Use global attributes: Choose to create global WooCommerce Attributes instead of creating custom attributes for each imported product.
3. Import images: Product mages will be imported in the background. It’ much faster to import products while turning off this option. You can import images later that after all products are imported by going to Products.
4. Migrate description images: Import images from product description to your WordPress server. If disabled, images in description will still use shopify cdn link.
5. Disable background processing: Product images and description images will be added to Failed images list so that you can go there to import all images with one click. This is recommended if your server is weak or if you usually have duplicated image issues.
6. Keep product slug: The product slug will remain, same as in your Shopify store. If this option is turned off, WooCommerce will automatical generate product slug from the product name.
7. Variable product SKU: This option allows you to choose Shopify product ID or Shopify product lug to use as your WooCommerce variable product SKU
8. Product status mapping: Choose a status for imported products “publish”, “private” or “pending”.
9. Product categories: Choose a category to add all imported products to. For example “Shopify products”. Please take note that categories from Shopify will be imported as well, so if you use this option, an imported product will be added to at least 2 categories.
10. Import Shopify product type as: Map the product type on shopify with the respective field on WooCommerce, it can be: category, tag, post meta. It is possible to choose a taxonomy to import Shopify product type to. For example, Taxomony brand from Perfect Brands for WooCommerce by Quadlayers.

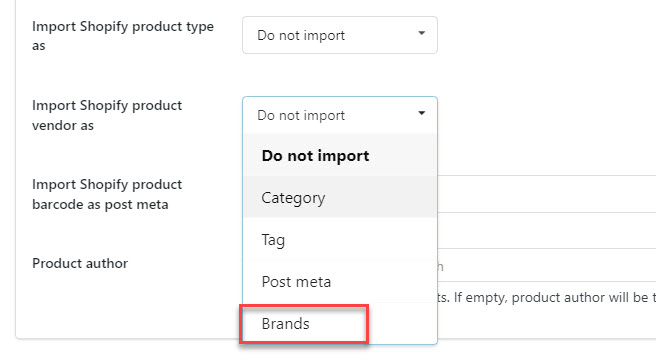
11. Import Shopify product vendor as: Map the product vendor on shopify with the respective field on WooCommerce, it can be: category, tag, post. It is possible to choose a taxonomy to import Shopify product vender to. For example, Taxomony brand from Perfect Brands for WooCommerce by Quadlayers.
12. Import Shopify product barcode as post meta: If you want to import the barcode of Shopify products as a post meta, enter the post meta key there.
If you’re looking to migrate Shopify’s Barcode (ISBN, UPC, GTIN, etc.) to WooCommerce’s GTIN, UPC, EAN, or ISBN field (under product page back end > > Inventory), use this meta key: _global_unique_id
13. Product author: Set the author for imported products. If left empty, the user who runs the import will be the product author.
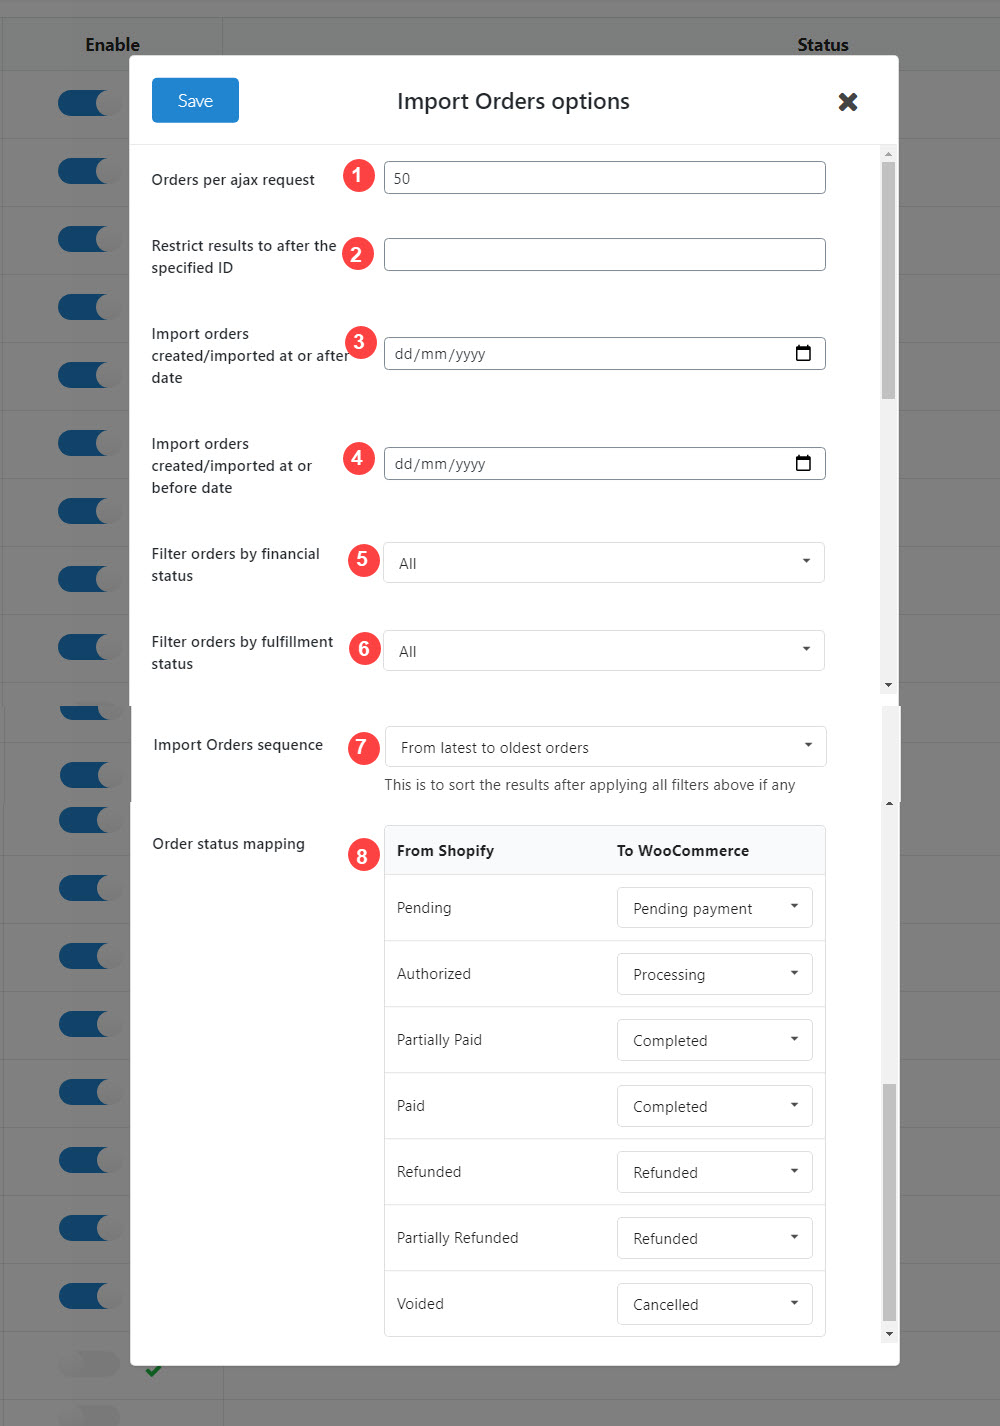
Configure options of orders imported from Shopify to WooCommerce.
*Important Notice: Due to recent changes in Shopify’s policies regarding Personally Identifiable Information (PII), the ability to import customer data directly from Shopify is now restricted to merchants on the Shopify plan or higher. For more details, you can visit this article.
*Recommended Action: If you wish to utilize the customer import feature, we recommend temporarily upgrading your plan to Shopify plan for one month. After completing the import, you can downgrade your plan if desired. This will allow you to migrate your customer data to WooCommerce while remaining compliant with Shopify’s policies.
In the import customer options, you can choose how many customers will be imported each AJAX request.
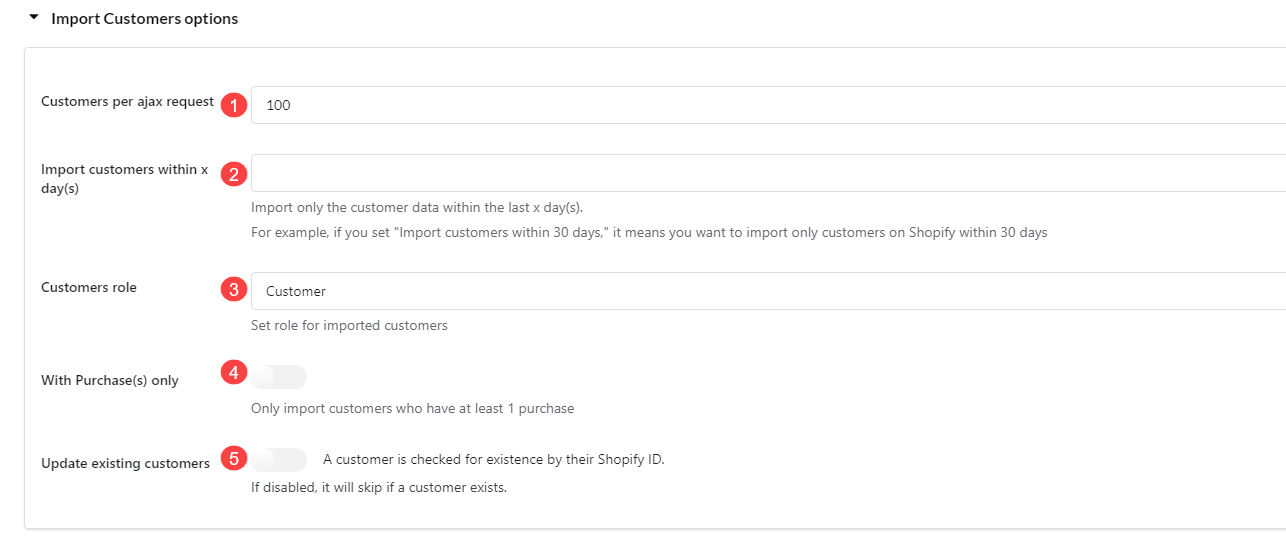
1. Customer per ajax request: Import a number of customer data per Ajax request.
2. Import customers within x day(s): Import only the customer data from the past x day(s).
For instance, setting “Import customers within 30 days” implies that you wish to import only those customers from Shopify who have been added in the last 30 days.
3. Customer role: Set role for imported customers
4. With Purchase(s) only: Only import customers who have at least 1 purchase.
5. Update existing customers: If enabled, the customer will be check if existed by their Shopify ID
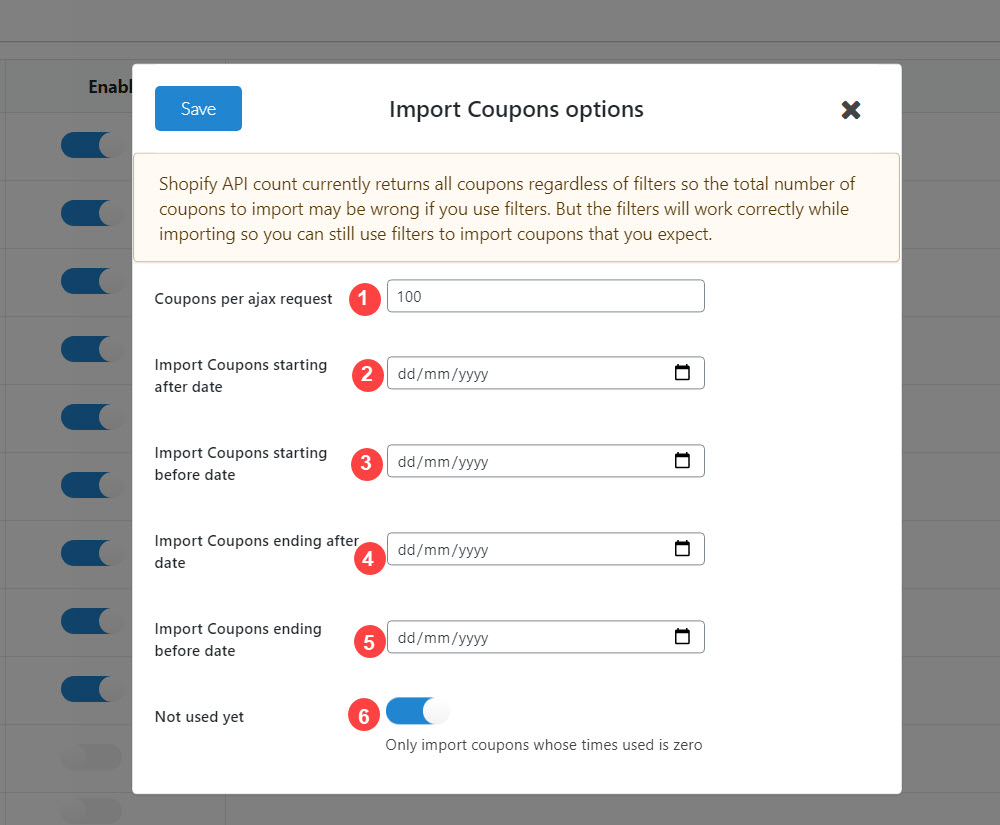
The plugin allows you to import coupons from Shopify to WooCommerce. You can select how many coupons will be imported per AJAX request.
If you want to update an existing blog while importing, select some options to update. Leave it blank to skip existing blogs.
*This option only works if your blogs are imported since version 1.0.9

You can import from Shopify to WooCommerce with ID option. You just need to enter Shopify IDs and click Import.

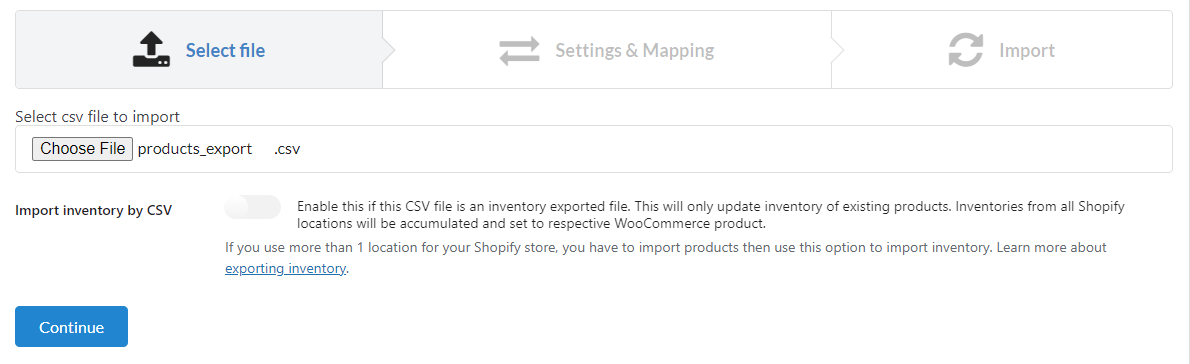
The plugin allows you to import products using CSV files. To use this option, you need a valid Shopify product CSV file. You can export this file from your Shopify store.
Then in your WooCommerce store, go to Dashboard/ Shopify to Woo/ Import CSV, and update the CSV product data file.
Important note: Import inventory by CSV – Enable this if this CSV file is an inventory exported file. This will only update the inventory of existing products. Inventories from all Shopify locations will be accumulated and set to respective WooCommerce products.
If you use more than 1 location for your Shopify store, you have to import products and then use this option to import inventory. Learn more about exporting inventory
Follow the below guide to import Shopify inventory via CSV if your Shopify store has more than 1 location.
Click “Continue”
Then in the next step, mapping fields from Shopify to WooCommerce. And configure settings with options like import directly.
Then click Import and wait for the products to be imported.

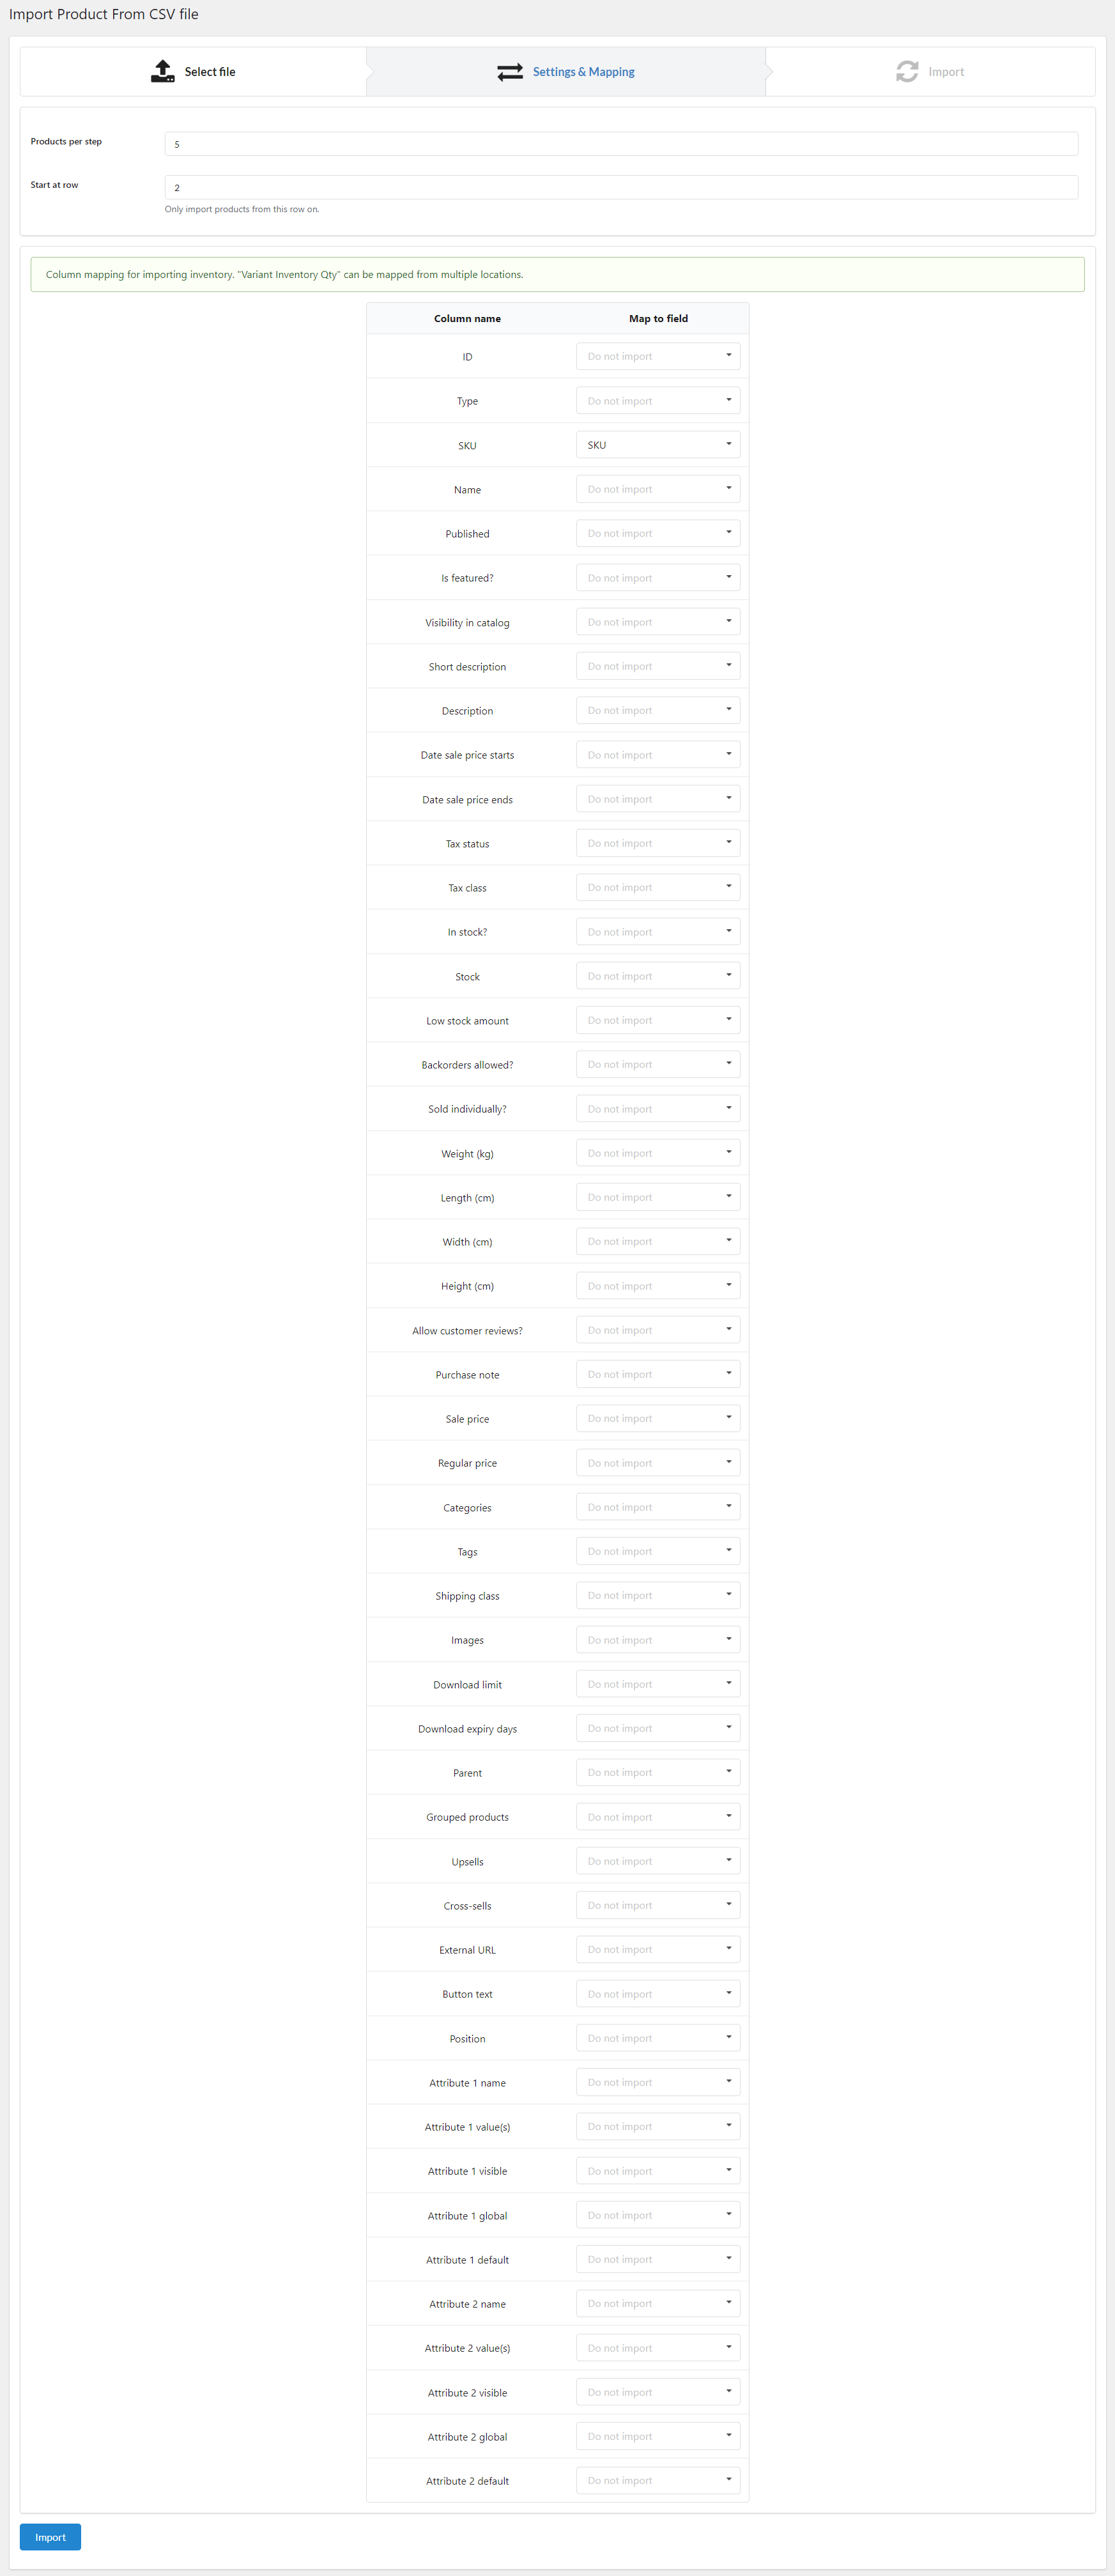
Step 1: Select the file

Select the Shopify inventory file to import. Enable the “Import inventory by CSV” option.
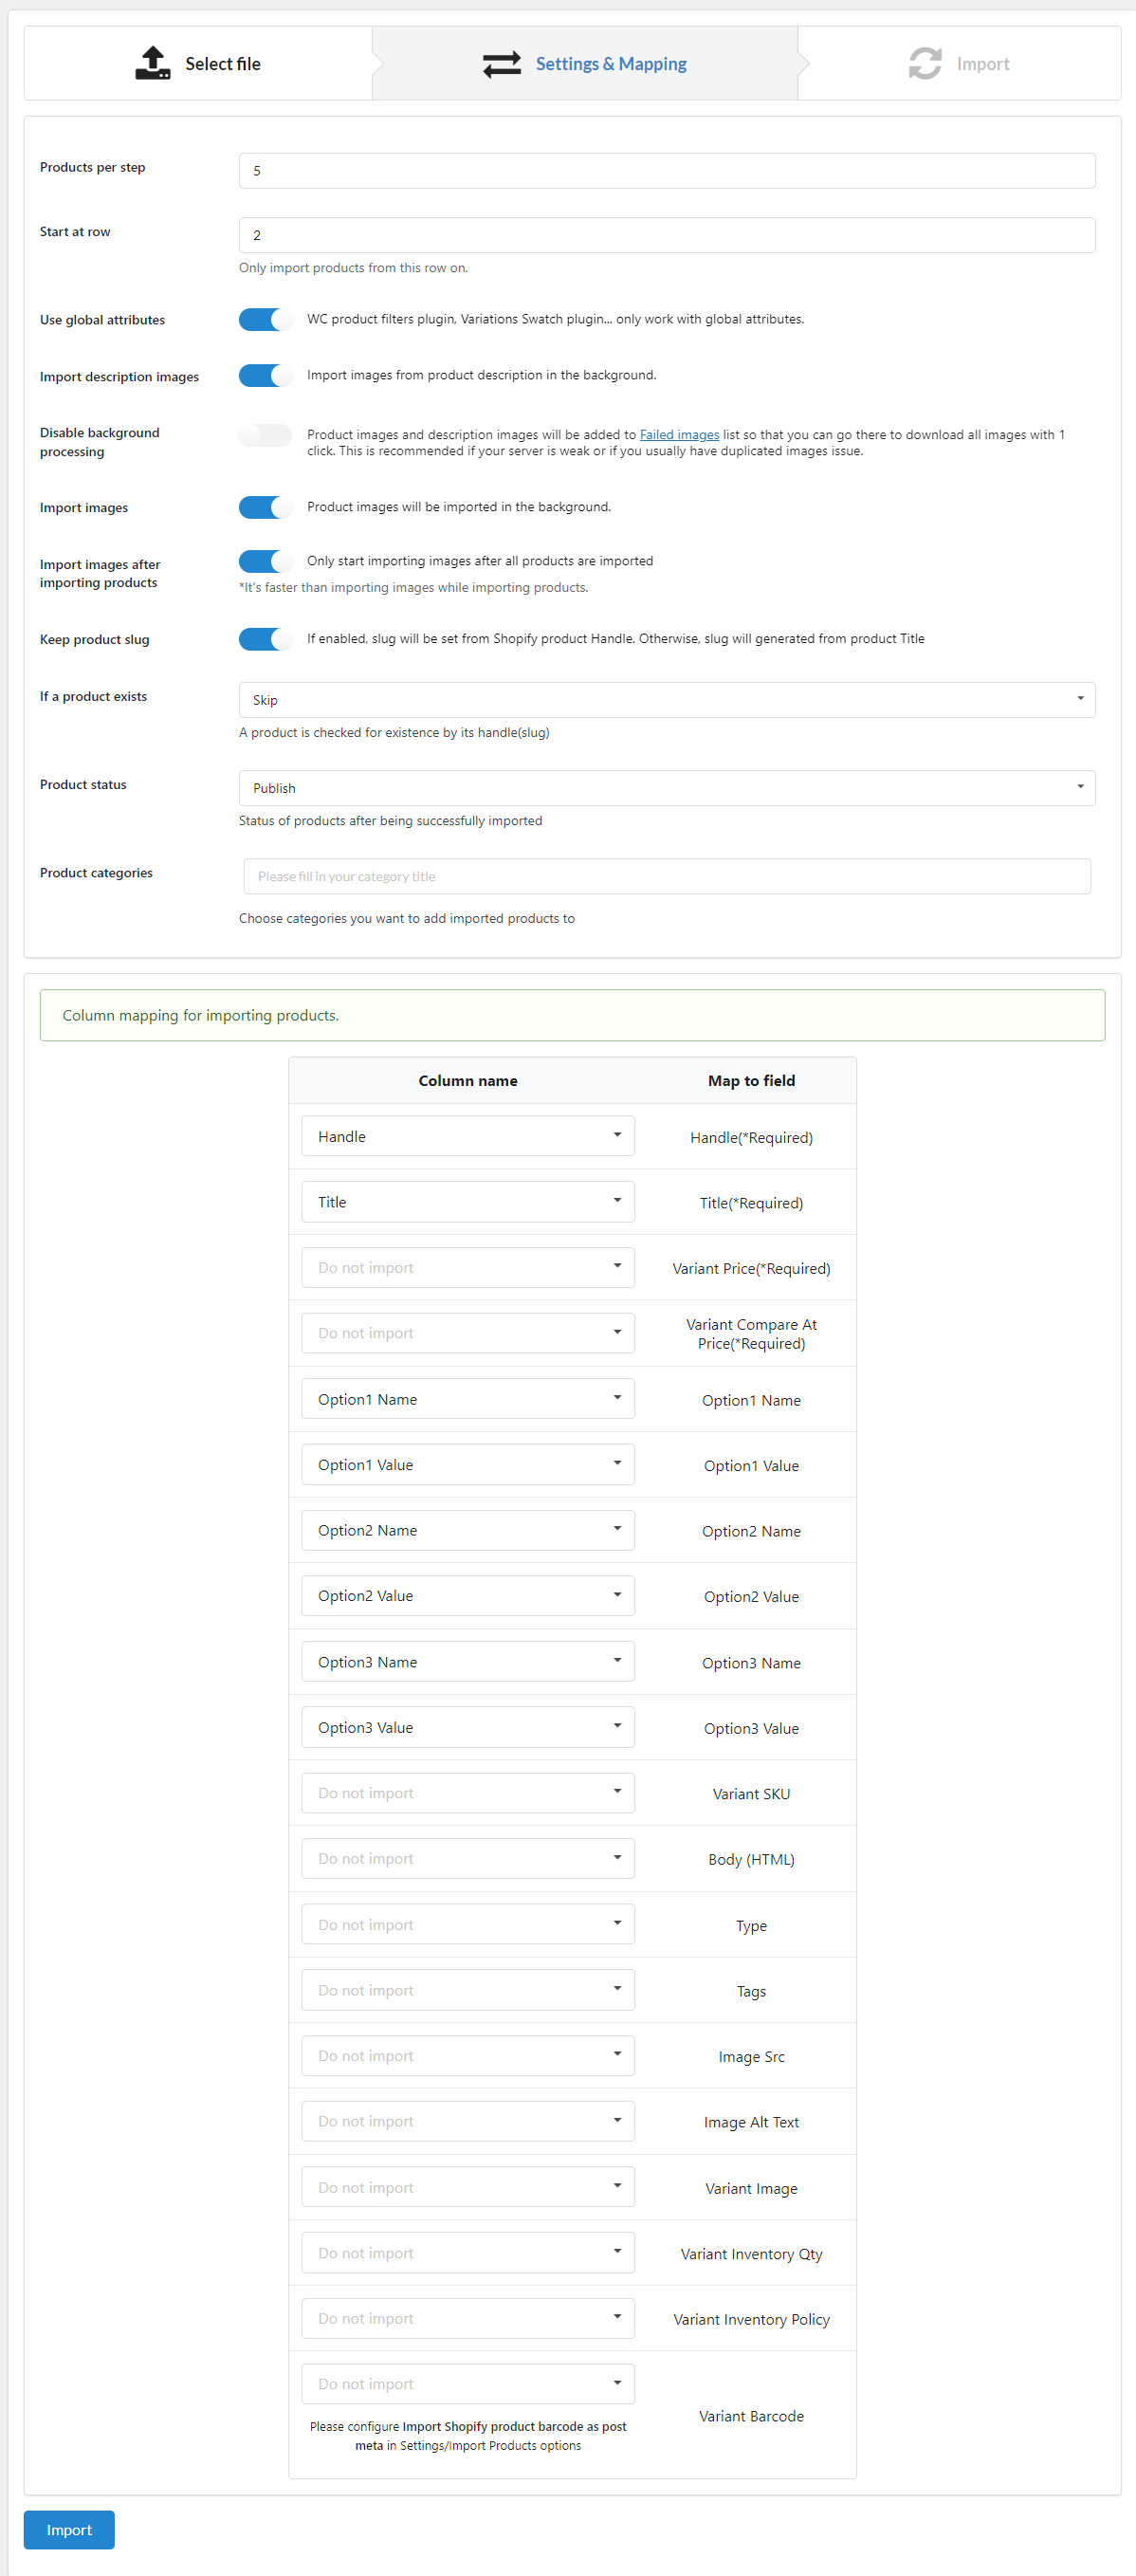
Step 2: Settings and Mapping
Adjust products imported per each step, select to import from the specific row in the file, and configure the mapping options
Then click Import and wait for the products to be imported.
This feature allows you to stay in sync with Shopify or execute code after a specific event occurs on a shop. The following guide helps you configure a webhook using the API.
* Note:
Important note: Normally the REST API on a website is enabled, but in some cases, access to the REST API may be disabled by a third-party plugin. If the webhook feature is not functioning properly, it could be due to the REST API being disabled, and you must verify and re-enable it accordingly.
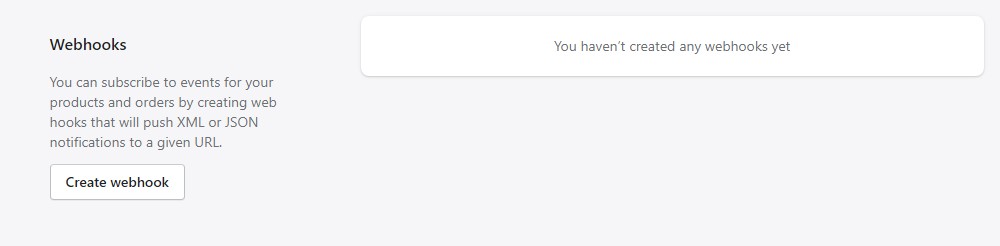
1. From your Shopify admin, go to Settings > Notifications.
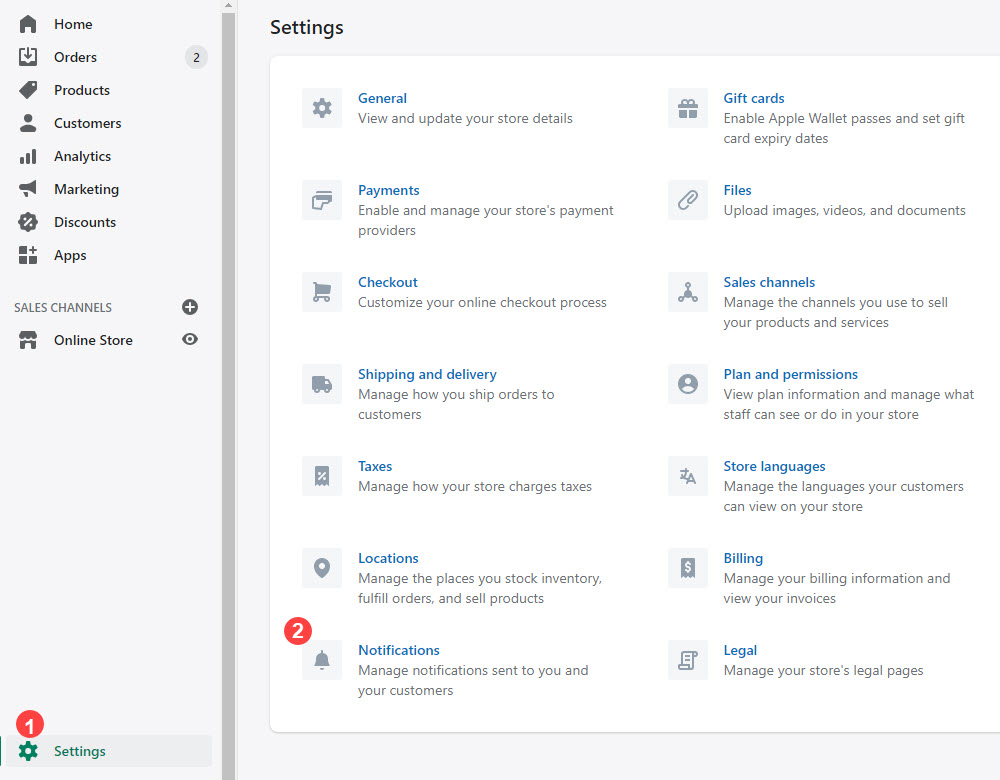
2. In the Webhooks section, click Create a webhook.
3. Select the event type you want to listen for, the format (JSON or XML), and the URL where you want to receive notifications.
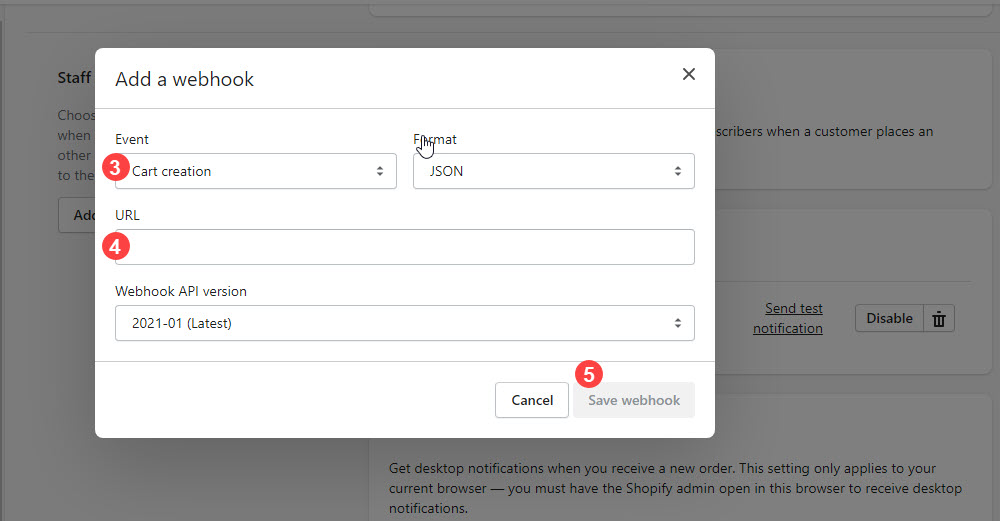
Event: You can choose one of these event as your need: Order creation, Order update, Product creation, Product update, Customer creation; Customer update.
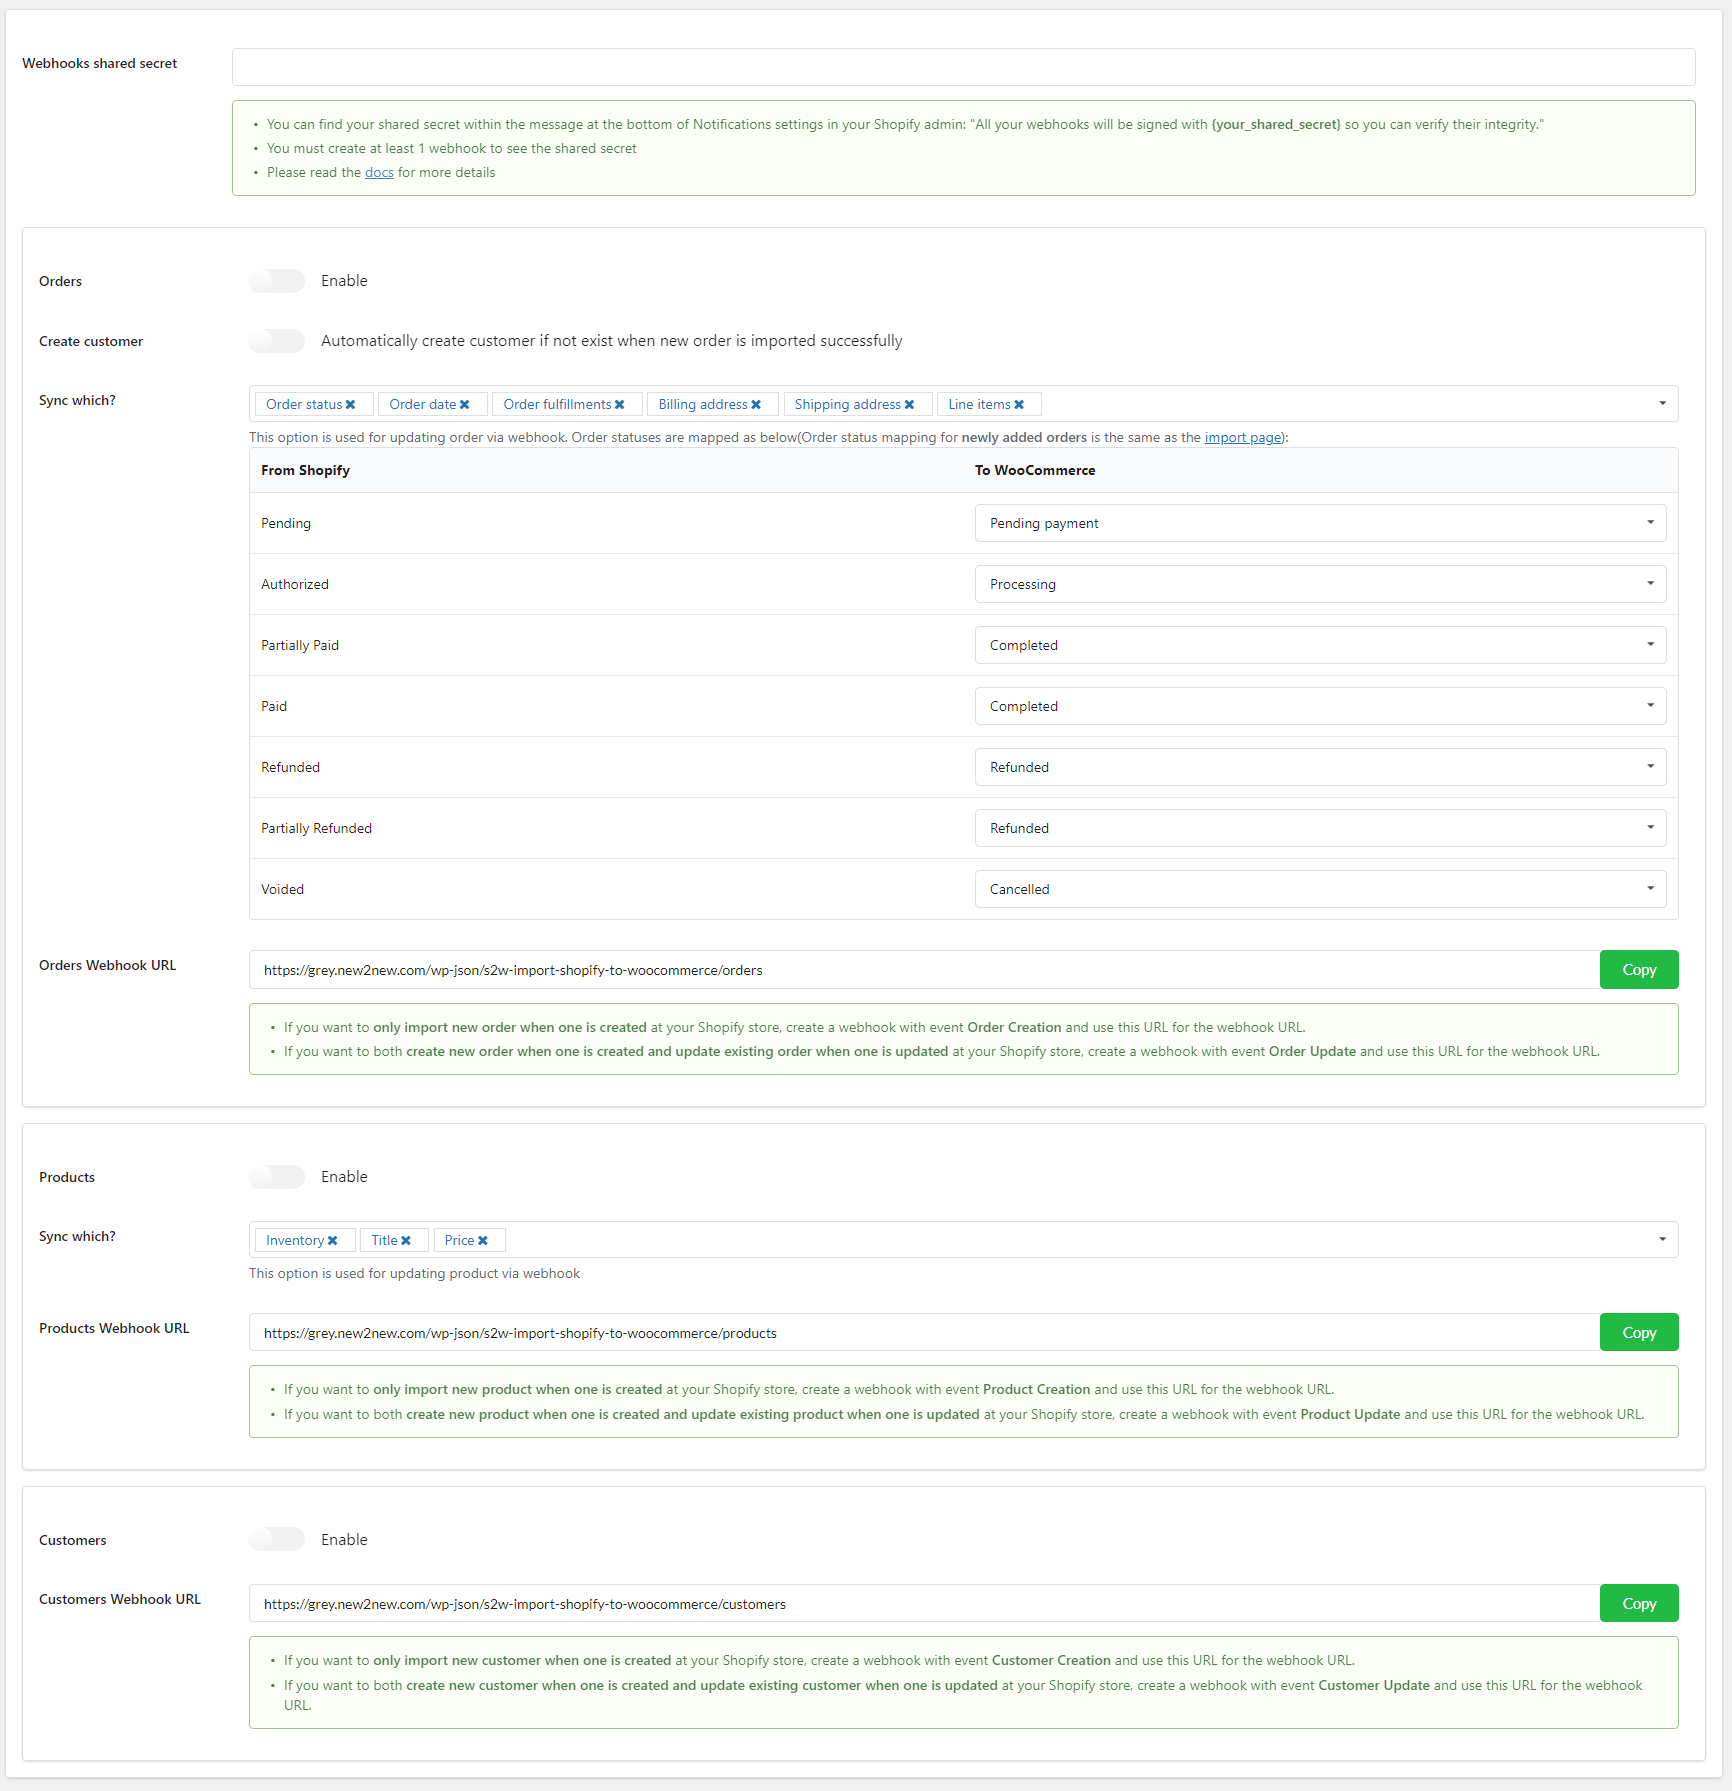
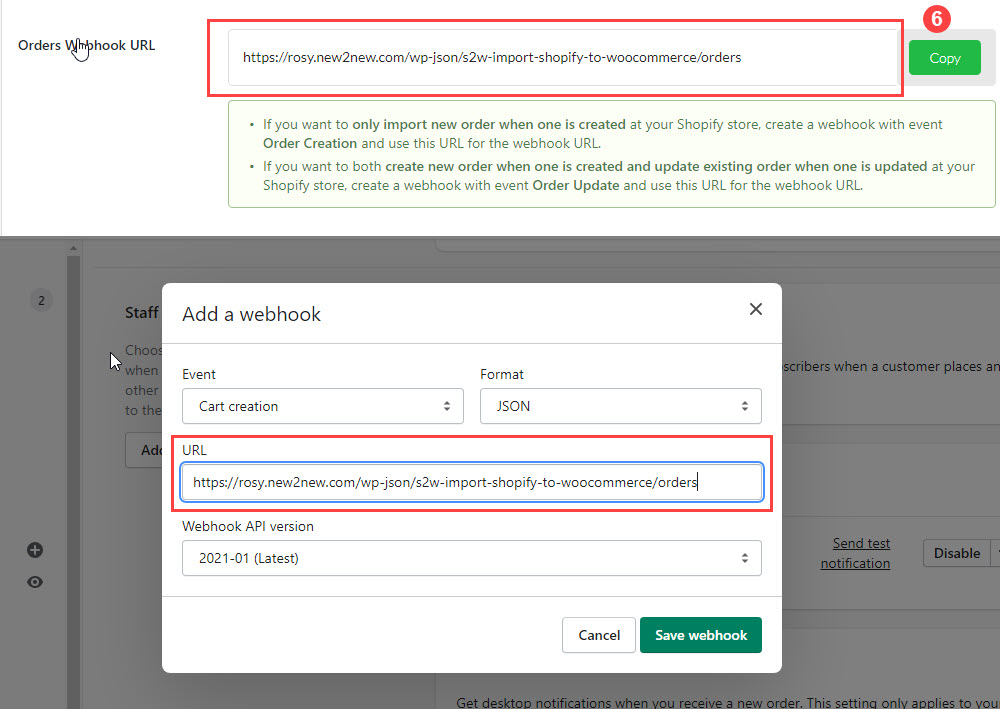
4. URL: Copy respective URL in S2W plugin to URL field in shopify and save the webhook.
5. Save the webhooks.
6. Copy the Order webhook URL from Import Shopify to WooCommerce and paste it to the URL in the Add Webhook area in Shopify dashboard.
7. Copy the Secret key you have just created on Shopify and paste to the Webhooks shared secret field in S2W and save the settings.

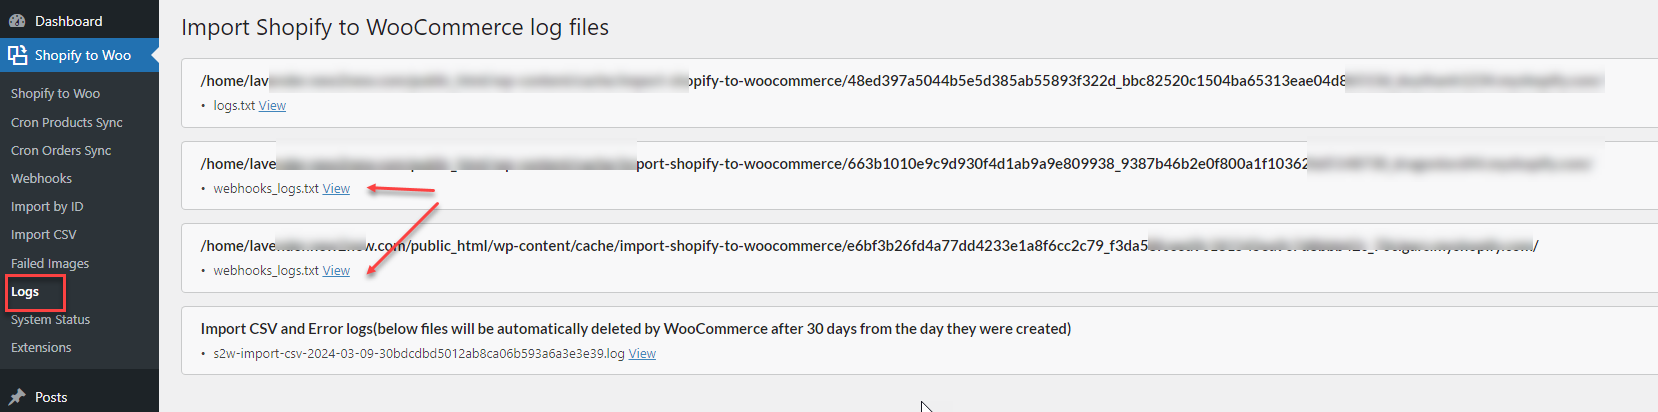
To verify data synchronization via webhook, please access the Logs section where you can review and debug errors in syncing with Webhook.
You can sync products from Shopify to WooCommerce manually on the product list page. You can select to sync each product, a number of products, or sync all products manually.
From the Dashboard > All Products:
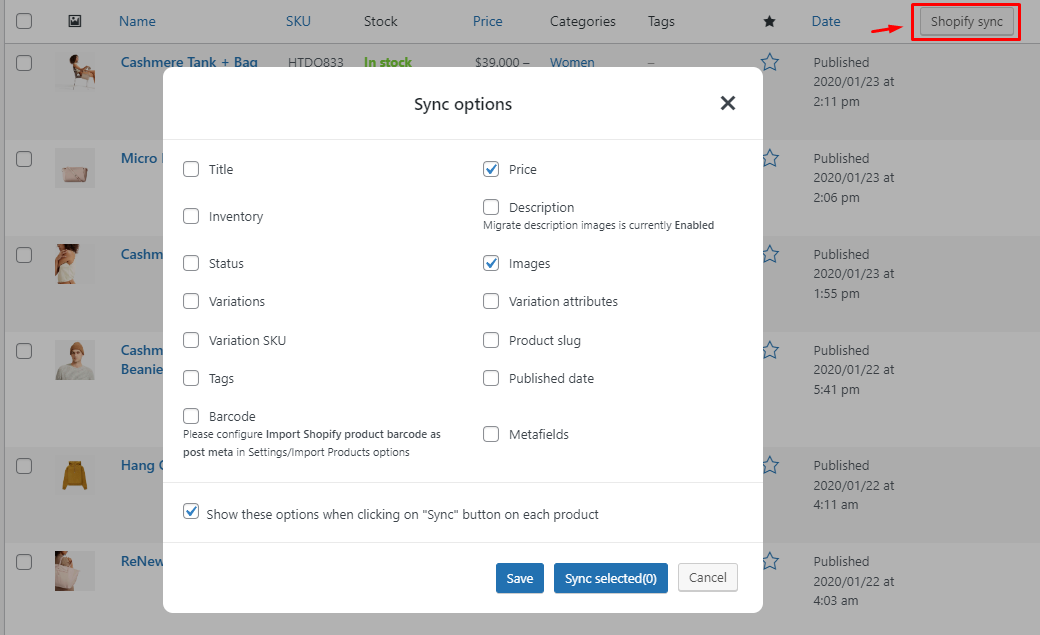
Click on the Shopify sync button, a popup appears to let you choose which product properties you want to sync.
You can sync a product:

Or sync a number of products:

* Options for syncing products manually.
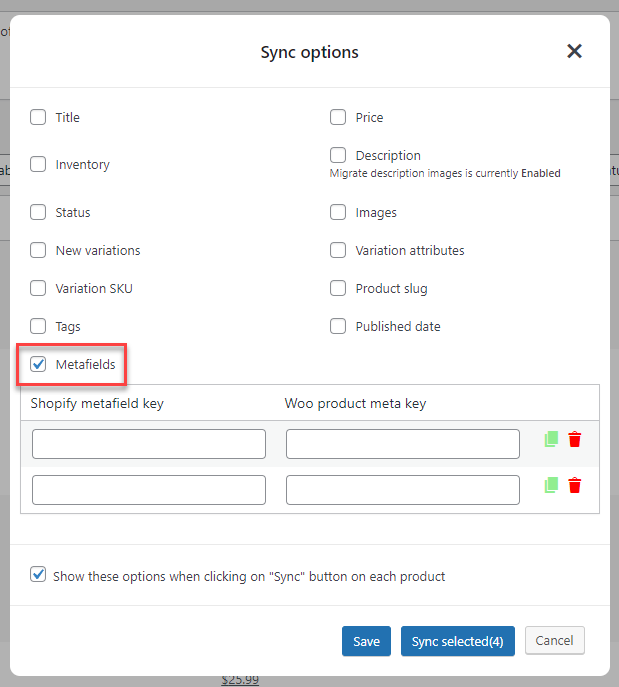
After selecting (a)products to sync, a popup appears and lets you choose product attributes for syncing. You can tick for what product attributes you want to sync. They include Title; Inventory; Status; New variations; Variation SKU; Tags; Metafields; Price; Description; Images; Variation attributes; product slug; Published date.
An option to show the selected options when clicking on the “Sync” button on each product.
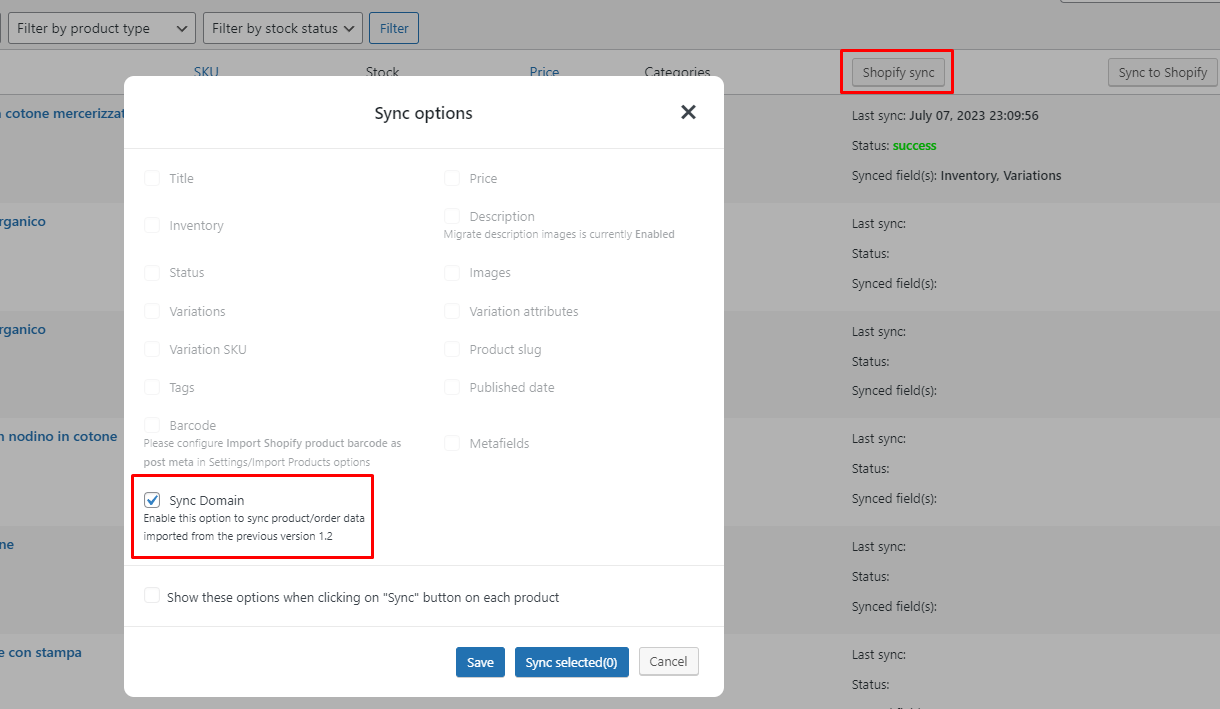
Starting from version 1.2, our plugin allows you to sync product data between Shopify and WooCommerce. This feature enables you to keep your product information up to date across both platforms. In order to initiate the syncing process, please follow the steps below:
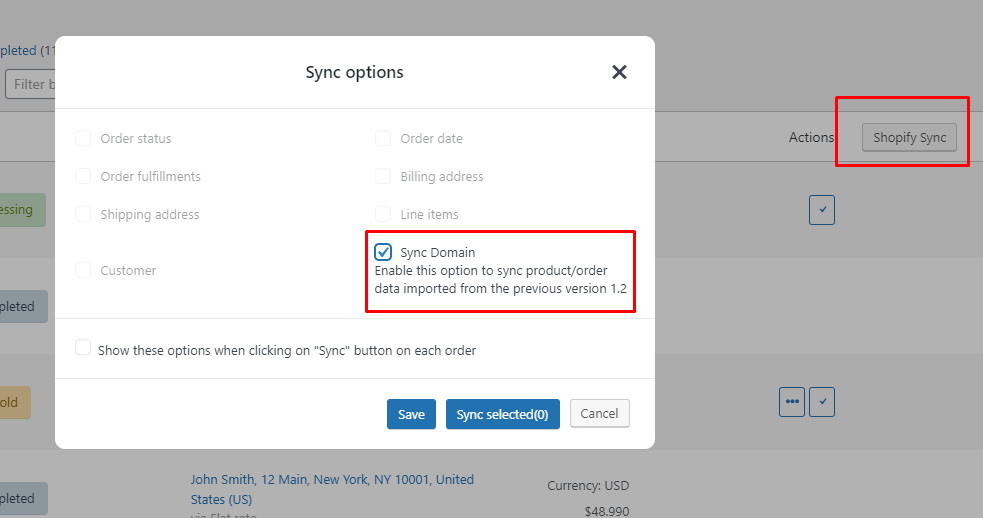
Note: Since you can only migrating data from one Shopify store to a WooCommerce store at once, when syncing the data, it is important to pay attention to the which store you are migrating the data. For syncing old products/orders imported before the version 1.2, please sync domain and reload the page to update the data.
Step 1: Connect Your Desired Shopify Store.
In the S2W plugin settings, navigate to the “General settings” section and connect Shopify API. You can see this guide in the General settings.
Step 2: Sync products
Go to Products > All products
Step 3: To sync the data reversely from WooCommerce to Shopify, from version 1.2, please follow this guide link.
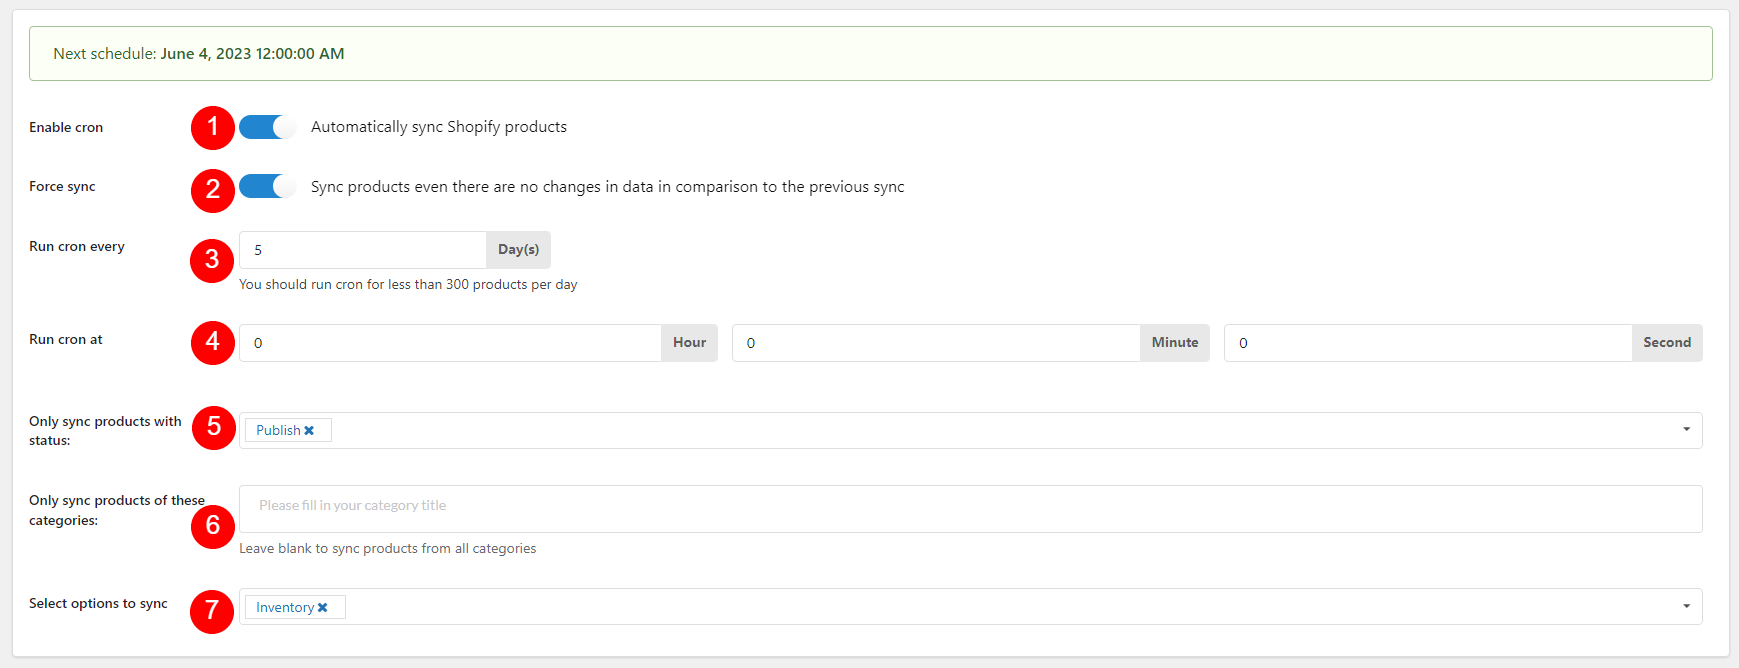
You also can set up the plugin to automatically update products. Go to Dashboard/ Shopify to Woo/ Cron Update Products.
You can sync metafields from Shopify to WooCommerce.
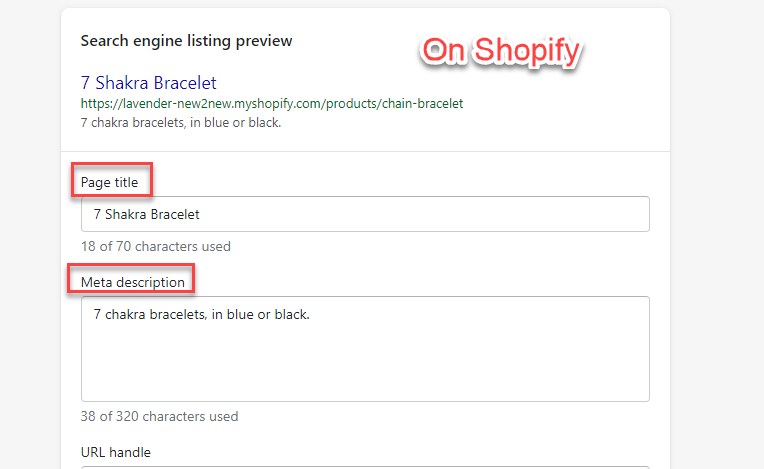
For example, if you want to sync meta title and meta description in Shopify to the title and description in WooCommerce, you have to use the Sync Metafields feature.
 |
 |
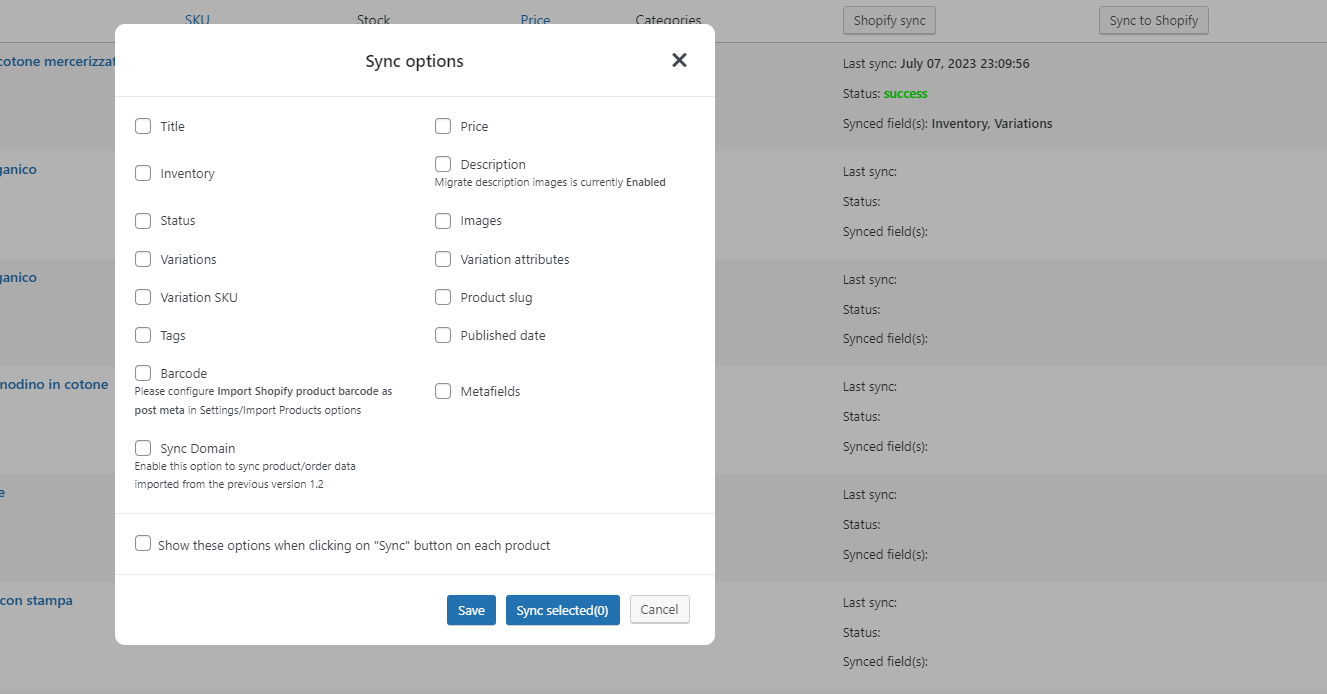
Step 1: In your WooCommerce Product list, click “Shopify sync” button. The sync option popup will appear, just click on the Metafields box.
Step 2: What you need to do is to fill the right metafield keys (which are stored in WooCommerce) reference with them in Shopify.

* Note: How to find the right metafield keys in Shopify and WooCommerce.
– Metafield keys in Shopify: Shopify has default metafields and other metafields created by shopify apps. If you need to sync page title and meta description, you can use default metafield keys for title: title_tag and description: description_tag . For other metafields, you need to find out the metafield keys in each shopify app.
– Metafield keys in WooCommerce: You can ask the author of the WordPress plugin which manage the custom metafields. Or you can export products which have the respective data fields, make sure to export all custom meta, then look for the meta keys in the respective column in the file.
Step 3: Click the Sync selected button and save the settings if needed.
For example:
rank_math_description in WooCommerce and in Shopify is description_tag; And for title is rank_math_title in WooCommerce and in Shopify is title_tag._yoast_wpseo_metadesc in WooCommerce and in Shopify is description_tag; And for title is _yoast_wpseo_titlein WooCommerce and in Shopify is title_tag.
| If use Rank Math | If use Yoast SEO |
 |
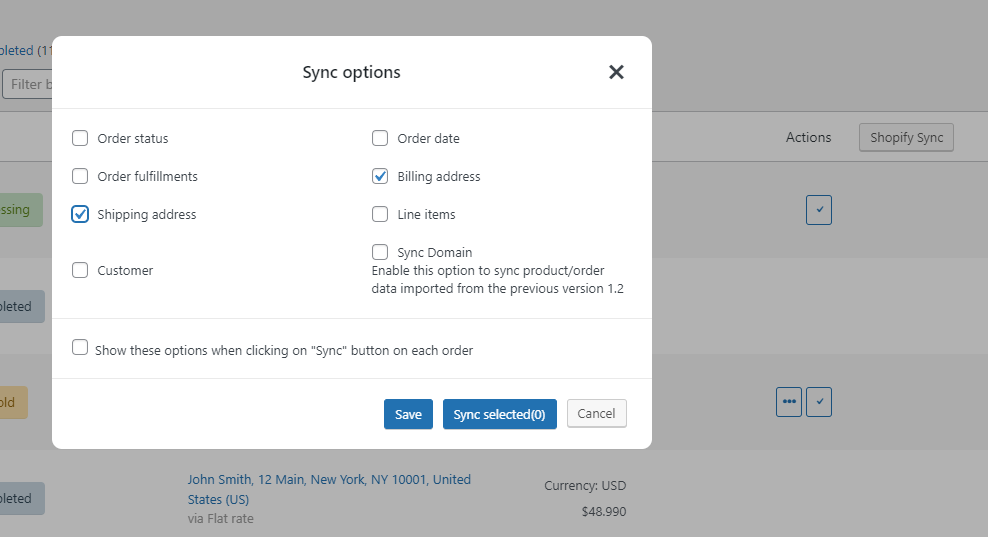
With the very same options with the “Sync Imported Product” feature, the Sync Orders feature allows you to sync the orders you imported from Shopify to WooCommerce.
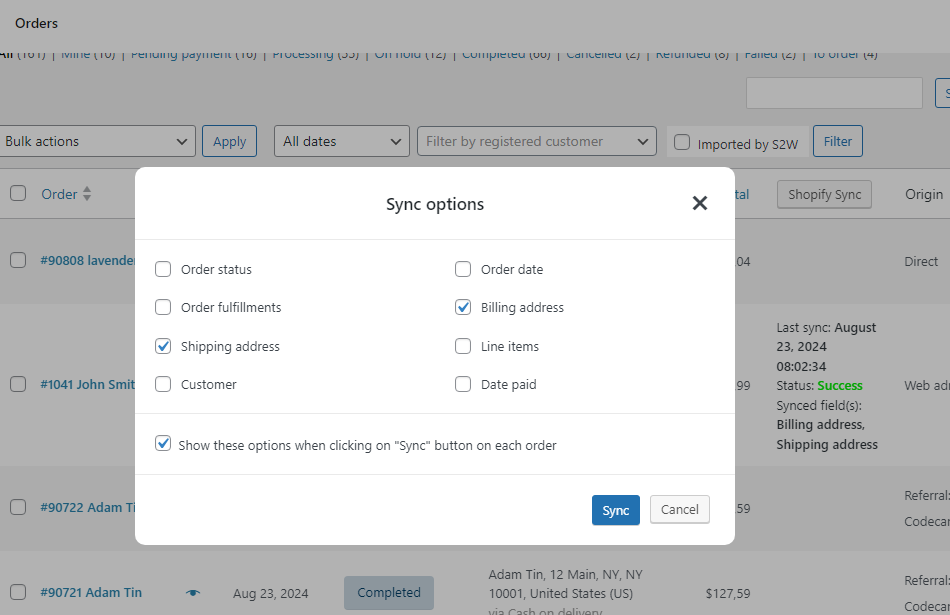
The sync orders options

The data you can choose to update orders include: Order status, Order fulfillment, Shipping address, Customer, Order date, Billing address, Line items, Date paid
Starting from version 1.2, our plugin allows you to sync product data between Shopify and WooCommerce. This feature enables you to keep your order information up to date across both platforms. In order to initiate the syncing process, please follow the steps below:
Note: Since you can only migrating data from one Shopify store to a WooCommerce store at once, when syncing the data, it is important to pay attention to the which store you are migrating the data. For syncing old products/orders imported before the version 1.2, please sync domain and reload the page to update the data.
Step 1: Connect Your Desired Shopify Store.
In the S2W plugin settings, navigate to the “General settings” section and connect Shopify API. You can see this guide in the General settings.
Step 2: Sync orders
Go to WooCommerce > Orders, click on the “Shopify sync”
Step 3: To sync the data reversely from WooCommerce to Shopify, from version 1.2, please follow this guide link.
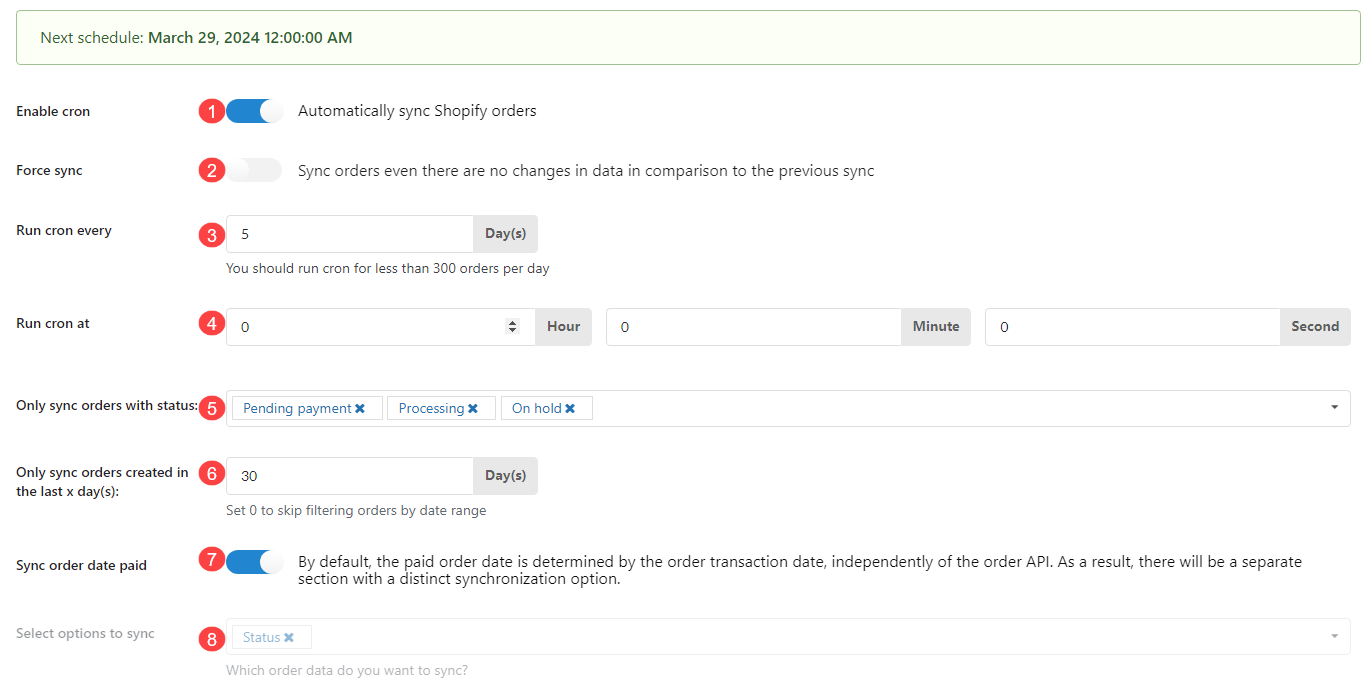
You also can schedule to sync imported orders. Go to Dashboard/ Shopify to Woo/ Cron Update Orders.
If you enable the option “Disable background processing” in the Import Product option, product images and description images will be added to Failed images list so that you can go there to import all images with one click. This is recommended if your server is weak or if you usually have duplicated image issues.
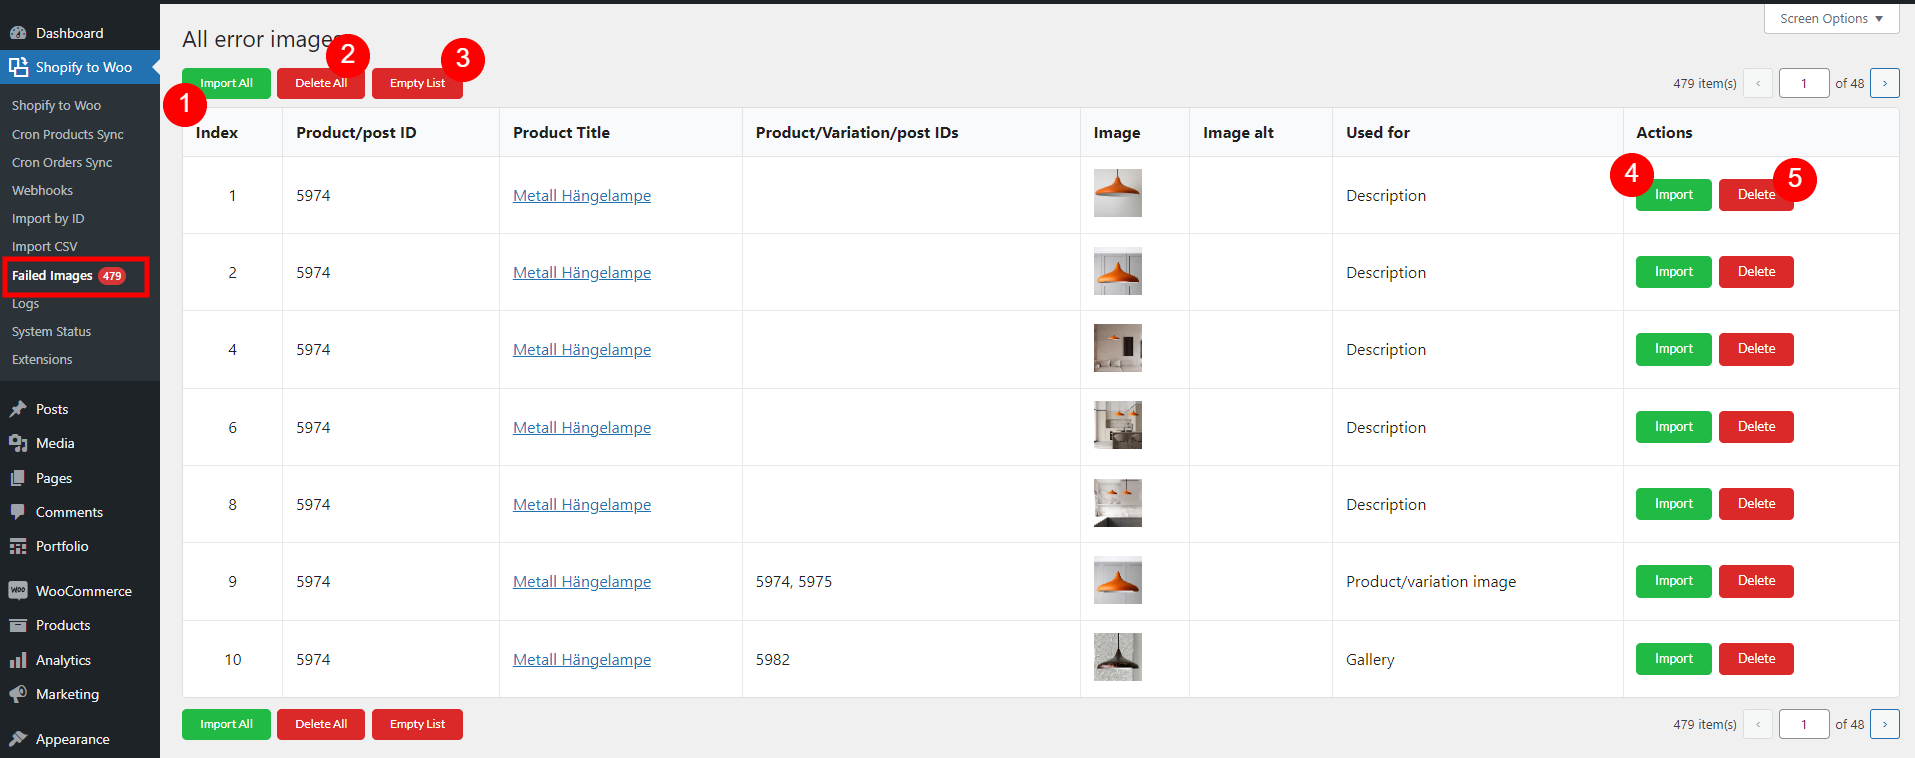
1. Download all: Click to import all images
2. Delete all: Click to delete all images on the current page
3. Empty List: Remove all failed images from the database
4. Download: Click to import each image one
5. Delete: Click to delete each image one
The log feature helps to record all import history which allows you to check the imported time, which imports, and import status: success, failed, or any errors.

1. Invalid email address: The email address is invalid because it must contain an “@” symbol. The part before the “@” can include letters, numbers, or special characters such as `!#$%&’*+/=?^_`{|}~.-`.
2. An account is already registered: An account with this email address or username already exists in the system.
3. Invalid account username: The username provided is invalid. This might happen if the username field is left empty or if the customer’s email is not available.
4. Account username exists: The username you are trying to register already exists in the system.
5. Password required: A password is required to complete the account registration or login process.
If you need to migrate your Shopify store to a WooCommerce store and your Shopify store contains a large number of images, including feature images, gallery images, and variation images, you may encounter difficulties when importing all of this image data during the migration process.
However, with the combined use of Exmage – WordPress Image Links, importing images can be made easier and can help save storage space on your site. The only requirement is that your Shopify store should not be deleted, and all images from your Shopify store must remain intact.
Let’s go through these simple steps to save Shopify’s images using external URLs with the Exmage – WordPress Image Links when migrating image data from Shopify to WooCommerce:
Video tutorial:
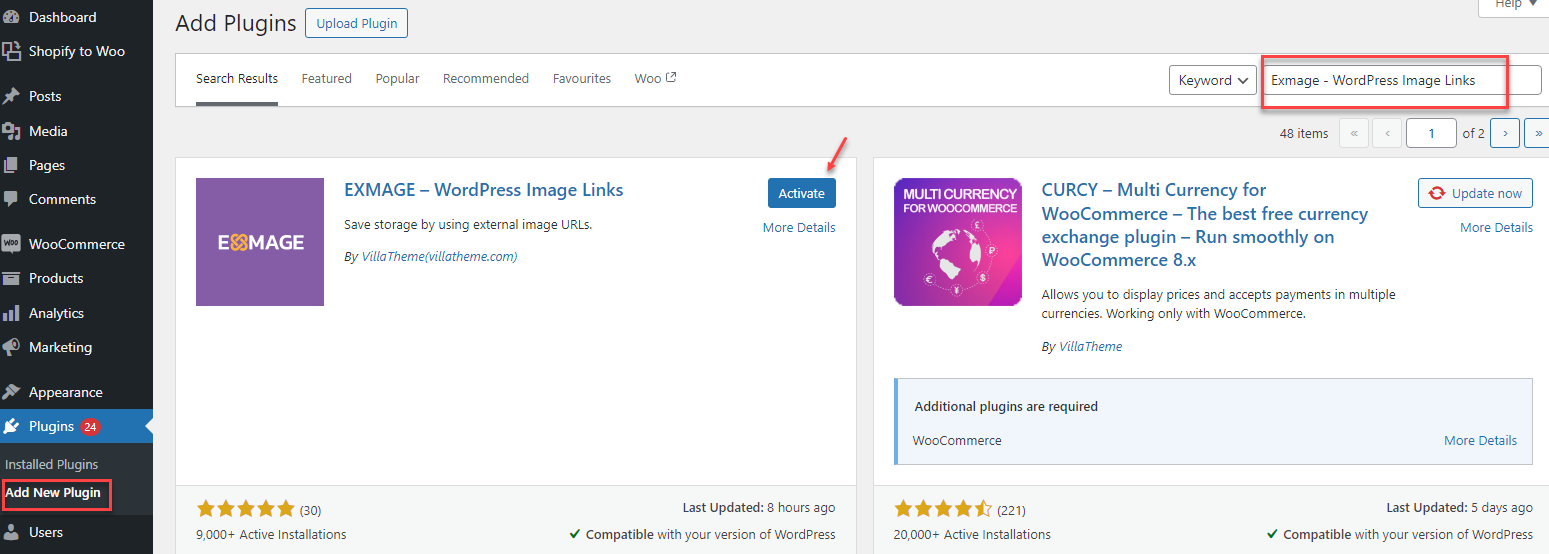
You can go to this link to download Exmage – WordPress Image Links, this plugin is free to use. Or go to Dashboard > Plugins > Add New Plugin, and find the plugin: Exmage – WordPress Image Links.
2. Ensure that you have S2W Migrate Shopify to WooCommerce Premium version installed.
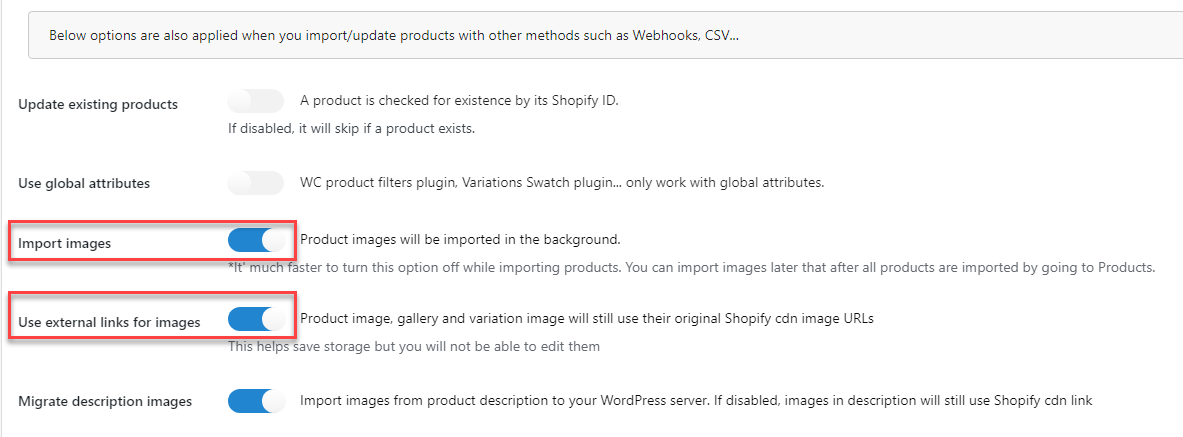
3. Enable the Use external links for image feature
Go to Shopify to Woo > Import Products options, enable these options: Use external links for image and Import Image.
4. Start import
Let’s commence the product data import via API. You can watch this video tutorial on how to import data from Shopify to WooCommerce using the API.
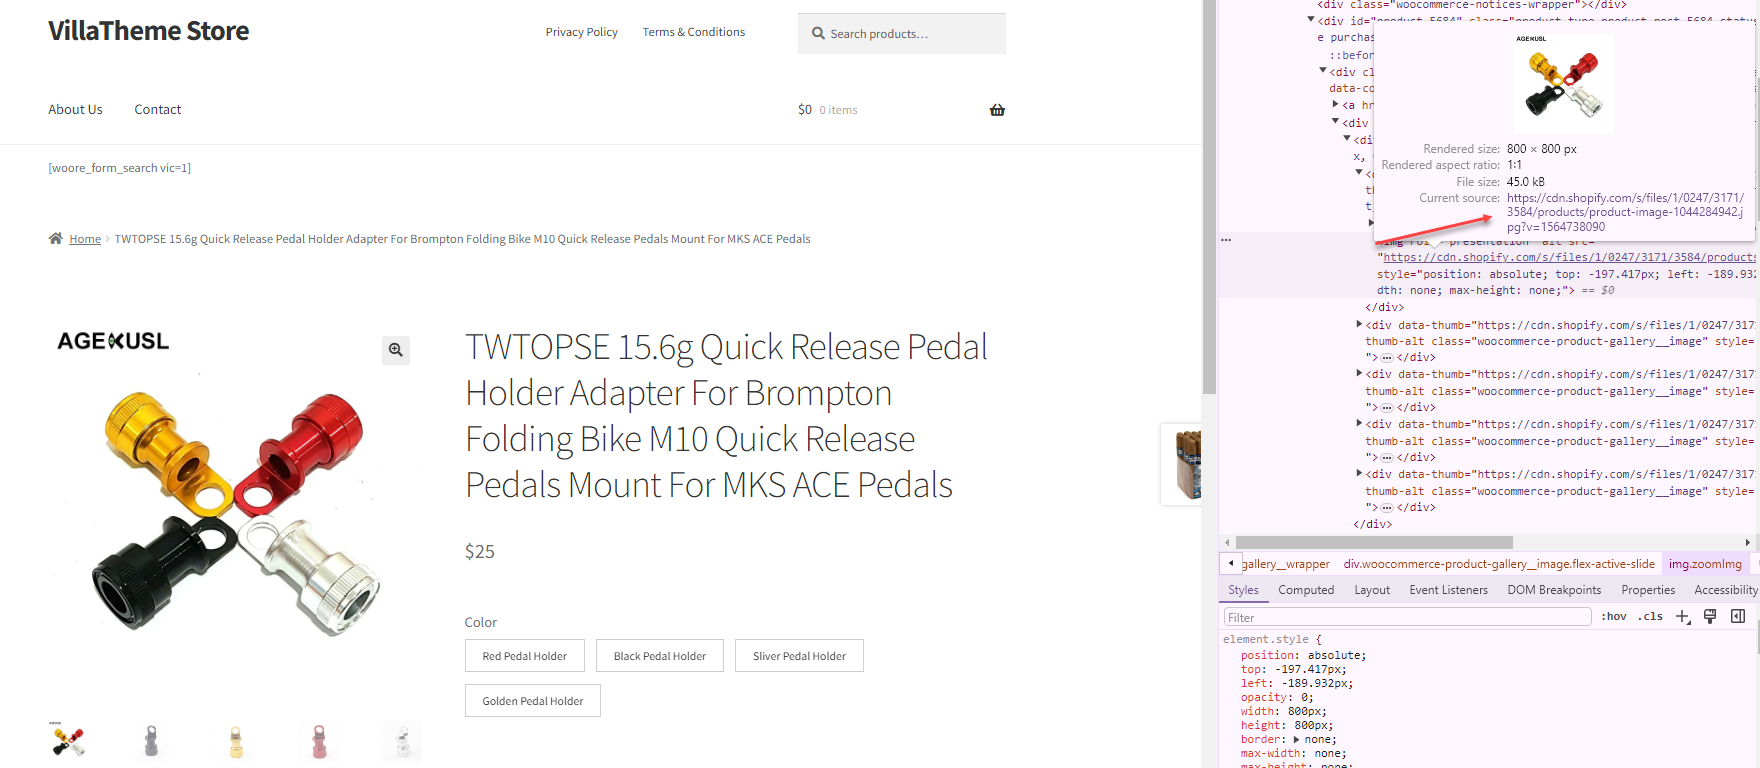
Now your Shopify images are quickly imported to WooCommerce under the external URLs
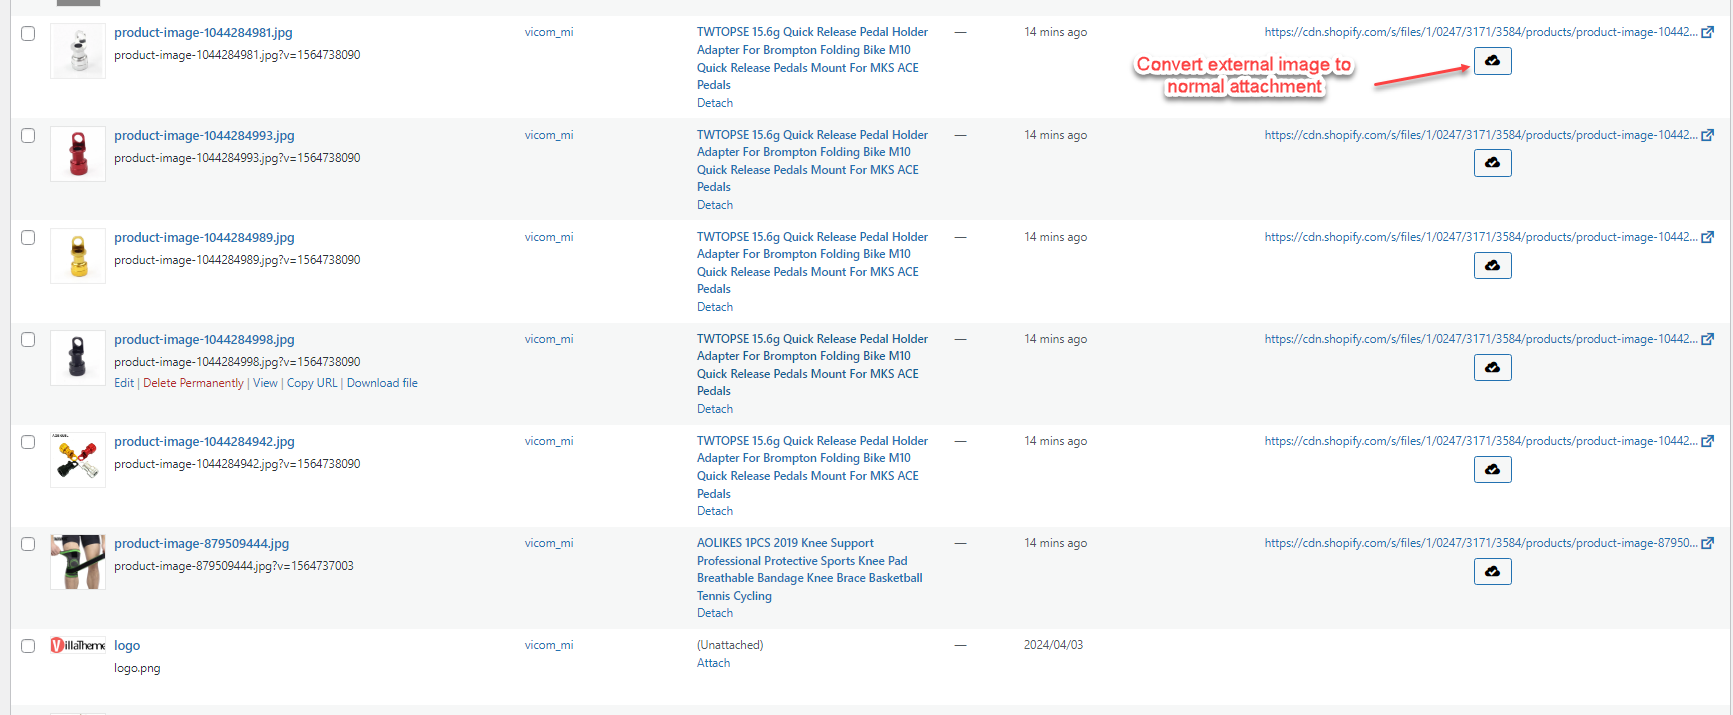
5. Go to Media:
You can refer to this documentation for further information on EXMAGE – WordPress Image Links.
You can distinguish between external images and normal attachments by the icon.
![]()
In summary, leveraging external URLs for storing Shopify images brings several benefits. Firstly, it streamlines the process of importing product data by eliminating the need to upload images directly to your WooCommerce site. This not only saves time but also reduces the workload associated with managing large volumes of image files. Secondly, utilizing external URLs helps optimize your site’s storage capacity. By storing images externally, you can conserve valuable storage space on your server, allowing for smoother site operation and improved performance. Overall, this approach offers a more efficient and convenient solution for handling Shopify images during the migration process.