- Start
- FILE INCLUDES
- INSTRUCTION
- INSTALLATION
- HOW TO USE
- HOW DOES IT WORK
- COMPATIBILITY
- ALD – Alidropshipping
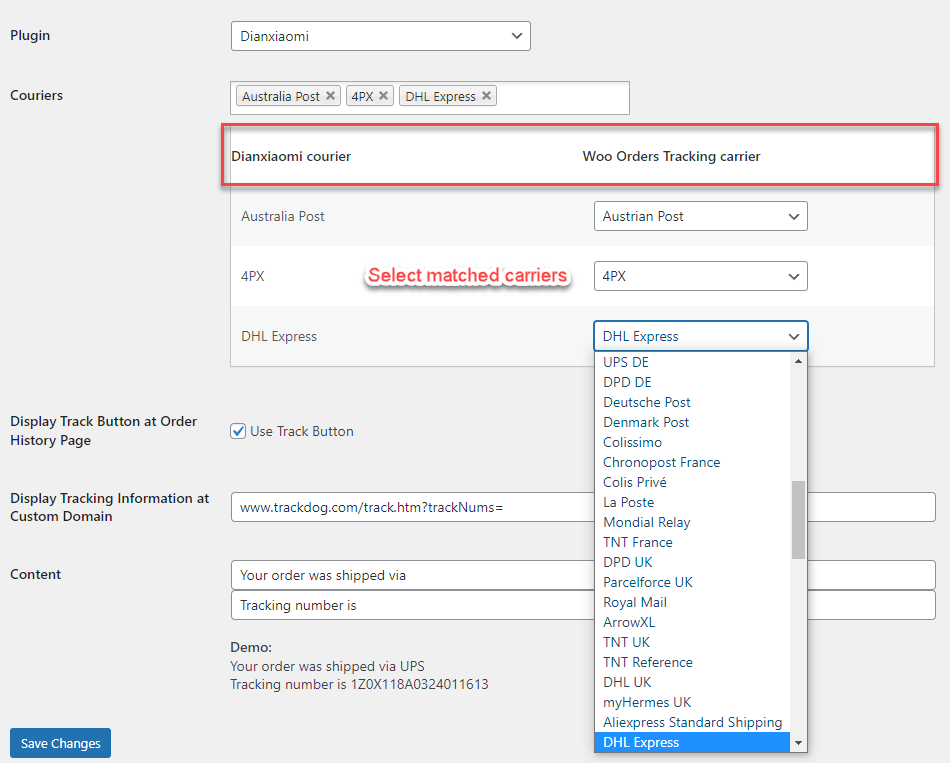
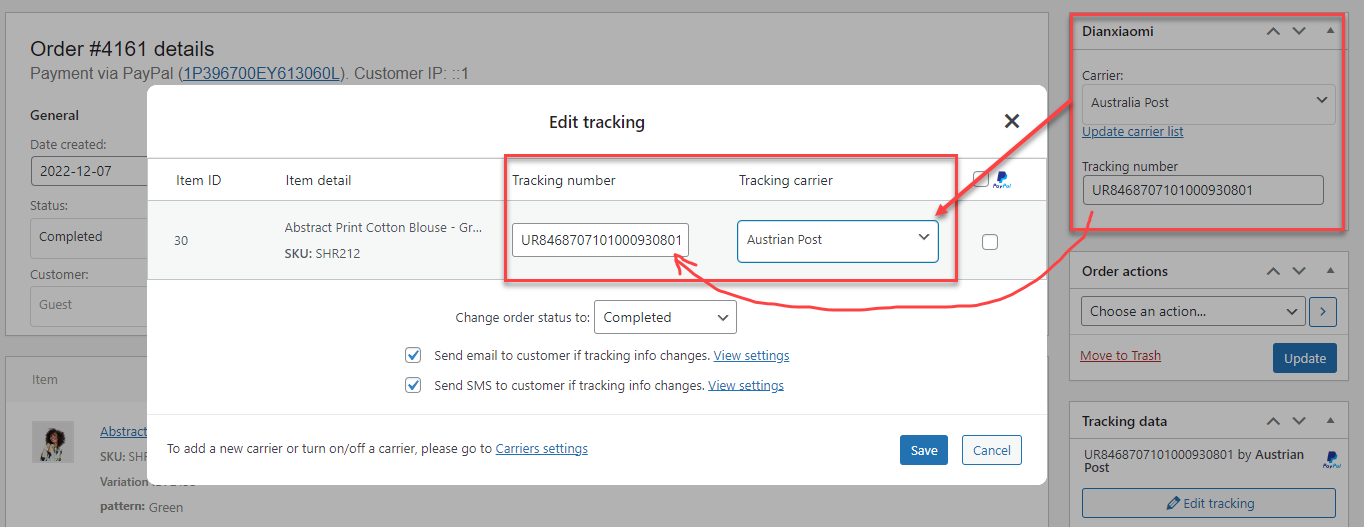
- Dianxiaomi
- DEVELOPERS
- Extra Information
Copyright Villatheme 2015-2025
Created: 03/2020
Latest updated: 03/2025 – Updated version: 1.1.16
By: VillaTheme
Thank you for purchasing our plugin. If you have any questions that are beyond the scope of this documentation, please feel free to request support at our Support Forum. Thanks so much!
Make sure that those limits to a minimum as follows in order for free-trouble while installing:
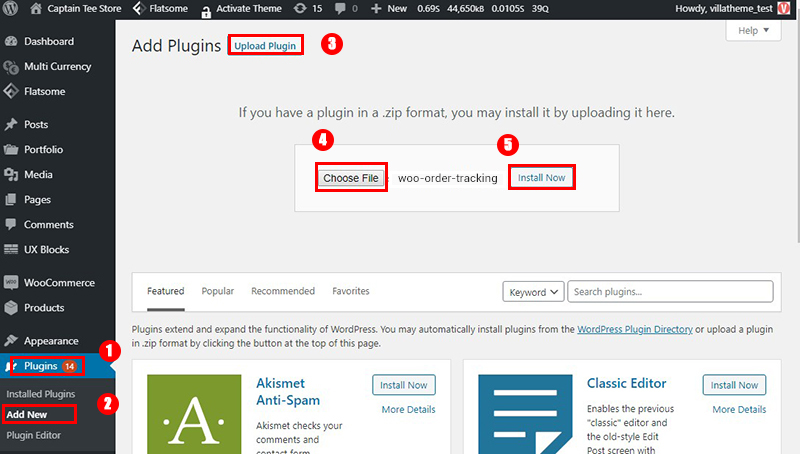
Go to Plugin/Add New/Upload Plugin/Choose file/ select plugin zip file woocommerce-order-tracking /click “Install Now“/click “Active plugin“.
Done! Let’s start using the plugin.
Guiding video on how to install and set up:
https://youtu.be/vXfgGyD5mz0
Go to the settings to configure the plugin.
SELECT/ADD SHIPPING CARRIER
Firstly, you will select a shipping carrier as default if you normally stick with one carrier. See this instruction for how to select a Shipping carrier and add a custom Shipping carrier.

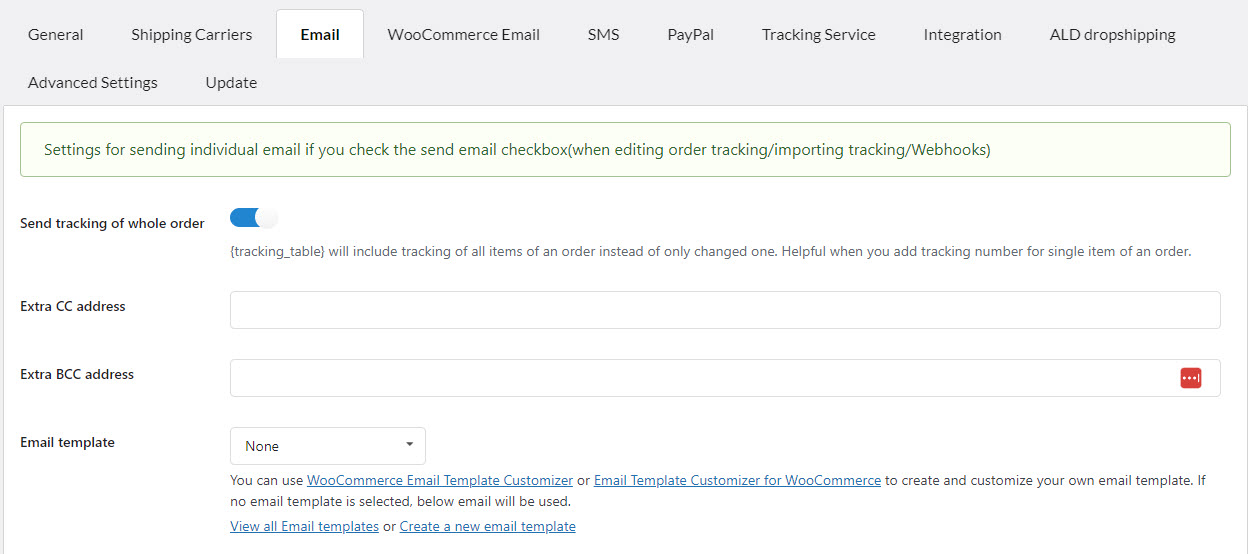
After selecting a shipping carrier, go to the Email tab and manage the settings of the Order Tracking email sent to customers when tracking info is changed. Please regard this part for more details of each option.
WOOCOMMERCE EMAIL
In this tab, you can include the tracking information in WooCommerce emails, select the order status emails, position of the tracking info; and manage the tracking content. Visit this documentation to know it better.

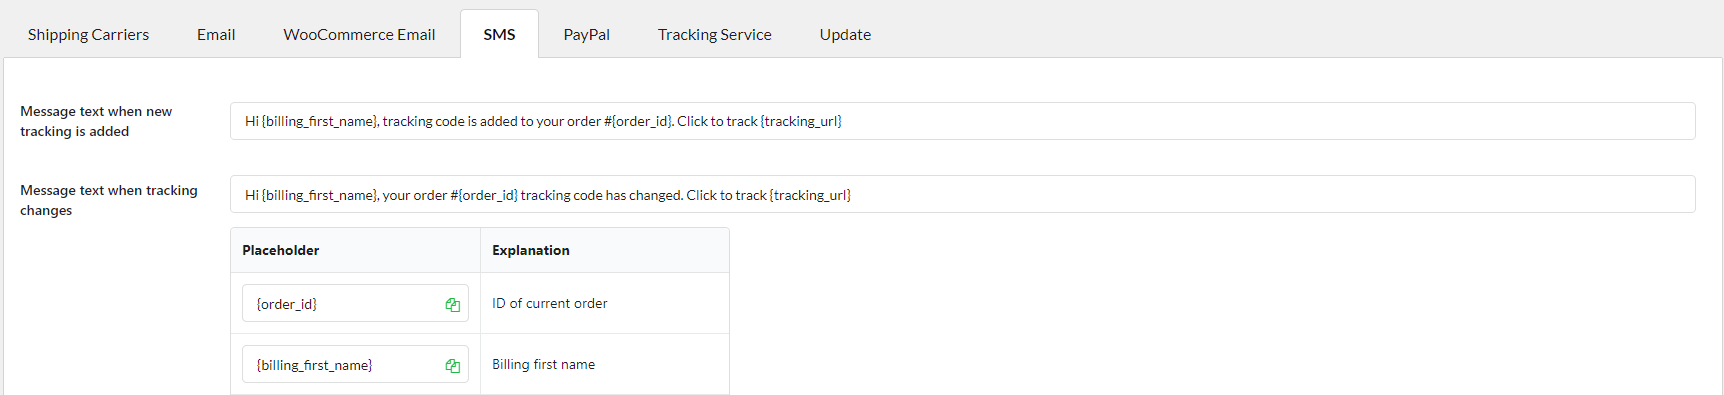
SMS
Configure this tab to enable the SMS tracking information message feature. Follow this guide to configure it successfully.
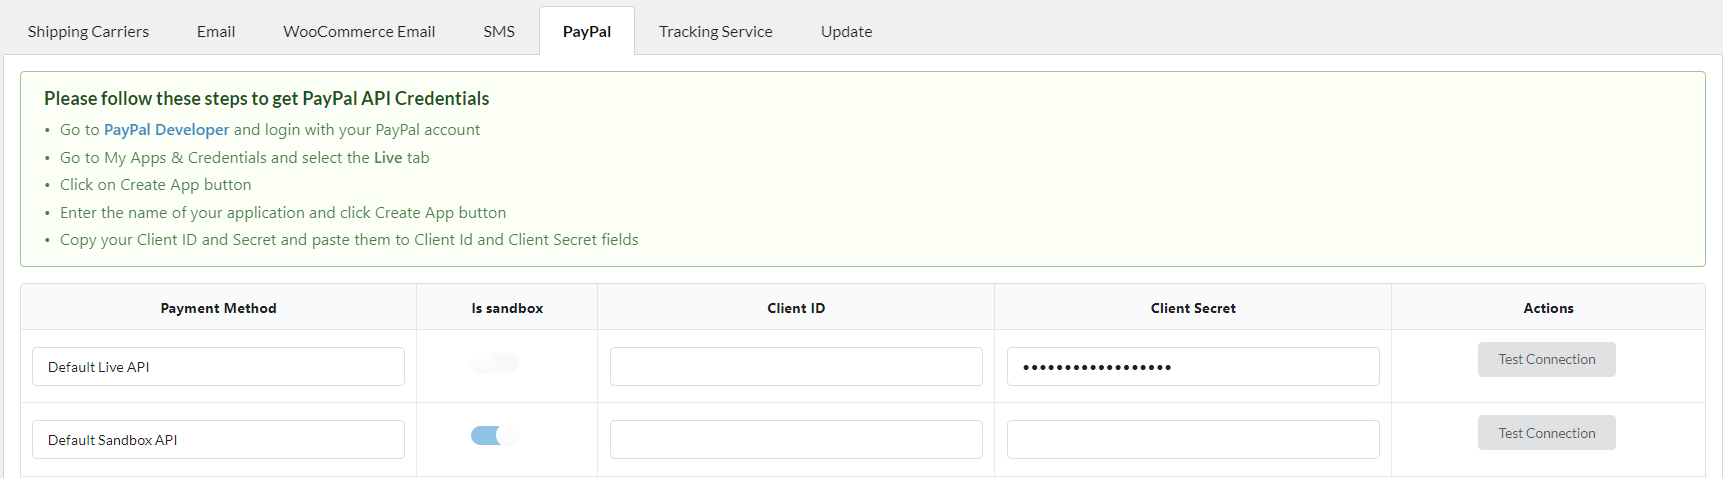
PAYPAL
Then go to the PayPal tab if you want to automatically add tracking numbers to customers’ order summary in their PayPal account. See the instruction and the tutorial video for how to make this function work.
TRACKING SERVICE
Go to the Tracking Service tab to track orders with a 3rd party shipping. You can refer to this part for more information and how to get the API key

Now you are able to add tracking numbers to the orders and your customers can track them on the carrier website.
In the General tab, you can manage the tracking number at the item level in each order (by Items only) or by Order only. This feature is beneficial if you do AliExpress dropshipping, please DO NOT choose “Order only” as each item of an AliExpress order can have its own tracking number. If our dropshipping plugin(ALD) is active, it will override this feature to make the tracking number field available for every item of an order.
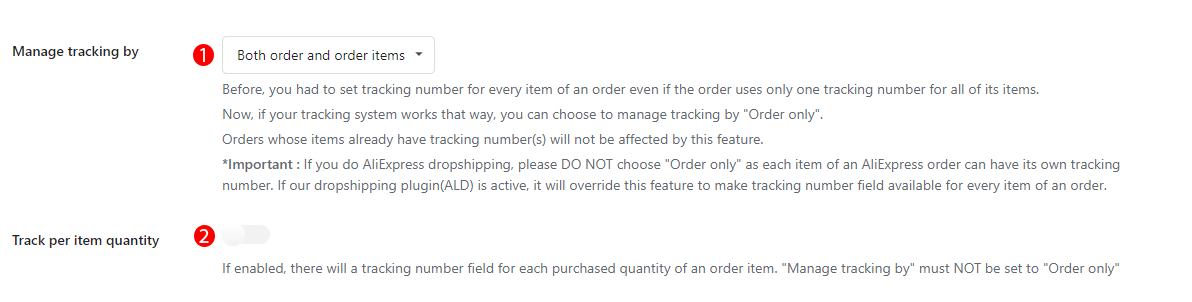
1. Manage tracking by:
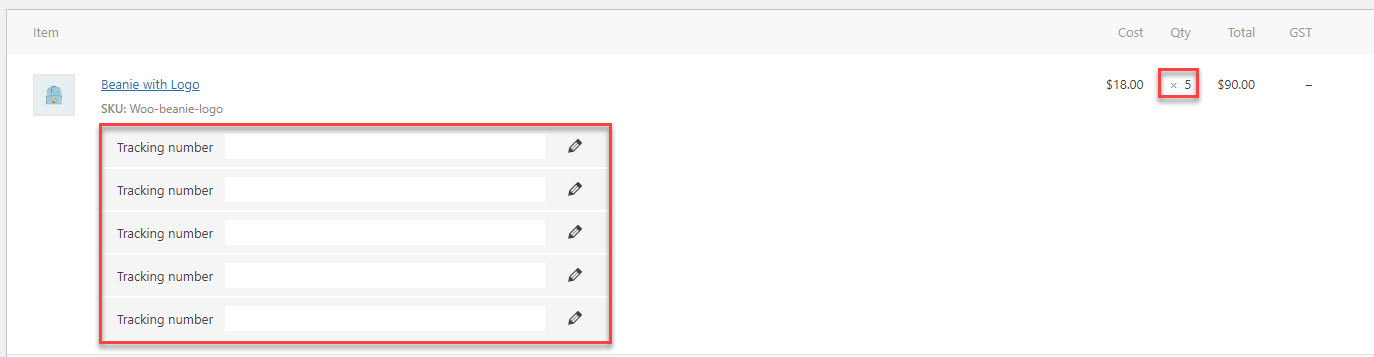
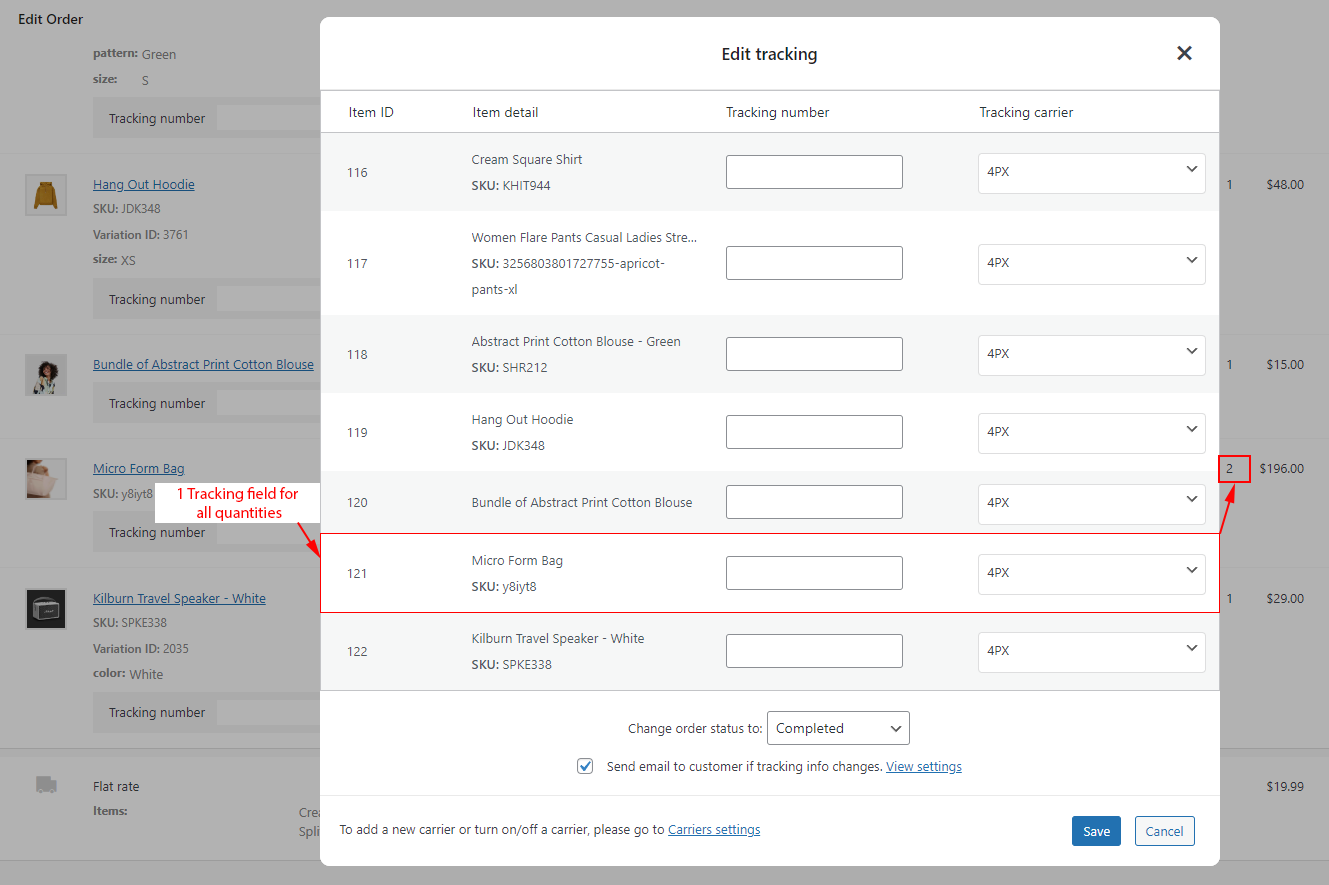
2. Multi track per item: If enabled, a tracking number field will appear for each purchased quantity of an order item. “Order only” must NOT be selected under “Manage tracking by.”


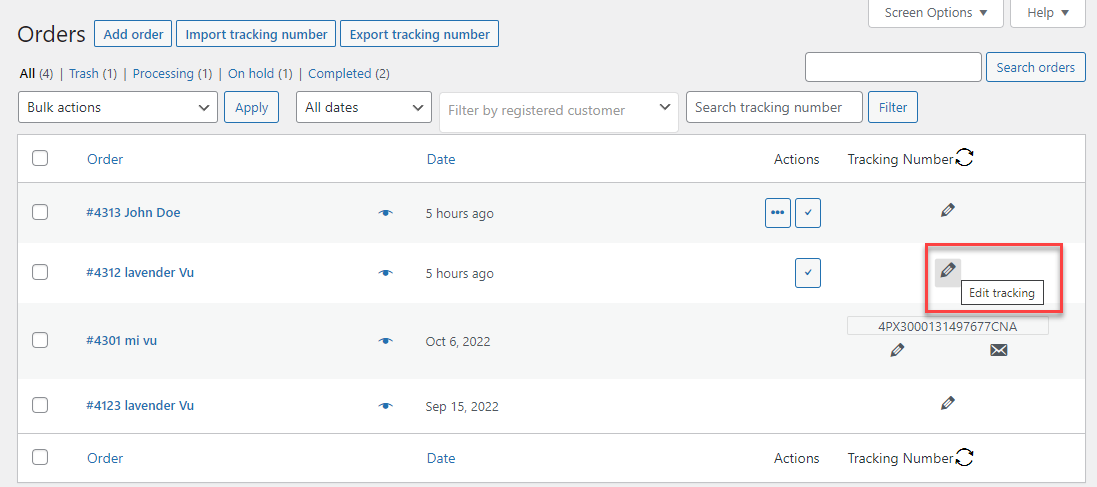
* Note: You can manage (add/edit) order tracking information on the Admin Orders List page.
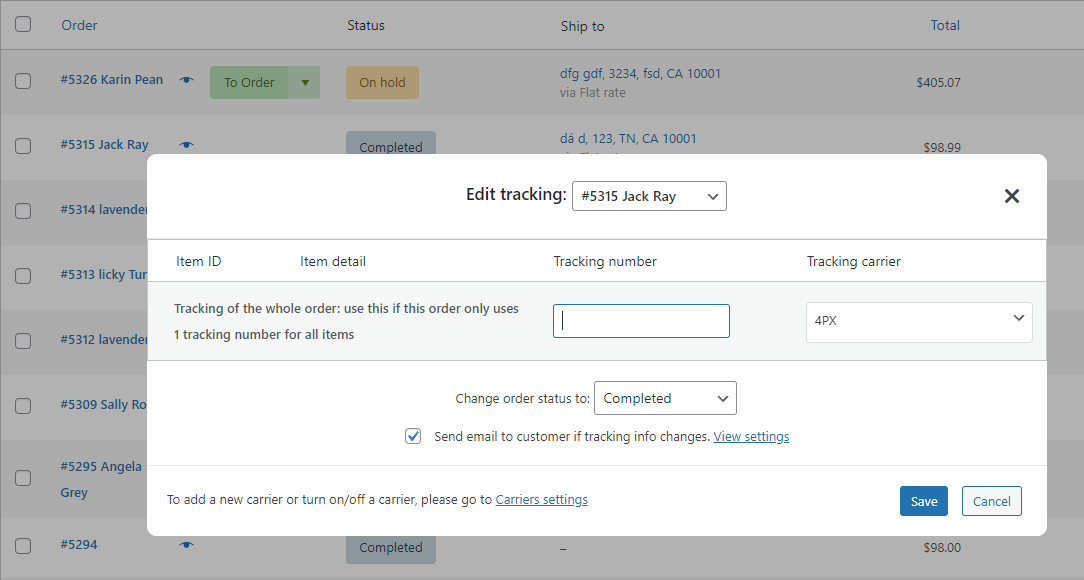
Add tracking info for the whole order:
Add tracking info to each item in the order:

You can quickly switch among orders to add, edit order tracking info in the order list page, which saves time because you don’t need to get out the popup and click to other editing tracking icons on the order list page or go to each order editing page to manage the order tracking.
![]()
A. Order only – Each order can only have 1 tracking number at a time
B. Each order item has its own tracking number:

Shipping Carriers are individuals or businesses that transport goods or people on behalf of another individual or business and are liable for any loss of the goods during transport. Each shipping carrier formed in the plugin has 4 information: Carrier Name, Display Name, Shipping Country, and Tracking ULR of the carrier.
In the Shipping Carriers tab, you can select available shipping carriers or customize the shipping carriers that you use on your site. The plugin will generate tracking links to the tracking page of the carriers.
There are over 90 shipping companies integrated into our plugin that you can quickly choose and assign for your orders.
Go to Orders Tracking > Shipping Carriers
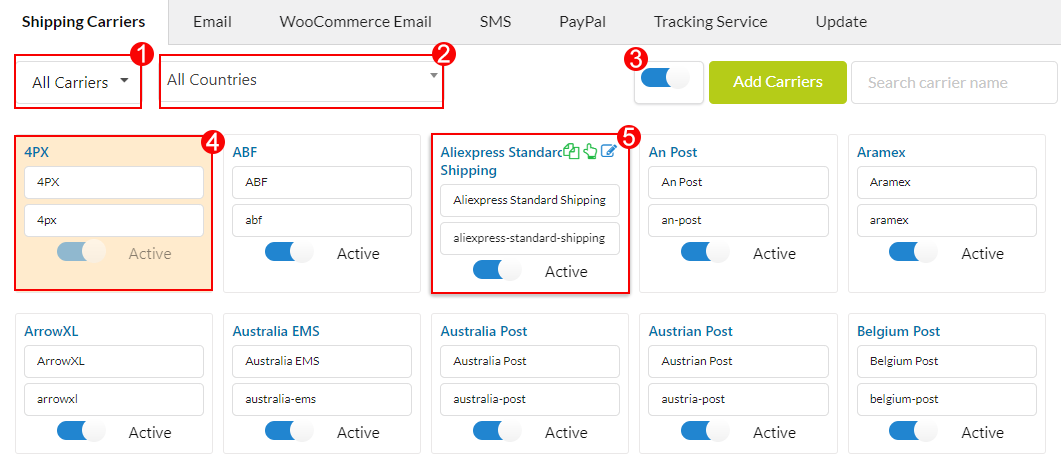

Note: Pre-integrated shipping carrier information is defined with carrier name, shipping country and carrier url. You can just change the display name which you want to mask with another custom name when showing them to the customer.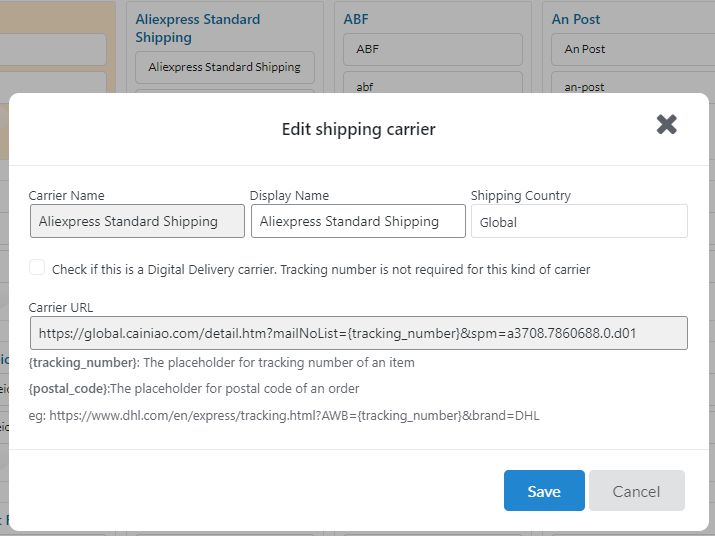
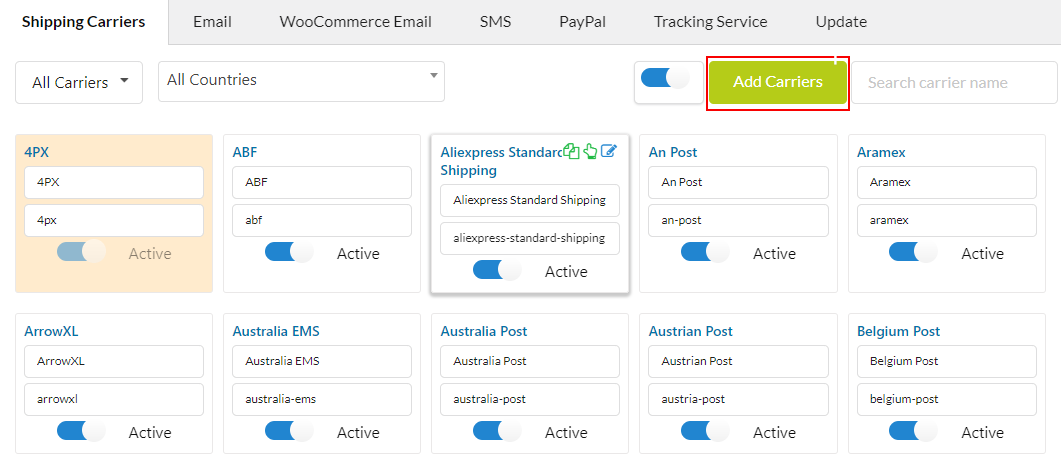
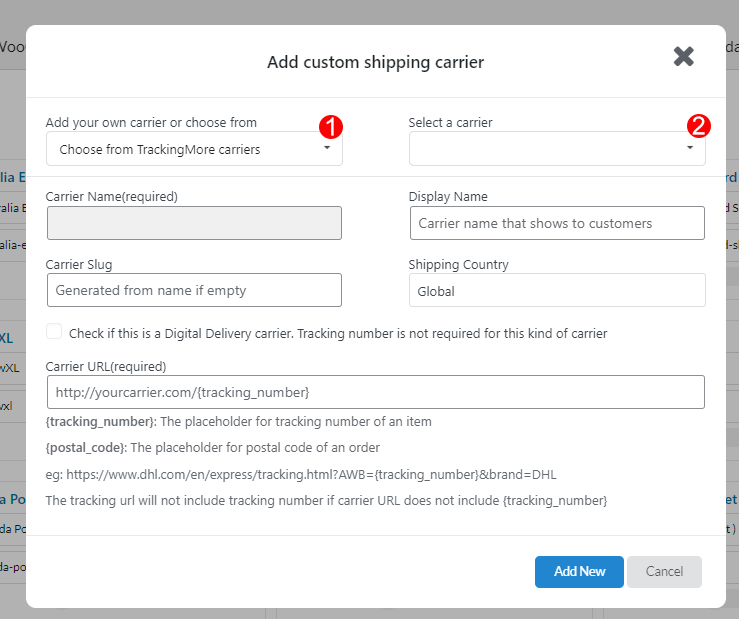
If you want to add more shipping carriers which have not been available in the shipping carrier list, you can do this by clicking Add carriers
a. You can add your own carrier:
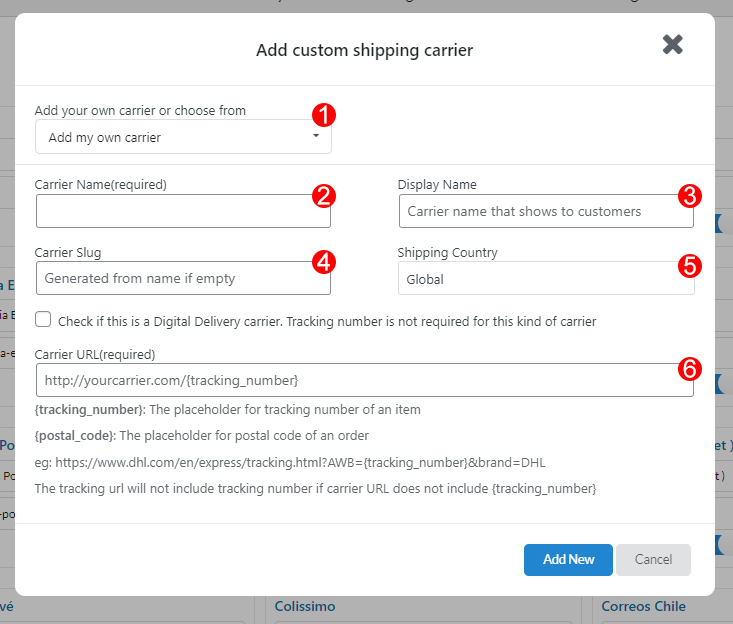
Please watch this video to find out how to add a custom shipping carrier.
Note: When you add a custom carrier, if you’re using a tracking service that needs a valid API in the Tracking Service tab (EasyPost, AfterShip, Tracking More), the Carrier Name of the custom shipping carrier must be the same as its name in the supported shipping carrier list of that tracking service.
You can find the name of the supported shipping carrier with the links below:
b. You can choose the carrier supported by a tracking service

When a tracking number is added to an order and whenever the tracking information of the order changes, the plugin will send the confirmation email to the customers
1. Enable/disable sending order tracking emails
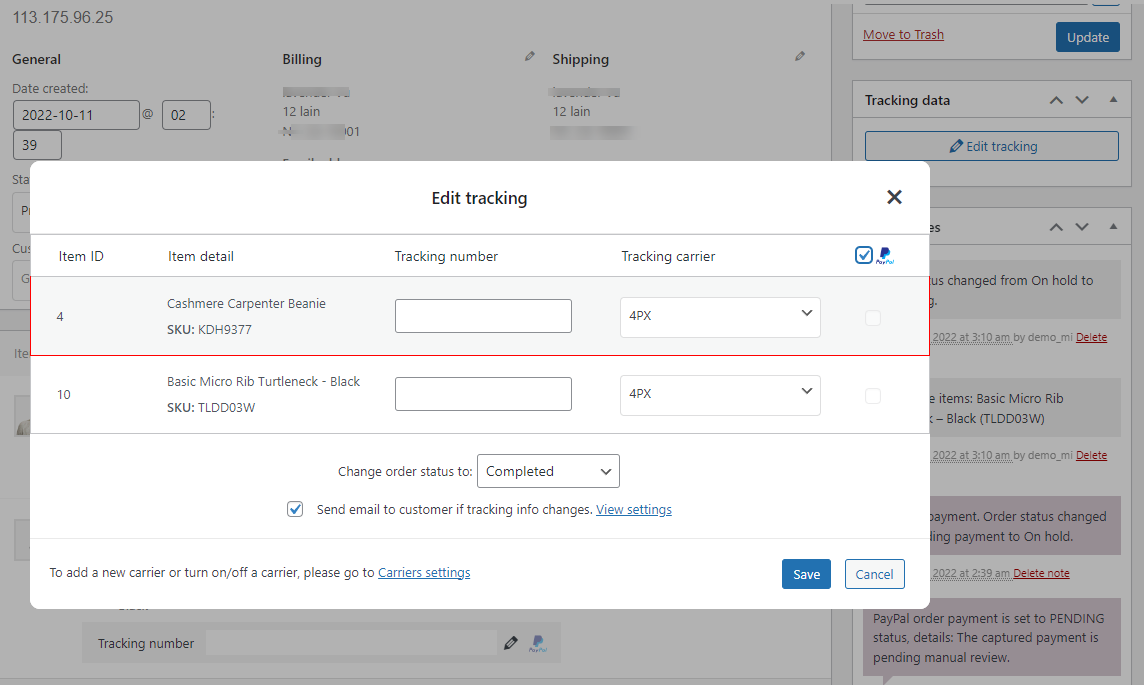
a. To enable sending this email, go to WooCommerce > Orders > Edit tracking > Tick on “Send email to customer if tracking info changes” and save
Once this option is ticked, order-tracking emails will be sent for every order whenever a tracking number is added to the orders.
b. To disable this email, simply untick “Send email to customer if tracking info changes”
2. Tracking emails:
a. Settings
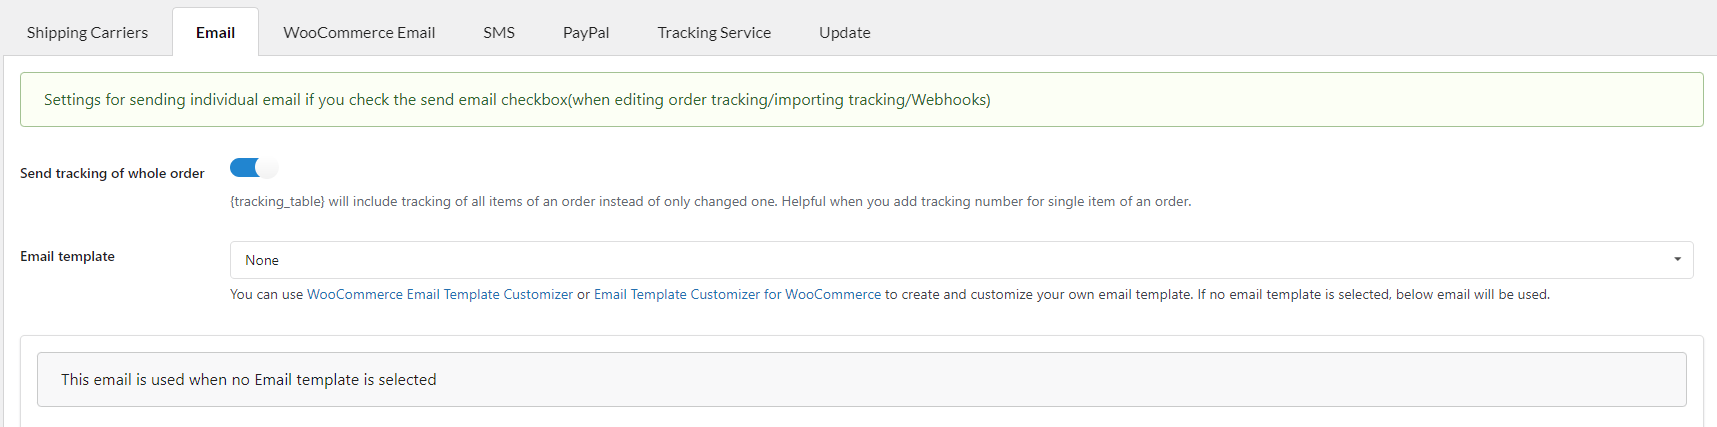
2. Default order tracking email template
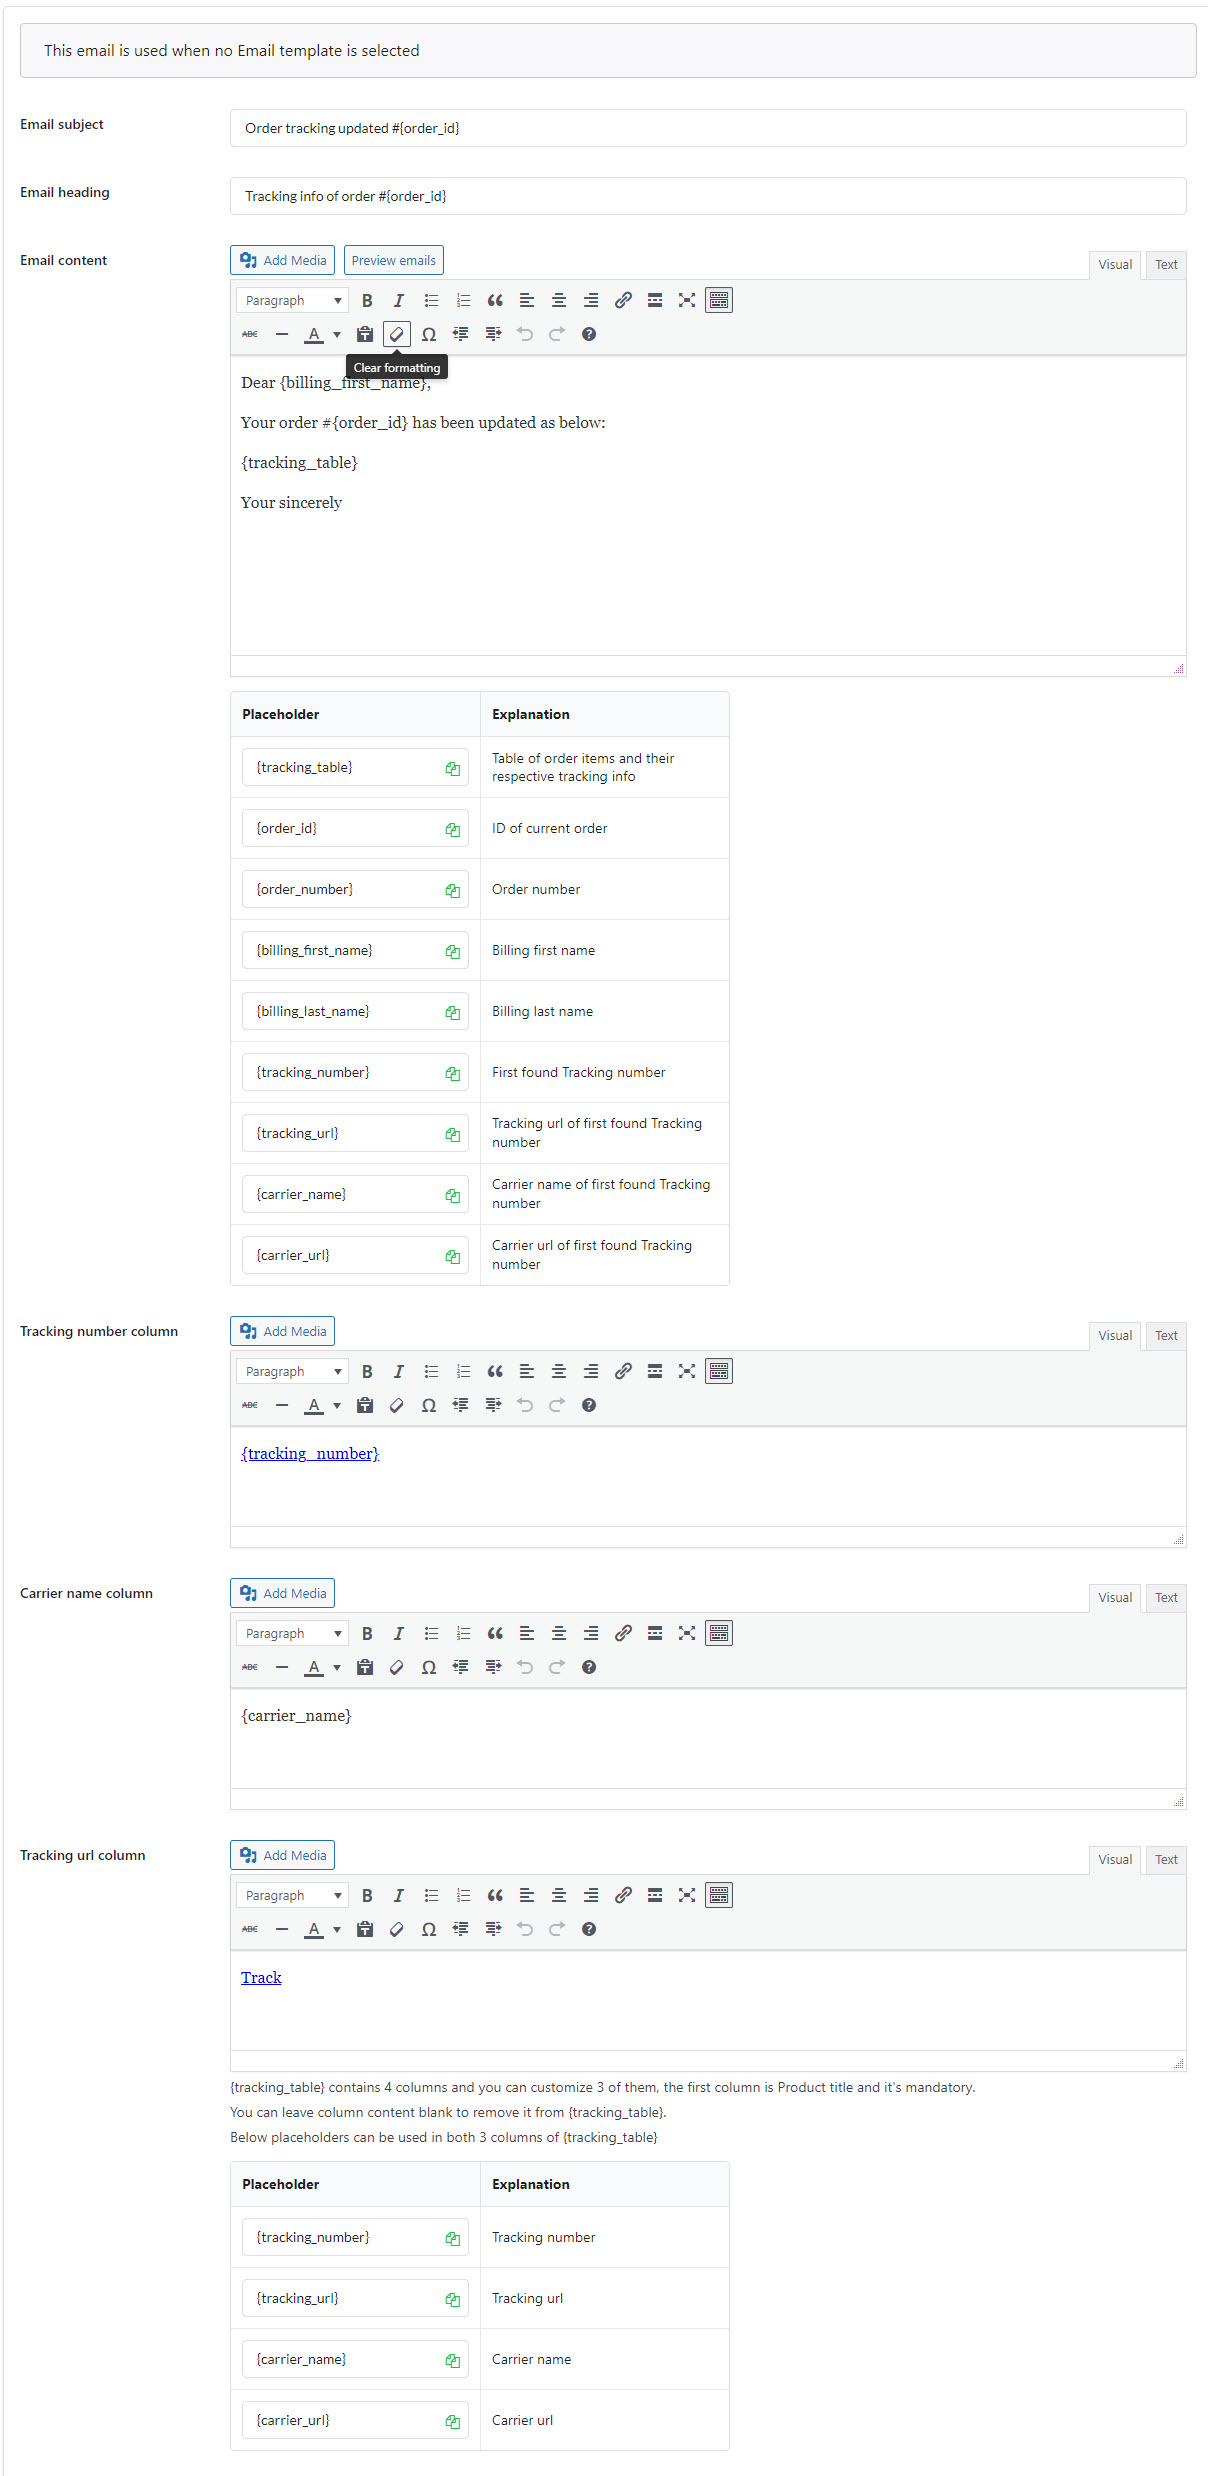
Let’s see the video guide on how to add Custom tracking link in the order tracking emails.
3. The setting for sending emails when importing tracking numbers

WooCommerce Email settings allow you to include tracking information in the WooCommerce emails, select the order status emails you want to include tracking info.
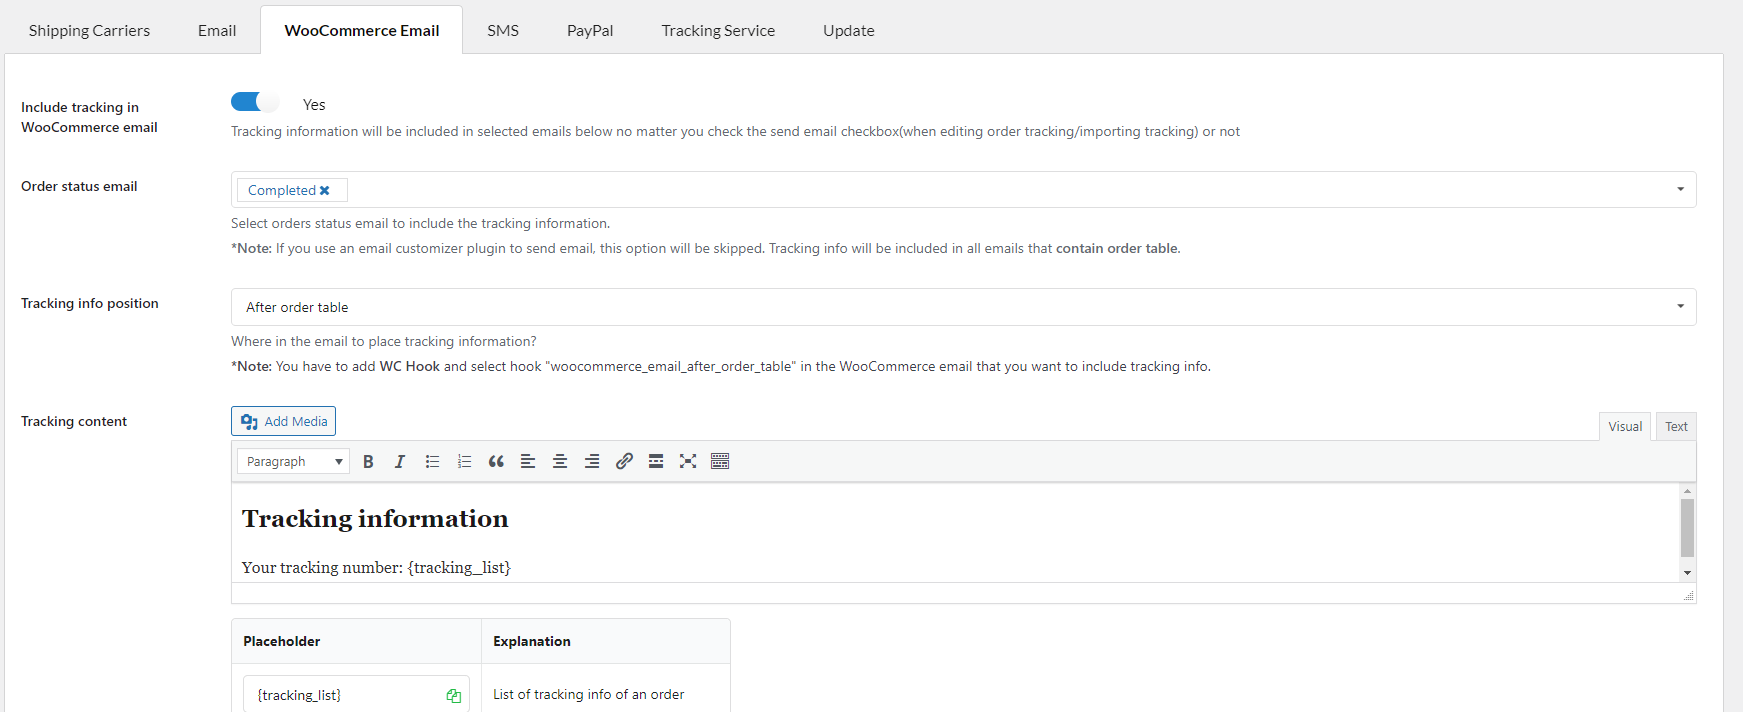
1. Include tracking in WooCommerce email: Enable this option to include tracking information in the WooCommerce emails
2. Order status email: Select orders status to include the tracking information.
3. Tracking info position: Choose a position to place the tracking information. With a particular position for the tracking information you choose, you need to add the WC Hook to the email template assigned, and select the corresponding position for the hook.
For example; if you select ‘Before order table’ for the ‘Tracking info position’ option, then in the email you want to attach the tracking info, there must be WC Hook with the position ‘Before order table’
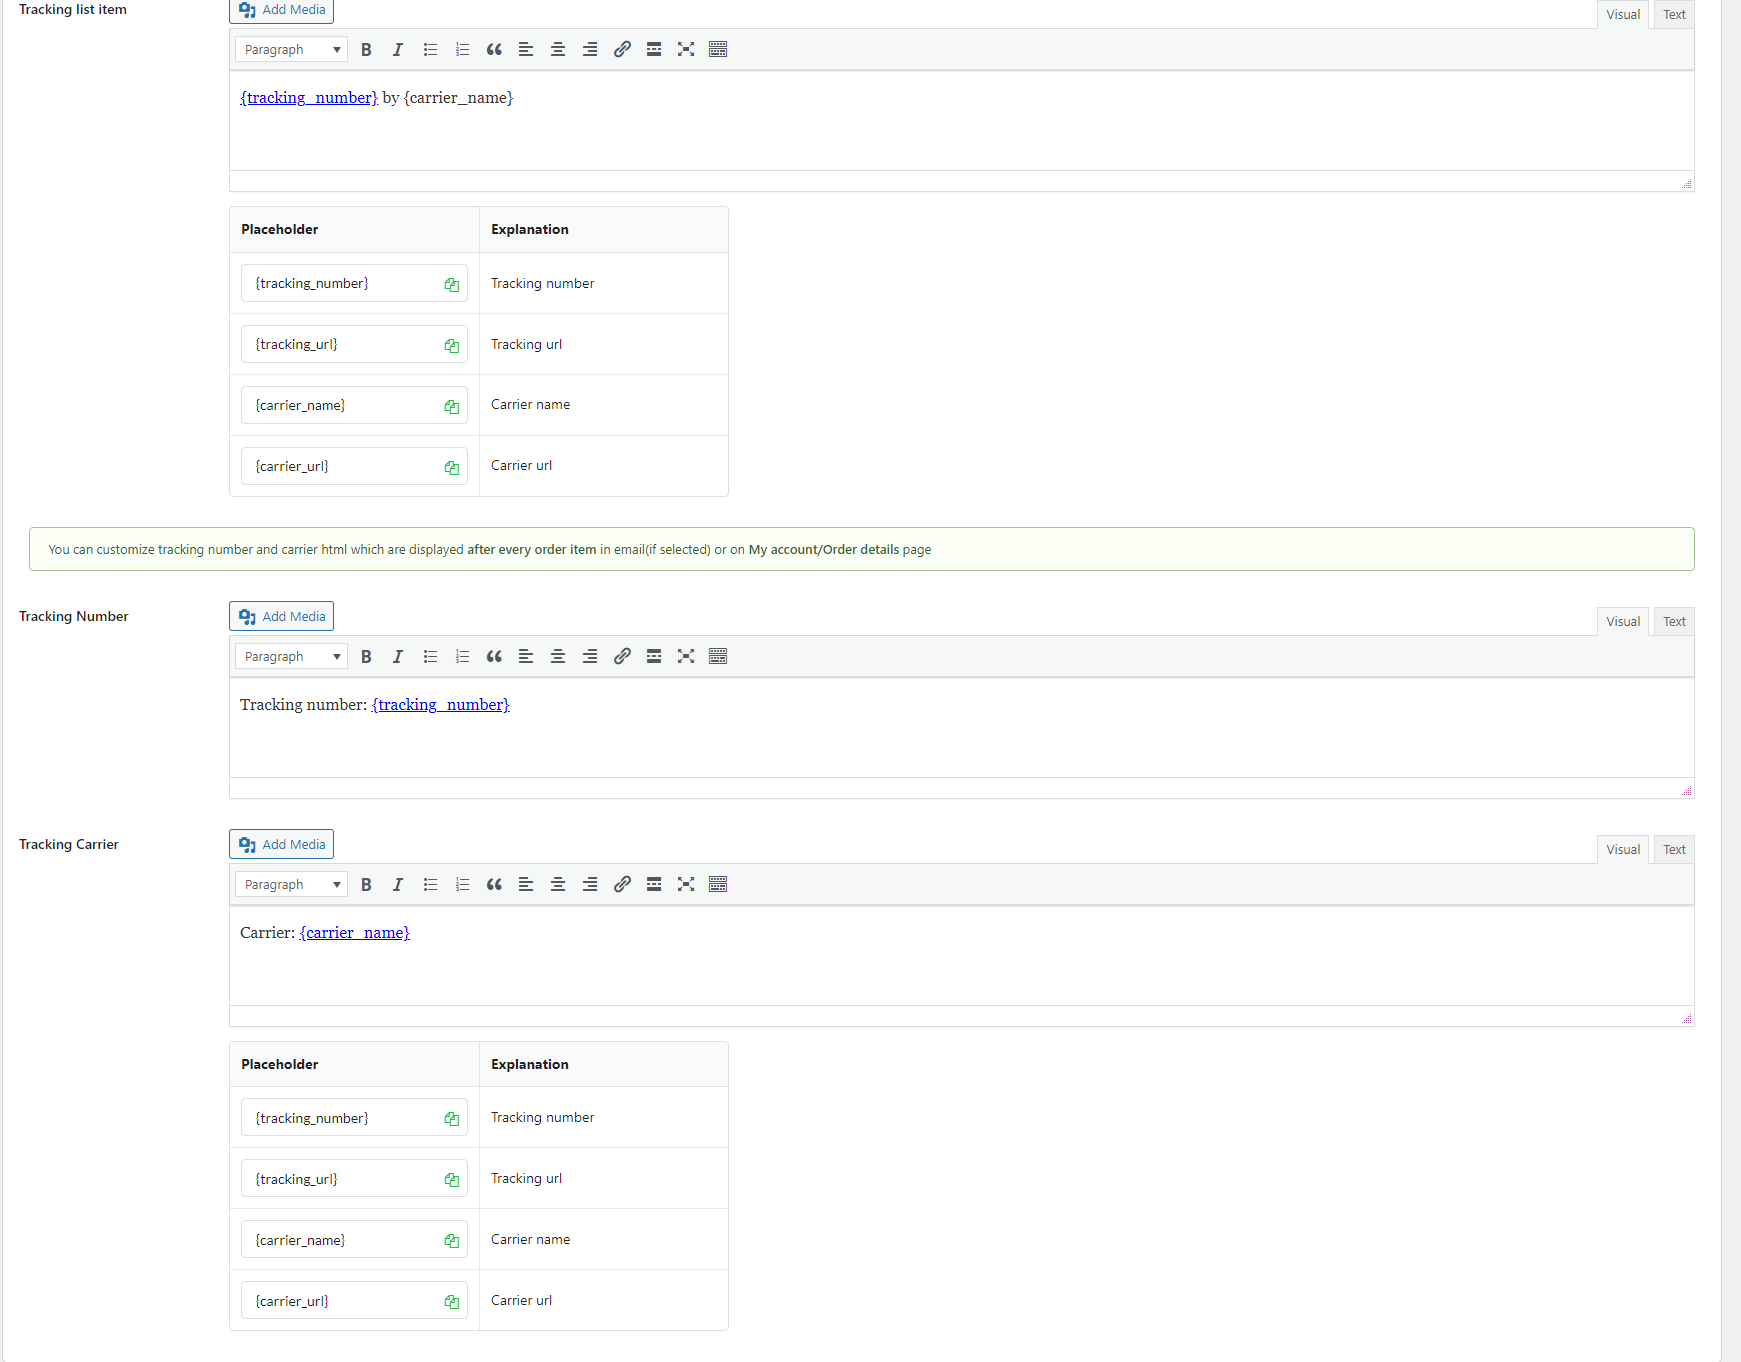
4. Tracking content, Tracking list item, Tracking Number, Tracking Carrier: The tracking information includes these elements. Manage how the tracking information is shown in WooComemrce emails with each element.
The SMS function allows you to inform your customers by SMS when the orders tracking information changes.
This function works with 3 providers: Twilio, Nexmo, and Plivo.

With each provider, configure its required sections with corresponding information.
* SMS Provider: There are 3 SMS Provider options for you to choose including Twilio, Nexmo, and Plivo. Here are the guidelines:
4. Send test SMS
After configuring a SMS provider, you can send SMS test to check the connection.
5. Send SMS when syncing Aliexpress orders: This option will appear only when you activate the ALD – Aliexpress Dropshipping and Fulfillment for WooCommerce plugin. SMS will be sent to the customers once their Aliexpress orders are updated tracking number when this option is enabled.
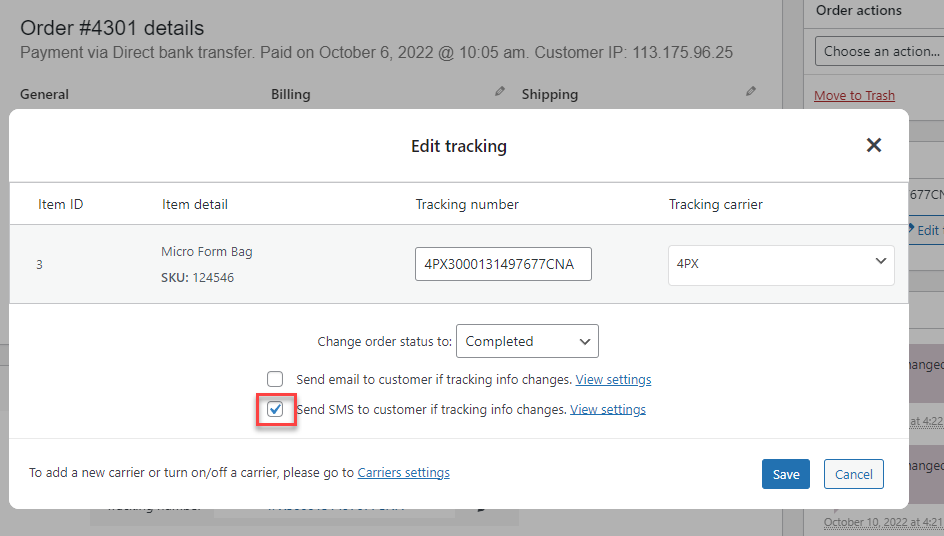
* To send SMS, go to WooCommerce/Orders/ edit order/ edit tracking order, change the tracking information, enable the send SMS to customer if tracking info changes option.
The PayPal option helps you to automatically add tracking numbers to the PayPal transactions. This option requires the Client ID and Client Secret.
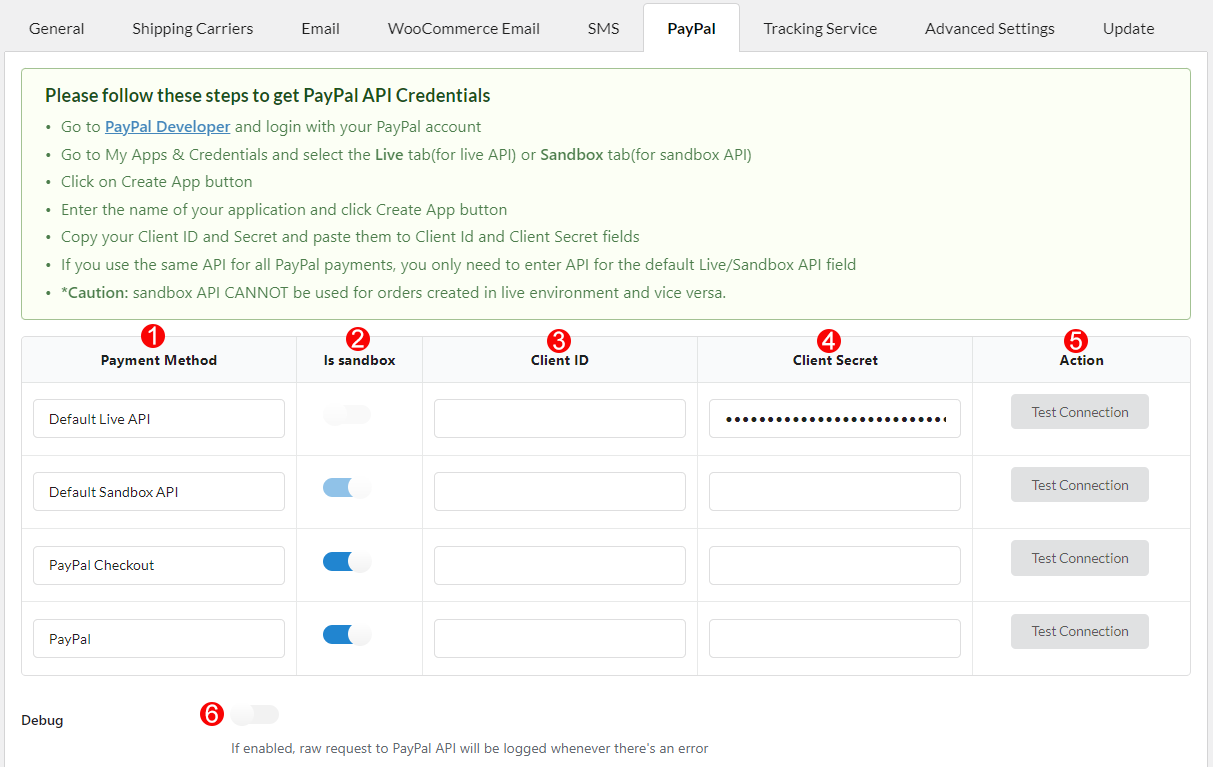
Note: In case you’re using different PayPal plugins, which creates different PayPal payment methods, you just need to fill in the Client ID and Client Secret of Default Live API and/or Default Sandbox API, and the other payment methods will use these APIs to work, depends on which mode you’re using. In case you don’t want to use the mutual APIs, please fill each payment method with their own Client ID and Client Secret to make it work
How to add orders tracking information on PayPal transaction, testing with a sandbox account:
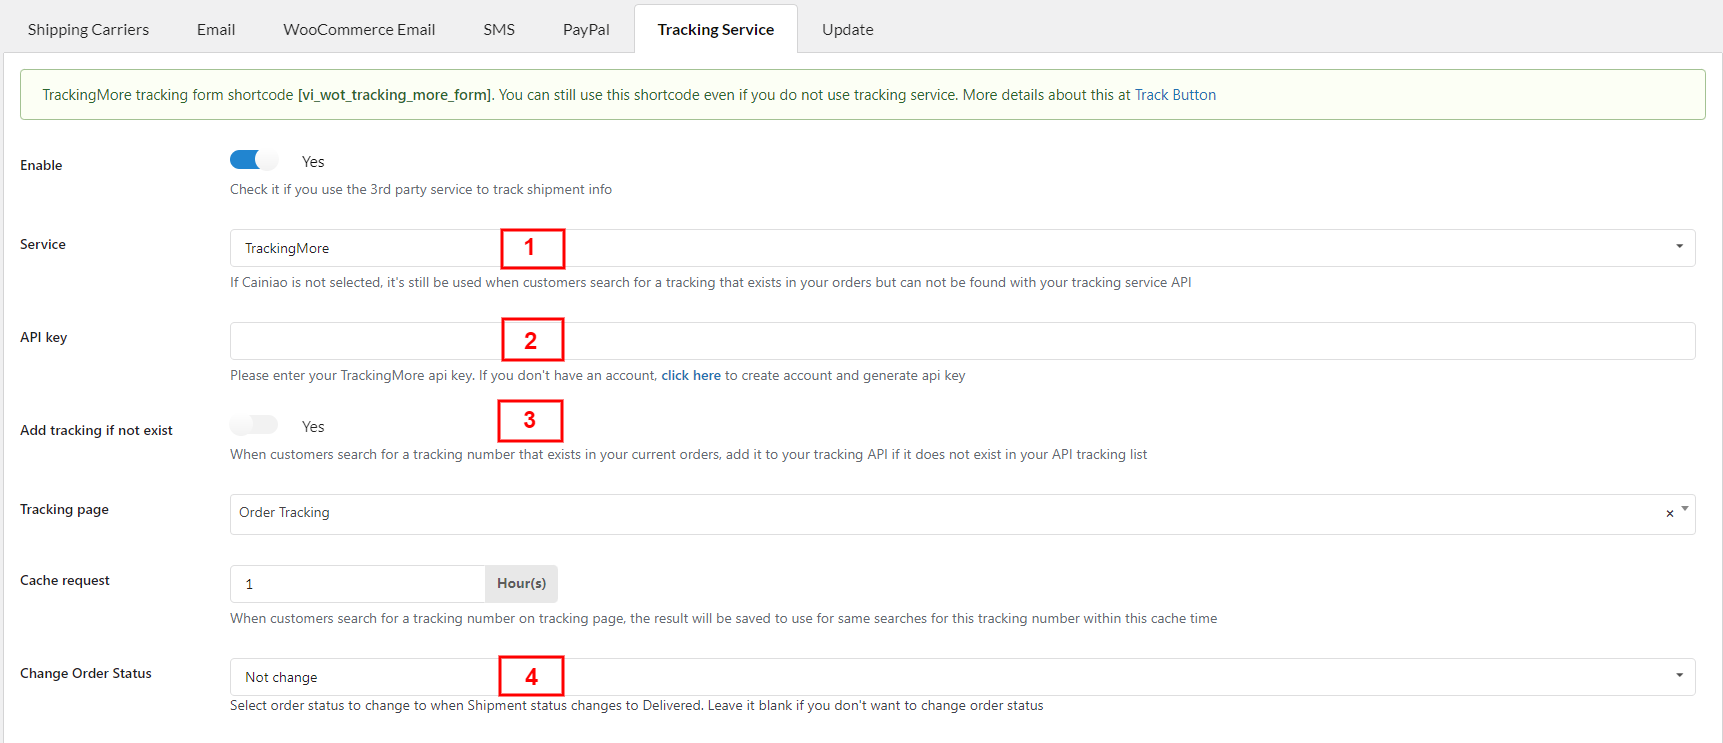
You can use the Tracking Service instead of using shipping carriers. This option allows you through a 3rd party to track shipping information by API key.
Note: The tracking service is offered by a 3rd party, integrating in our plugin using API, and it may require a fee to use their services. Please visit the tracking service webpage to find out more information about their plans.
| Tracking Services | URL |
|---|---|
| TrackingMore | Price information |
| EasyPost | Price information |
| Tracktry | Price information |
| 17Track | Price information |
| Aftership | Price information |
![]()
Other than Cainiao, you need to fill the API key generated in your corresponding tracking service account, select some more options to complete the configuration, so you can connect to the other 5 tracking services successfully.
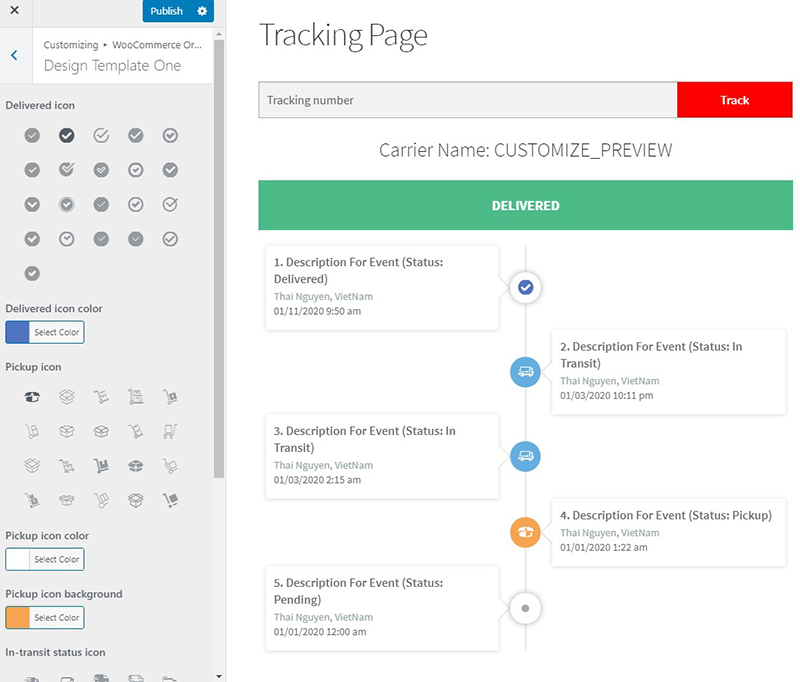
When you click on customize your tracking page, you can design the tracking page as you want.
![]()
1. Sort events: You can order the events into 2 types: Most recent to oldest and oldest to most recent.
2. Date format: Select the date format.
3. Time format: Select the time format.
4. Translate datetime: Datetime displays by default in English. It will be translated to your site’s locale if you check this option.
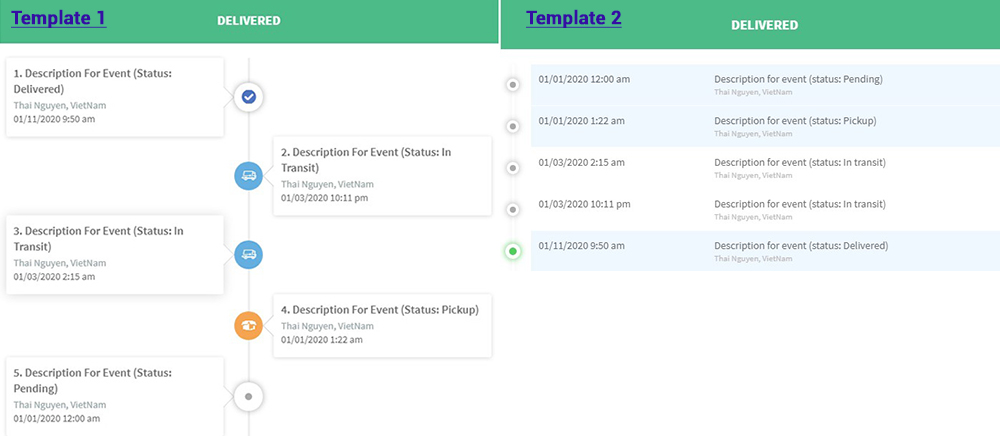
5. Timeline template: There are 2 templates.
6. Title: Add the title.
7. Title text alignment: This can be left, right, center.
You can also customize text, background color, the font size in the general tab.

![]()
From version 1.0.7 of the WooCommerce Orders Tracking plugin, we integrated a new feature: “Translate timeline”, which allows translating the orders tracking timeline on the Tracking page using Google Cloud Translation API.
![]()
See this video for how to get an API key to add in the plugin and use the Translate timeline feature of the WooCommerce Orders Tracking plugin.
Enable/Select/Add the correct information to each field to configure this function. See the instruction below for how to connect to each tracking service.
e1. Default tracking info
![]()
1. Show default tracking info: Show below track info in the tracking timeline if a real tracking number does not have any information from the tracking service.
2. Default carrier name: The carrier which will show for the default track info
3. Show if order status: Display milestones (since order created); shipment status and shipment tracking description with respectively selected WooCommerce order statuses.
4. Time (since order created): Create milestones since order created to delivered.
5. Status: Describe shipment status with a respective milestone: Pending; In transit or Pickup.
6. Description: Describe the shipment status.
7. Delete tracking info.
8. Duplicate tracking info.
e2. Default tracking number
![]()
1. Default tracking number: If an order does not have a tracking number, the default tracking number will be displayed on the Order received page, My account/orders, and in emails that you configủe on the WooCommerce Email tab. When a customer uses a “default tracking number” to track, the default track info will be used.
2. Content: Message including default tracking number which will be displayed on Order received page or WooCommerce email.
3. Position: Position of the default tracking number message on the Order received page.
Go to Orders Tracking/ Tracking Service/ Google reCAPTCHA for the tracking form.
This setting helps you protect your website from spam and abuse.

In the Advanced Settings, you can manage to allow which one can be able to change settings and use the plugin.
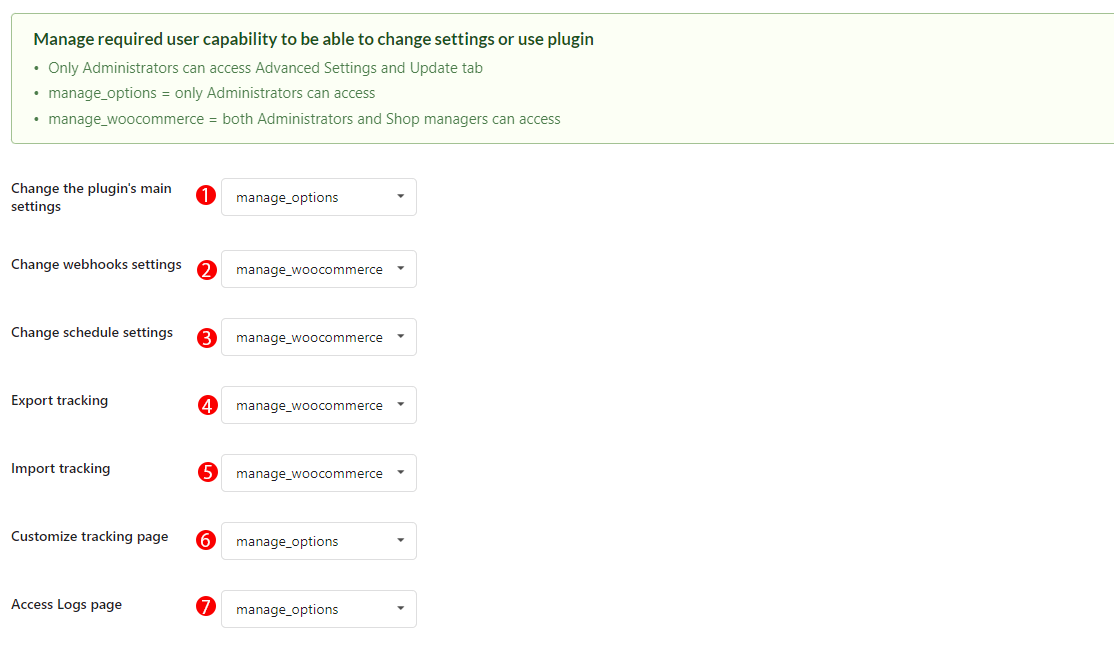
You will select an user role (Administrators or Shop managers) who can manage the plugin:
1. Change the plugin’s main settings.
2. Change webhooks settings.
3. Change schedule settings.
4. Export tracking.
5. Import tracking.
6. Customize tracking page.
7. Access Logs page.
Webhook API allows you to get notifications for when the tracking is updated and it triggers an update of one of your trigger settings.
A webhook is not part of the 17TRACK API. It’s an interface created by you in the form of a URL to receive the tracking status pushed by the 17TRACK Tracking API.
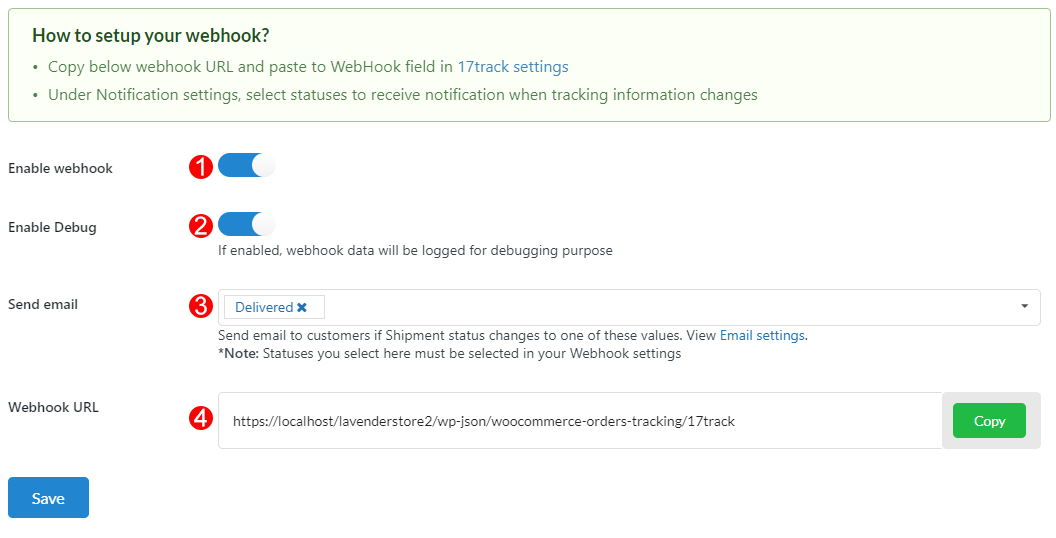
1. Enable webhook: Turn this option on to use this feature of 17Track
2. Enable debug: Data from webhooks will be logged for debugging purposes if enabled.
3. Send Email: Select the statuses that you want to be notified of.
4. Webhook URL: Copy Webhook URL and paste it to Webhook URL field – Webhook settings in your 17Track account.
* Follow the guide below and save all configurations.
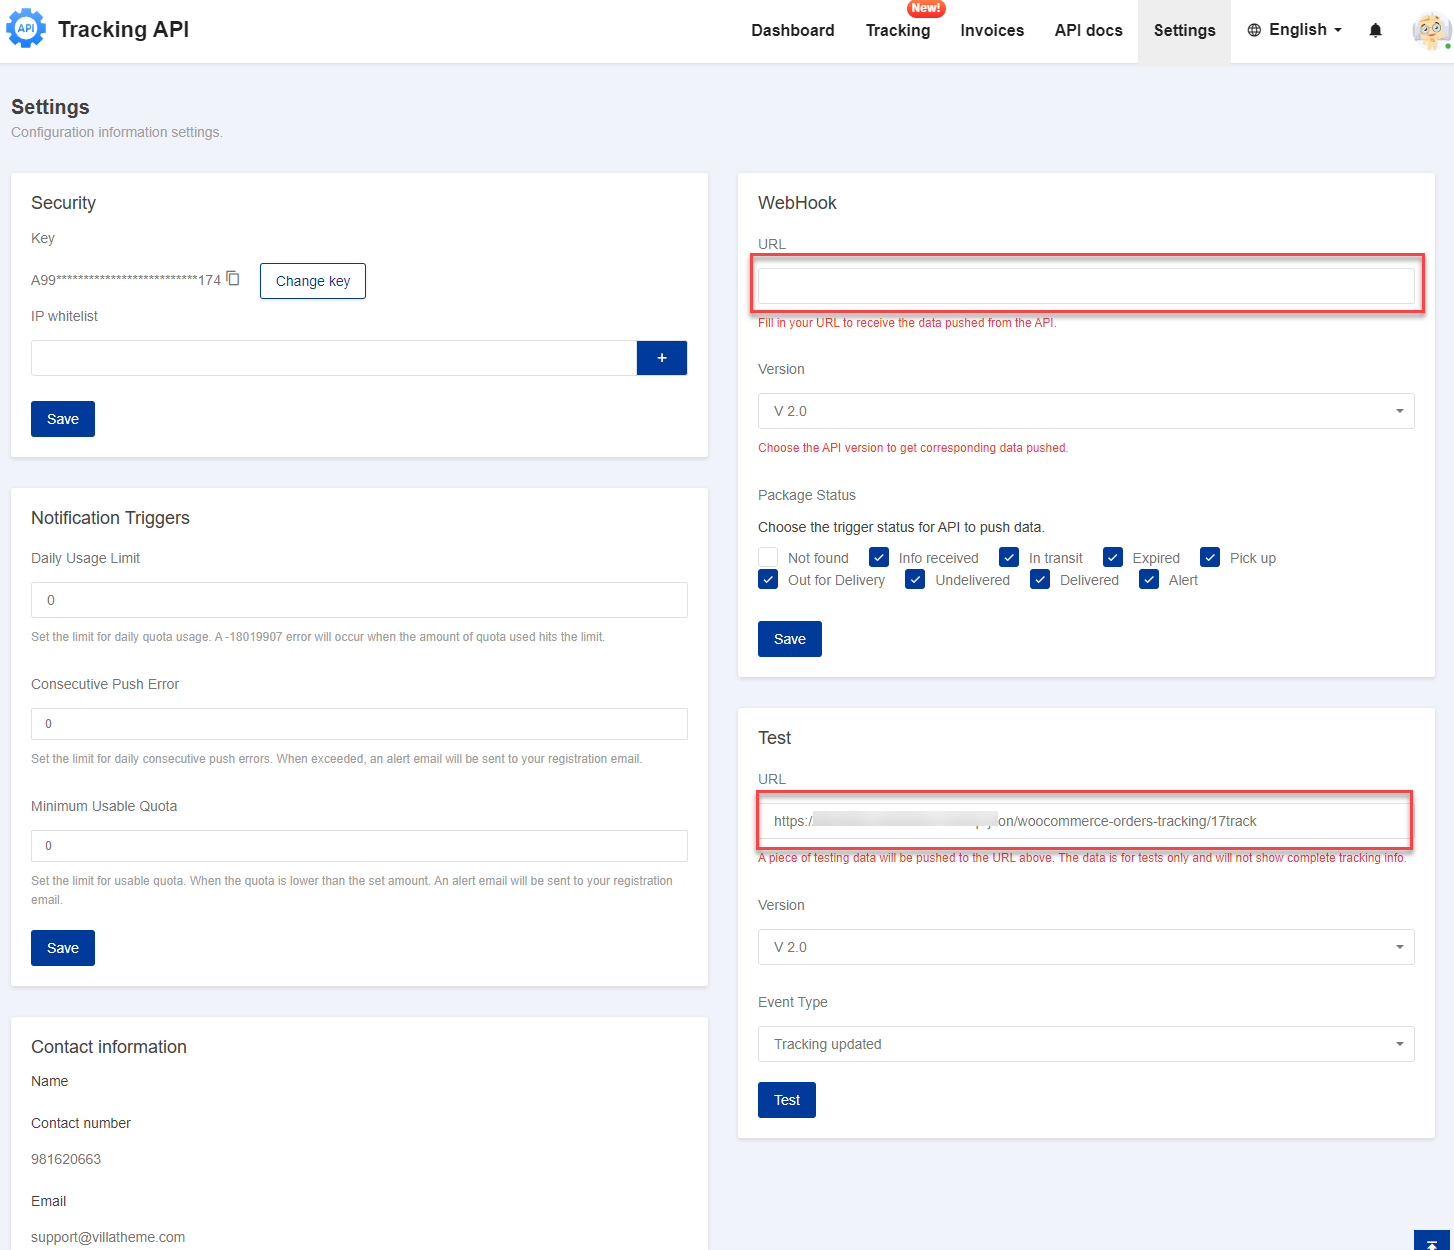
Step 1: Copy the Webhook URL in number (4)
Step 2: Log in to your 17Track account. Go to Settings and paste the URL above as the image below.
Step 3: Choose a version, recommend the lastest V 2.0
Step 4: Under Notification settings, select statuses to receive a notification when tracking information changes.
Step 5 (Optional): Do a quick test and see if it works.
Go to the [WebHook test] section on the left, paste your Webhook URL to the input box and click on the [Test] button. If a notification in green pops up saying “Operation Done”, then it works.
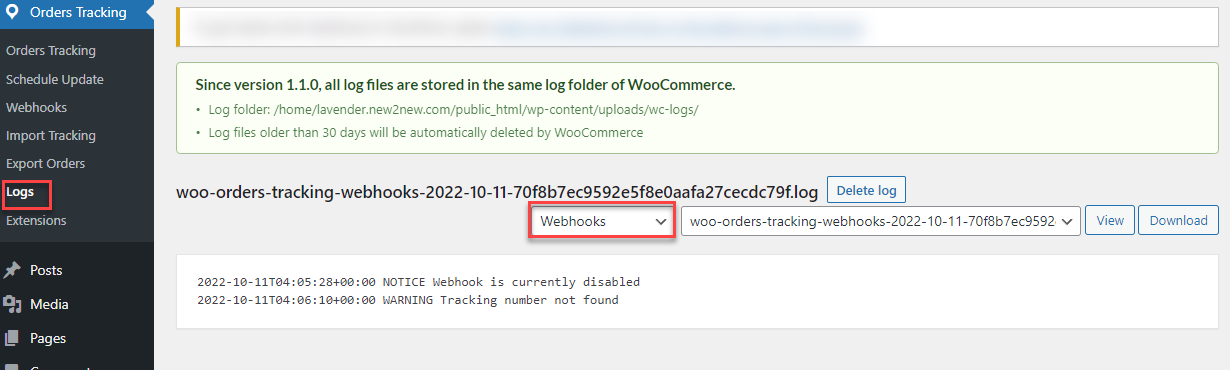
Step 6: Check webhook logs
Go to Orders Tracking > Logs, select Webhooks, date, and view the log.
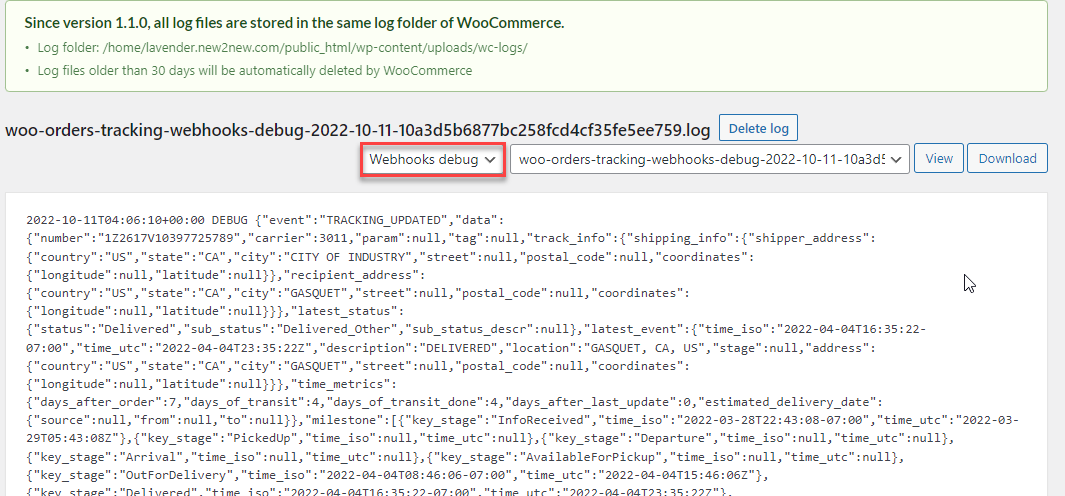
Step 7 (If needed): Check webhook debug. Check the log debug to see if there is a problem.
Go to Orders Tracking > Logs, select Webhook debug, date, and view the log.
When you select TrackingMore as your tracking service, the webhook section will trigger the webhook setting of TrackingMore.
![]()
1. Enable webhook: Turn on to use this feature of TrackingMore
2. Enable debug: Data from webhooks will be logged for debugging purposes if enabled.
3. TrackingMore Email: Enter the address you registered in TrackingMore.
4. Send Email: Select the statuses that you want to be notified of.
*Note: Statuses you select here must be selected in your Webhook settings
5. Webhook URL: Copy Webhook URL and paste it to Webhook URL field of your Webhook Notification Settings.
* Follow the guide below and save all configurations.
Step 1: Go to https://my.trackingmore.com/webhook setting.php
Step 2: Copy Webhook URL in the plugin (4) and paste it to the Webhook URL field of your Webhook Notification Settings

When you select EasyPost as your tracking service, the webhook section will trigger the webhook setting of EasyPost.
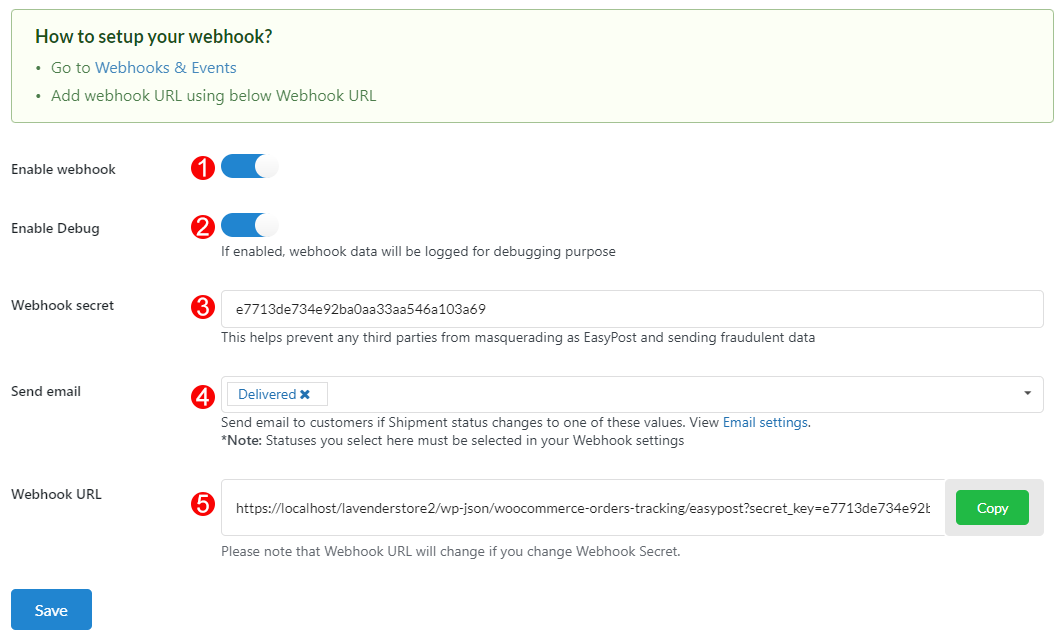
1. Enable webhook: Turn on to use this feature of EasyPost
2. Enable debug: Data from webhooks will be logged for debugging purposes if enabled.
3. Webhook secret: This helps prevent any third parties from masquerading as EasyPost and sending fraudulent data
4. Send email: Select the statuses that you want to be notified of.
5. Webhook URL: Add webhook URL using this Webhook URL
* Follow the guide below:
Step 1: Go to Webhooks & Events
Step 2: Click on the Add Webhook button, copy Webhook URL in the plugin (4) and paste it to the Webhook URL field and create the webhook.

When you select AfterShip as your tracking service, the webhook section will trigger the webhook setting of AfterShip.
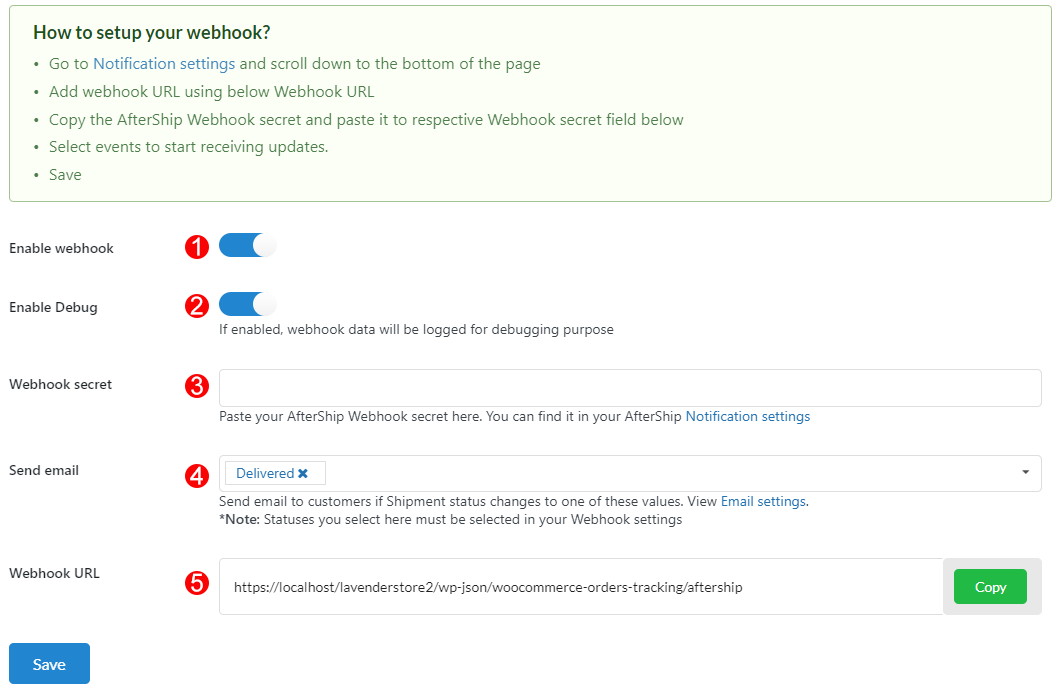
1. Enable webhook: Turn on to use this feature of AfterShip
2. Enable debug: Data from webhooks will be logged for debugging purposes if enabled.
3. Webhook secret: This helps prevent any third parties from masquerading as AfterShip and sending fraudulent data
* You can find the Webhook secret in your AfterShip Notification settings
4. Send email: Select the statuses that you want to be notified of.
5. Webhook URL: Copy Webhook URL and paste it to Webhook URL field
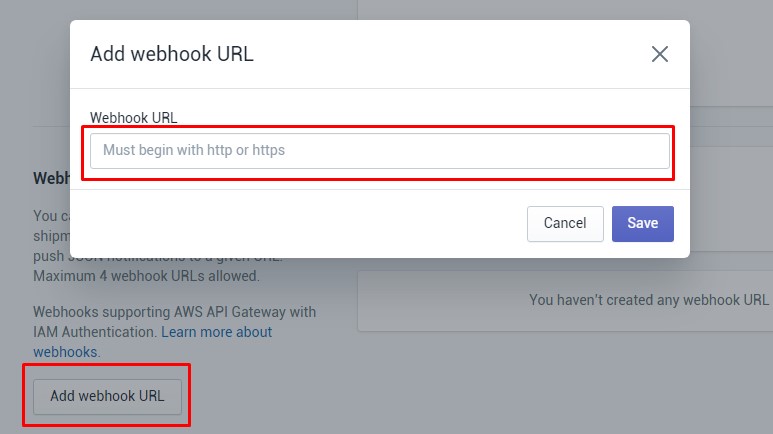
* Follow the guide below:
Step 1: Go to Notification settings and scroll down to the bottom of the page
Step 2: Click on the Add Webhook button, copy Webhook URL in the plugin (4) and paste it to the Webhook URL field and save.
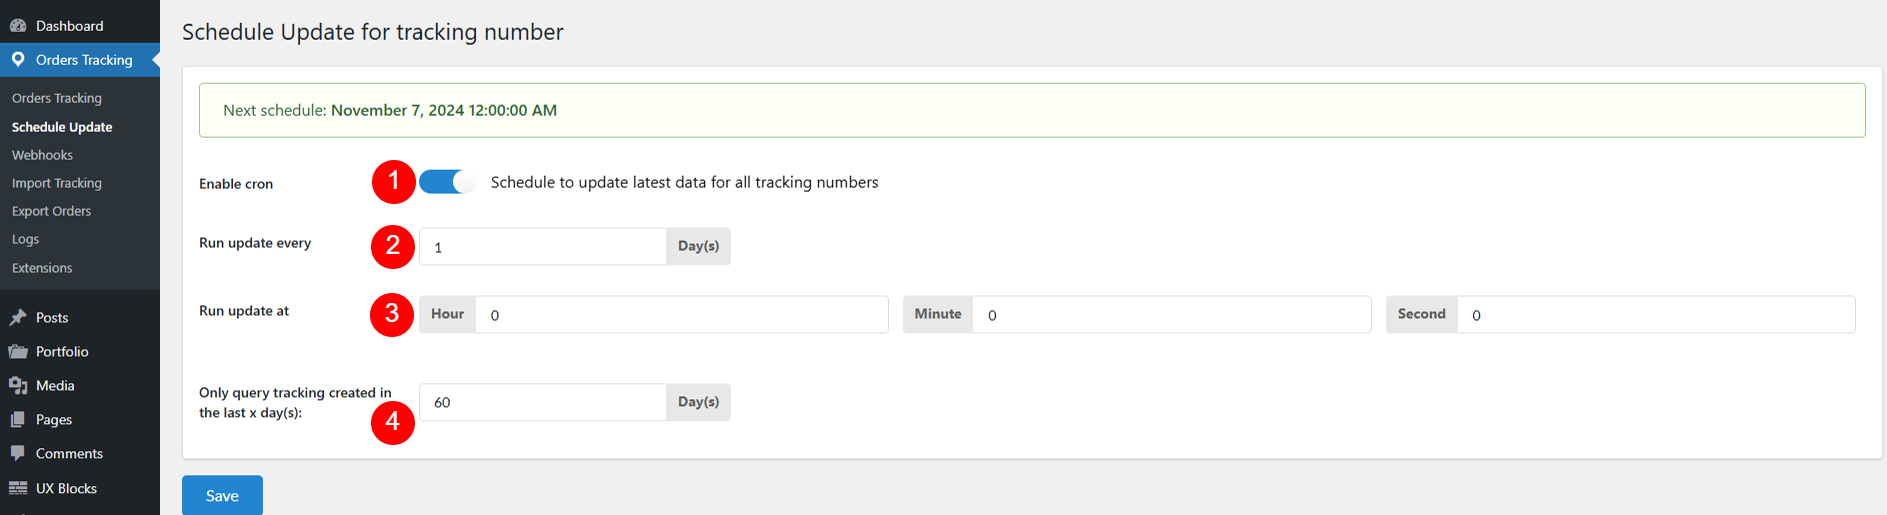
If you use tracking service to track shipping information by API key, you can set to update the latest data of the respective tracking service.
If your Tracking service is “ViTracking” or “Cainiao”, this feature isn’t supported.
Go to the Schedule update section of the plugin setting:
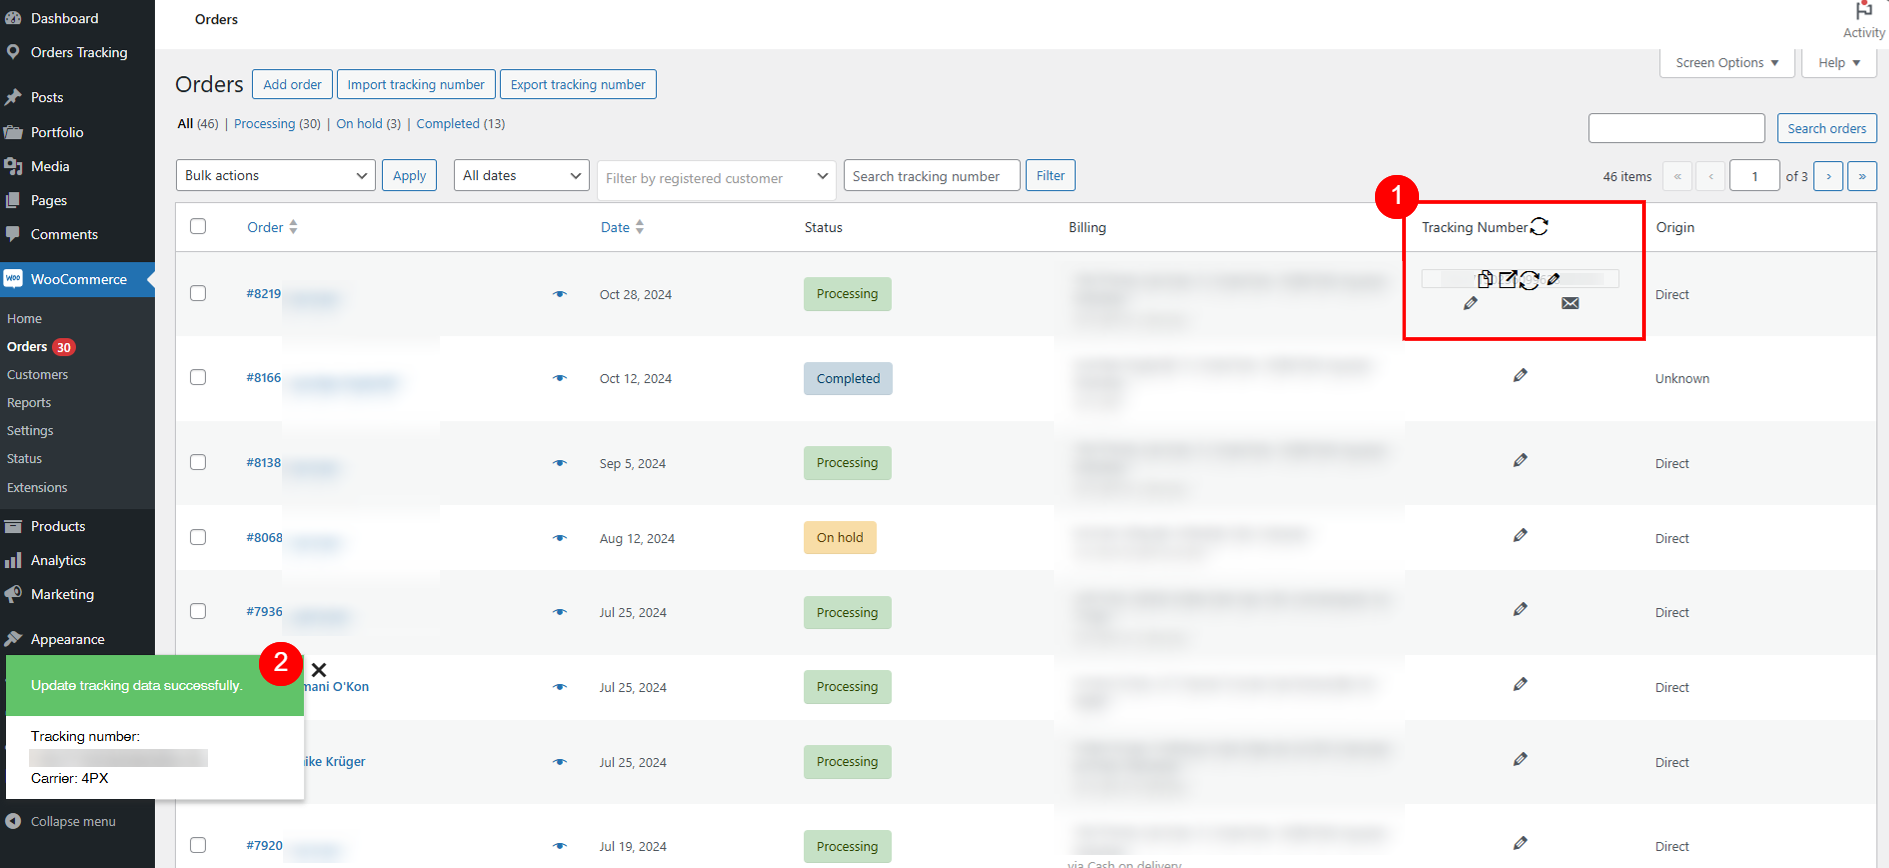
The update icon is visible only if you enable Tracking Service feature.
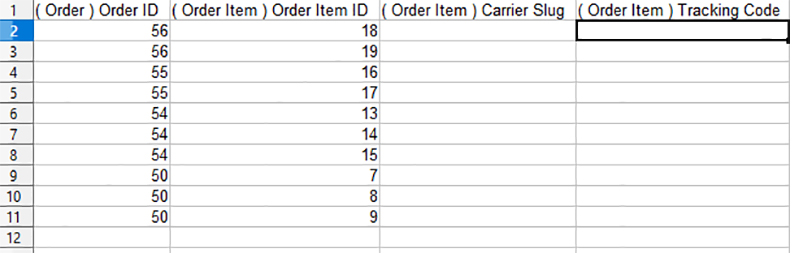
The plugin allows you to export order data into a CSV file, you can select the data you want to export.
Then you can edit the tracking information in the exported file, and import it back.
This function helps you save time when importing/changing tracking numbers in a large amount.
Go to Dashboard/ Order Tracking/ Export Orders, select the orders you need to add tracking number.
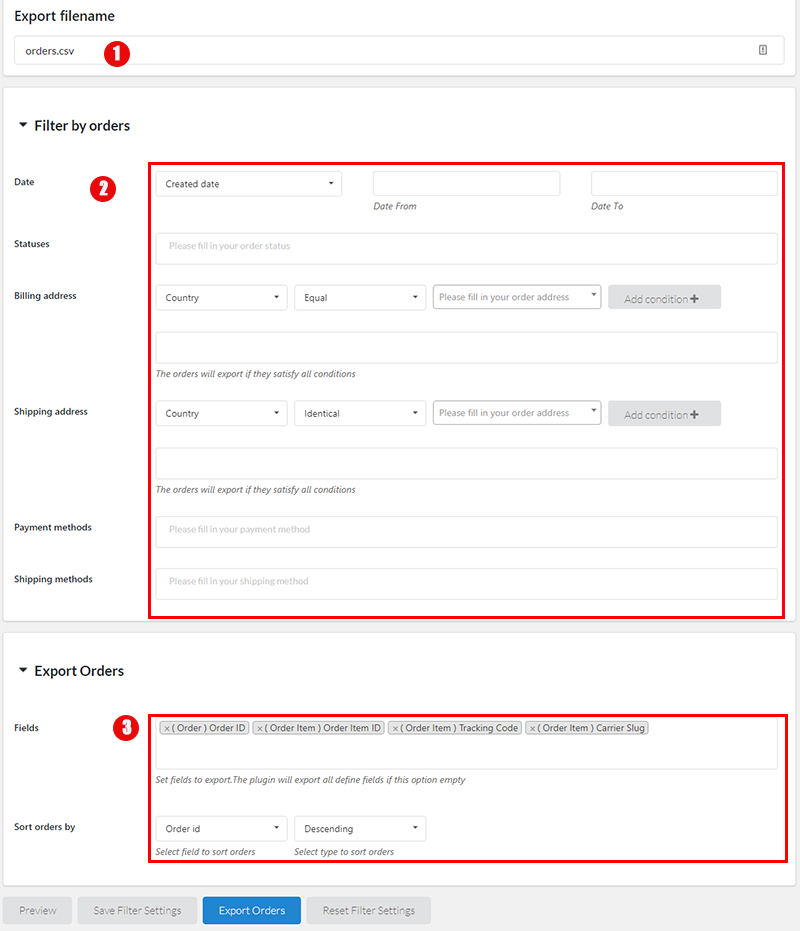

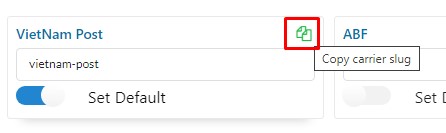
* Note: Carrier slugs: You can add in 2 ways: Get the carrier slugs list here or go to the shipping carrier tab of the plugin setting to get carrier slugs.
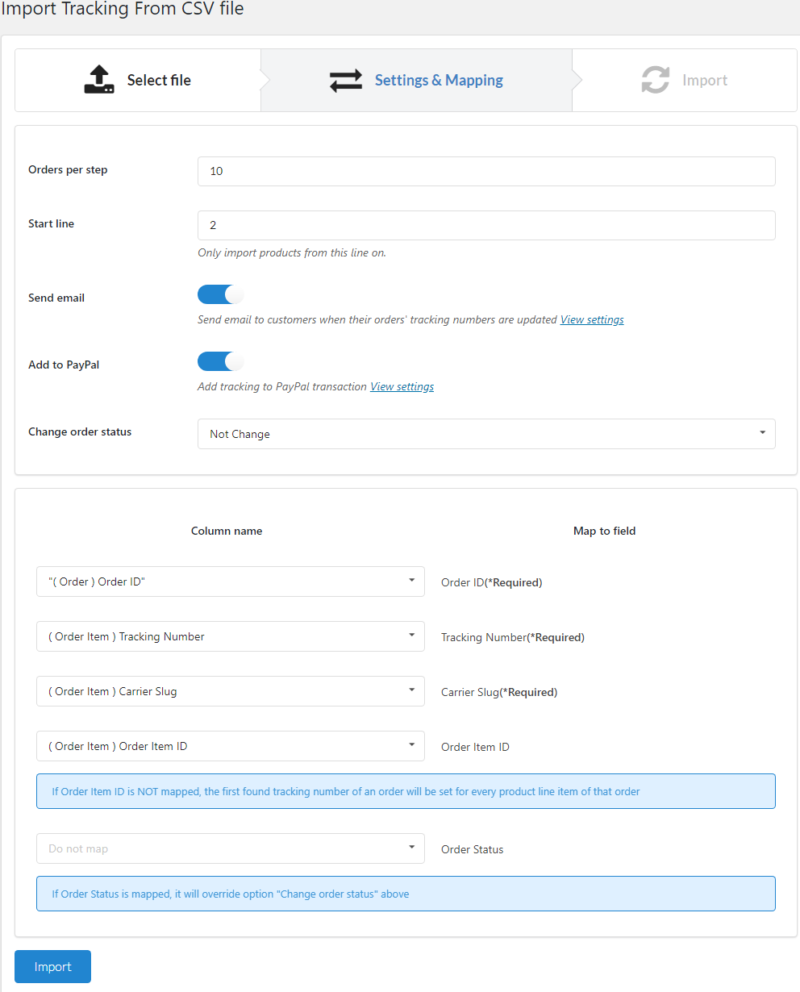
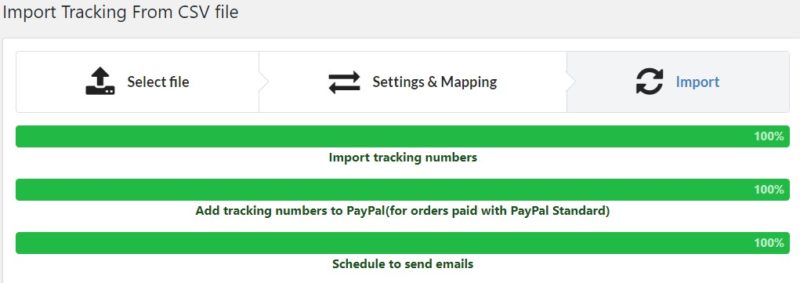
Then you can go to Dashboard/ Order Tracking/ Import Orders Tracking to import the CSV file you just edited.
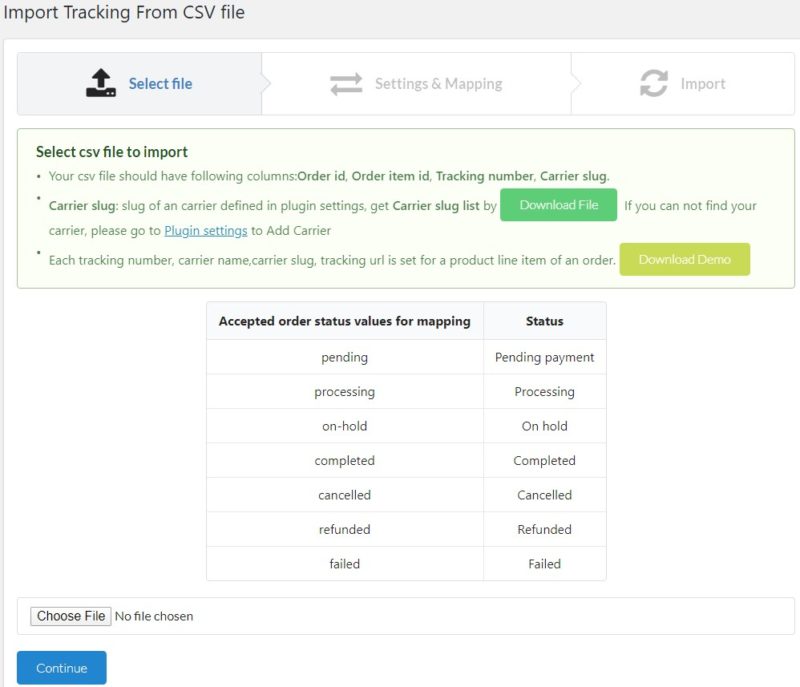
Mapping fields and import.
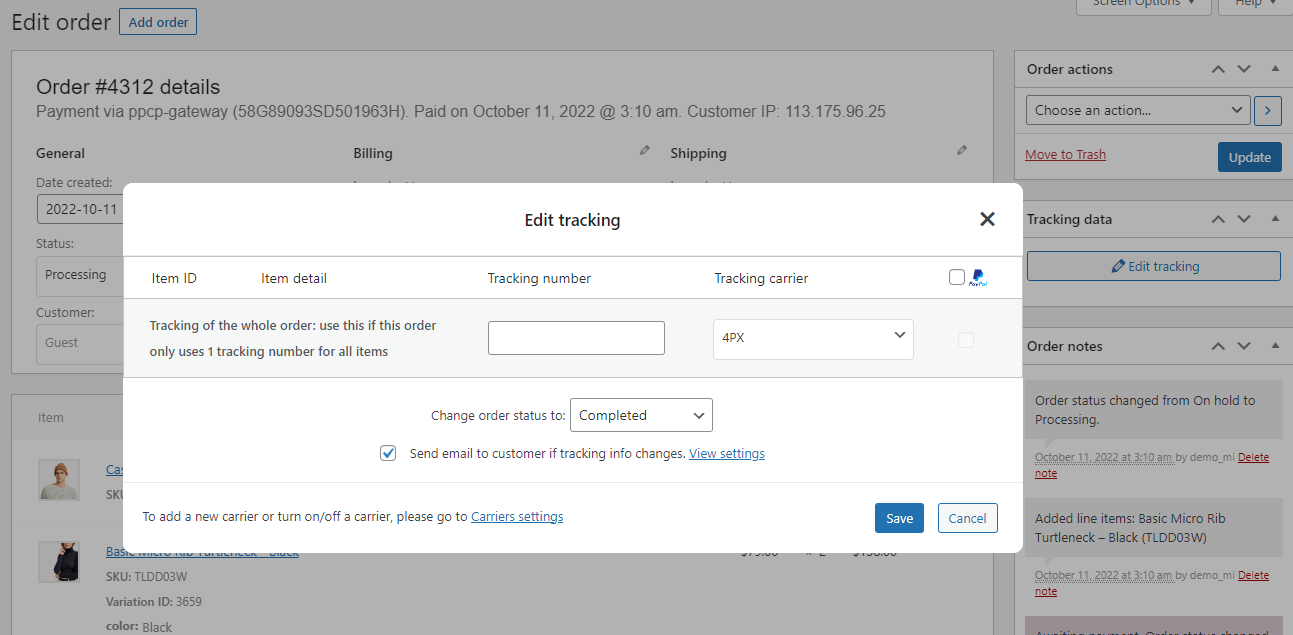
To add tracking numbers manually please go to Dashboard/ WooCommerce/ Orders select the order you want to add the tracking number and click on the Edit Tracking button.
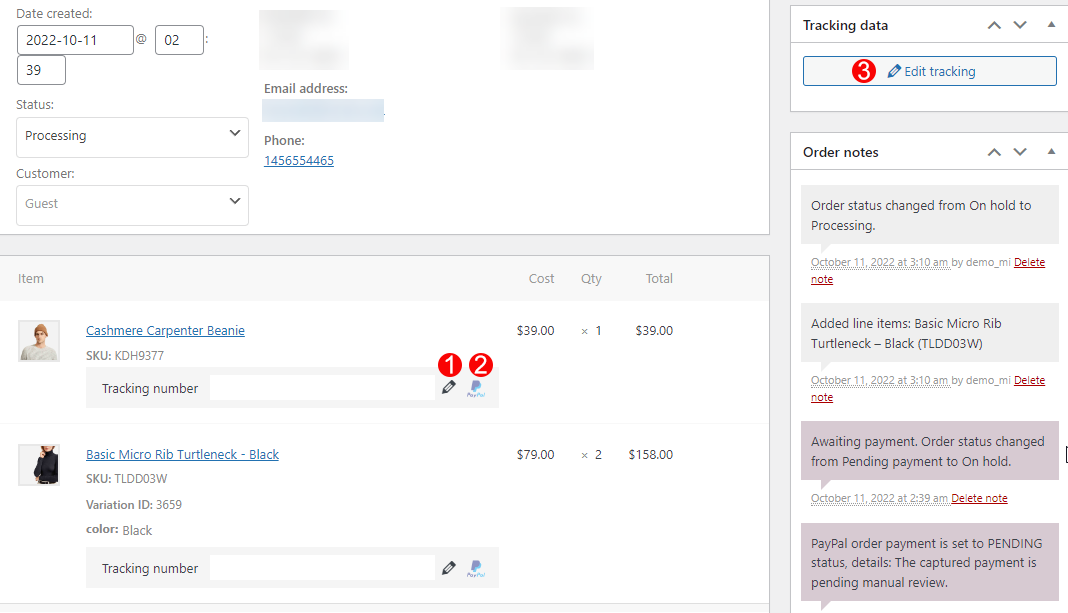
1. and 3. The Edit tracking button: Click this button to edit tracking information including: Tracking number, Tracking carrier, Shipping carrier, Change order status; then enable/disable sending email and/or adding tracking number to PayPal after saving.
2. Add a tracking number to PayPal.
The plugin provides shortcodes to:
[vi_wot_tracking_more_form]
[vi_wot_form_track_order]You can check logs of All log file, Import Tracking, Webhooks, Webhook debug, and PayPal debug in the Logs section.
Go to Orders Tracking > Logs

For example – Check Webhooks and Webhook debug log.
When you install and activate the ALD – Aliexpress Dropshipping and Fulfillment for WooCommerce plugin, the ALD dropshipping tab will appear and allow you to manage the tracking info of the Aliexpress orders.
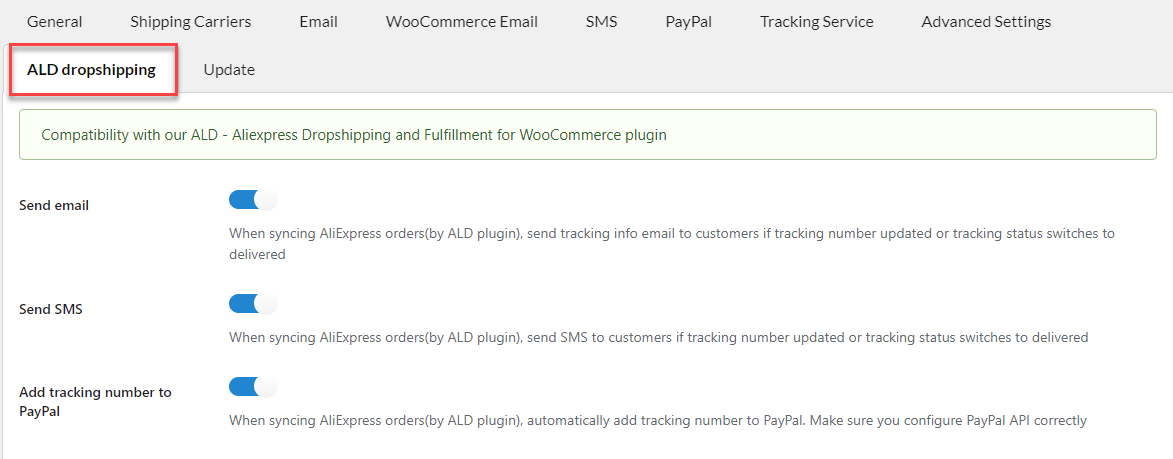
After your Aliexpress orders are fulfilled and the order tracking information is updated, if the above options are enabled, the tracking information will be sent out to the customer.