You can use the Image Element to display images within your email templates. For detailed instructions on how to add images using this element, please refer to the Image Element section in our documentation.
Common Issues and Solutions When Displaying Images in Emails
When displaying images in email templates, there are a few common issues that may arise due to server restrictions or email client settings. Below are some potential issues and their solutions:
Images Require User Action to Display
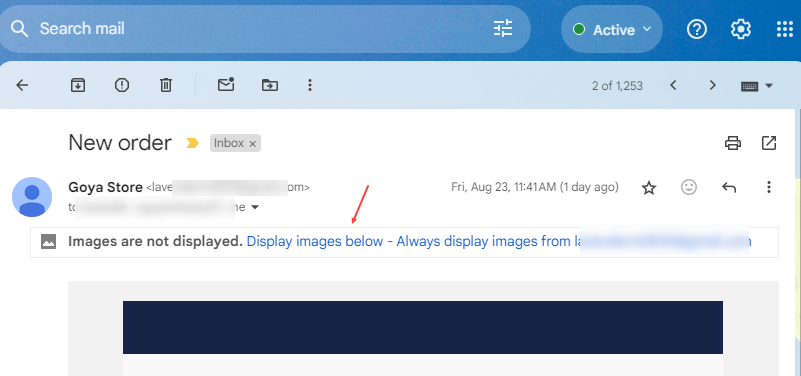
Issue: Some email servers or clients may require the recipient to manually click a button to display images within the email.
Solution: Instruct your email recipients to click the “View/Display Images” option within their email client to display the images.
Images Not Appearing Due to Server Blocks
Issue: Images may not appear because the email server is blocking them. This can happen when using a third-party image hosting service. For example, when emails are sent to Gmail, the product image URL might be encrypted into an unusual link, which the server may block. Another case, the image in use is SVG.
Solution: If you suspect that the issue is due to the use of a third-party image hosting service, please contact the service provider for assistance in resolving the issue. You may need to adjust settings or switch to a different hosting service that is compatible with the email servers you are sending to. In case you’re using SVG image, you need to convert the image to another type (e.g. PNG, JPG) before adding them to email template.
By addressing these potential issues, you can ensure that images display correctly in your email templates, providing a better experience for your recipients.
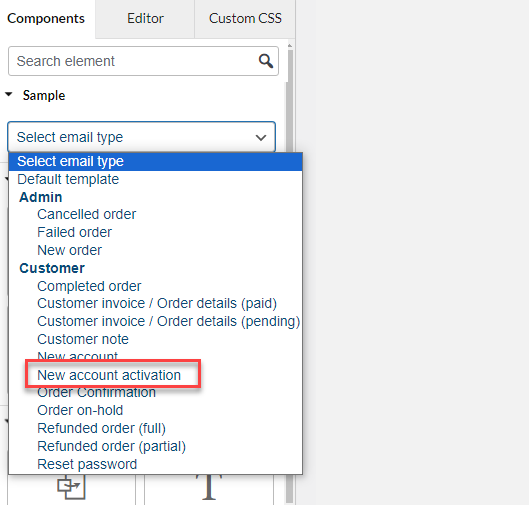
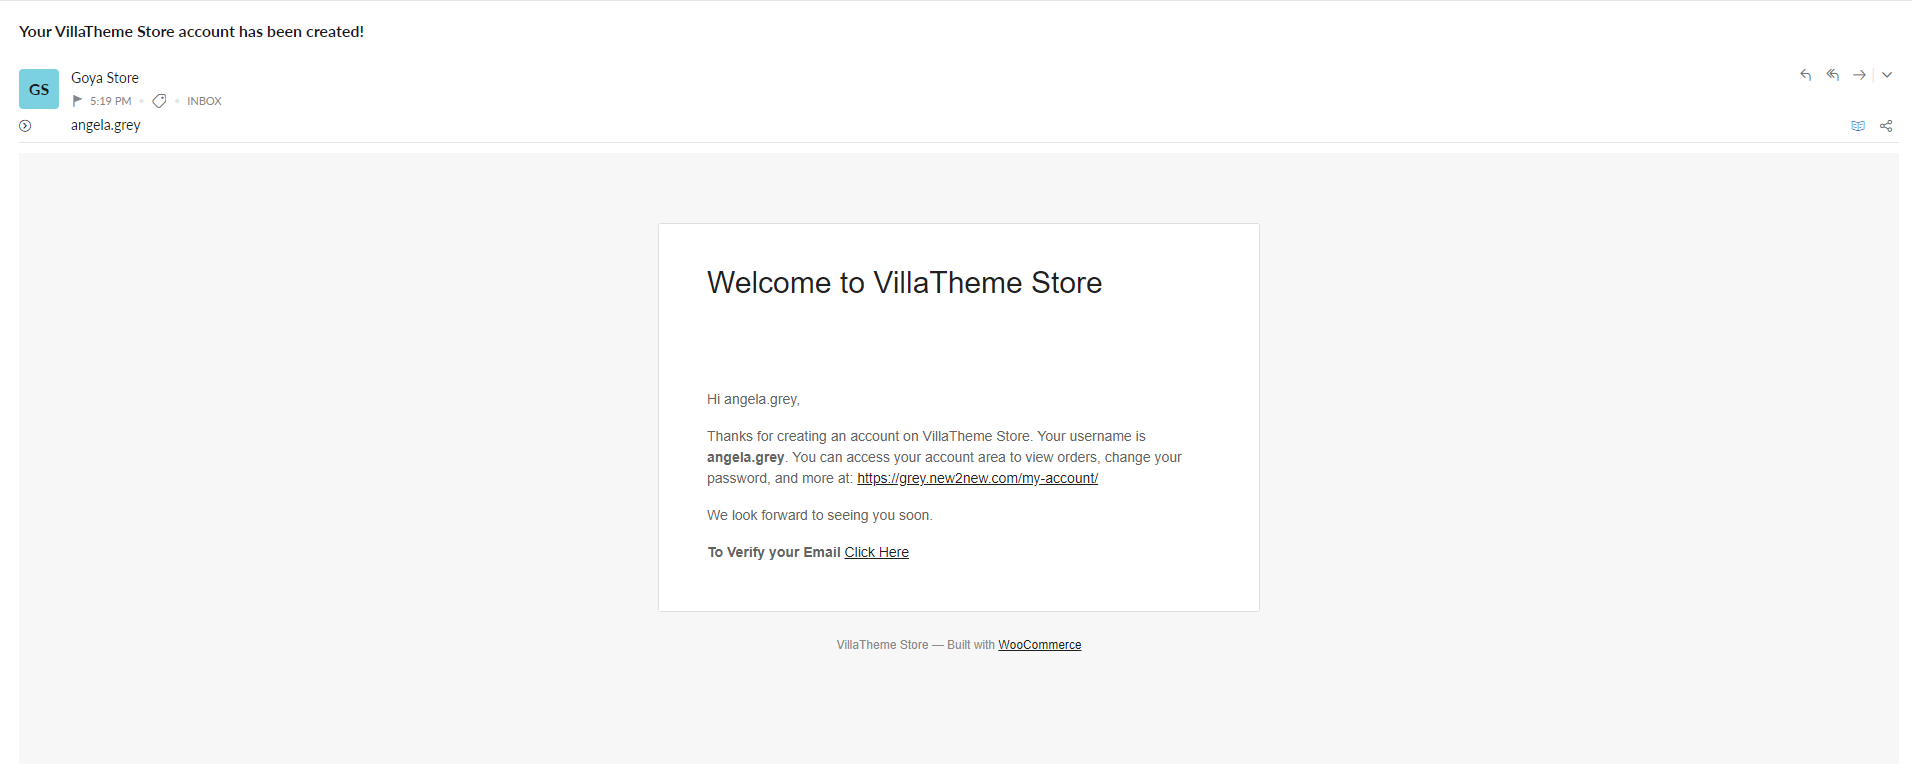
When users are registered on your site which uses Germanized for WooCommerce (Both Free and Premium versions) by vendidero, the “New Account Activation” email is automatically triggered upon account creation, and you have the option to include a verification link within the email.
Our WooCommerce Email Template Plugin is now compatible with Germanized for WooCommerce. Once both plugins are activated, a new email type becomes available, which can be displayed in our email template under the “New account activation” email type.
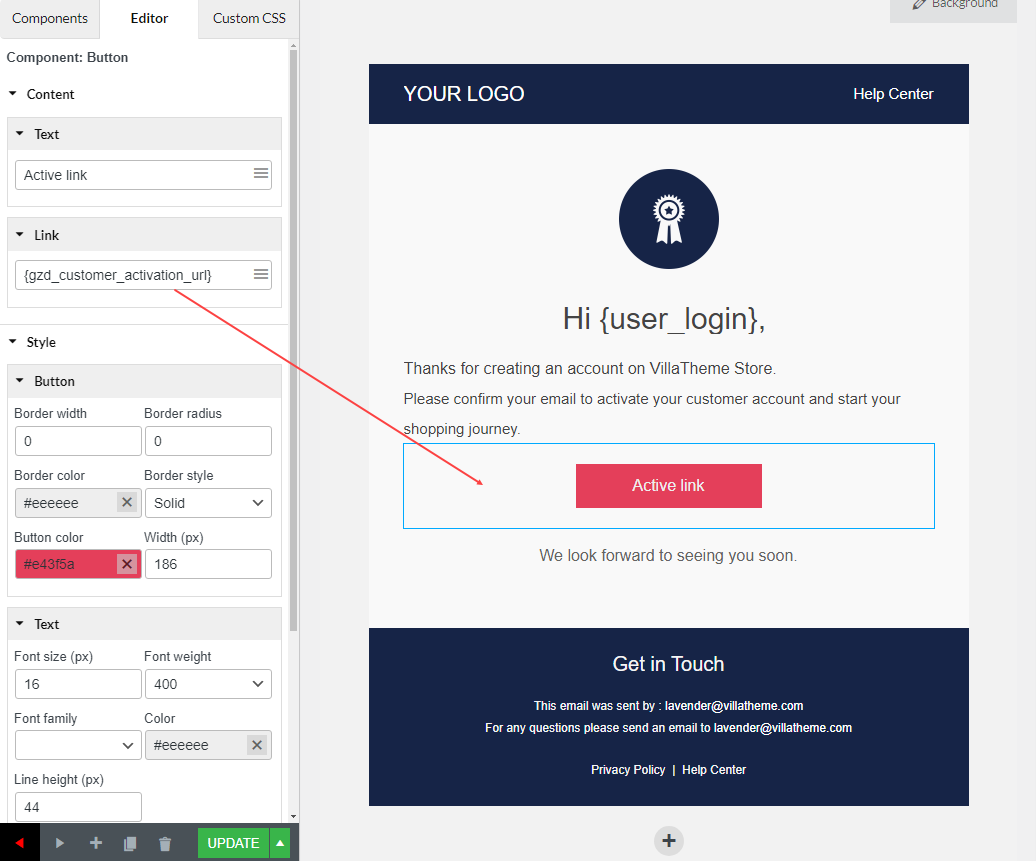
You can use the shortcode {gzd_customer_activation_url} to fetch the activation link within the email. Note: This shortcode will only take effect with the “New Account Activation” email type.
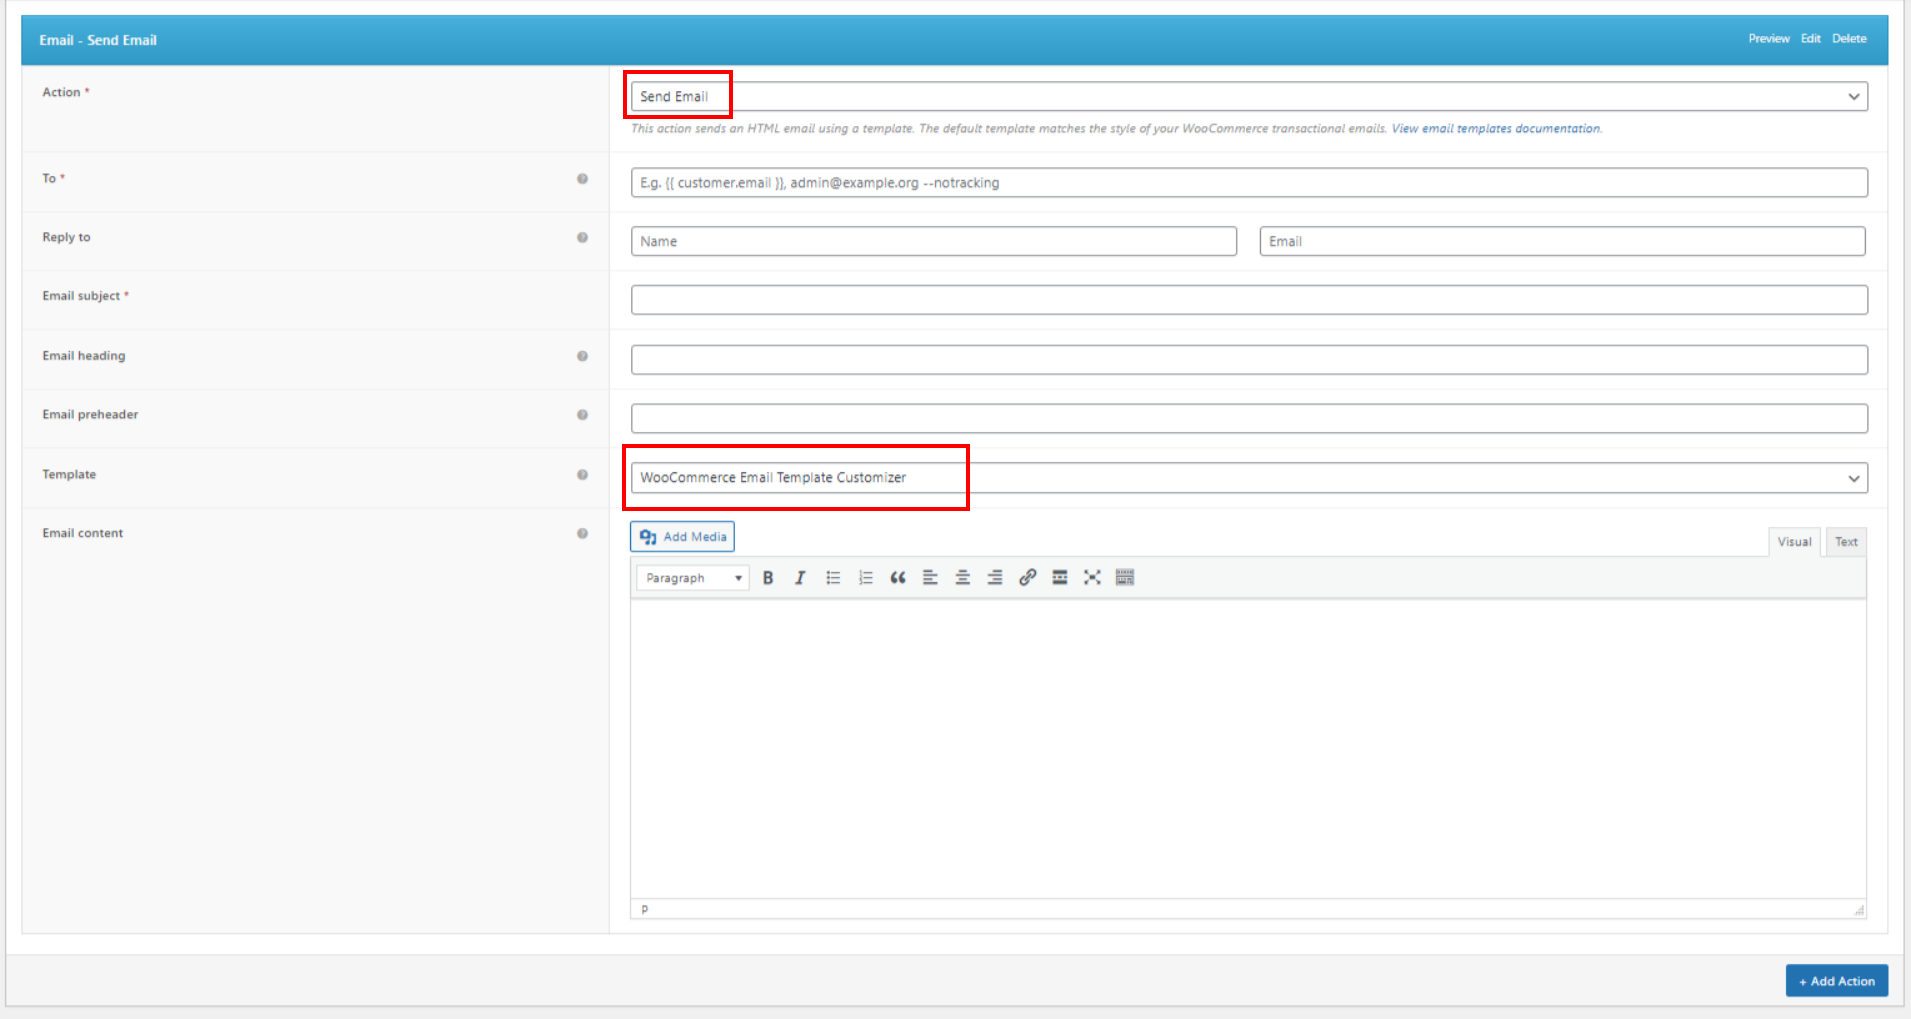
AutomateWoo allows you to add Workflows. When configuring the workflow, you need to choose the action. One of the selections in the “Actions” is Email – Send Email. When you select this option, you’ll be able to select “Default Template” built by our plugin.
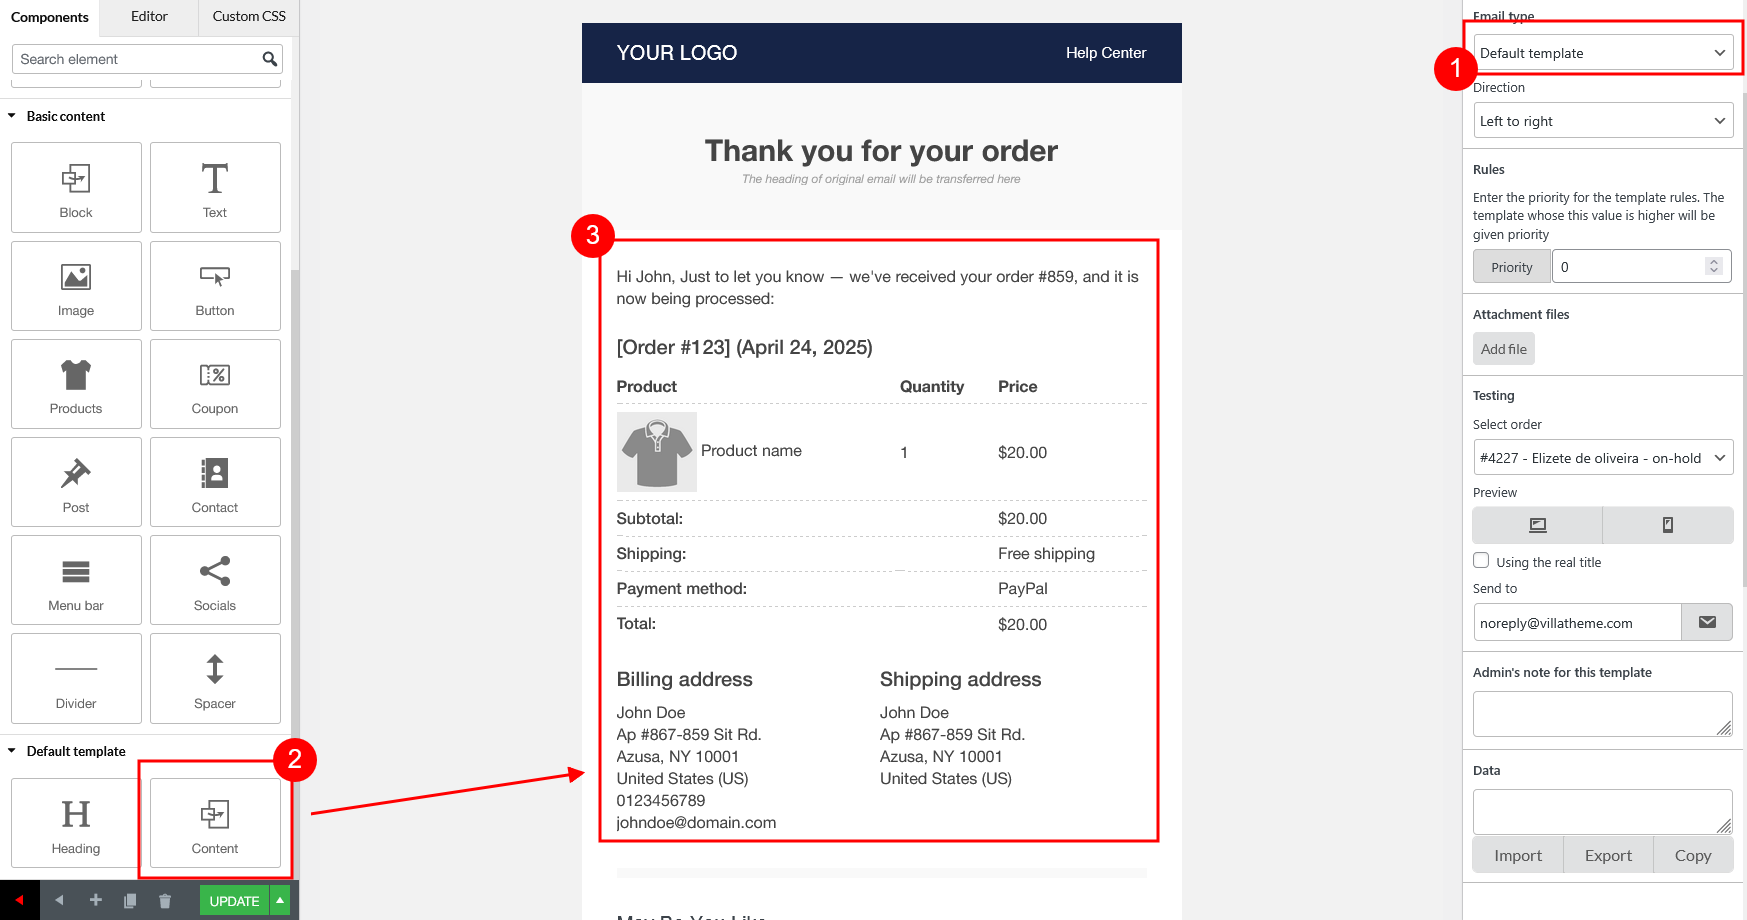
With Default Template – There are 3 points you need to carefully pay attention:
1. Email header and body
The important component that must be added to the Default Template to show the email content is “Content”
This component can be edited with customizing options. There are customization for the font size, font weight, font family, line height, text color, background color, padding, and some other customizations of borders if there’re any.
But you can’t edit the content. To change the message/information in the email content, you must edit it in the email settings of the 3rd plugin instead.
2. Email form
Now you can add other component to the Default Template and make changes to them. The available components for Default Template is less than in other email types. You can use: Block, Text, Image, Button, Products, Coupon, Post, Contact, Menu bar, Socials, Divider, and Spacer.
3. All 3rd plugin emails will inherit the same Default Template.
Even if you create multiple Default Templates, only one will be applied to all 3rd plugin emails. You can’t assigned one particular “Default Template” for a specific email of a 3rd plugin.
Important note: Default Template only works with 3rd plugin emails which are listed in WooCommerce Emails list.
If the 3rd plugin creates their emails, but they’re not visible in the WooCommerce Emails settings, they can’t be displayed in the Default Template form.
Create new email template
If the Default Template doesn’t meet your needs – since it only displays the content from the initial email without allowing design or content customization – you can create a new email type within our plugin. This lets you assign any template you prefer, giving you flexibility to make custom edits that aren’t possible with the Default Template. However, please note that setting up a custom template is considered custom code, so direct support may not be available. For further details, please refer to our guide.
If you’re using a 3rd plugin that add additional information to WooCommrerce Email, you can use WC Hook to attach this information to our template. For example, the custom fields like Gender; Date of birth; CIF/NIF number… Specific steps are as follows:
Step 1: Locate the position of additional info in WooCommerce default email.
In this step, you would need to deactivate our plugin to locate the position of the info. The most common way is to create a test order with that info filled, and see where it’ll show in the WooCommerce email.
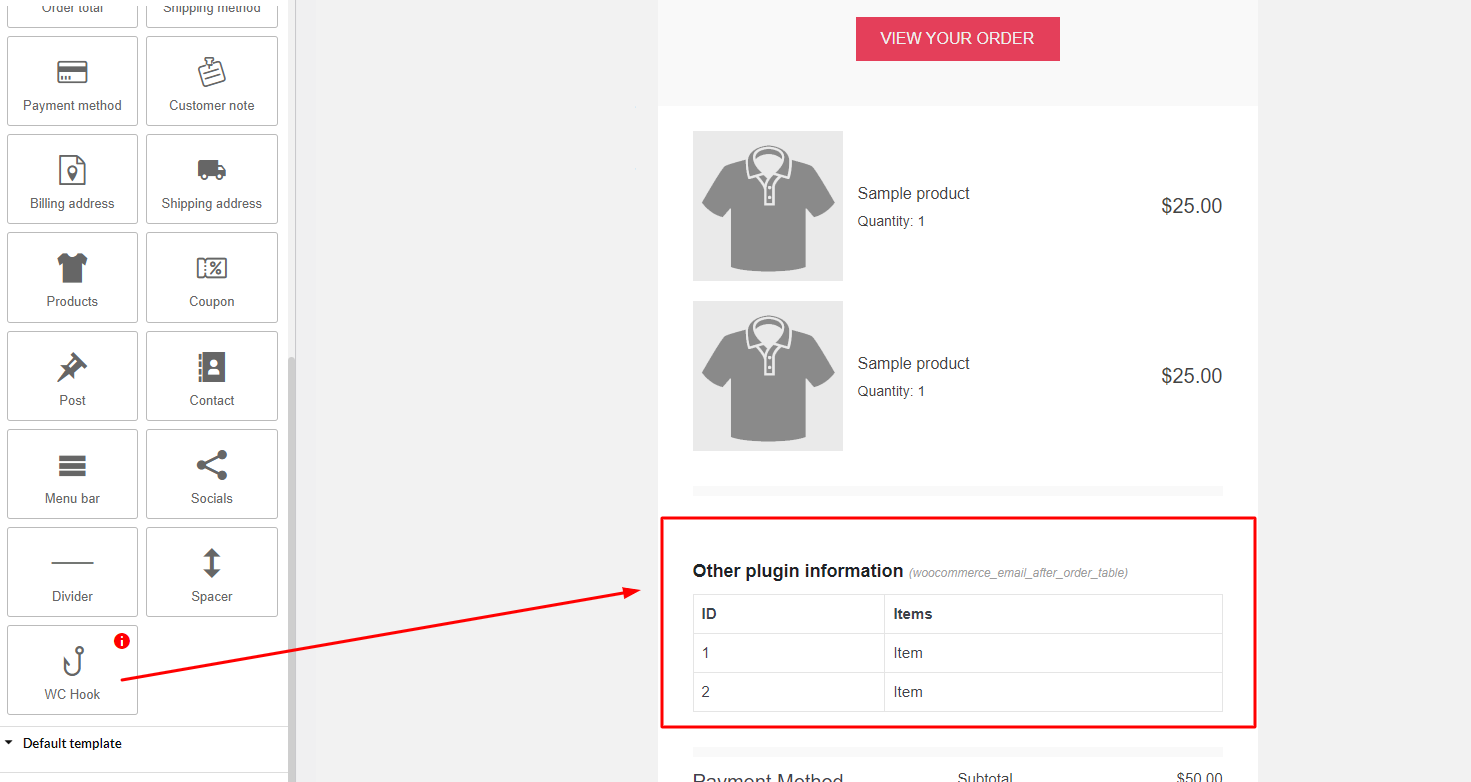
Step 2: Drag the hook to the corresponding place on the template.
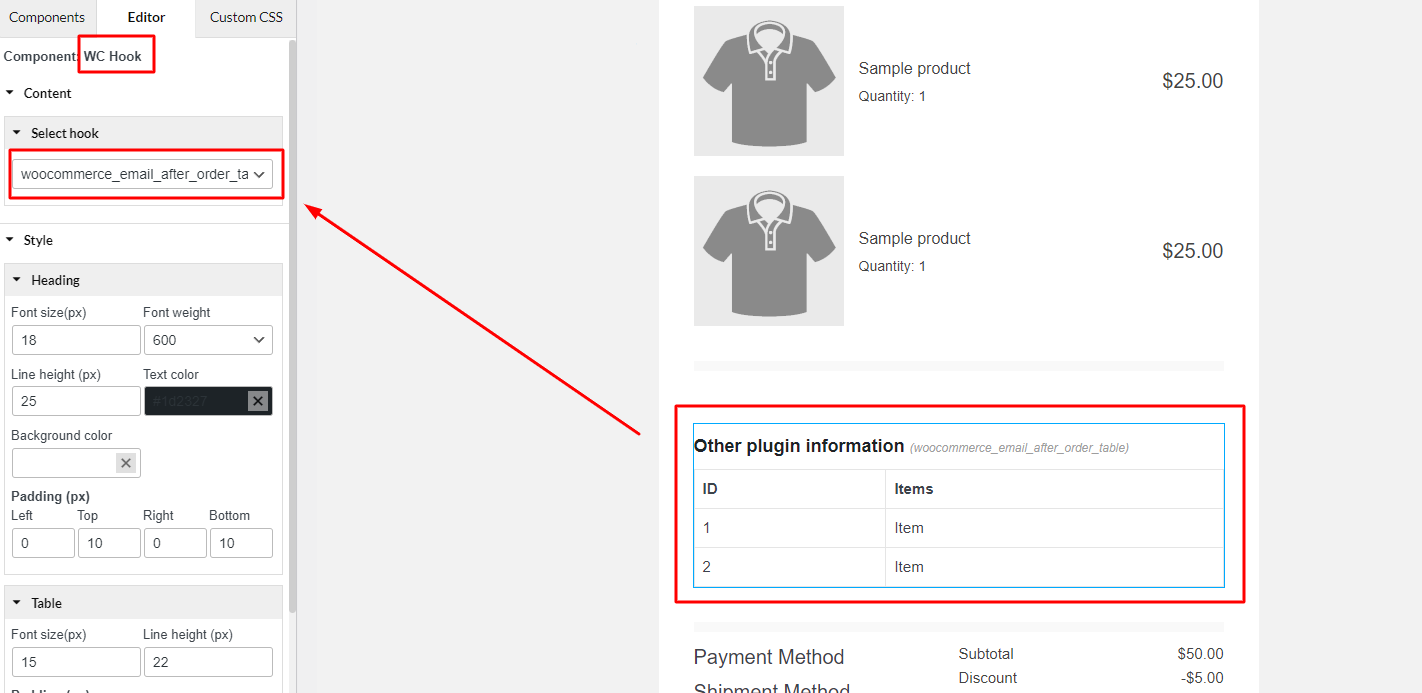
Step 3: Select the correct hook. Based on the info, you would need to test with each hook and see with which one the additional info is shown.
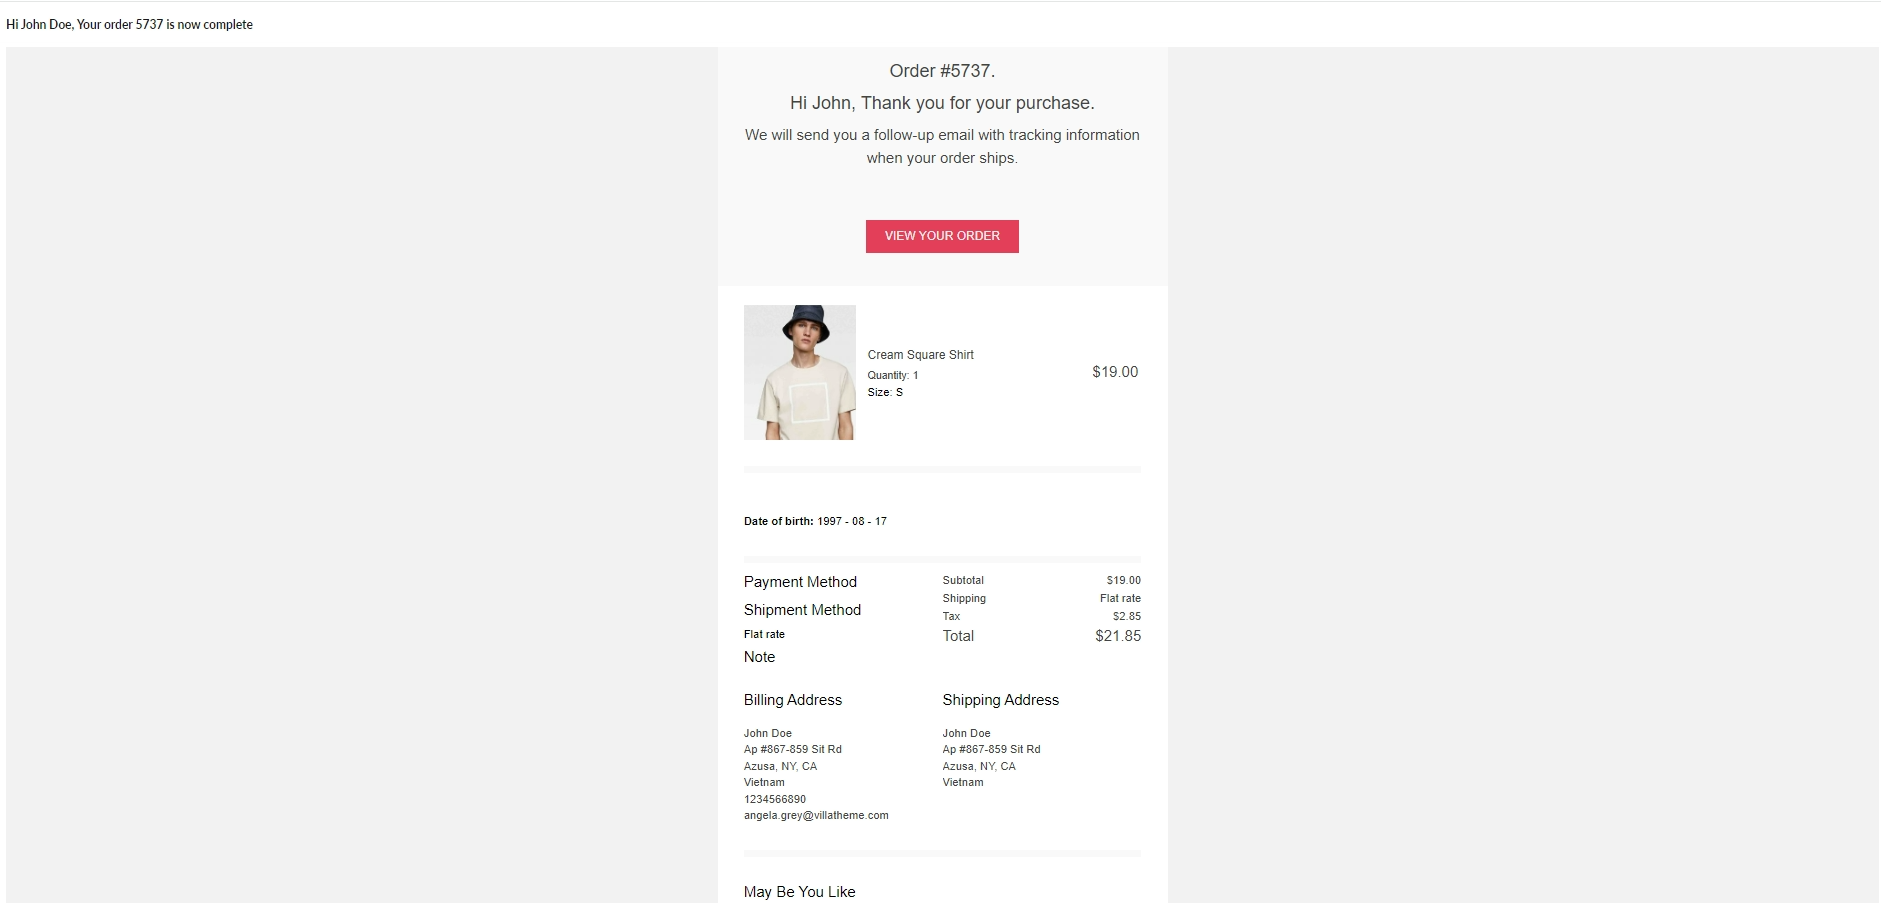
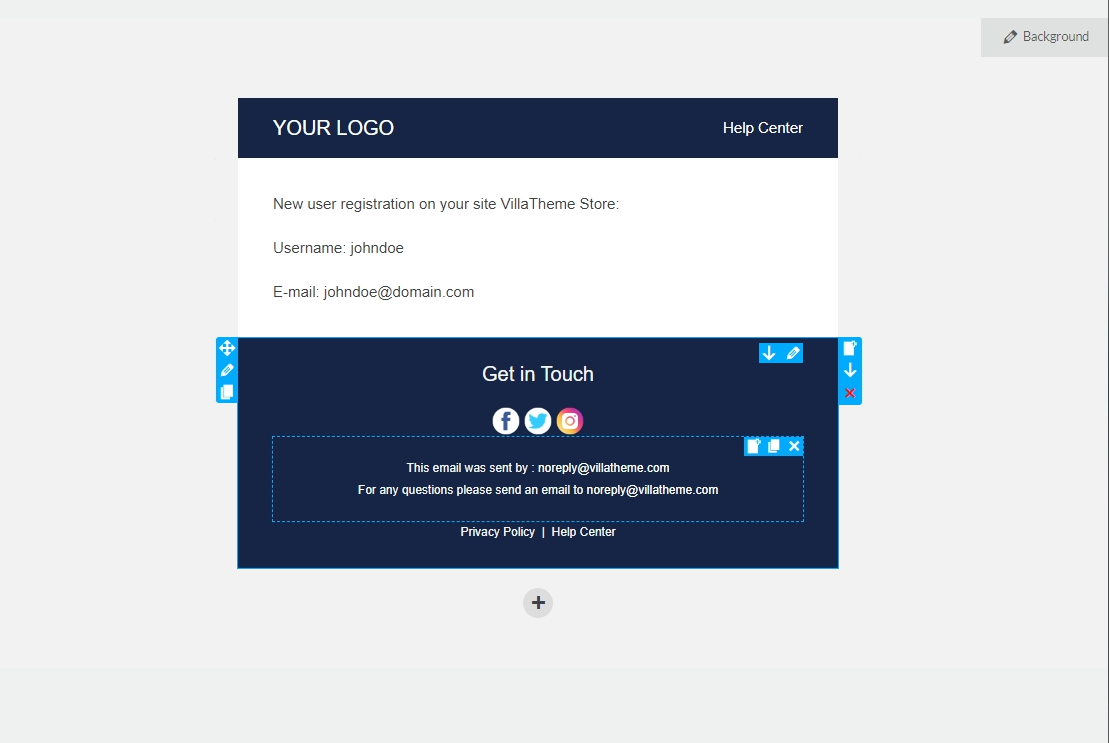
The result will come out like this
Note when you use WC Hook:
The WC Hook does not inherit the rule for language. If you’re using a multilingual plugin, like WPML or Polylang, and there’s valid translation for the additional information. Then once you get the correct hook in the email template, the hook will display the info in the user’s selected language, no matter the template language.
So you must create a template for each language, and each template must include the WC Hook, in order for the info and the template language to match.
If there are multiple info show in the same place, and they may use the same hook to be displayed. Then you only need to add one hook. If for example, you have 2 different pieces of info created by 2 separated plugins, but they all display below the order table, and you realize they use the same hook woocommerce_email_after_order_table, then only one hook should be added.
If you add 2 same hooks, the info will be duplicated.
If you want to display the payment instruction, simply drag the WC Hook to any place on the email template, and select this hook woocommerce_before_order_table
All settings with WC Hook component should be test with a real email sending. The hook which is added to a position with no additional info attached will be hidden in a real email, but will show in a test email.
Now the template has been assigned to the correct email type. You can check it in the WooCommerce Emails settings
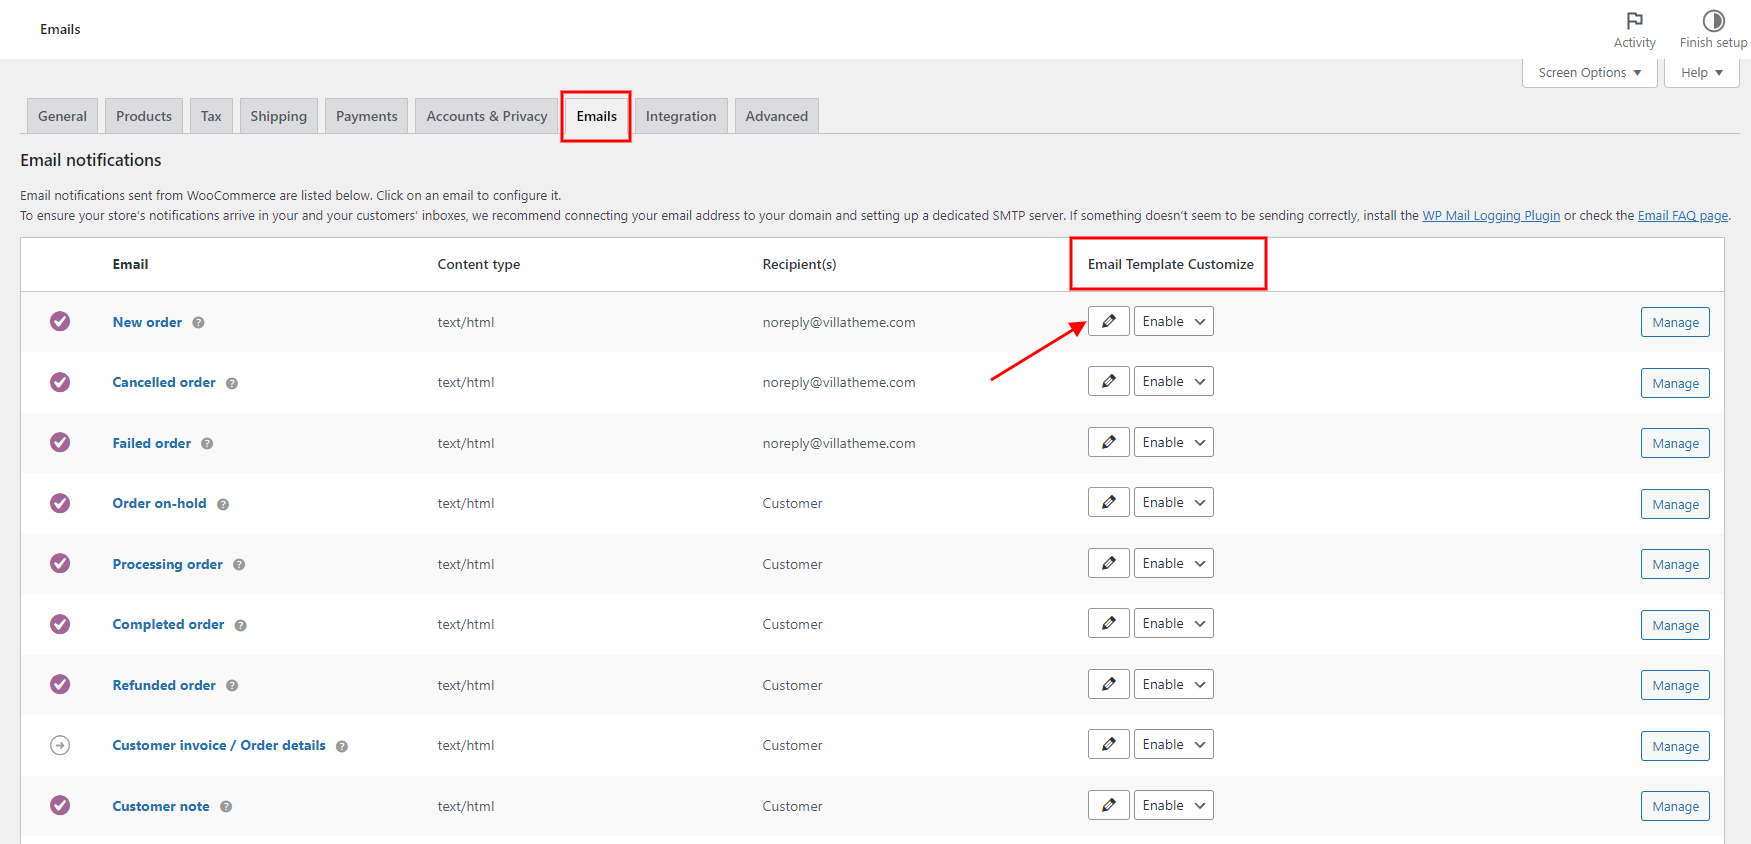
Go to WooCommerce >> Settings >> Emails. In this email list, you’ll see the “Email Template Customizer” column.
Edit templates of particular email
In each email type, there’s a corresponding “Edit” button to edit the template(s) assigned to that particular email type.
Click the “Edit” button of a particular email type, you’ll be redirected to the templates assigned to that type only. Now you can customize the template.
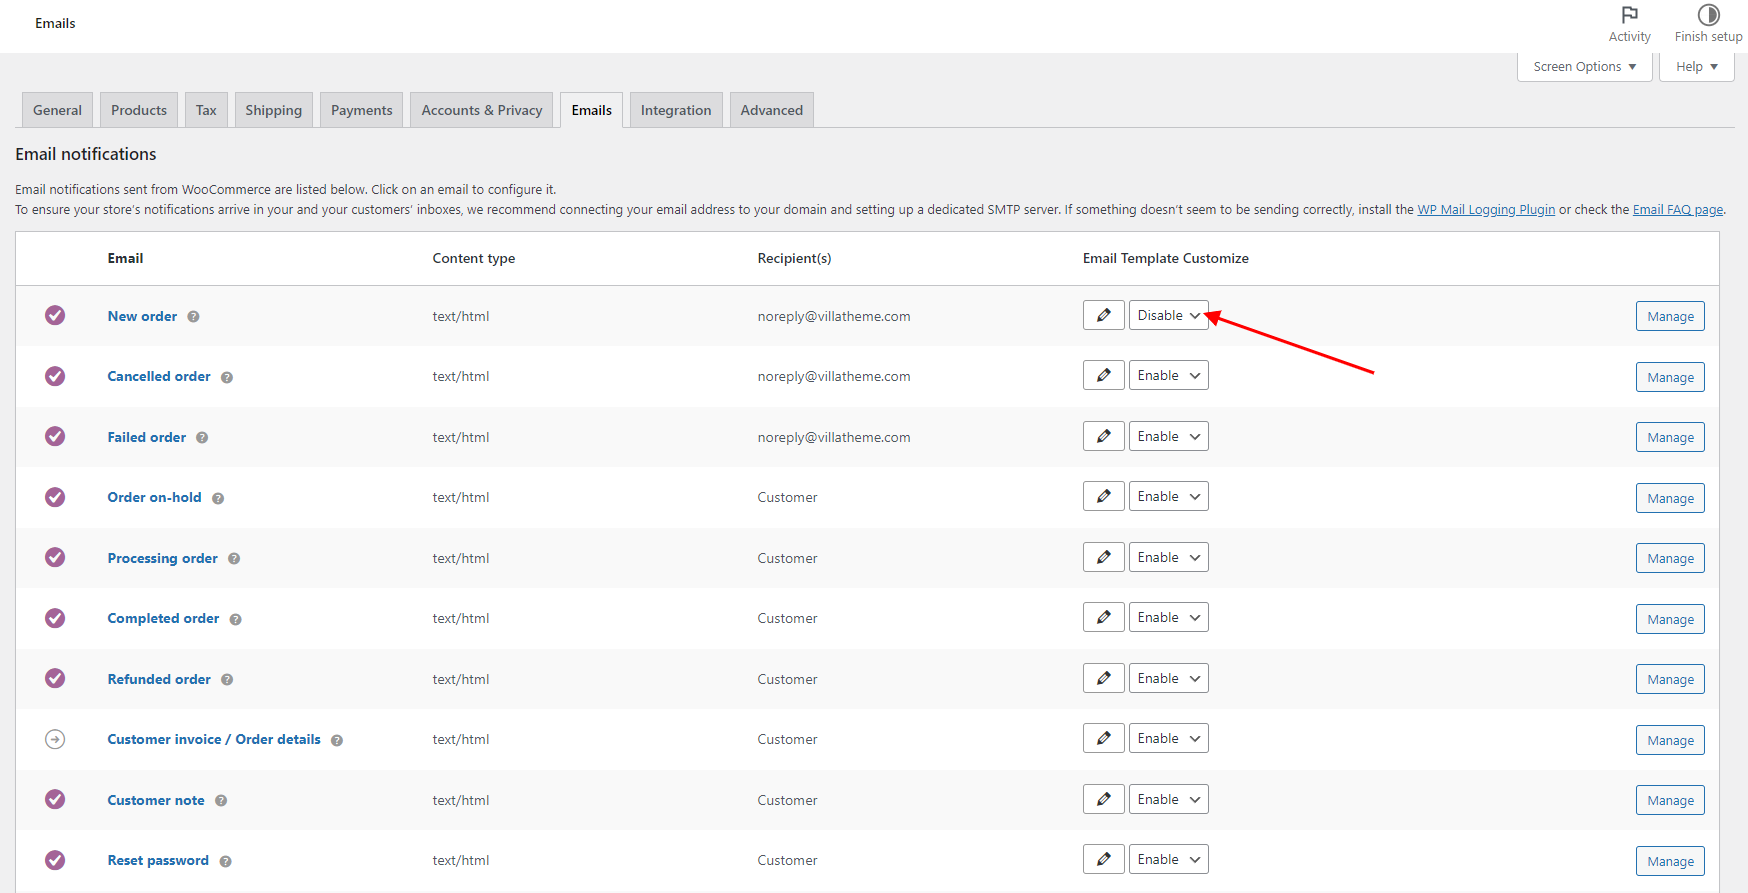
Disable WooCommerce Email Template for a particular email type
You’ve activated the plugin, but for some specific email types, you don’t want to use the customized template, but the default email of WooCommerce instead. In that case, you can disable the template of WooCommerce Email Template Customizer in WooCommerce Emails settings for that email type.
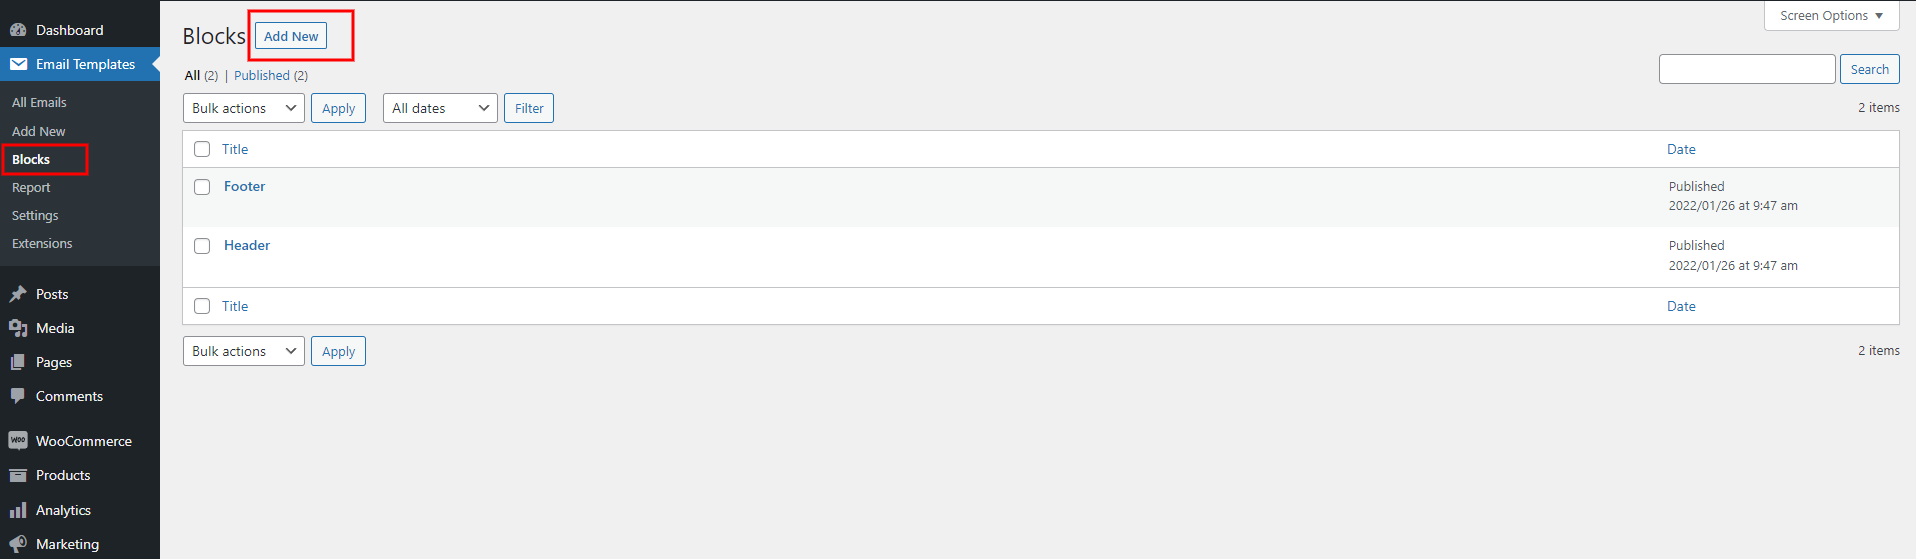
Block is built with layouts and components just like the email templates. It helps a lot and saves time if you want to make mutual blocks that can be used in different templates.
Step 1: Create new blocks
Step 2: Build your block with Drag-and-drop builder, using available layouts and components.
Note:
All the change in the block content and customization must be done here. You can’t change the block – either its content or its customization – in the email template editor page. Because it will inherit the content and the customization of the original block. Once you modify a block, all the templates containing the blocks also update the modification.
Some settings/rules can’t be applied to the block. For example: Background Image/Color; Responsive point; language rules… Because these configuration are made in each particular email template instead.
Step 3: Drag the completed block to a particular position in the email template.
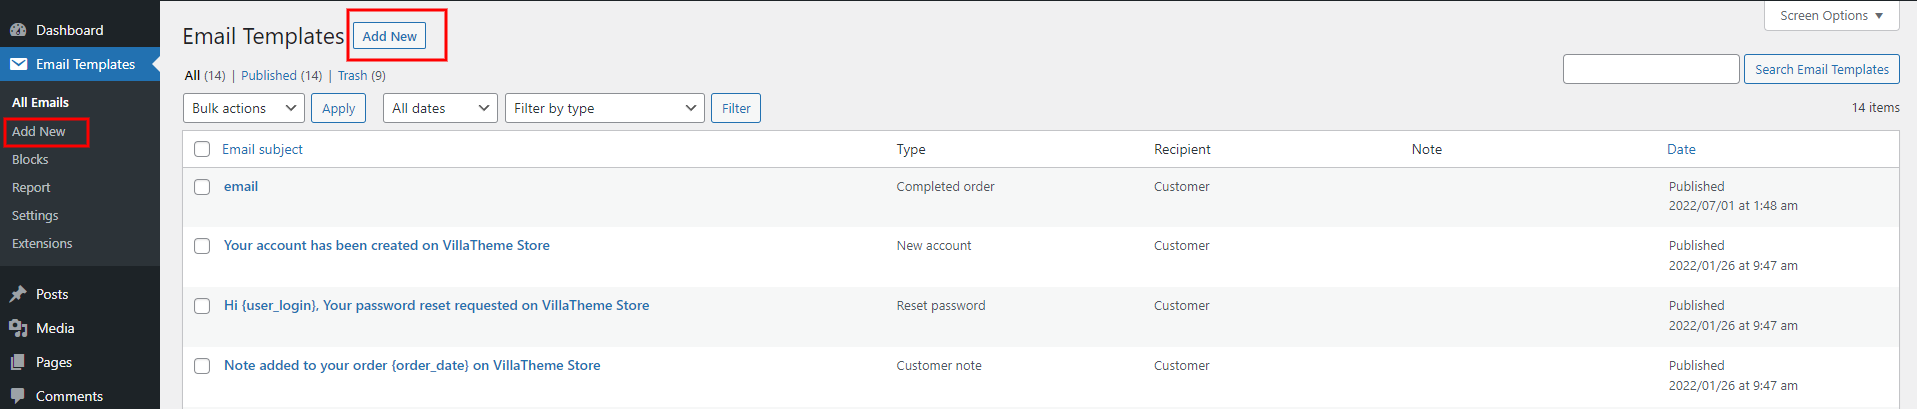
The first thing to do after activating the plugin, is to create/customize your own email templates.
To build your own email template, click “Add new” in the plugin settings like in this image
You’ll be redirected to a new blank email editor page. Build your email here by dragging and dropping layouts/elements and configuring them.
Email elements overview
First, let’s take a look at the elements that play important parts in making a complete email
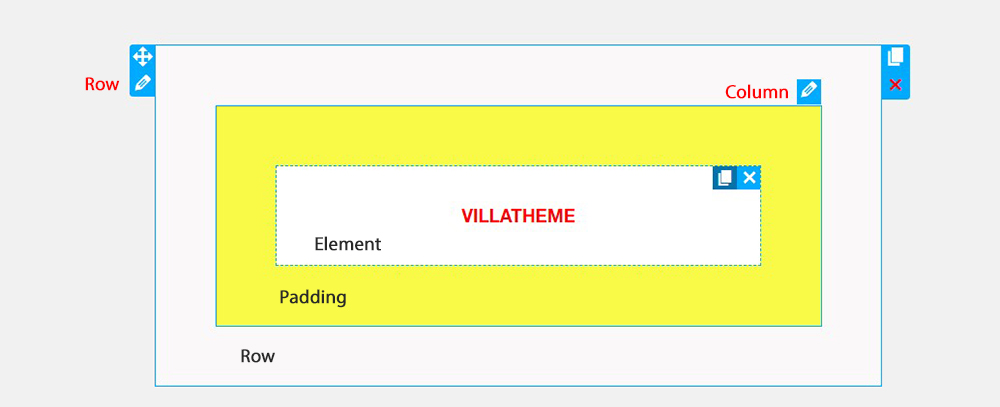
WooCommerce Email Template Customizer uses 3 main building blocks: Row, Column and elements. Row are the largest building blocks, and inside them are groups of Columns.Columns are to cover outside elements. Elements are placed inside of columns.
You control, edit duplicate, remove row, Columns with their handles.
To edit row, column padding.
To duplicate row, column.
To remove row, column and element.
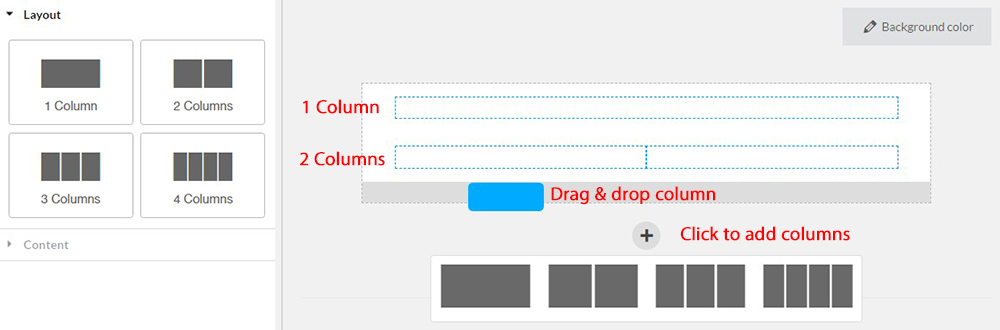
Now, for the Layout, you need to select the layout according to necessity. These layouts are from 1 to 4 column in one rows, based on your requirements, select one to add elements into.
Simply drag the Layout from the Widget panel, or click the “Plus” button to add the layout you need.
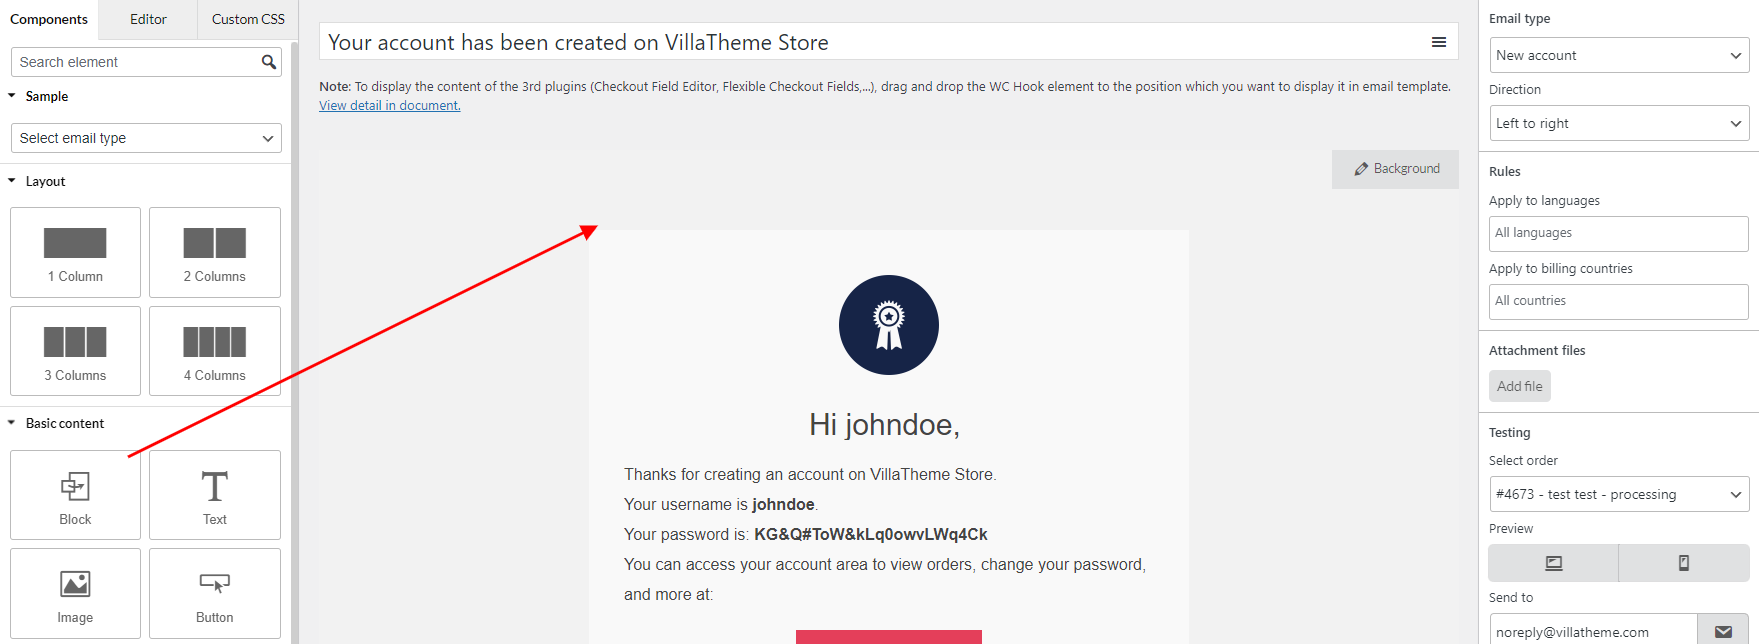
Then start adding the element and edit the content, as well as its appearance: size, outline, style…
To add the element, drag them from the Widget panel to the place you want, like the image below:
These are the general steps for how to build a new template. To customize one, it’s almost the same, it’s just you have an available template with lots of components, all you need is to modify them to meet your expectation.
Drag and drop: Left click and hold this button, and drag the layout to your ideal place, and drop it there
Edit: Clicking this button will lead you to the Editor area of that layout/component
Duplicate: Clicking this button will double the current layout/component
Copy: Click this button to copy the layout/component
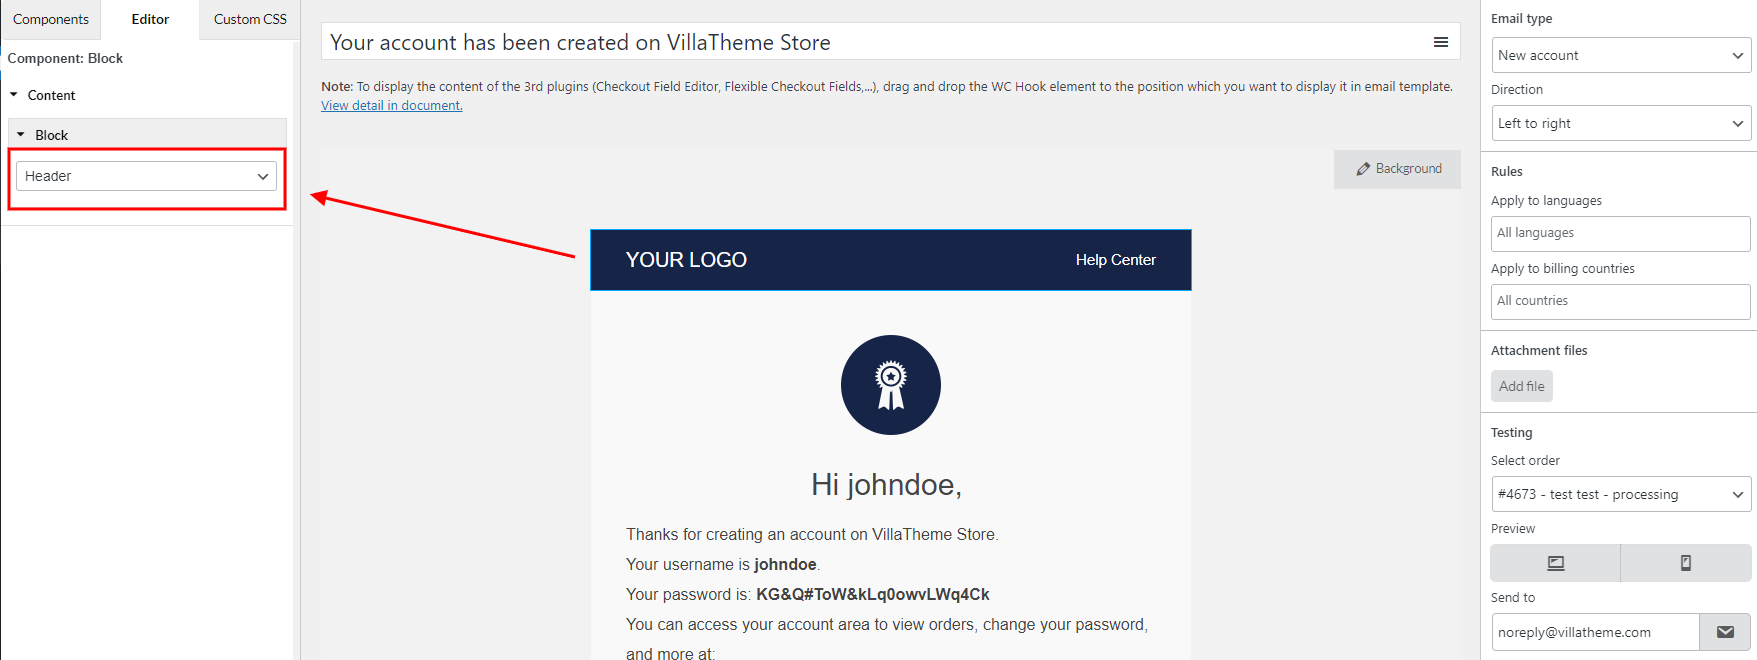
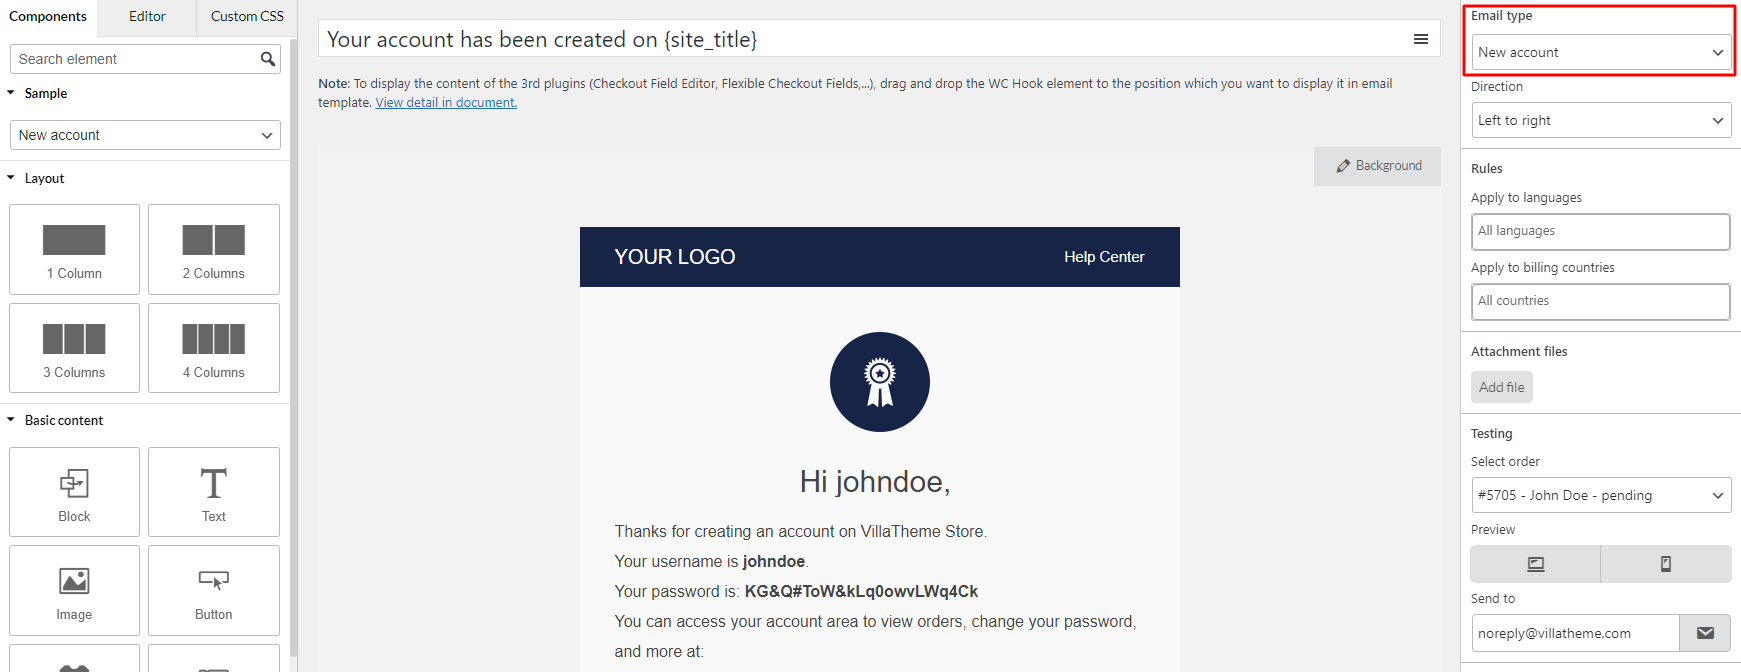
After you build an email, you may need to take care of the email type attached to it. Once the action to trigger the email is done, you can make sure the template assigned to that email type will be sent.
To do that, you can select the email type here
Rules for template
These rules will let you control which template is sent in different conditions.
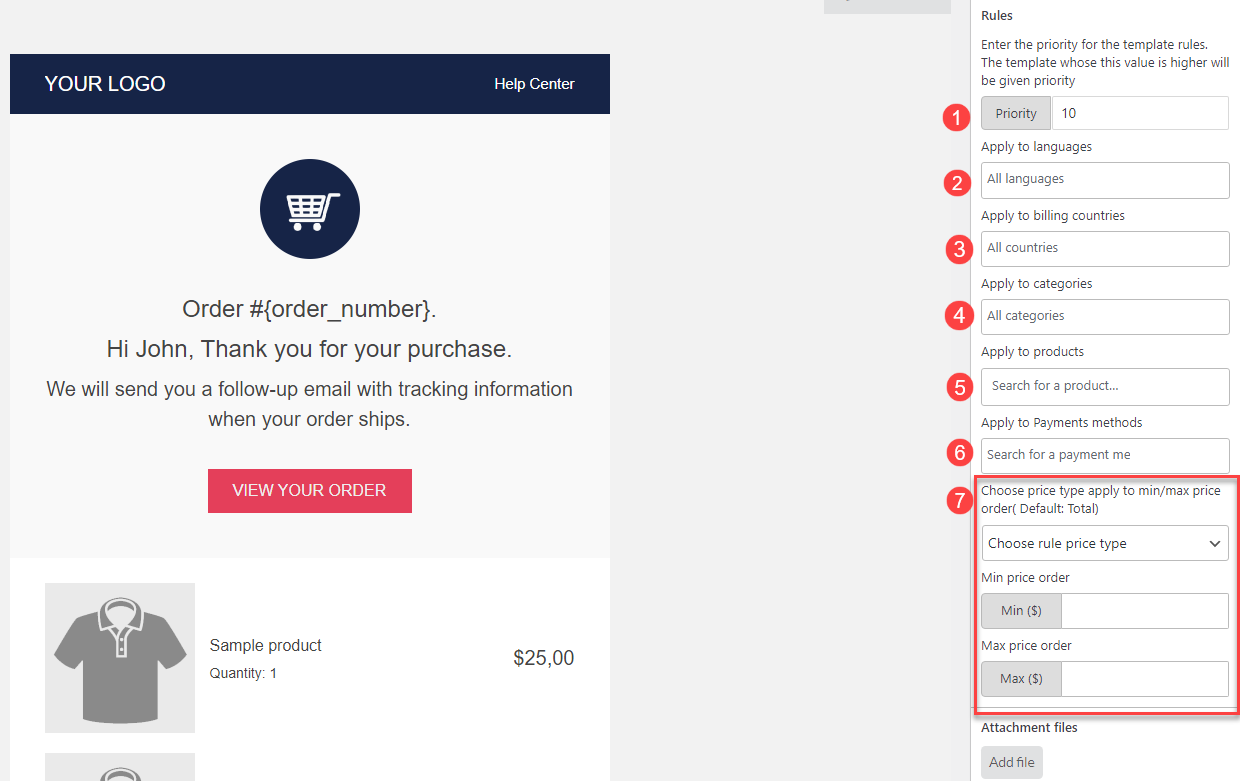
1. Priority: The plugin checks rules from top to bottom of the Email template list to find a matching template. When filtering email templates by type on the email list, templates with higher priority rules will be arranged to the higher position and are applied first. Go to each email template editing page to add priority for each one.
Important note: If a template includes multiple rules, for example: products, categories, and language rules…. set it with a higher priority than the templates which is applied to the global cases.
2. Rules for languages: This option becomes available when using a multilingual plugin like WPML, Polylang, or TranslatePress. It allows you to create different email template templates for multiple languages and assign them to specific languages. You can view our guide video on how to send multilingual email notifications with WPML for a better view.
3. Rule for billing countries: Select the countries. The template will be sent when the user’s billing country is one of the selected.
Rules for transaction email – From rules 4 to 7: These rules will be available for WooCommerce transaction emails – New order, Failed order, Cancelled order, Order on-hold, Customer invoice/Order details (both paid and pending), Processing order, Completed order, and Refunded order (both full and partial).
4. Apply to categories: Select the categories applied to this template. When the user makes an order with items belong to these categories, the template will be sent.
5. Apply to products: Select the products to apply this template. When a user places an order for these items, the template will be sent. The Product Categories rule also works with variations.
6. Apply to payment methods: Select the payment methods applied to this template. When the user makes an order with these payment methods, the template will be sent.
7. Choose the price type that is applied to min/max price orders: Select the price type to apply this template, they can be Order subtotal, Order total.
Apply to min price order: Add the minimum order. Once the order reaches this minimum amount or higher, the template will be sent.
Apply to max price order: Enter the maximum amount for the order. The template will be sent to when the user makes an order with the price lower or equal to this value.
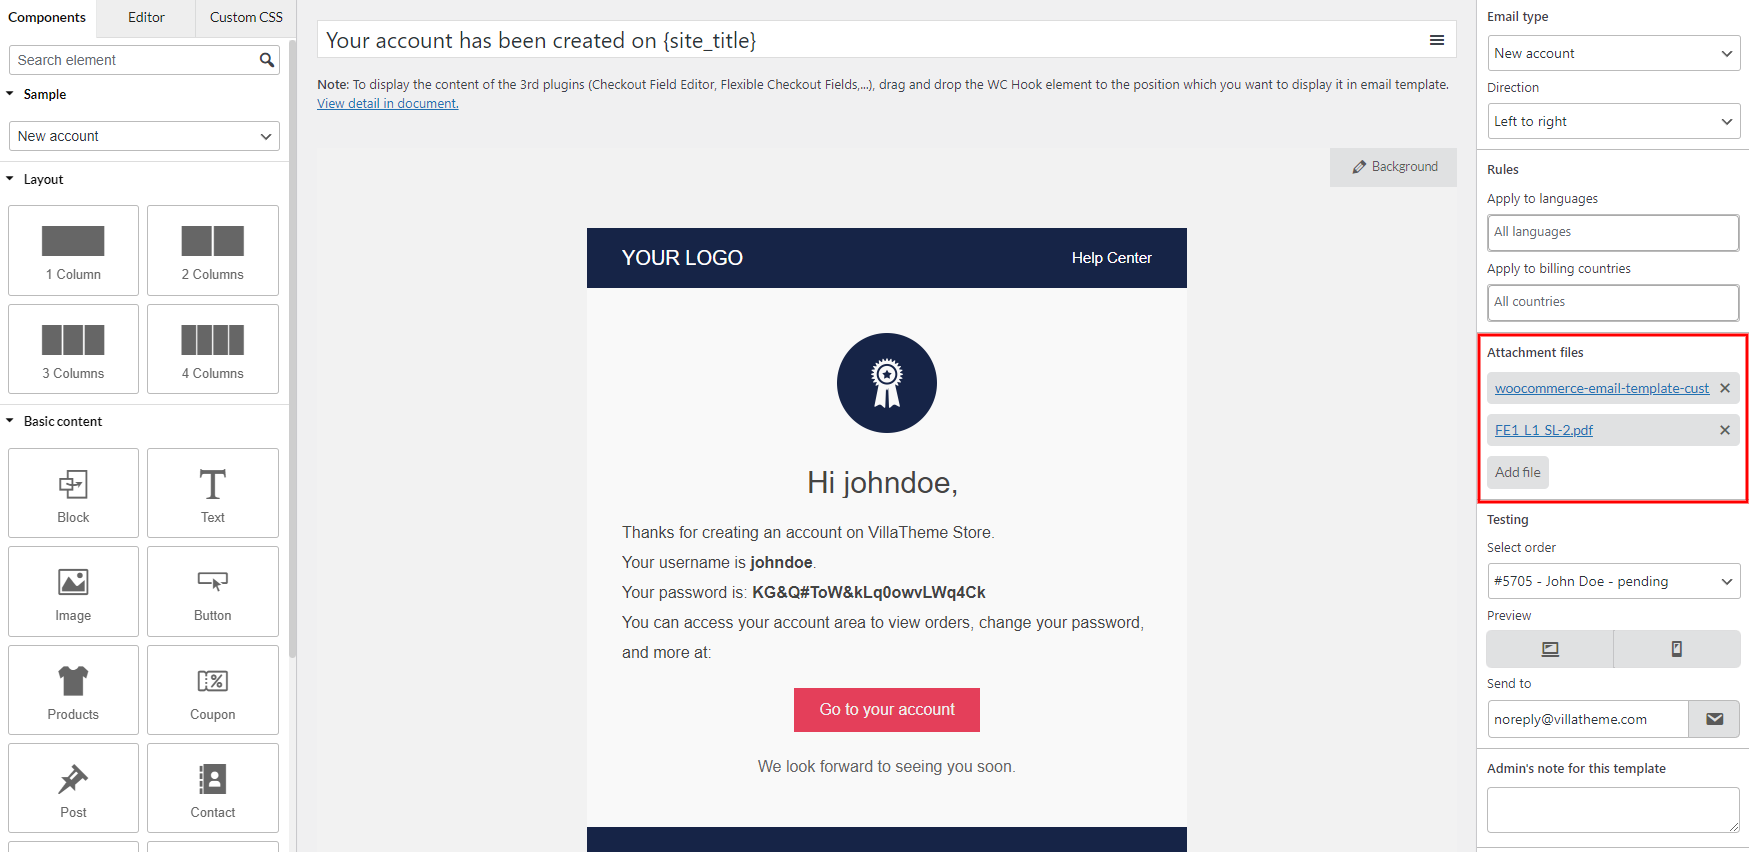
Attach file
You can add file(s) to the template. Once the template is sent, the file(s) will be sent along as the attachment(s).
Note: This function can’t be used along with dynamic data files. For example: If you use another plugin that can generate file with data based on each user’s particular order, those files generated can’t be attached.
Simply click the “Add file” button, then select the file(s) to attached.
Preview & Send test email
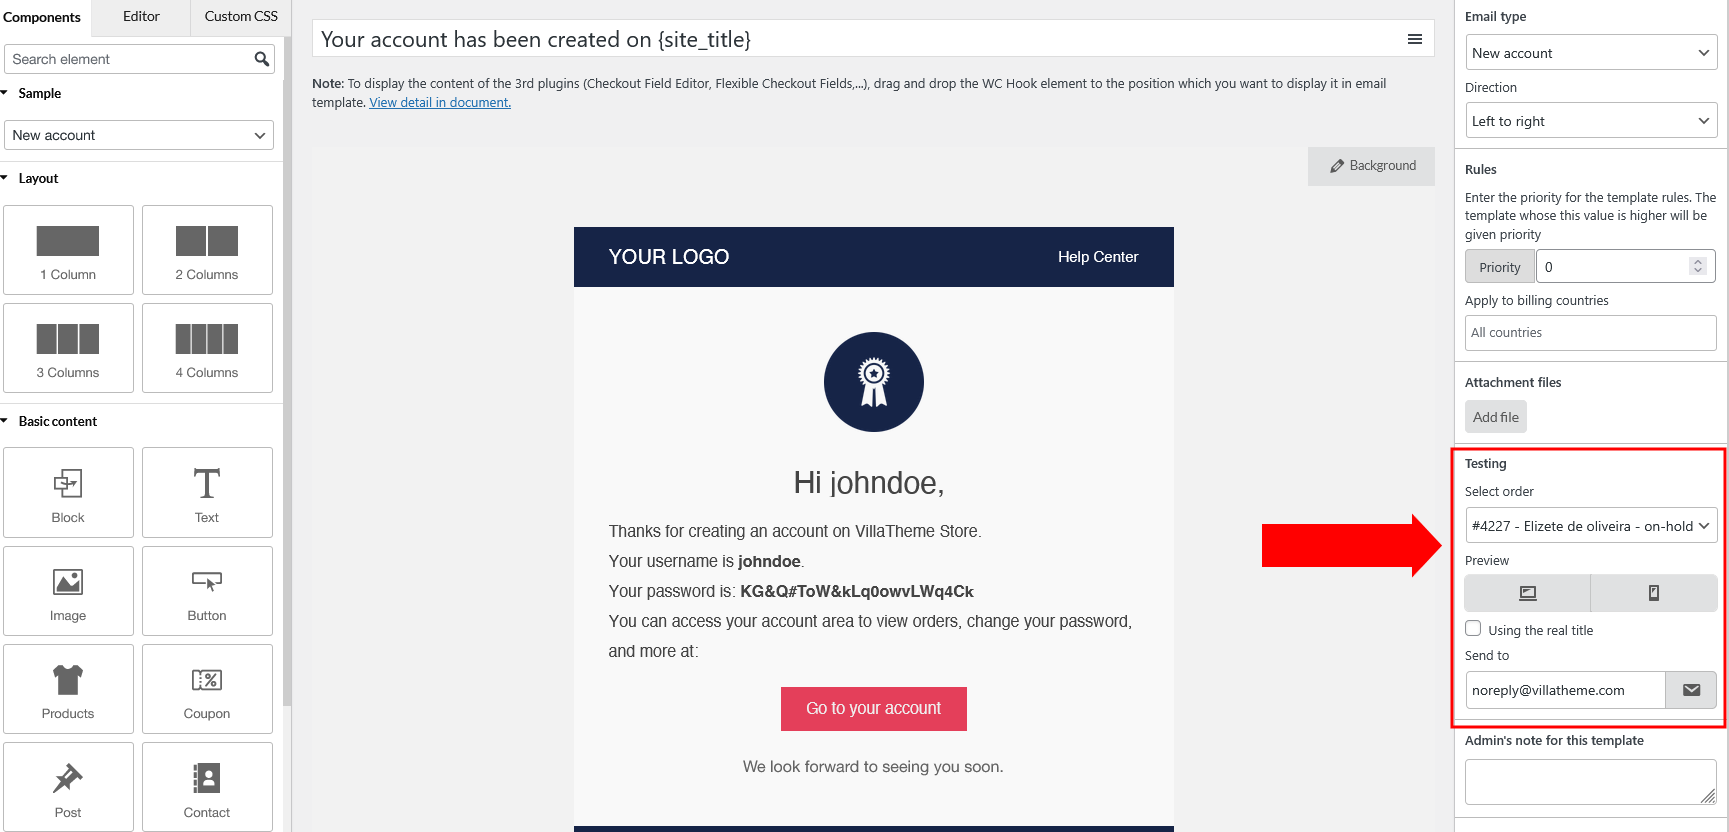
When you build a new template and want to see how this template works when it’s sent, especially in a particular situation. These functions in the Testing field can help.
PREVIEW
First, to preview the email, simply click these 2 buttons to view the template on Desktop and Mobile devices in “Preview”
SEND TEST EMAIL
If you’re not certain with the Preview, send a test email so you can see how email works.
Step 1: Select a particular order in the “Select order” field. The real latest order for each status on your site will be updated here. Only one for each status for testing purpose.
Step 2 (optional): Check the “Using the real title” option if you want the test email to show the actual email subject instead of the default test title “WooCommerce Email Customizer test email template” (which is normally used to help distinguish test emails).
Step 3: Enter your email to send the test email to the “Send to” field.
Step 4: Click the “Send test email” button.
Note:
Normally, the test email can be sent properly. Once it’s sent, you’ll see a green message letting you know the test email is sent successfully.
If it’s not sent, there’ll be a red message letting your know which reason caused this issue. You would need to check if the problem happens to only test email, or even the real email. In that case, please try these trouble shooting steps.
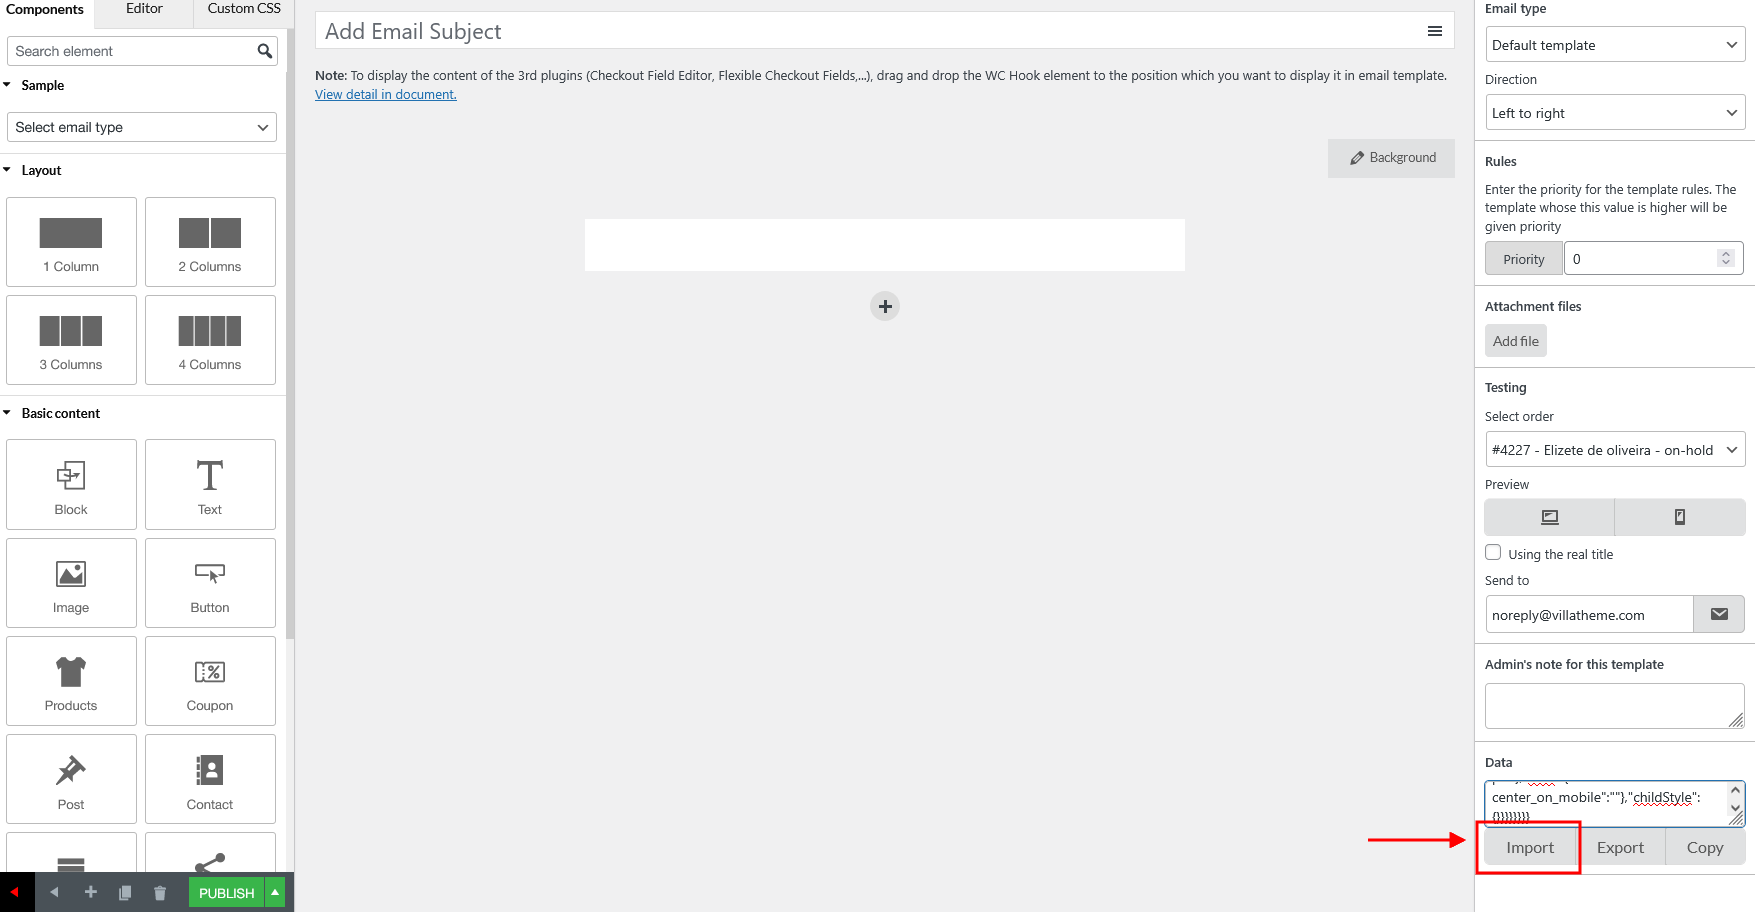
Import & Export Templates
These settings allow the admin to export a template, and import it back to another blank template, on the current website or on other websites (there must be WooCommerce Email Template Customizer installed and activated on those websites).
This function saves your time, you needn’t re-make another similar template.
Step 1: In the Editor page of an email template, click “Export”
Step 2: Copy the exported data.
Step 3: Go to a blank template, paste the copied data to the “Data” field. >> Click “Import”
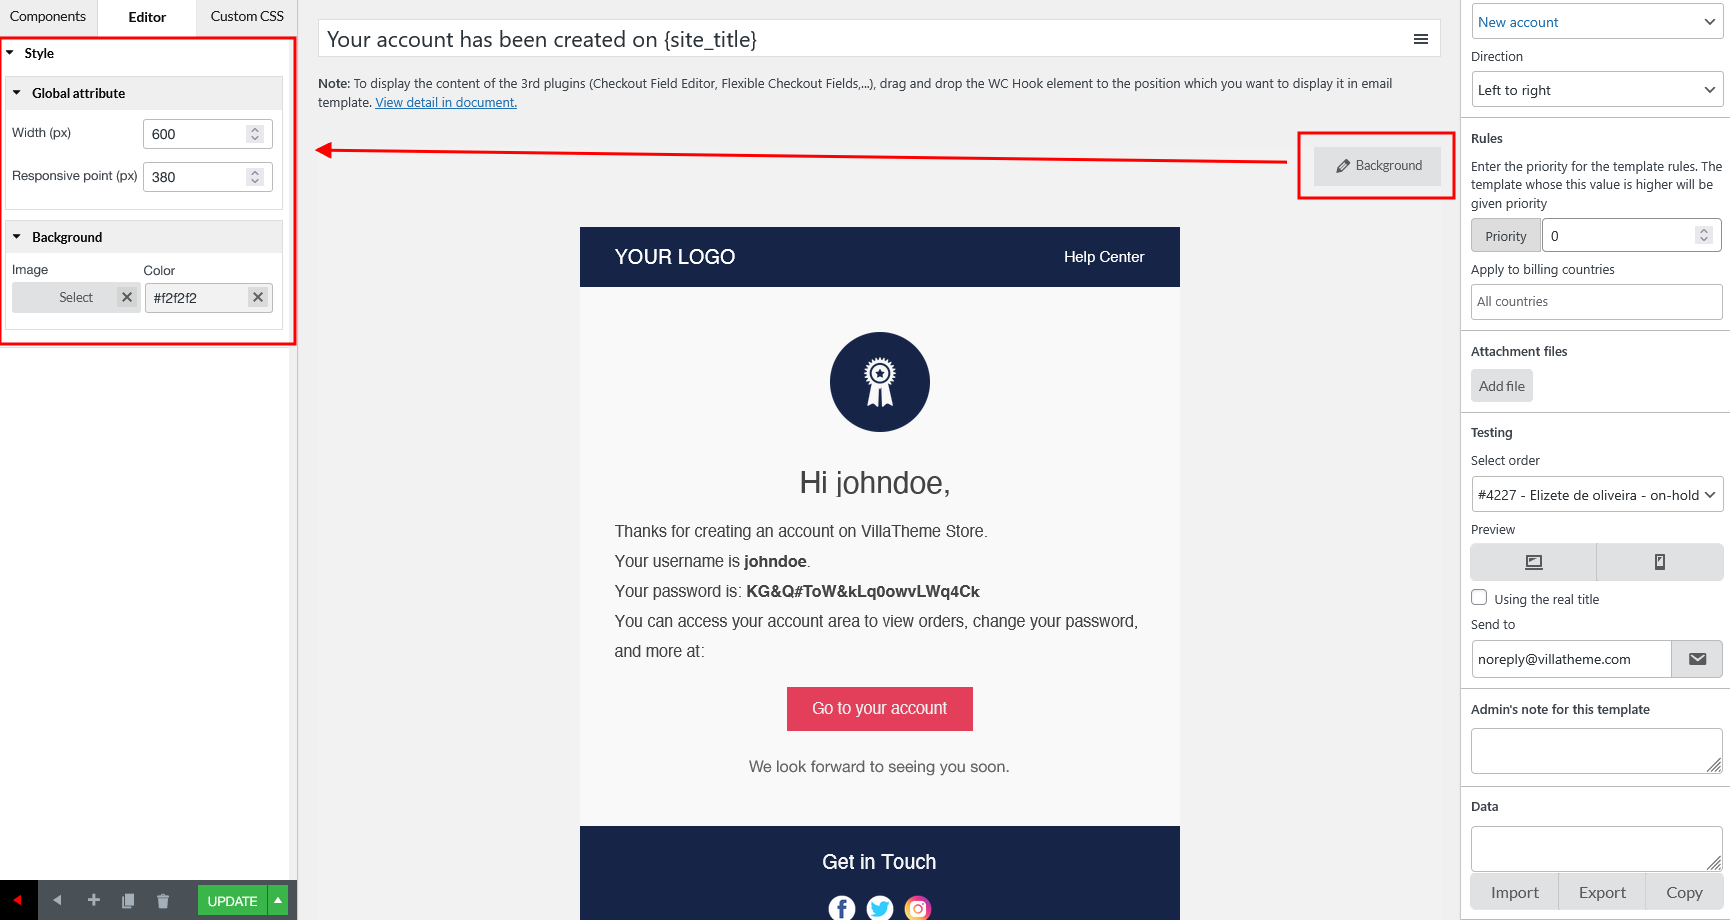
Background & Responsive point
In this part, we’ll learn how to edit the email background and make it display responsively on any device.
First, click “Background”.
In the Editor zone, you’ll see options to customize the email background and the responsive point.
Email Background
There’re 3 options to edit the email background – Width, Image and Color.
Width (px): Make the background width fit your screen size. The change is applied instantly after you enter a new value here.
Image: Click the “Select” button to choose the image for the email background from your media. Click the “x” button to remove the background image
Color: Similar to Background Image. Choose the color for the email background.
Responsive point (px)
If you view the email template via Preview mode, but you’re still not happy with how it looks on different screen. You may want to make the email on the desktop and mobile look the same, or perhaps you want elements on mobile look bigger than how they look on desktop.
Responsive point will help you with that. It allows your email content to flow freely across all screen resolutions and sizes, and renders it to look great on all devices. The higher responsive point, the bigger element.
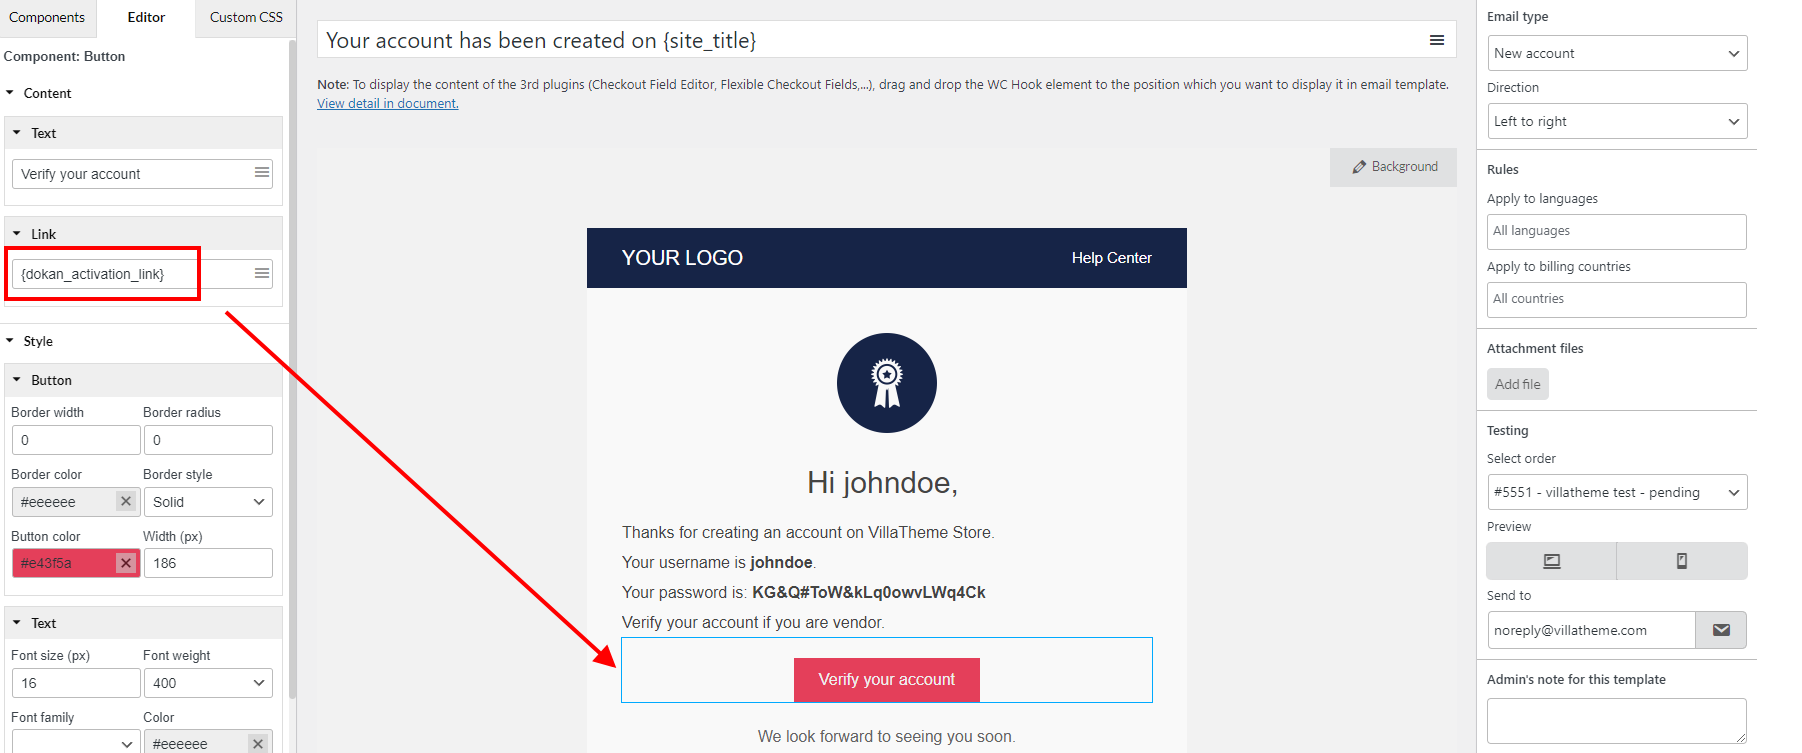
In the premium version of Dokan, when a vendor account is registered, the “New account” email is triggered and you can enable an option to add a verification link into the email, it would look like this:
When you build the “New account” email using our plugin, and you enable this verification link in the Dokan settings, then you can use this shortcode to show the link in our email template: {dokan_activation_link}