Copyright Villatheme 2015-2026
Created: 2017.02
Latest updated: 2026.06 – Updated version: 1.3.1
By: VillaTheme Thank you for purchasing our plugin. If you have any questions that are beyond the scope of this documentation, please feel free to request support at our Support Forum. Thanks so much!
Make sure that those limits to a minimum as follows in order for free-trouble while installing:
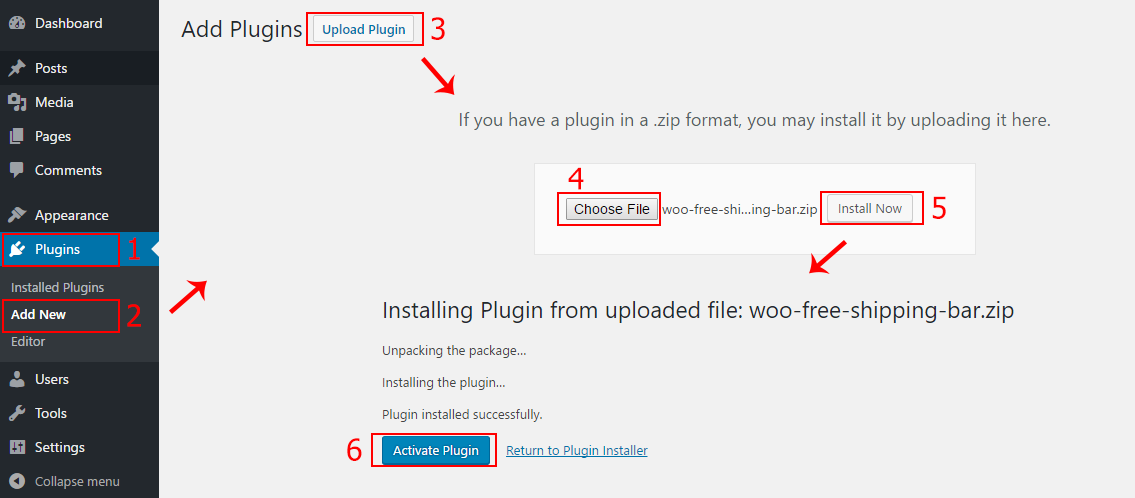
Go to Plugin >> Add New >> Upload Plugin >> Choose file >> select file zip plugin >> click “Install Now” >> click “Active plugin”.
Done! Let’s start using plugin.
Install and Set up Video:
After installing and activating the plugin, you need to:
1/ Go to: WooCommerce > Settings > Shipping.
2/ Select a Shipping Zone, Click Edit
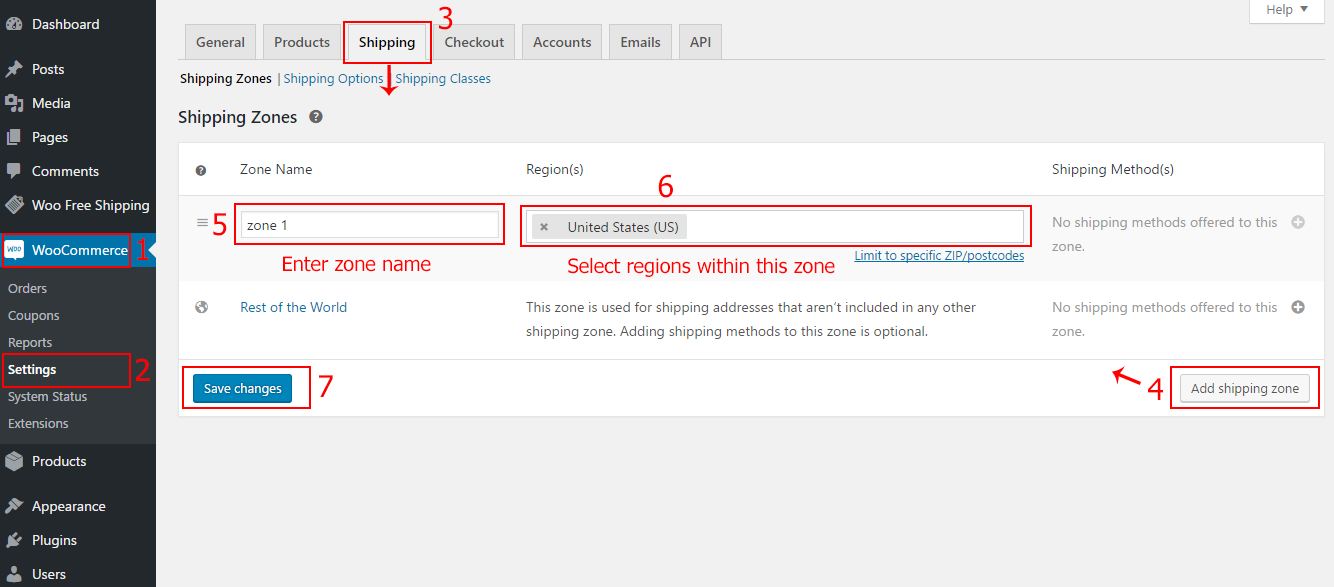
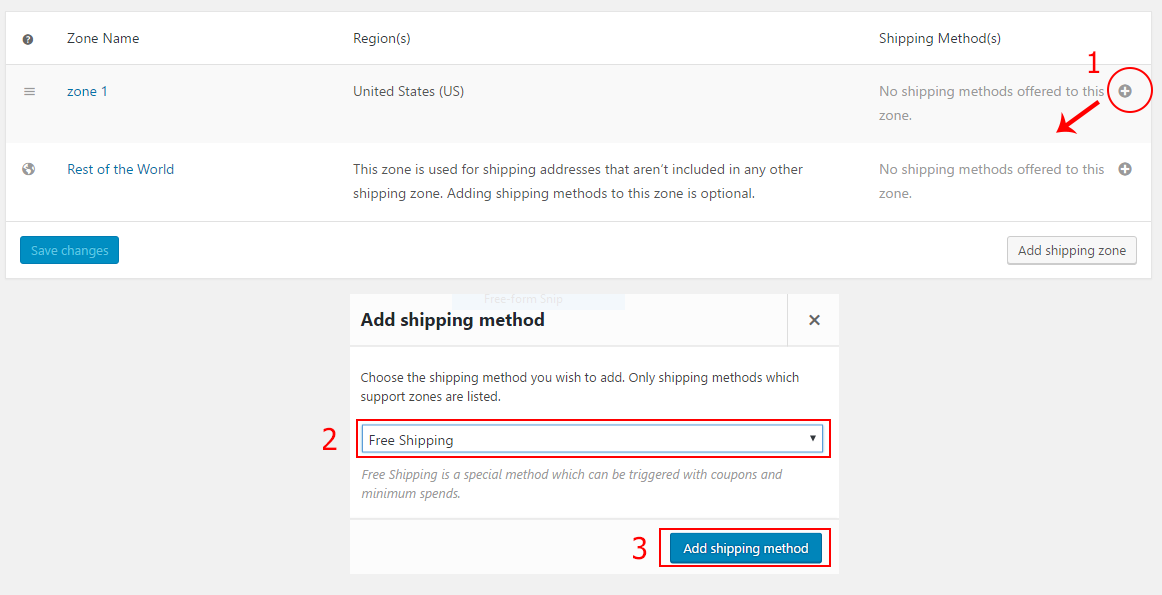
3. After that you need to add a shipping method >> Choose Free Shipping >> Add shipping method.
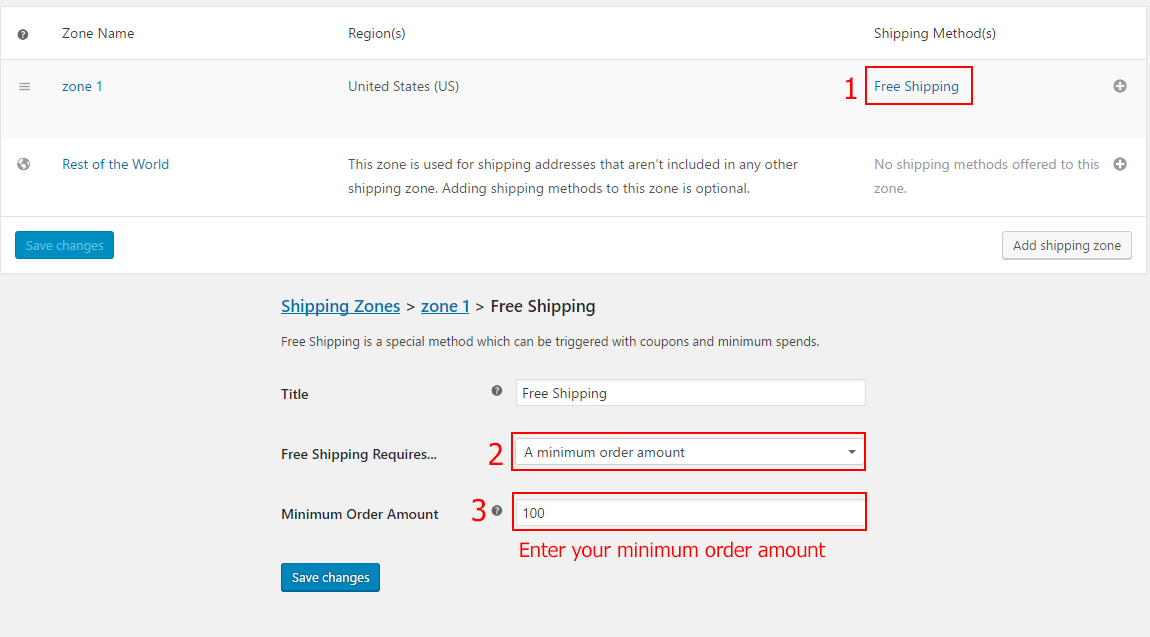
4. Click to Free Shipping >> setting a minimum order amount for this free shipping zone
After installing and activating plugin, you need to configure to show Progress bar:
In the general settings, you will enable the plugin’s functions and select free shipping zones.
Go to Woo Free Shipping > General.
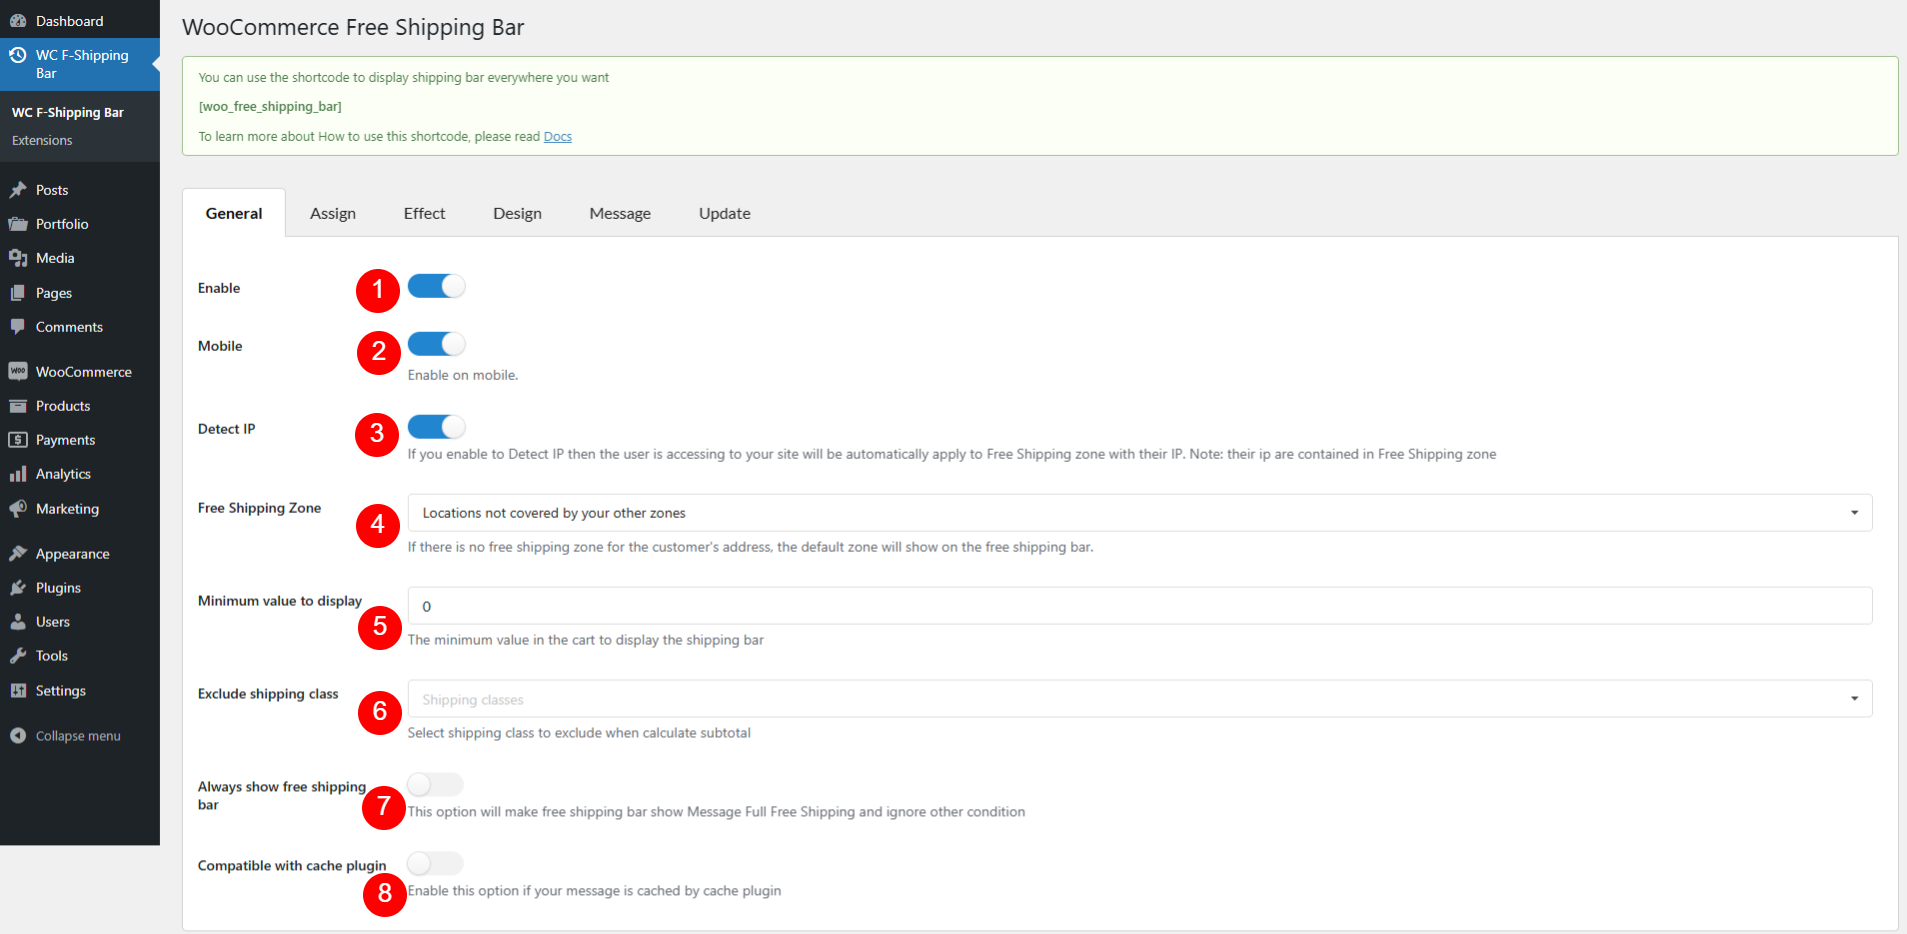
1. Enable: Turn on Woo Free Shipping Bar plugin on desktop.
2. Mobile: Use this option to show free shipping bar on mobile device.
3. Detect IP: The plugin will detect customers’ countries based on their IP Addresses and display a free shipping bar respectively with that shipping zone at the country level.
* Note:
+ If set, the “Free Shipping Zone” option will not be used. If no IP is detected, the shipping bar will show the general zone that’s set in WooCommerce shipping settings > Locations not covered by your other zones.
+ This option can be applied to detect at the country level, not working for states or provinces and regions within a country.
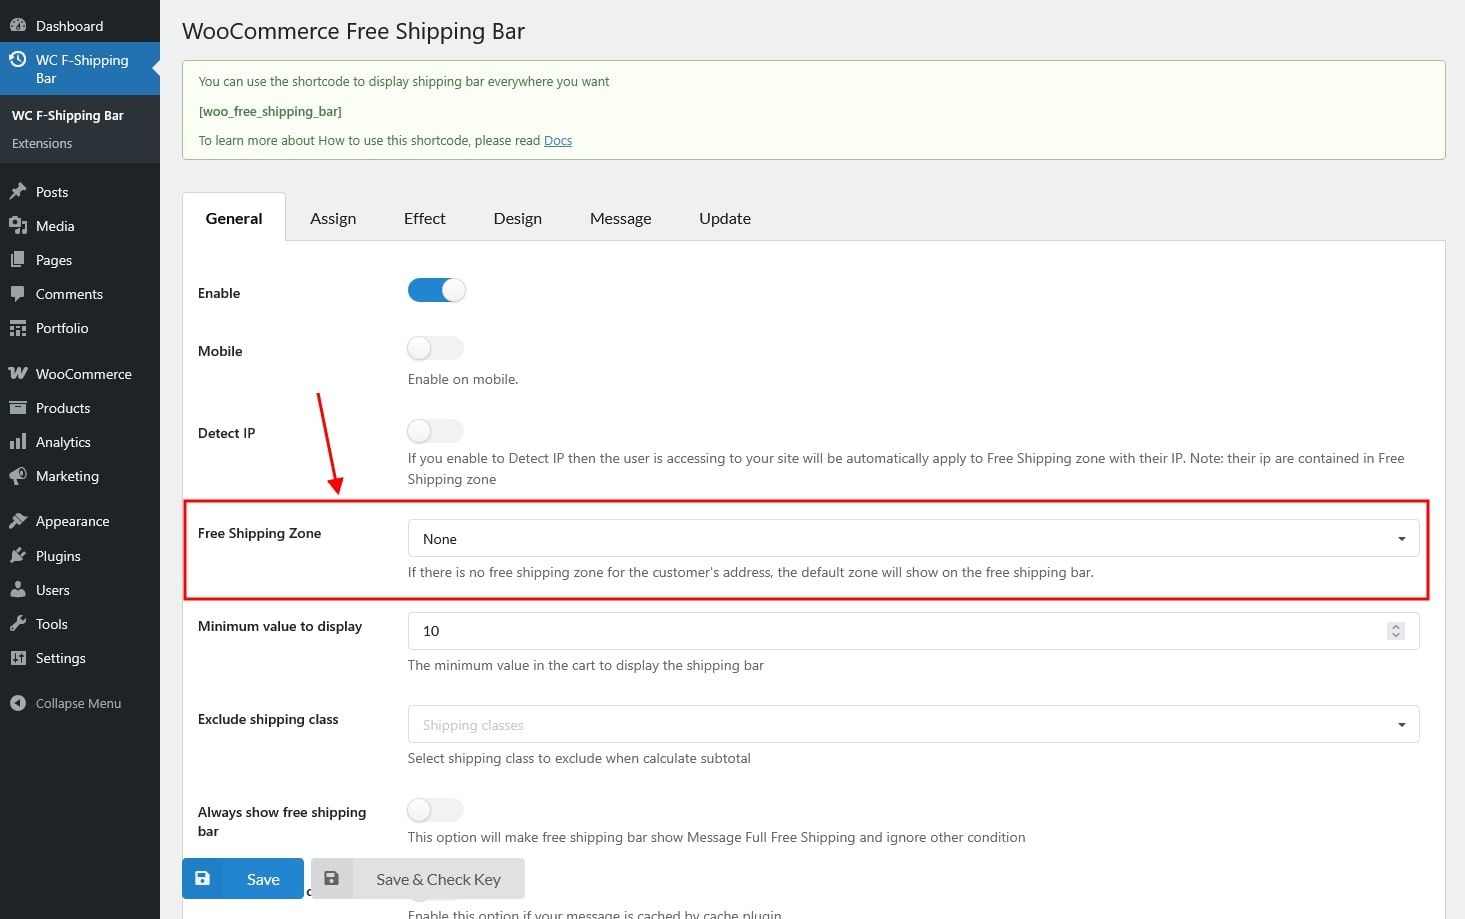
4. Free Shipping Zone: If no free shipping zone is available for the customer’s address, the default zone will be displayed on the free shipping bar
5. Minimum value to display: Only display free shipping when the cart value reaches this one
6. Exclude shipping class: This feature helps you to exclude calculating free shipping for the product shipping classes you set in WooCommerce.
7. Always show free shipping bar: Show the free shipping bar with Message Full Free Shipping regardless of conditions
8. Compatible with cache plugin: Use this option if you message is cached
The Assign section allows you to select on which pages, the free shipping appears or hides.
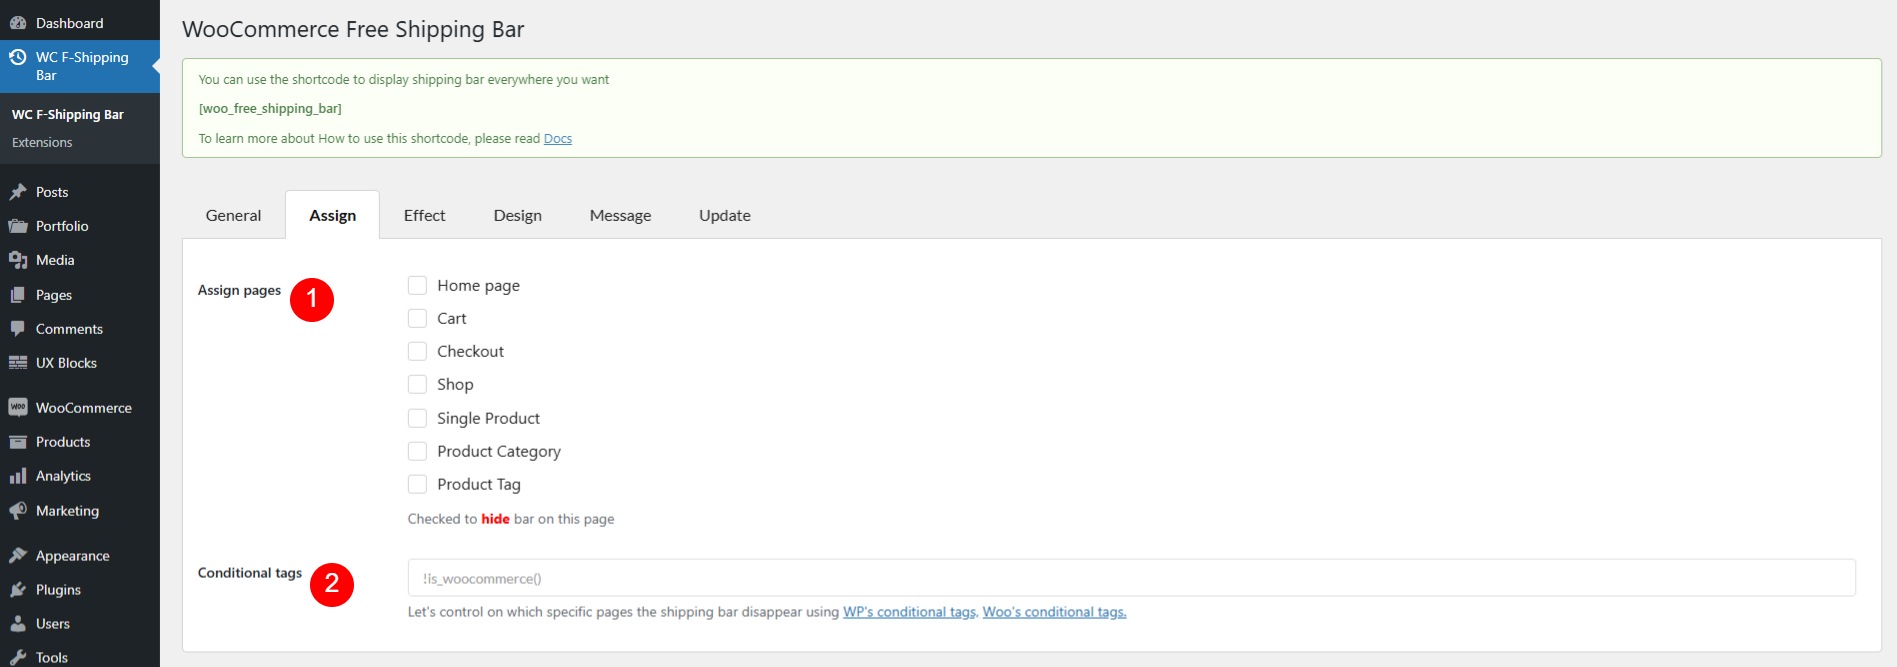
1. Assign pages: Tick on the boxes on which you want the free shipping bar to be hidden.
2. Conditional tags: Show/Hide the free shipping bar on specific pages as per your needs using WordPress and WooCommerce conditional tags
Our plugin supports assigning the free shipping bar on certain pages using WP’s Conditional tags. To handle WP’s Conditional Tags, this plugin uses eval() which is very dangerous because it allows the execution of arbitrary PHP code. Therefore, please only fill this field with proper conditional tags which are validated and/or provided by trusted developers.
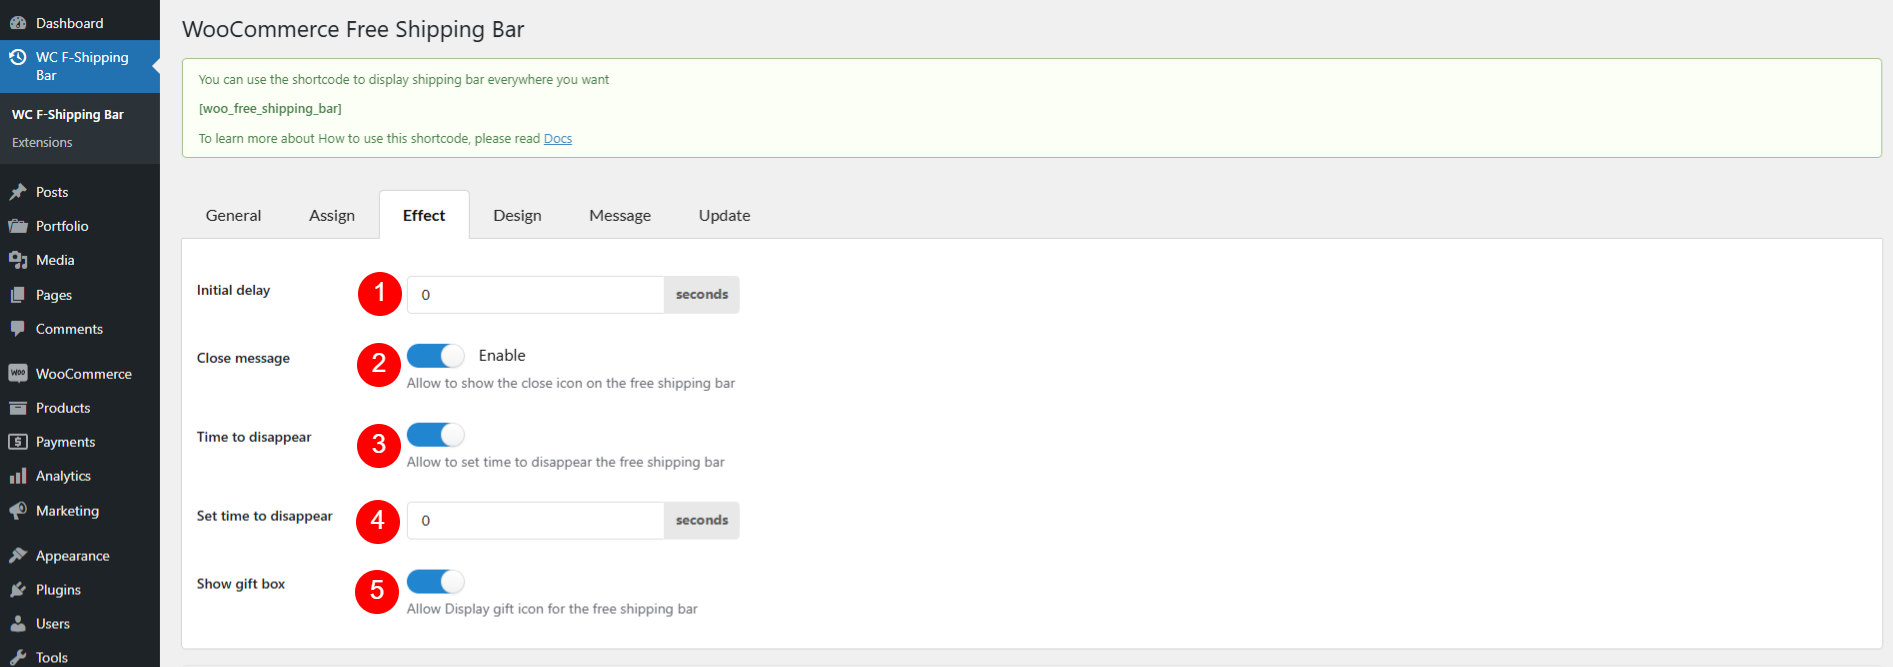
1. Initial delay: After this time, the free shipping will be automatically hidden. It will appear again until you load the page or change to another page.
2. Close message: Enable to display the close button on the free shipping bar, click on it to close the free shipping bar on the front end.
3. Time to disappear: Enable to allow to set up a schedule for hiding the free shipping bar.
4. Set time to disappear: Set a time value to hide the free shipping bar.
5. Show gift box: Enable to use an icon to open the free shipping bar. Go to the Design tab to select a style of the icon: Truck or an uploaded image.
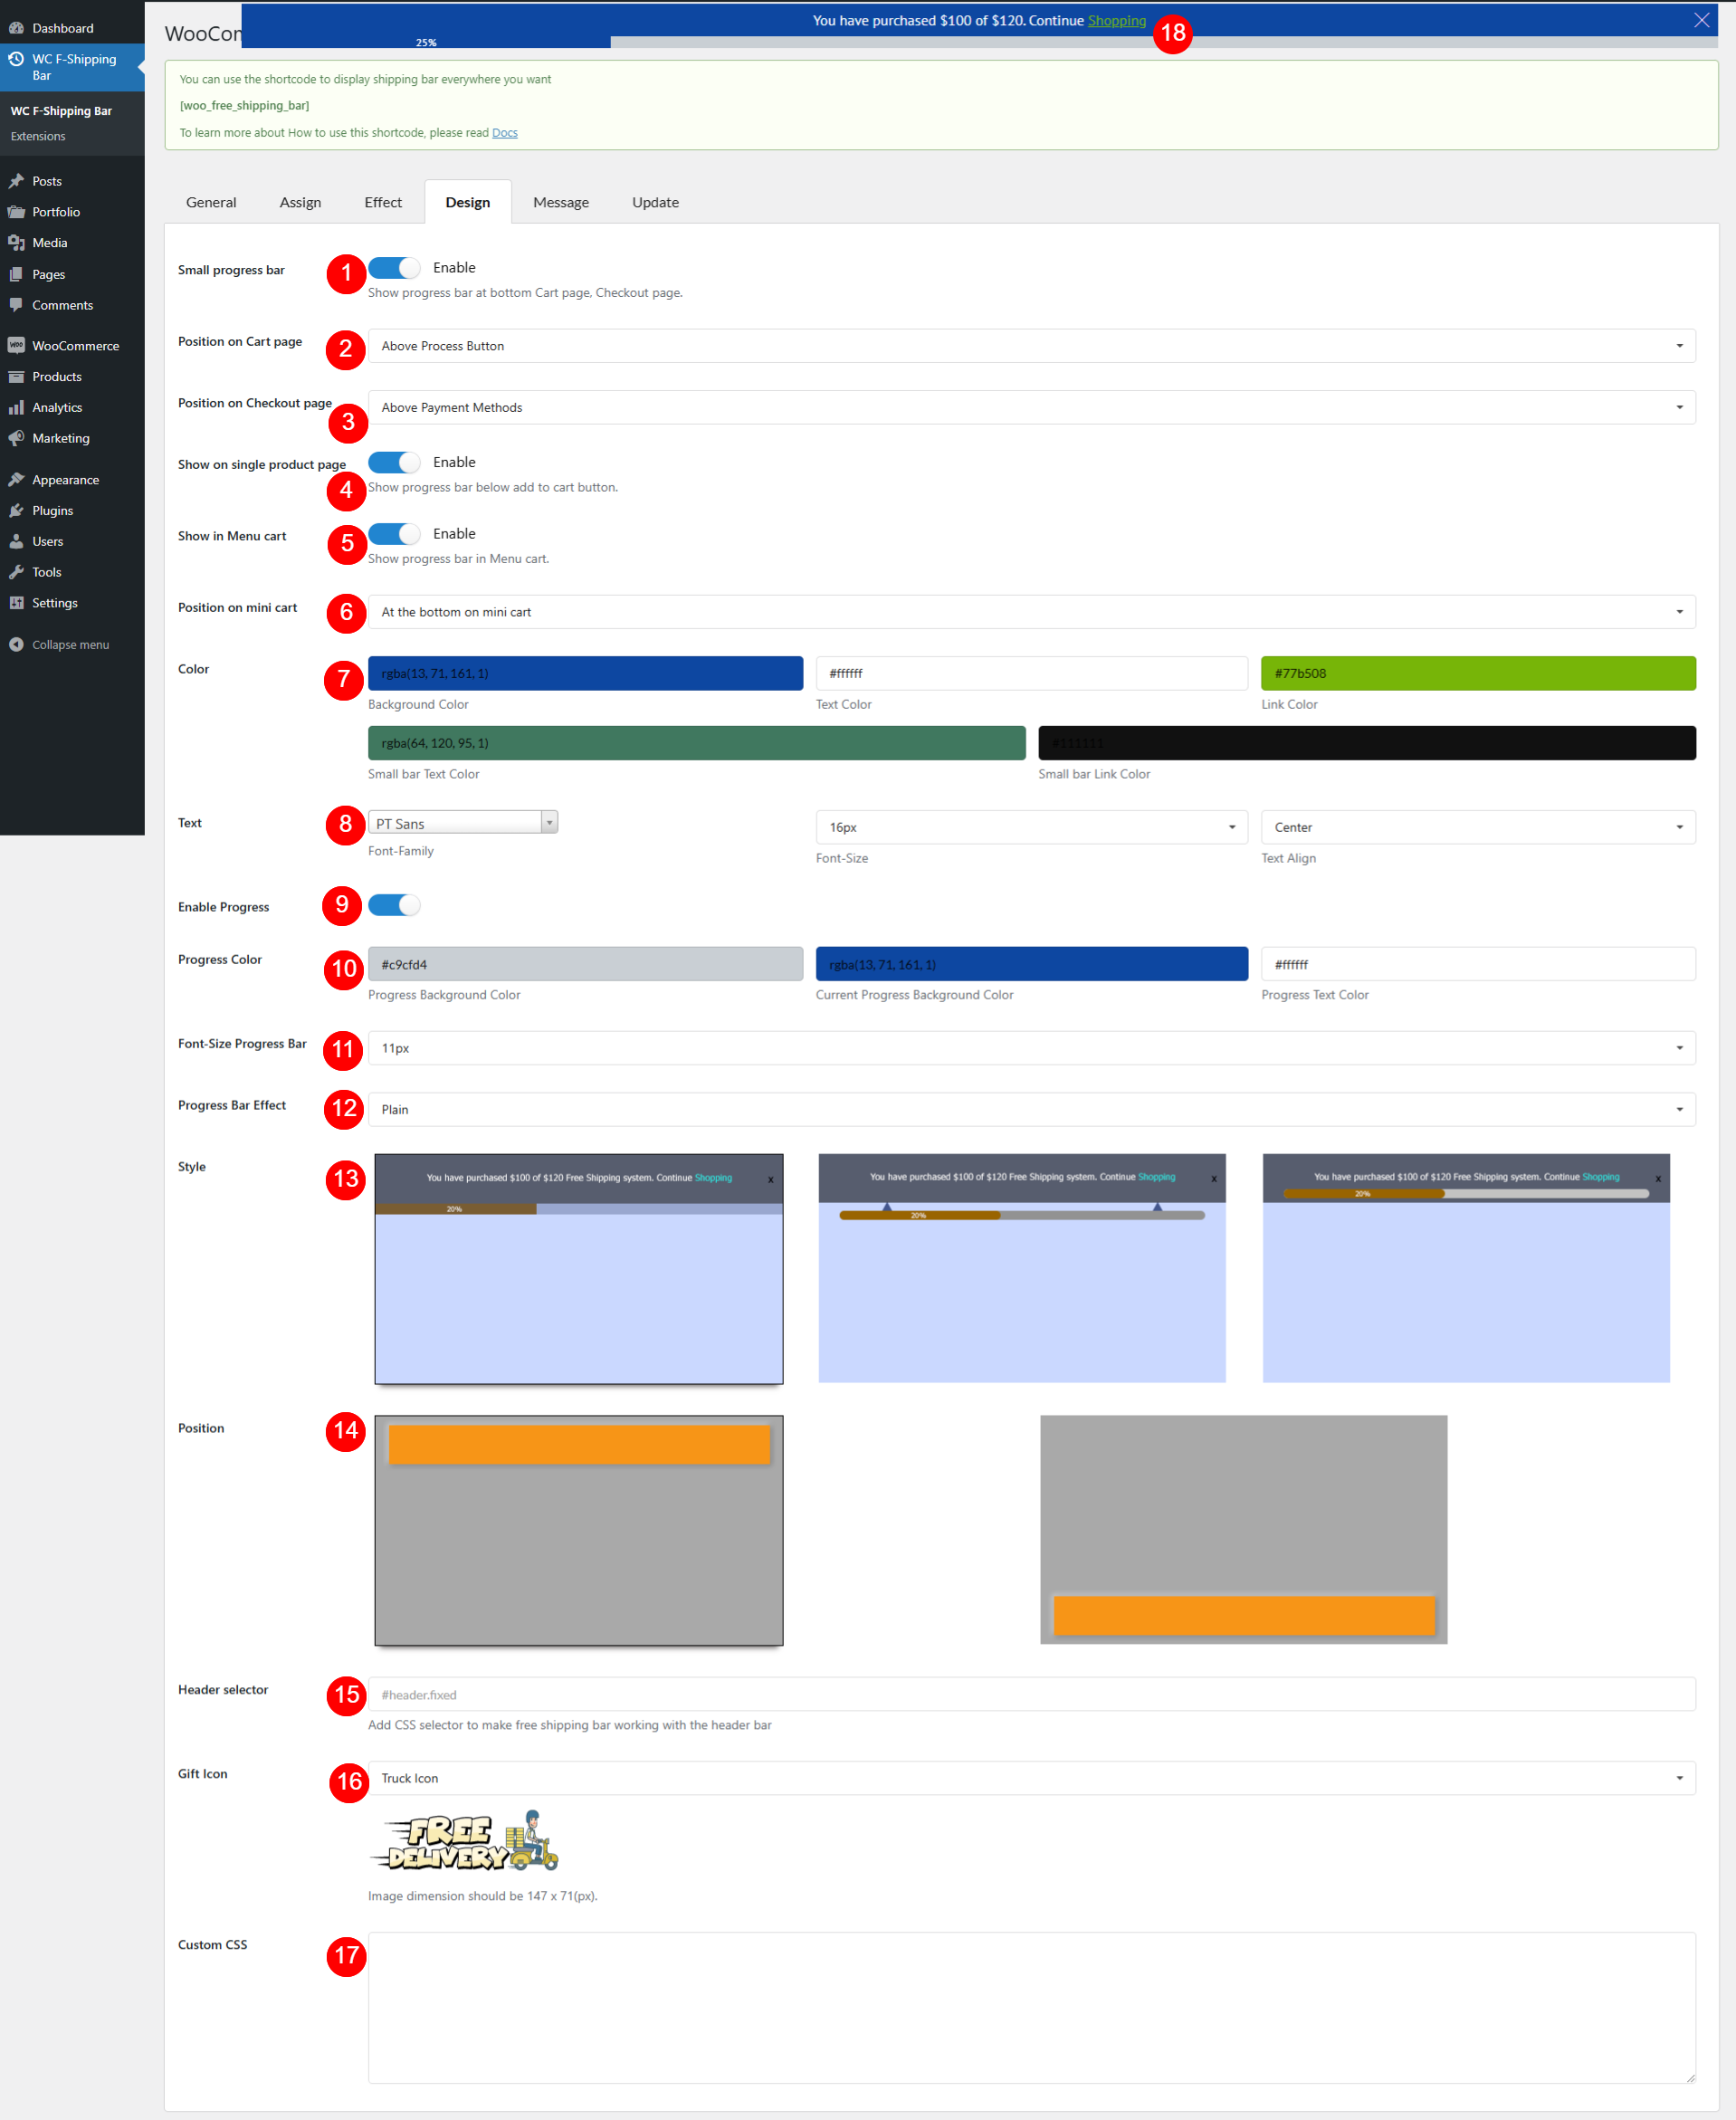
In the Design tab, you can configure how the free shipping bar, progress bar display on the front end.
Go to Woo Free Shipping Bar > Design.
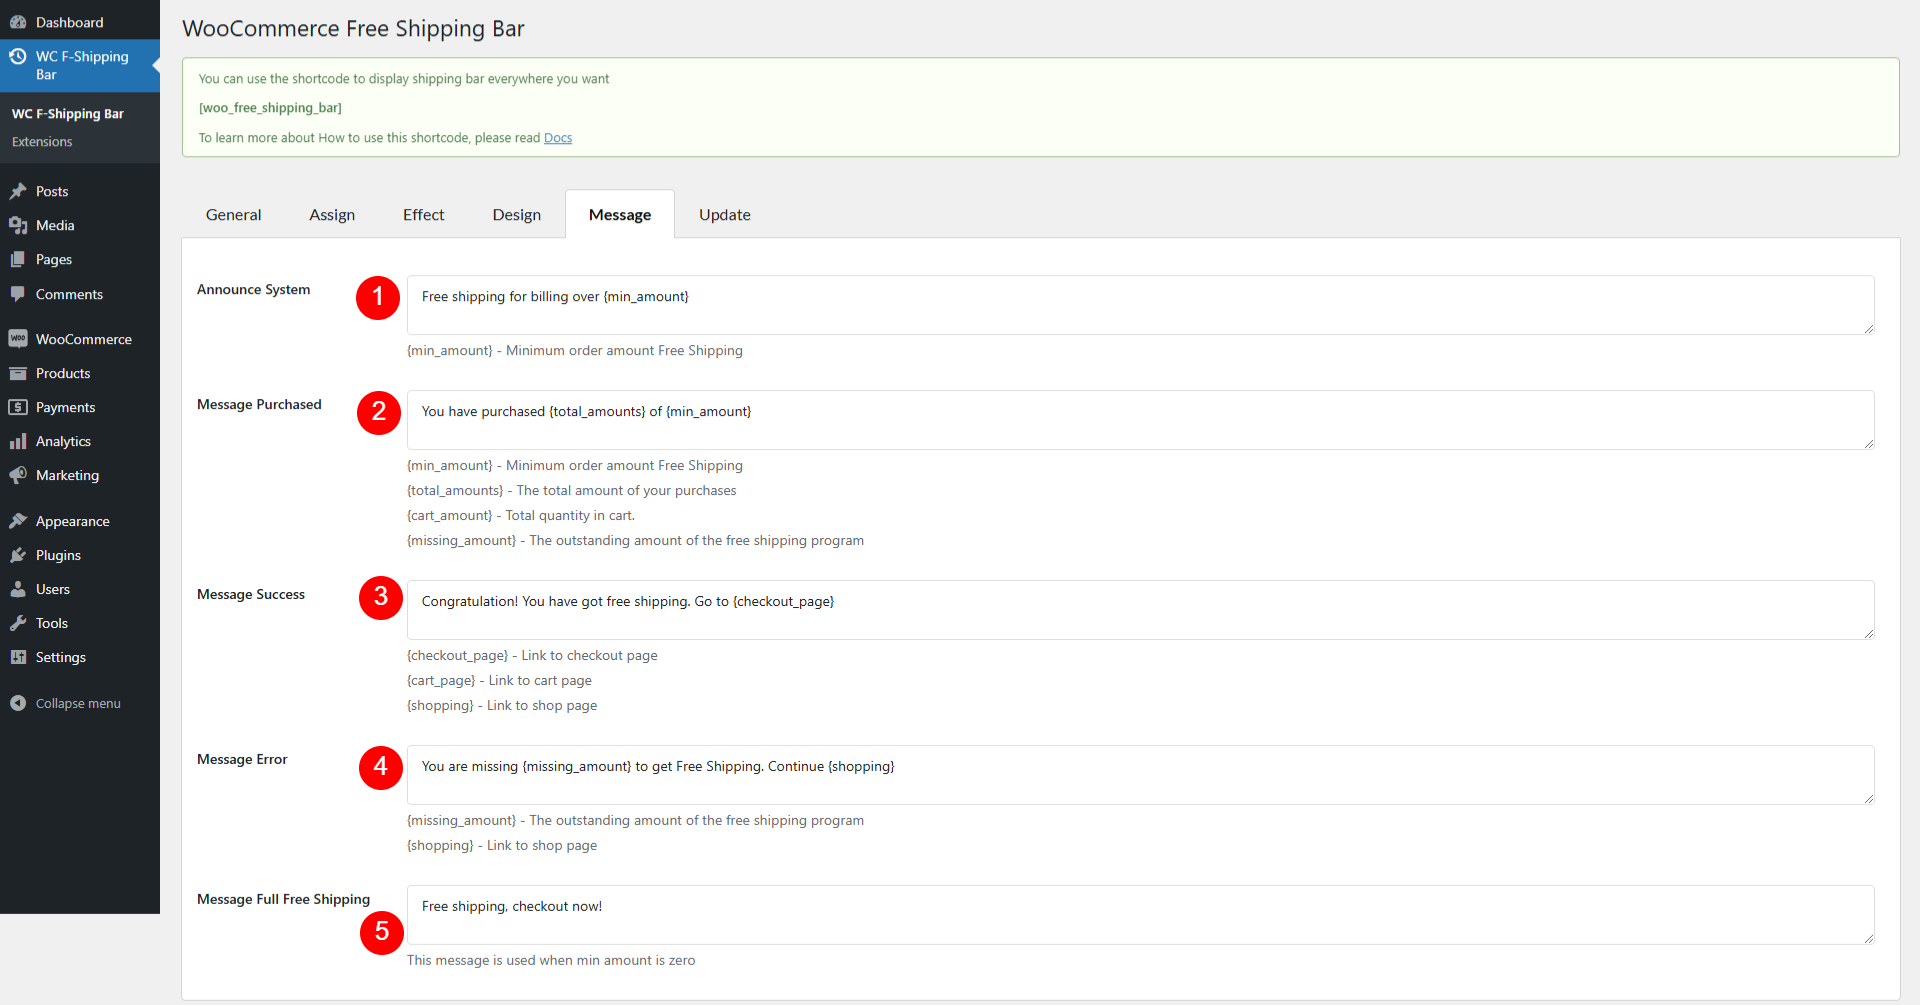
{min_amount}
{total_amounts}; {cart_amount}; {min_amount}; {missing_amount} For example, You have purchased {total_amounts} of {min_amount}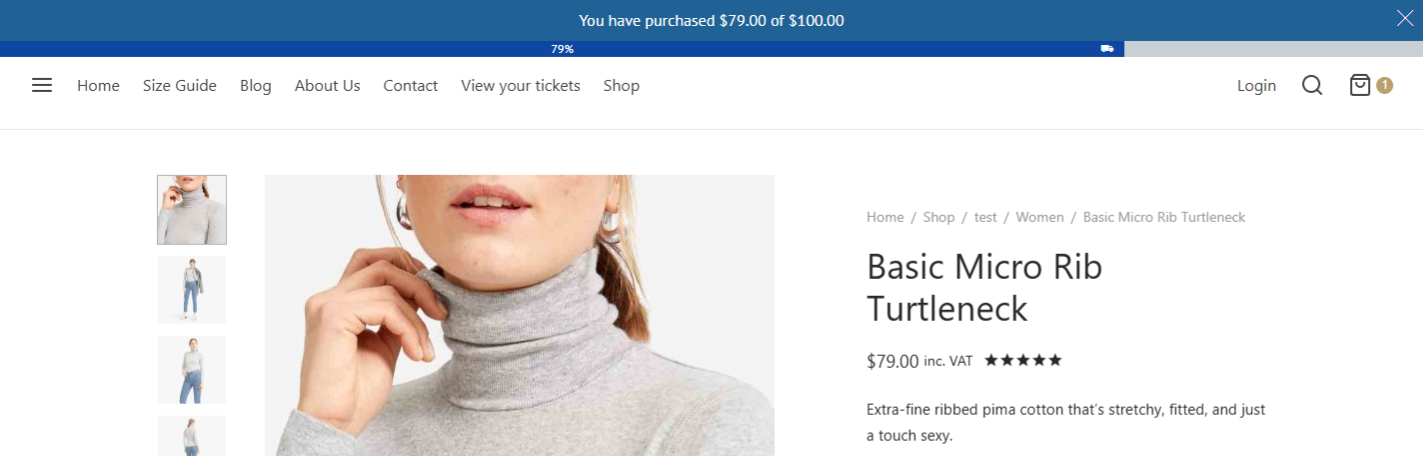
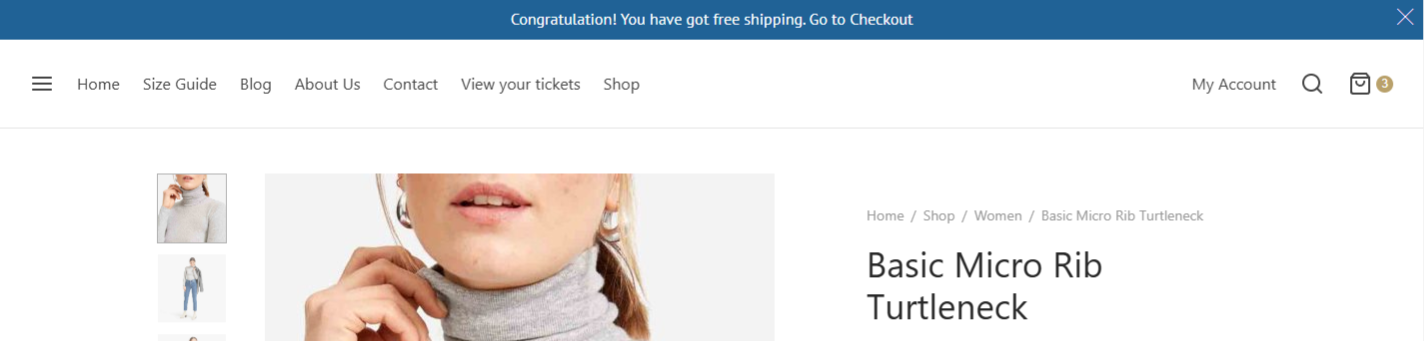
{missing_amount}, {cart_amount}, {total_amounts}, {min_amount}. For example Congratulation! You have achieved enough to be able to get free shipping. Go to {checkout_page}
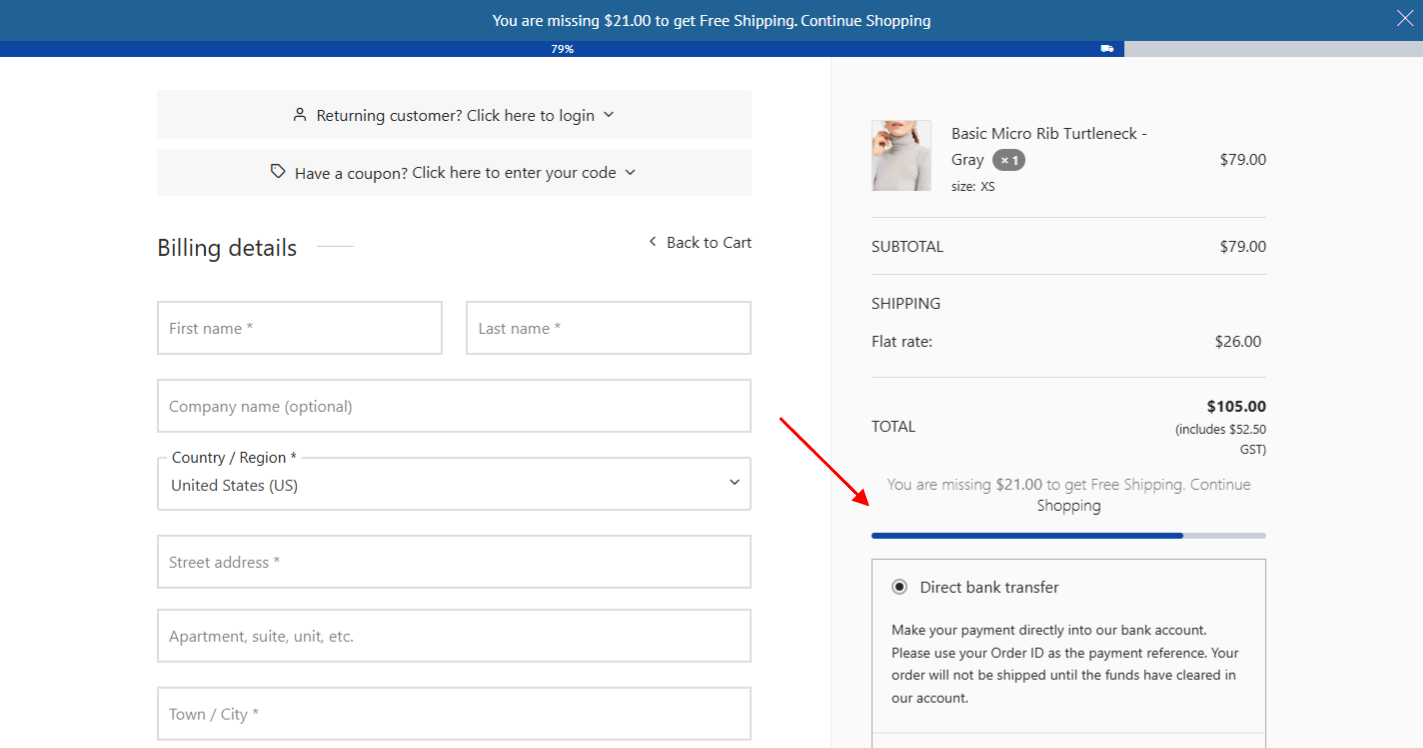
{missing_amount} and {shopping}. Example: You are missing {missing_amount} achieved enough to be able to get Free Shipping. Continue {shopping}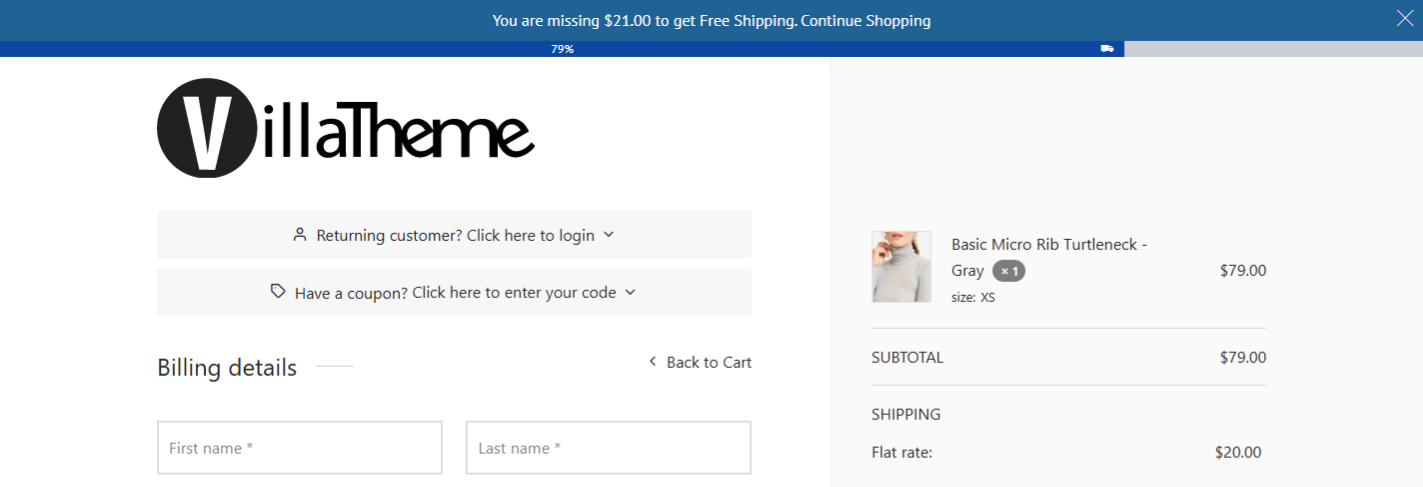

| Plugin | Author |
| CURCY – WooCommerce Multi Currency – Currency Switcher | VillaTheme |
| YITH WooCommerce Frequently Bought Together Premium | YITH |
| WPML |
OnTheGoSystems
|
| Polylang | WP SYNTEX |
| WooCommerce Cart All in One | VillaTheme |
| WP Rocket | WP rocket |
| SG Optimizer | SiteGround |
| FOX – Currency Switcher Professional for WooCommerce | realmag777 |
| WooCommerce Advanced Free Shipping | Jeroen Sormani |
| Flexible Shipping | Octolize |
Watch this tutorial video to set up WooCommerce Free Shipping Bar with multilingual plugins.
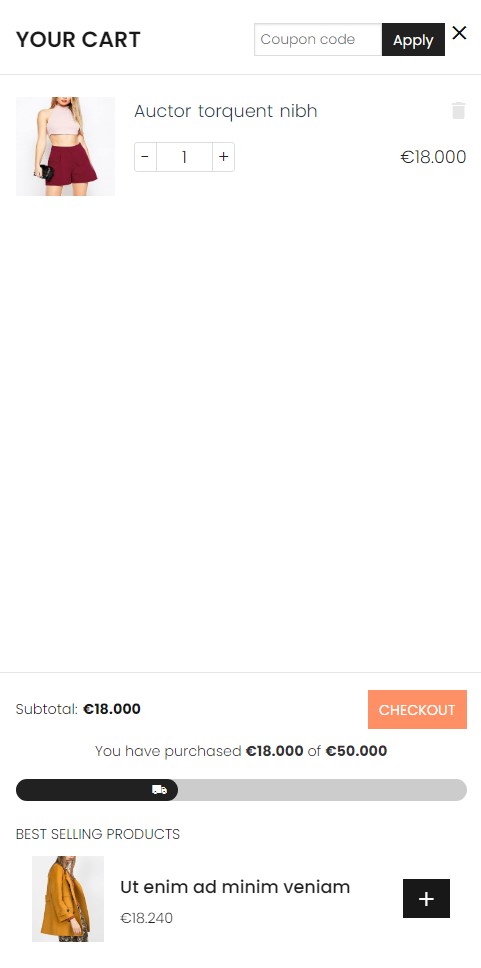
You can display the free shipping bar or WooCommerce Free Shipping bar on the sidebar cart of WooCommerce Cart All in One by the shipping bar shortcode. This feature is available in the premium version of these two plugins.
Step 1: Activate these 2 plugins premium version
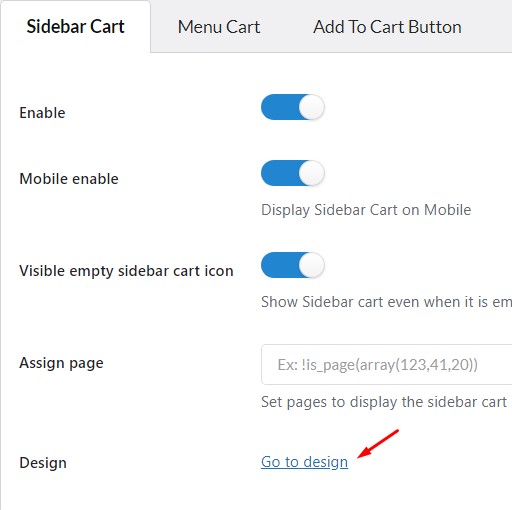
Step 2: Go to Cart All In One > Sidebar cart, go to the Design option.
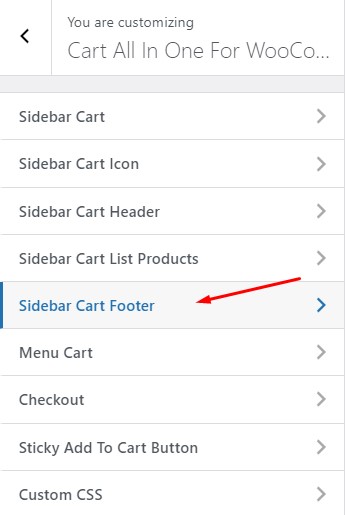
Step 3: In the Cart All In One customization, go to the Sidebar Cart Footer section,
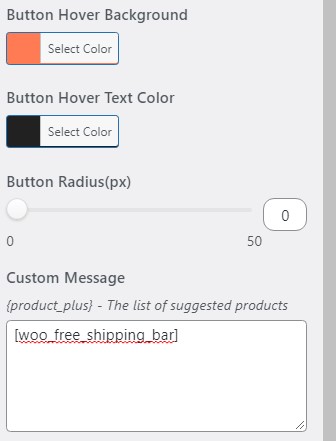
Step 4: In the Custom message option, and the free shipping bar shortcode there: [woo_free_shipping_bar]
Step 5: Configure WooCommerce Free shipping normally and check the shipping bar on sidebar cart.
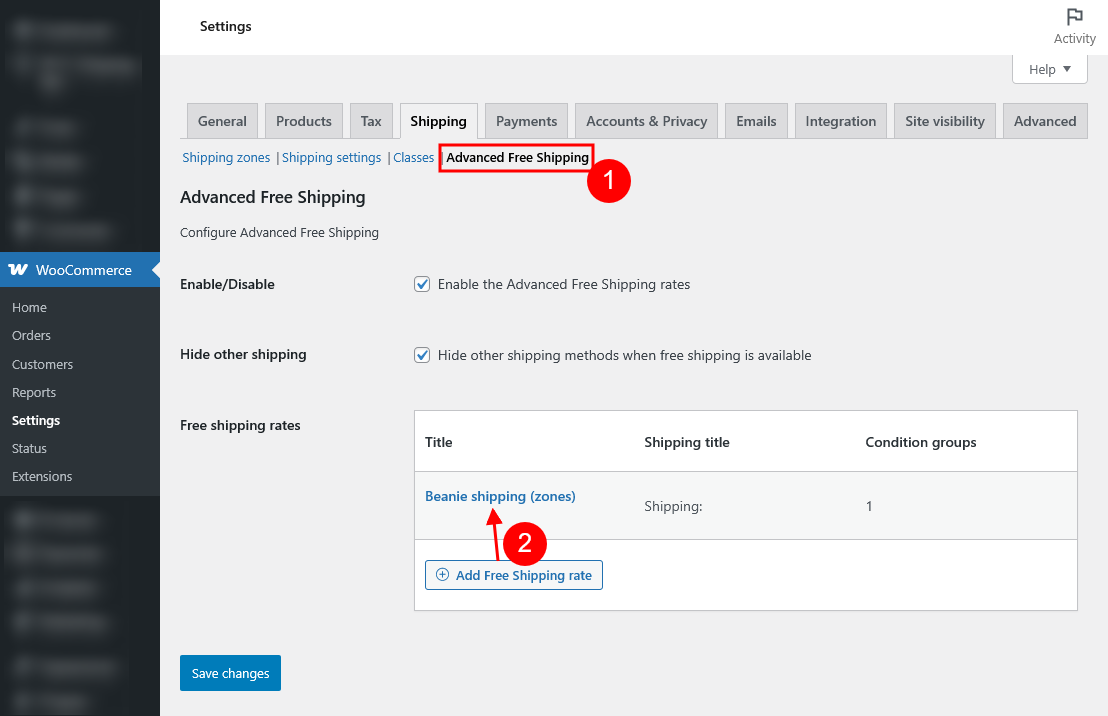
Edit WooCommerce Free Shipping Bar messages in each WooCommerce Advanced Free Shipping rate – except for “Message Full Free Shipping” and “Message Success”.
Step 1: Install WooCommerce Advanced Free Shipping and add advanced free shipping rates
WooCommerce Advanced Free Shipping allows you to create advanced rules to control when free shipping becomes available to customers. Once installed, configure these rules by going to Dashboard >> WooCommerce >> Settings >> Shipping >> Advanced Free Shipping
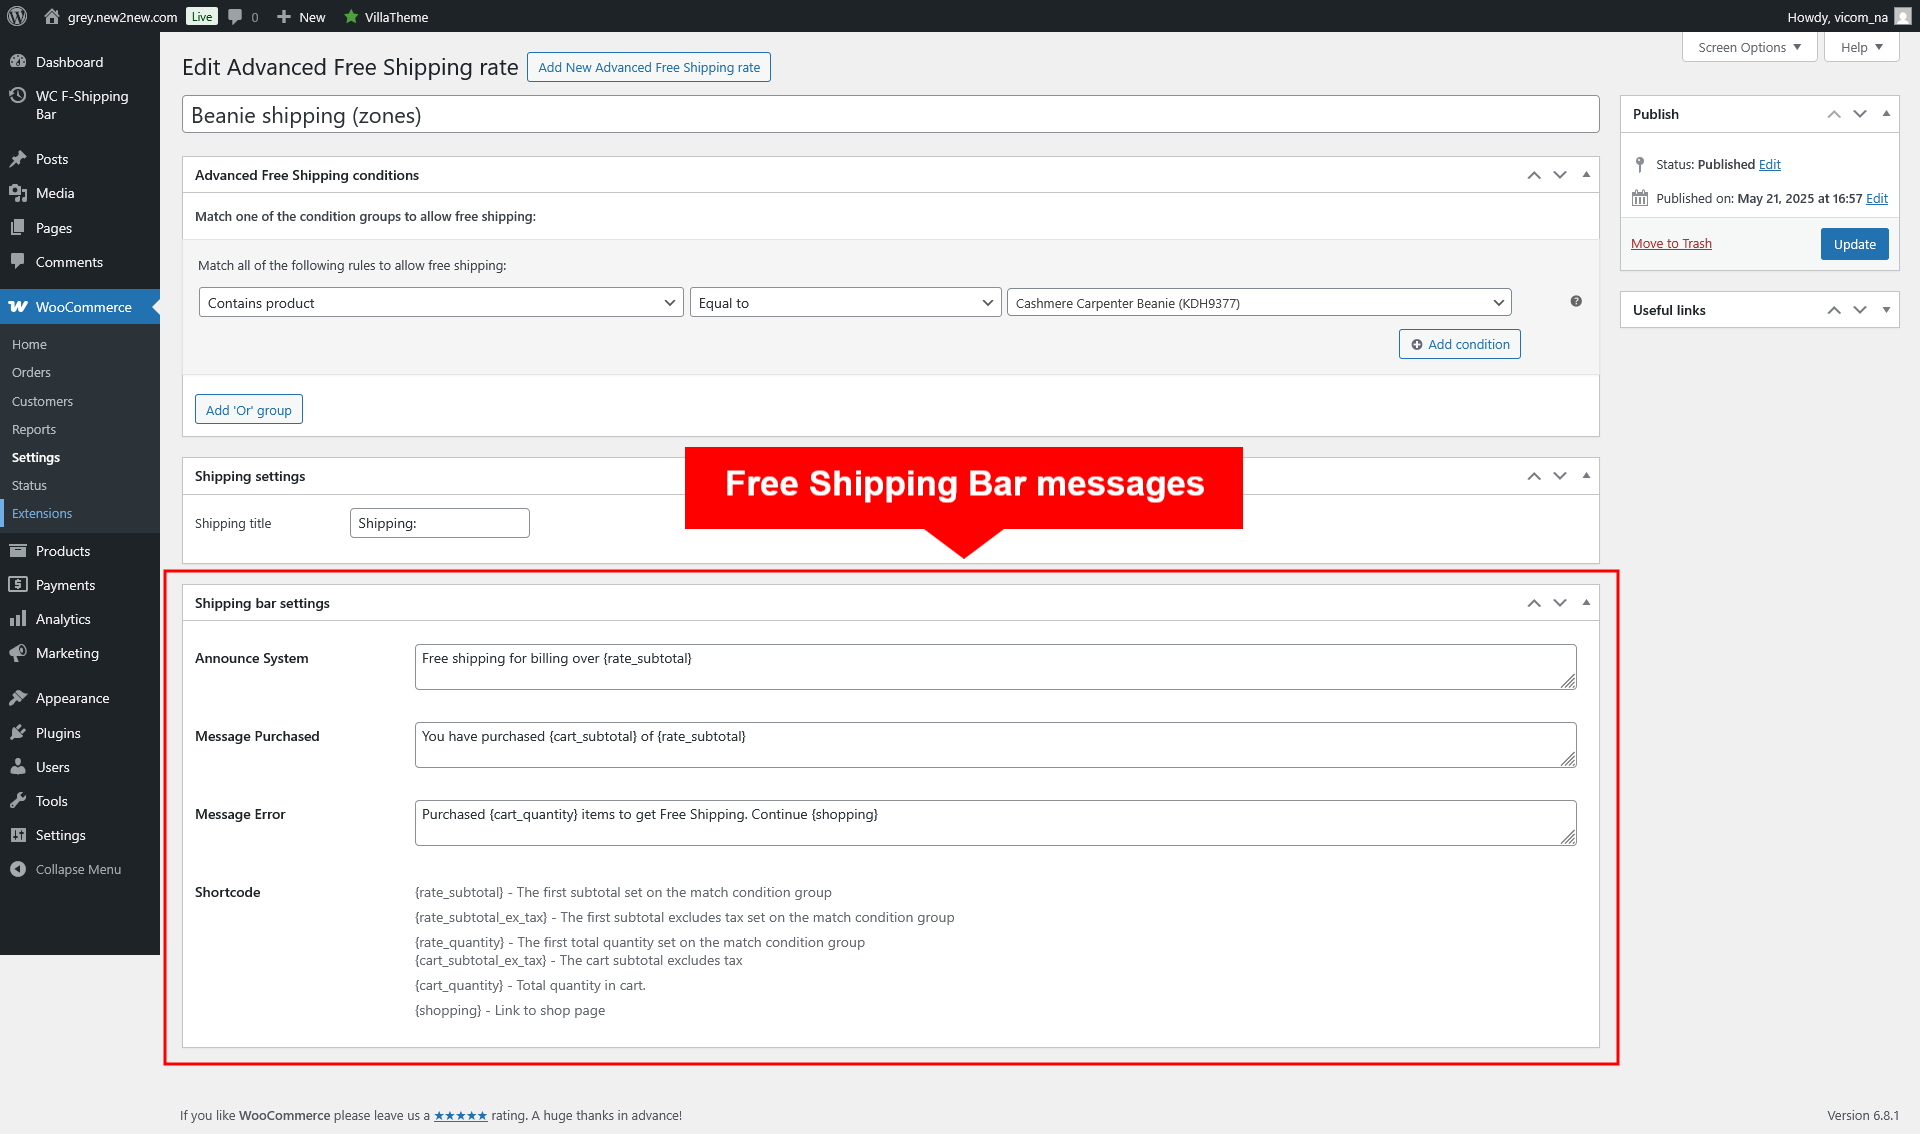
Step 2: Configure custom message for each rate
After activating both WooCommerce Advanced Free Shipping and WooCommerce Free Shipping Bar, you’ll see additional input fields for message content directly within the Advanced Free Shipping rate settings.
The following features do not work when using WooCommerce Advanced Free Shipping rates:
Free Shipping Zone Setting: Set the Free Shipping Zone option to None.
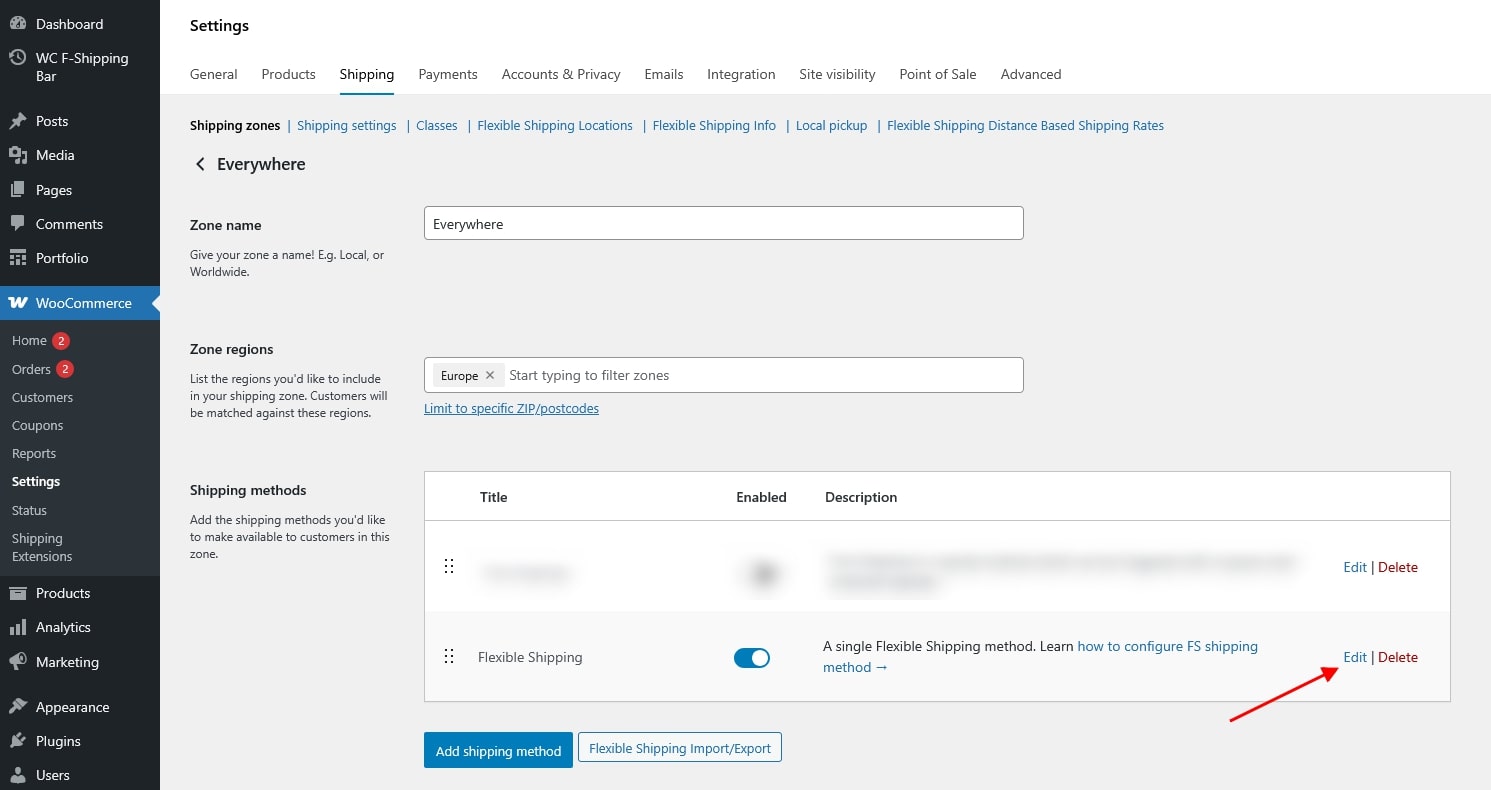
Configure Flexible Shipping
In your Flexible Shipping settings, make sure to:

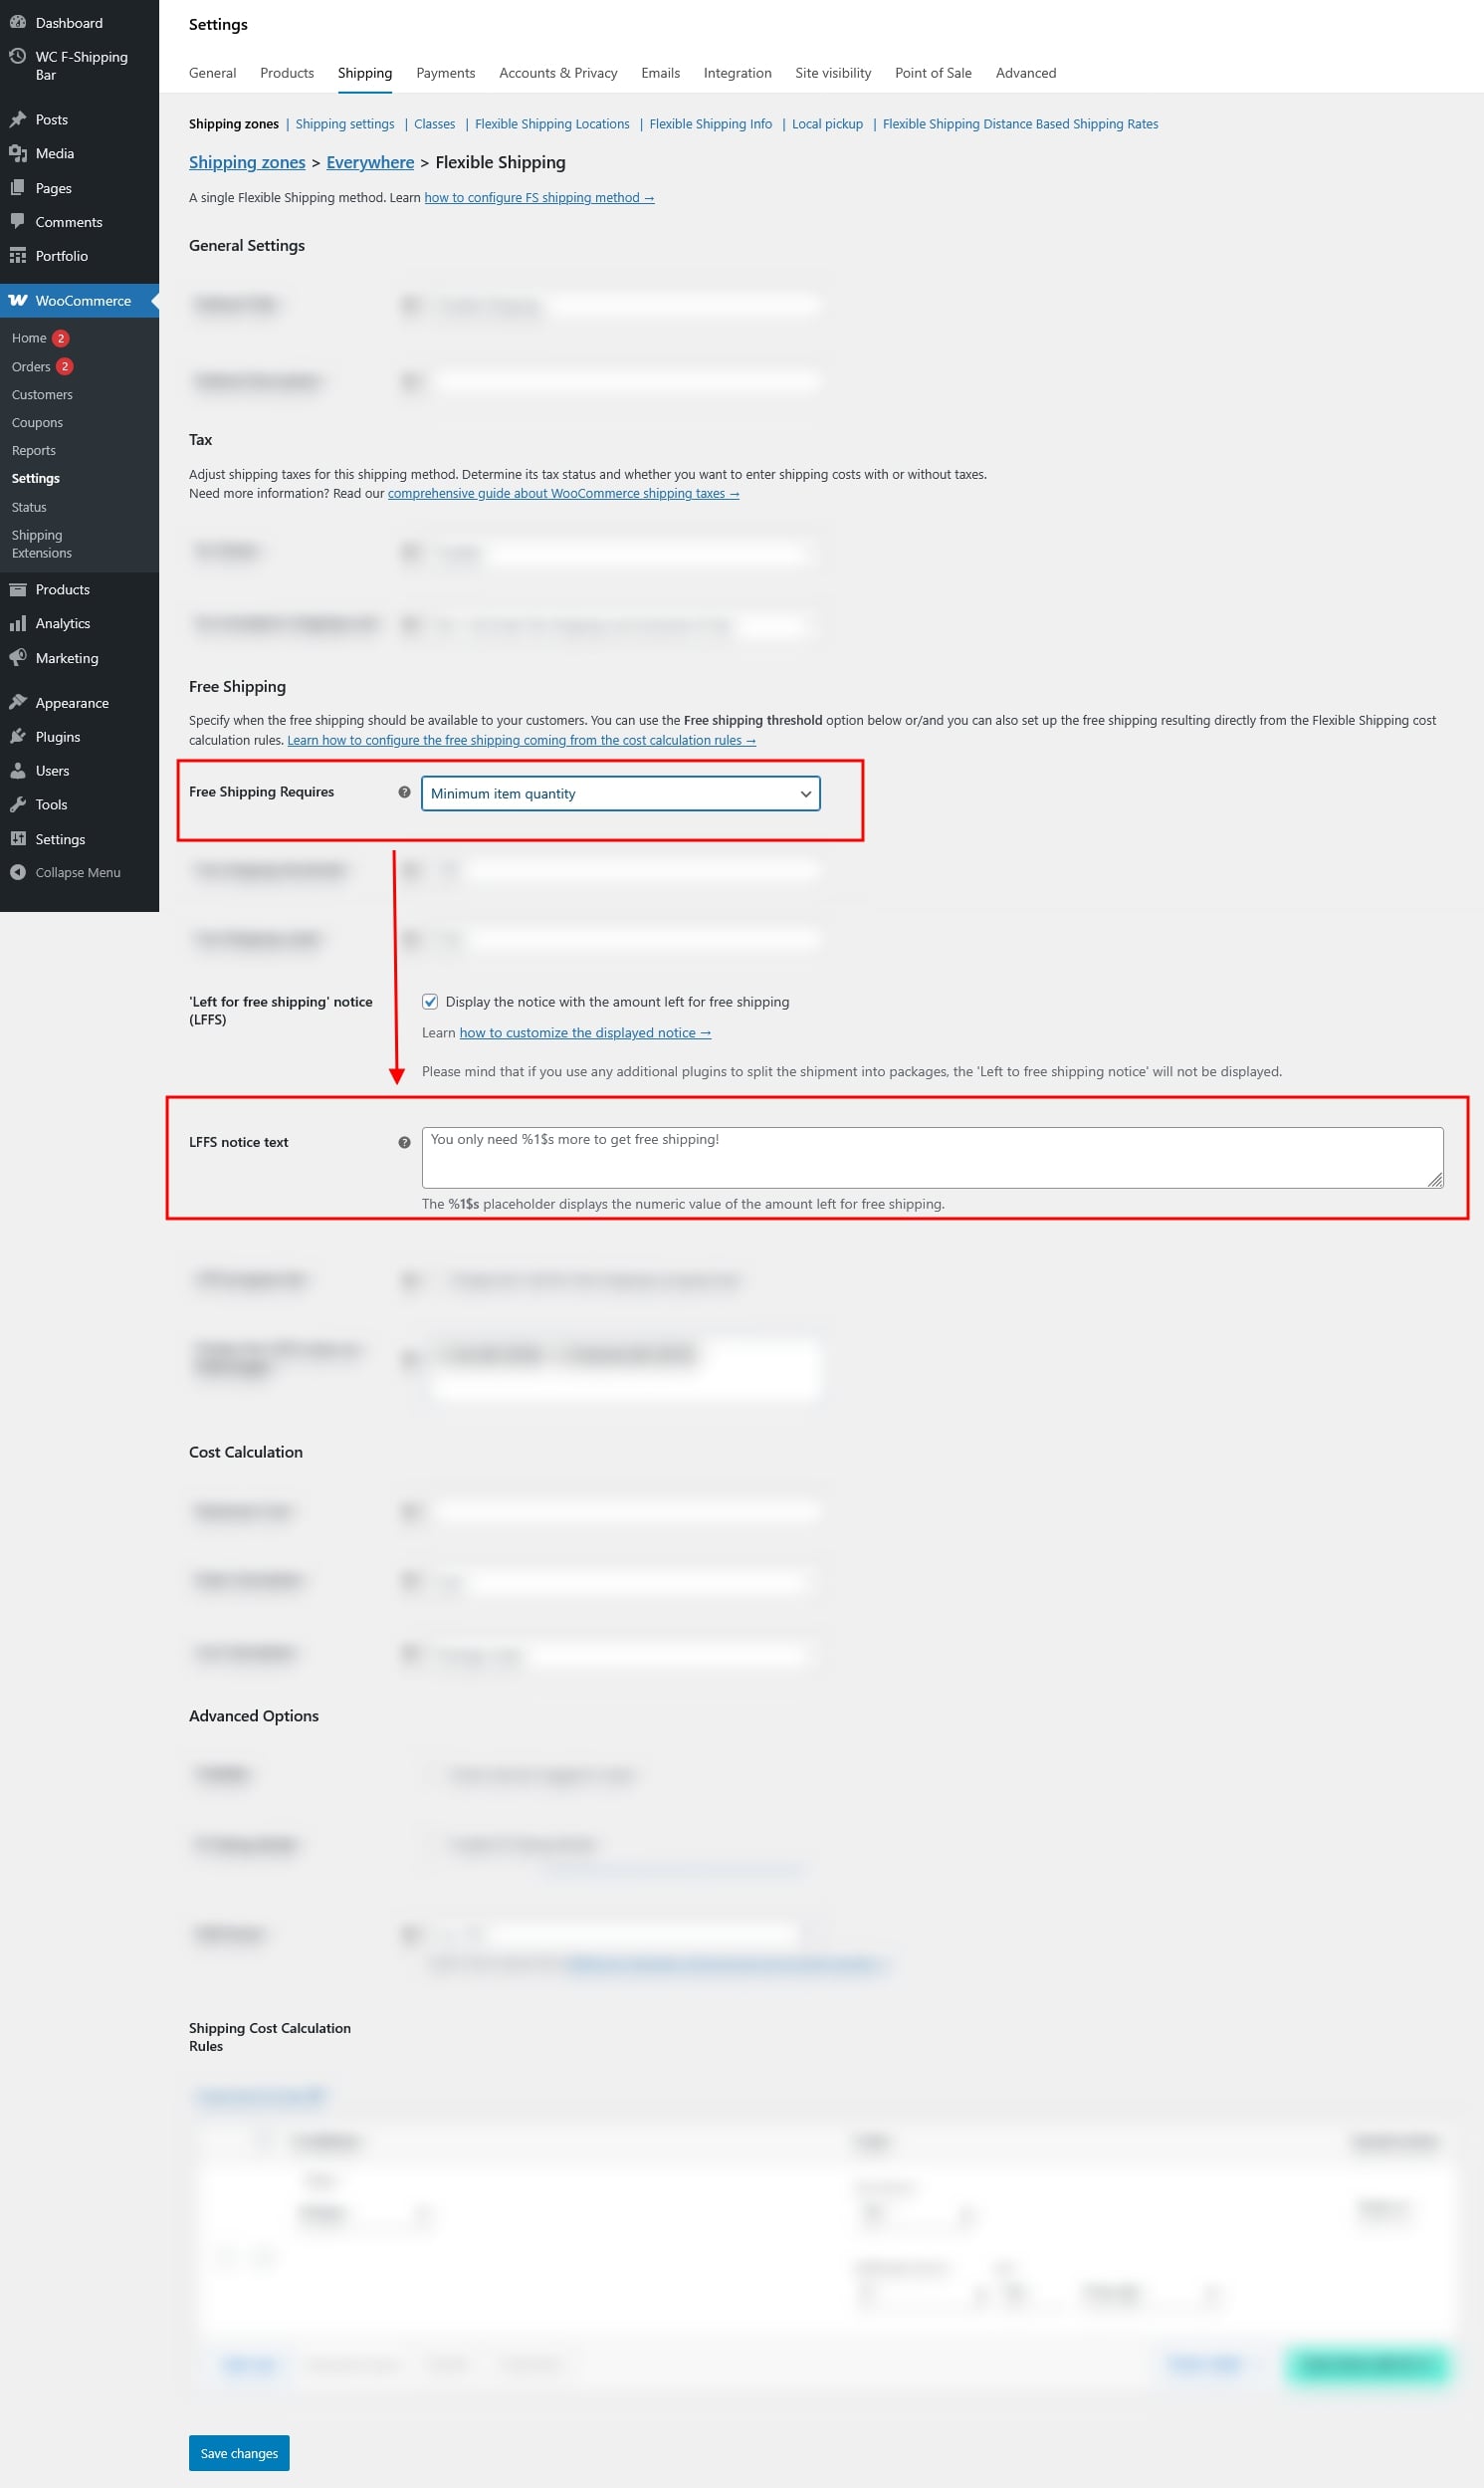
When Free Shipping Is Based on Product Quantity
If your free-shipping rule depends on the number of items in the cart, the message shown in the plugin’s shipping bar will be taken from the “LFFS notice text” option in Flexible Shipping.
Multiple Free-Shipping Methods in One Region
If a region contains two or more Flexible Shipping methods that offer free shipping, the plugin’s shipping bar will display the notice from the first method that matches our plugin’s logic.
Testing Your Setup
After saving all settings:
This ensures the correct free-shipping notice is displayed based on your rules.