Copyright Villatheme 2015-2026
Created: 01/2021
Latest updated: 10/2022
Updated version: 2.1.4
By: VillaTheme Thank you for purchasing our plugin. If you have any questions that are beyond the scope of this documentation, please feel free to request support at our Support Forum. Thanks so much!
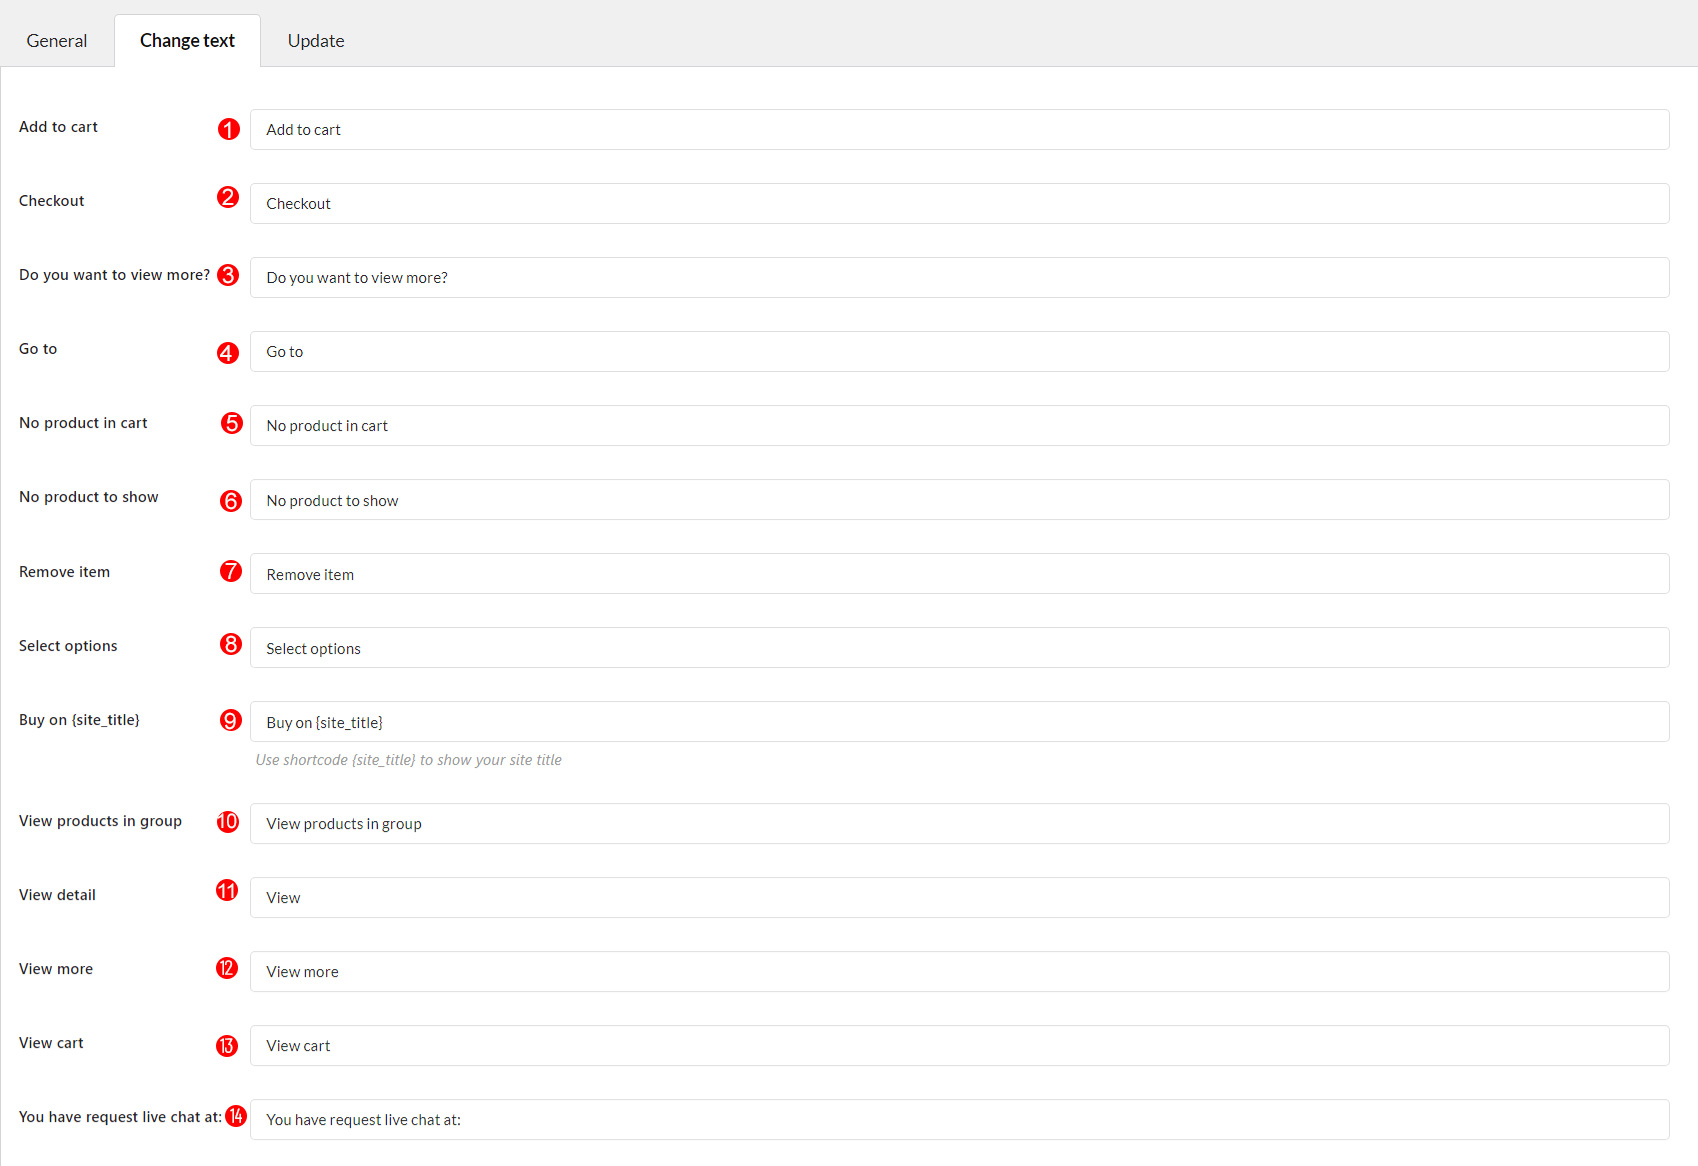
WooCommerce Chatbot for Messenger is a useful extension that is capable of “conversing” with your customers, respond particular questions, and automatically providing suggestions about all products, policies, and other information on your WooCommerce. The plugin provides users with many tools to create the conversation flow for responding to frequent questions from the clients and satisfying exact needs. The Customers now can receive the information and buy the products on your WooCommerce with customer service online 24/7.
Create conversation flows that are programmed with a variety of responses in a very short time. It allows you to combine flows to the one that you generate and create proper conversation as live chat with assistants. You can create flows with nodes by using the basic elements to match the features of your store and customers.
Hi Chatbot says: How can I help you? with suggested contents below like: Shop, Support center, Policy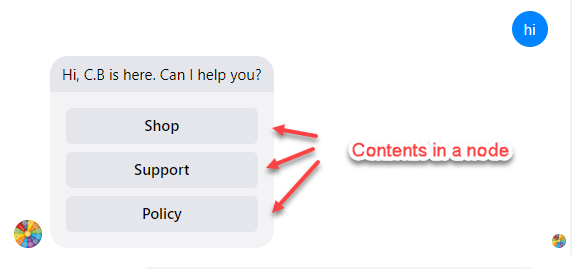
 =>>
=>> 
Fixed actions are necessary for all conversations on WooCommerce. They are available in the plugin such as get started, default answer, after adding to Cart, after removing items. Moreover, you can customize the automatic response to these fixed actions by adding the available elements.
Tips: You can create welcome messages, default answer, after adding to the cart, or after removing item by own sample responses created in the flow section.
The plugin can configure programmed questions, according to the different commercial objectives. Shop owners can create frequently asked questions that most customers may ask on the store and program respective answers using available elements. After that, whenever the customers ask about these questions, the chatbots will answer as programmed.
You can create the specific persistent menu for your store on WooCommerce. Customization of persistent menu helps the chatbot system to become more professional. You can change menu you want in Persistent Menu maximum 3 elements.

The plugin provides a lot of elements such as text, video, typing, images, video, gallery, redirect, quick reply, stop live chat, post, action, product, search products, that helps you to create the most flexible responses for the Chatbots. By using the basic element, the chatbot can interact with people through texts, videos, images and buttons of call-to-action…
WooCommerce Chatbot for Messenger will ask the customers about their information such as name, phone number, email address… and automatically save it.
System required:
Download plugin:
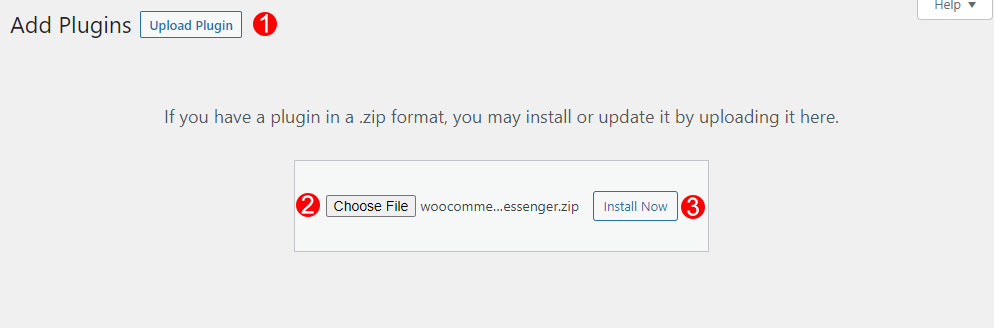
Go to Plugin/Add New/Upload Plugin/Choose file/
Select plugin zip file woocommerce-chatbot-for-messenger.zip
You can watch the Video guide about how to install and use the WooCommerce Chatbot for Messenger
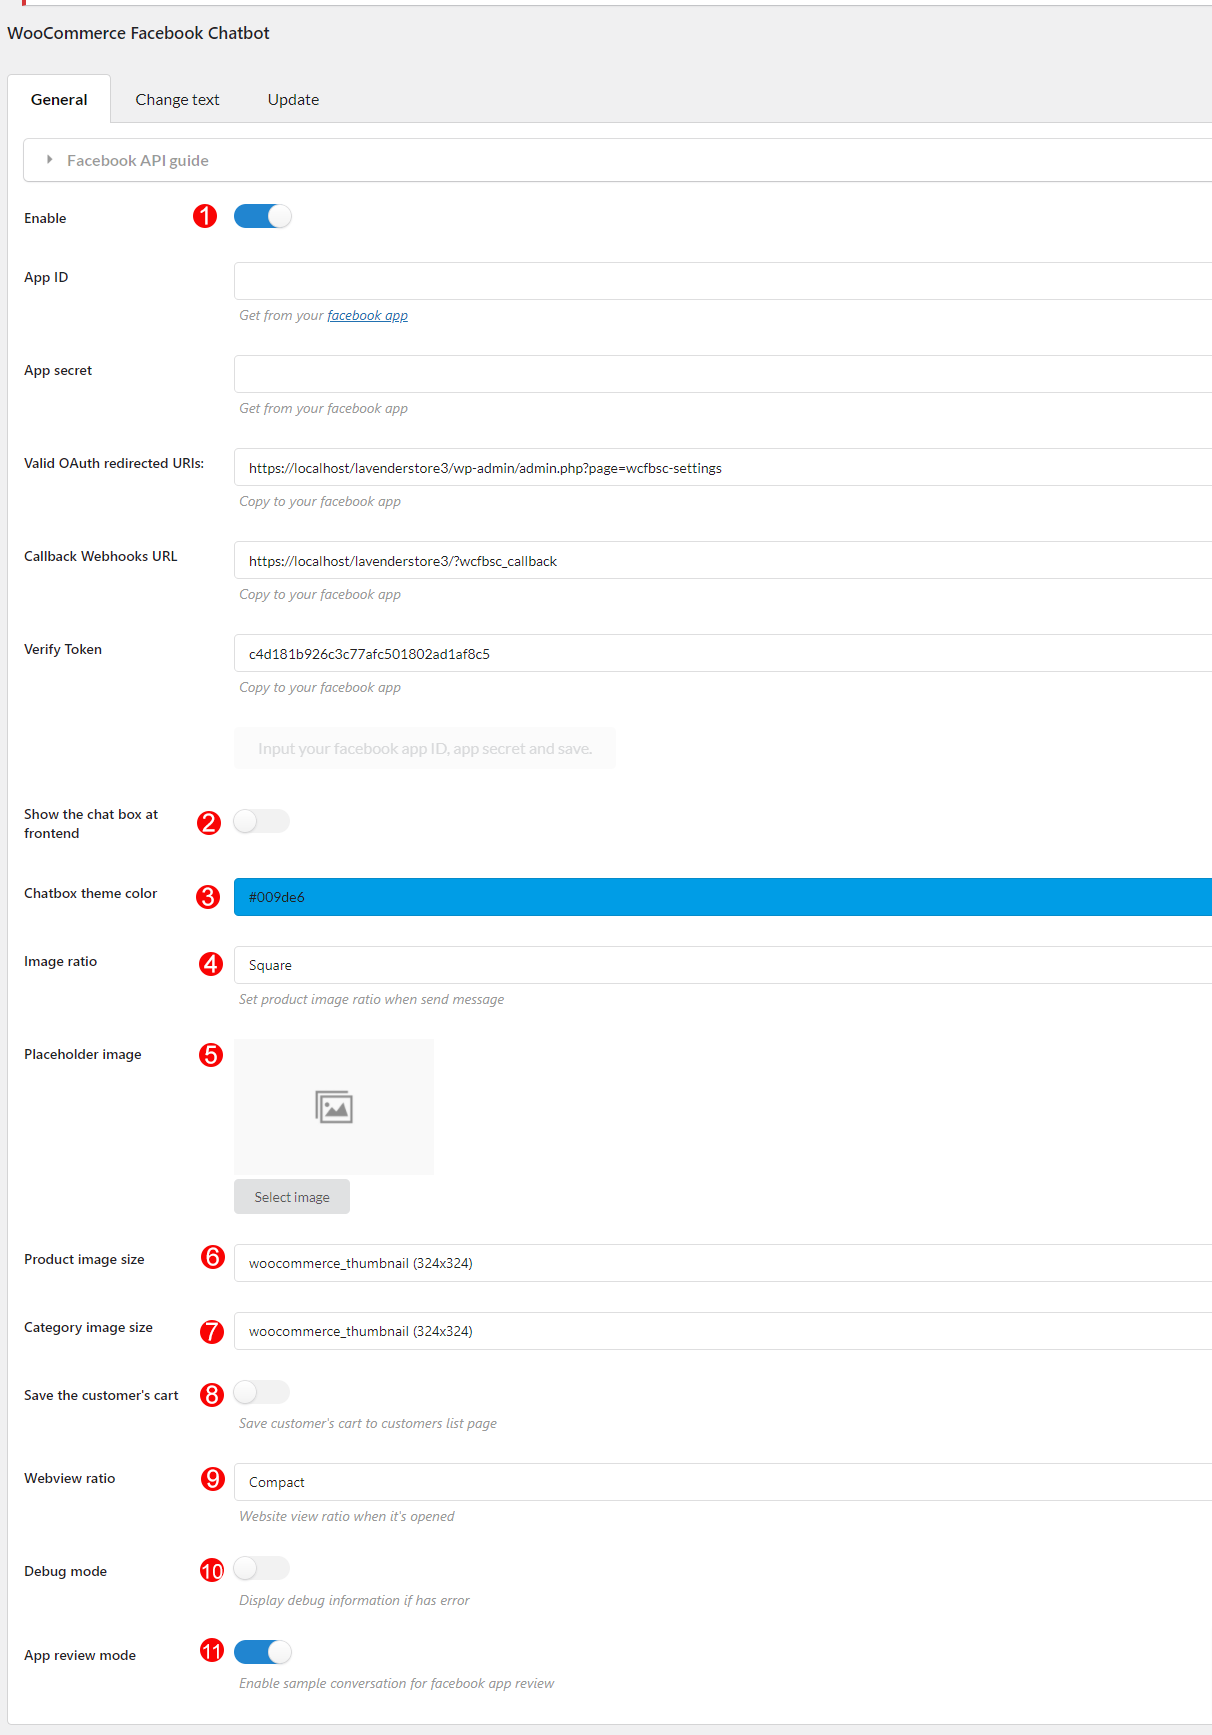
1. Go to the FB Chatbot/ Settings/ General tab/ Enable the plugin and connect your WooCommerce to the Facebook.

Click on the Facebook API guide and follow step by step, all steps have attached guide images (click on the black arrow to open the images) which help you easily to connect with your Facebook. If you want to have more instructions, please click on tab How does it work/ Settings on this documentation for further information with video guide.
2. After connecting to Facebook successfully, go to Conversation Flow to set up the auto-responses for the Chatbot with the flows, fixed actions, Customers typing and Persistent menu.

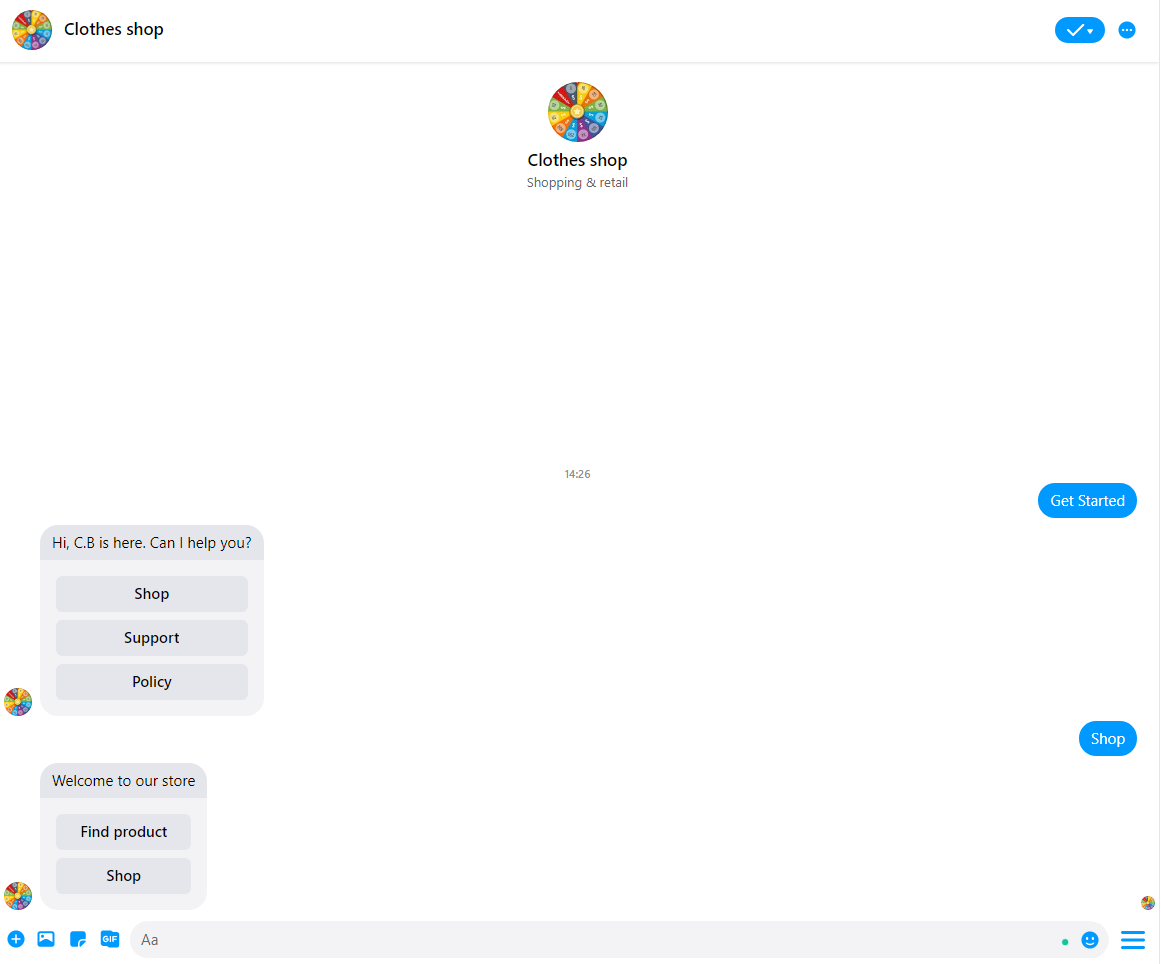
3. Test the Chatbot by clicking the button “Test this bot”, and you will have a Facebook message chatbot opened:
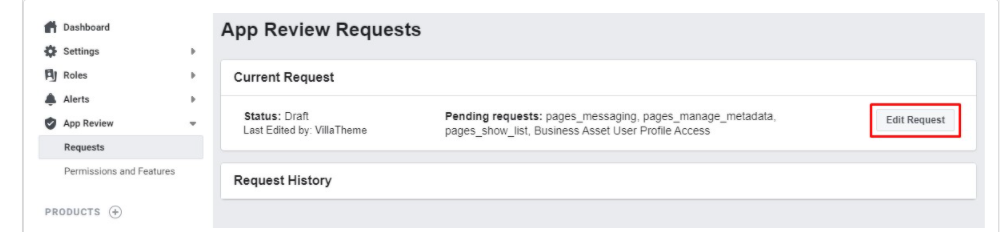
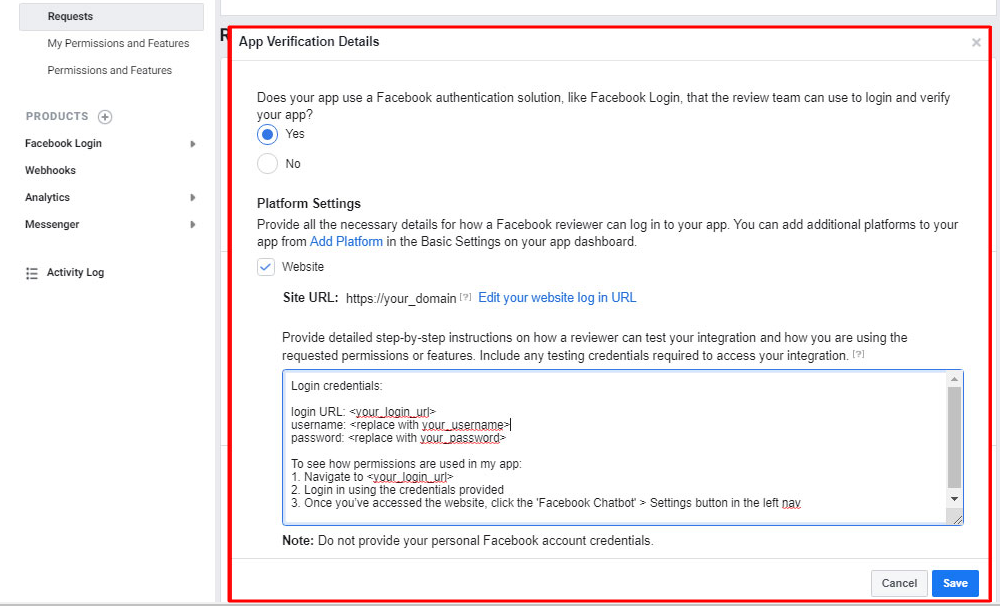
4. Request for approval from Facebook Review Team to make the plugin works on Facebook Messenger with all the customers. Come back to the Facebook chatbot/ Settings tab/ Click on the Facebook API Guide/ Follow step by step in the App Review section:

If you want to have more instructions, please click on the tab How does it work/ Settings on this documentation, we have described more clearly with a video guide attached.
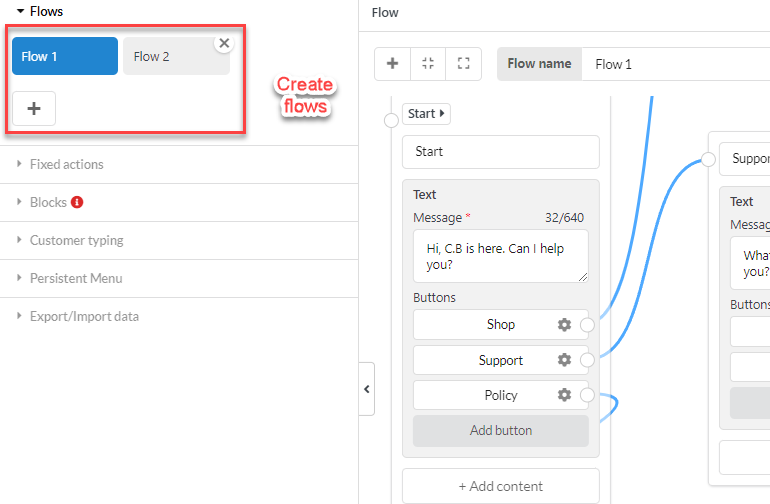
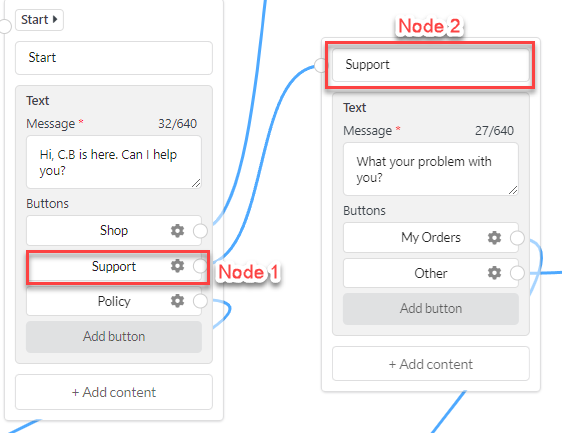
The Flows option helps to create a chat flow giving more options for your customers.
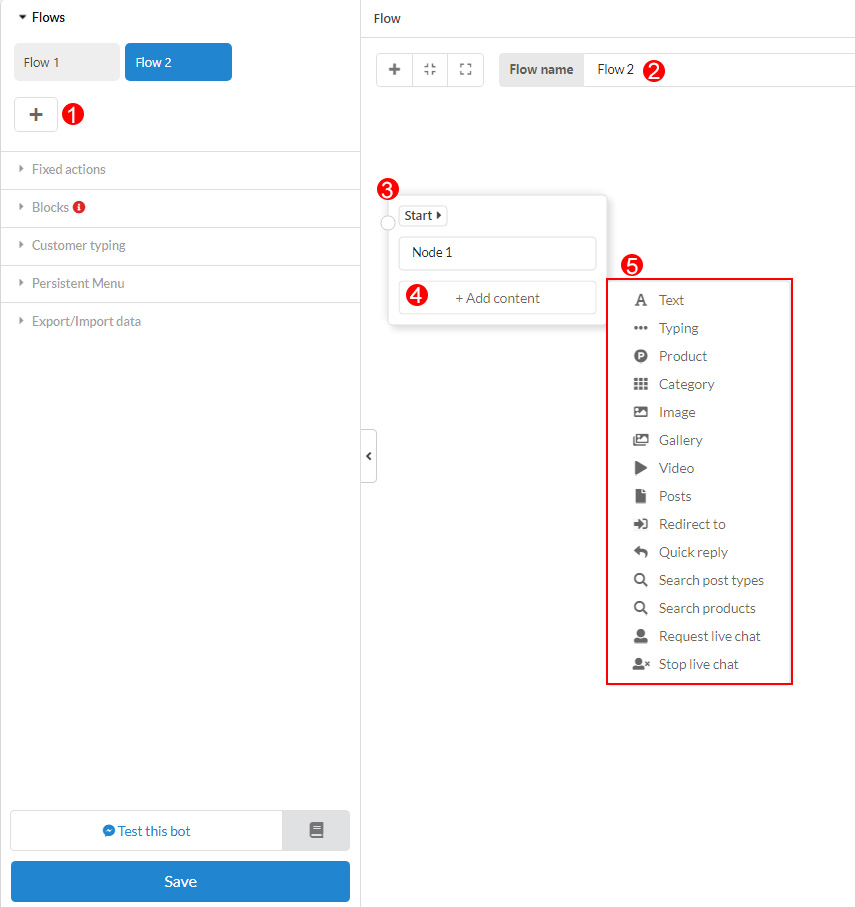
1. Add more flow: Click on the button to create a new flow.
2.Flow name: Add the name for the new flow.
3.Flow area to design the flow chat for your Chatbot.
4.Add content: Click to add the content you want
5. The list of content you can add to the flow.
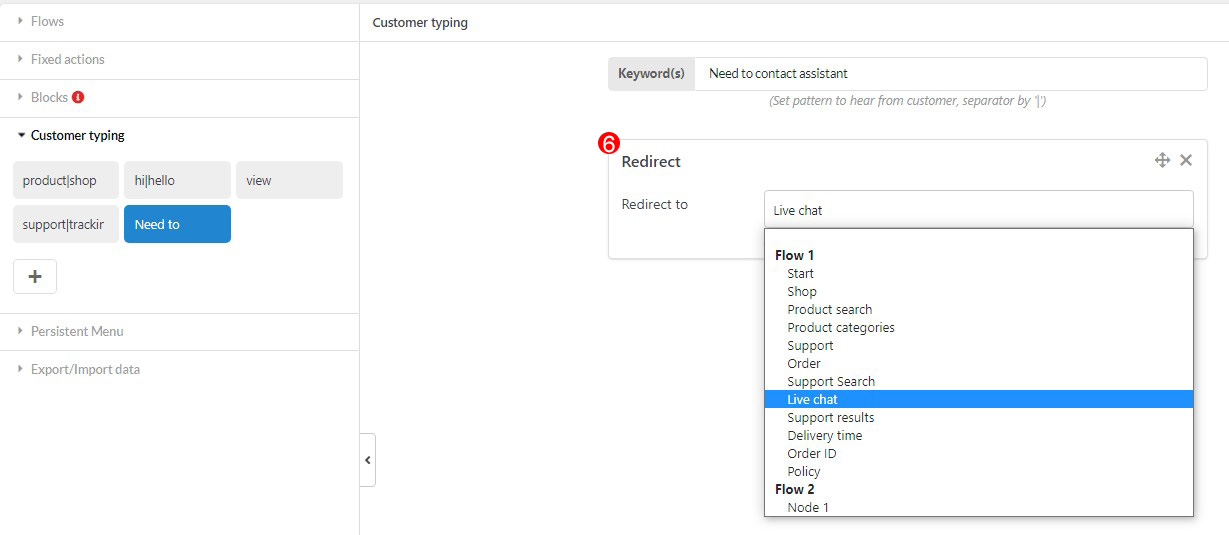
6. You can add the flows through the customer typing tab
The Fixed actions help to program the responses for the Chatbot when it meets the popular requests from the customer. There are four fixed actions, you can program the responses for each action using 12 available basic elements.
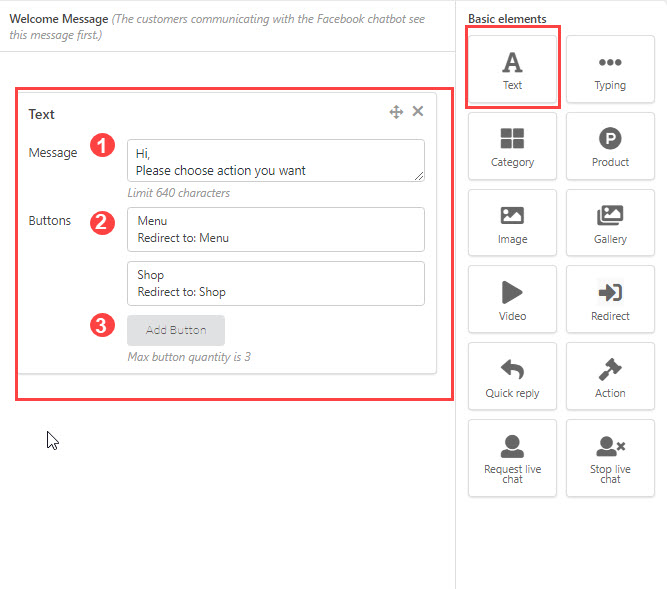
Welcome message
The customers who touch the messages box for the first time will see it first. You can design it with the text, gallery, video elements or event the block which are created from the plugin. The welcome message is automatically displayed when the customers access Messenger.
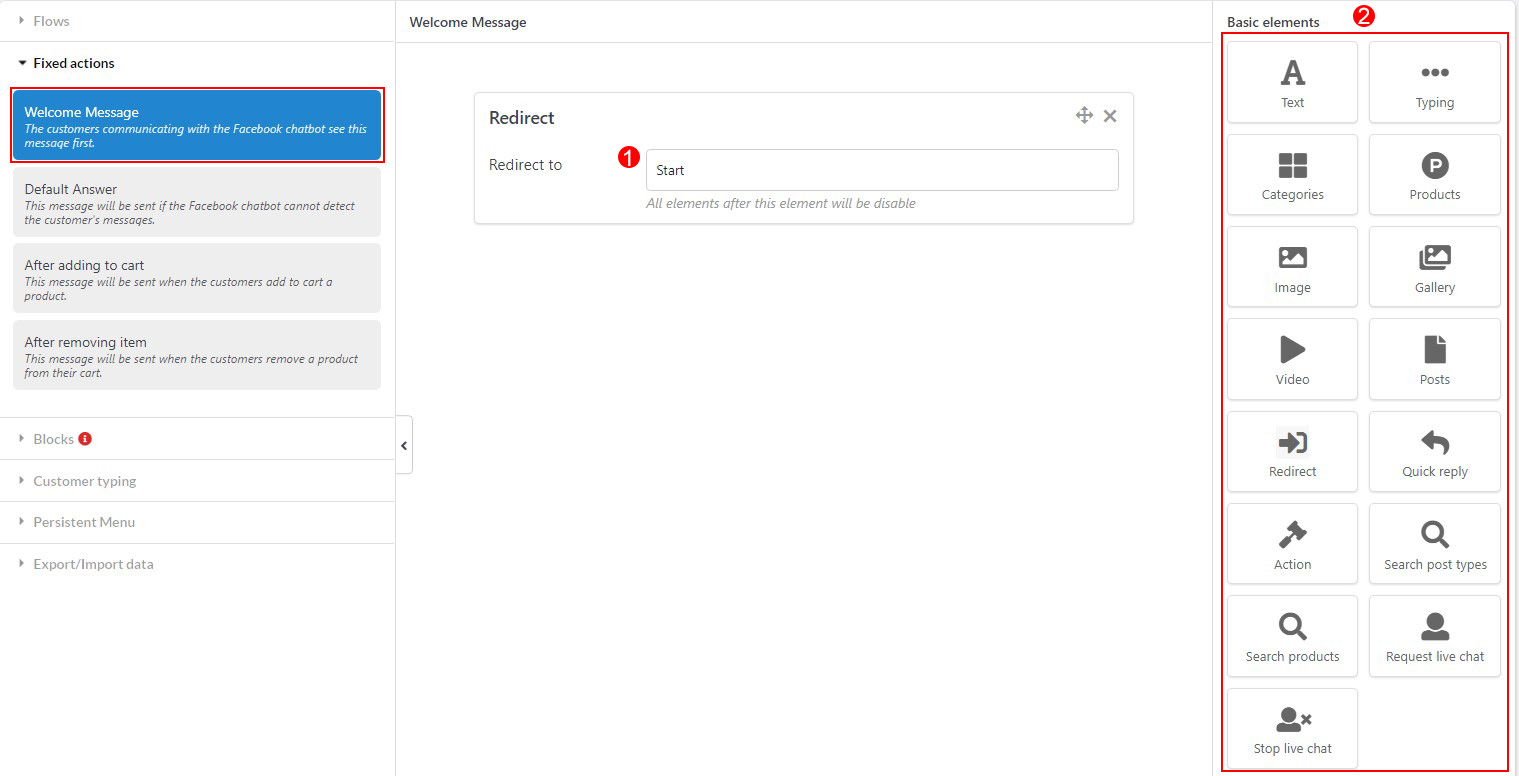
1. Change the content of Welcome message as you want.
2. You can also add more elements to the welcome message by double-click on the element board then customize the elements as you want. Go to the tab basic elements in this documentation to read more about how to use elements.
Default answer
The default answer will be sent when the customer questions are undefined . You can change the default answer in your own way with the 12 available basic elements.
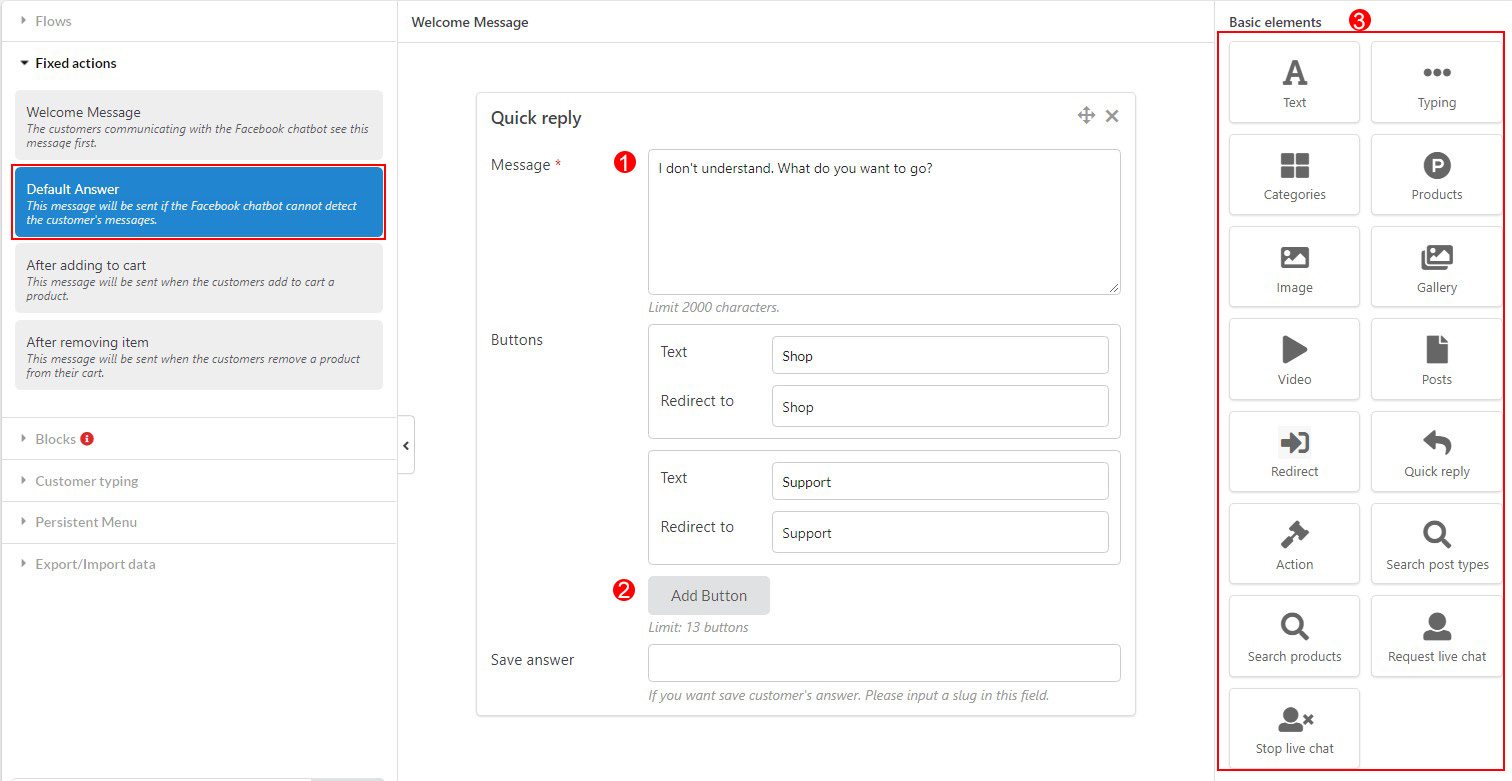
1. Change the content of default message as you want.
2. Add button to add more choices for customers. It will go with the default messages displayed to the customers.
3. You can also add more elements to the default message by double-click on the elements in the element board then customize the elements as you want. Go to the tab basic elements in this documentation to read more about how to use elements.
After Adding to the Cart
This message will be displayed to the customers after they add the product to their cart. You can change the default answer in your own way with the 12 available basic elements.
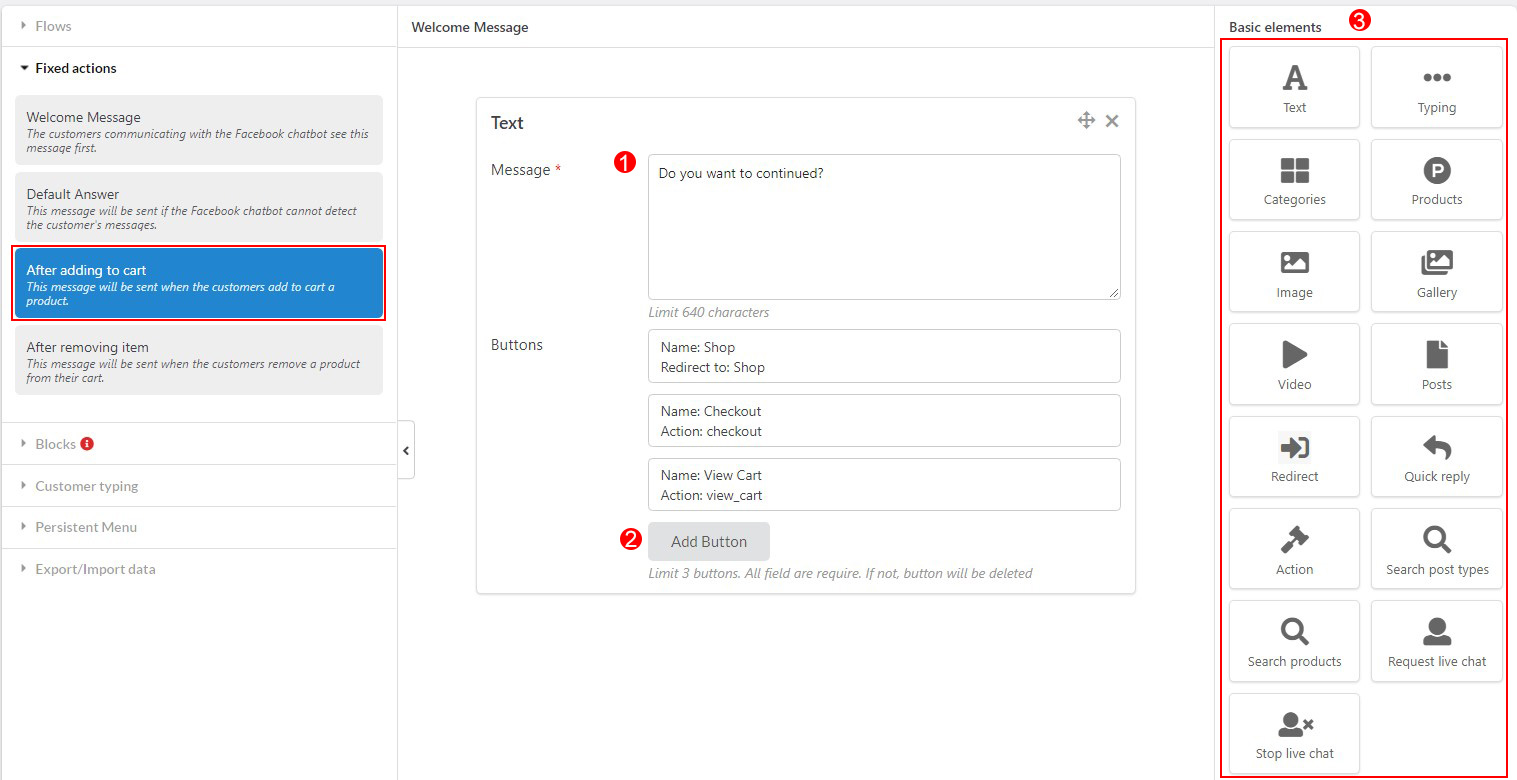
1. Change the content of message sending to customers after they add a product to cart.
2. Add button to add more choices for customers. It will go with the messages displayed to the customers.
3. You can also add more elements to the message by double-click on the element board then customize the elements as you want. Go to the tab basic elements in this documentation to read more about how to use elements.
After removing item
The message will be displayed to the customers when they remove the items from their cart. With the basic elements or blocks, you can give the other suggestion about other products on your store or ask them about the reason…
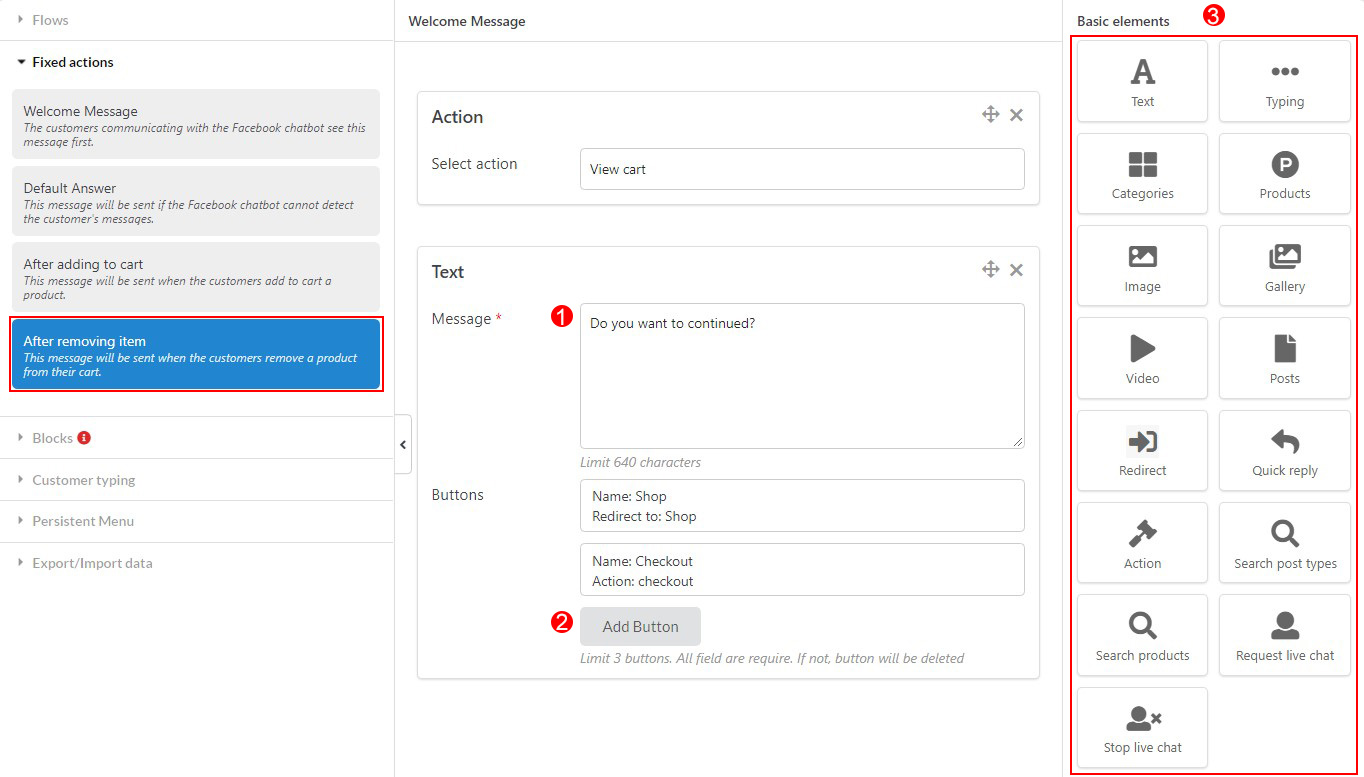
1. Change the content of message sending to customers after they remove product the cart.
2. Add button to add more choices for customers. It will go with the messages displayed to the customers.
3. You can also add more elements to the message by double-click on the element board then customize the elements as you want. Go to the tab “basic elements” in this documentation to read more about how to use elements.
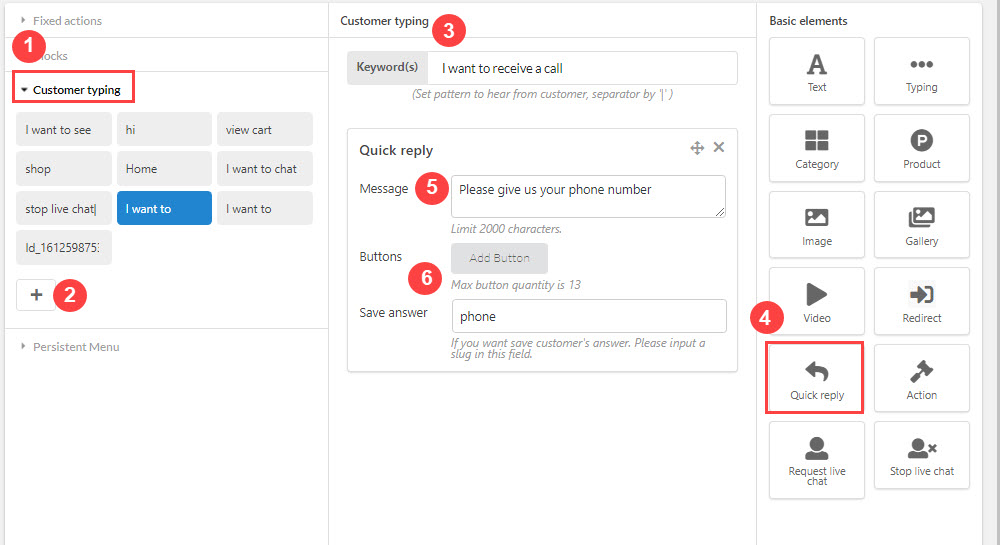
The Customer typing is to list some common questions of customers when chatting on messenger, then chatbot will give respective responses as your desire when you chat online to customers. You can enlist as many questions that you think customers may ask as you want in this section.
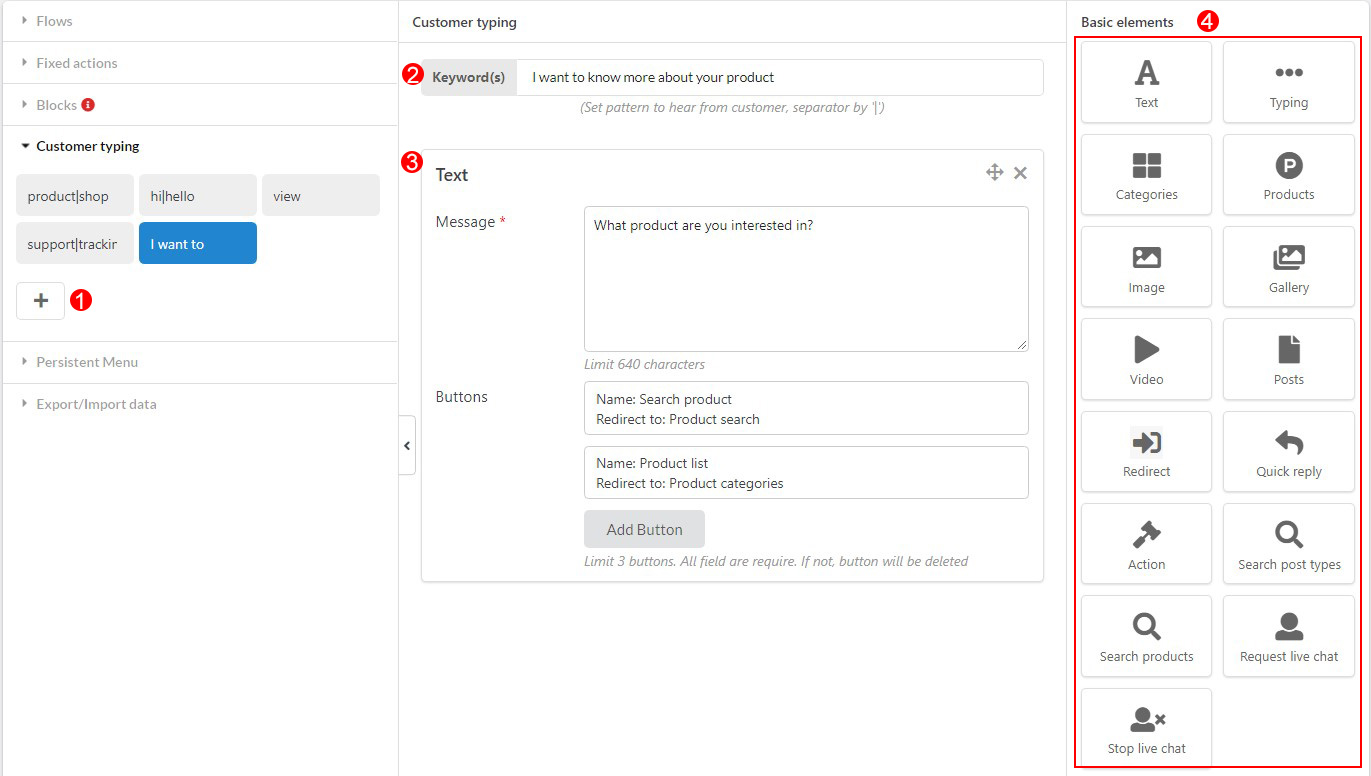
1. Click on the “+” button to add more customer typing.
2. Enter the content of questions, key words that are frequently asked by the customer, use the separator “|” for synonym questions.
3. Enter the text you want to reply whenever receiving the questions as programmed. Click to add button to add more options for customer to choose.
4. Using panel with available elements to quickly program replies.
Persistent Menu is always displayed on the Customer Messenger. You can change menu you want in Persistent Menu maximum 3 elements.
Persistent Menu on the backend:
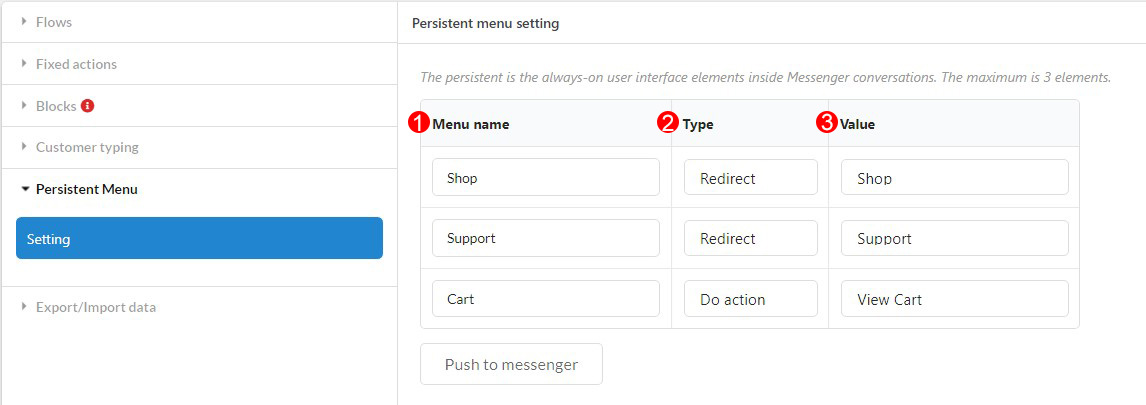
1. Enter the name of menu you want to display in the Persistent menu. That may be: Shop, Support, Cart, Policy….
2. Choose the type of actions when the customers click on each menu. That may be: Redirect action; Open URL or Do Action.
3. Select responsive with the respective type. For example: If customers click on Shop, chatbot can respond a direction to a flow defined in the Flow section. Or chatbot can respond a shop link…
4. Push to messenger: To save and push above setting to messenger.
Persistent Menu on Messenger:
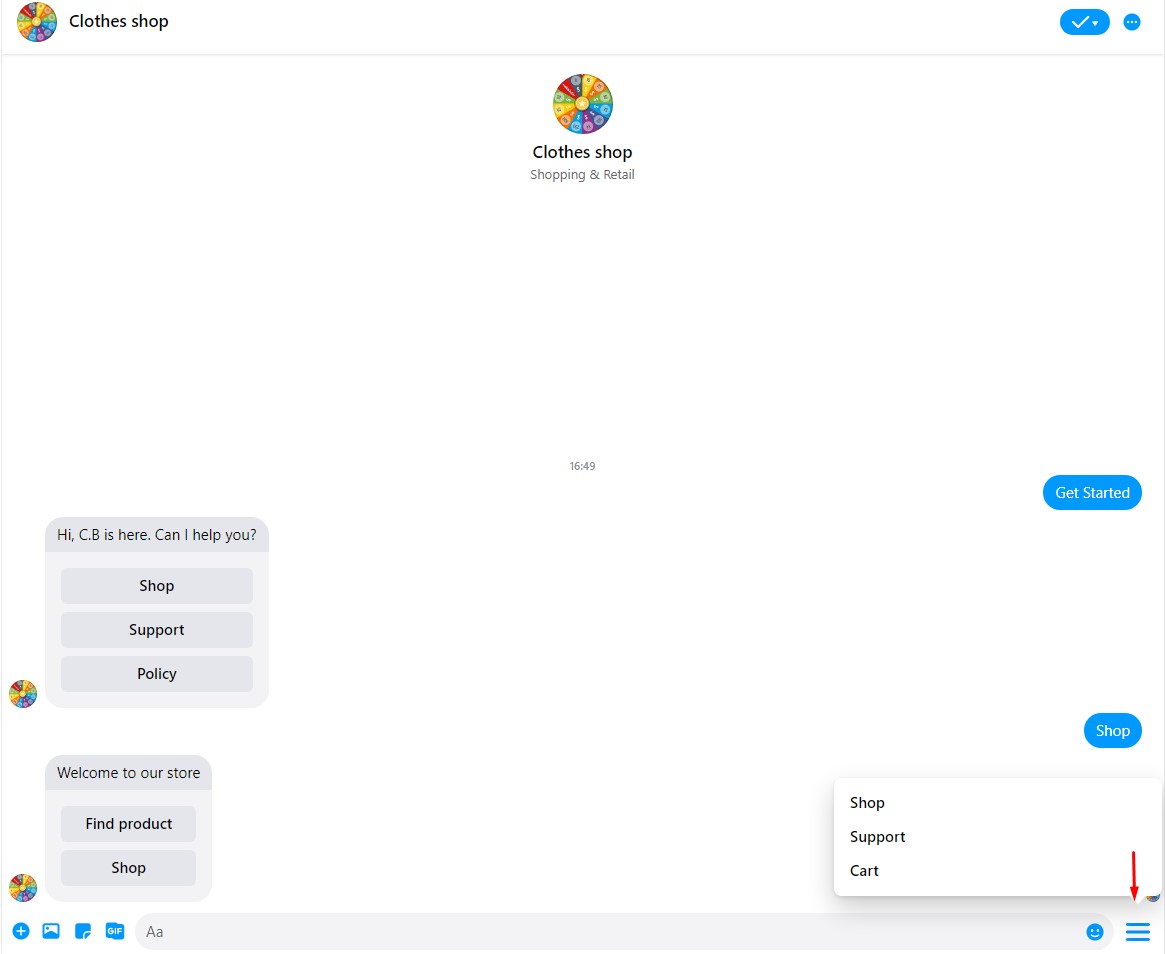
You can use the basic elements to add to the programmed actions of the chatbot. You just need to double-click on the elements then it will display on the customization area for you to customize it.
Text Element
The text element helps you to create the response for the chatbot by text. It can use in fixed action, block or customer typing.
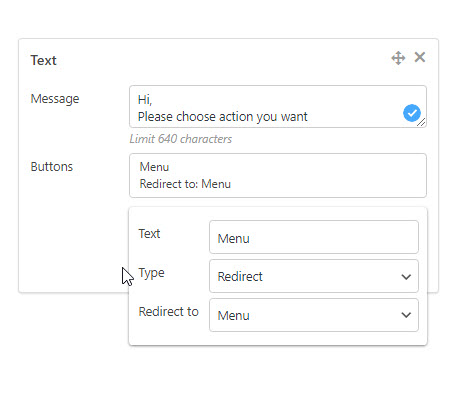
3. Add button: Add the button to give customer more choices. The max button quantity is 3.
Typing Element
The Typing element helps to display the symbol as a person are chatting to reply the customers. You can adjust the duration for each times displayed.

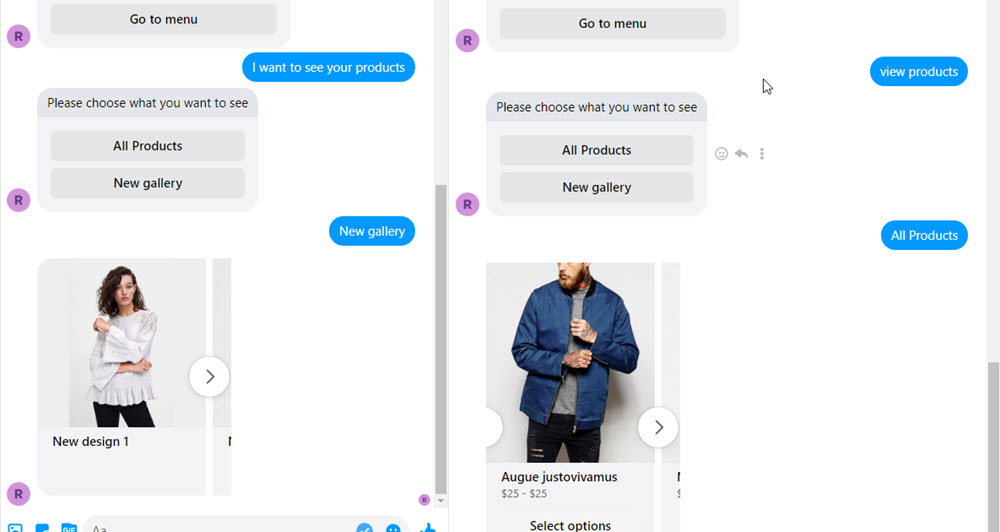
Product Element
Product elements helps to display the products in the conversation between the customers and the Chatbot.
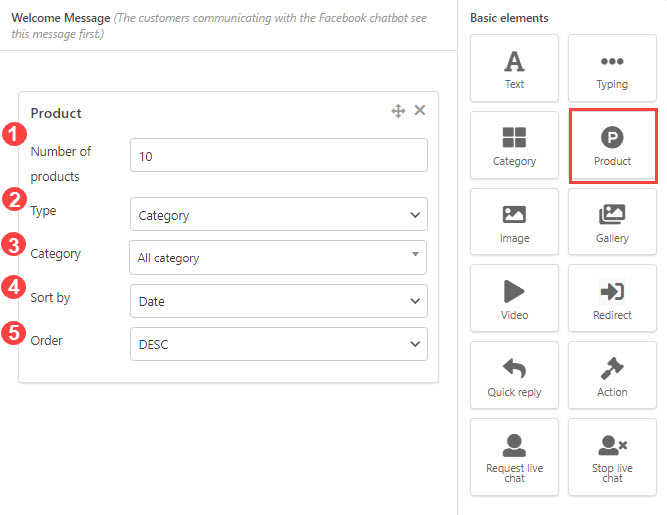
1. Number of products: Enter the number of product displayed.
2.Type: You can choose the type of product displayed. Choose Category if you want the product displayed followed categories. Choose Products if you want to assign specific products to show in the coversation.
3. Category: Choose categories to show.
4. Sort by: Sort product by date, name, best seller, best rate, price.
5. Order: the orders can be Asc or Desc.
Category Element
Category Element helps to display category in the conversation between the Chatbot and the Customers.
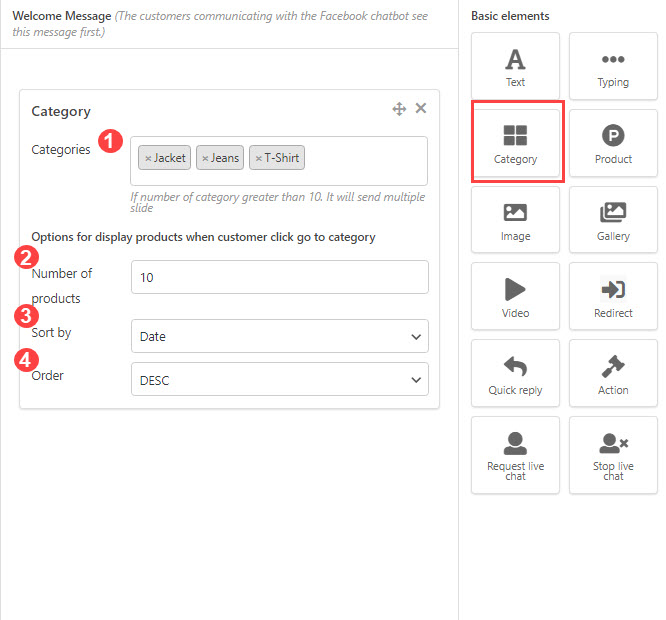
1.Categories: Choose the categories displayed
2. Number of products: Enter the products from those categories displayed. The maximum is 10 products.
3. Sort by: The products can be sorted bydate, name, best seller, best rate, price.
4. Order: the orders can be Asc or Desc.
Gallery Element
The Gallery element helps to display the gallery in the conversation between the Chatbot and Customers.
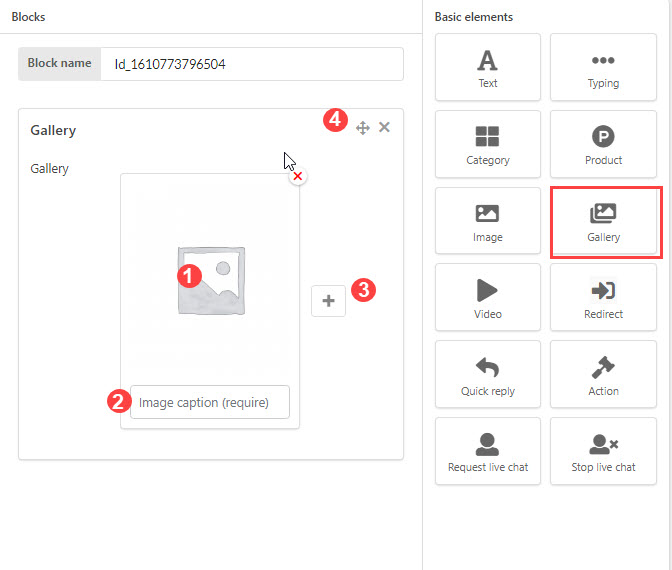
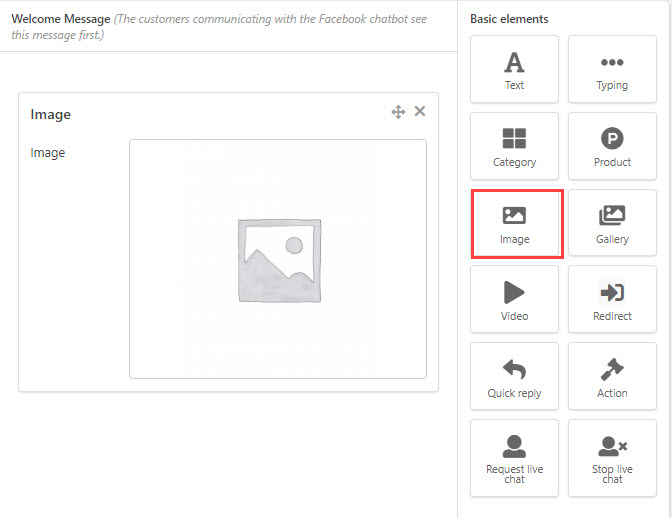
Image element
The image element helps to display the images in the conversation between the Chatbot and the customers. You just need to click on the center of box to upload the images.
Redirect element.
The Redirect element helps to redirect the action in the conversation. When you click to the box, it will show all the blocks created to rediret.

Video element
The video element helps to display the video in the conversation. You just need to copy and page the URL of the video to the box.

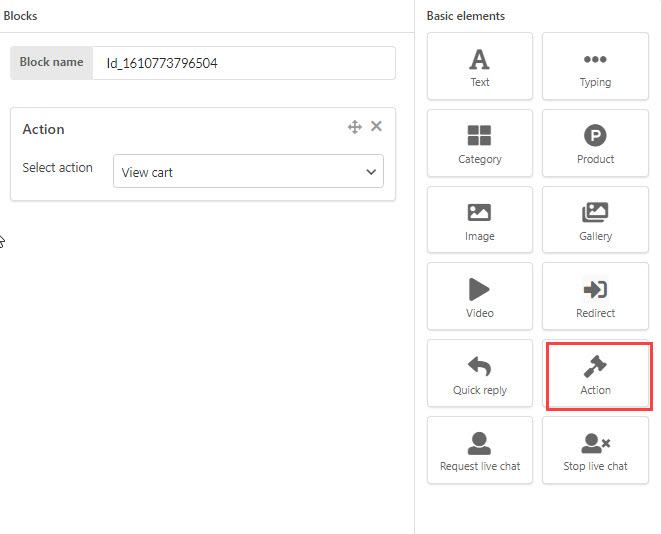
Action element.
This element helps to add the action to the conversation.
Request live chat element
The Request live chat element helps to give customer the request for chat with human in the conversation.
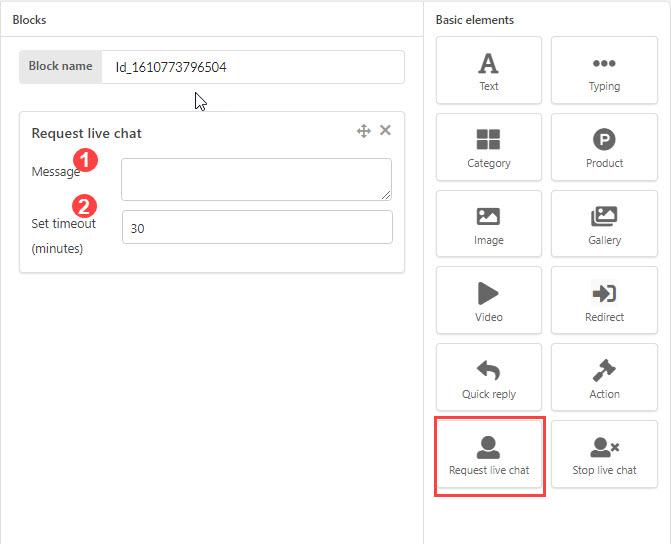
1. Enter the automatic response when received the live chat from the Customers.
2. Set timeout: Set time (minutes) for coming back to the Chatbot.
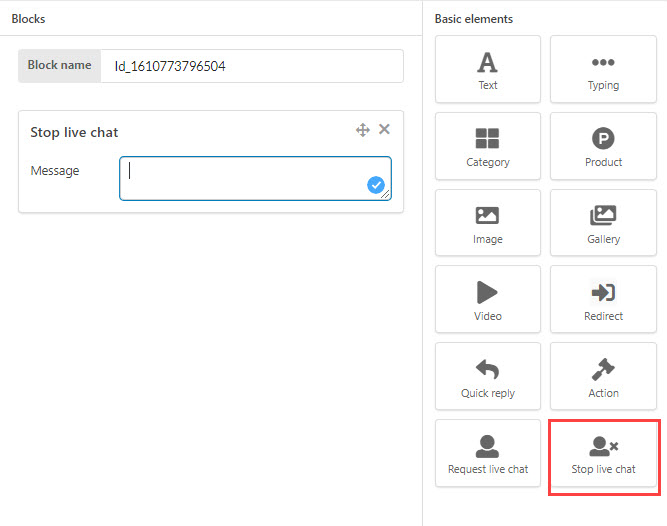
Stop live chat element
The Stop live chat element helps to response for the request for stopping live chat from the customer. You just need to enter the message you want to send to the customers when they want to stop live chat.
The customers section helps to save the customer’s information (Phone number, email address) which is collected from the conversation between Chatbot and the customers.
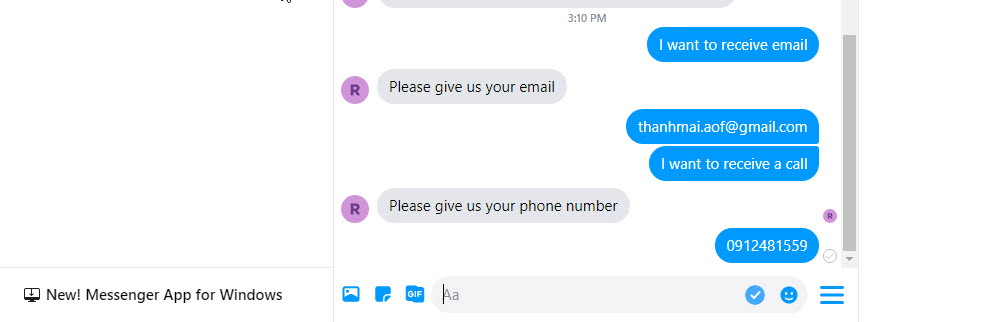

You have to create an action to take the information from the Customers.
The Settings is the first step the user have to do to enable the plugin and connect it to the Facebook Messenger.
A. General settings.
Connect to the Messenger.
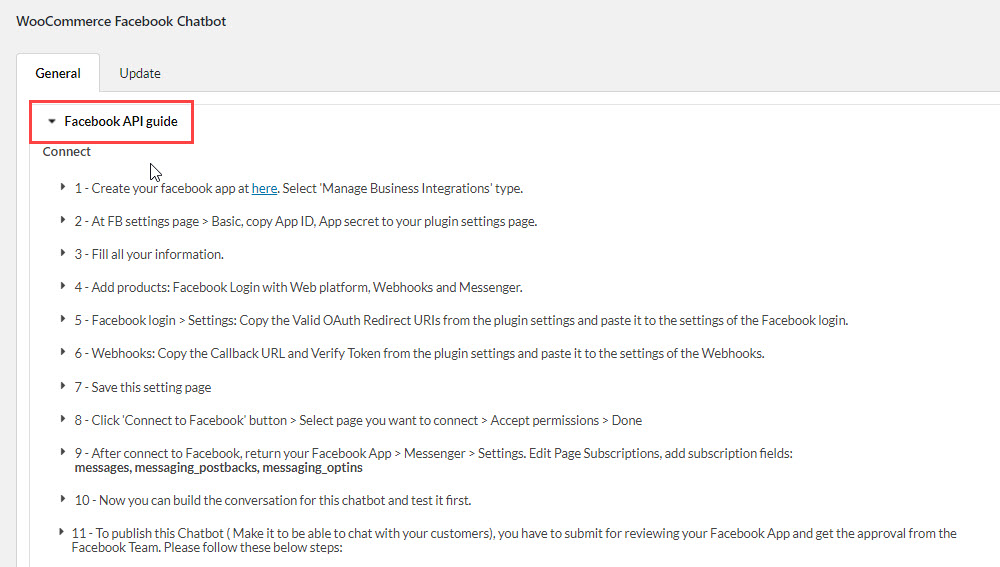
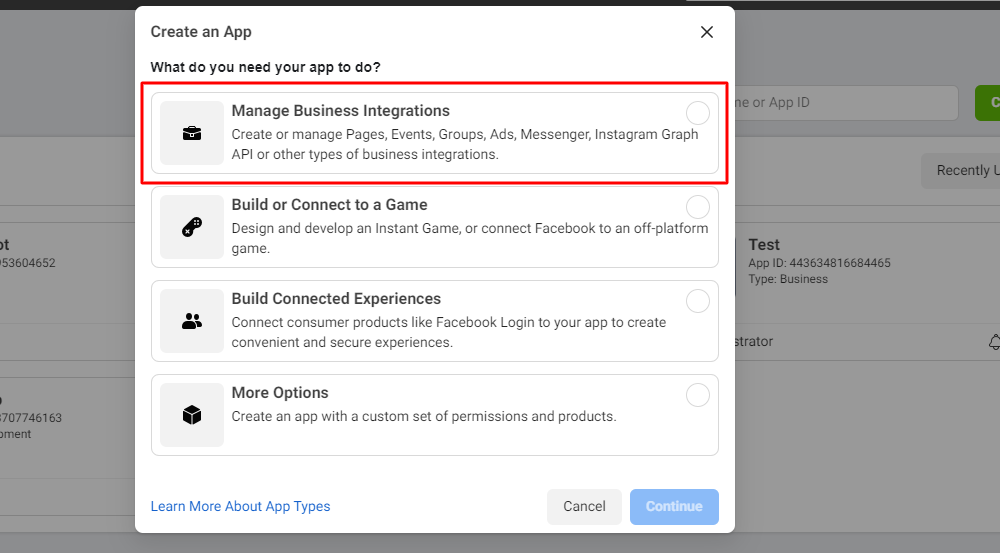
1. Create your Facebook app at here. Select ‘Manage Business Integrations’ type.
2. At FB settings page > Basic, copy App ID, App secret to your plugin settings page.

3. Fill all your information.

4. Add products: Facebook Login with Web platform, Webhooks and Messenger.

5. Facebook login > Settings: Copy the Valid OAuth Redirect URIs from the plugin settings and paste it to the settings of the Facebook login.

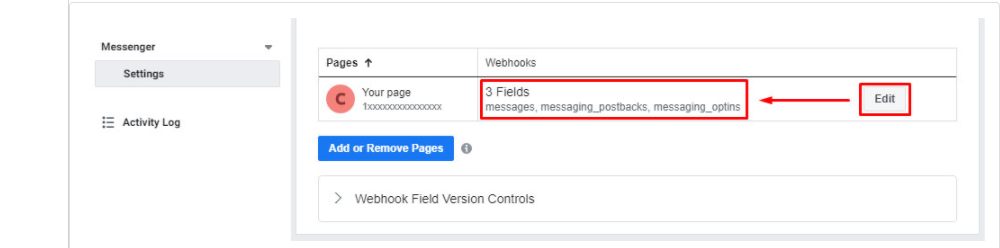
6. Webhooks: Copy the Callback URL and Verify Token from the plugin settings and paste it to the settings of the Webhooks.