- Start
- FILE INCLUDES
- INTRODUCTION
- INSTALLATION
- How to use
- How does It work
- Compatibility
- Extra Information
Copyright Villatheme 2015-2026
Created: 2020.04
Latest updated: 2026.06 – Updated version: 1.1.14
By: VillaTheme
Thank you for purchasing our plugin. If you have any questions that are beyond the scope of this documentation, please feel free to request support at our Support Forum. Thanks so much!
After activating the plugin, the variations products in the dropdown type will be changed to button swatches.
You can modify them as you want in the plugin settings.
Before exploring what WooCommerce Attributes and Variations are, you should be familiar with the WooCommerce variable products.
As WooCommerce states, Variable products in WooCommerce let you offer a set of variations on a product, with control over prices, stock, image, and more for each variation. You can use them for a product like a t-shirt, which you can offer in large, medium, and small sizes, all in different colors.
To create a new variable product:
1. Go to “Products” in WP-Admin (the site’s admin area).
2. Click on “Add New Product” at the top of the page.
3. Enter the product name.
4. Select “Variable Product” from the “Product data” dropdown menu.
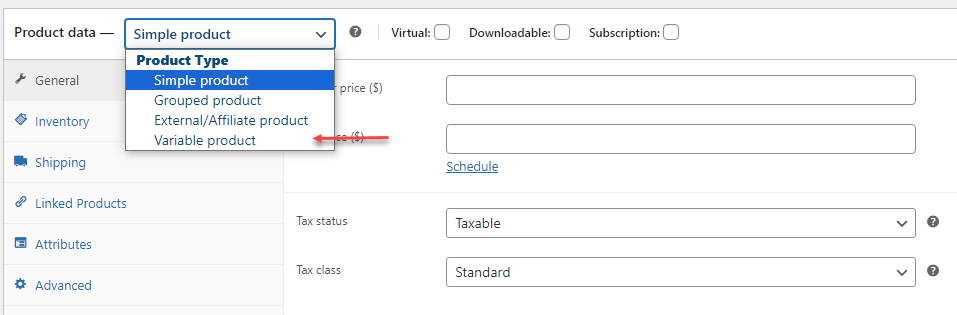
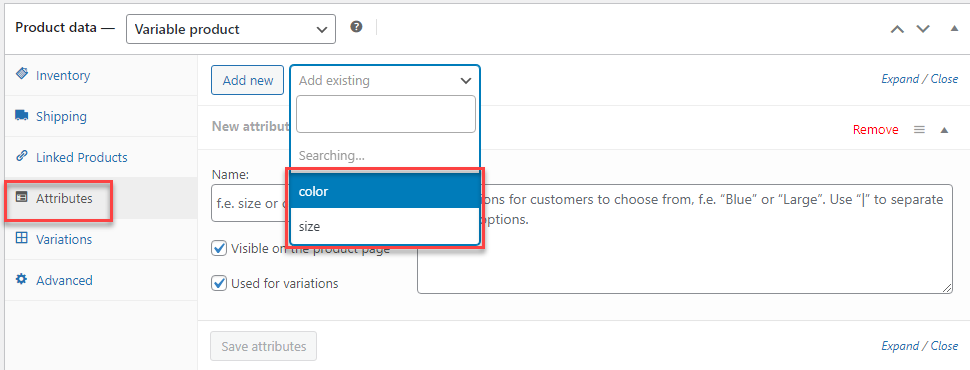
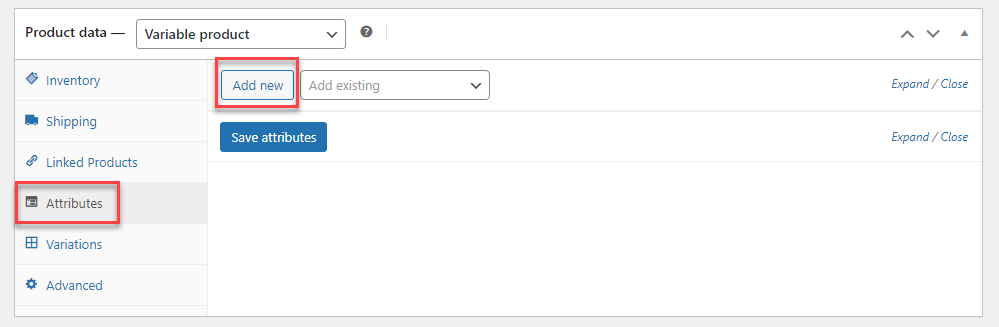
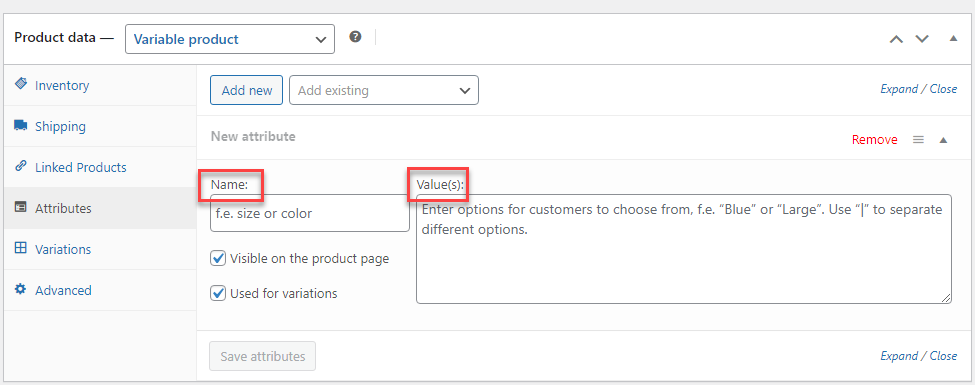
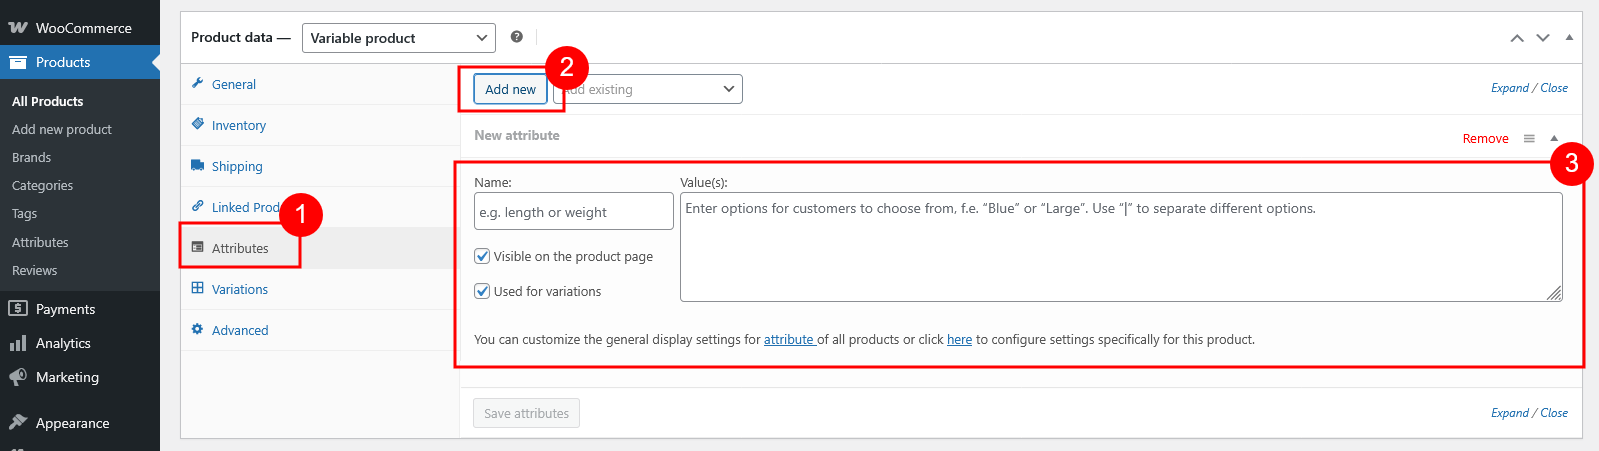
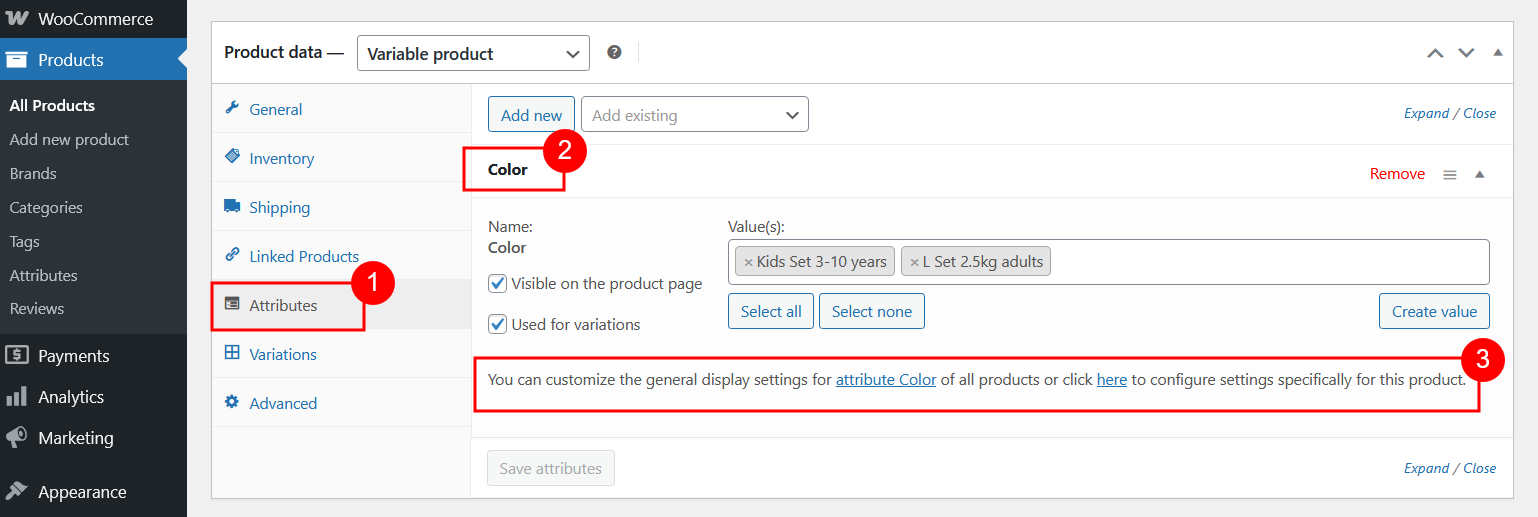
5. Navigate to the “Attributes” tab on the left-hand side under the “Product data” dropdown.
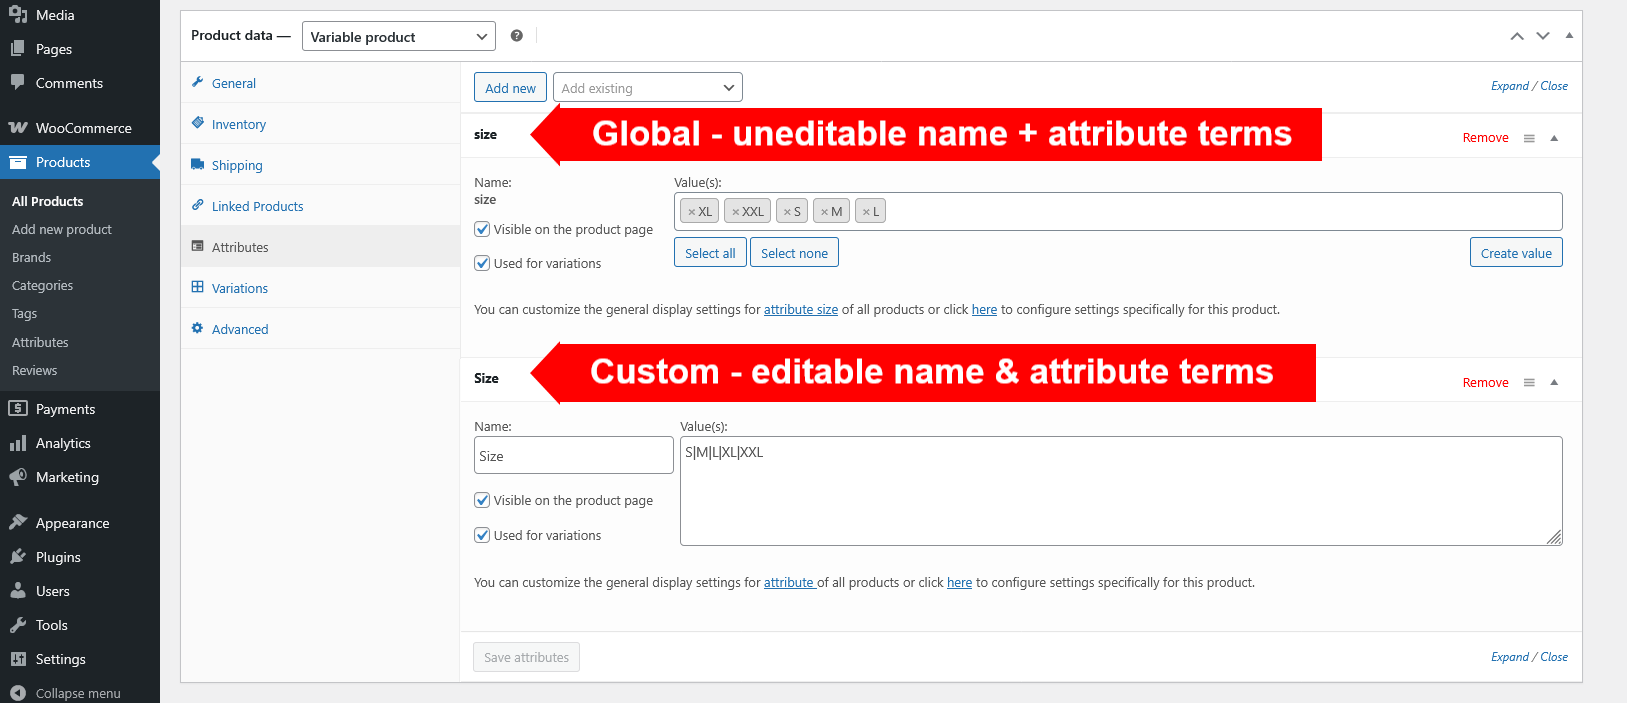
6. Add either a global/existing attribute or create a new one specific to the product (Custom attribute). You can see how to distinguish between a global and a custom attribute
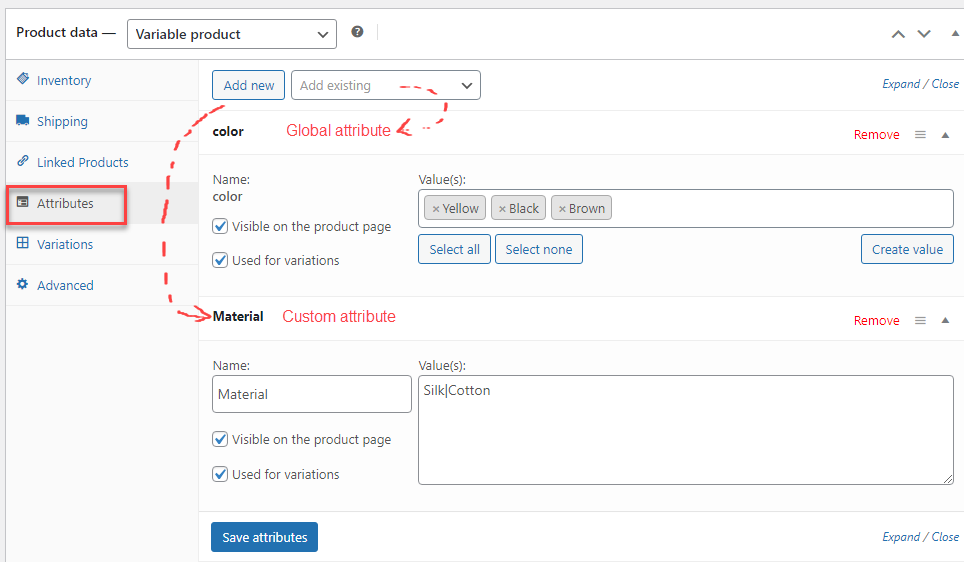
You can see how to create and distinguish between a global and a custom attribute
7. Then “Save attributes”.
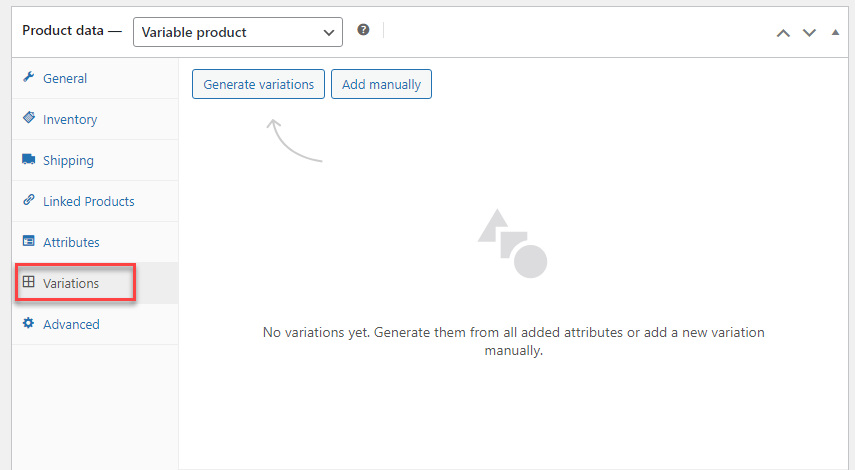
8. Next, navigate to the Variations tab.
9. Check whether
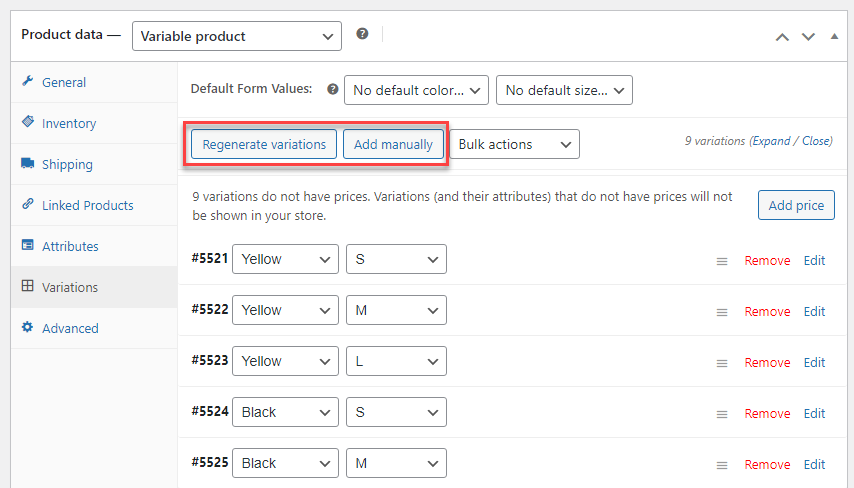
10. Next, click on each variation to expand its product menu.
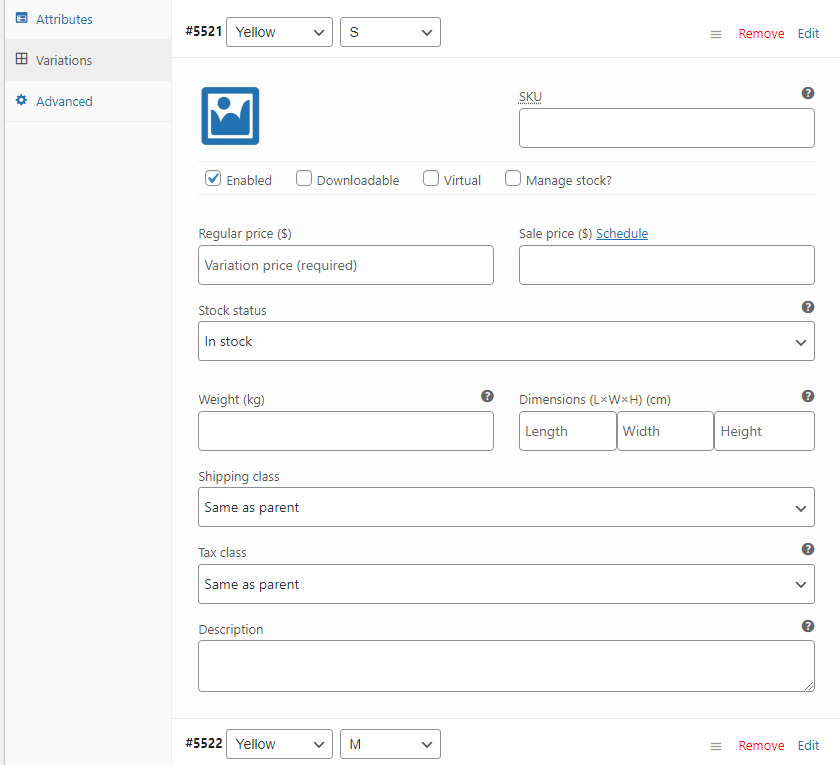
11. Enter the necessary product information such as price, stock status, weight, dimensions, shipping class, and description. Additionally, add Linked Products if required. Repeat this process for all variations.
12. Optionally, you can utilize the “Bulk Actions” dropdown at the top of the “Variations” menu to set product information for all variations simultaneously.
13. Finally, click “Save changes” at the bottom of the variations menu, and then click “Publish” in the top right corner of the screen to publish the product.
As demonstrated above, we can understand between the 2 definitions: Attributes and variations
Product attributes in a WooCommerce store, as well as in most other eCommerce platforms, are characteristics that provide additional information about your product. For example, if you’re selling a dress, the product attributes might include its size and color. Similarly, if you’re offering courses, an attribute could be the prerequisite skills needed to enroll in the course.
These attributes serve to provide detailed information about the product. In the case of the dress, they specify the available sizes and colors, helping customers make informed decisions. Similarly, for the courses, listing the required skills ensures that potential students know whether the course is suitable for them.
Variations in WooCommerce represent the various options available to customers when purchasing a product. These options are determined by the product’s attributes.
A variation in WooCommerce is a combination of different attribute options, referred to as ‘terms’. For example, consider a dress:
In summary, WooCommerce attributes provide detailed information about your products, while variations offer customers a selection of choices. It’s important to note that attributes are optional for many products but are essential for Variable products, as they serve as the foundation for creating necessary variations.
There are two options for adding attributes. You can use global or custom attributes. Let’s look at both options below.
Global attributes apply to all products in your store. For example, if you run an online apparel shop, size, and color are common global attributes you might use. Brand names can also serve as global attributes.
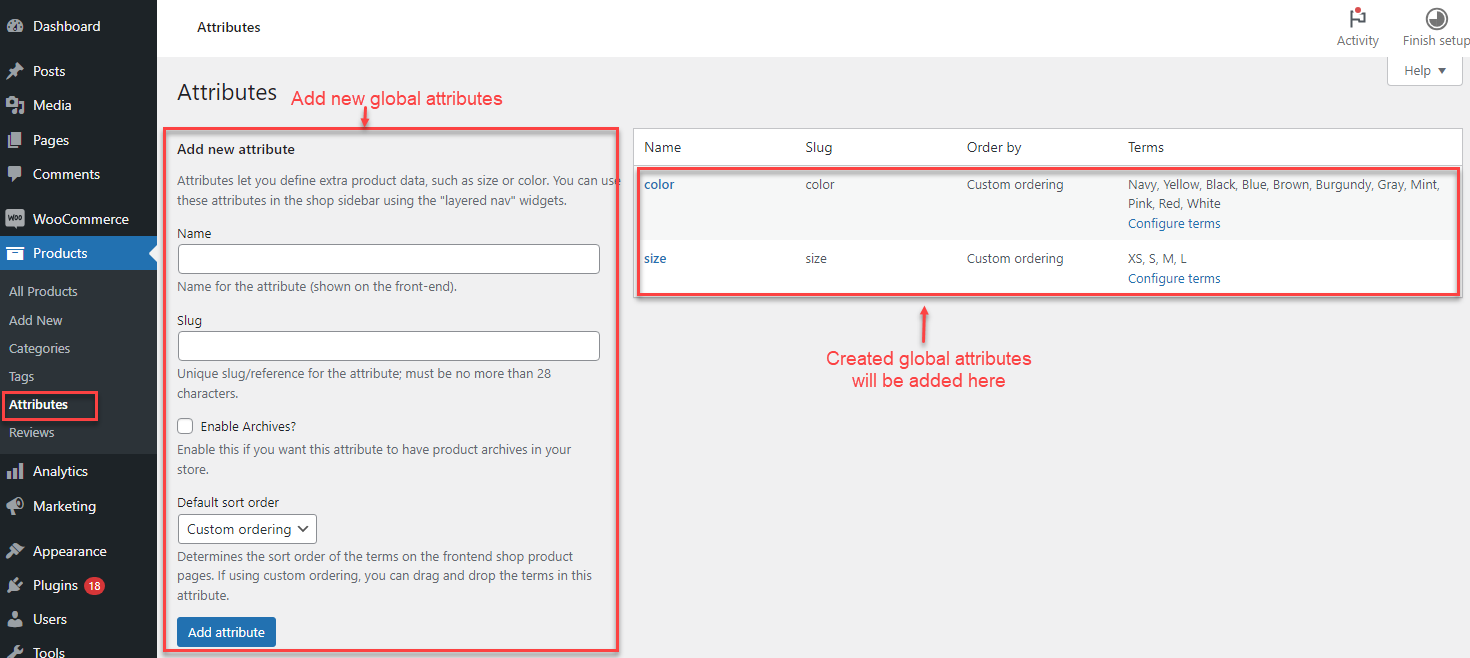
How to create a global attribute in your WooCommerce Store:
Custom attributes are tailored to individual products, distinguishing them from global attributes. They are exclusively applicable to items with distinct characteristics or standalone products within your store.
While custom attributes serve to showcase product details, they do not facilitate product display or filtering. For instance, ‘Limited edition’ could serve as a custom attribute for jewelry, watches, or other premium items. This attribute is reserved for products with unique features that differentiate them from others in the store. It is important to note that custom attribute names may distinguish between lowercase and uppercase characters.
To create a custom attribute in your WooCommerce Store, follow these steps:
A tip to tell those two apart (Global/Custom attributes) on the product page back end, other than by how they are created, is their name and terms.
Let’s see this video guide for further demonstrations about the global and custom attributes.
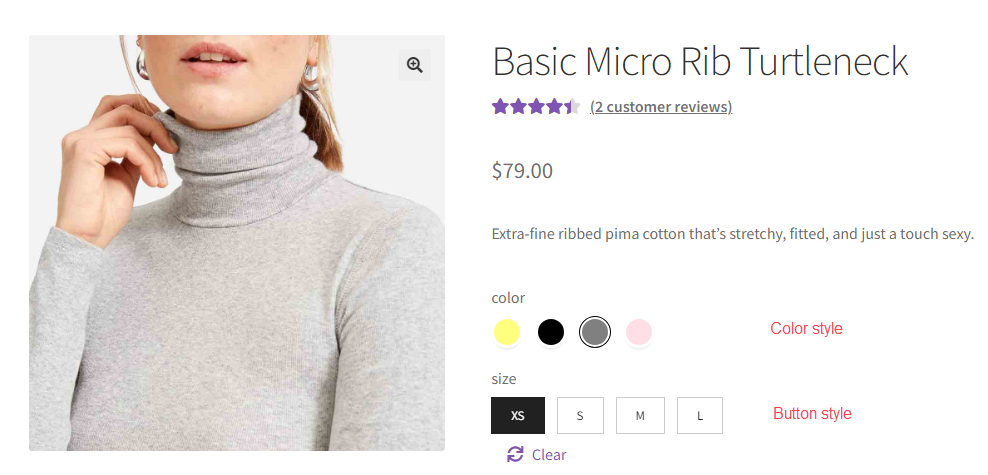
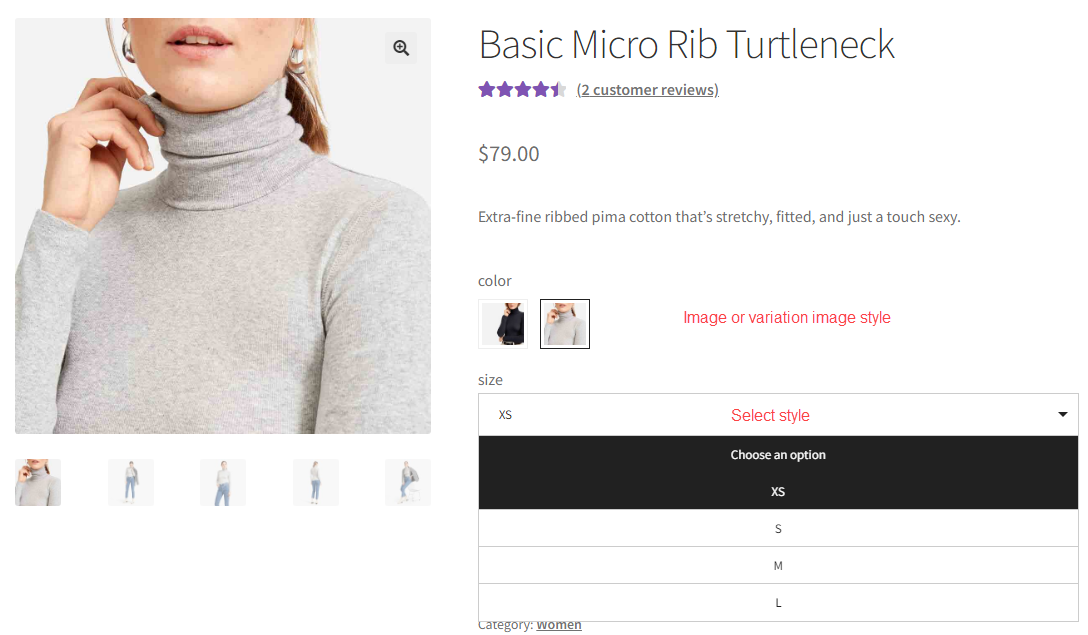
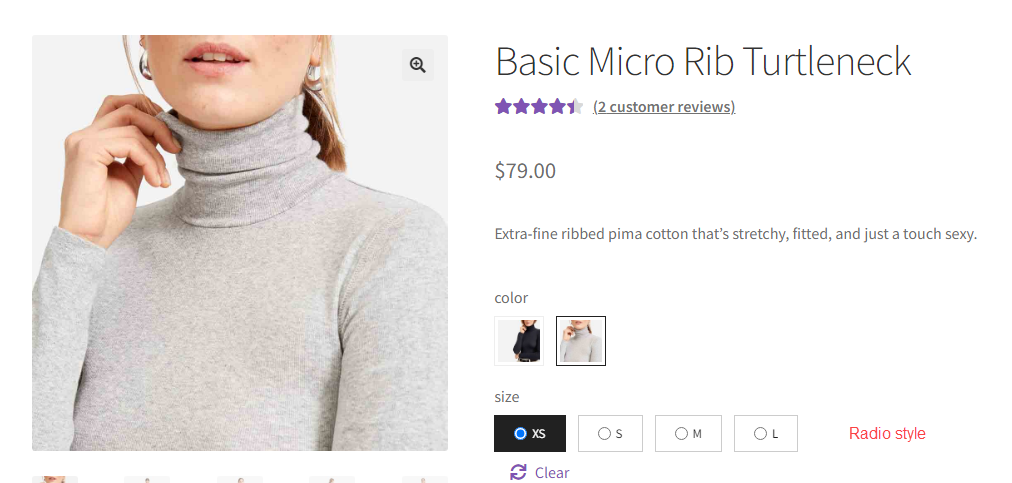
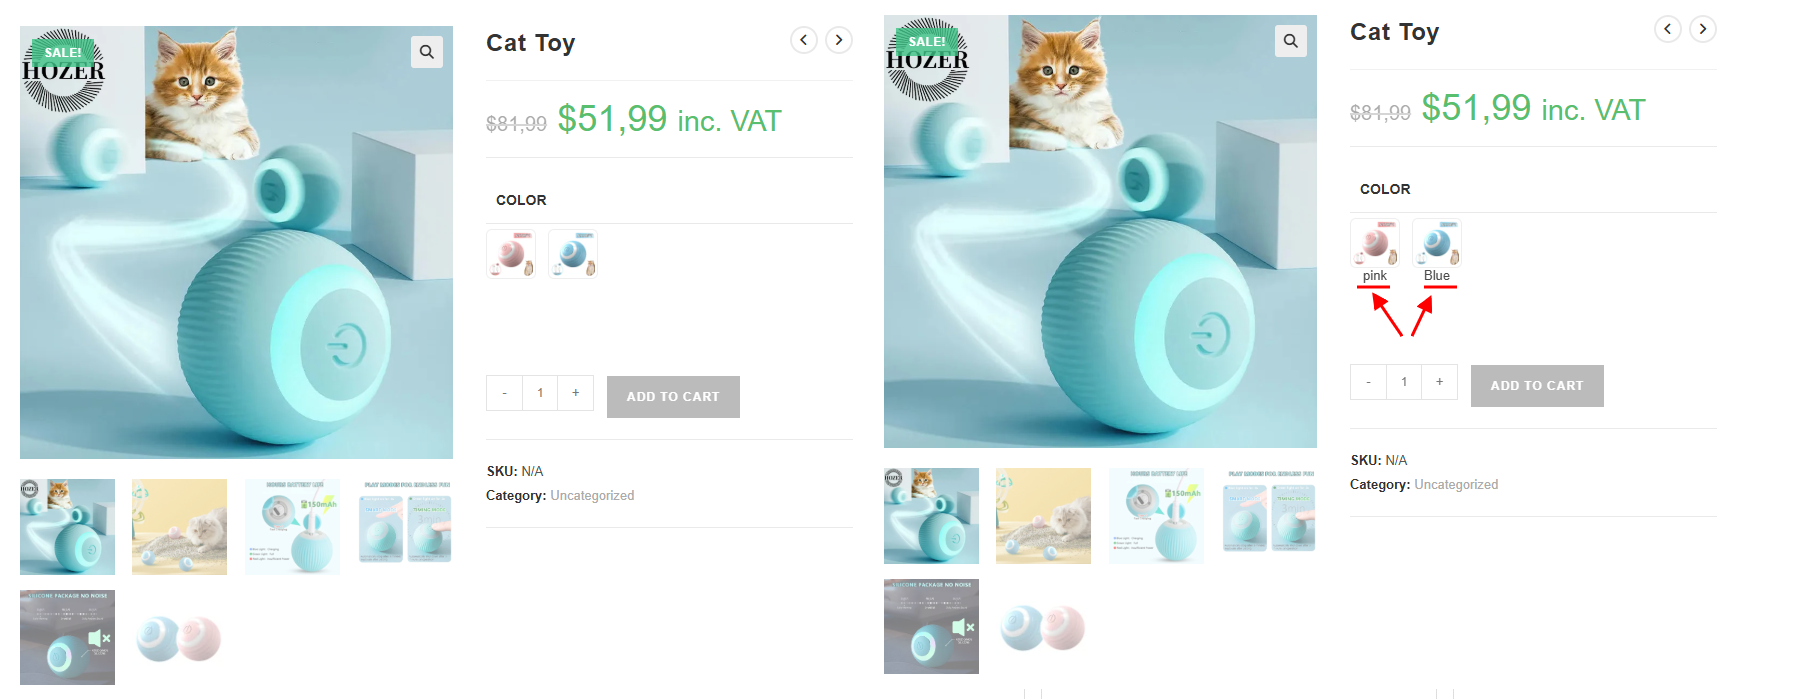
You have a variety of swatch styles available to showcase your attribute, tailored to your preference including button, color, image, variation image, radio, select, or theme default. Below are the ways these styles are displayed. To change among swatch styles, switch among options in the Display type for:
You can see this video guide to observe each style and how to switch among them.
Global attributes are product attributes that can be used for many different products, they’re stored in the Attributes settings of WooCommerce.
You can edit them all on Global Attribute settings. No need to configure each product attribute one by one in the product data.
Go to Dashboard >> Variations Swatches >> Global Attributes. Here you’re provided with full settings to customize your global attributes and make them display how you want.
Step 1: Search for the attribute you want to edit its swatches.
Step 2: Customize its “Default design” for the general settings on all product pages and on product list. Visit this documentation – Default Design.
Step 3: Set extra rules if needed with particular customization for the attribute on specific categories. Visit this documentation – Extra rule to design with Product category.
Step 4: Save/Save All.
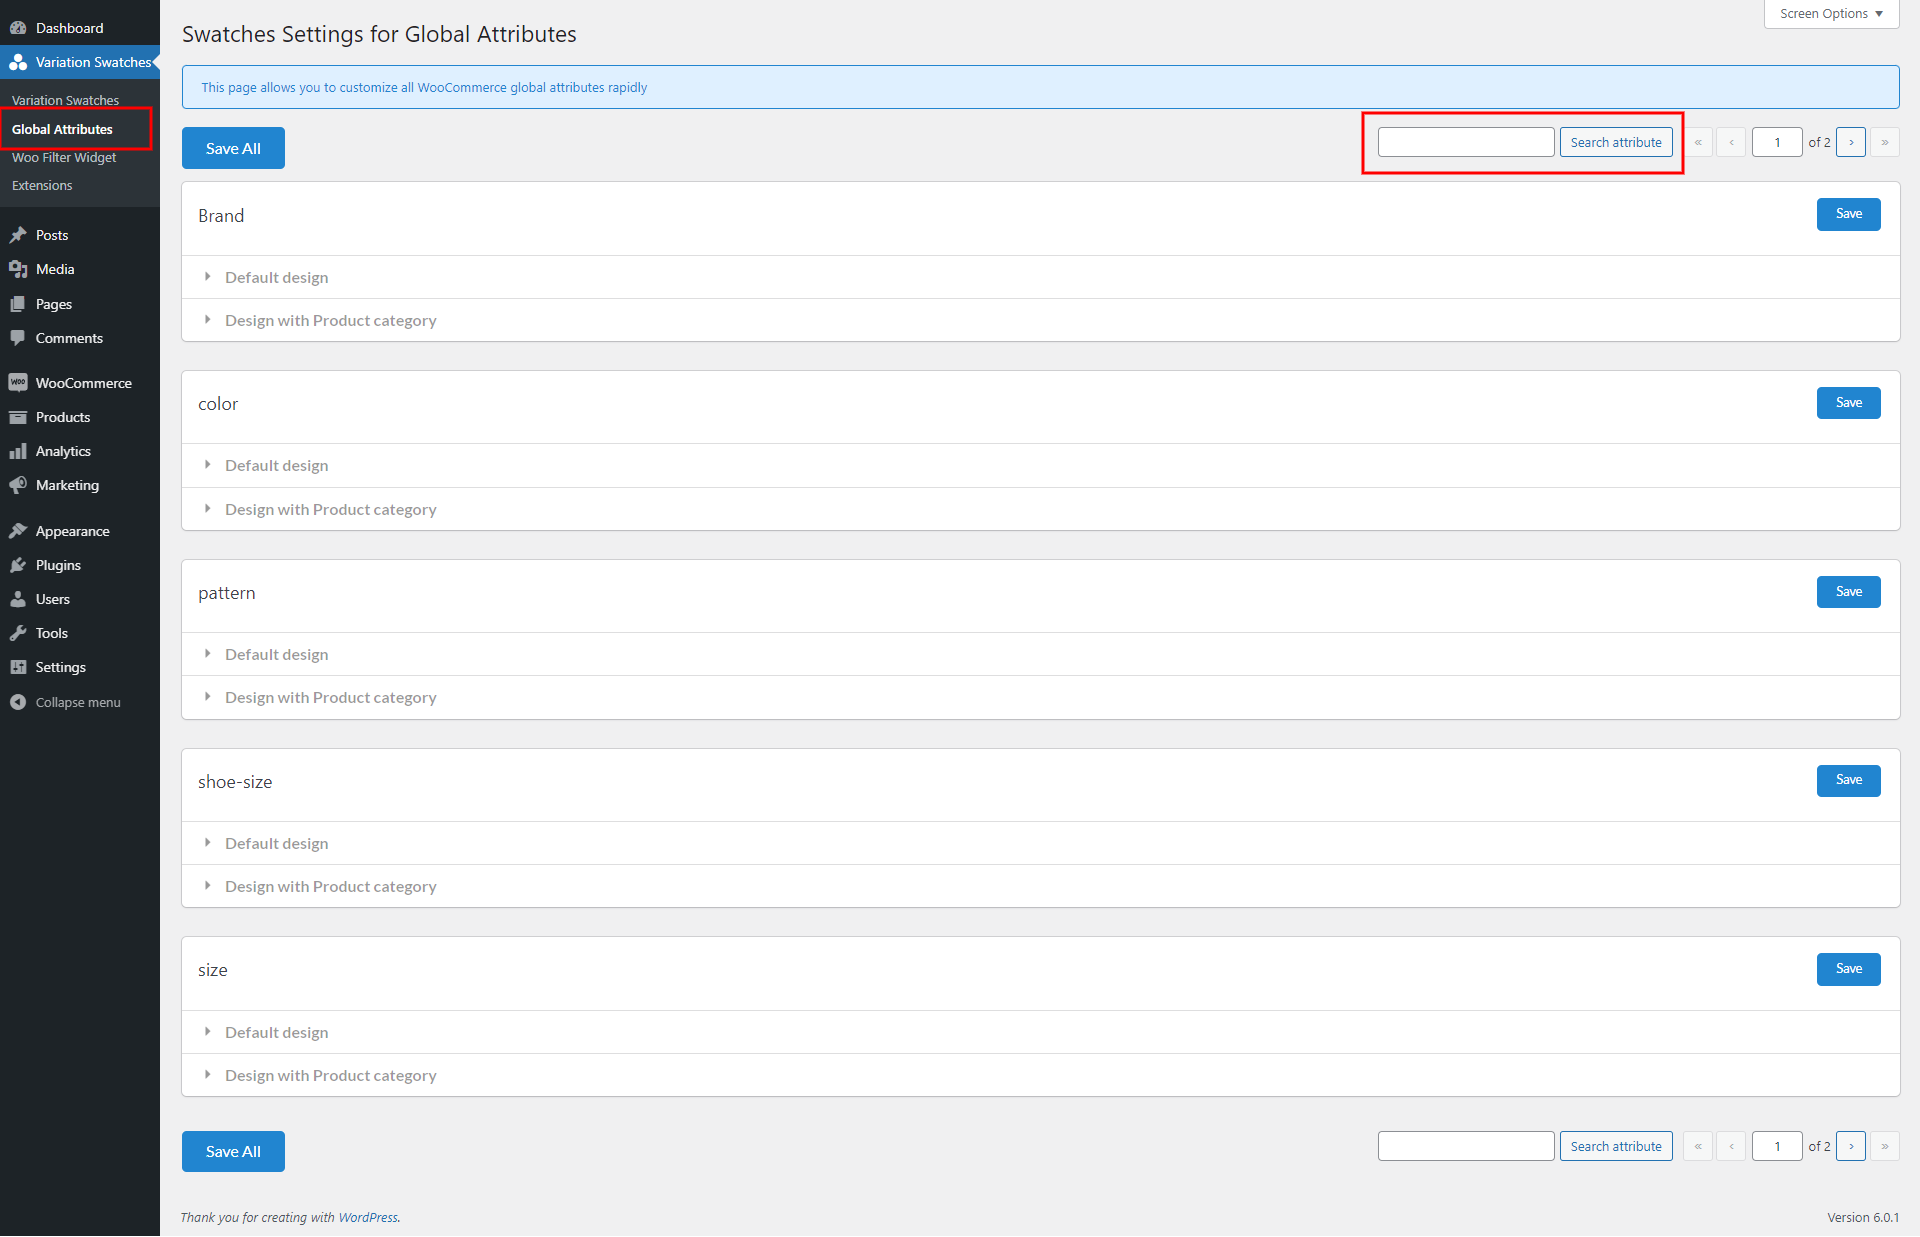
After you’re happy with the global attribute customization, you can go to a single product page, or the product list to view the result.
Read all options for custom attribute customization in this documentation. In this part, we’ll learn how to create and customize custom attribute with our plugin.
Custom Attributes are created for individual product. The purpose of a custom attribute, is to represent a certain feature of a product, and is used for that one product only. It’s not applicable to most other products.
Once you have custom product attribute for any product, you can always customize them.
In the Custom Attributes settings
Step 1: Create a custom attribute in the Product data
Step 2: Configure the custom attribute with the attribute title, add image/color if needed.
Step 3: Edit the customization options as needed. Visit this documentation for more details.
Even though you customize the swatches for all attributes, including global and custom attributes. But in case you want to make them different on some specific products. You can do it in the product data.
Step 1: Go to Product data of the product you want to customize its attributes >> Attributes
Step 2: Select the attribute to customize
Step 3: Configure the swatches settings

Global attributes are common attributes that you want to use for several products in your WooCommerce store. They’re created and placed in WooCommerce >> Products >> Attributes. All these attributes there will be listed in the plugin settings, and it’ll be updated each time you update your global attribute list.
After you install and activate WooCommerce Product Variations Swatches, you can customize the newly created attributes right away when you make them.
Also, you’ll be redirected to the settings of all Global Attributes, or specific attributes by using the “Swatches settings” buttons.
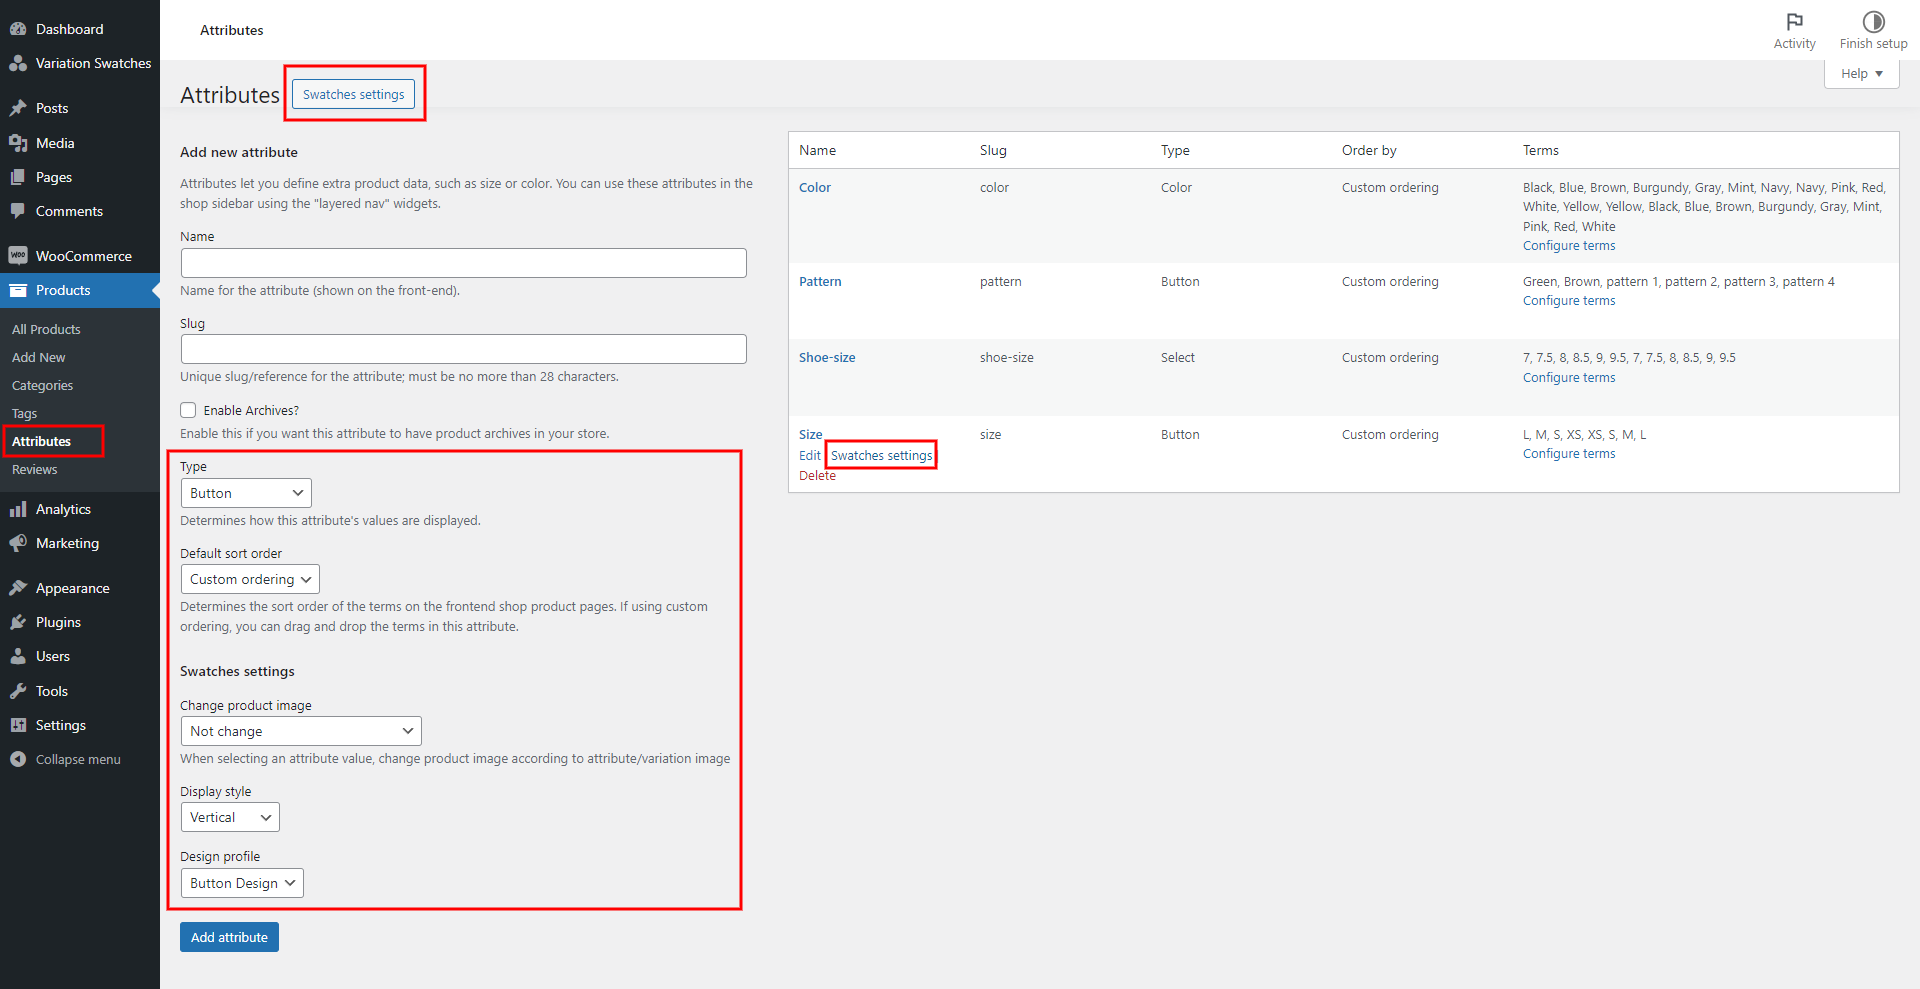
Step 1: In the Dashboard >> Products >> Attributes, create a new attribute
Step 2: Configure these options below for its swatches: Type (Display Type); Change product image; Display Style; and Design Profile.
Step 3: Click “Add attribute”
WooCommerce allows you to customize the sorting order of your attributes and variations displayed on the product page.
For instance, if you prefer the item size options to display in a specific sequence like small, medium, large, etc., when customers are selecting the size variation, you can easily adjust the sort order by simply dragging and dropping the attribute into the desired position.
WooCommerce offers you 2 methods to sort global attribute terms. Here’s a step-by-step guide to swiftly changing the sort order of global attributes for your WooCommerce products:
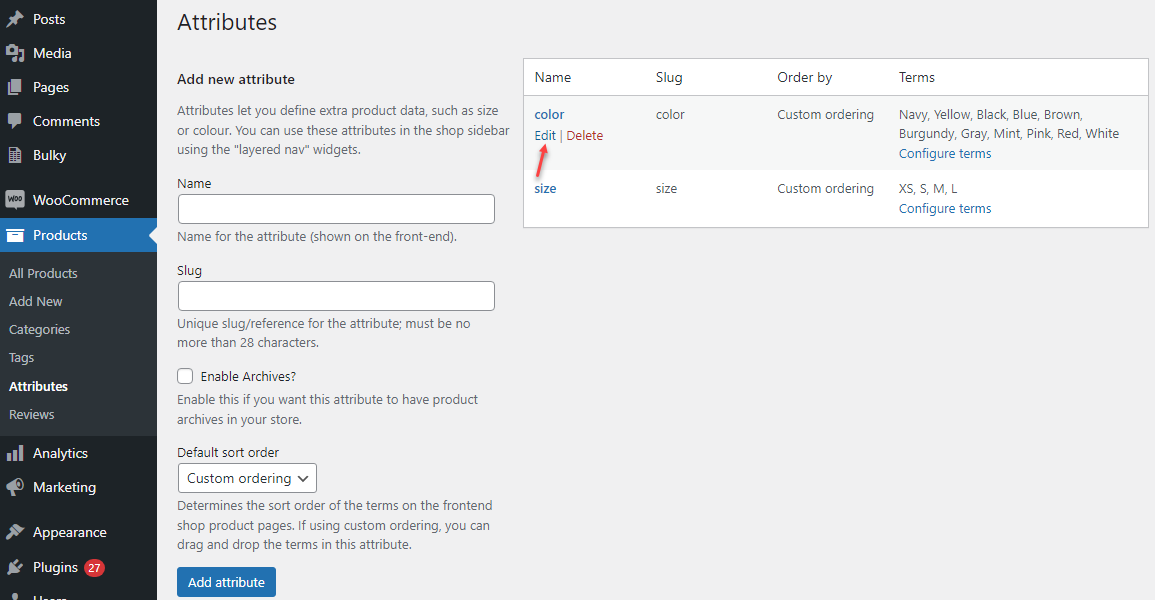
Step 1: In the Dashboard > Click Products > Attributes in the left menu.

In this section, we’ll change the variations and attributes sort order for Color.
Step 2: Click on “Edit” under the Color attribute.
Step 3: Then, on the “Edit Attribute” page, navigate to the “Default sort order” dropdown.
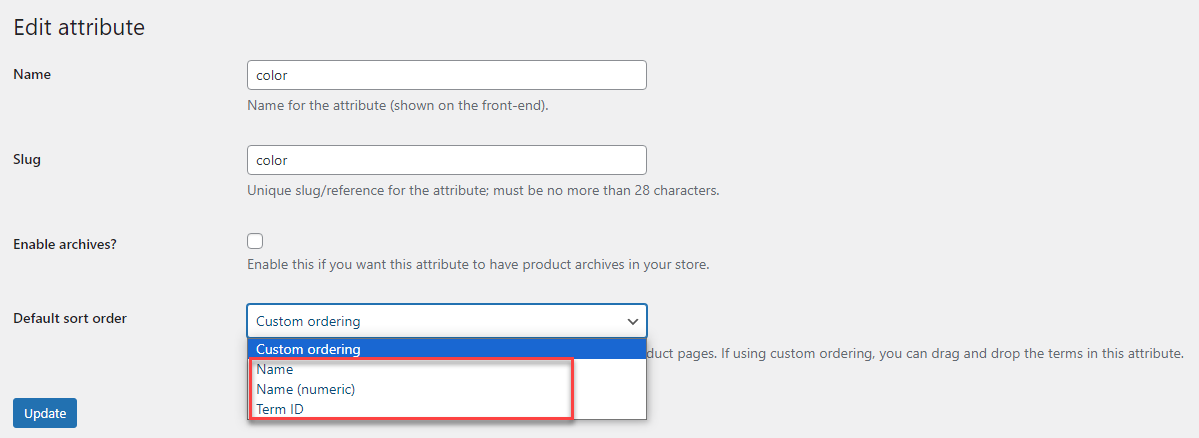
This section assists the administrators in managing the sort order of terms on the shop product pages, offering 3 options:
Choose the desired order and then click on the “Update” button to apply the changes.
It is noted that the custom ordering will be the 2nd method below.
Now that the default sort order is configured, it’s important to verify if the changes in order are reflected in the template.
Custom ordering enables you to easily rearrange attribute terms by dragging and dropping them within the attribute section. Let’s walk through how it functions.
Step 1: In the Dashboard > Click Products > Attributes in the left menu.
In this section, we’ll also change the variations and attributes sort order for Color.
Step 2: Click on “Configure terms” below the color attribute.
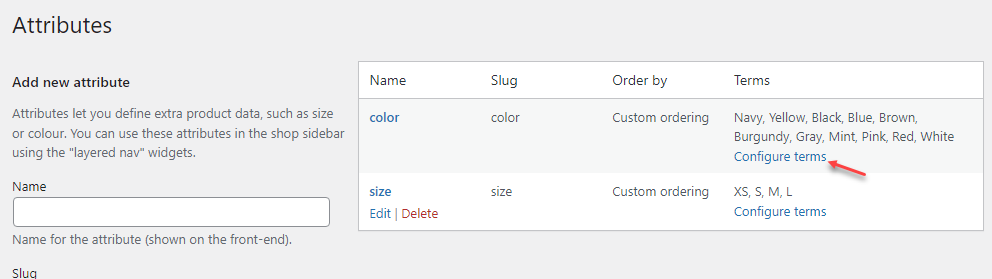
Clicking on “Configure terms” will redirect you to the “Product Color” page.
To adjust the order of colors, hover over the three lines next to each attribute. You can then drag the attributes up or down to rearrange them according to your preference. When hovering over, the cursor will be displayed as a hand icon.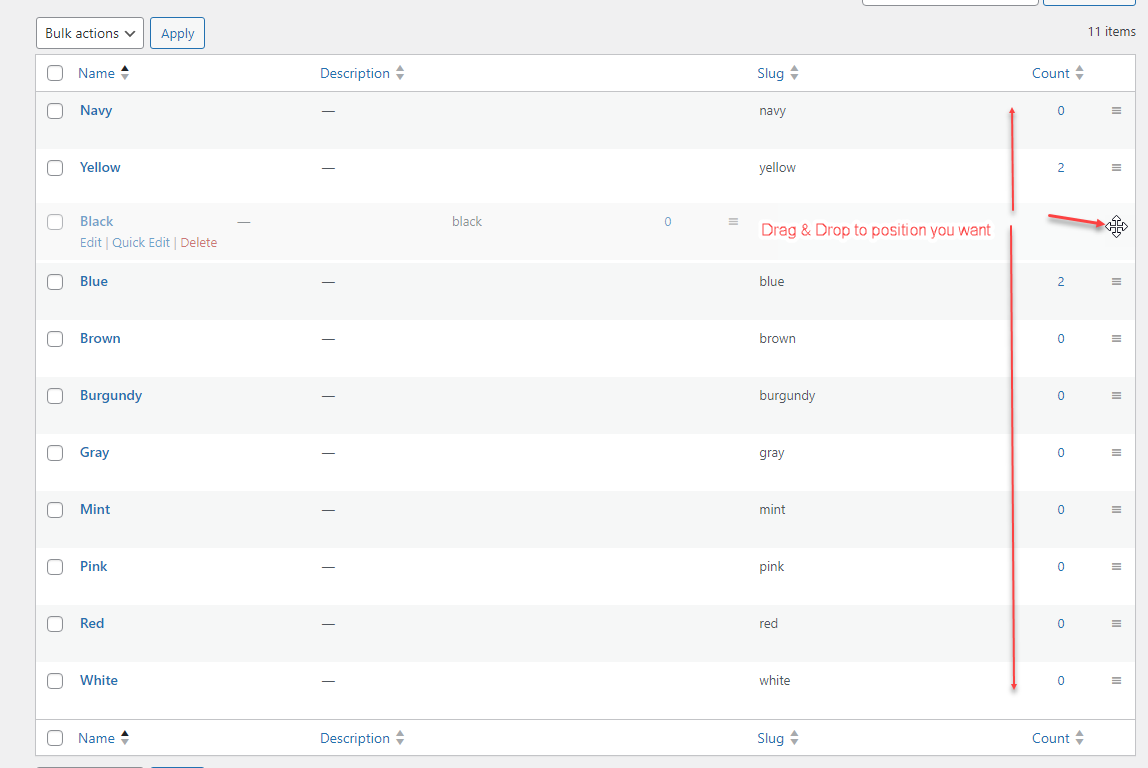
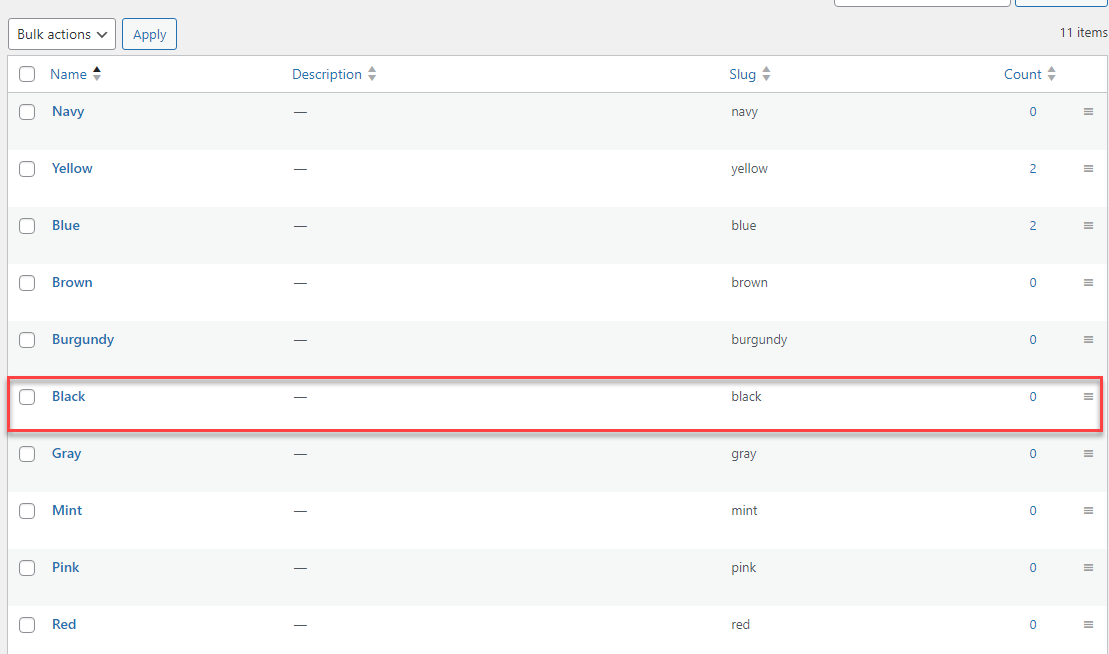
Now, visit the Product page to verify the new custom order.
If you are new to the term Custom attributes, please refer to look through this part of our documentation.
There is no way to sort custom attributes, you must remove them and add them in the desired order.
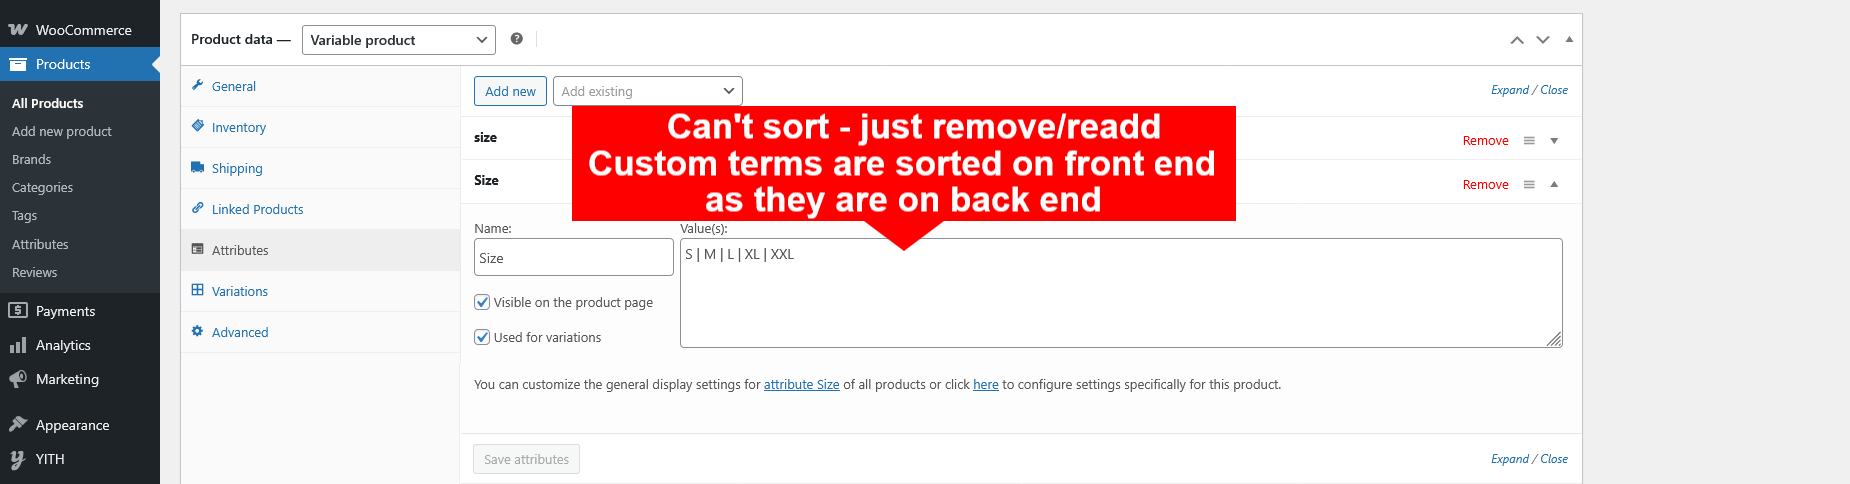
* Important note: It is cautioned and not recommended to rename the custom attribute terms in order to sort the existing custom attribute as the assigned values might be conveyed to each term, they can not be changed respectively after renaming the terms. Moreover, you can not drag and drop custom attribute terms to sort custom attributes.
You can use this shortcode [viwpvs_swatches_archive] (following this guide) to show product swatches on the archive page.
In the general setting tab of the plugin settings, you can set a default display type of variation swatches. It can be the button or radio type.
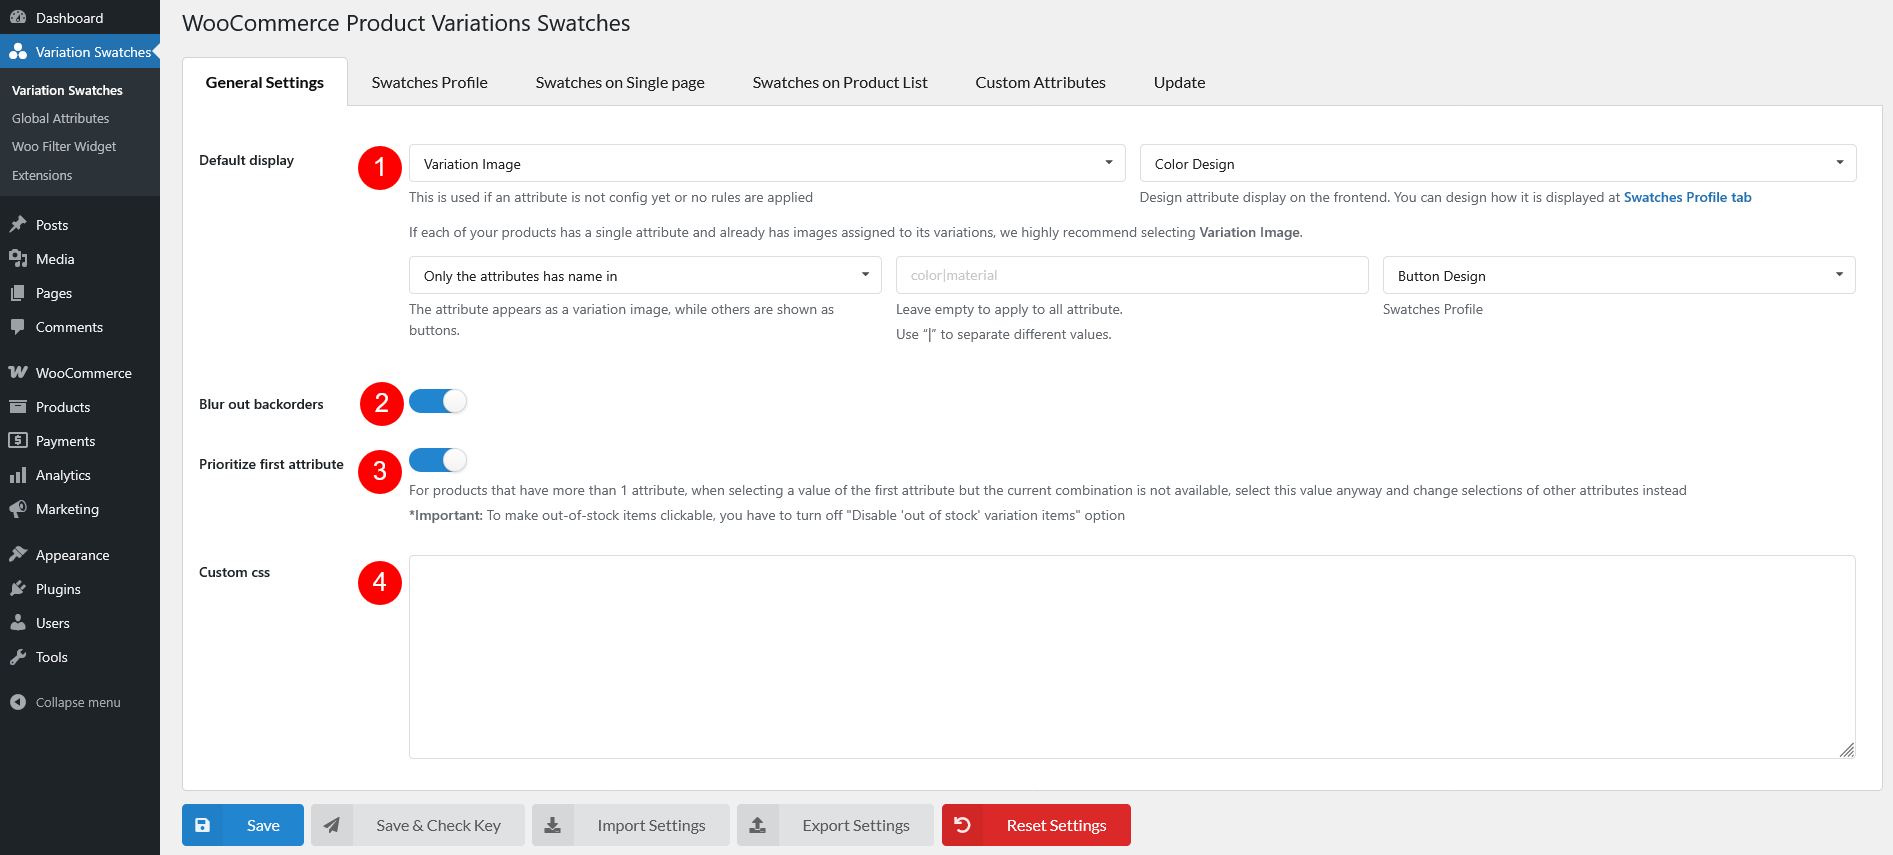
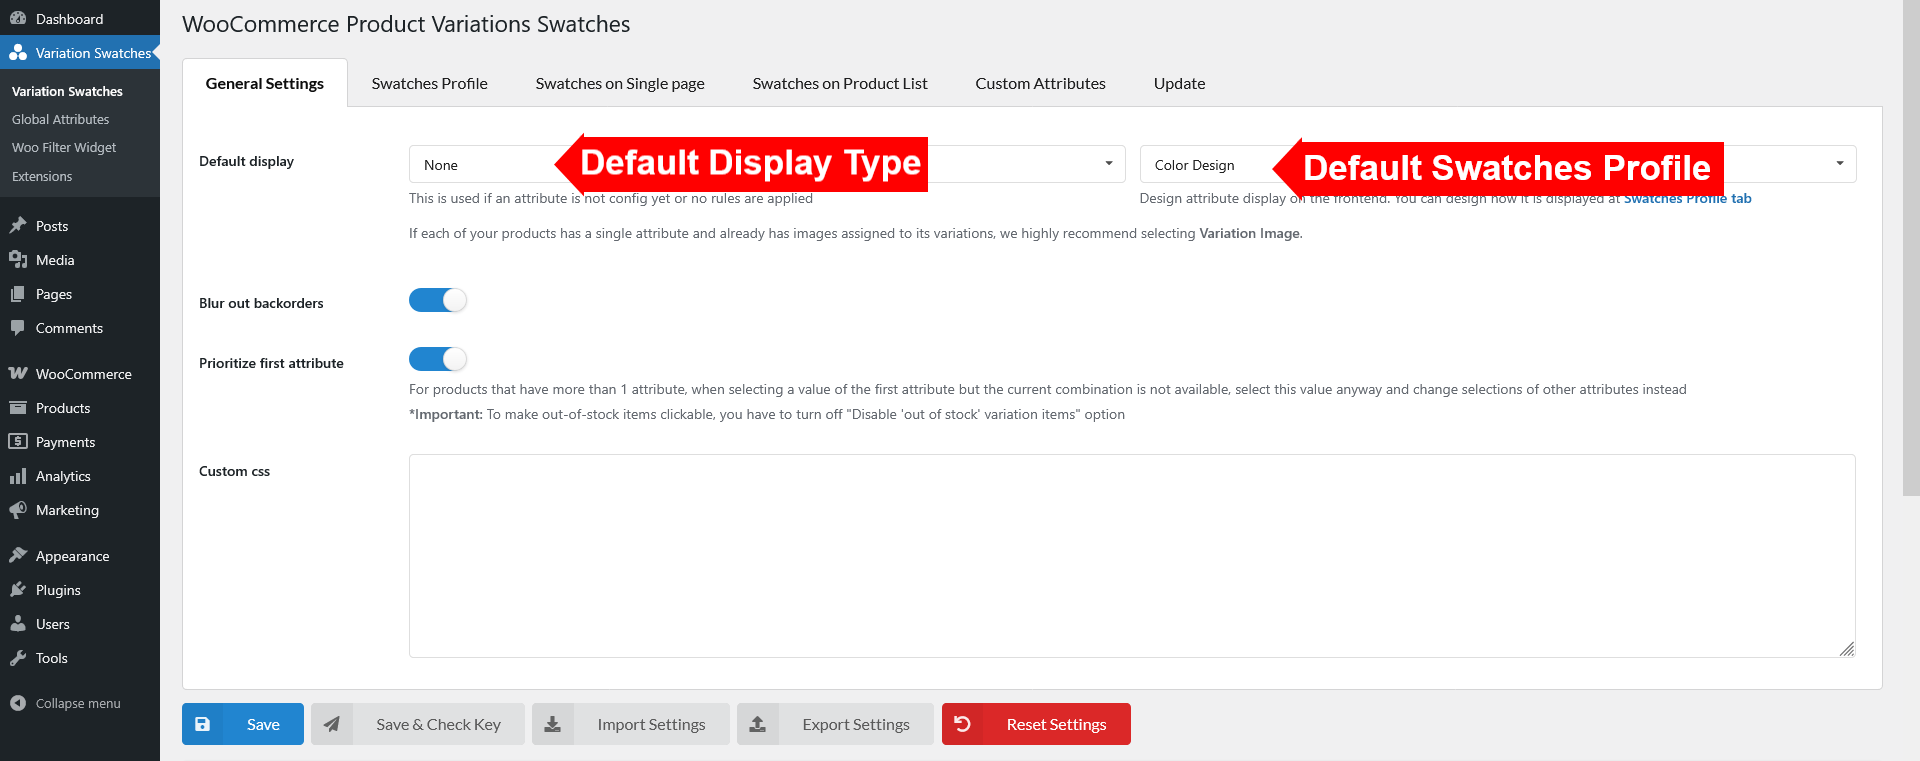
The variations of each attribute can be different with various combination of Display Type and Swatches Profiles. On this settings page, you can create as many profiles and configure them.
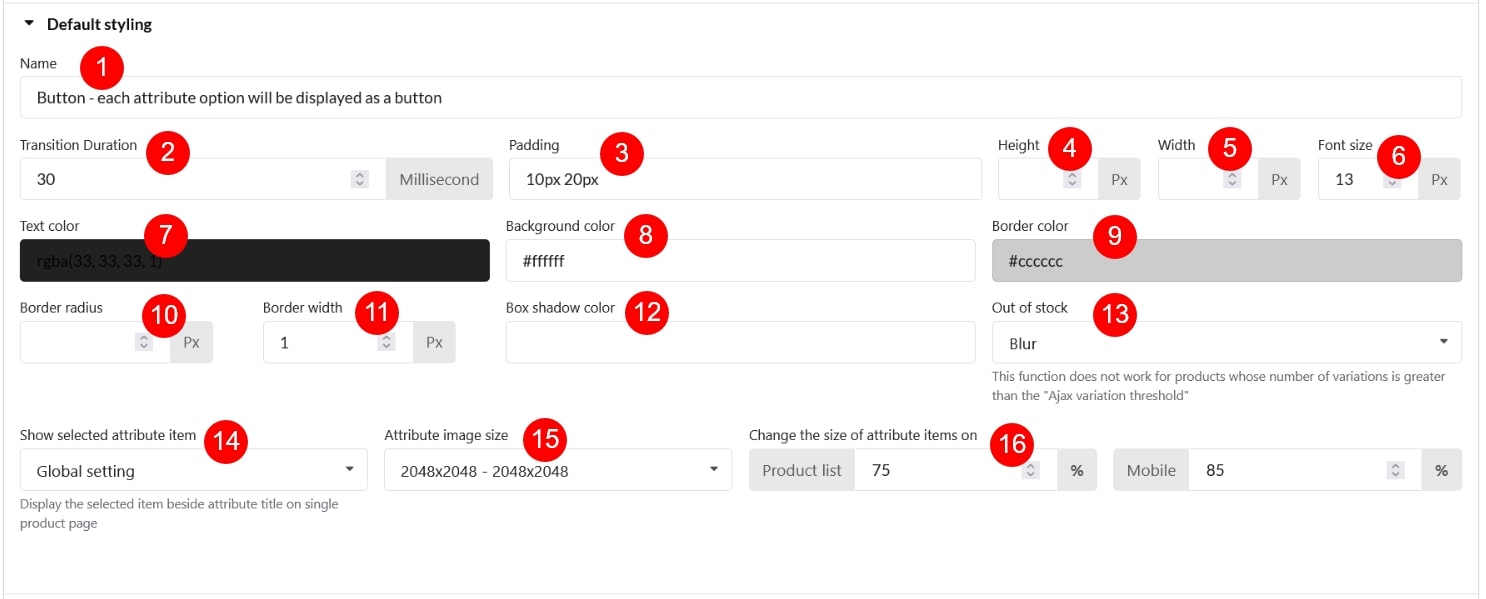
By default, the plugin builds 3 profiles for you – Button, Color, and Image. Each profile includes settings of swatches : on default status; on hover status; on selected status; settings for tooltip; and settings for attribute value if the Display Type is “Color”, or “Image”.
When you add more profiles by “cloning” any particular profile, the settings will be the same.
Go to Dashboard >> Variation Swatches >> Swatches Profile.
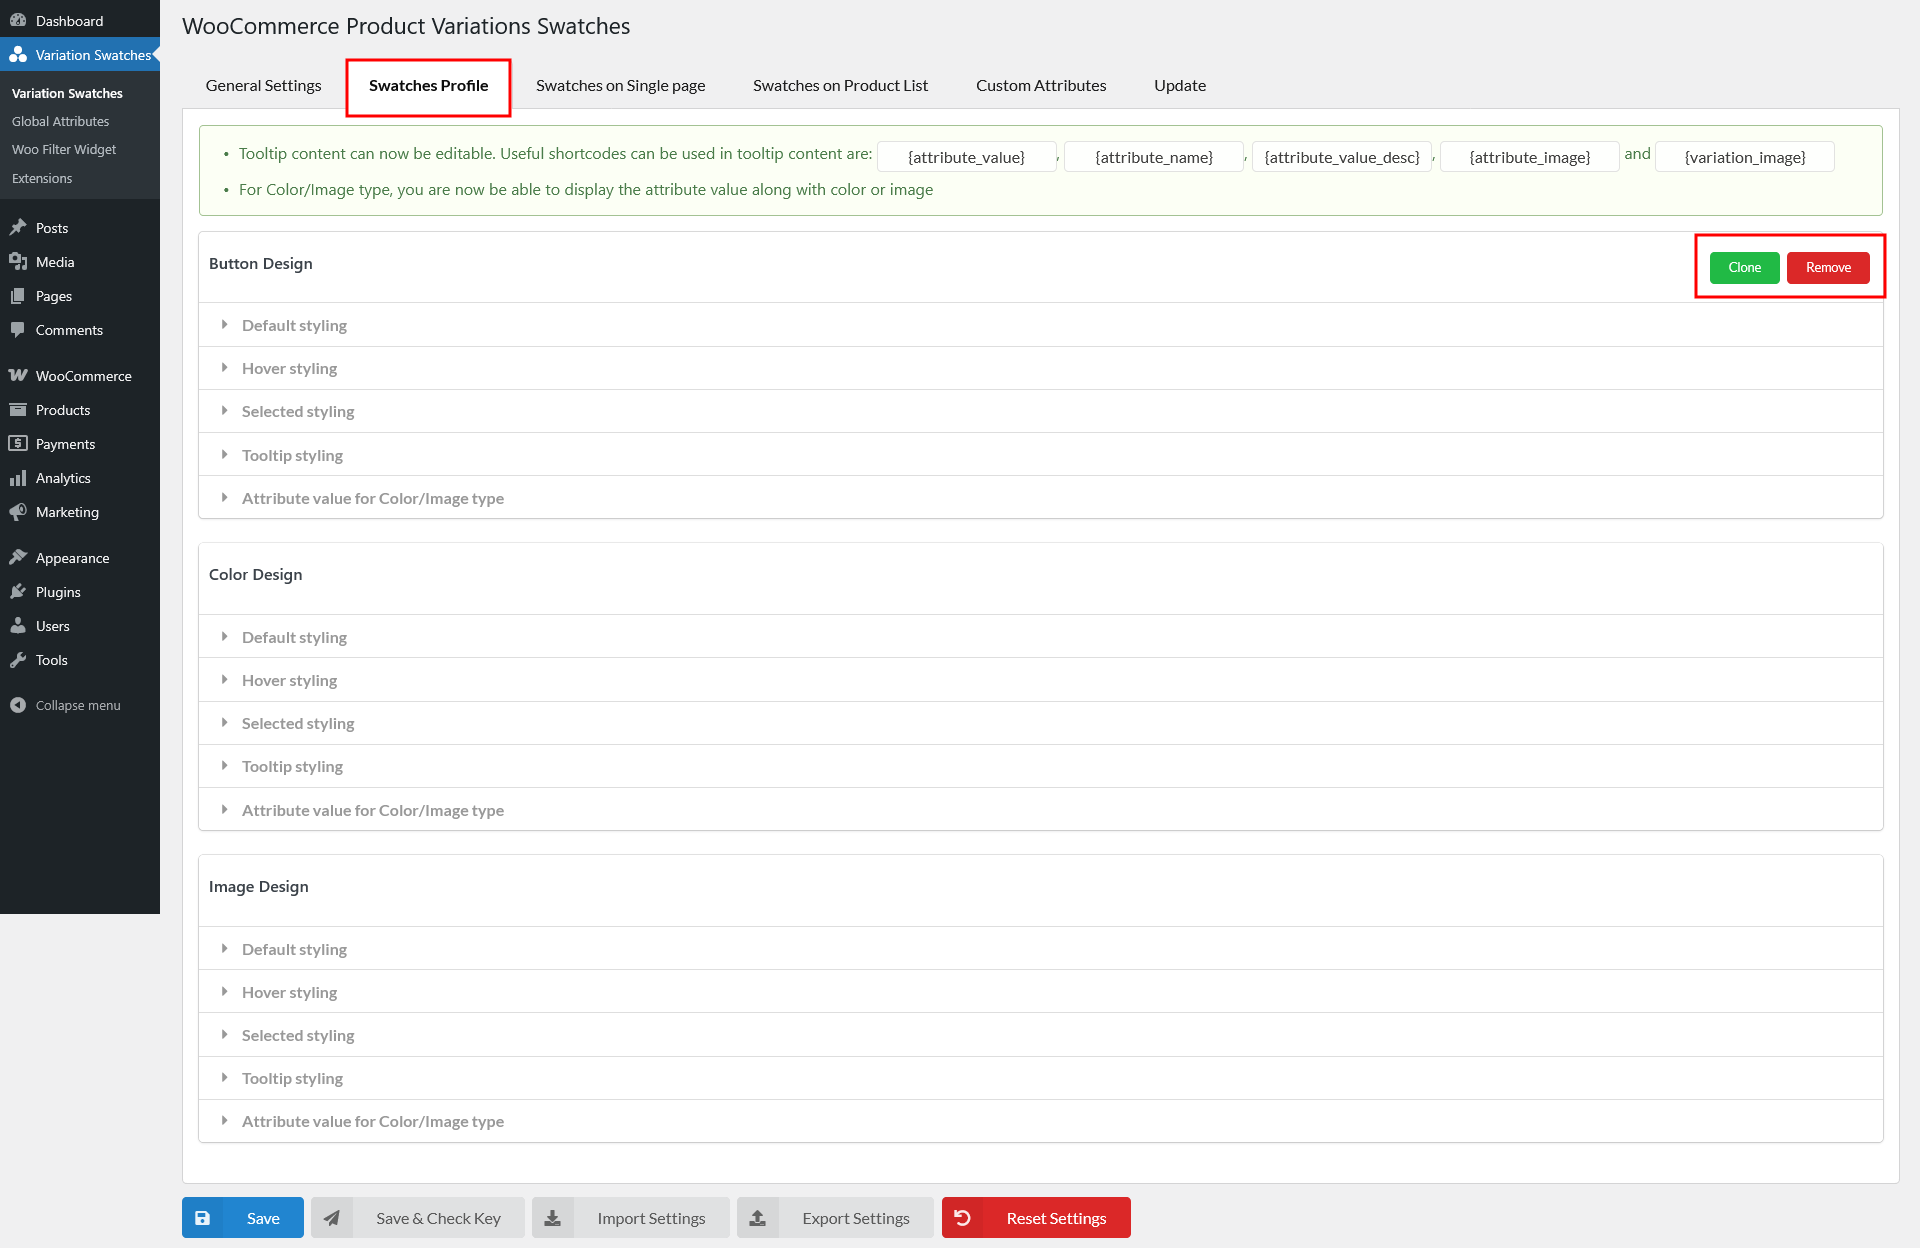
Now let’s configure the settings for each swatch profile.


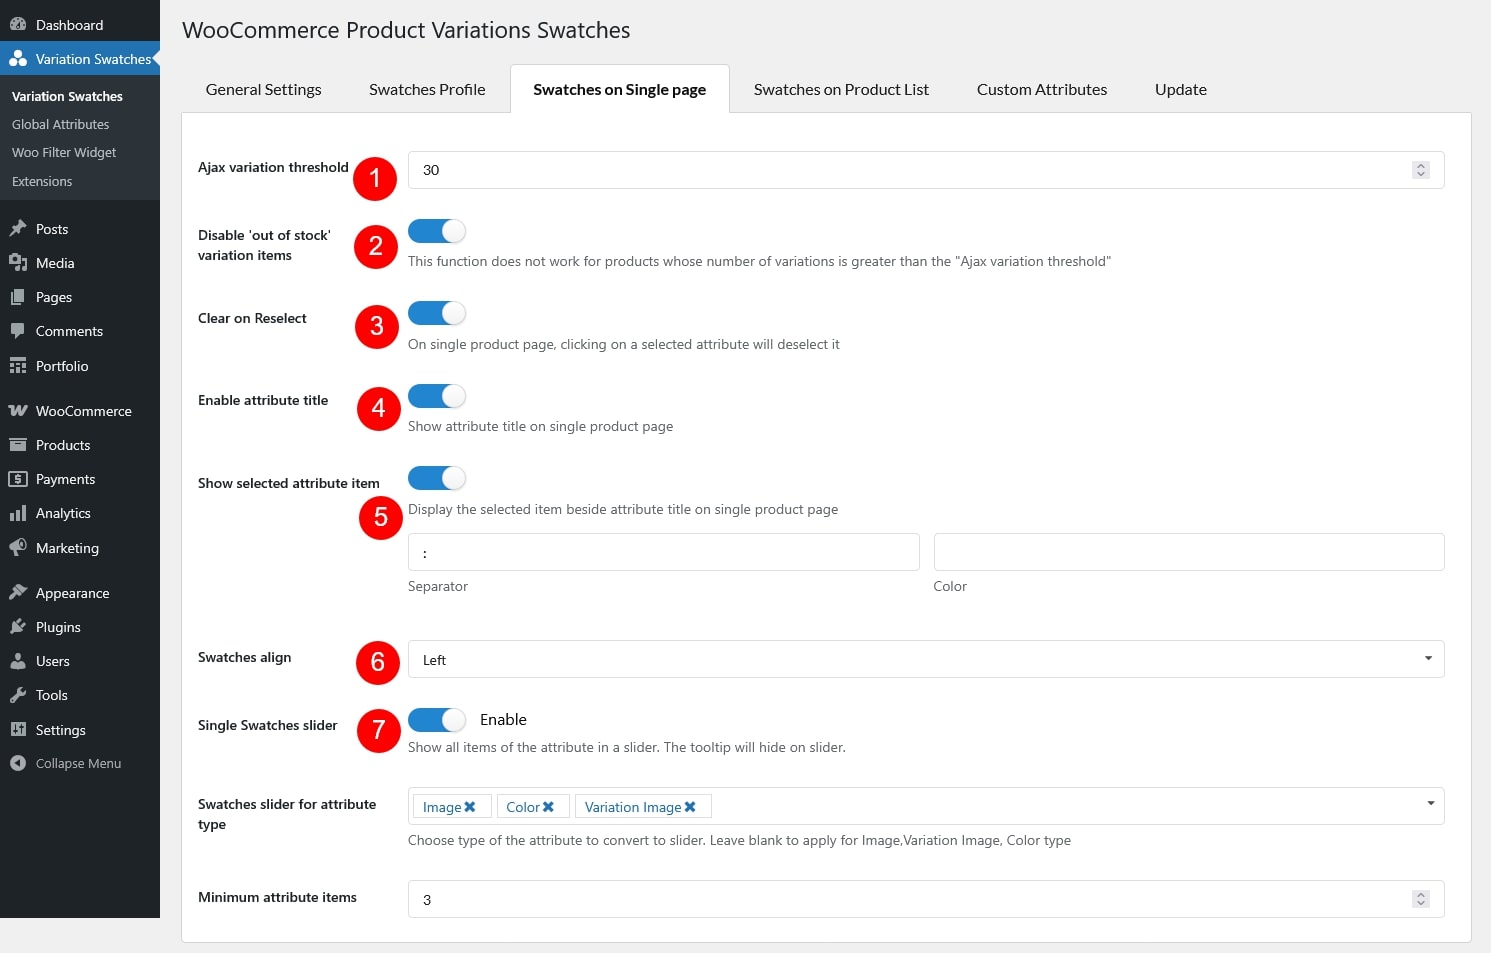
WooCommerce Product Variations Swatches can show attribute and variation swatches on product list, like Shop and category pages. Go to Dashboard >> Variation Swatches >> Swatches on Product List to set up this feature and scroll down to learn all of it setting options below.
These Settings allow you to customize displaying variation swatches of variable products on the product list.

Custom Attributes settings include all swatches settings for custom attribute. Make rules for each attribute and configure them here.
In these settings, if a custom attribute has the same name as the field “Attribute name” and products that contain this custom attribute belongs to one of the selected “Product category”, the swatches settings of the current rule will be applied to that custom attribute.
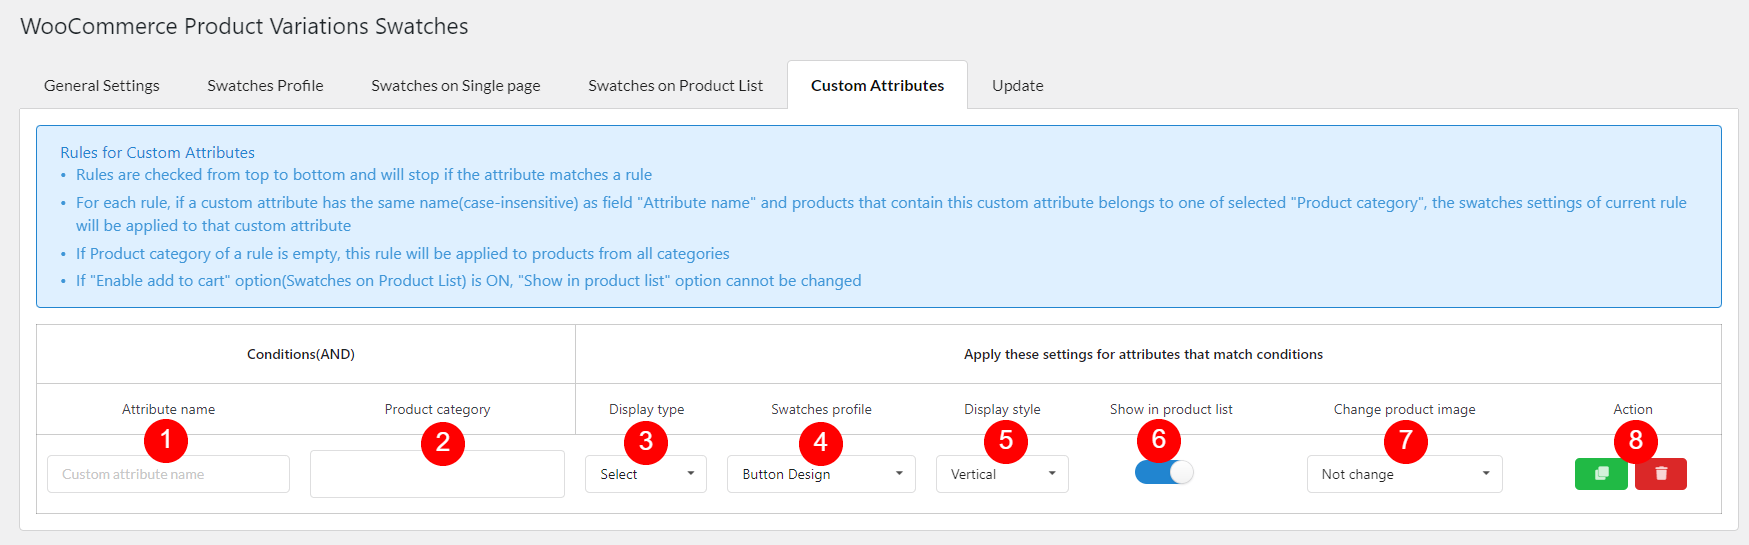
Important note: Make sure to check the rules for Custom Attributes before start configuring the Custom Attributes rules.
All global attributes will be listed in the “Global Attributes” settings. Go to Variation Swatches >> Global Attributes.
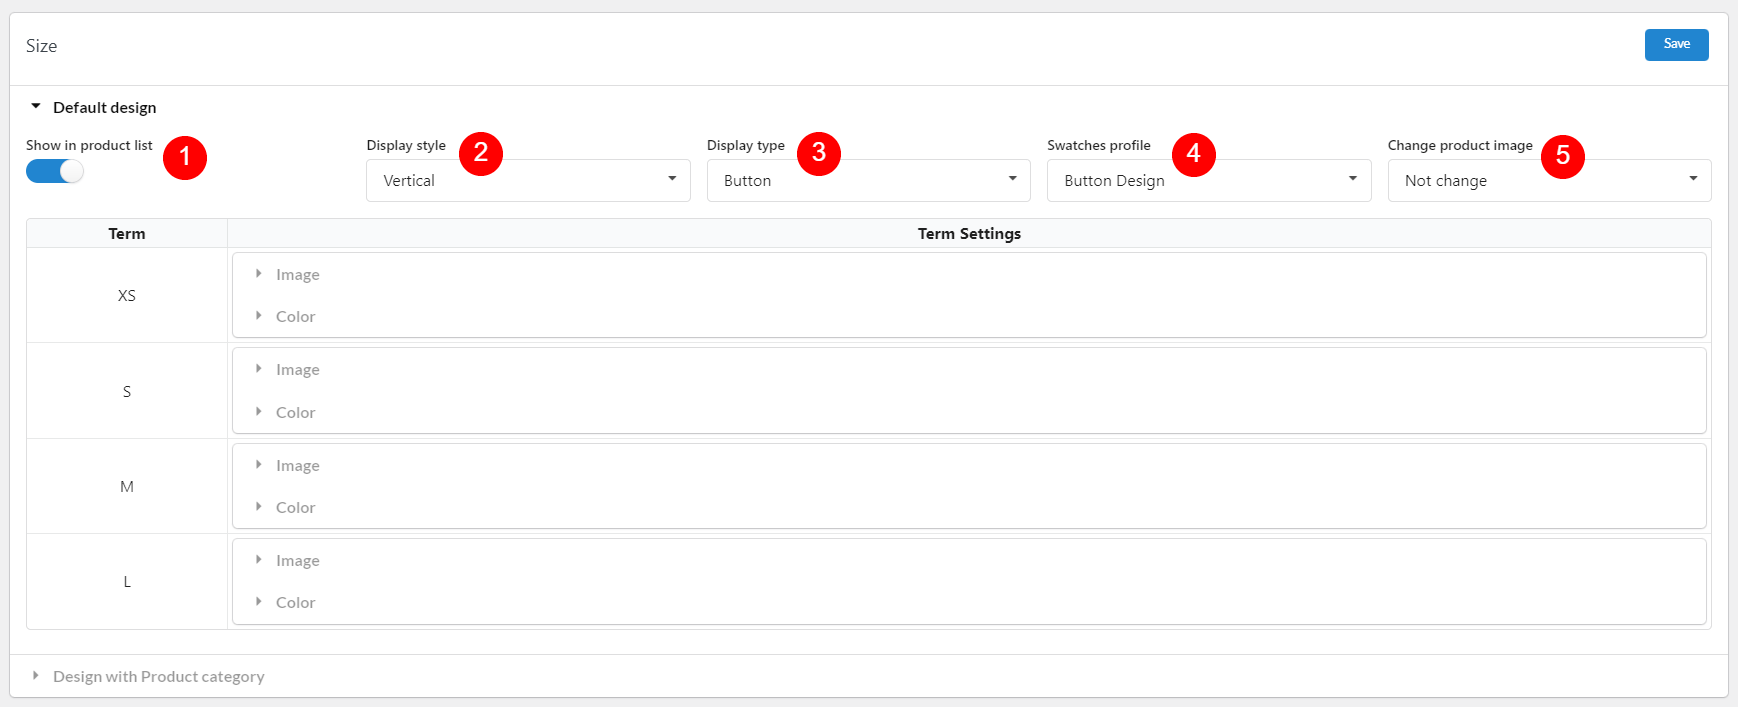
On this settings page, you can customize/edit the swatches settings for each attribute.
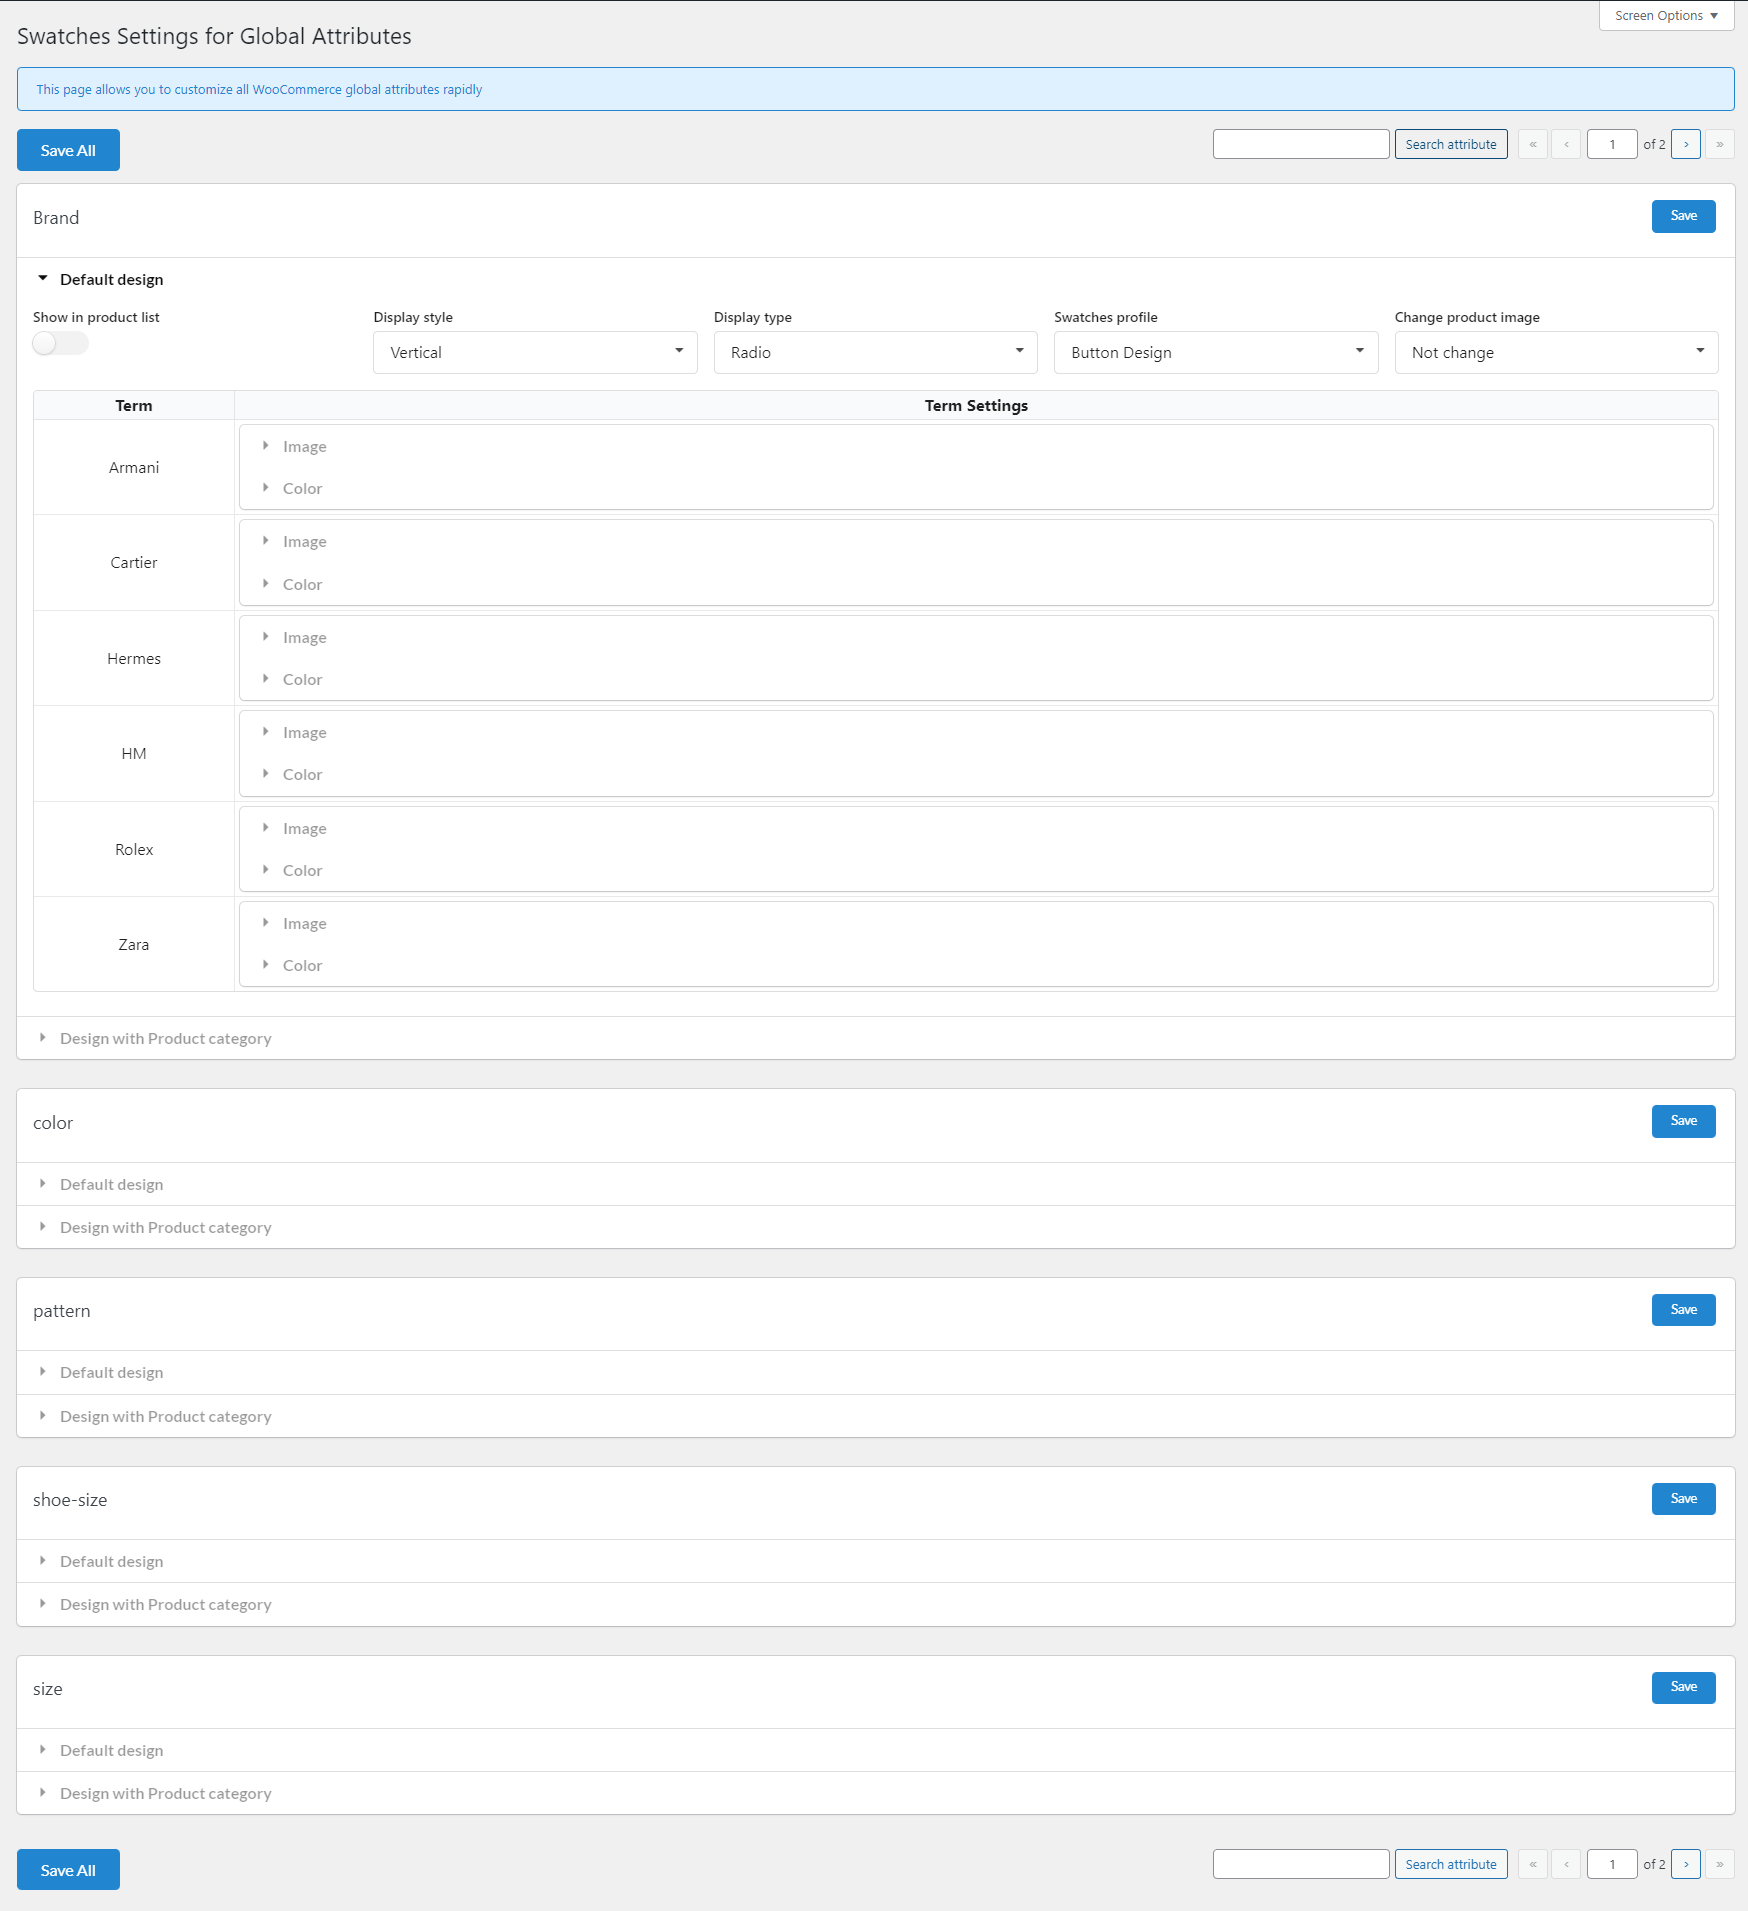
Each global attribute has the default design and the extra design for particular product categories.
To add color gradient for the attribute
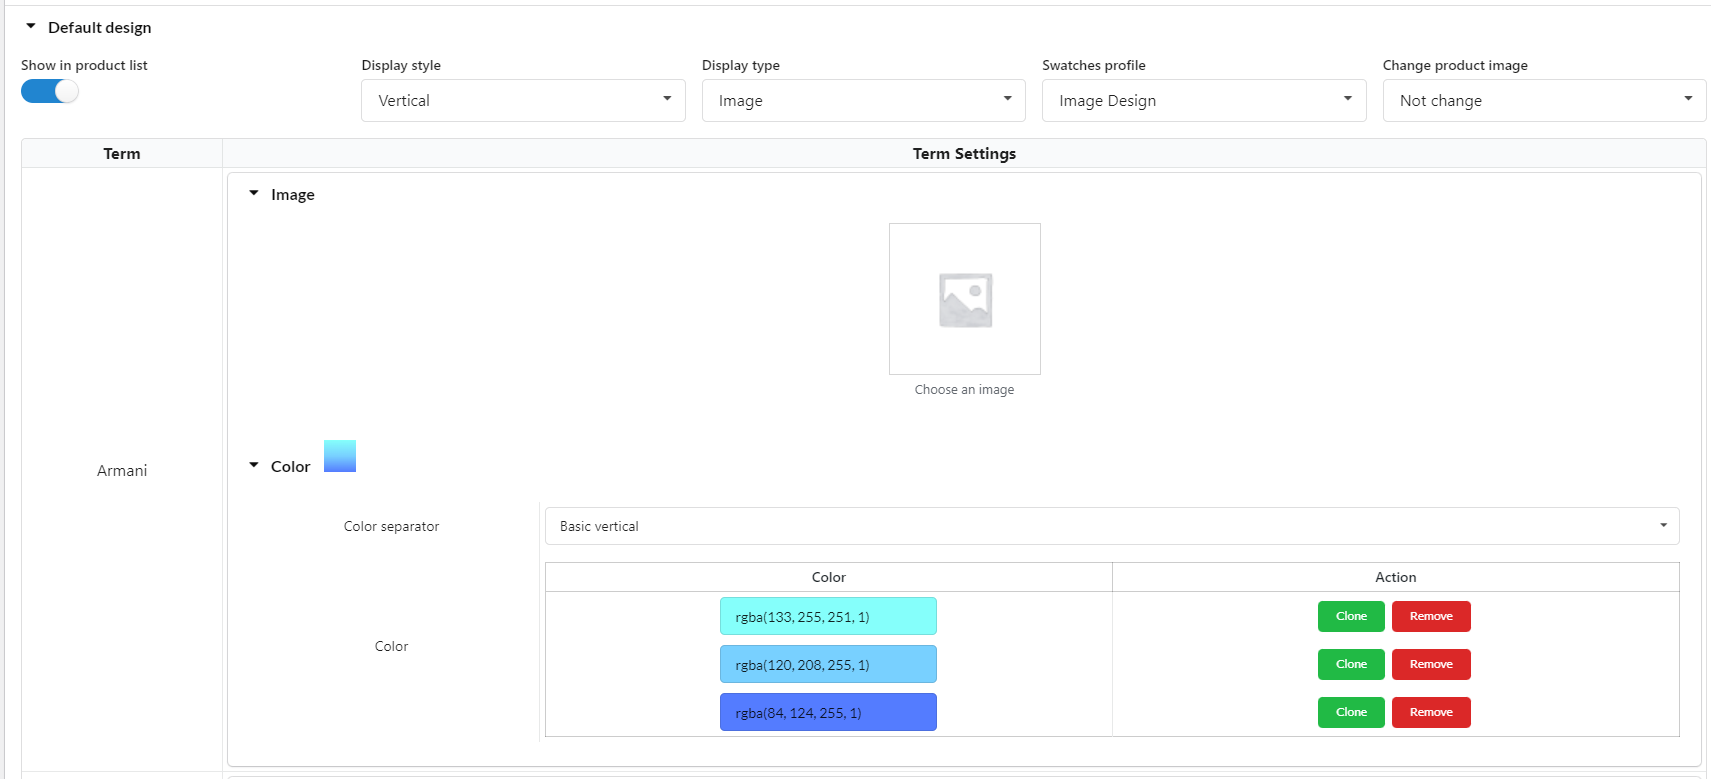
Step 1: Use the “Clone” button to duplicate the current color.
Step 2: Edit the duplicated color
Step 3: Select the color separator. View the change in the preview color when you edit.
Other than the general settings for the attribute above, you can create your extra rules for the categories. These extra rules will be applied to the attribute when they’re in the products belong to the selected categories.
For example; you can make the “Color” attribute show as images with clothes, but make them buttons with shoes.

Important Note: This feature doesn’t work with WooCommerce Block feature, only the classic widget.
Note: This filter is function of WooCommerce. Our plugin makes the variations in the filter look better, but we don’t interfere the filter function. If you encounter any filter relating issue, please follow this instruction to test.
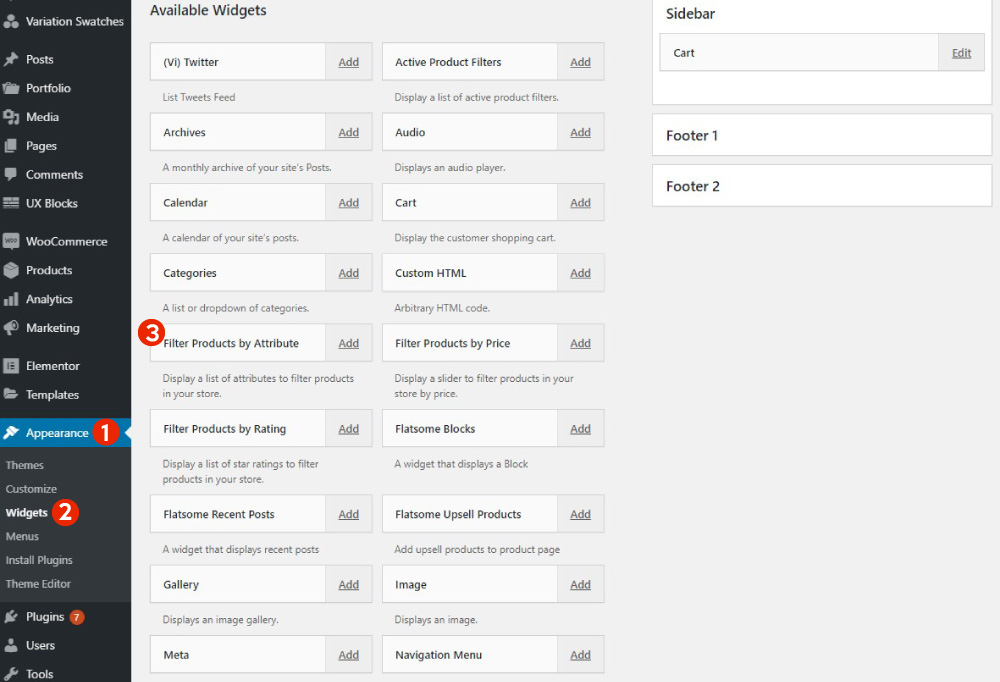
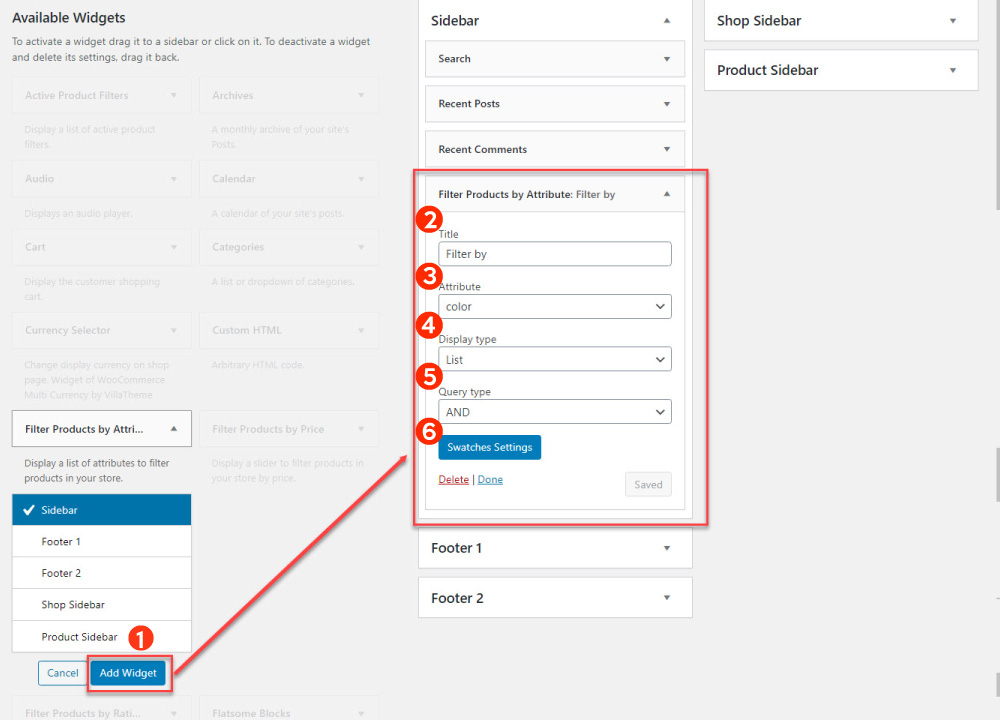
To display “Filter Products by Attribute’ on the product list, Go to Dashboard/ Appearance/Widgets and click on Add Widget to add the Filter Products by Attribute.
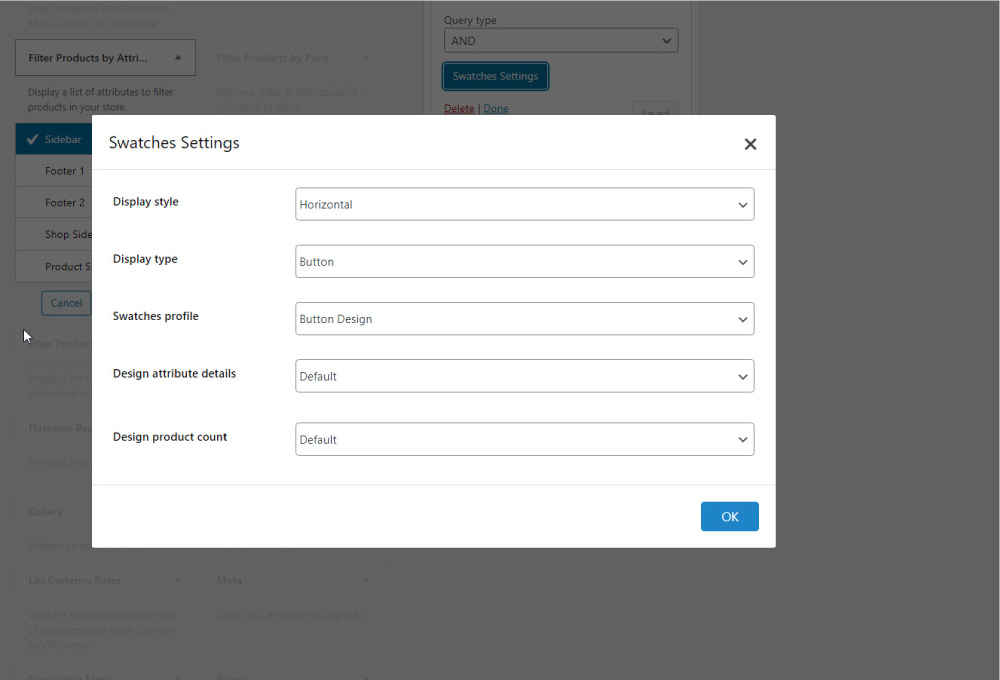
Configure the opened window for Widget Filter Products by Attribute.
Go to Dashboard >> Variation Swatches >> Woo Filter Widget
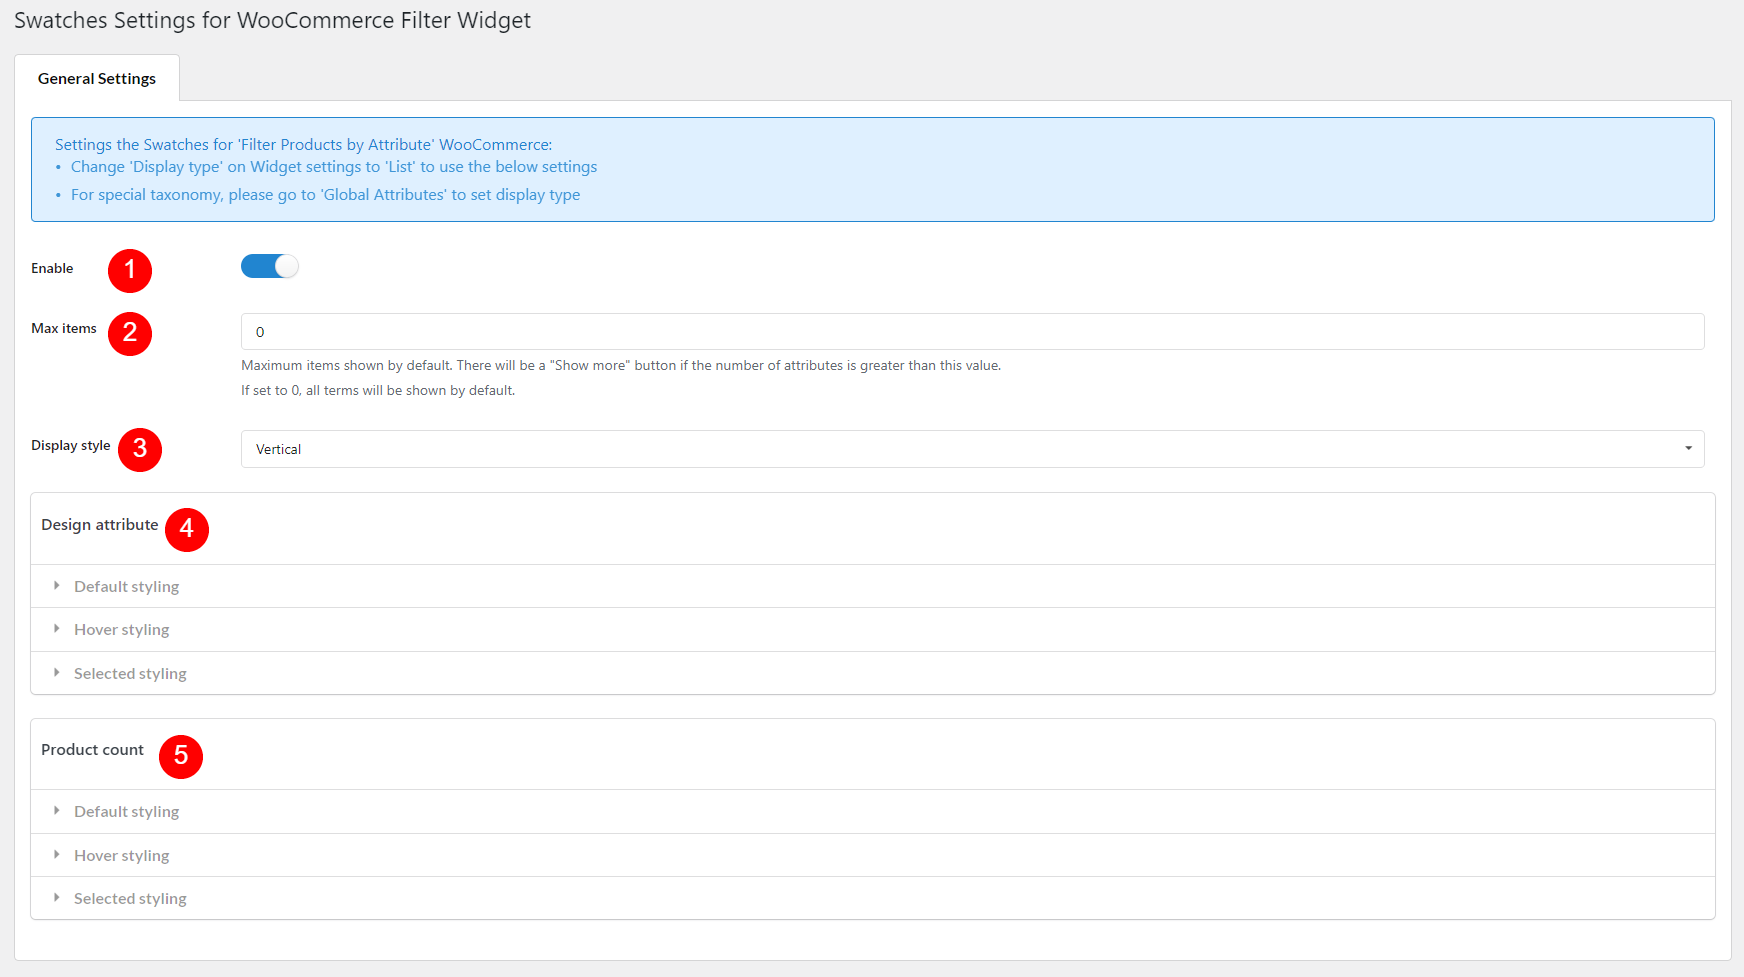
Design attribute
These settings are to customize the swatches on the Woo widgets.

Default styling: Customize the default style of the swatches.
Hover styling: Customize the swatches on Woo widgets when hovered
Selected styling: Customize the swatches on Woo widgets when selected
Product count
These settings enable and allow the admin to customize product count for filter of attributes.
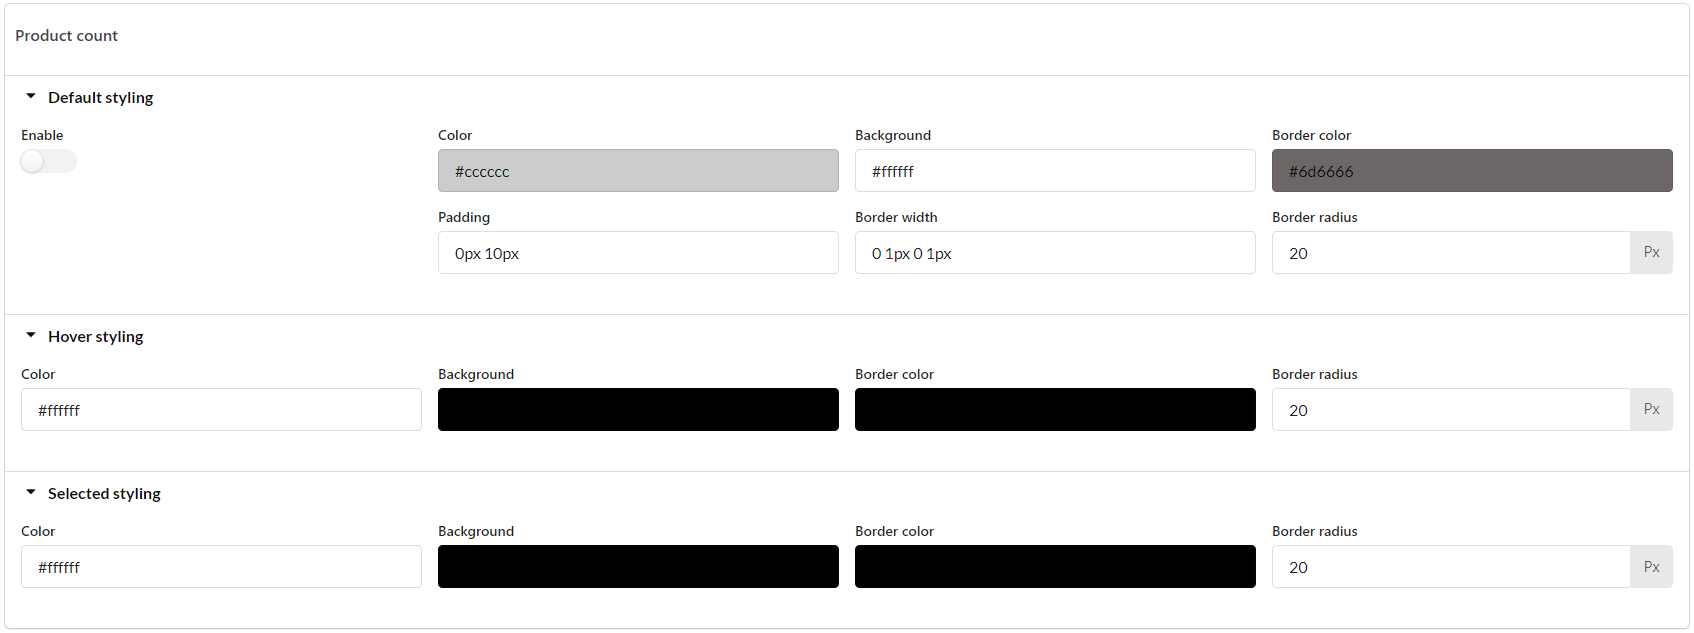
Default styling: Customize the default style of the product quantity.
Hover styling: Customize the product quantity when hovered.
Selected styling: Customize the product quantity when the swatches is selected.