Go to the Receipt section to configure receipts for the POS transactions. There are 3 types of receipt to build and you can add new receipt template as per your needs.
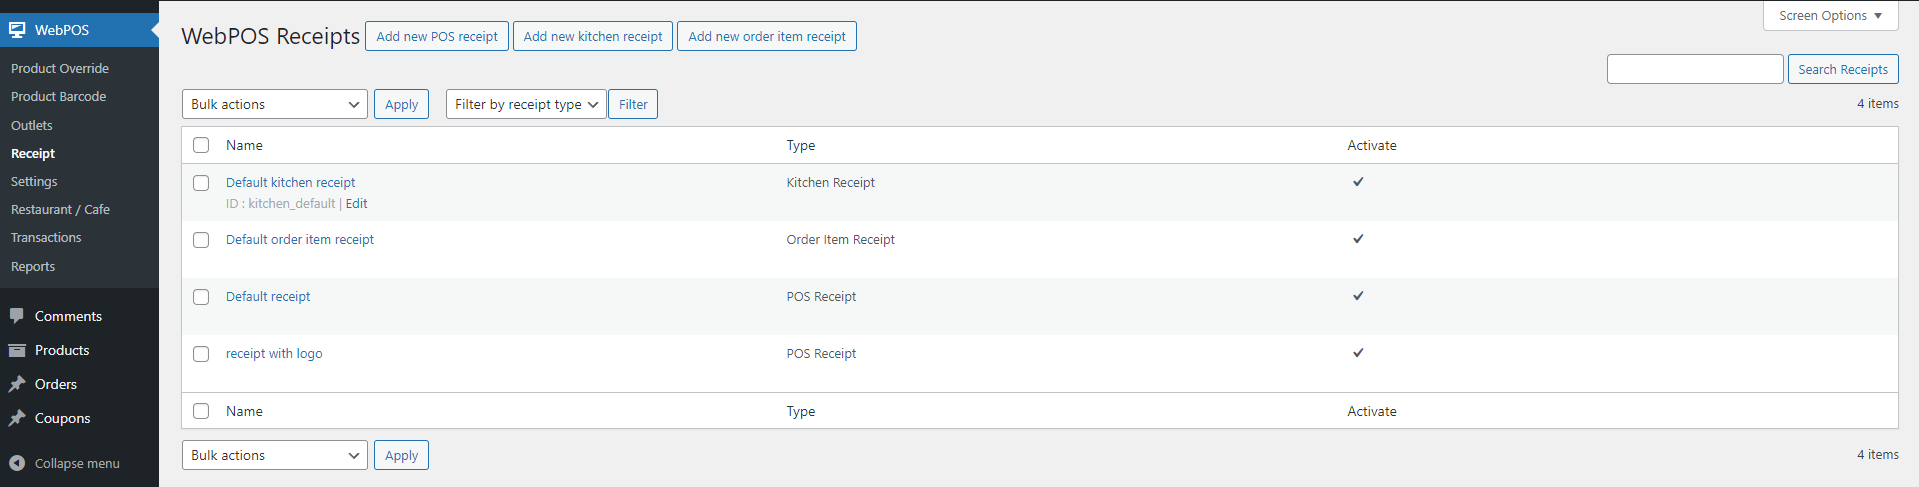
There are 3 default templates which can’t be removed. These templates will work in case you have no other template. But you can add your own and deactivate the default ones. We’ll learn about them right below. Each template editing page has preview template right next to the options.
POS RECEIPT
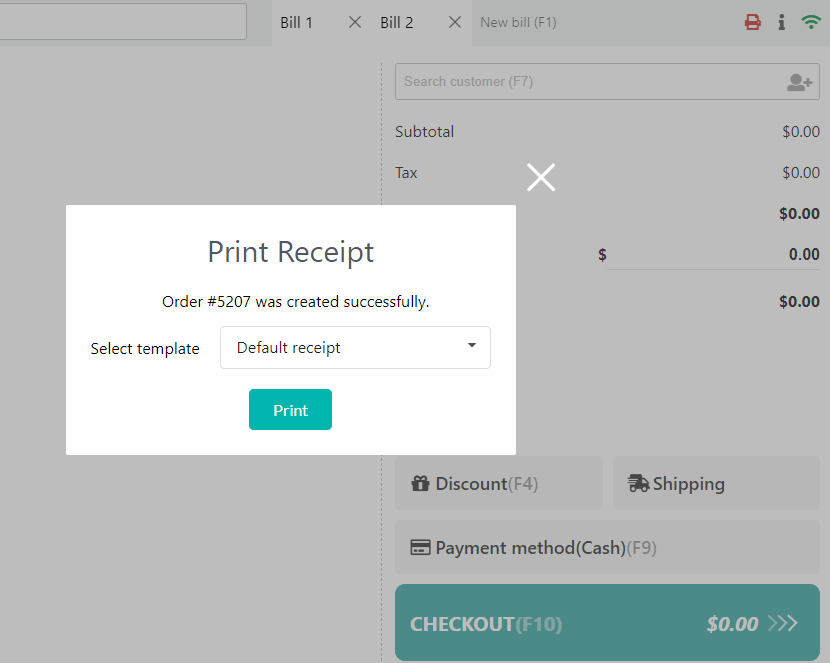
This is the receipt the cashier prints when an order placed successfully and the payment is done.
Note 1: In the General settings, there is an option to allow the cashier to select a receipt template before checkout.
Note 2: To allow the cashier to print a receipt template before checkout:
- Step 1: Go to Settings > General, enable the Select template to print option.
- Step 2: On the POS front end page, disable the Auto-print receipt after checkout
- Step 3: Once clicking on the Checkout for an order, a Print receipt popup appears and lets the cashier choose a receipt template to print for that order.
a. General settings for the POS order receipt
Go to WebPOS > Receipt > General
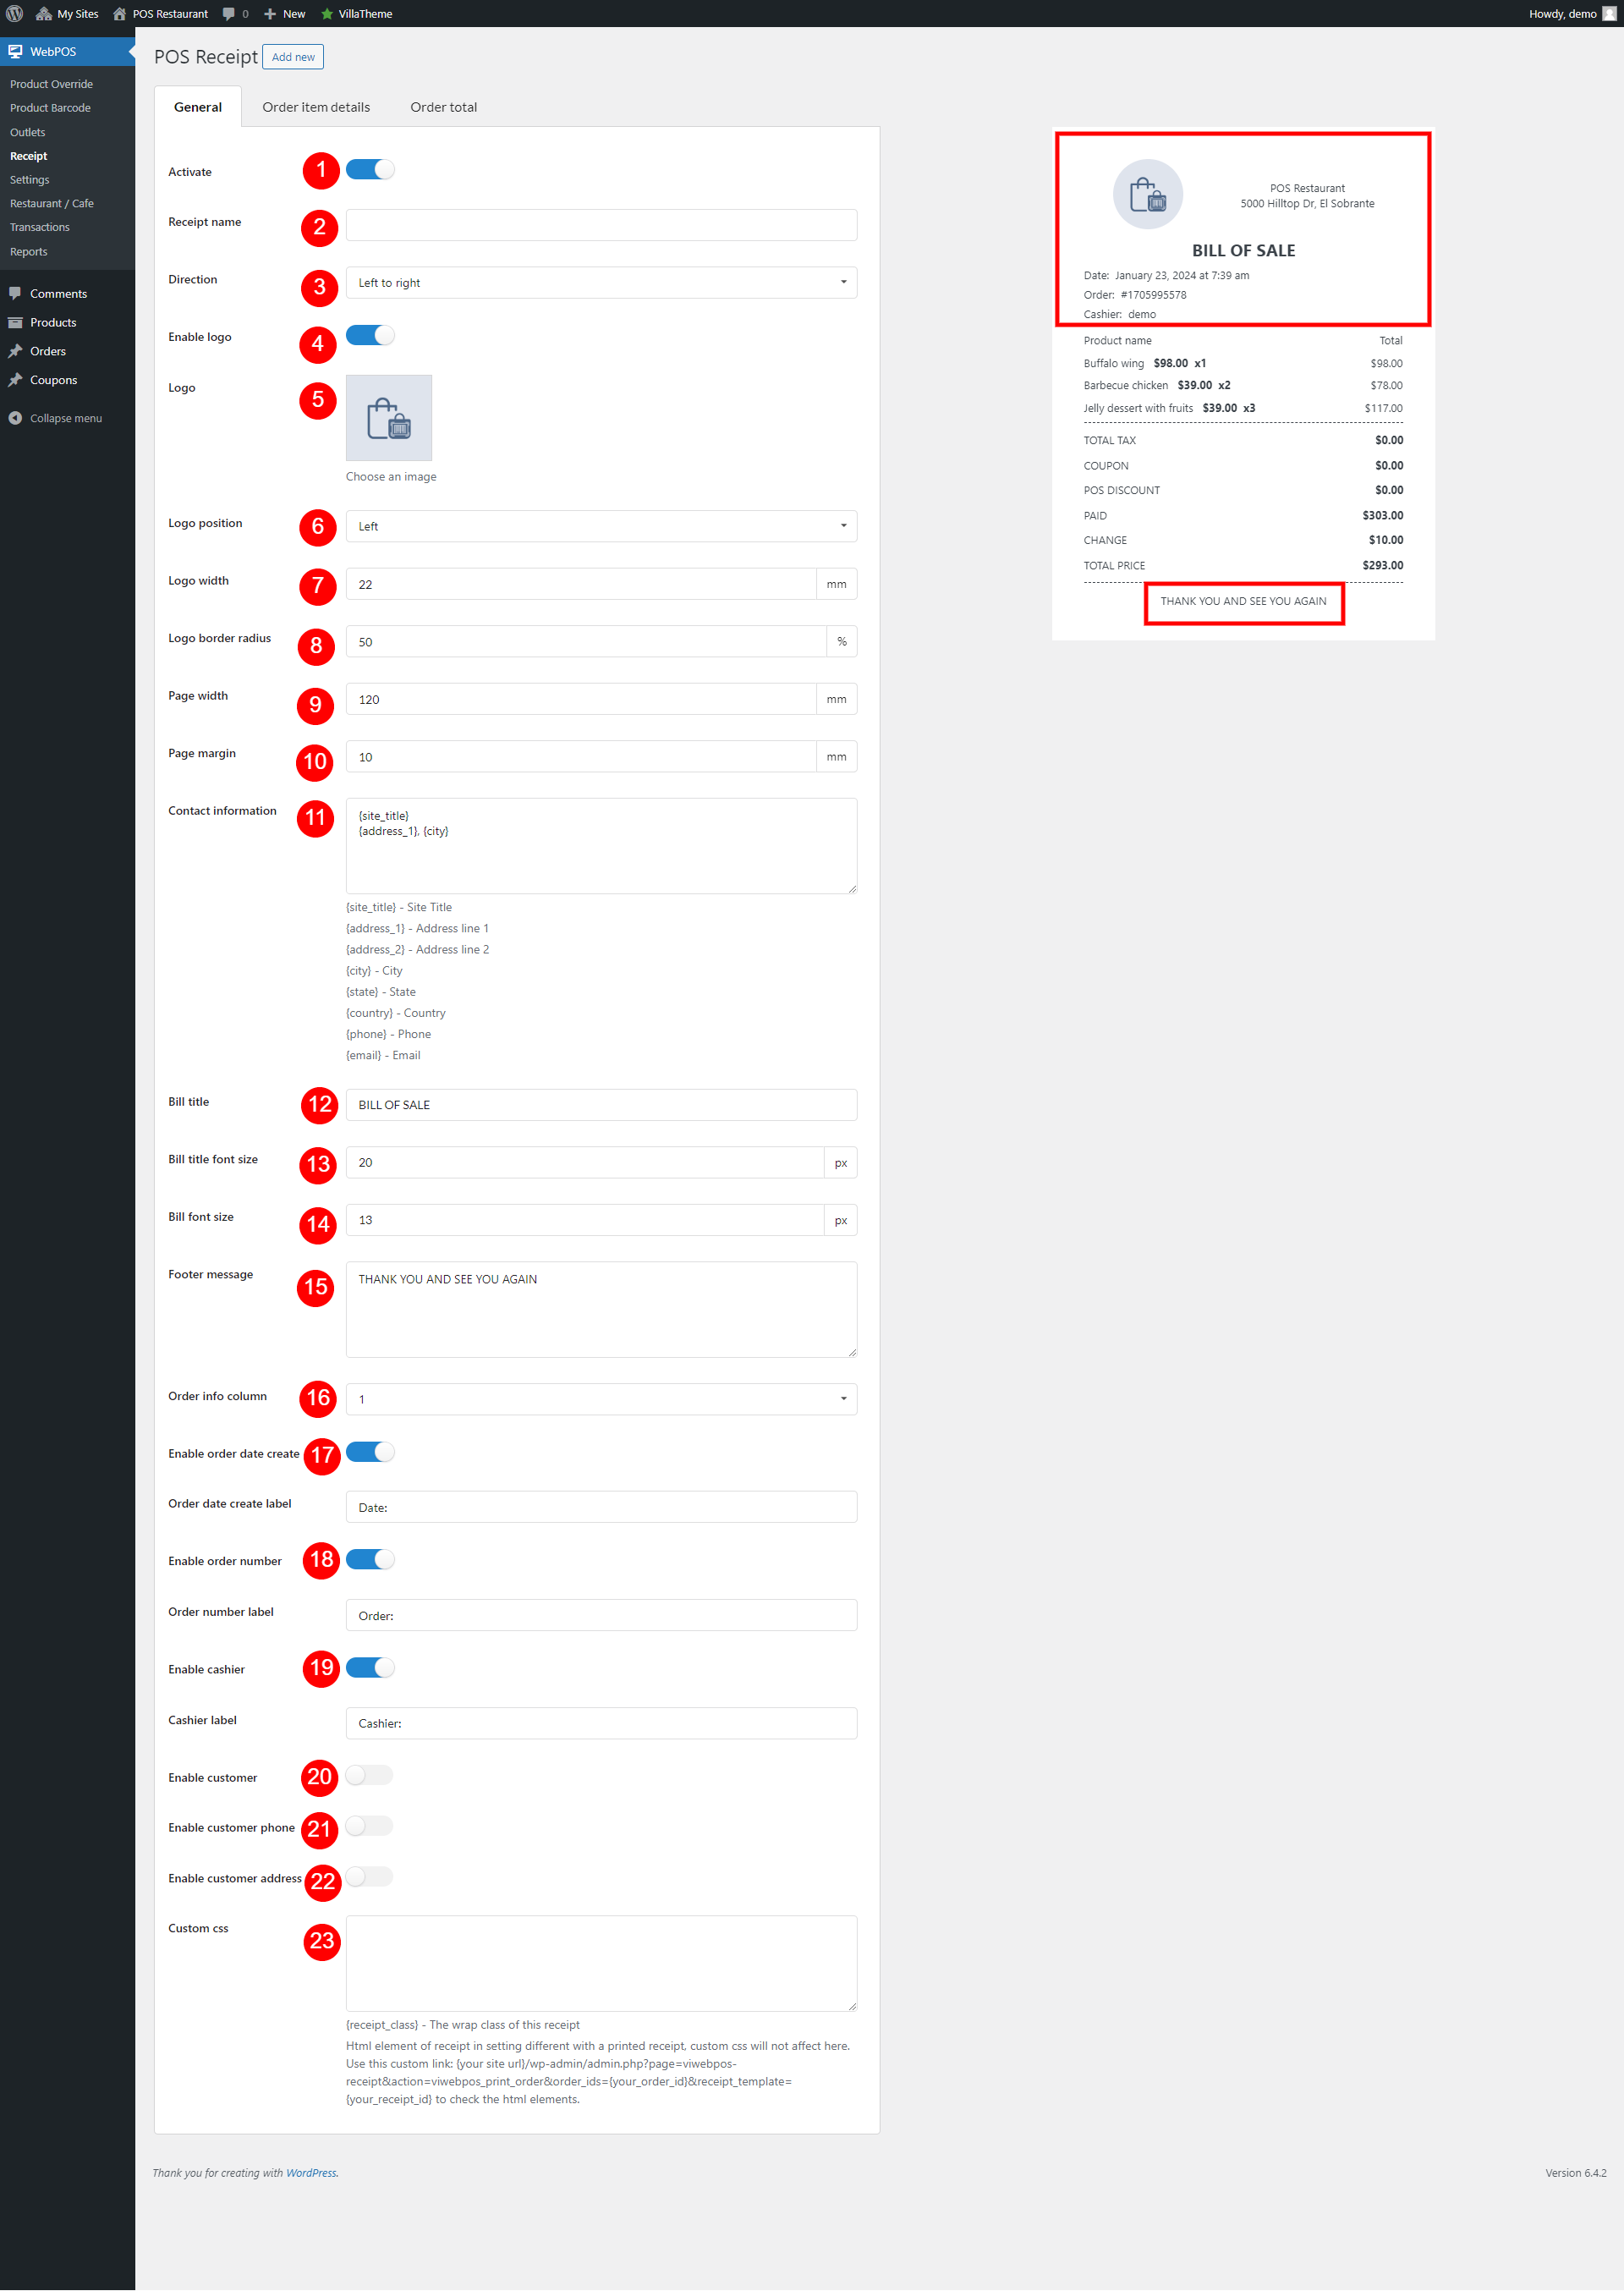
- Activate: Enable/Disable the template
- Receipt name: Fill in the name for this template
- Direction: Support Left to Right and Right to Left.
- Enable logo: Add a logo to your receipt
- Logo: You are able to select an image to be your receipt logo if you enabled option Logo above.
- Logo position: Set the position for the logo icon on the receipt: Left, right or center.
- Logo width: Change the width of the logo.
- Logo border radius: Change the border radius of the logo
- Page width: Adjust the width of the receipt page
- Page margin: Adjust the margin of the receipt page.
- Contact Information: Add your address of the point of sale. You can use available shortcodes about the shop’s contact information.
-
{site_title}– Site Title -
{address_1}– Address line 1 -
{address_2}– Address line 2 -
{city}– City -
{state}– State -
{country}– Country -
{phone}– Phone -
{email}– Email
-
- Bill Title: Name for the title of the receipt.
- Bill title font size: Adjust the font size of the bill title.
- Bill font size: Change the font size of the entire bill.
- Footer message: The message you leave at the footer of the receipt.
- You can add shortcodes in this footer area, and print the receipt footer including the shortcode, you can use
{order_id}for the id order parameter in the shortcode.
- You can add shortcodes in this footer area, and print the receipt footer including the shortcode, you can use
- Order info column: Column the order info on the bill, it can be set to 1 or 2 columns
- Enable order date create: Add the order created date to the receipt
- Order date create label: Edit the label
- Enable order number: Add the order number to the receipt
- Order number label: Edit the label
- Enable cashier: Enable to display of the cashier’s name on the receipt.
- Cashier label: Change the cashier label displayed on the receipt.
- Enable customer: Enable to display customer’s name on the receipt.
- Customer label: Edit the label
- Customer information
- Full name
- First name
- Last name
- Company
- Company or Full name
- Enable customer phone: Enable to display customer’s phone number on the receipt.
- Customer phone label: Change the customer phone number label displayed on the receipt.
- Enable customer address: Change the customer address label display on the receipt.
- Customer address label: Edit the label
- Customer address: Enable to display customer’s address on the receipt. You can use available shortcodes about the customer address:
-
{address_line_1}– Address line 1 -
{address_line_2}– Address line 2 -
{city}– City -
{state}– State -
{country}– Country
-
- Custom CSS: Design the receipt as your desire
b. Order item details on the receipt
Go to WebPOS > Receipt > Order item details.
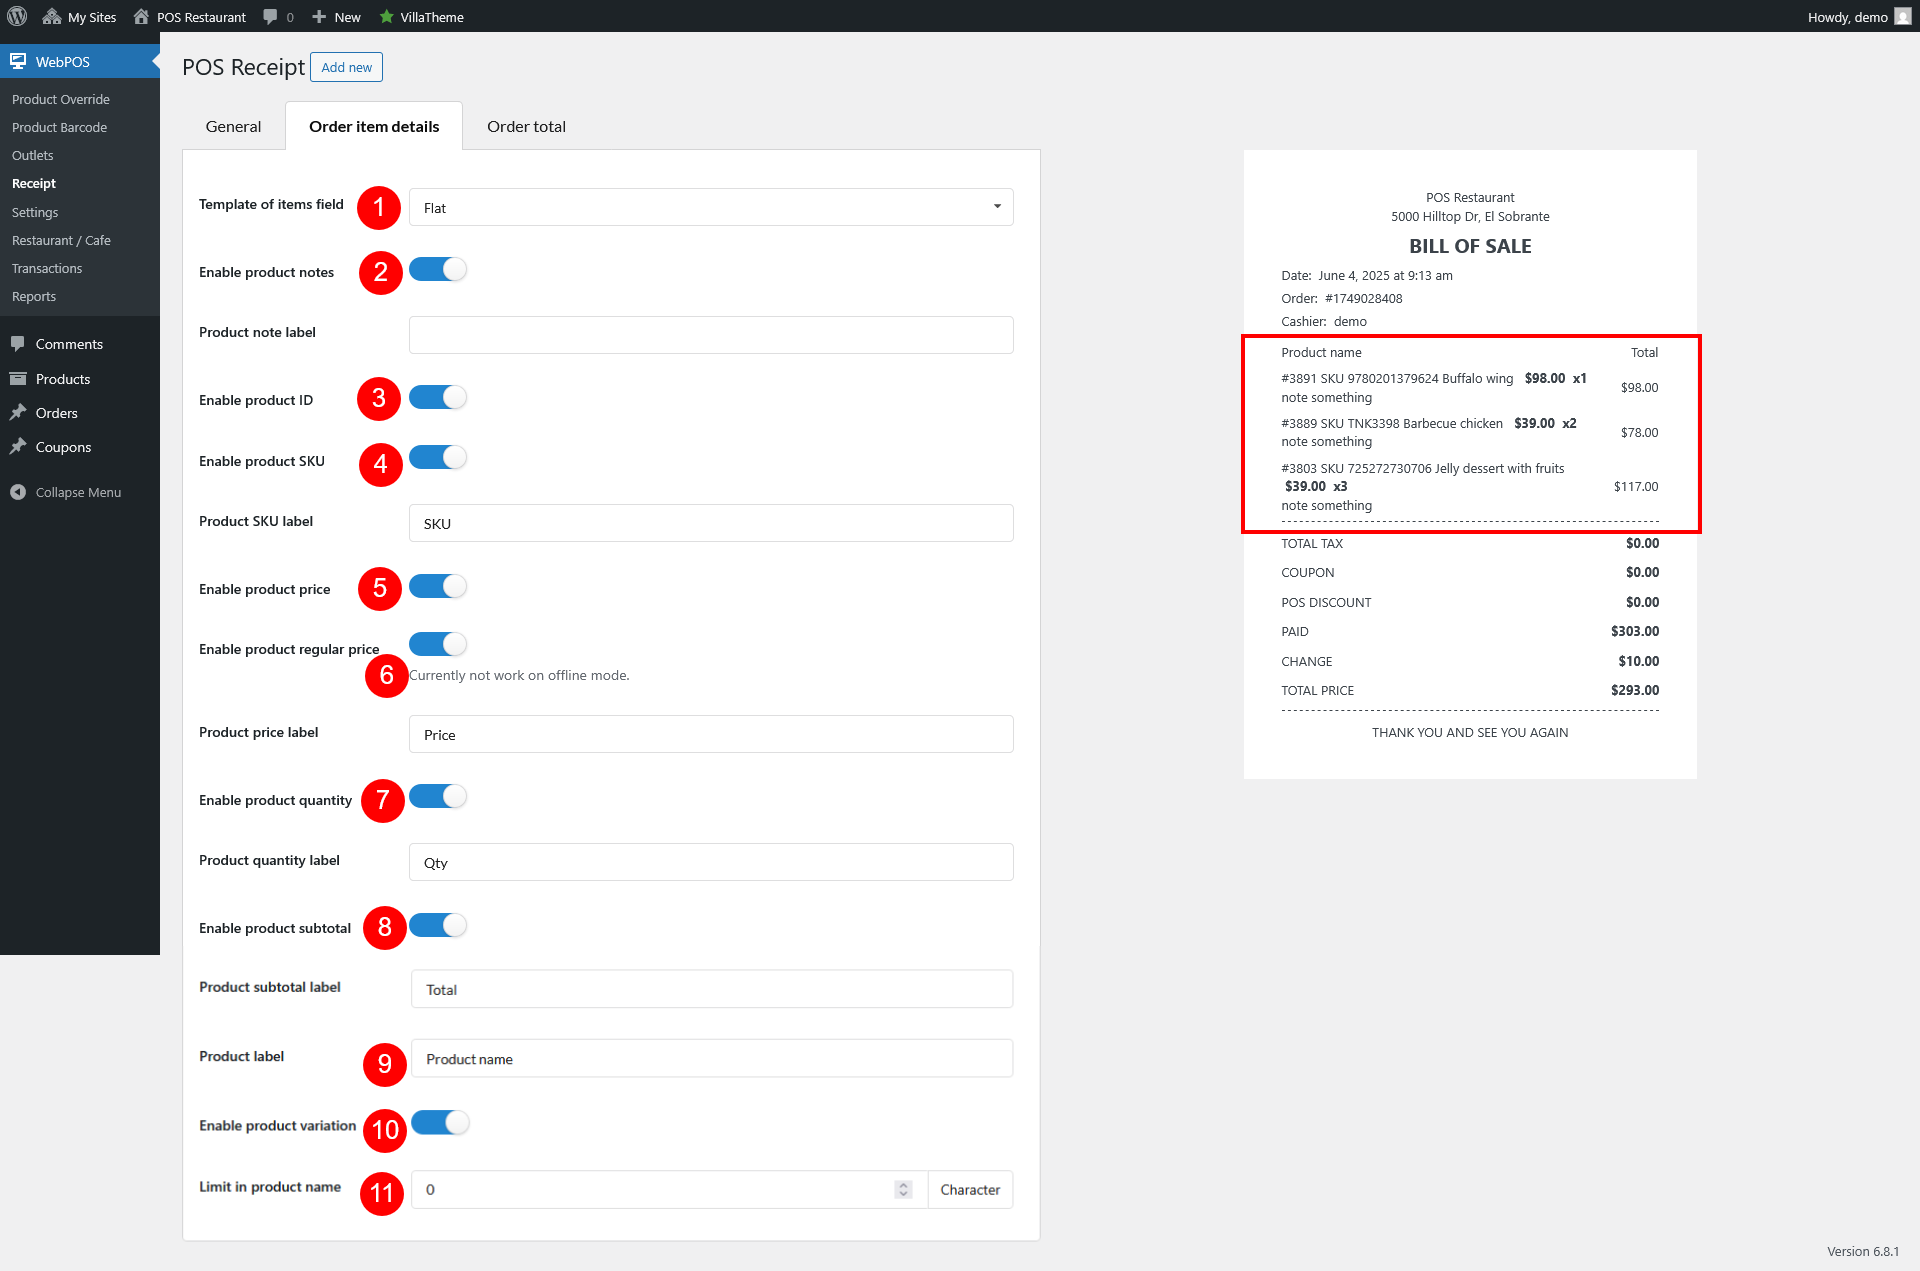
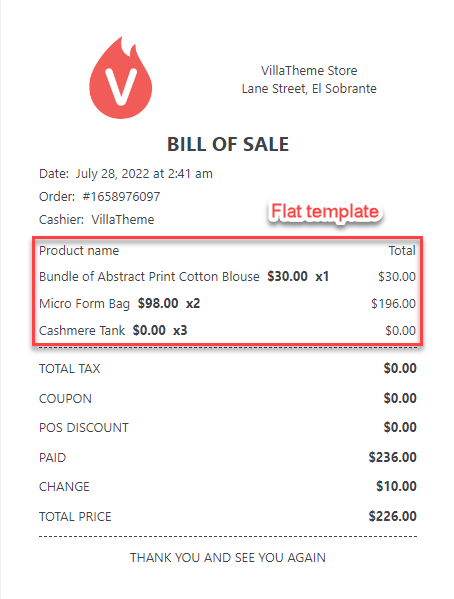
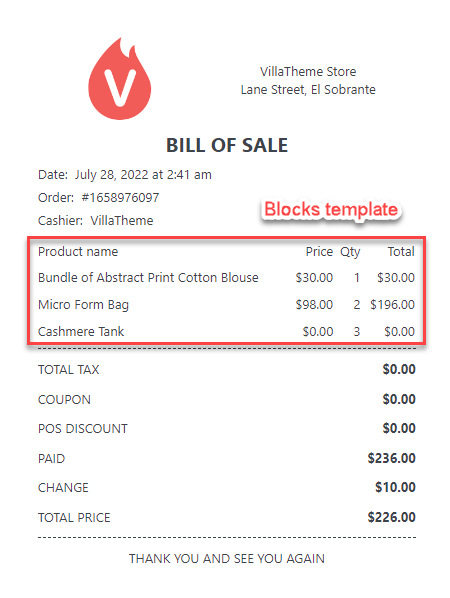
- Template of items field: Choose a style of how the items field displays on the receipt. They can be flat or block style.
- Enable product note: Enable to display the product note on the receipt.
- Product note label: The title of the product note on the receipt.
- Enable product ID: Enable to display of product ID on the receipt.
- Product ID label: Edit the label if you use Block template
- Enable product SKU: Enable to show product SKU on the receipt
- Product SKU label: Edit the label
- Enable product price: Enable to display of product price on the receipt.
- Product price label: Change the product price label displayed on the receipt.
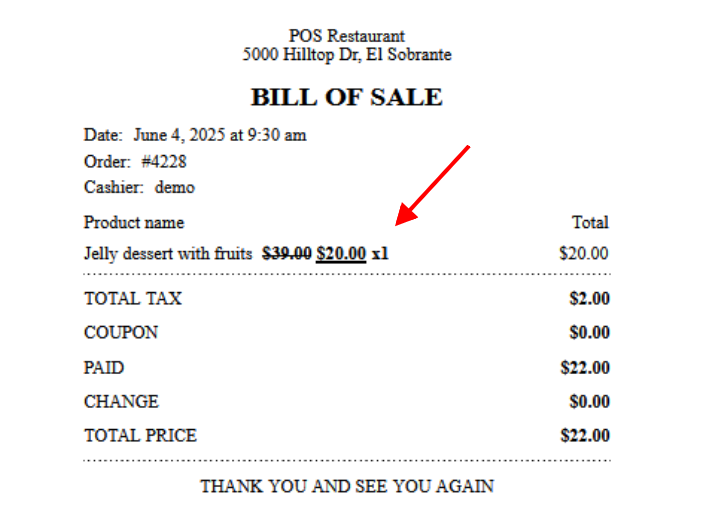
- Enable product regular price: If an item has sale price, or when you enter a custom price for a product on the POS page, this option displays the original price as the regular price (crossed out) and the custom price as the sale price (final price shown to the customer)
- Enable product Quantity: Enable to display of product quantity on the receipt.
- Product quantity label: Edit the label
- Enable product subtotal: Enable to display of product subtotal on the receipt.
- Product subtotal label: Change the product subtotal label displayed on the receipt.
- Product label: Change the column title on the receipt.
- Enable product variation: Enable or disable to display or hide the variations of the variable products on the receipt.
- Limit in product name: The maximum number of characters allowed in the product title.
c. Order total on the receipt
Go to WebPOS > Receipt > Order total.
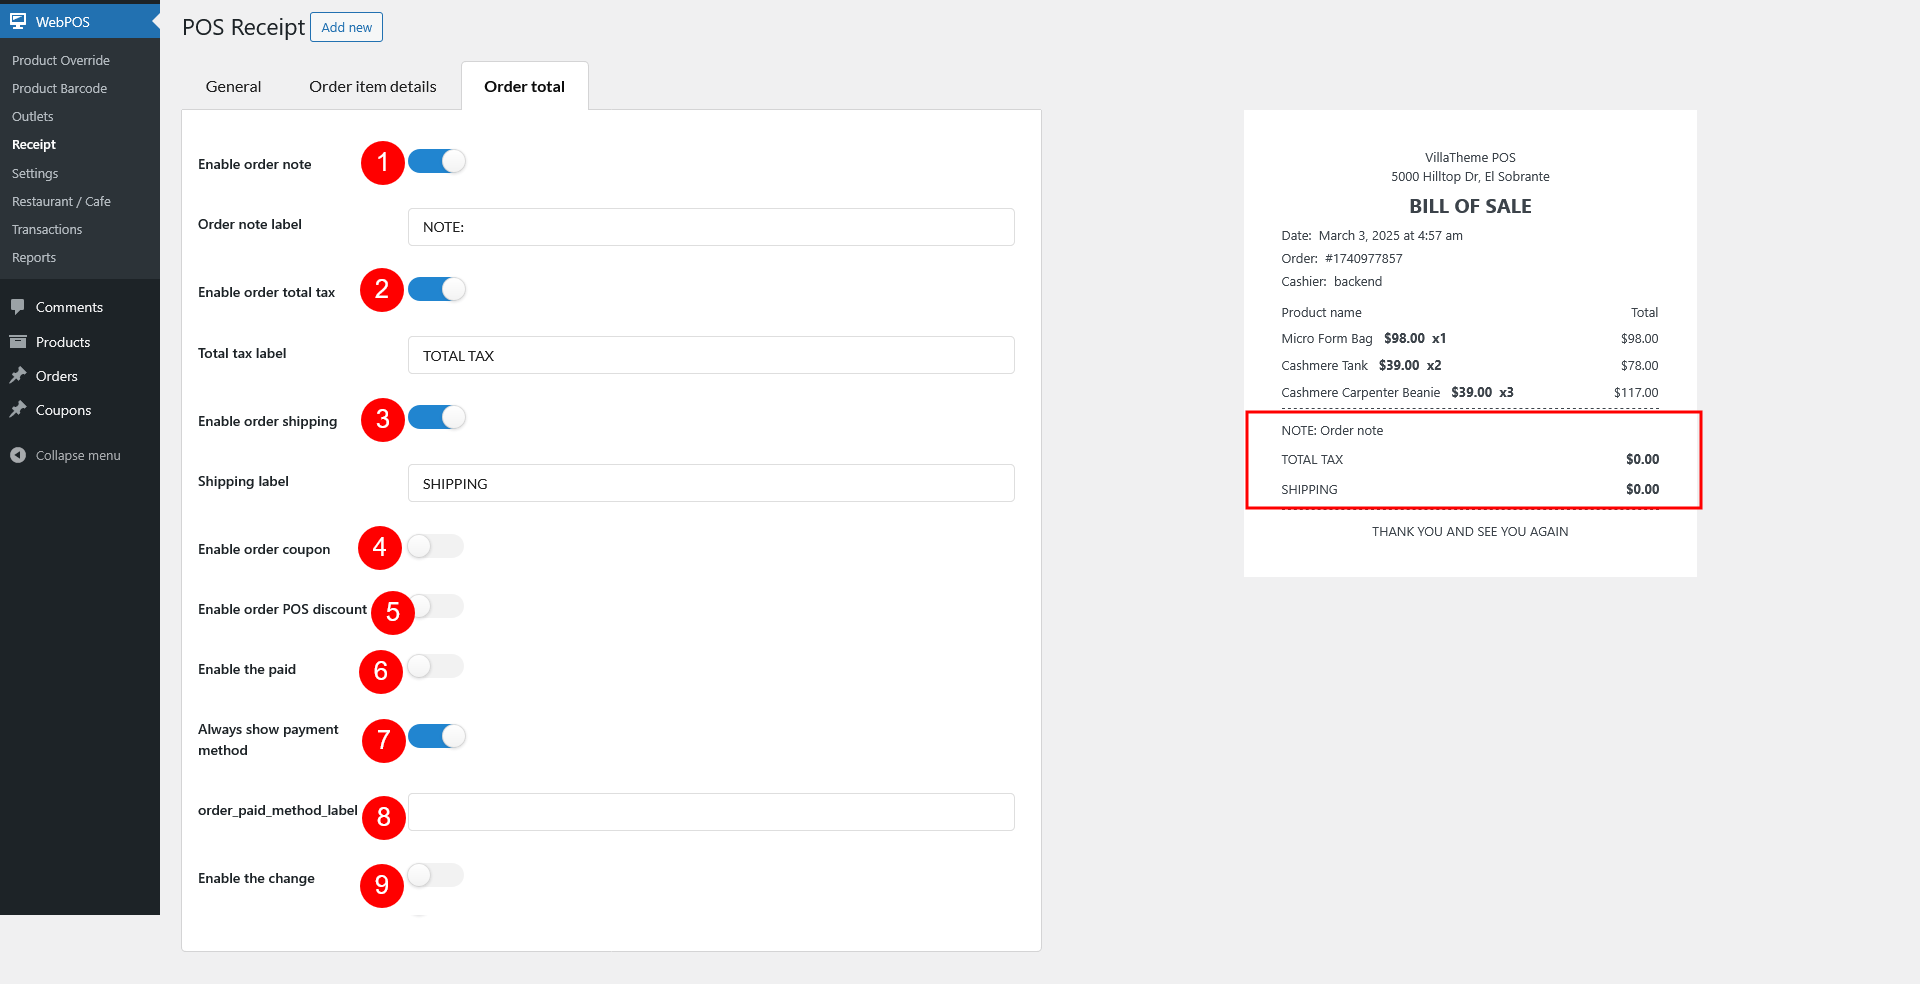
- Enable order note: Enable to display the order note on the receipt.
- Order note label: The title of the order note on the receipt.
- Order total tax: Enable to display the order total tax on the receipt.
- Total tax label: Change the order total tax label displayed on the receipt.
- Enable order shipping: Enable to display the order shipping on the receipt.
- Shipping label: Change the shipping label displayed on the receipt.
- Order coupon: This is an existing WooCommerce coupon, enable to display this type of coupon on the receipt.
- Coupon label: Change the coupon label displayed on the receipt.
- Order POS discount: This type of discount is generated directly for a POS order by the plugin, enabling to display of this type of discount on the receipt.
- POS discount label: Change the POS discount label displayed on the receipt.
- Display the paid: Enable to display the paid amount of the customer on the receipt.
- Paid label: Change the paid label displayed on the receipt.
- Display the change: Enable to display the change on the receipt.
- Change label: Edit the change label displayed on the receipt
- Order total: Enable to display the order total on the receipt.
- Order total label: Change the order total label displayed on the receipt.
KITCHEN RECEIPT
This is the kitchen bill that the cashier/waiting staff sends to the kitchen so the chefs prepare the order
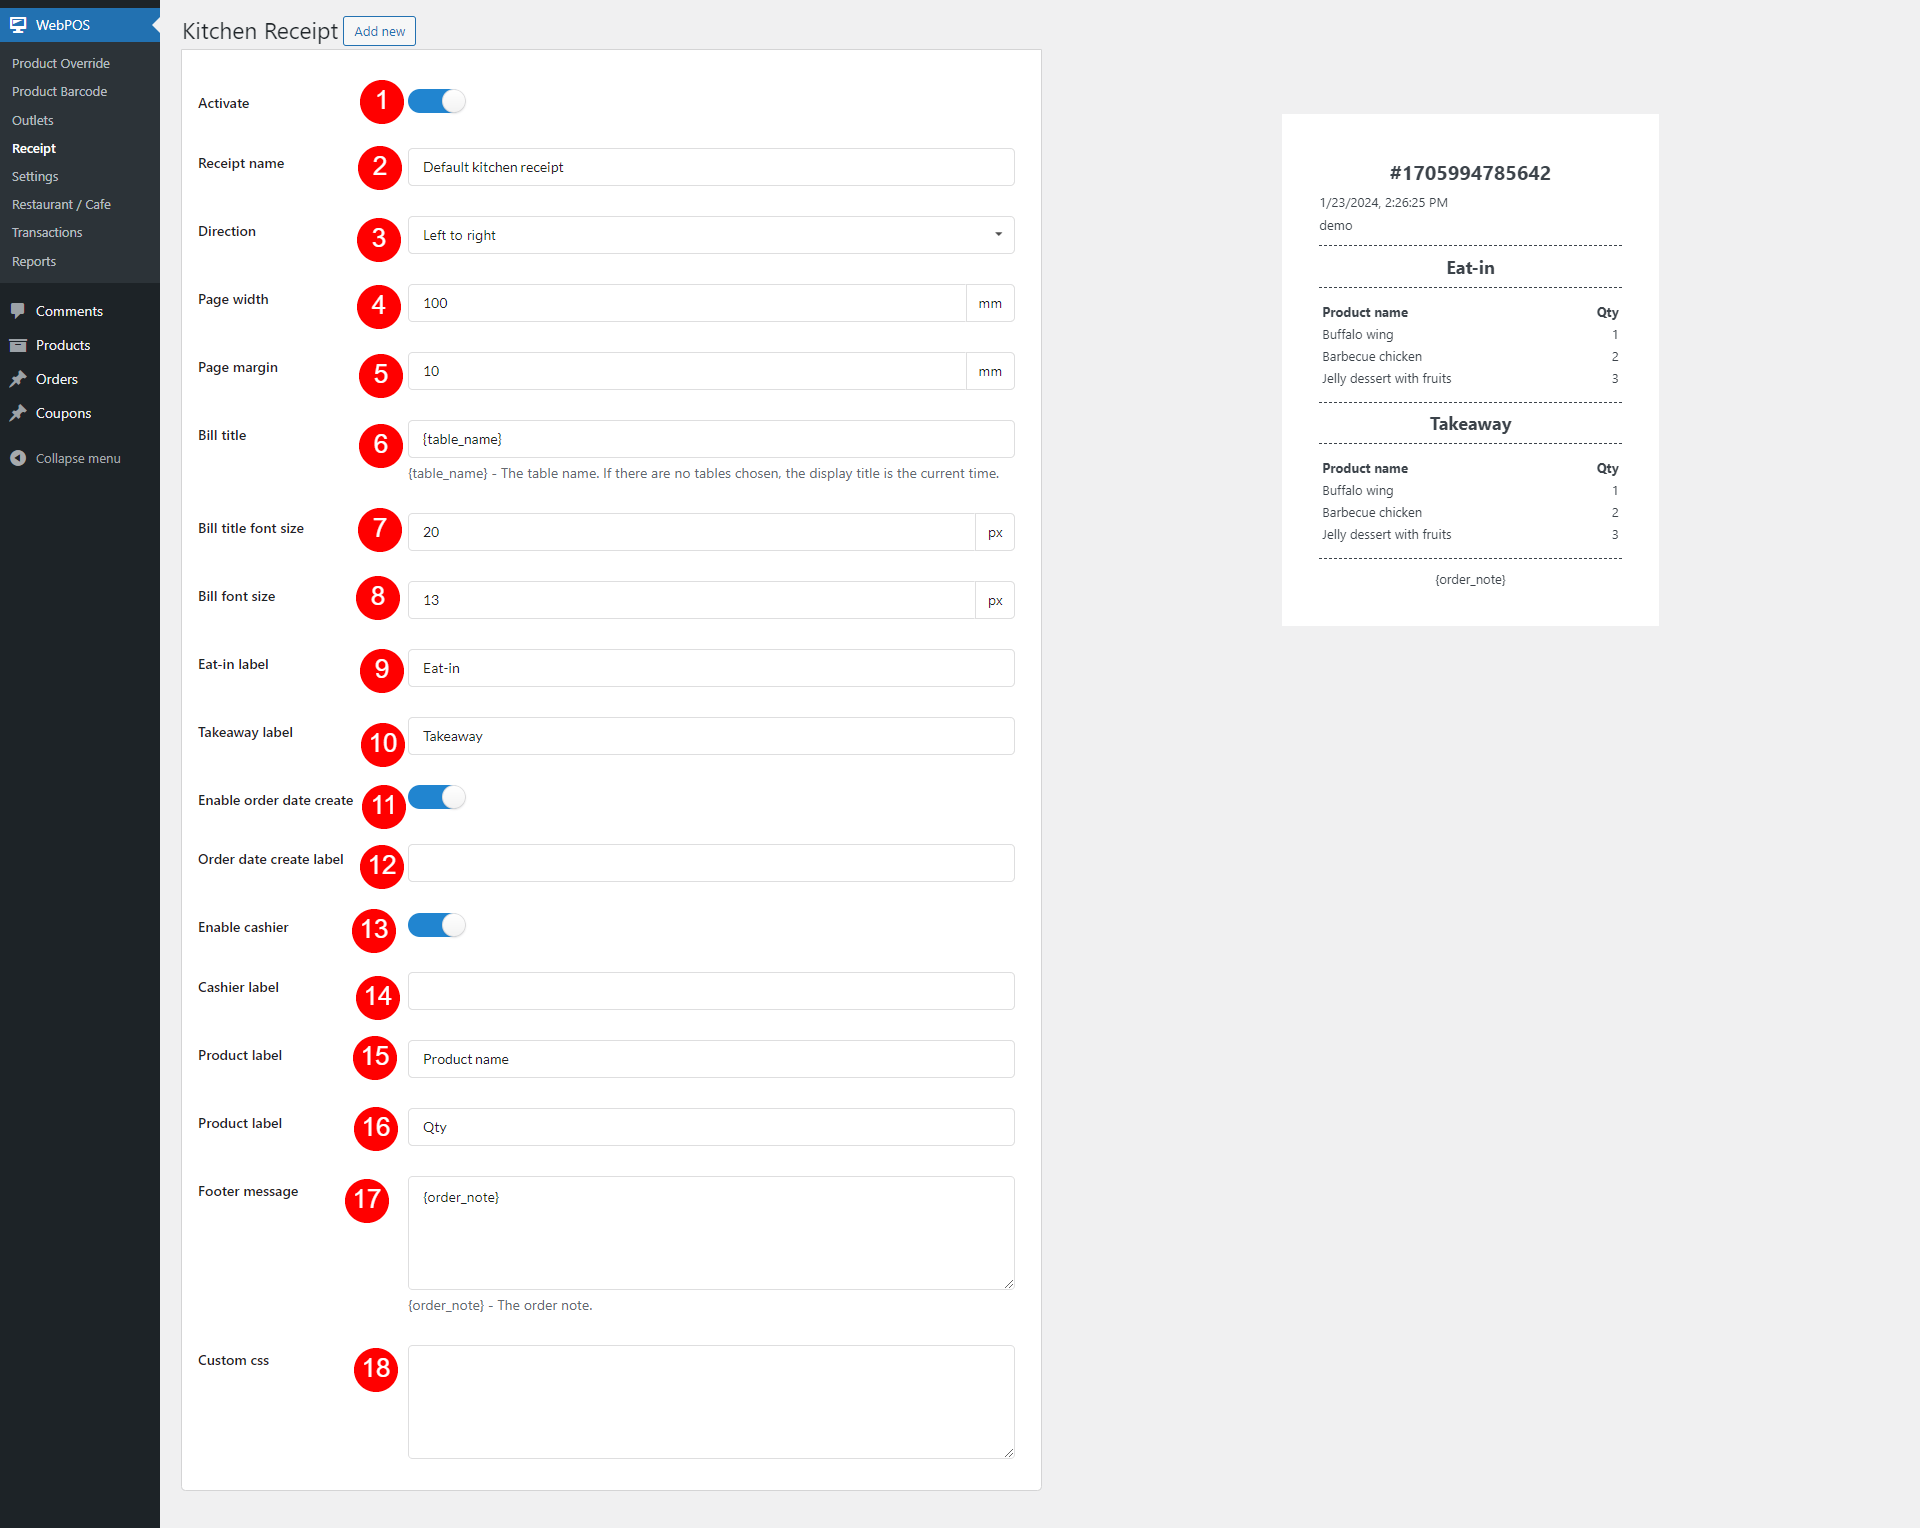
- Activate: Toggle the option to enable or disable this template
- Receipt name: Edit the receipt template name
- Direction: Choose the template direction as either right-to-left (RTL) or left-to-right (LTR). This works independently from the site language – You can make the receipt template RTL even when your site language is LTR and vice versa
- Page width: Adjust the width of the receipt page
- Page margin: Adjust the margin of the receipt page
- Bill title: Specify the title to be displayed on the receipt
- Bill title font size: Adjust the font size of the bill title
- Bill font size: Change the font size specifically for the bill title
- Eat-in label: Edit the label for eat-in note
- Takeaway label: Edit the label for takeaway note
- Enable order date create: Enable this option to add the order created date to the receipt
- Order date create label: Edit the label for order created date if you’ve enabled the option above
- Enable cashier: Enable to display of the cashier’s name on the receipt
- Cashier label: Change the cashier label displayed on the receipt if you’ve enabled the option above
- Product label: Label for the product title column
- Product label: Label for the quantity column
- Footer message: Add a custom message in footer
- Custom css: Add custom CSS to design the template to your needs
ORDER ITEM RECEIPT
This is the product decal which contains general info of the product
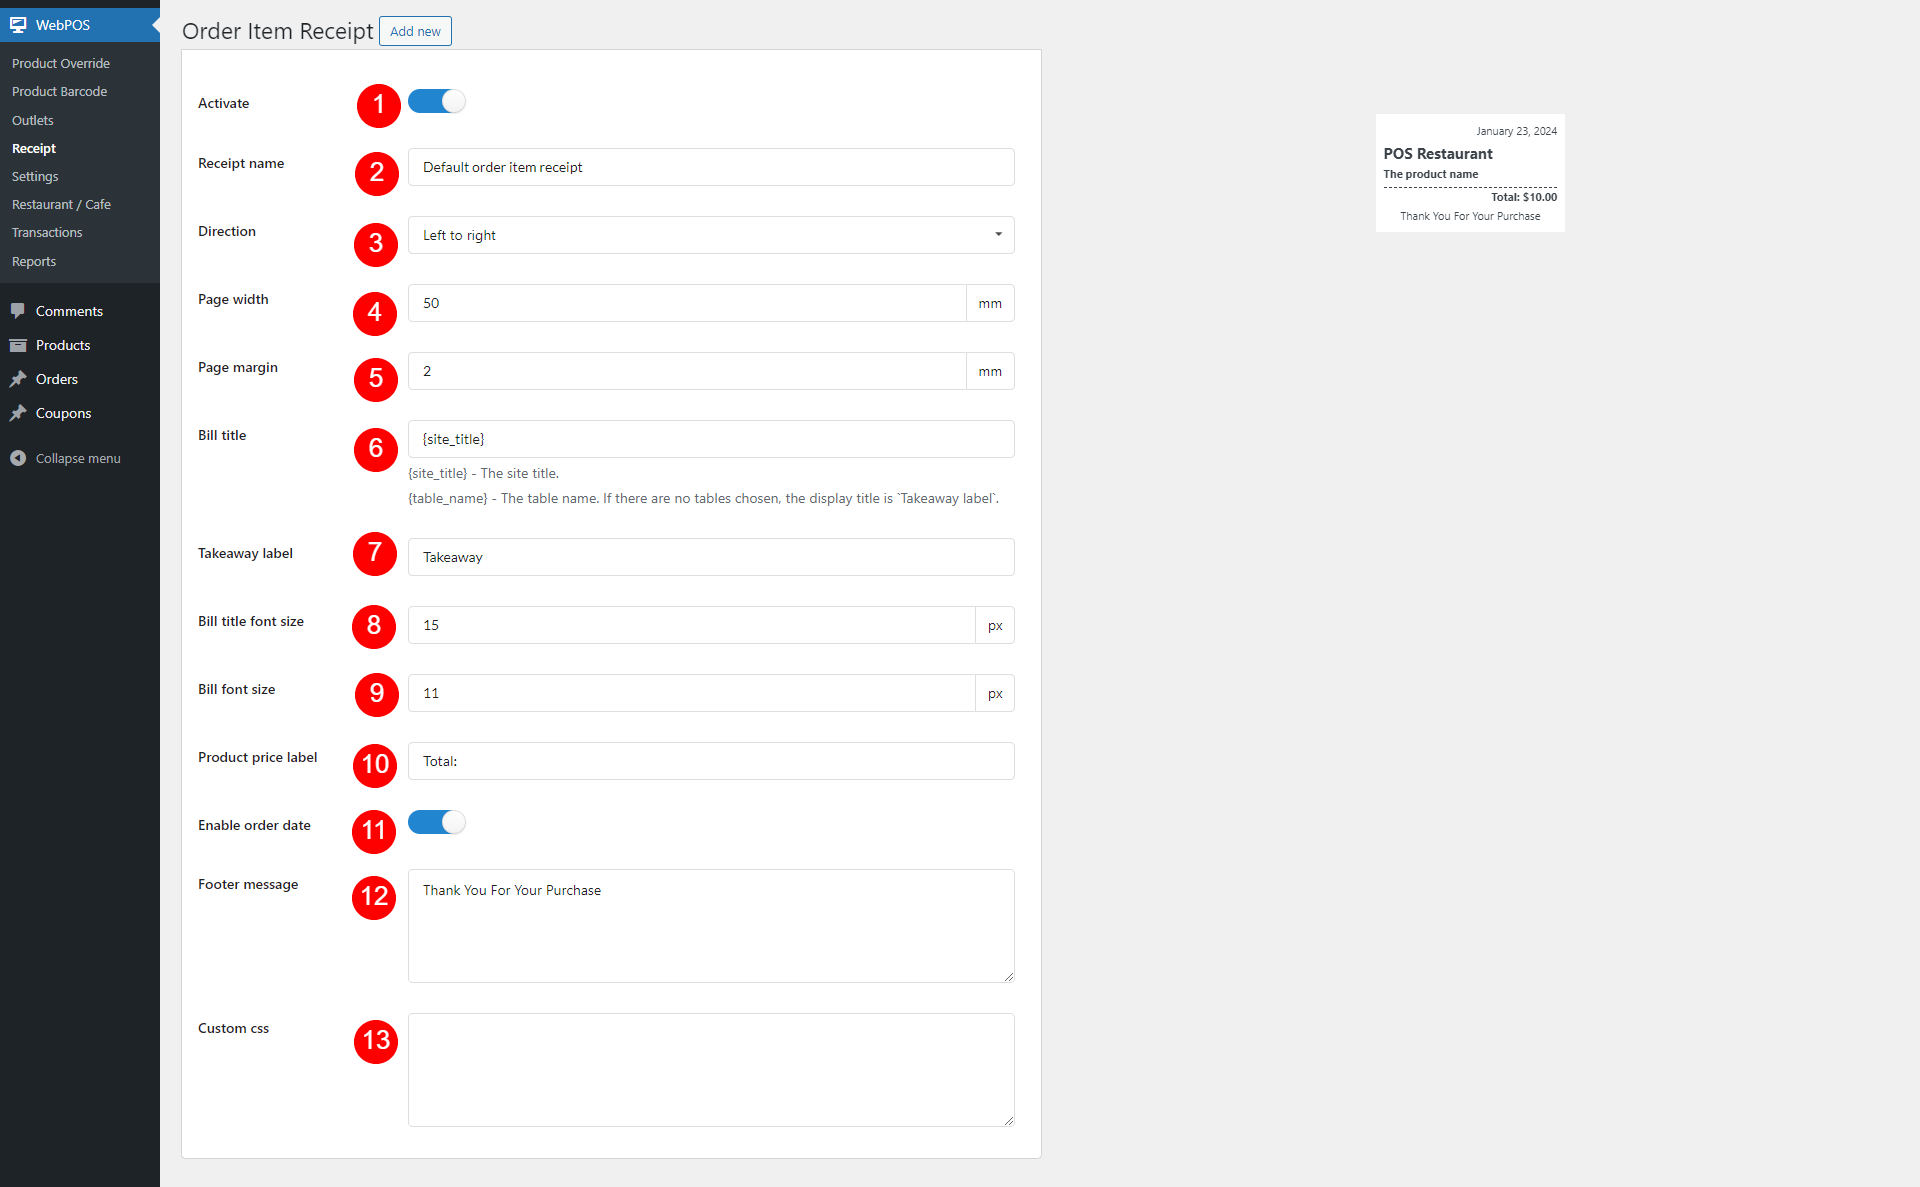
- Activate: Enable/Disable this template
- Receipt name: Edit the receipt template name
- Direction: Choose the template direction as either right-to-left (RTL) or left-to-right (LTR). This works independently from the site language – You can make the receipt template RTL even when your site language is LTR and vice versa
- Page width: Adjust the width of the receipt page to your desired dimension
- Page margin: Adjust the margin of the receipt page as per your needs
- Bill title: Edit the title to display in the decal
- Takeaway label: Edit label indicating takeaway items
- Bill title font size: Adjust the font size of the bill title
- Bill font size: Change the font size of the entire bill
- Product price label: Label for product price
- Enable order date: Add the order date to the receipt
- Footer message: Add a custom message in the footer
- Custom css: Add custom CSS to design the template to your needs