A. General settings
You can use the Tracking Service instead of using shipping carriers. This option allows you through a 3rd party to track shipping information by API key.
Note: The tracking service is offered by a 3rd party, integrating in our plugin using API, and it may require a fee to use their services. Please visit the tracking service webpage to find out more information about their plans.
| Tracking Services | URL |
|---|---|
| TrackingMore | Price information |
| EasyPost | Price information |
| Tracktry | Price information |
| 17Track | Price information |
| Aftership | Price information |
![]()
- Enable: Enable the option to track shipment information with a 3rd party.
- Service: Select the tracking service you want to use. At the moment the plugin supports Cainiao, TrackingMore, EasyPost, Aftership, Tracktry and 17Track. You can see detailed information about how to connect each tracking service below.
- Timeline AJAX: Get timeline information on the tracking page via AJAX.
- Tracking page: Select a page by title and make it the order tracking page. Customers can track the shipping information from a tracking page on your website.
- The page is Order Tracking by default (is automatically created by our plugin when activated), the admin can create their own pages and add the shortcode to display the tracking form to make it their own order tracking page. See this documentation of Shortcodes provided by our plugin.
- Customize Tracking page: A link leads you to the Design of the Tracking page. You can see the instruction in the Design tracking page section below.
- Cache request: When customers search for a tracking number on the tracking page, the result will be saved to use for the same research for this tracking number within this cache time.
B. Connect tracking service via API
- Cainiao: You can connect Cainiao directly without API.
Other than Cainiao, you need to fill the API key generated in your corresponding tracking service account, select some more options to complete the configuration, so you can connect to the other 5 tracking services successfully.
- Other tracking services: ViTracking, TrackingMore, EasyPost, AfterShip, Tracktry and 17Track
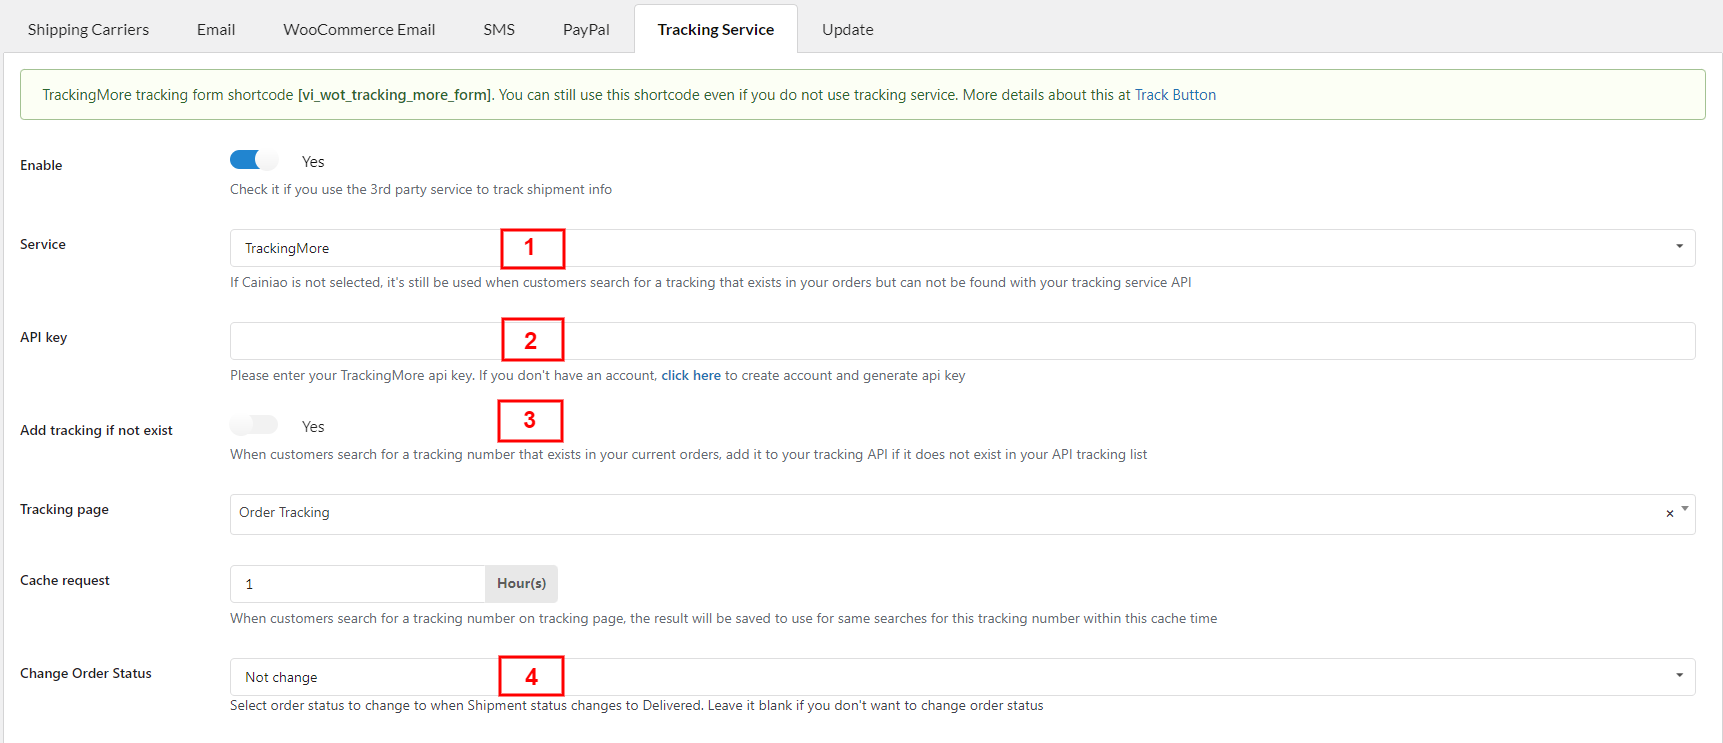
- Service: Select one tracking service – TrackingMore; EasyPost; AfterShip, Tracktry or 17Track.
- API key: Enter the API key generated in your corresponding tracking service account
- ViTracking – Beta: Click here to create one and generate api key
- TrackingMore: If you don’t have an account, click here to create an account and generate an API key.
- EasyPost: If you don’t have an account, click here to create an account and generate an API key.
- AfterShip: If you don’t have an account, click here to create an account and generate an API key.
- 17Track: Create and log in to your account here, then go to the management console -> Settings ->Security-> Access Key, you can get the access key.
- Tracktry: Click here to register an account here, then go to Settings to copy API key.
- Add tracking if not exist: When customers search for a tracking number that exists in your current orders, add it to your tracking API if it does not exist in your API tracking list.
- Change Order Status: Select order status to change to when Shipment status changes to Delivered. Leave it blank if you don’t want to change order status.
C. Customize tracking page
When you click on customize your tracking page, you can design the tracking page as you want.
- In the General tab:
![]()
1. Sort events: You can order the events into 2 types: Most recent to oldest and oldest to most recent.
2. Date format: Select the date format.
3. Time format: Select the time format.
4. Translate datetime: Datetime displays by default in English. It will be translated to your site’s locale if you check this option.
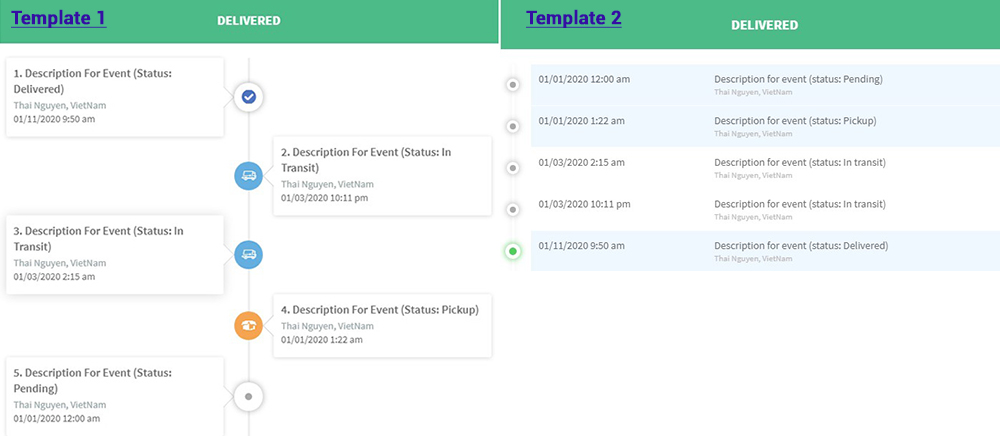
5. Timeline template: There are 2 templates.
6. Title: Add the title.
7. Title text alignment: This can be left, right, center.
You can also customize text, background color, the font size in the general tab.

- In the Tracking form tab: You will determine which information fields customers must provide in order to call shipment tracking timeline on the tracking page and customize the tracking button on the tracking page: Background and text colors.
![]()
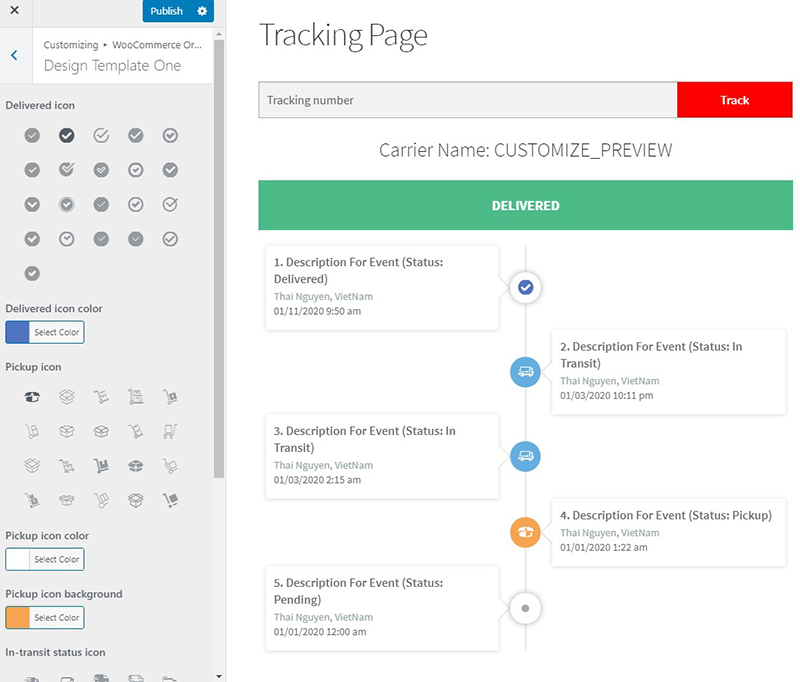
- In the Design template tab: You can select your desired icons and their colors: Delivered icon, Pickup icon, In-transit status icon.
- In the Custom CSS tab: You can add a custom CSS here.
D. Translate timeline
From version 1.0.7 of the WooCommerce Orders Tracking plugin, we integrated a new feature: “Translate timeline”, which allows translating the orders tracking timeline on the Tracking page using Google Cloud Translation API.
![]()
See this video for how to get an API key to add in the plugin and use the Translate timeline feature of the WooCommerce Orders Tracking plugin.
Enable/Select/Add the correct information to each field to configure this function. See the instruction below for how to connect to each tracking service.
E. Default tracking info and tracking number
- This feature is to reduce after-purchase support for new orders when the tracking number is not available, or available but without any info
- Row with empty description will not show on the tracking page
- Time is relative to an order’s created time
- Tracking service must be enabled and a tracking page must be set
e1. Default tracking info
![]()
1. Show default tracking info: Show below track info in the tracking timeline if a real tracking number does not have any information from the tracking service.
2. Default carrier name: The carrier which will show for the default track info
3. Show if order status: Display milestones (since order created); shipment status and shipment tracking description with respectively selected WooCommerce order statuses.
4. Time (since order created): Create milestones since order created to delivered.
5. Status: Describe shipment status with a respective milestone: Pending; In transit or Pickup.
6. Description: Describe the shipment status.
7. Delete tracking info.
8. Duplicate tracking info.
e2. Default tracking number
![]()
1. Default tracking number: If an order does not have a tracking number, the default tracking number will be displayed on the Order received page, My account/orders, and in emails that you configủe on the WooCommerce Email tab. When a customer uses a “default tracking number” to track, the default track info will be used.
2. Content: Message including default tracking number which will be displayed on Order received page or WooCommerce email.
3. Position: Position of the default tracking number message on the Order received page.
F. Google reCAPTCHA
Go to Orders Tracking/ Tracking Service/ Google reCAPTCHA for the tracking form.
This setting helps you protect your website from spam and abuse.

- ReCaptcha 2: “I’m not a robot” Checkbox. This requires the user to click a checkbox indicating the user is not a robot. This will either pass the user immediately (with No CAPTCHA) or challenge them to validate whether or not they are human. This is the simplest option to integrate with and only requires two lines of HTML to render the checkbox.
- ReCaptcha 3: reCAPTCHA v3 allows you to verify if an interaction is legitimate without any user interaction. It is a pure JavaScript API returning a score, giving you the ability to take action in the context of your site: for instance requiring additional factors of authentication, sending a post to moderation, or throttling bots that may be scraping content.