Catna – WooCommerce Name Your Price and Offers


Created: 07/2021

Update: 10/2023 – Updated version: 1.0.9

By: VillaTheme

Thank you for purchasing our plugin. If you have any questions that are beyond the scope of this documentation, please feel free to request support at our Support Forum. Thanks so much!


Catna – WooCommerce Name Your Price and Offers helps your customers who shop on your online store to propose their desired price for products. WooCommerce Name Your Price plugin displays the price field of each product and allows customers to flexibly enter the price that they are willing to pay for a product. Customer price proposals can be approved if they are eligible for the price conditions and rules that you set in the backend.

THE PLUGIN FEATURES

WooCommerce Name your price

This feature allows customers to enter the suggested price on your products.

  • Name your price: The plugin allows customers to enter the willing to pay price on the price field of products on the front end.
  • Name your price for product types: Easily set the name your price for simple, variable products.
  • Quick view display:  You can display the name your price of products on the quick view.
  • Set range of acceptable prices: You can set a minimum acceptable price and a maximum acceptable price for each product on the single product editing page.
  • Display the name your price on the single page and shop page: The plugin allows setting the name your price on the single product page and shop page.
  • Allow free purchase: You can allow your customers to buy products for free.
  • Collect donations for products or in simple.
  • Invalid Price Error Validation: Whenever a customer enters an invalid Product price to buy the product, it will not allow buying the product, so we have added validation. Therefore, the admin can easily change the error message of invalid Price Error from settings.
  • Simply customize and design name your price button labels and messages on the shop and single product page.
  • Customize Error Messages & Add to Cart Button text (Optional)
  • Custom CSS:  You can add your own CSS to design the name your price on the front-end as you want.


Smart Offers in WooCommerce Name Your Price plugin

This feature allows customers to bargain at a lower price with the current product price if that bargain price matches the conditions that the admin set in the backend.

  • Smart offer for product types: You can set smart offers for each simple or variable product.
  • Display the name your price on the single product and shop page
  • Smart offer without product quantity: Set a smart offer for the product not based on the product quantity. You can set an offer with a fixed amount decrease or percentage decrease in the product price.
  • Smart offer with product quantity: Set various smart offers based on the product quantities purchased. Offers can be a fixed amount decrease or percentage decrease in the product price based on the respective quantity.
  • Simply customize and design smart offer button labels and messages on the shop and single product page.
  • Set Min & Max Quantities a customer needs to purchase to avail price reduction: Define minimum & maximum quantities a customer can order on configured price.
  • Display bargain form under a pop-up.
  • Custom CSS:  You can add your own CSS to design the smart offer on the front-end as you want.


Global rules.

This feature helps shop owners to generate as many name-your-price or smart offer rules as they want that match product conditions or customer conditions set. It helps save time to set minimum acceptable prices and maximum acceptable prices for products or customers that matched the rules.

  • Create unlimited customer roles and assign prices to each role.

Setting conditions for displaying the WooCommerce name your price and smart offer which match the global rules.

You can set up conditions to display the WooCommerce name your price and smart offer feature for many products or customers which match the global rules:

  • Product conditions: Set up product conditions to open the name of your price or smart offer for the eligible products, available with: Include products, Exclude product, Product price, Include categories, Exclude categories, Product visibility.
  • Customer conditions: Set up customer conditions to open the name of your price or smart offer for the eligible customers, available with: Only logged in, Include user role, Exclude user role, Include users, Exclude users.


System Requires

Make sure that those limits are to a minimum as follows in order for free trouble while installing.

It is recommended using

  • 1. WooCommerce 4.0.x
  • 2. WordPress 5.0.x  
  • 3. PHP 7

Download Plugin

Get the plugin installation package from your account download page and save it to your desktop.

Install & Active plugin

Go to PluginsAdd NewUpload PluginChoose file/ Select  catna-woocommerce-name-your-price-and-offers.zip file/ click “Install Now“/ click “Active plugin“.

Install and Set up Video:

After installing the plugin, please go to Dashboard/ Catna to config its settings. After installing the plugin, please visit the dashboard/Catna to set up bargaining for your site. A setup page will then appear on your website, allowing your customers to offer another discount that you offer on your products.

NAME YOUR PRICE

General Settings

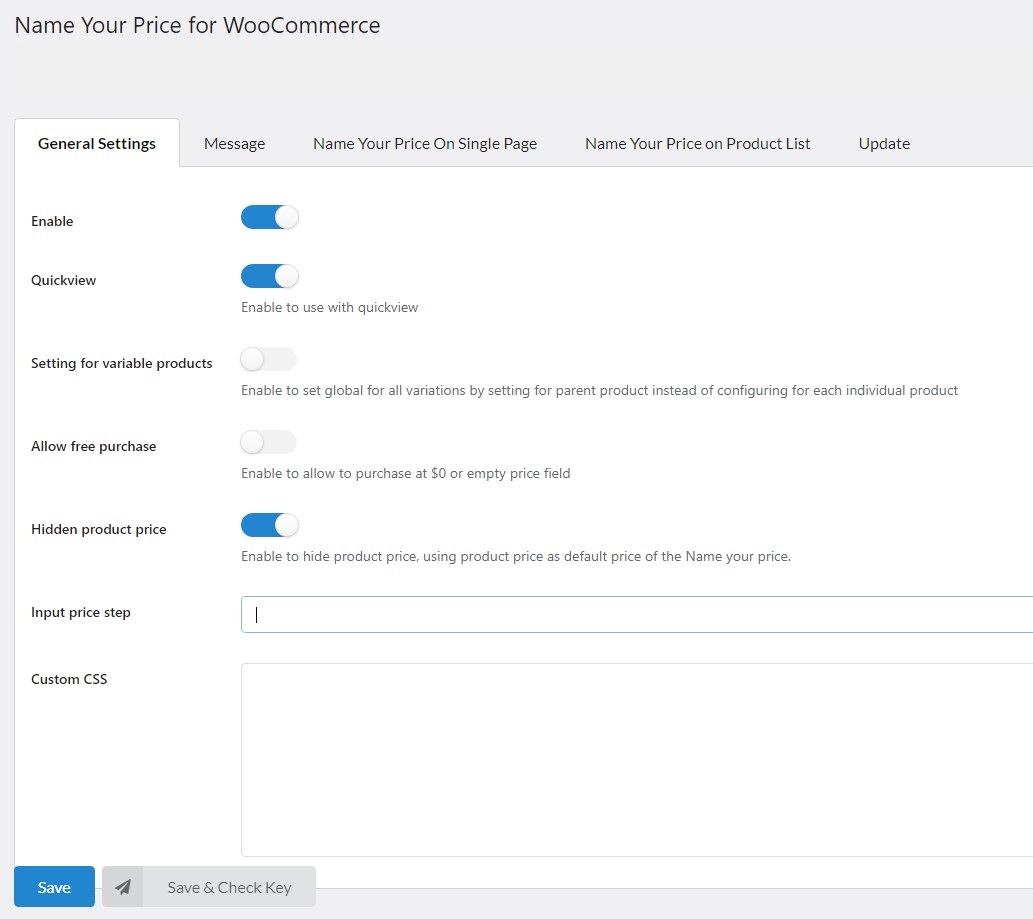
In General, you can set up the main features of WooCommerce Name Your Price and Offers


  1. Enable: Enable the plugin to allow your customers to make another offer price that you give in your products.
  2. Quickview: If you use a theme or plugin with quick view, you should enable it.
  3. Setting for variable products: Enable to set global for all variations by setting for parent products instead of configuring for each individual product.
  4. Allow free purchase:  If you want your customer can be purchased for $0 or the price field is empty then enable it.
  5. Hidden product price: Enable this option to hide the price of the product, the plugin will use the price of the product as the default price of the Name Your Price
  6. Input price step: When you setting it any to number, in the frontend your buyer will no longer need to write the value but instead, when they clicking on it and using the up or down arrow on the keyboard it will change according to the number you have set.
  7. Custom CSS: Allow you to add your own CSS code to design the currencies bar or widget.

Message

  1. Low suggested price: The message content when the customer enters the offer price is lower than the accepted minimum price, you can change the content as you want
  2. High suggested price: The message content when the customer enters the offer price is higher than the accepted maximum price, you can change the content as you want
  3. Shortcode:

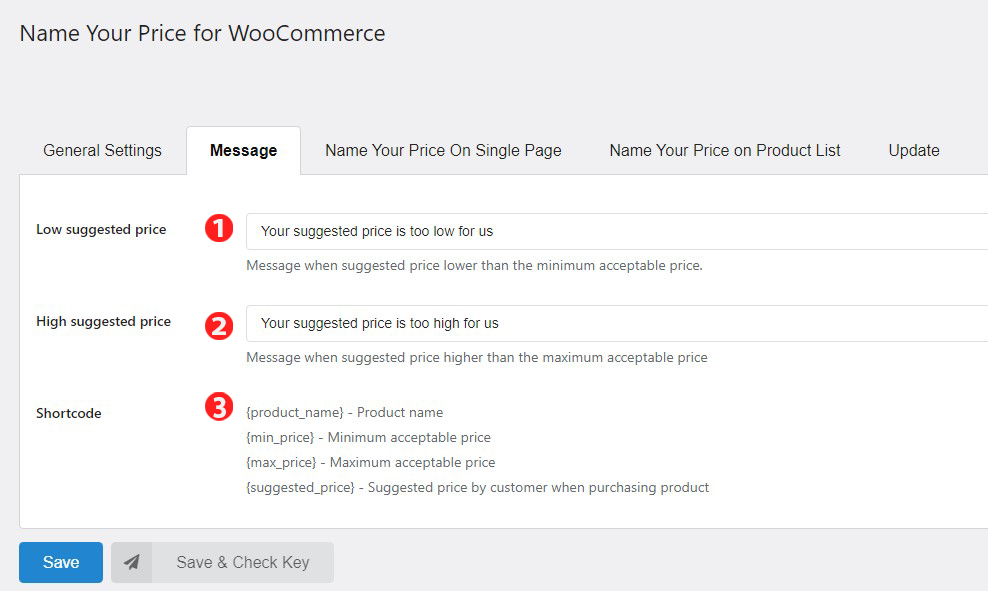
    {product_name} – Product name

    {min_price} – Minimum acceptable price

    {max_price} – Maximum acceptable price

    {suggested_price} – Suggested price by the customer when purchasing the product

    Conversely, when “Allow Free Purchases” is disabled in General Setting tab, the message your guest receives will add “Empty suggested price” as shown below:

When no suggested price is entered, the customer will receive this message, you can also change the content of the message as you want.


Name Your Price On Single Page

  1. Position: Choose the positions where you want to show Name Your Price on single product page. There are two options are Before add to cart button and After add to cart button.
  2. Content layout: Type in the content you want to display. You can use shortcodes to display necessary information.
  3. Style of content layout: You can set the color and font size for the content layout.
  4. Input placeholder: This is the setting of what you want to be displayed for the input.
  5. Style of input: 
  • Enable currency: If you enable currency it will show the symbol of the currency, the position according to the position setting of Woo.

  •   You can set the Border width, Border radius, Border color, background color, color, and font size of Input placeholder.


Name Your Price On Product List


  1. Add to Cart button label: You can change the label of the add to cart button on Product List. If you leave it blank it will show by default.
  2. Disable: When you Disable, Product list on your Shop page does not appear Name Your Price below each product.


  1. Add to Cart button label: You can change the label of the add to cart button on Product List. If you leave it blank it will show by default.
  2. Enable: When you Enable, Product list on your Shop page appears to Name Your Price below each product.

3. Enable variable product: Allow customer to give suggested price and add variable product to cart on Product List.

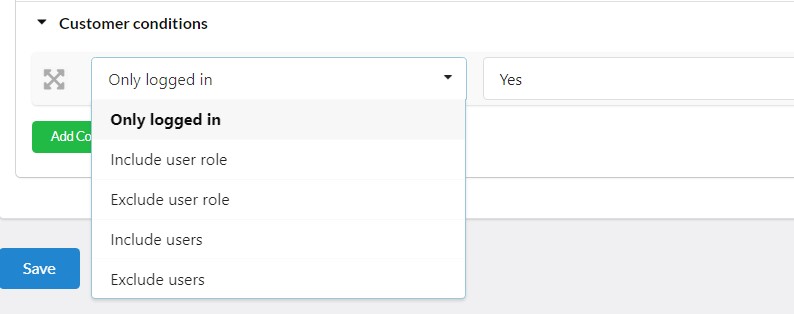
4. Assign page: You can use WP’s Conditional tags to enable/disable Name Your Price of product list on specific pages.

Important note:

To handle WP’s Conditional Tags, this plugin uses eval() which is very dangerous because it allows the execution of arbitrary PHP code. Therefore, please only fill this field with proper conditional tags which are validated and/or provided by trusted developers.


5. Display style: you can choose one of two ways as follows to display the style of Name Your Price on Product List: On loop product template or On popup after clicking add to cart button. But you can not set the style for variable products.

  • On loop product template: – Position: There are 4 placement options including: Before product title, After Product title, Before add to cart button, After add to cart button.

  • On popup after click add to cart button.


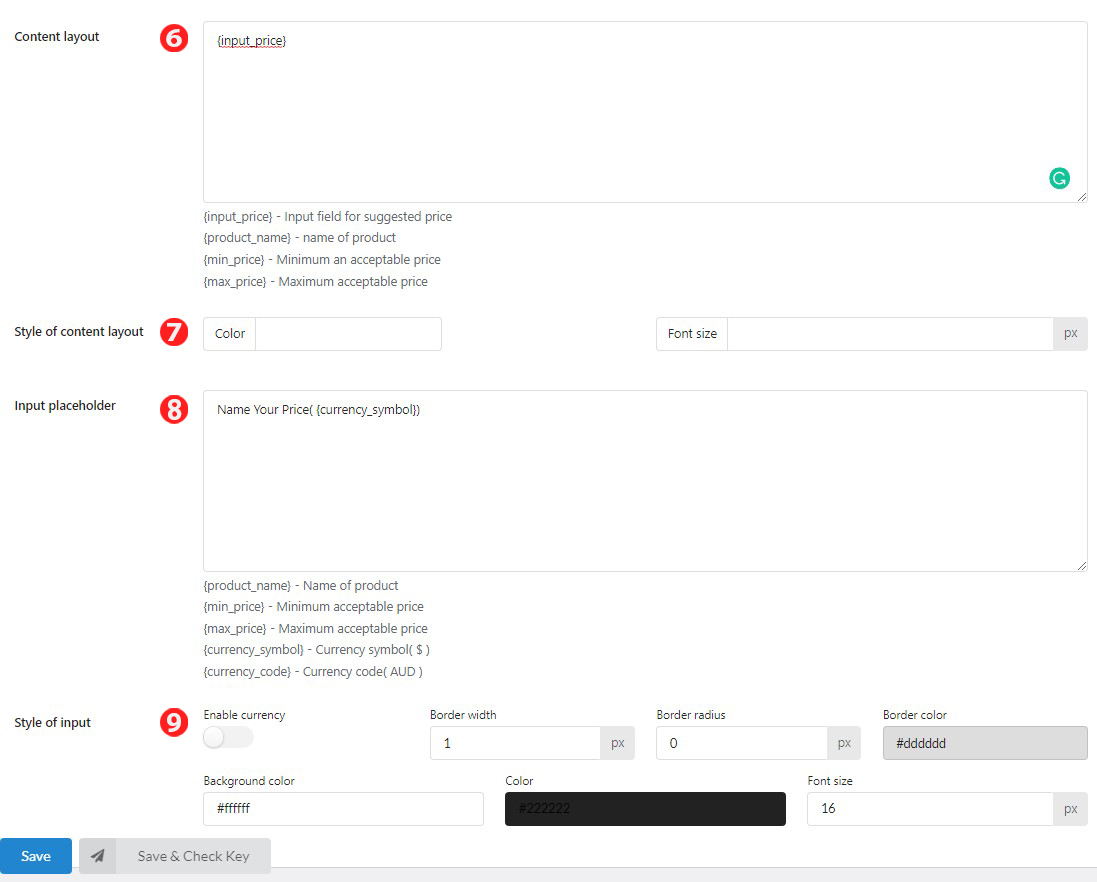
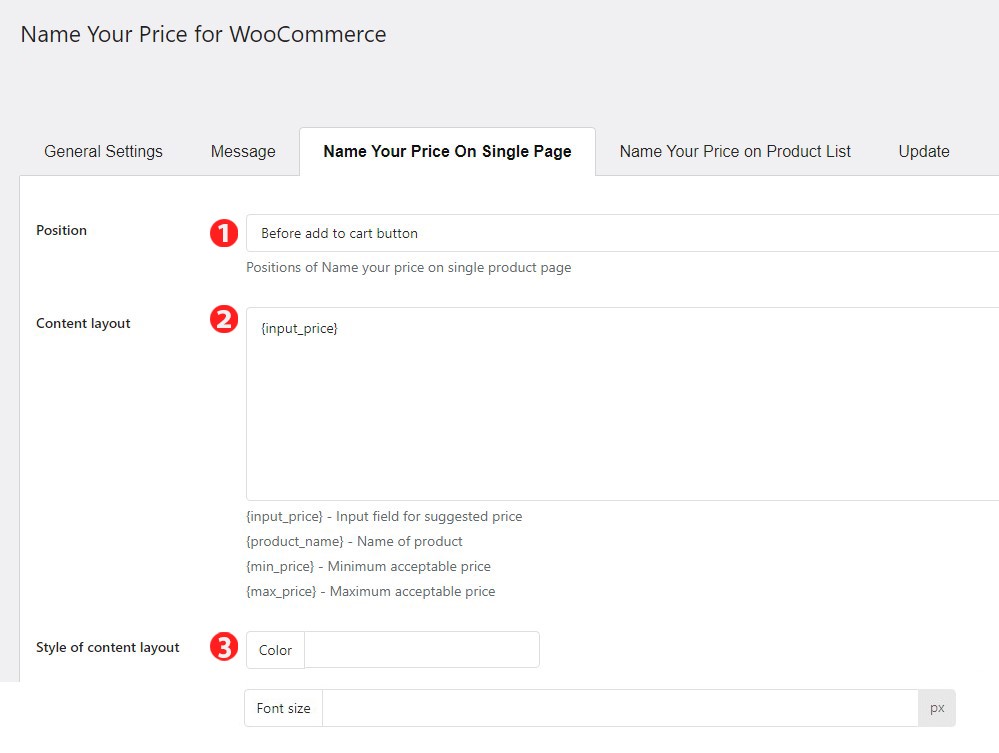
6. Content layout: Type in the content you want to display. You can use shortcodes to display necessary information.

7. Style of content layout: You can set the color and font size for the content layout.


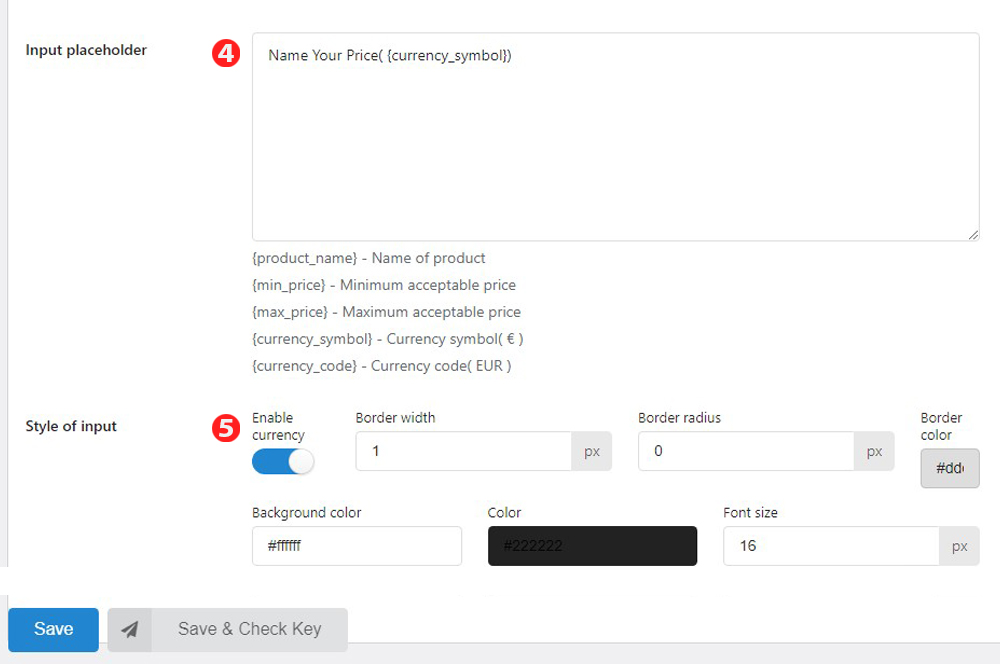
8. Input placeholder: This is the setting of what you want to be displayed for the input.

9. Style of input: 

  • Enable currency: If you enable currency it will show the symbol of the currency, the position according to the position setting of Woo.

  •  You can set the Border width, Border radius, Border color, background color, color, and font size of Input placeholder.

Setting in Edit product page

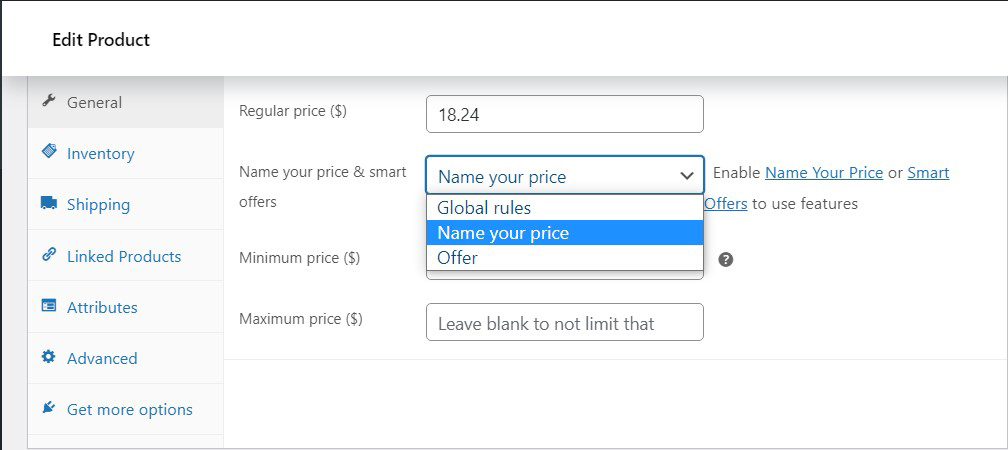
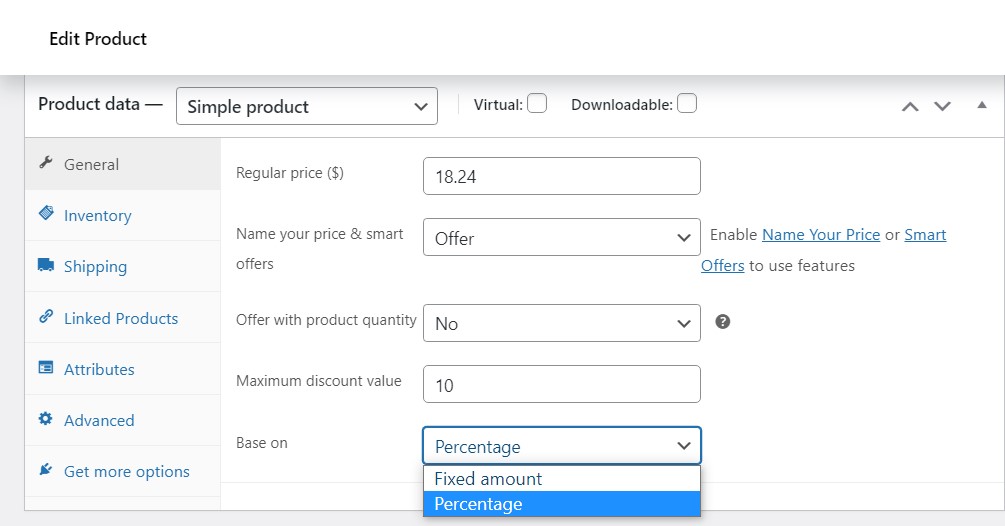
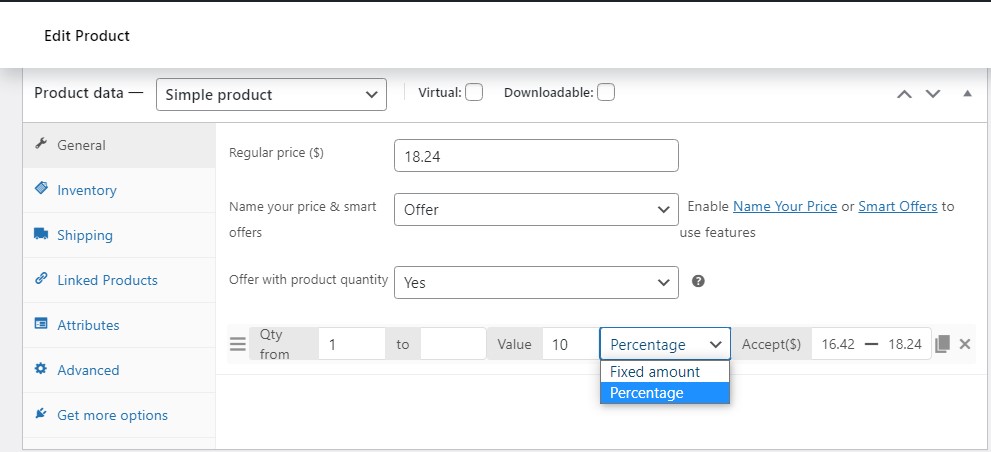
After saving the above settings, we go to edit products. Choose Name Your Price for your products and Update


SMART OFFERS

General Settings

  1. Enable: Enable/ Disable the Smart Offers feature. Allow customers to bargain for less than the selling price of the product if the price they offer matches the conditions you set earlier.
  2. Setting for variable products: Enable to set global for all variation products by setting for parent products instead of configuring for each individual product.
  3. Add to cart without bargain: Enable to allow to add the product to cart, skip bargain steps.

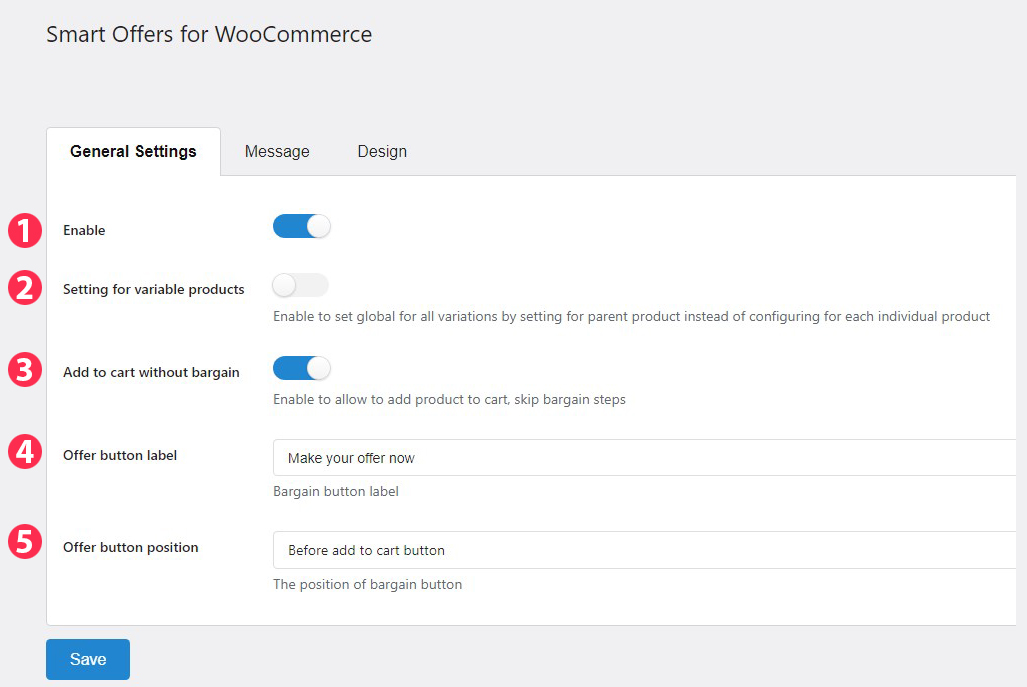
If you Disable it, your customer must go through a bargaining step before adding the product to the cart.

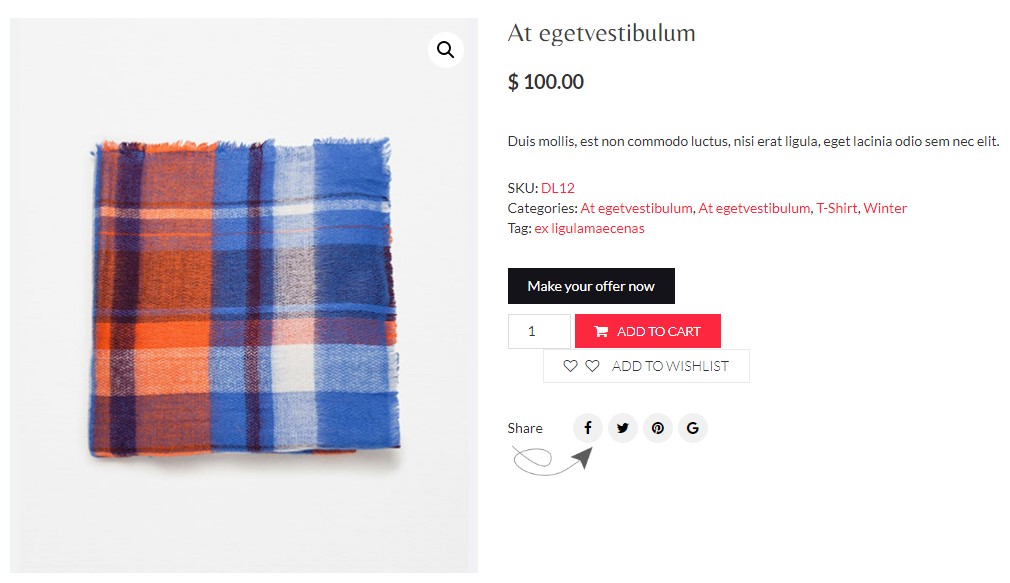
4. Offer button label/ Add to cart button label on single page: Constant if you don’t want to change the label content of the bargain button.

5. Offer button position: There are 2 positions of the bargain button are Before and After Add to cart button.

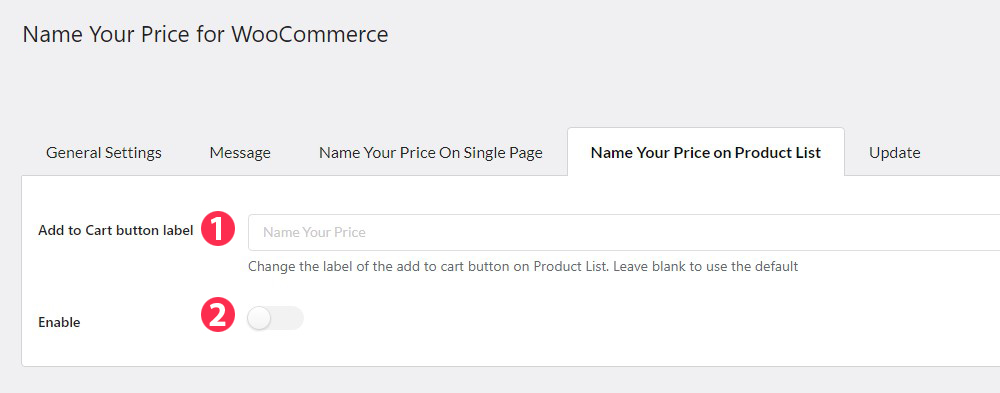
Or when Disable ” Add to cart without bargain” you can Change the label of the add to cart button on product list. Leave blank to user the default Add to cart button label on product list 

Message

  1. Empty suggested price: You can change the text of the message that the customer will receive when the customer does not enter their suggested price.
  2. Low suggested price: You can change the text of the message that your customer will receive when the customer enters the offer price lower than the minimum acceptable price.
  3. High suggested price: You can change the text of the message your customers will receive when they enter a suggested price higher than the current selling price of the product.
  4. Waiting for response: Message when suggested price is being checked. You can change the text of the message that the customer will receive.
  5. Successful message: Message after suggested price acceptable. You can change the text of the message that the customer will receive.
  6. Shortcode:

    {product_name} – Name of product

    {min_price} – Minimum acceptable price

    {product_price} – Product price

    {suggested_price} – Suggested price by customer when purchasing product

Design

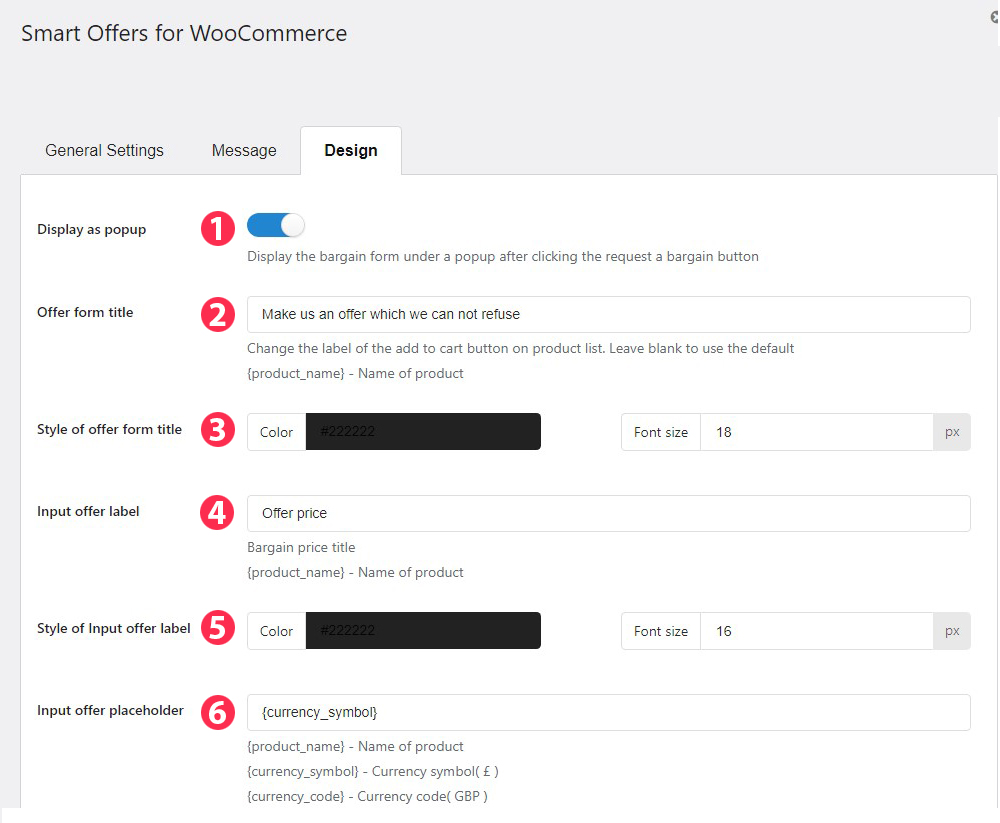
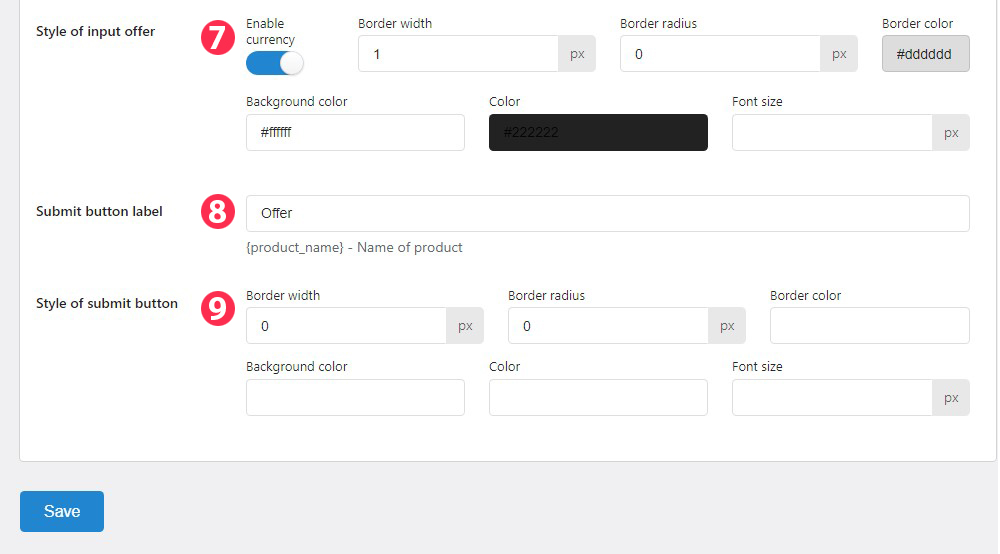
Design tab, where you can configure the front-end interface of the plugin.

  1. Display as popup: When you Enable, the bargain template will show up as a pop-up after clicking the bargain request button.
  2. Offer form title: You can change the label of the add to cart button on the product list. Leave blank to use the default.
  3. Style of offer form title: You can change the Color and Font size of Offer form title.
  4. Input offer label: You can change the text of Input offer label here.
  5. Style of Input offer label: You can change the Color and Font size of Input offer label.
  6. Input offer placeholder: This is the setting of what you want to be displayed for the input.
  7. Style of input offer: If you enable currency it will show the symbol of the currency, the position according to the position setting of Woo.
  8. Submit button label:
  9. Style of submit button: You can change the Border width, Border radius, Border color, Background color, Color, and Font size of submit button.

Setting In Edit Product Page

After saving the above settings, we go to edit products. Choose Offer for your products and set rules for your product. There are two options:

  • If Offer with product quantity is NO, the rule gives only the Maximum Discount Value based on a Percentage or Fixed amount whichever you set.

  • If Offer with product quantity is YES, the rules include the product quantity, the maximum discount for the product as a percentage or a fixed amount, and the price range that you can accept.

GLOBAL RULES

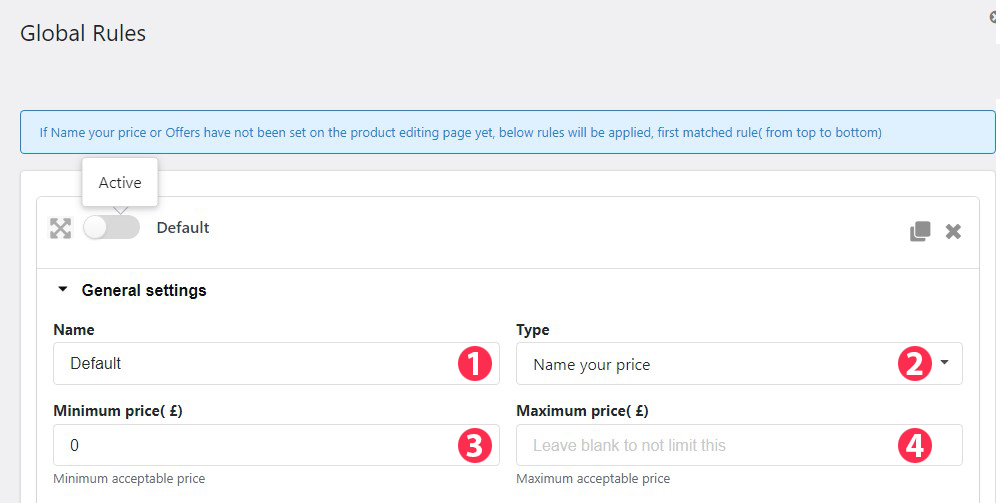
Global Rules: If Name your price or Offers have not been set on the product editing page yet, below rules will be applied, first matched rule (from top to bottom)

Default: Enable/ Disable default global rules mode

General Settings

  1. Name: You can change the name in the blank.
  2. Type: There are two types you can choose are Name your price and Offer.
  3. Minimum price($): Minimum acceptable price.
  4. Maximum price($): Maximum acceptable price, you can leave blank to not limit this.

Products Conditions

There are two options:

  1. If you do not set a condition for your product, it applies to all products
  2. If you set a condition, it only applies to products that meet all of the conditions you’ve set


Customer conditions

There are two options:

  1. If you do not set customer conditions then it will apply to all users.
  2. If you have set a customer condition then only matching users will be applied.

Template Usage
/name-your-price.php Catna name-your-price form
/name-your-price-popup.php
name-your-price popup form for variable products in product list when Display style option is set to ‘On loop product template’
/name-your-price-popup-non-ajax.php
name-your-price popup form for variable products in product list when Display style option is set to ‘On popup after click add to cart button’
/smart-offers.php Smart offers onpage form when ‘Display as popup’ option is turned off
/smart-offers-popup.php Smart offers popup form when ‘Display as popup’ option is turned on


Follow this guide on how to override VillaTheme plugins’ templates via a theme.

Extra Information


Thank you for your attention!

If you have any question, please create a topic at our FORUM, we will support within 24 hours.