Prena – WooCommerce Product Pre-Orders


Created: 02/2021

Latest updated: 12/2025 – Updated version: 1.0.0

By: VillaTheme

Thank you for purchasing our plugin. If you have any questions that are beyond the scope of this documentation, please feel free to request support at our Support Forum. Thanks so much!

SYSTEM REQUIRES

Make sure that those limits to a minimum as follows in order for free-trouble while installing:

  • WordPress 5.0+
  • PHP 7.0+
  • WooCommerce 7.0+


DOWNLOAD PLUGIN

  • Go to Plugin/Add New/Upload Plugin/Choose file/ select plugin zip file product-pre-orders-for-woo-pre.zip
  • Click “Install Now“/“Active plugin.


See this video for a better view

The Pre-Order for WooCommerce Premium plugin gives store owners the flexibility to sell products before they are available, helping you capture early sales, generate buzz, and better plan your inventory. Whether you are launching a new product, restocking a bestseller, or testing customer demand, this plugin equips you with powerful tools to manage the entire pre-order process with ease.

Key Features

  • Flexible Pre-Order Setup: Enable pre-orders for both simple and variable products directly from the product edit page.
  • Custom Availability Dates: Set a specific release date or define availability after a chosen number of days.
  • Dynamic Pricing Options: Offer full payment upfront, collect deposits, or adjust pre-order pricing with fixed or percentage-based increases or decreases.
  • Design Customization: Style pre-order buttons, notices, and badges to match your brand identity.
  • Advanced Conditions: Control pre-order availability based on product type, price, categories, tags, custom fields, and more.
  • Flexible Delivery & Payment: Allow free shipping for pre-orders and configure deposit types with automated balance payments.
  • Automated Notifications: Keep both customers and admins informed with customizable email templates for availability updates, payment reminders, and confirmations.


Create a pre-order product

For Simple Products

  1. Go to Products → All Products and edit (or create) a simple product.
  2. In the Product Data box, check the Pre-Order checkbox.
  3. A new Pre-Order tab will appear. Click it to open pre-order settings.
  4. Configure the options:
    • Pre-Order Date: Select the date or number of days until the product becomes available.
    • Quantity Limit: Limit how many units can be pre-ordered.
    • Free Shipping: Allow free shipping for this product.
    • Notices & Button: Customize the pre-order button label and product notices.
    • Manager Price: Adjust pre-order pricing (set a specific value, increase, decrease, or disable purchase).
    • Payment: Choose between full payment upfront or deposit (fixed/percentage).
  5. Click Update to save your product.


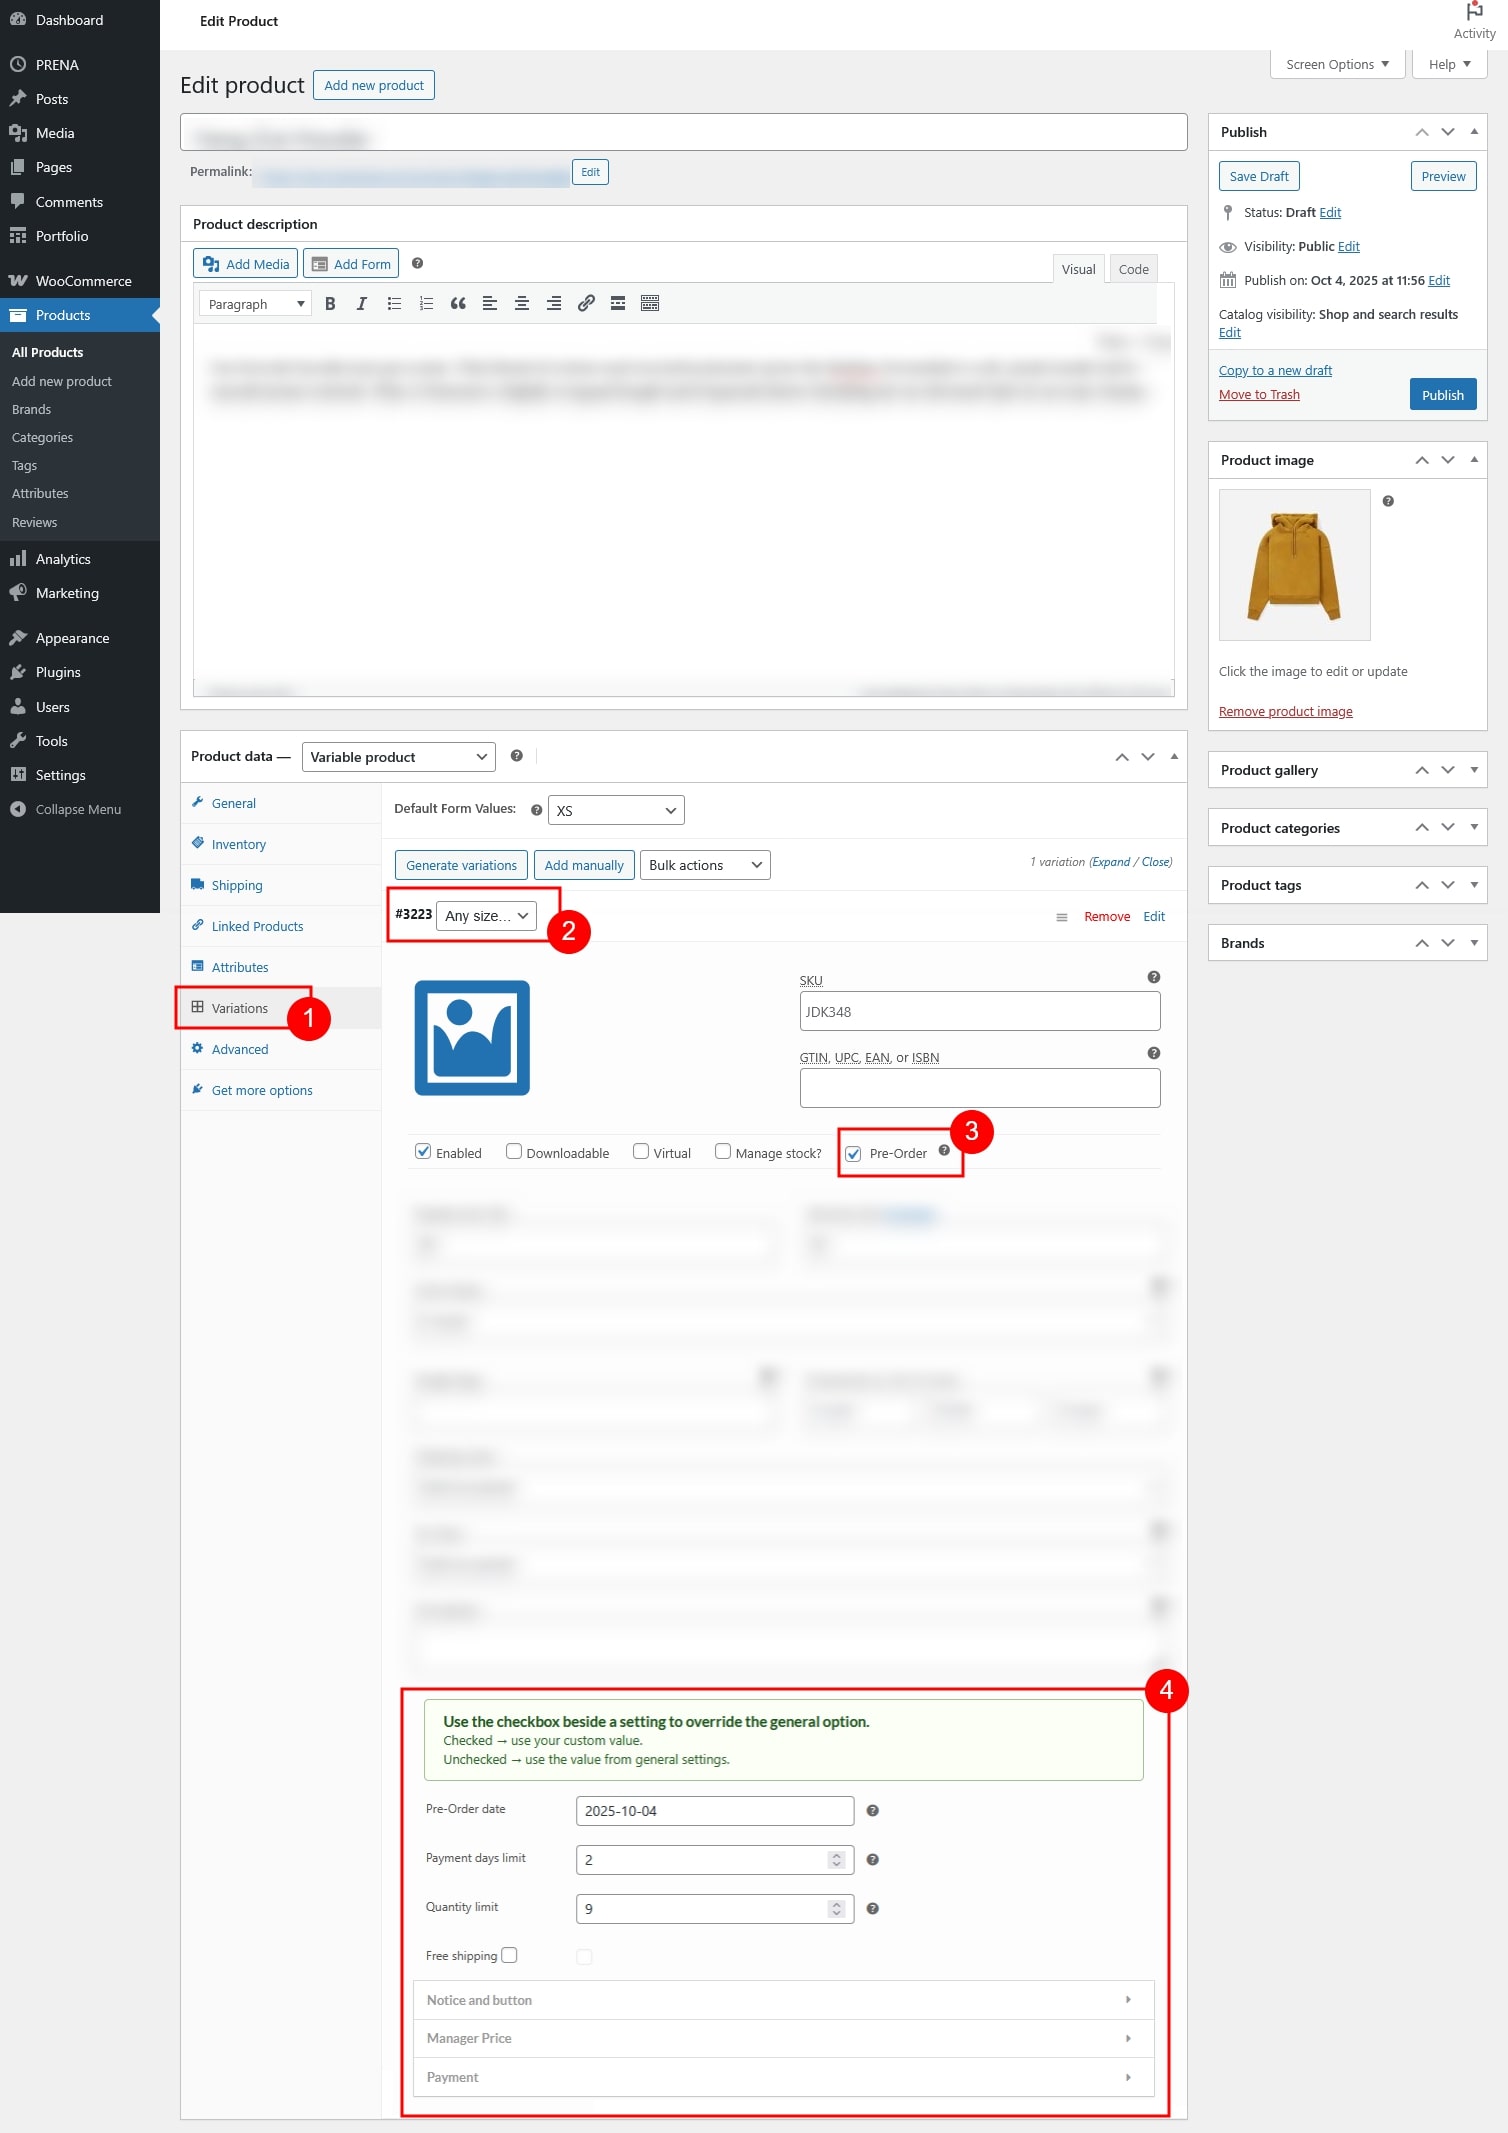
For Variable Products

  1. Go to Products → All Products and edit (or create) a variable product.
  2. In the Variations tab, expand the variation you want to set as a pre-order.
  3. Check the Pre-Order checkbox for that variation.
  4. Configure the same pre-order options as for simple products (date, limits, notices, pricing, and payment).
  5. Repeat for other variations if needed.
  6. Click Update to save your product.


Result

  • Pre-order products may show a Pre-Order button instead of “Add to Cart” if you configure a Pre-Order button
  • Notices will display on the product page, cart, and shop page as configured.
  • If deposit payments are enabled, customers will see the deposit amount and be reminded to complete payment later.


Set up plugin options

Step 1: Configure Global Settings

  1. Go to WooCommerce → Pre-Order → General settings.
  2. Enable pre-order features on the frontend.
  3. Adjust global options such as:
    • Price calculation rules.
    • Automatic “Back to Pre-Order” when products go out of stock.
    • Availability dates (fixed date or after X days).
  4. Use the Conditions section to automatically apply pre-order to products that meet specific rules (e.g., by category, tag, price range).


Step 2: Customize the Design

  1. Navigate to WooCommerce → Pre-Order → General settings → Go to Design or Appearance → Customize → Prena WooCommerce Product Design
  2. Customize how pre-order elements look:
    • Pre-order button style and text.
    • Cart, product page, and shop page notices.
    • Badges to highlight pre-order products.
  3. Preview each component to see changes instantly.


Step 3: Configure Payment and Delivery

  1. Go to WooCommerce → Pre-Order → Payment & Delivery Settings.
  2. Decide how customers pay for pre-orders:
    • Full payment upfront.
    • Deposit (fixed or percentage).
  3. Set rules for remaining payments (Pay Later).
  4. Optionally enable free shipping for pre-order products.


Step 4: Set Up Email Notifications

  1. Open WooCommerce → Pre-Order → Email Settings.
  2. Enable admin notifications to be reminded before products become available.
  3. Enable customer notifications such as:
    • Availability alerts.
    • Release date changes.
    • Payment reminders and order confirmations.
  4. Use the Manage buttons (or go to WooCommerce → Settings → Emails) to edit and customize email templates.


Monitor and Manage Pre-Orders

Once you have set up products as pre-order items, here’s what happens next:

Products in Backend

  • All pre-order products will appear in your WooCommerce → Products list, just like regular products.
  • They are clearly marked so you can easily identify which items are available for pre-order.


Customer Experience

  • On the frontend, customers will see the pre-order button, notices, and badges (depending on your design settings).
  • Whether a customer can place a pre-order depends on the rules you configured:
  • If “Disable Buy Product” is enabled, they can view the product but cannot complete checkout.
  • If purchase is allowed, they can place a pre-order using the payment type and pricing you defined (full payment, deposit, adjusted price, etc.).


Order Status

  • When a customer places a pre-order, the order is assigned a Pre-Order status in WooCommerce.
  • Customers can track these orders under their My Account → Orders page, where the pre-order label will be visible.


Admin Order Management

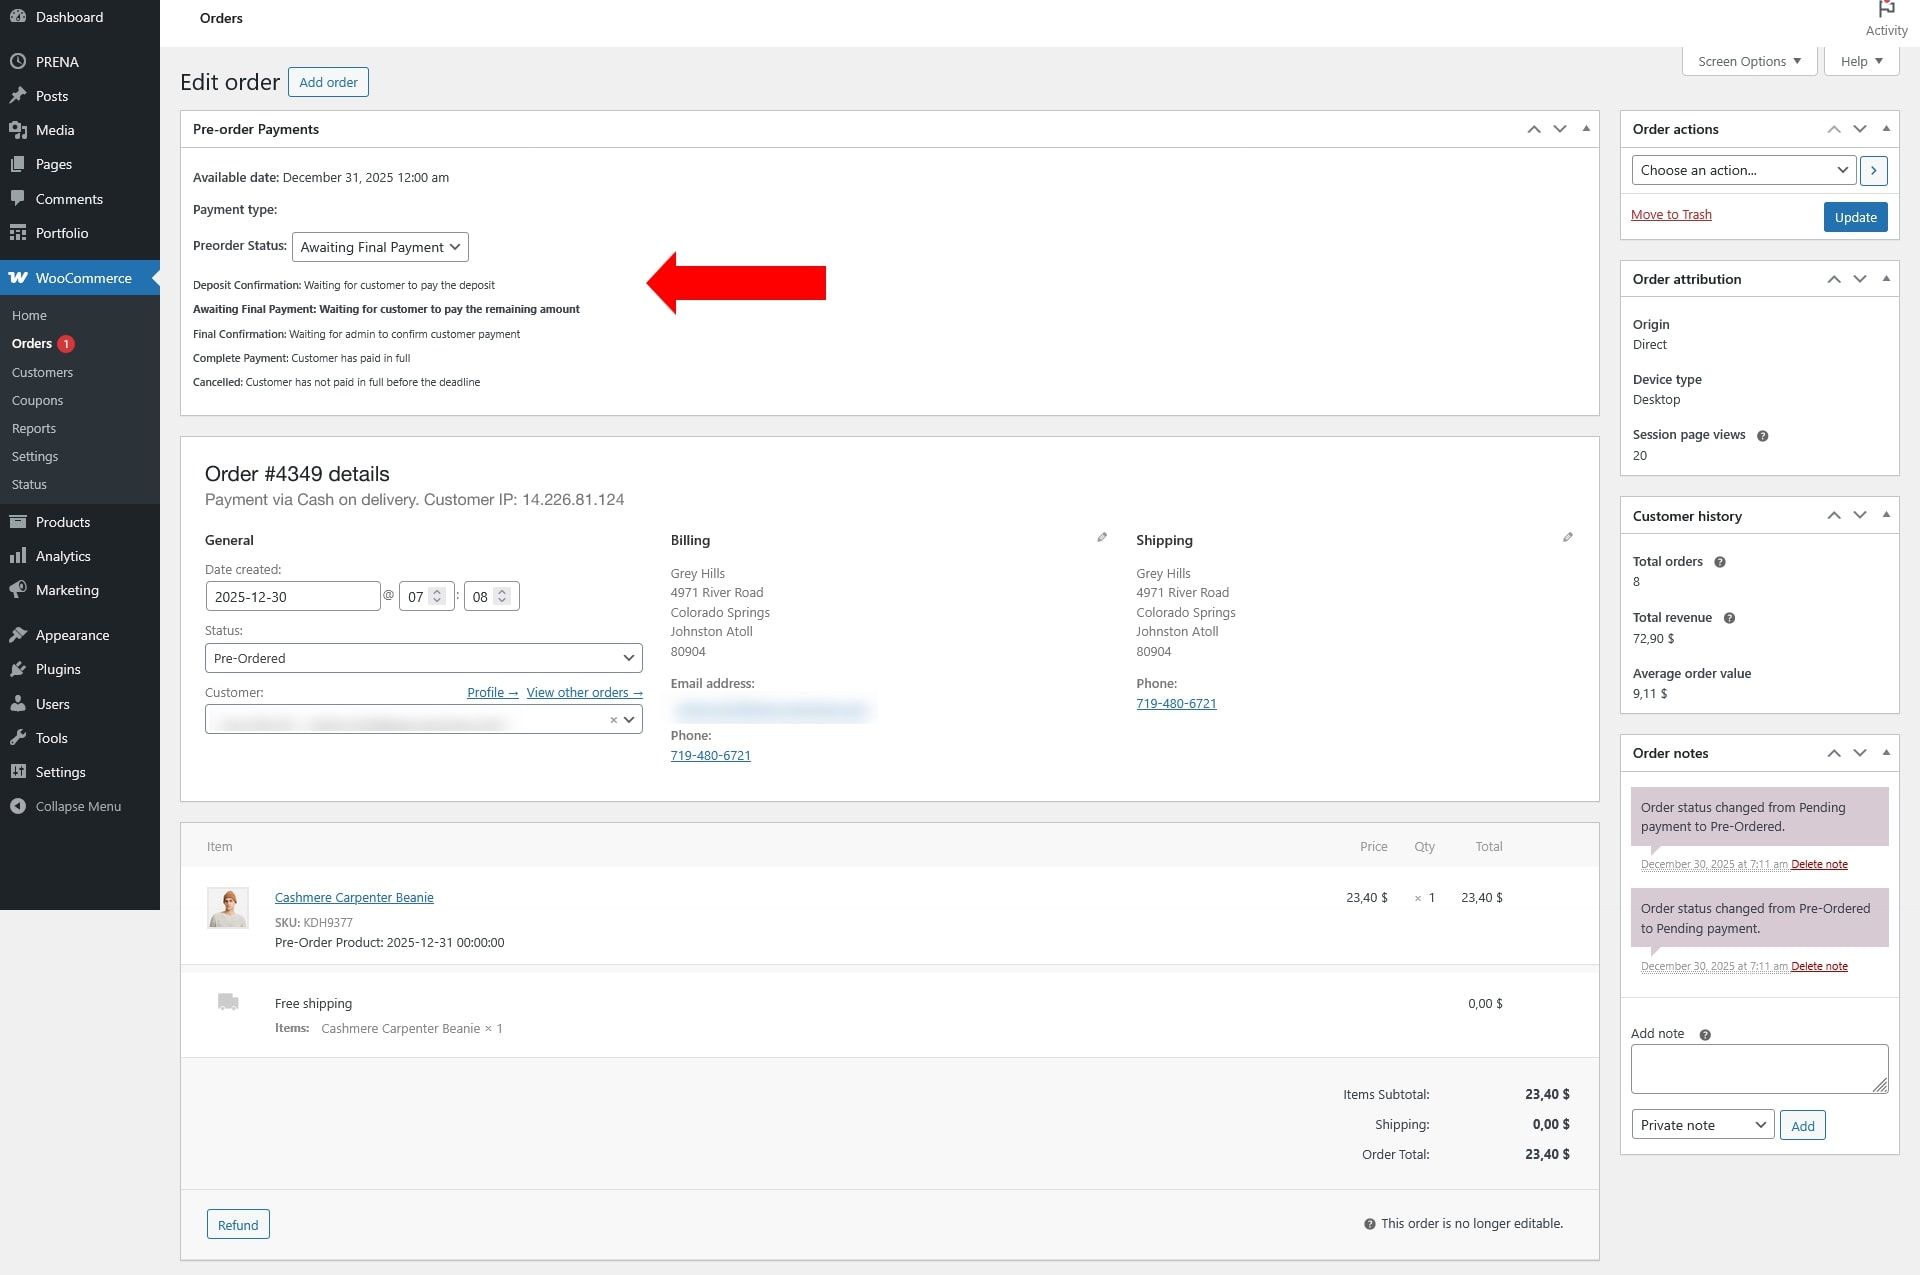
As the store admin, you can view all pre-order orders in WooCommerce → Orders.

Each order will display its pre-order status, making it easy to filter or identify.


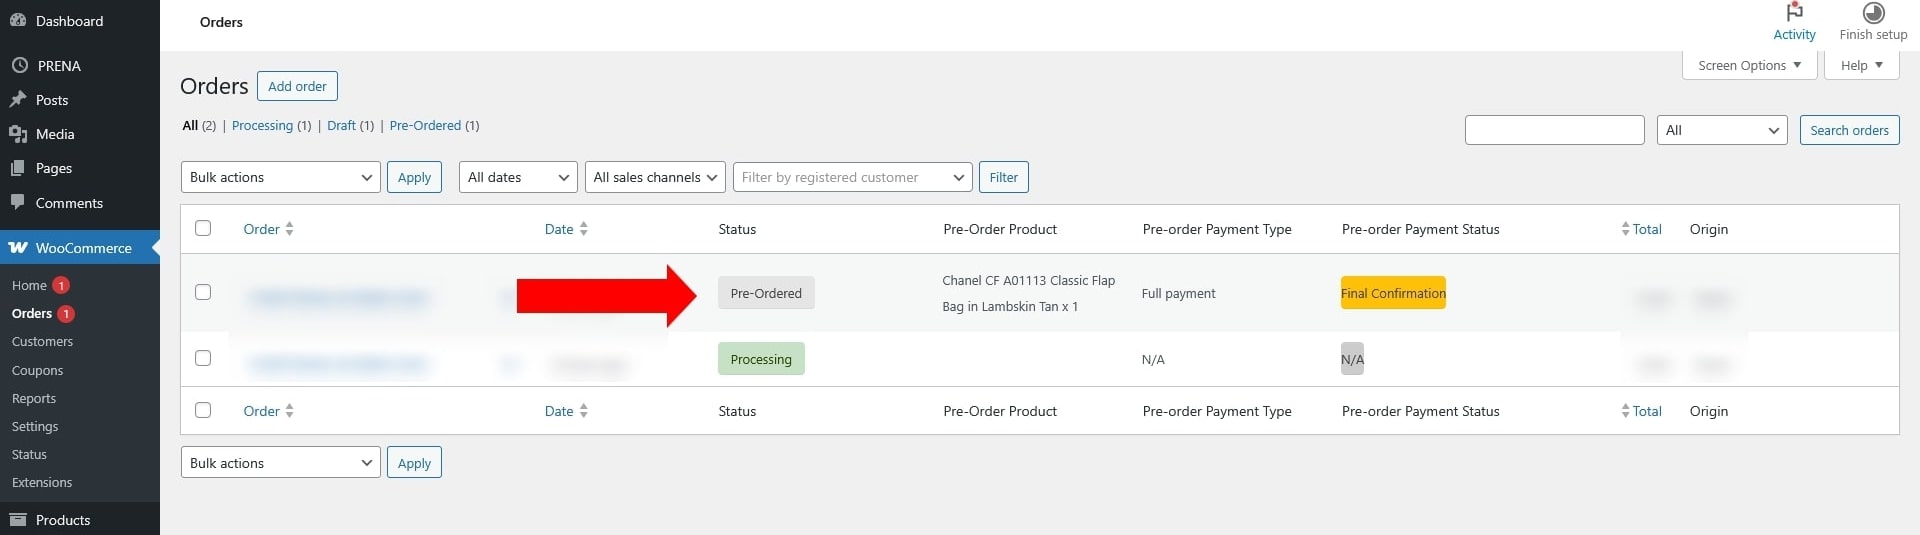
You can also manually update the pre-order payment status (for example, when a deposit is paid later or the final balance is collected).

Refer to the Pre-Order Status explanation guide for details on each order status and how it affects payment and fulfillment.


Settings – General

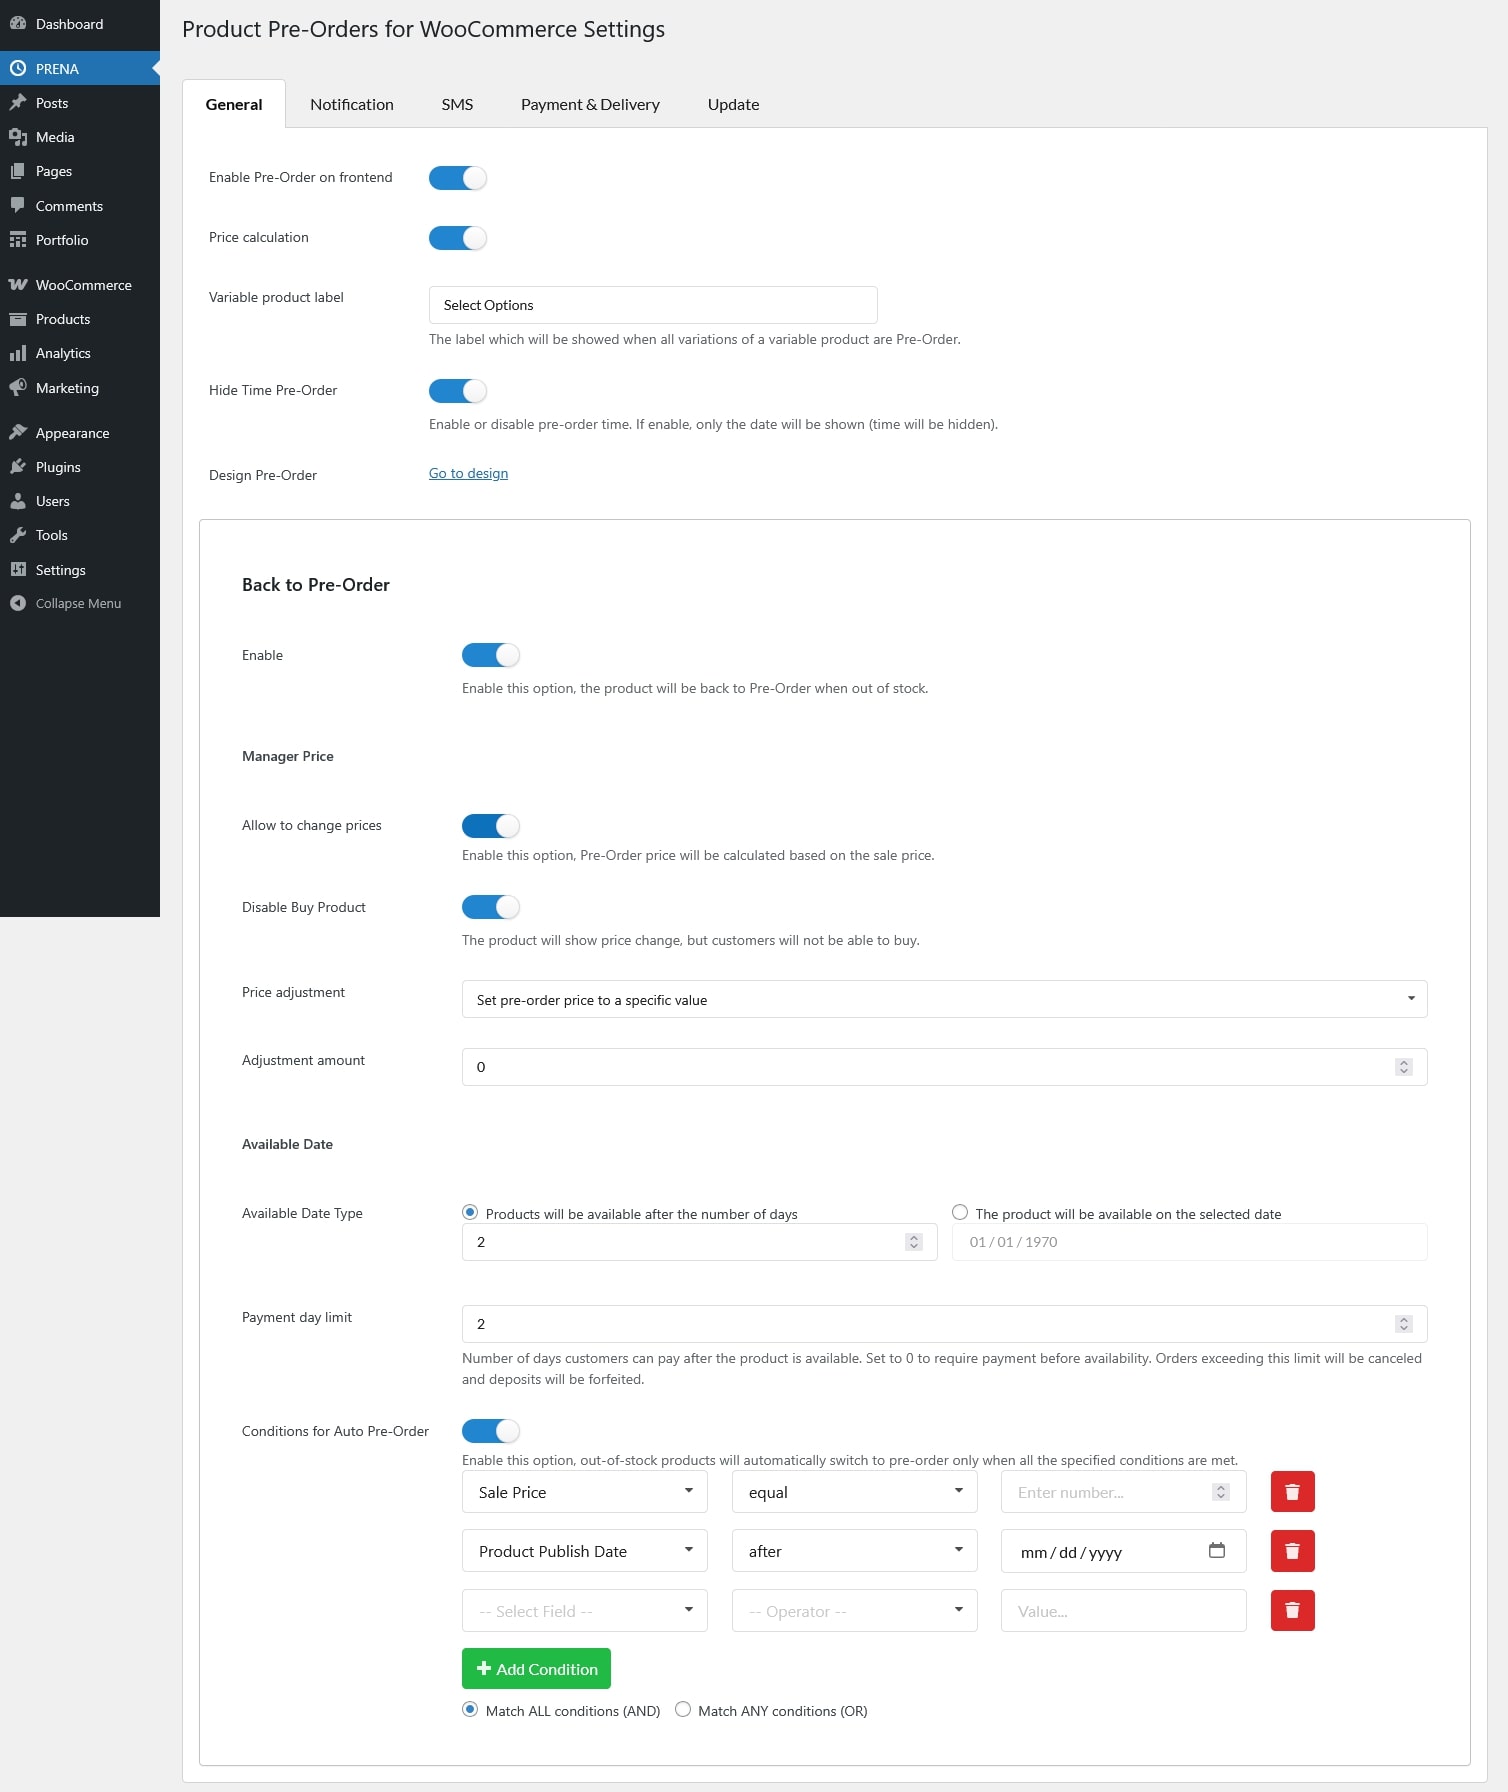
The General tab provides the main settings to configure how the Pre-Order feature works across your store. From here, you can enable or disable pre-orders on the storefront, define how prices are handled, customize labels, manage stock behavior, and set product availability dates. This tab also includes the Conditions for Auto Pre-Order section, where you can create rules to automatically assign products to pre-order.

  • Enable Pre-Order on frontend: Enable this option to display pre-order functionality on the storefront, making it visible and available for customers.
  • Price calculation: Define how the pre-order price will be calculated. If enable, pre-order product prices can be calculated by “Manager Price” rules
  • Variable product label: Set the label displayed for variable products whose all variations are available for pre-order, helping customers identify pre-order options more clearly.
  • Hide Time Pre-Order: Enable this option to hide the pre-order availability countdown timer from product and shop pages.
  • Design Pre-Order: Navigate to the Prena Customize settings directly
  • Back to Pre-Order
    • Enable: Enable this option to automatically set a product status to pre-order when its inventory goes out of stock.
    • Manager Price:
      • Allow to change prices: Enable this option to calculate the pre-order price based on the sale price. options below are available only if this option is in use.
      • Disable Buy Product: Enable this option to display price changes but prevent customers from purchasing the product.
      • Price adjustment: Set how the pre-order price is modified:
        • Set pre-order price to a specific value: Define a fixed price for pre-orders.
        • Adjust to decrease pre-order price: Reduce the pre-order price by a set value or percentage
        • Adjust to increase pre-order price: Increase the pre-order price by a set value or percentage
      • Adjustment type: If the pre-order price is adjusted up or down, choose whether to apply the change as a fixed amount or a percentage.
        • Set a fixed amount to apply to the pre-order price
        • Set a percentage to apply to the pre-order price
      • Adjustment amount: Enter the exact amount (fixed or percentage) to increase or decrease the pre-order price, or to set the value for fixed price
    • Available Date
      • Available Date Type: Choose how to define when pre-order products become available:
        • Products will be available after the number of days: Set the number of days the product will be available after
        • The product will be available on the selected date: Select a fixed date when the product becomes available
      • Conditions for Auto Pre-Order: The Auto Pre-Order feature allows you to automatically mark products as pre-order when they meet specific conditions. Each condition is made up of three parts: Attribute, Operator, and Value.
        • Attribute Selector: Select the product property you want to check:
          • Product Type: Target by product type (simple, variable, grouped, etc.).
          • Product Price: Compare using the product’s regular price.
          • Sale Price: Compare using the product’s sale price.
          • Product Category: Match products from selected categories.
          • Product Tag: Match products with specific tags.
          • Custom Field (Meta Key): Match products using a custom meta key value.
          • Product Publish Date: Target products based on their published date.
          • Product SKU: Match products by SKU or part of an SKU.
        • Operator: Choose how the attribute will be compared. The available operators may change depending on the selected attribute. For example, Product Type usually supports equal and not_equal, while attributes like Category or Tag may also support contains and does_not_contain. Some common options are:
          • equal: The attribute must exactly match the value.
          • not_equal: The attribute must not match the value.
          • contains: The attribute must include the value.
          • does_not_contain: The attribute must not include the value.
        • Value: Provide or select the value for the condition.  The input field type for the value also changes based on the attribute. For example, choosing Product Type will show a dropdown of types, while Product Price will require a number.
          • For Product Type, Category, and Tag: choose from a dropdown list of available options.
          • For Product SKU, Product Price and Sale Price: enter a numeric value.
          • For Custom Field (Meta Key): enter the meta key and its value.
          • For Product Publish Date: select date.
        • Condition Groups: Combine multiple conditions to refine your rules
          • Match ALL conditions (AND) – Product must meet every listed condition.
          • Match ANY conditions (OR) – Product must meet at least one condition.


Settings – Notification

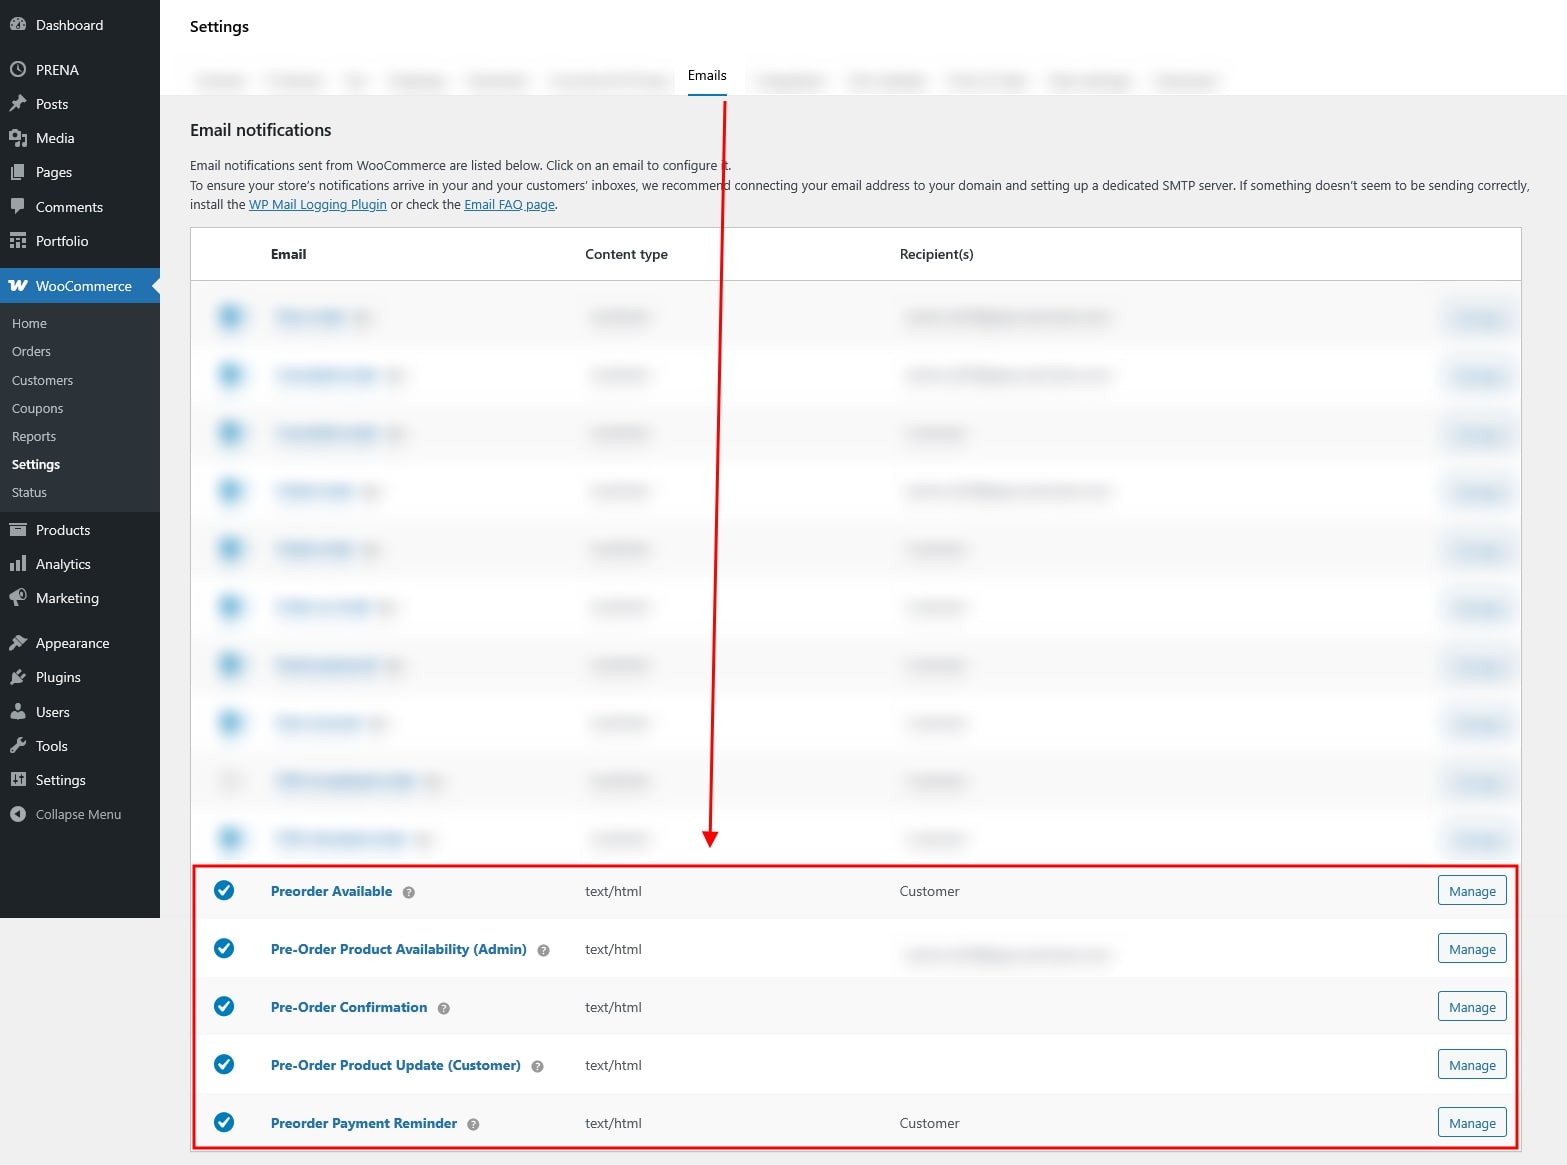
The Email Settings tab manages all email notifications related to pre-orders. These notifications help keep both store administrators and customers informed about product availability, payment reminders, and order updates. Each option includes a Manage button that links to the WooCommerce Email Settings page, where you can edit and customize the email template.

Admin Notification

  • Enable: Send an email notification to the store administrator a set number of days before a pre-order product becomes available.
  • Days: Define how many days in advance the admin should be notified.
  • Email Template: Click Manage to access and edit the template from the WooCommerce Emails settings page.


Customer Notifications

  • Product availability notice: Notify customers when their pre-order product becomes available.
  • Notify users of release date changes: Send an update if the pre-order product’s availability date is modified.
  • Payment Reminder Notification: Send reminders to customers who still have outstanding payments for their pre-orders.
  • Payment Notification Before: Define how many days before the product release customers should be reminded if they haven’t completed payment.
  • Order Confirmation: Send an order confirmation email when a customer successfully places a pre-order.


Each option includes a Manage button that links directly to the WooCommerce Email Settings page, where you can edit and customize the email template. Alternatively, you can access all templates by navigating to WooCommerce → Settings → Emails.


Settings – SMS

The SMS Settings allow you to send automated text messages related to pre-orders. You can configure these settings under: Dashboard → PRENA → SMS

  • Enable new pre-order SMS: Enable this option to send an SMS notification when a new pre-order is placed.
  • SMS content when has a new pre-order: Enter the message content that will be sent when a customer places a pre-order. You can include dynamic placeholders to display order-related information.
  • Enable payment reminder SMS: Enable this option to send an SMS reminder to customers one day before a pre-order payment is due.
  • SMS content for payment reminder: Enter the message content for payment reminder notifications. This message will be sent based on the reminder schedule configured in the plugin
  • SMS provider: Choose the SMS provider you want to use. Create an account at https://www.twilio.com, https://www.nexmo.com, https://www.infobip.com or https://www.plivo.com, and login to your SMS account.
    • Nexmo (Vonage)
      • From number: The sender phone number that will appear on outgoing SMS messages
      • API Key: To get Nexmo API key and token, please read Where can I find my API key and API secret?
      • API Secret: To get Nexmo API key and token, please read Where can I find my API key and API secret?
      • Enable unicode: Only enable this option if your message contains Unicode characters because Unicode messages can only contain 70 characters, rather than the usual 160. There’s more information about this on the help page
    • Twilio
      • From number: The sender phone number that will appear on outgoing SMS messages
      • ACCOUNT SID: To get this credential, please read this guide
      • AUTH TOKEN: To get Twilio Access Token, please read Twilio API: Access Tokens
  • Bitly access token: If your SMS messages include shortened links, you can use Bitly to shorten URLs. Please read How to get Access Token
  • Send test SMS: Use this button to send a test SMS using the current configuration.


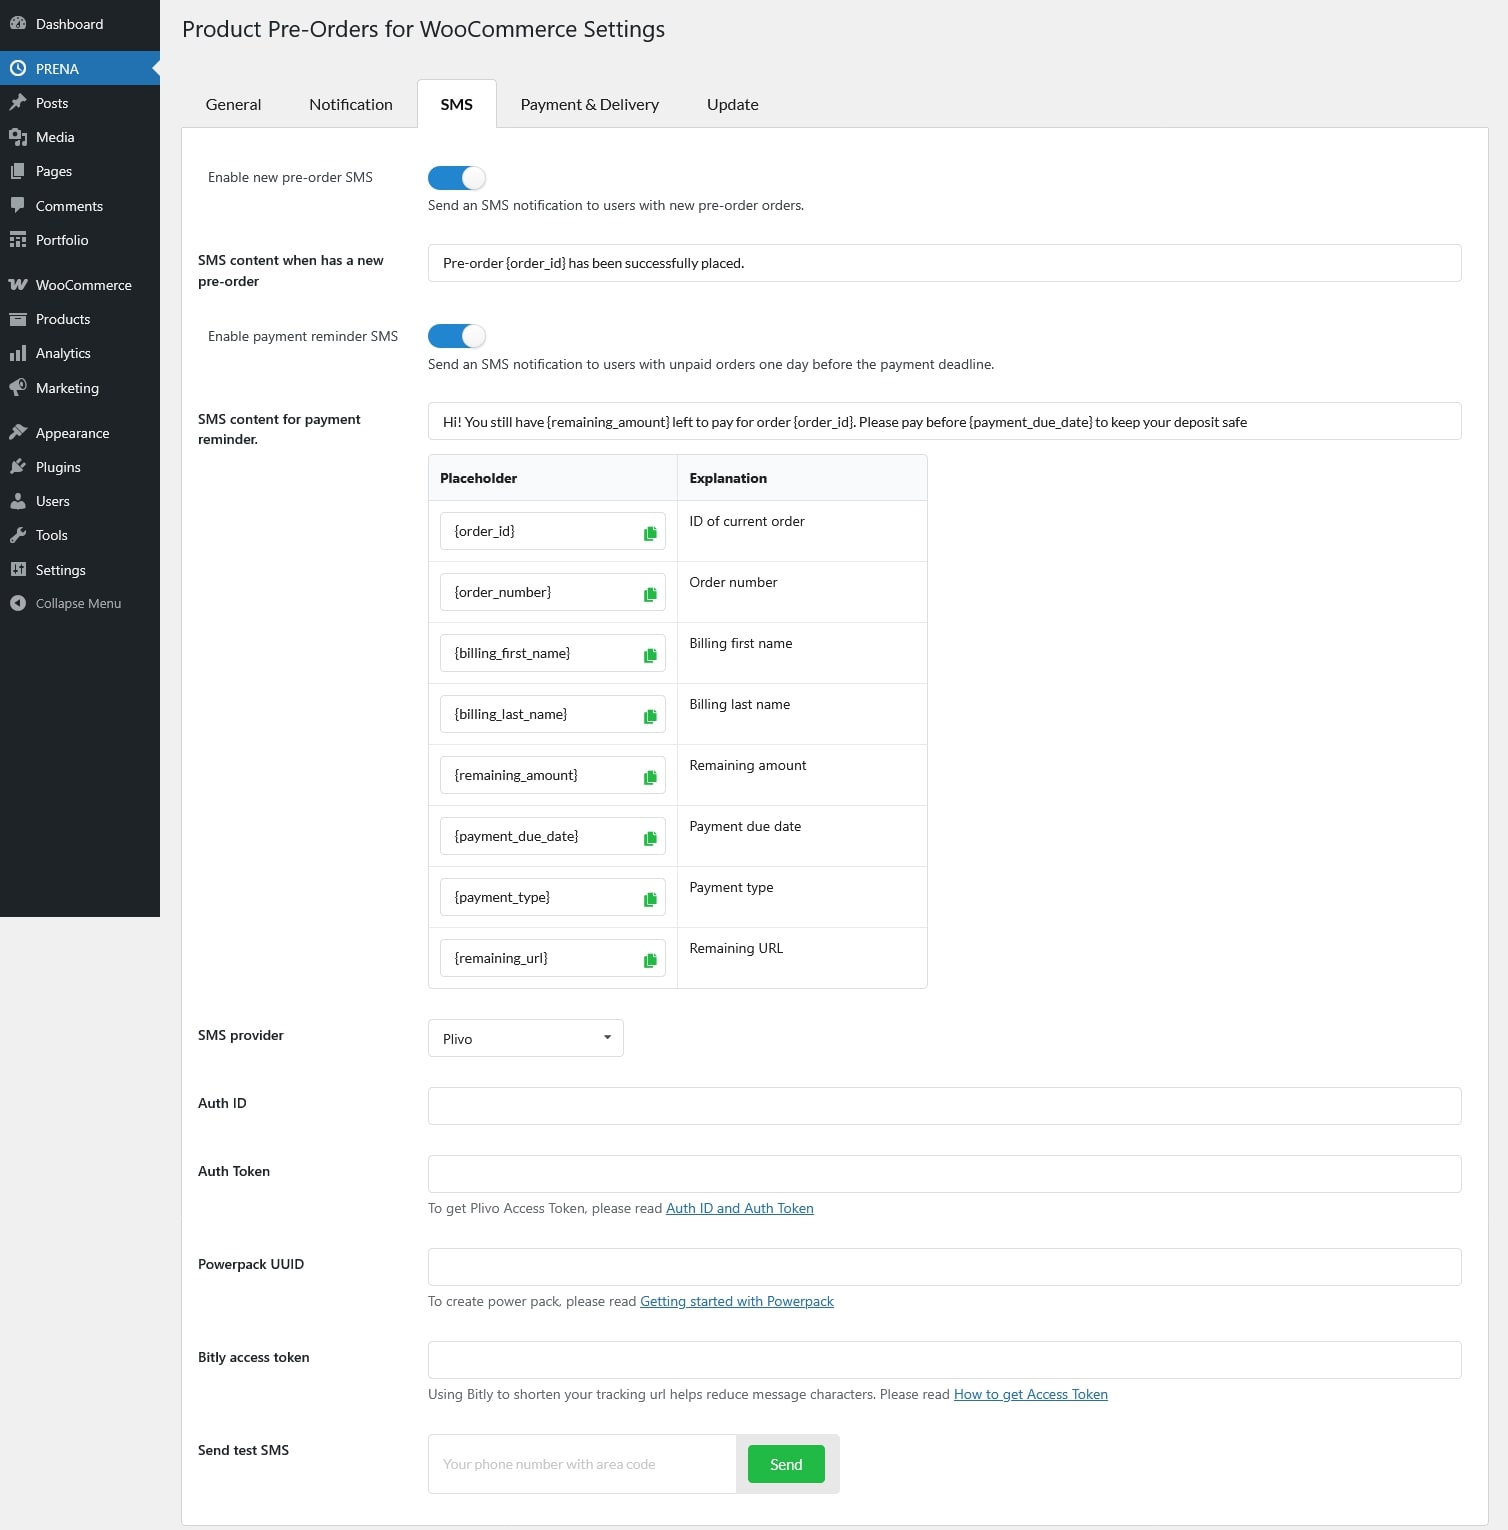
Supported placeholders for the SMS content:

  • {order_id}: ID of current order
  • {order_number}: Order number
  • {billing_first_name}: Billing first name
  • {billing_last_name}: Billing last name
  • {remaining_amount}: Remaining amount
  • {payment_due_date}: Payment due date
  • {payment_type}: Payment type
  • {remaining_url}: Remaining URL


Settings – Payment & Delivery

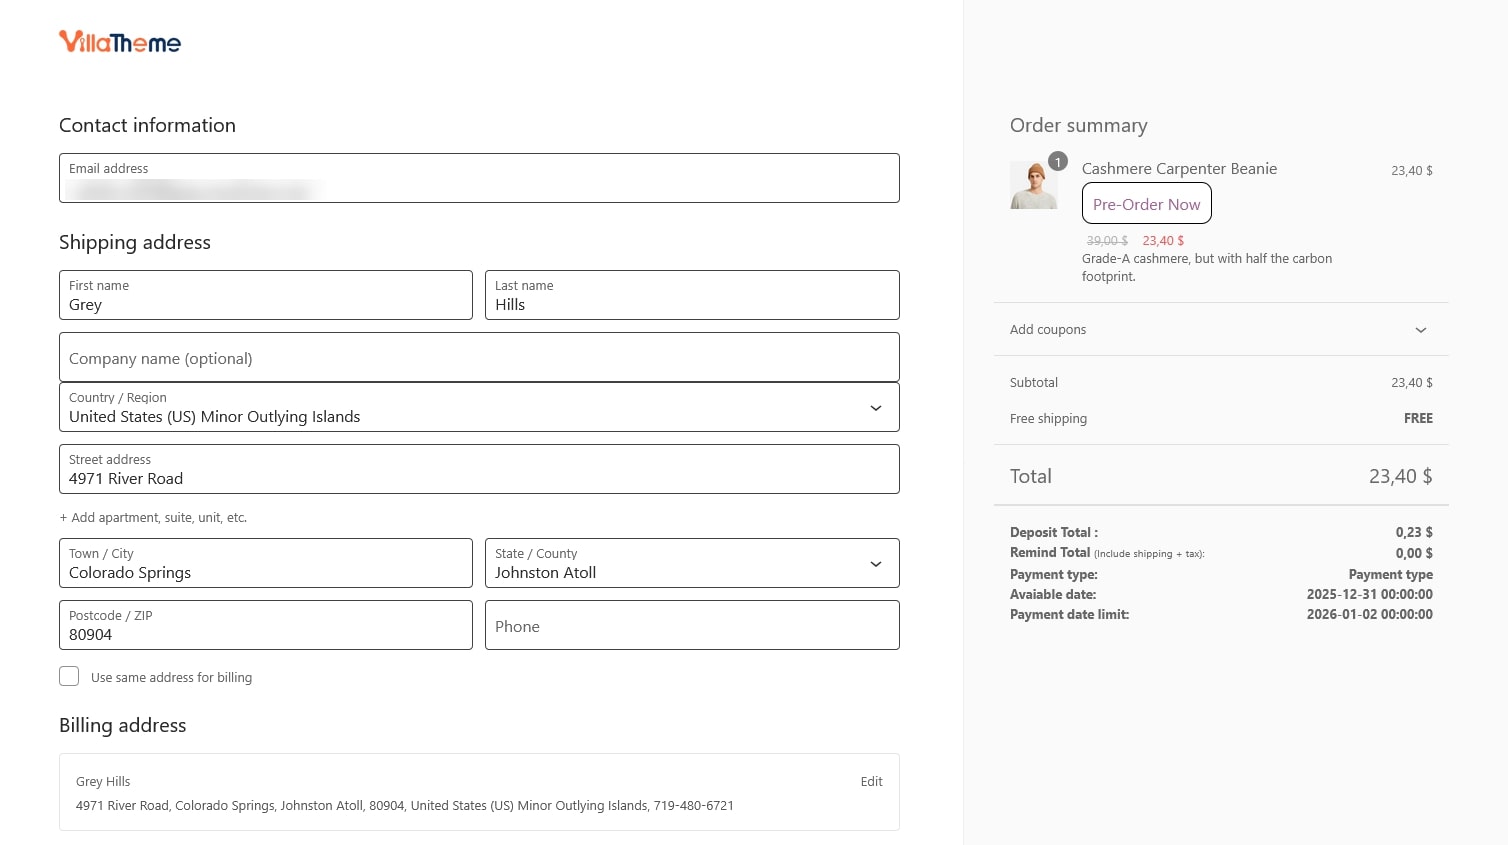
The Payment and Delivery tab allows you to configure how customers pay for pre-order products and how shipping is handled.

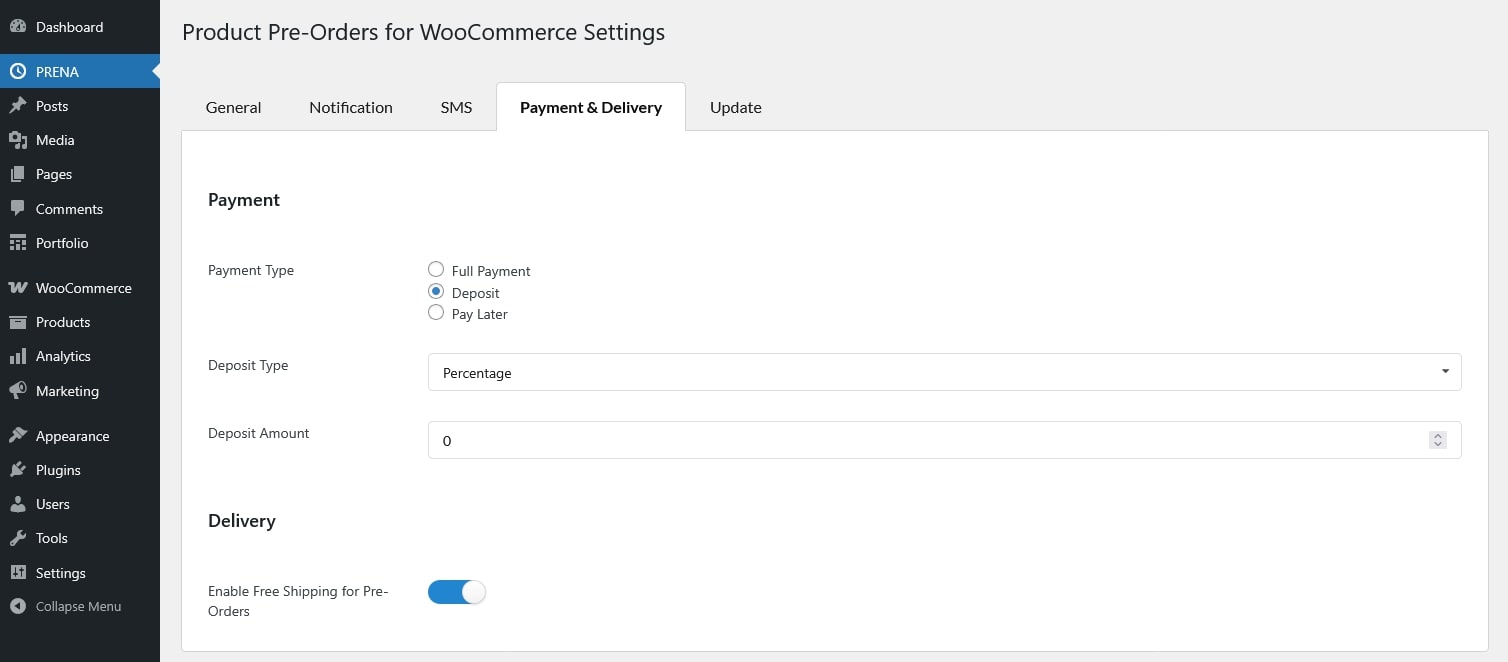
Payment: Control how pre-order payments are collected.

  • Payment Type: Choose how customers pay for pre-order items.
    • Full Payment: Customers pay the full product price upfront at the time of ordering.
    • Deposit: Customers pay a portion of the price now, and the remaining amount later.
      • Deposit Type: Define how the deposit is calculated if deposit payment is enabled.
        • Fixed: A specific fixed amount is charged as a deposit.
        • Percentage: A percentage of the product price is charged as a deposit.
      • Deposit Amount: Set the exact deposit value (fixed amount or percentage, depending on deposit type).
    • Pay Later: Customers will be required to pay the remaining balance once the product becomes available.


Delivery

  • Enable Free Shipping for Pre-Orders: Allow pre-order items to qualify for free shipping, even if they would not normally meet your store’s free shipping rules.


Single product page

You can configure pre-order options directly from the product editing page in WooCommerce. The settings are available for both simple products and variable products, with the same configuration fields once enabled


VARIABLE PRODUCTS

Check the Pre-Order checkbox for each variation that you want to enable for pre-order.


SIMPLE PRODUCTS

Check the Pre-Order checkbox. A new Pre-Order tab will appear where you can configure settings


Pre-Order Settings

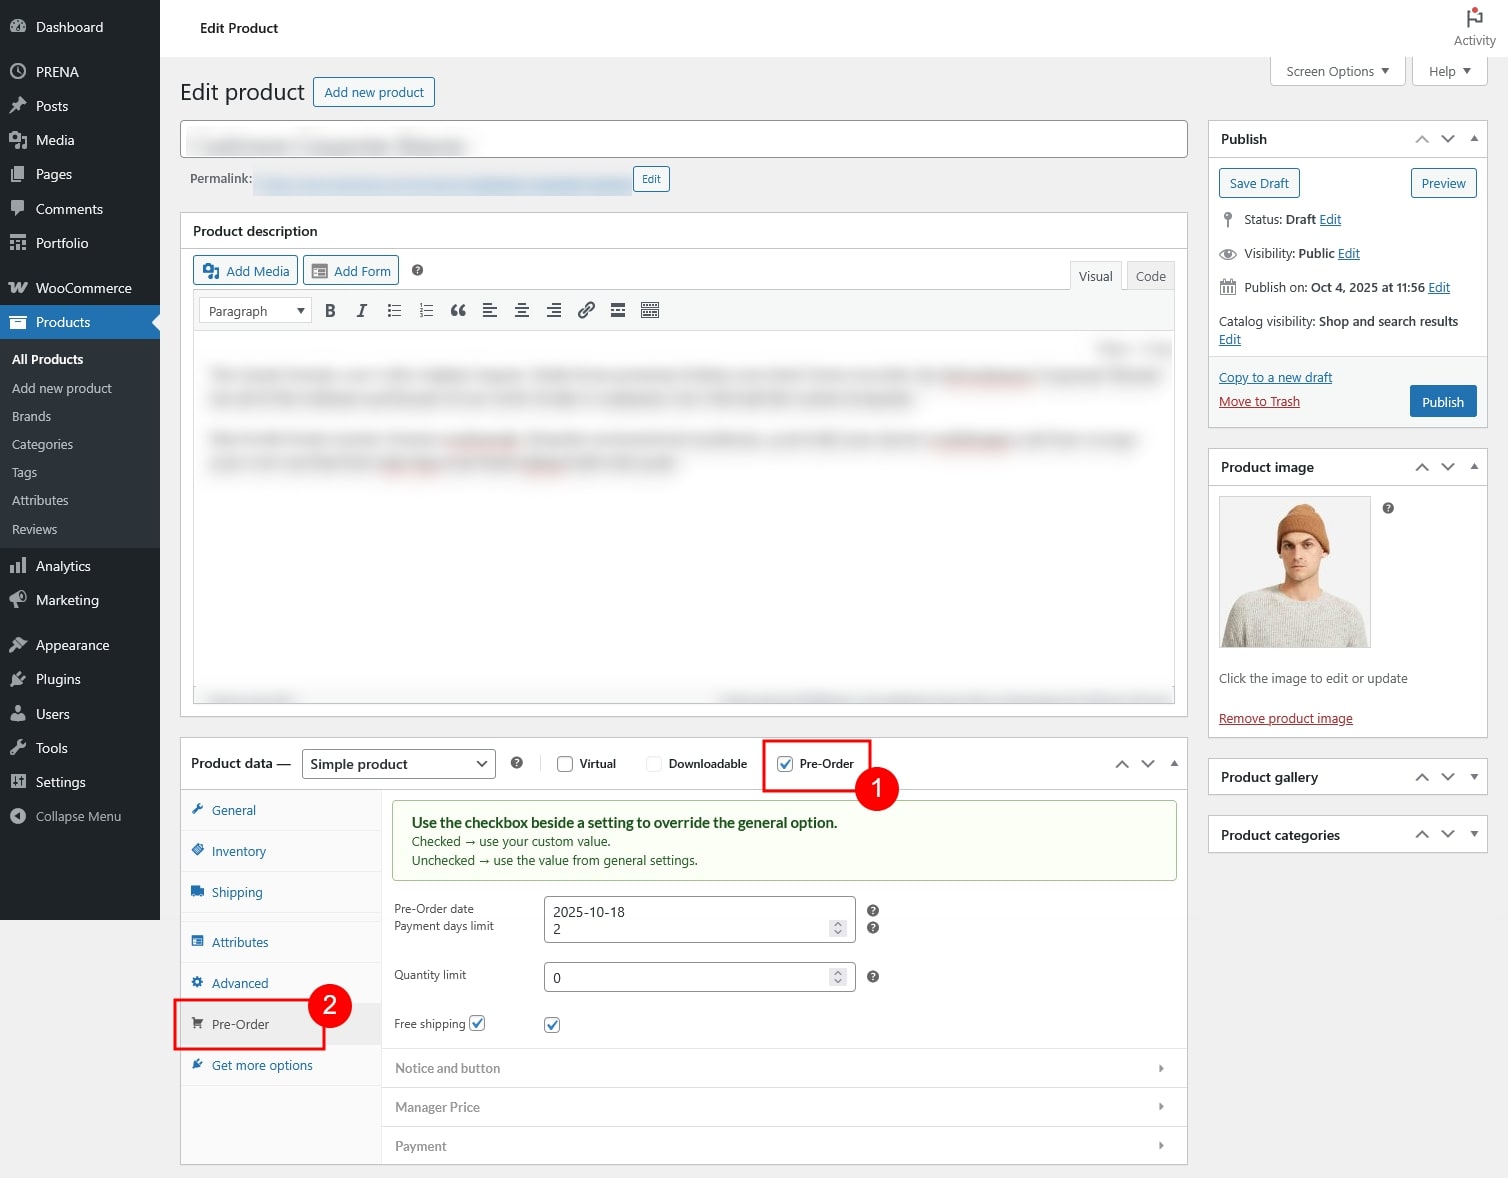
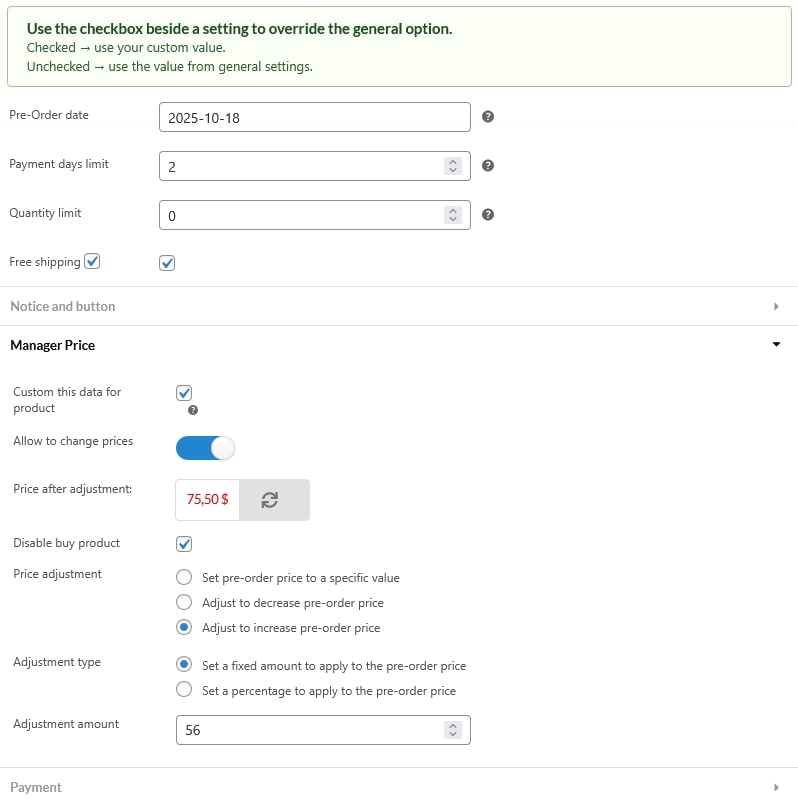
Each product can have its own pre-order configuration. By default, product settings follow the General Pre-order Settings. To customize a specific product, use the checkbox next to each option:

  • Checked → Use a custom value for this product
  • Unchecked → Use the value from the general settings

Once enabled, the following options are available for both simple and variable products:

Availability and Limitations
  • Pre-Order date: Set the date until the product becomes available.
  • Payment days limit: Define the maximum number of days allowed for customers to complete payment after placing a pre-order.
  • Quantity limit: Restrict how many units can be pre-ordered.
  • Free shipping: Enable free shipping for this pre-order product regardless of other shipping rules.
Notice and button

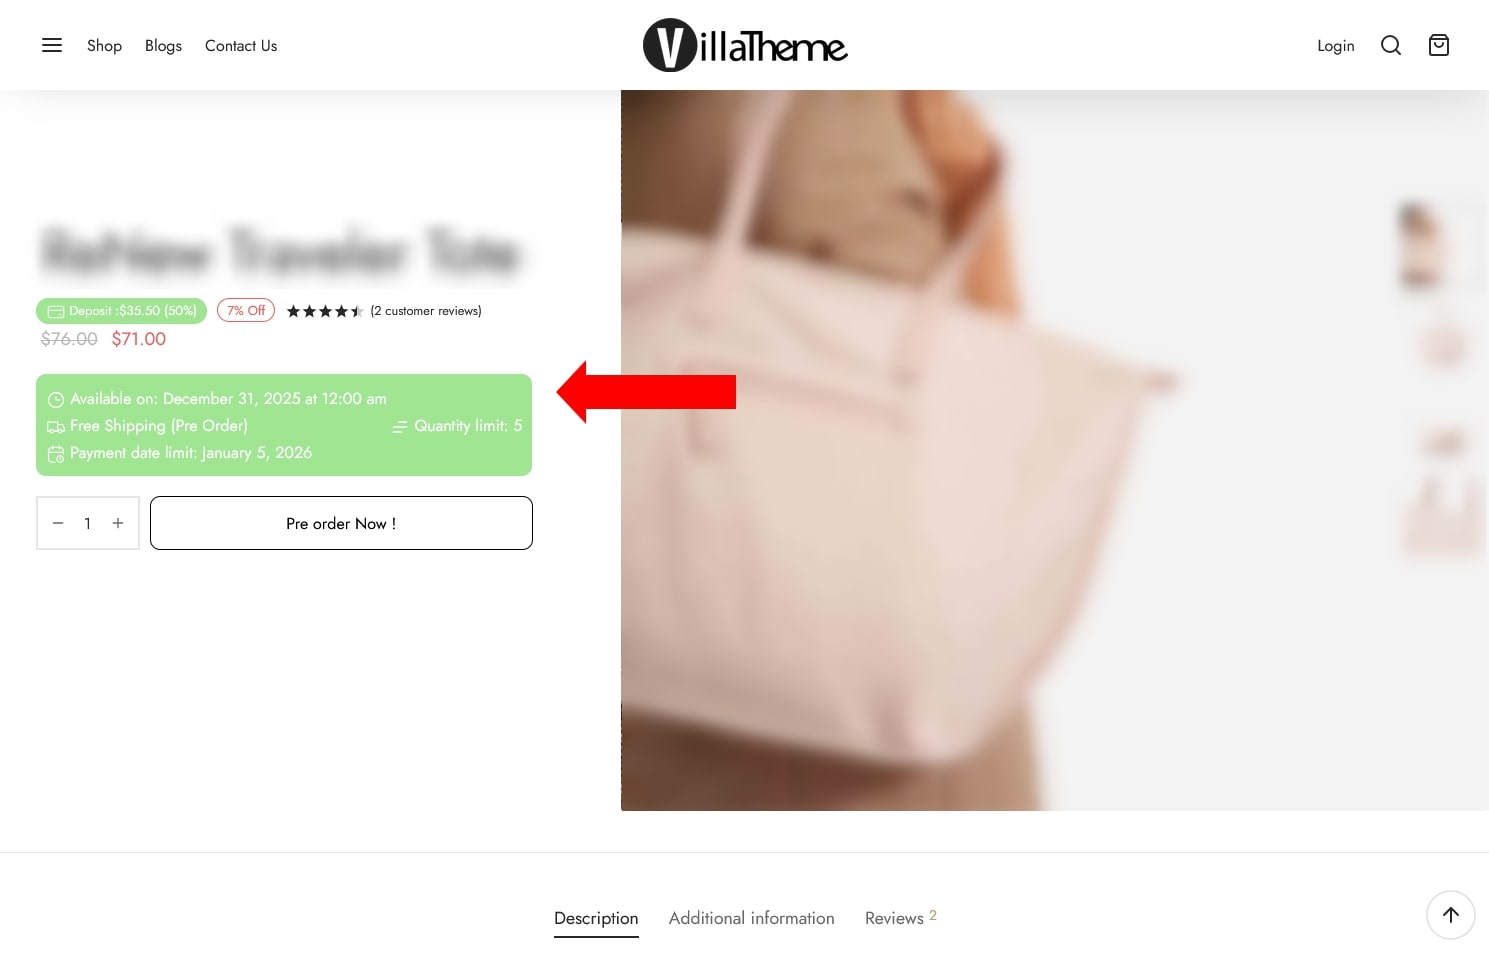
Customize the pre-order button text and product notice.

  • Pre-Order button text: Label of the Pre-Order button on single product pages
  • Pre-Order Cart Notice: Message displayed in the cart when the product is pre-ordered.
  • Pre-Order Product page notice: Message shown on the product detail page.
  • Pre-Order Shop page notice: Message displayed on shop/archive pages.


Manager Price

Control how the pre-order price is displayed or adjusted.

  • Custom this data for product: Check this option to enable the settings below it. If disabled, price are calculated by global rule under General settings
  • Allow to change prices: Enable pre-order price calculation based on the sale price.
  • Price after adjustment: Preview the pre-order price after applying pricing rules. Click the Refresh button whenever you update price calculation rules to see the latest result.
  • Disable buy product: Show pre-order pricing but prevent customers from purchasing.
  • Price adjustment: Set how the pre-order price is modified:
    • Set pre-order price to a specific value
    • Adjust to decrease pre-order price
    • Adjust to increase pre-order price
  • Adjustment type: Apply adjustments as a fixed amount or a percentage.
  • Adjustment amount: Enter the exact adjustment value to increase, decrease or set a fixed value for price


Payment

Configure how customers pay for this pre-order product.

  • Custom this data for product: Check this option to enable the settings below it. If disabled, price are calculated by global rule under Payment & Delivery settings
  • Payment preview: This section shows a real-time preview of how the pre-order payment will be split.
    • Pay Now Amount: The amount the customer is required to pay immediately when placing the pre-order.
    • Remaining Amount: The balance that will be paid later, based on the selected payment type and deposit settings.
  • Payment Type: Choose between full payment upfront or a deposit.
    • Full Payment: Customers pay the full product price when placing the order.
    • Deposit: Customers pay a partial amount now, with the balance due later.
      • Deposit Type:
        • Fixed: Charge a specific fixed amount as the deposit.
        • Percentage: Charge a percentage of the product price as the deposit.
        • Deposit Amount: Define the deposit value (fixed or percentage).
    • Pay Later: Customers will be required to complete the remaining payment once the product becomes available.


Design

The Design Settings tab allows you to customize how pre-order elements appear throughout your store. Access these tabs using “Go to Design” option under General settings or by going to Appearance > Customize > Prena WooCommerce Product Design

Pre-Order Button

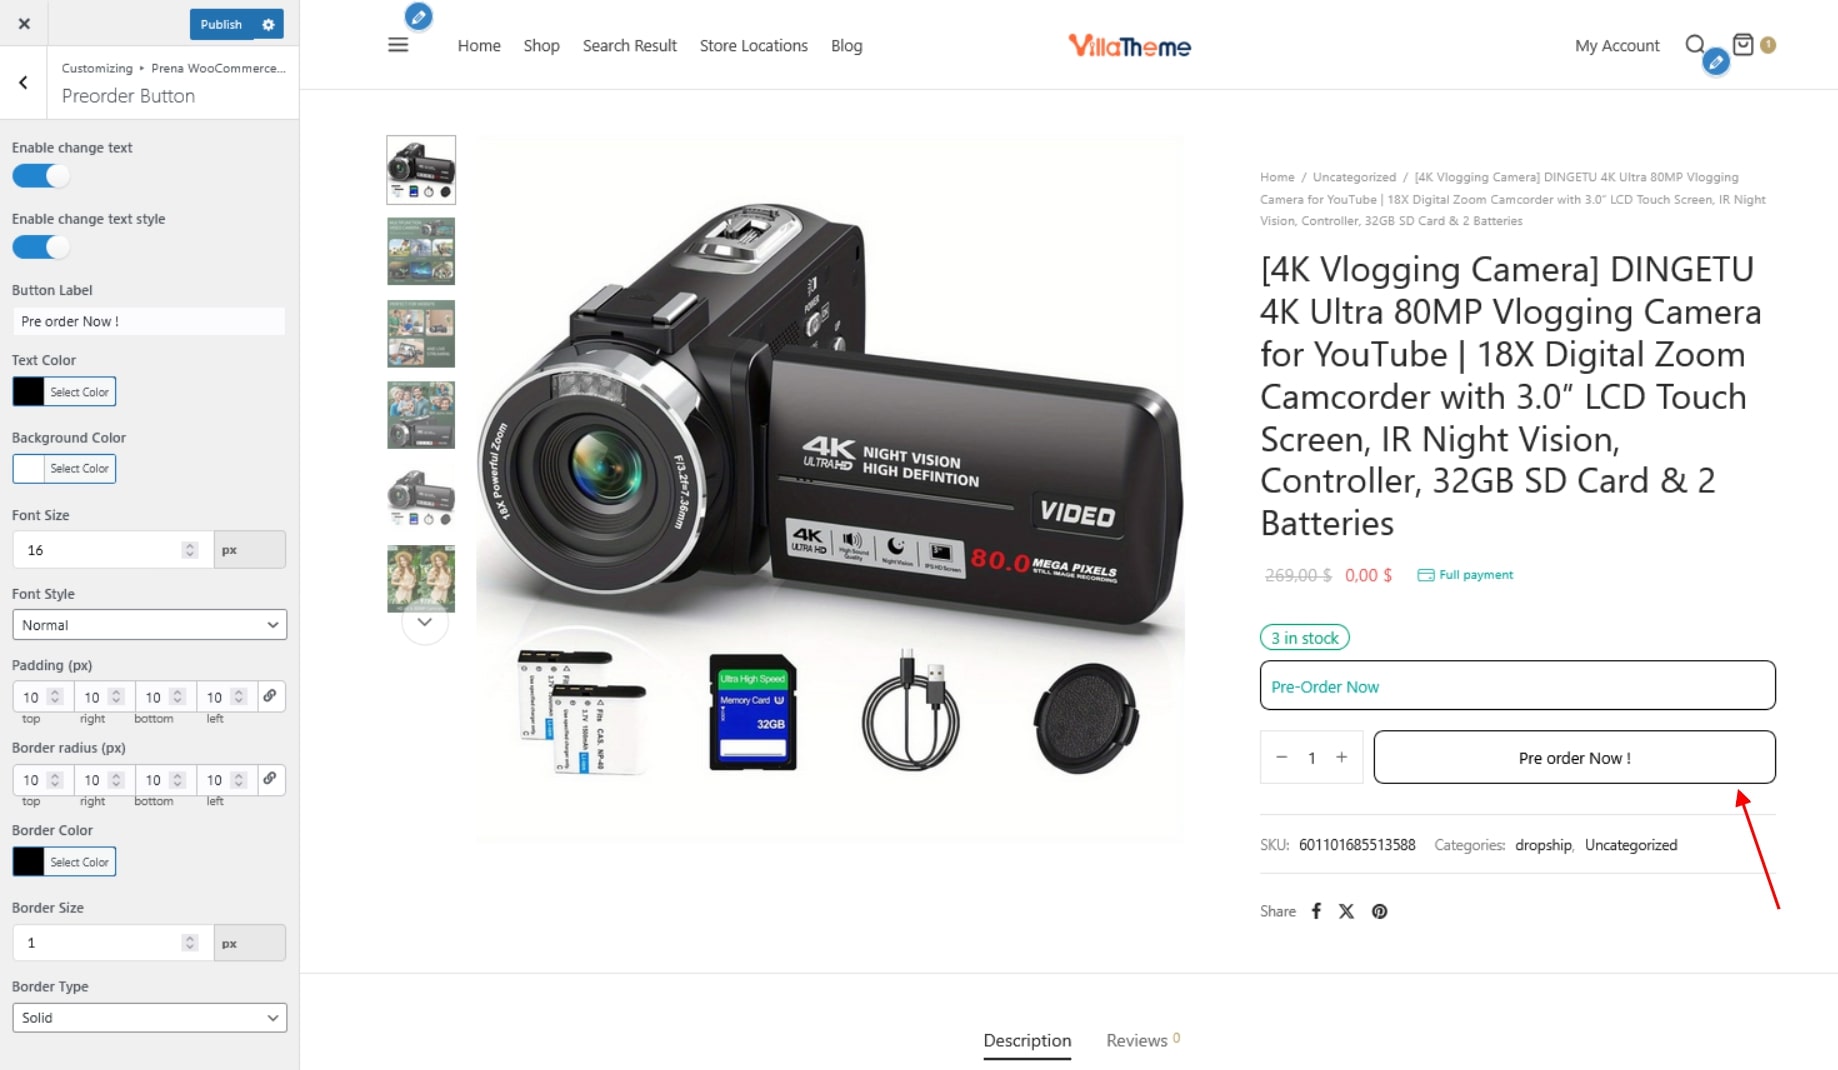
Customize the appearance of the pre-order button displayed on product and shop pages.

  • Enable change text: Allow editing of the default pre-order button label.
  • Enable change text style: Enable customization of the button design. Disable this option to use the theme’s default button style.
  • Button Label: Set the text displayed on the pre-order button.
  • Text Color: Choose the color of the button text.
  • Background Color: Set the background color of the button.
  • Font Size: Define the size of the button text.
  • Font Style: Choose the font style for the button text: Normal, Italic, or Oblique.
  • Padding (px): Control the inner spacing between the button content and its border.
  • Border radius (px): Adjust the roundness of the button corners.
  • Border Color: Set the color of the button border.
  • Border Size: Define the thickness of the button border.
  • Border Type: Choose the border style
    • Solid
    • Dashed
    • Dotted
    • Double


Cart Notice

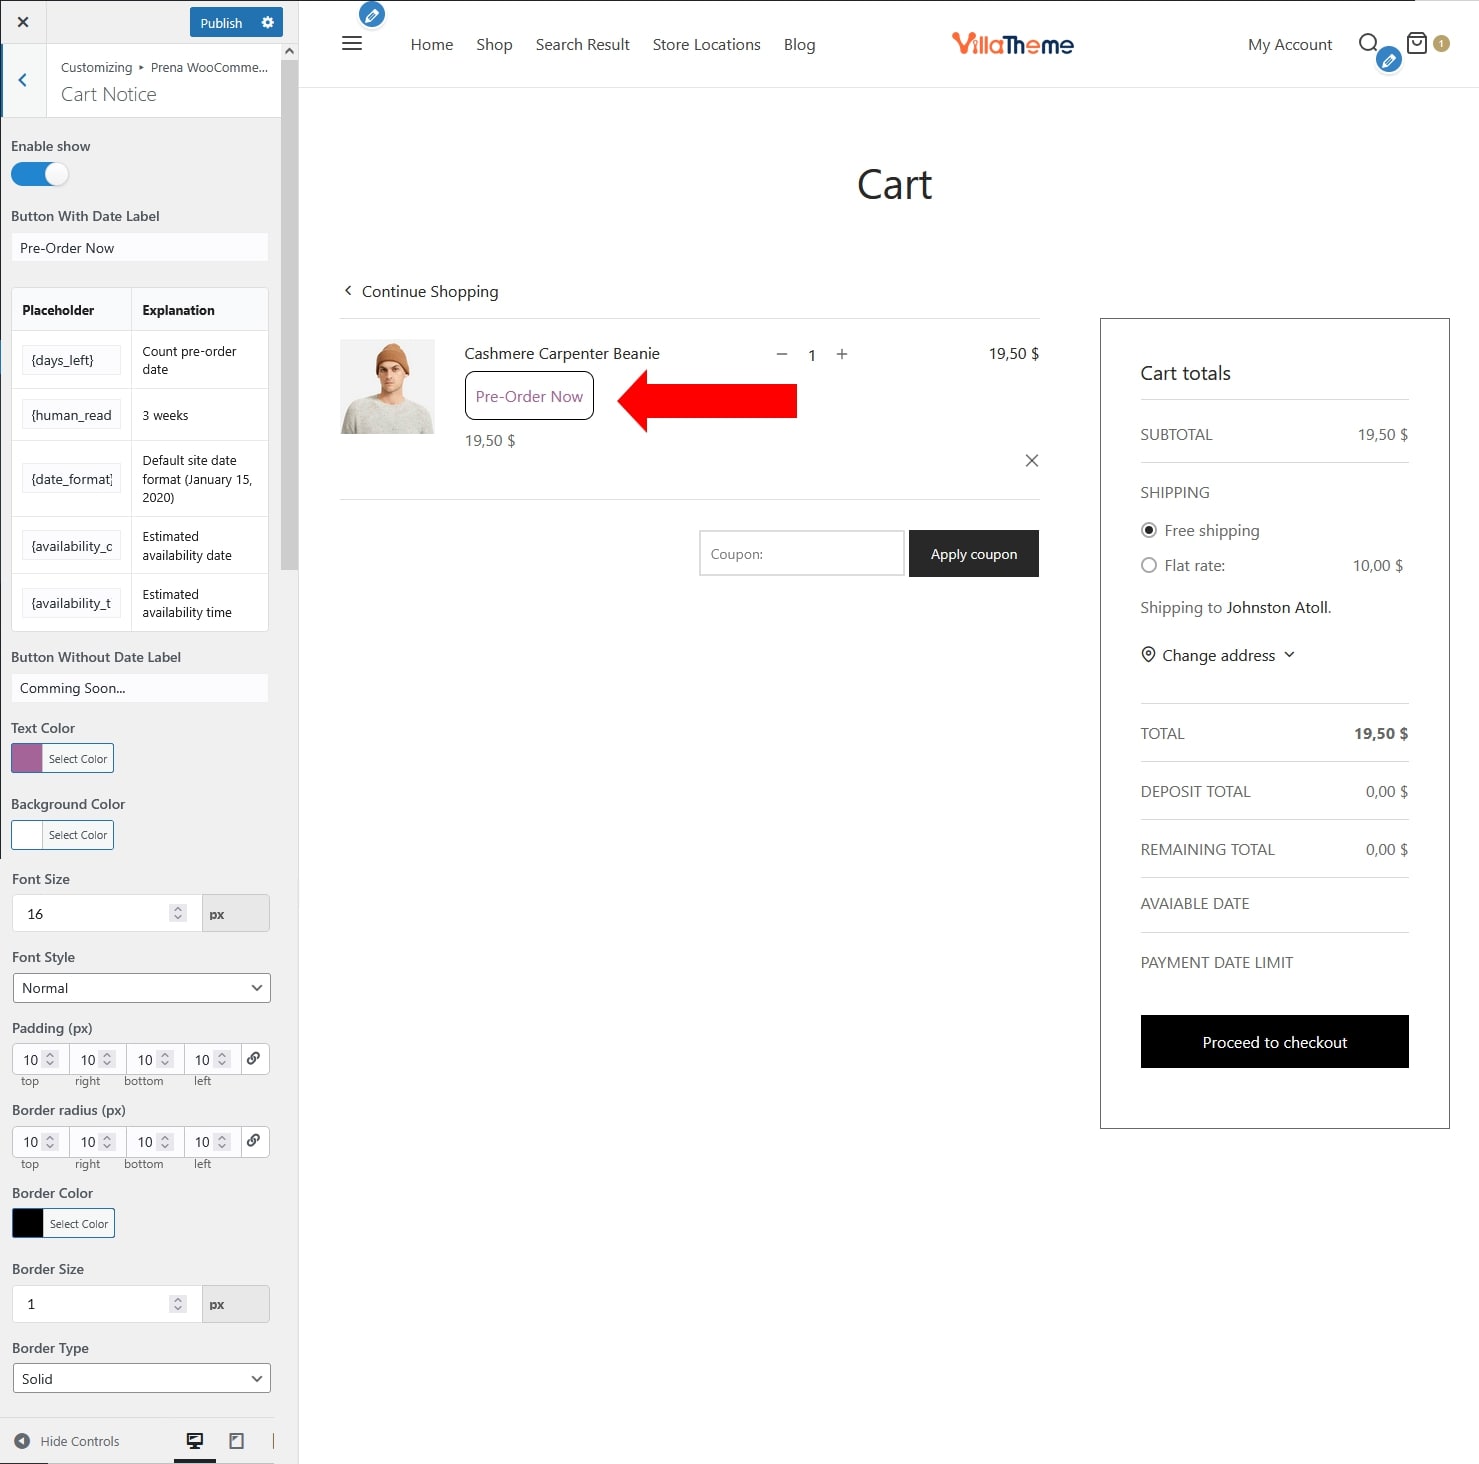
Add a customizable notice in the cart when it contains pre-order products.

  • Enable show: Enable or disable the cart notice for pre-order products.
  • Button With Date Label: Set the notice text when the pre-order product has an availability date.
    • Supported placeholders: {days_left}; {human_readable}; {date_format}; {availability_date}; {availability_time}
  • Button Without Date Label: Set the notice text when the pre-order product does not have an availability date.
  • Text Color: Choose the color of the notice text.
  • Background Color: Set the background color of the notice.
  • Font Size: Define the size of the notice text.
  • Font Style: Choose the font style for the notice text: Normal, Italic, or Oblique.
  • Padding (px): Control the inner spacing inside the notice.
  • Border radius (px): Adjust the roundness of the corners.
  • Border Color: Set the color of the border.
  • Border Size: Define the thickness of the border.
  • Border Type: Choose the border style
    • Solid
    • Dashed
    • Dotted
    • Double


Product Page Notice

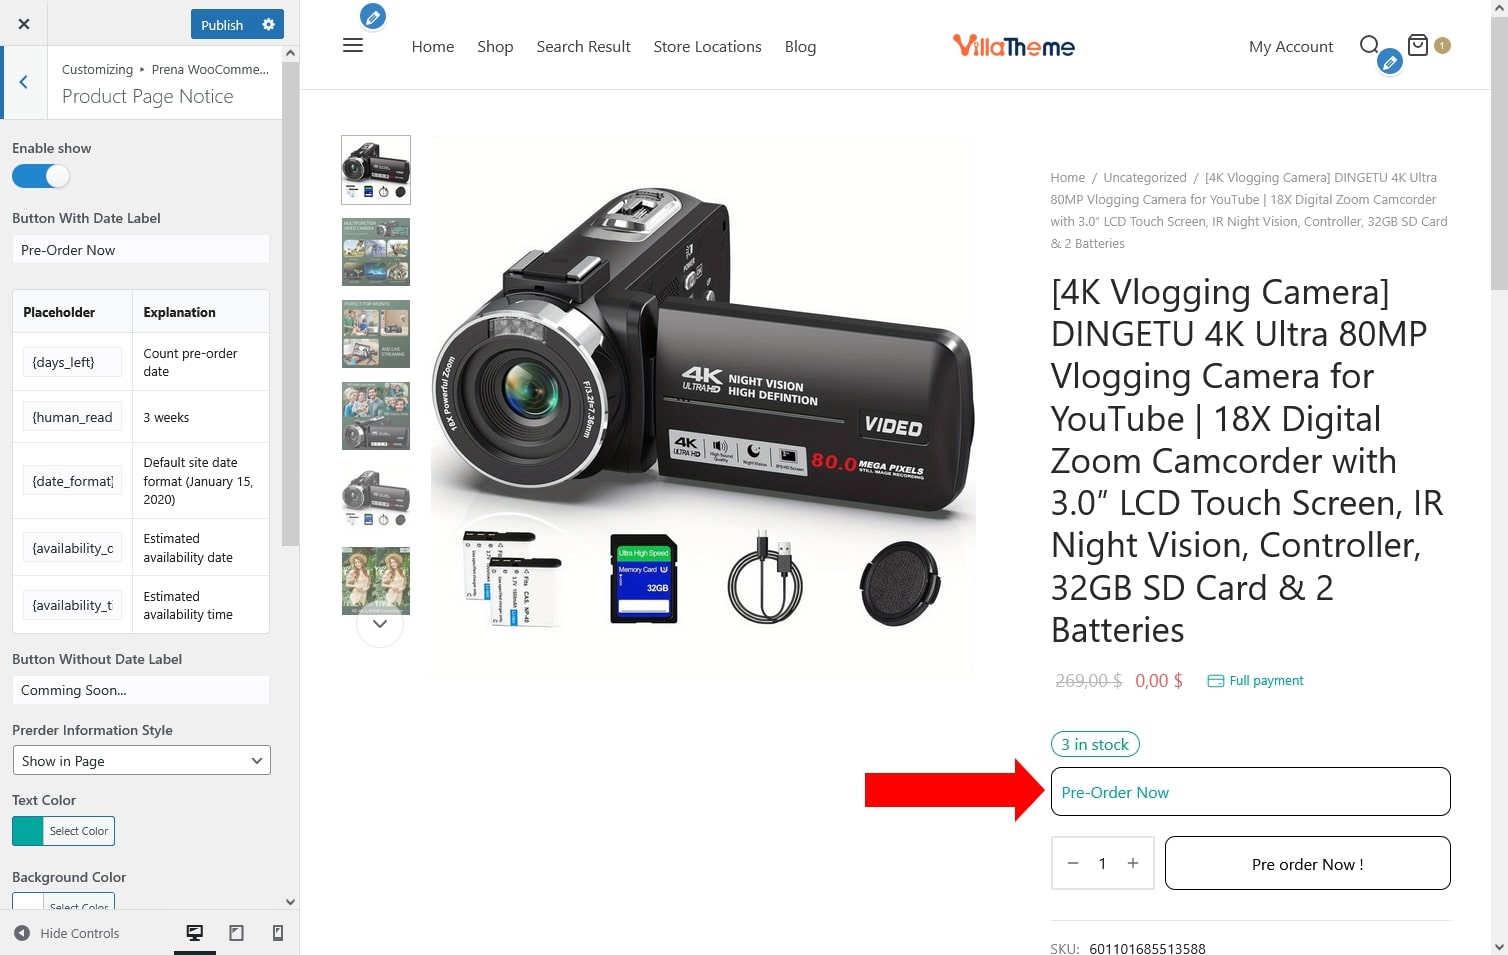
Display a pre-order notice on product detail pages.

  • Enable show: Enable or disable the pre-order notice on product detail pages.
  • Button With Date Label: Set the notice text when the pre-order product has an availability date.
    • Supported placeholders: {days_left}; {human_readable}; {date_format}; {availability_date}; {availability_time}
  • Button Without Date Label: Set the notice text when no availability date is defined.
  • Prerder Information Style: Choose how the notice is displayed – Show in Page or Show in Popup.
  • Text Color: Choose the color of the notice text.
  • Background Color: Set the background color of the notice.
  • Font Size: Define the size of the notice text.
  • Font Style: Choose the font style for the notice text: Normal, Italic, or Oblique.
  • Padding (px): Control the inner spacing inside the notice.
  • Border radius (px): Adjust the roundness of the corners.
  • Border Color: Set the color of the border.
  • Border Size: Define the thickness of the border.
  • Border Type: Choose the border style
    • Solid
    • Dashed
    • Dotted
    • Double


Shop Page Notice

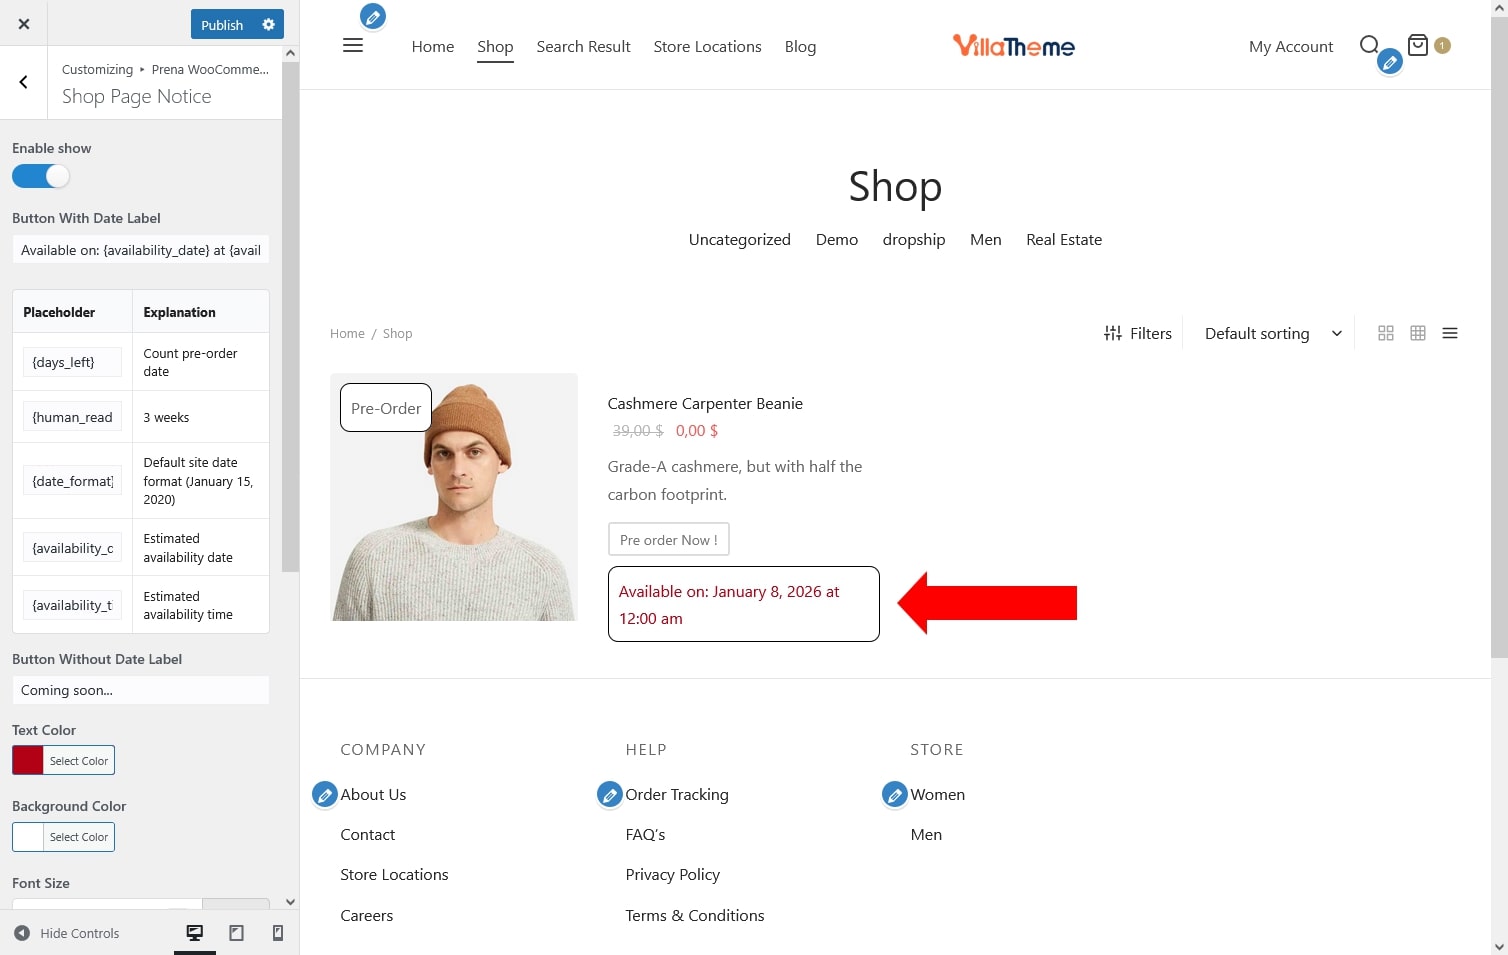
Show a pre-order notice on product listings in the shop/archive pages.

  • Enable show: Enable or disable the pre-order notice on shop and archive pages.
  • Button With Date Label:Set the notice text when the pre-order product has an availability date
    • Supported placeholders: {days_left}; {human_readable}; {date_format}; {availability_date}; {availability_time}
  • Button Without Date Label: Set the notice text when no availability date is available.
  • Text Color: Choose the color of the notice text.
  • Background Color: Set the background color of the notice.
  • Font Size: Define the size of the notice text.
  • Font Style: Choose the font style for the notice text: Normal, Italic, or Oblique.
  • Padding (px): Control the inner spacing inside the notice.
  • Border radius (px): Adjust the roundness of the corners.
  • Border Color: Set the color of the border.
  • Border Size: Define the thickness of the border.
  • Border Type: Choose the border style
    • Solid
    • Dashed
    • Dotted
    • Double


Badge

Add a badge to highlight pre-order products in the shop or product pages.

  • Enable change text: Enable or disable the pre-order badge.
  • Badge Text: Customize the text displayed inside the badge.
  • Enable Icon: Enable or disable an icon displayed with the badge text.
  • Icon File: Choose an icon to display in the badge.
  • Text Color: Choose the color of the badge text.
  • Border Type: Choose whether the icon appears before or after the badge text.
  • Display Position: Select the badge placement
    • On Thumbnail – Top Left
    • On Thumbnail – Top Right
    • On Thumbnail – Bottom Left
    • On Thumbnail – Bottom Right
    • Before Item Title
    • After Item Title
    • Before Item
    • After Item
  • Background Color: Set the background color of the badge.
  • Font Size: Define the badge text size.
  • Font Style
    • Normal
    • Italic
    • Oblique
  • Spacing: Adjust the distance between the badge icon and the badge text.
  • Page To Display: Define where the badge will appear
    • Shop / Archive Page
    • Related / Widgets
    • Search Page
  • Padding (px): Adjust spacing inside the badge.
  • Border Radius (px): Set roundness of the badge corners.
  • Border Color: Set the color of the border.
  • Border Size: Define the thickness of the border.
  • Border Type: Choose the border style
    • Solid
    • Dashed
    • Dotted
    • Double


EXTRA INFORMATION


Thank you for your attention!

If you have any questions, please create a topic at our FORUM, we will support within 24 hours.