WooCommerce Product Builder


Created: 04/2017

Latest updated: 5/2024 – Updated version: 2.2.6

By: VillaTheme

Thank you for purchasing our plugin. If you have any questions that are beyond the scope of this documentation, please feel free to request support at our Support Forum. Thanks so much!

WooCommerce Product Configurator appears to be a must-have app for any component and part building pages, particularly PC builder pages. Imagine if customers could go through the process of building a PC and selecting the components and parts they want through steps. That would be incredible, and that is what WooCommerce Product Configurator can provide.

WooCommerce Product Builder is a supportive plugin that allows your customers to build a full product set from small parts step by step. This plugin works as a WooCommerce Product Configurator based on the WooCommerce platform, promising to provide you with many useful features like compatible, email completed product, attributes filters …


PLUGIN MAIN FEATURES:

CREATING WOOCOMMERCE PRODUCT CONFIGURATOR PAGE

WooCommerce Product Builder helps create as many WooCommerce Product Configurator pages as you want, builds complete products step by step. You can set up steps, in each step, there will be products. You will decide which products will appear in a step then customers will pick one or more from those products in this WooCommerce Product Configurator plugin.

  • Create Product Builder pages: Each product builder will display on the front-end as a page, customers will build their products on this page. You can add as many product builders as you want.
  • Multiple steps: Add as many steps as you need, so customers can select products contained in each part.
  • Add/ remove steps: Easy to plus or remove steps in each product builder.
  • Change step name: Name for each step like STEP 1 – Mainboard, STEP 2 – CPU…
  • Select product and categories for each step: You can select which products and categories that will appear in each step and then customers can pick up one (or more) in those steps.
  • Search: The search bar available allows you to quickly look for a product or category.
  • Icon of step: You can add an icon that stands for a step in general.


SETTINGS ON THE PRODUCT BUILDER PAGES

  • Text prefix each step:  Quickly name each step with a fixed part and use the shortcode {step_number} to display the number of current steps.
  • Description: Add a description to tell more what a product builder page is for, this description will appear under the product builder page name, applied for the Classic template only.
  • Sort default: You can sort items on a product builder page in order: Title A-Z, Title Z-A; Price low to high, Price high to low, or Sort by latest. Choose a default option you want.
  • Child categories: Display all products in child categories.
  • Select multiple products: Allow customers to add more than one product in each step. If this option is disabled, when customers select a product they will be automatically redirected to the next step.
  • Quantity field: This option allows customers to select products quantity. If this option is disabled, the quantity will be set as 1.
  • Preview button always shows: The preview feature allows customers to view their full product before purchase. The preview page will appear in the last step, by enabling this option you will allow customers to visit the preview page from any step.
  • Add to cart always shows: If disable this option, the add to cart button only displays in the final step.
  • Remove all buttons: Enable to display the remove all button on the product builder pages.
  • Search product form: Enable if you want to display search products form by ajax.
  • Product is required for each step: To move to the next step, customers must select at least a product in the previous steps.
  • Out of stock products: Enable it to display out-of-stock products on the product builder page.
  • Hide zero price product: Enable it to hide the products which have zero prices.
  • Remove product title link: Not redirect to the single product page when clicking on the product title on the product builder pages
  • Product per page: Set the maximum number of products per builder page.

THE DEPEND FEATURE IN WOOCOMMERCE PRODUCT CONFIGURATOR

Make sure all selected product parts will work properly. The Depend feature works based on attributes values. For example: In STEP 1 – CPU, customers select a CPU with the attribute “Socket” has its value as “LGA 1151”, then in STEP 2 – Mainboard he will find only mainboards which have the socket LGA 1151 (this attribute value must be added to products)

ATTRIBUTE WIDGET IN WOOCOMMERCE PRODUCT CONFIGURATOR

Attribute widgets help your customers to easier to find the product they want to purchase. To enable attribute widgets, visit Appearance/ Widgets, look for WC Product Builder Widgets, and drag/drop them to WC Product Builder Sidebar Area. Please take note that the plugin will not work with custom attributes. To add/edit attributes, please visit Products/ Attributes

  • Price Filter: Allow customers to find products in a price range.
  • Rating Filter: Allow customers to find products based on ratings.
  • Attribute Filter: Allow customers to find products based on attributes. Like color, brand…

PREVIEW PAGE

After finishing building a product, customers can review it again on the preview page. This page will display information about product names, prices, quantity, total price. Then customers can select to check-out or email the completed product.

SEND AN EMAIL CONTAINING SELECTED PRODUCTS USING WOOCOMMERCE PRODUCT CONFIGURATOR

There is a Send email to your friend button on the selected product list page, customers can share their selected products via emails.

  • Shortcode: There are 3 shortcodes to help you configure the emails.
    {email}: sender email
    {subject}: email subject
    {message_content}: products information
  • “Thank you” message: A message notice customers that their products have been sent successfully.
  • Customize email content: Flexible build the email content with available shortcodes.

DESIGN

The plugin offers many options to change the front-end design.

  • Template: There are 3 different templates of the product builder page that you can select to display on the front end.
    • Classic
    • Modern
    • Ajax
  • Text color: Change the button text color
  • Background color: Change the button background-color
  • Primary text color: Change the button text hover color
  • Primary background color: Change the button background hover color
  • Button Icon: Select the button icon style. There are 2 styles of text and icon.
  • Custom CSS: Add your own CSS code to configure the front-end style as you want.

PRINT AND PDF

After assembling a set of component products, you can export the selected product list to a PDF file and print it on the preview page.

  • Print button: Enable to display the print button on the preview page, and use the print function.
  • Download PDF button: Enable to display the Download PDF button on the preview page, and use the download PDF function.
  • Show short description: Enable to display the product short description in the PDF file and printed file.
  • Header of layout: Customize the content of the header using available shortcodes.
  • Footer of layout: Customize the content of the footer using available shortcodes.

OTHER USEFUL FEATURES

  • Support control bar on mobile mode: This feature helps to display a control bar and at the bottom of the product builder page, when clicking the menu on the bar, the detailed table of selected products will show up.
  • Distance from bottom: Control the space from the bar to the bottom.
  • Design control bar: You can change the text color and background color of the control bar.
  • Display share link: Copy and share a URL that links to the selected products.
  • Remove short share link records after x day(s): Automatically clear the short share link after a certain day you set.
  • Custom CSS: Design the product builder page as you want.
  • Support service.

System Requires:

  1. WordPress 5.0+
  2. PHP 7.0+
  3. WooCommerce 7.0+


Download Plugin:

Go to Plugin/ Add New/ Upload Plugin/ Choose file/ select the plugin zip file/ click “Install Now”/ click “Active plugin”.

Done! Let’s start using the plugin.

Video install and set up WooCommerce Product Builder


After installing and activating the plugin, create your first product builder page.


Add new Product builders

A. Create new product builder pages

Step 1: Go to Dashboard > Product Builders > Add new 


Step 2: Configure on a product builder page.

a. Enter the product builder page name and configure products and categories for each step. Go to the Product Builder page section in the How does it work to discover more.


b. Configure the product builder page settings. Go to the Product Builder page section in the How does it work to discover more.


Step 3: Configure in the general settings.

Go to Product builders > Settings, in the settings section, you can design the builder page such as buttons, view on mobile, and others. Configure the product list email shared with other users. Go to the Settings section in the How does it work to discover more.


Customer choose products

There are 3 templates of the product builder page displayed on the front-end including Ajax; modern, and classic. Go to the Settings section to select the template.

Template 1. Modern


1. Product selection: Customers choose products in each step in this area.

2. Selected product list: List the selected products in steps.

3. Sort products: Sort products as you want in order A-Z; Z-A; Price low to high; Price high to low; Sort by latest.

4. Move to, back steps: Go to the following or previous steps by clicking the arrow buttons.


Template 2. Ajax


Template 3. Classic

Preview page

After finishing all steps, or by clicking on the Preview button, customers will be redirected to the preview page. All products, quantities, prices and the total price will be listed here. Customers can choose to add all products to the cart and then checkout or send the complete product via email. Go to the Settings section to configure the options on the preview page.


The Depend feature

How to use the Depend feature on WooCommerce Product Builder?

  • Please keep in mind that WooCommerce Product Builder uses Attributes (not apply for custom attributes) to detect which products are compatible among different steps.

For example: you set a value – Red of the attribute – Color for some products in the categories: Women and Children.

  • Go to Product Builder Edit page at Dashboard/ Product Builder/ *Your Product Builder*

On this page, you want to set the “Children” categories at step 3 will follows the “Women” categories at step 1.

Scroll down the page, you will find the Depend part. The children category will be depended on the Women category, or it can be expressed that all products in the children category which have the attribute – Color and  value – Red will appear if you selected a product with the red value in the Women category.

Done. Now after customers select an attribute with Red value in the first step (Women category), they will find only products which have the red value in the third step (Children category)

Attribute Widgets

Attribute Widgets helps customers to search product by attributes on front-end.

To display attribute widgets on front-end, go to Dashboard/ Appearance/ Widgets and look for WC Product Builder Price Filter, WC Product Builder Rating Filter and WC Product Builder Attribute Filter. Drag and drop these widgets into WC Product Builder Sidebar. Take note that you may need to add the widget WC Product Builder Attribute Filter many times because each attribute will cost a widget.

In each widget settings, you can edit the widget title and click on the Attribute to select an attribute slug.


Product Builder Page

Create new products builder pages, edit existing product builder pages in the list.

Go to Dashboard > Product Builders. You can Add new/ Remove product builder pages here.

1. Add new: Click to add a new product builder page.

2. Existing product builder page: The product builder pages which are generated on your site.

  • “Title” column
    • Edit: Go to the editing page of the product builder product
    • Quick Edit: Edit title, slug, status, published date, add password or mark private of the product builder right on this Product Builders list
    • Trash: Remove a product builder
    • Duplicate: Clone the current product builder
  • “Shortcode” column: Simply click the shortcode to copy it, then you can place it anywhere to display the associated product builder
  • “Date” column: This column simply displays the published date of each product builder for overview


1. Product Builder name: Name for your product builder page.

2. Permalink: The URL of the product builder page, you can edit the URL

3. Shortcode: A shortcode of the product builder is generated that allows you to put the product builder everywhere.

Guide steps:

3.1.  Copy the shortcode

3.2.  Go to Pages > Add new product builder page.


3.3. Name for the page, add shortcode there and save.

4. Select categories/products: Show categories/ products to select for each step.

5. Search product/category: This tool helps you to search for a product/category quickly when you have a lot of products/categories.

6. The visible area of products and categories: When you select categories/products in (4), the categories/products will show in this area for you to choose.

7. Add a new step: Click to add a new step, a box appears to add the name of the step, you can edit the name, change categories/products in each step by clicking on that category/product in that step.

8. Step icon: Set an icon for each step to make a step more outstanding.


1. Text prefix each step: Auto names the step with the certain text prefix and suffix.

2. Description: Enter the step description to tell more what the step is.

3. Sort default: You can sort items on a product builder page in order: Title A-Z, Title Z-A; Price low to high, Price high to low, or Sort by latest. Choose a default option you want.

4. Children categories: Get all products in children categories

5. Add many products in step: Allow to select more than one product in a step.

6. Quantity field: Enable to show the quantity option if the customer needs more than one. Deactivate this option if you default the quantity 1.

7. Preview button always show: Show the preview button in every step.

8. Add to cart button always show: If disable this option, the add to cart button only displays in the final step.

9. Remove all buttons: Remove all the selected items in all steps.

10. Search product form: Display search products form by ajax

11. Product is required for each step: Enable this option if each step is mandatory to choose. The customer can not skip any steps.

12. Out of stock products: Enable it to display out-of-stock products on the product builder page.

13. Hide zero price product: Enable it to hide the products which have zero prices.

14. Remove product title link: Not redirect to the single product page when clicking on the product title on the product builder pages


Settings

Set up WooCommerce Product Builder settings at Dashboard/ Product Builder/ Settings


A. Design

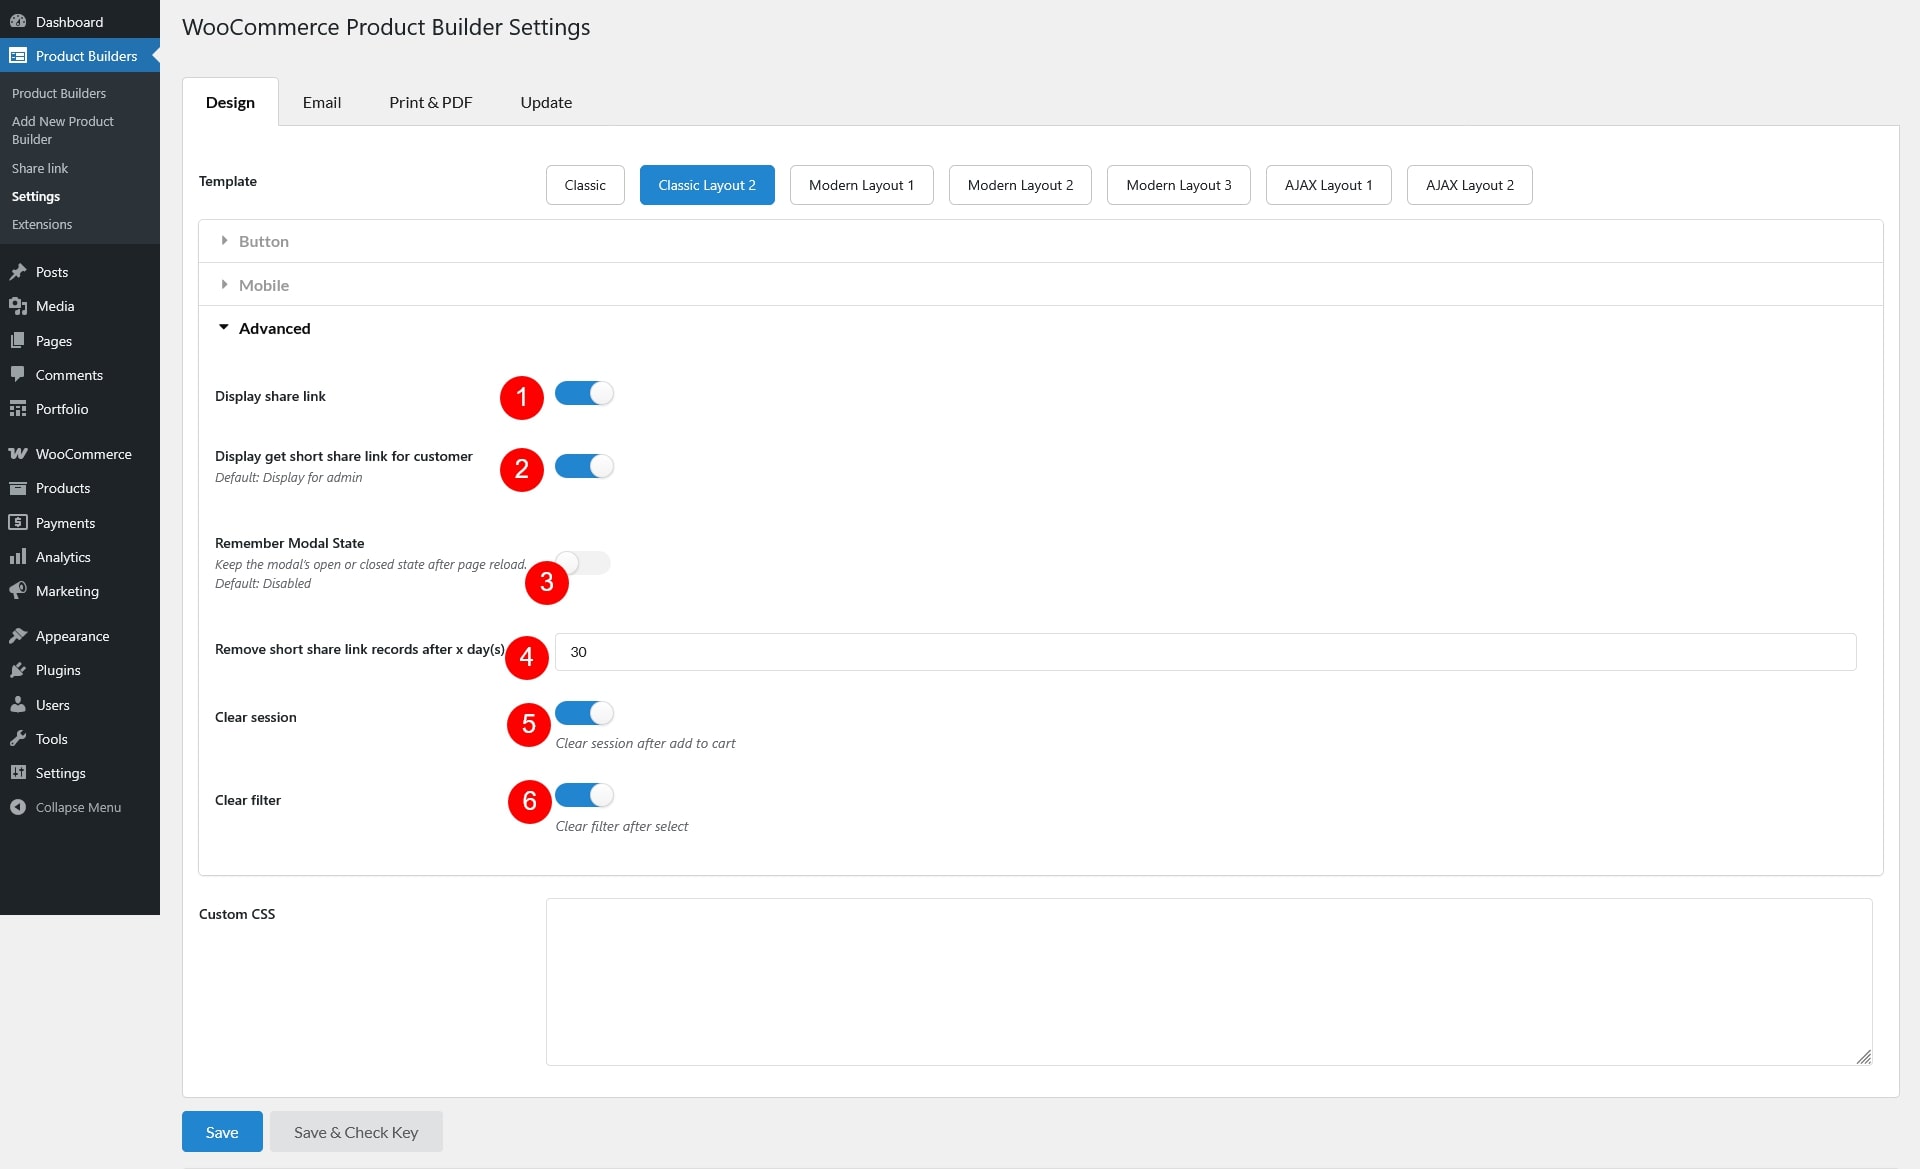
In the Design tab, you can choose the product builder templates, customize the button on the product builder page, customize on mobile mode, and other advanced features.

  1. Template

You can select available product builder displays in 3 templates: Classic; Modern; Ajax.

Ajax template: With this template, all steps will be visible on a page, and customers can load Ajax to add the product to the cart, preventing the entire page from being reloaded.

Classic and modern templates share the same style with a bit different in some details:  Each step will be visible in one page.


Button

2. Text color.

3. Background color.

4. Primary text color.

5. Primary background-color.

6. Button icon.


Mobile

7. Distance from bottom:  The space between the bottom and the control bar.

8. Control bar text color: Set the color for the text on the control bar.

9. Control bar background color: Set the color for the background on the control bar.


* Design the control bar on mobile


Advance

10. Display share link: Enable this option to show the share link of the selected products on the preview page.

11. Display get short share link for the customer: Enable to display the Get short share link on the front end applied for Ajax template


12. Remove short share link records after x day(s):  Set after x day(s) the short share link records will be removed.

13. Clear Section: Clear session after adding to cart

14. Clear filter: Clear filter after selecting.

15. Custom CSS: Re-design the product builder page as your desire.


B. Email

1. Enable: to show the email button on the preview page, click that button to send an email including the selected products.

2. Header: Add the default header.

3. From Enter certain address the email sends from.

4. Subject: Enter the subject of the email.

5. Body Message: Add the content of the message, you can use a shortcode to write the email content.

6. Message thank you: The messages display after sending email.


C. Print & PDF

After assembling a set of component products, you can export the selected product list to a PDF file and print it on the preview page.

Go to the Print & PDF tab to configure the PDF page.

  1. Print button: Enable to display the print button on the preview page, and use the print function.
  2. Download PDF button: Enable to display the Download PDF button on the preview page, and use the download PDF function.
  3. Show short description: Enable to display the product short description in the PDF file and printed file.
  4. Header of layout: Customize the content of the header using available shortcodes.
  5. Footer of layout: Customize the content of the footer using available shortcodes.


Plugin Author
Elementor Elementor
WPML OnTheGoSystems
Polylang Frédéric Demarle
Woodmart XTEMOS
Template Usage
/ajax-parts/empty.php Placeholder when no product is added
/ajax-parts/product.php Display product added in step
/ajax-parts/product-modal.php Display product in list to select
/ajax-parts/step.php Step row
/shortcode/single-product-builder.php Wrapper template when use shortcode (to exclude get_header())
/single/add-to-cart-simple.php.php Select form with simple product
/single/add-to-cart-variable.php Select form with variable product
/single/product-image.php Product image
/single/product-price.php Product price
/single/product-short-description.php Product short description
/single/product-title.php Product title
/single/variation-add-to-cart-button.php Select button for variation
/archive-product-builder.php Product builder archive page
/content-product-builder-preview.php Preview page after select all step
/content-product-builder-preview-popup.php Popup to send email in preview page
/content-product-builder-single.php Step con tent
/content-product-builder-single-2.php Step con tent with modern template
/content-product-builder-single-ajax.php Step con tent with AJAX template
/product-template.php Product content wrapper
/single-product-builder.php Wrapper template when use post type


Follow this guide on how to override VillaTheme plugins’ templates via a theme.

Thank you for your attention! If you have any question, please create topic at FORUM, we will support within 24 hours.