WooCommerce Checkout Upsell Funnel


Created: 03/2021

Latest updated: 5/2024 – Updated version: 1.0.10

By: VillaTheme

Thank you for purchasing our plugin. If you have any questions that are beyond the scope of this documentation, please feel free to request support at our Support Forum. Thanks so much!  

WooCommerce Checkout Upsell Funnel – Order Bump is a WooCommerce extension that helps you to offer product suggestions and WooCommerce order bump with attractive discounts to the customers on their checkout page. On the checkout page,  the WooCommerce Checkout Upsell Funnel – Order Bump will suggest customers purchase extra products along with a good deal without interrupting their checkout progress.

THE PLUGIN FEATURES

Upsell Funnel

When the customers hit the “Place Order” button, WooCommerce Checkout Upsell Funnel will offer them a checkout funnel to buy extra products with a discount. Moreover, those offers will not interrupt their checkout progress. If the customer accepts the offer, the extra product will be added to their going-to-purchase order.

  • Suggest products: the plugin will suggest customers purchase more products when they hit the “Place Order” button.  You can create the suggestion on the Checkout page from many types of products on your WooCommerce.
  • Display location:  you can choose to display the suggested products on the checkout page, on a pop-up, or redirect the customers to an “order suggestion” page.
  • Pop-up: the order suggestion pop-up will appear on the checkout page when a customer clicks on the place order button.
  • On the checkout page: a product suggestion list will appear on the checkout page when a customer clicks on the place order button.
  • Order suggestion page: with this option, the customers will be redirected to this page when they click place order.
  • Display time: Set up the days in the week to display the suggested products.
  • Discount rules: apply the discount type and discount amount for product suggestions to encourage the customers to buy more products.
  • Design Checkout Funnel: Many options to design the layout, content, title, product list and icons of the Checkout funnel. Besides that, you can use the available shortcode to make the title, content, messages on Checkout Funnel become more flexible.
  • Countdown timer on Checkout page: Create and design Countdown timer on Checkout Funnel. The display of the countdown timer on the checkout page will encourage the customers to buy the suggested products more quickly.
  • Custom CSS: You can add your own CSS code to design the upsell funnel on the front-end as you want.

Conditions for displaying the Upsell Funnel

You can set up the conditions to display the Upsell Funnel

  • Product conditions: set the conditions such as product price, include products, exclude products, include categories, exclude categories, product visibility.
  • Cart conditions: Cart total, Cart items, applied coupon, billing address, shipping address. The customers need to have their carts met the conditions to be offered the product suggestion on the checkout page.
  • Customer conditions: Limit per day, only logged in, include/exclude user role, include/exclude user. Only customers meeting the conditions are offered the product suggestion on the checkout page.

WooCommerce Order Bump

WooCommerce Order bumps help to give the products on the checkout page, that the shoppers can add to their cart. They’re usually related products that complement what the customer is buying. With the smart WooCommerce order bumps, you can easily add an extra offer to the final step of the funnel to boost your sale.

  • Unlimited WooCommerce Order Bumps: You can create as many WooCommerce order bumps as you want and assign them to work on your WooCommerce Store.
  • Suggest products on the Order Bump:  Create the suggestion on the WooCommerce Order Bump from many types of products on your WooCommerce.
  • Discount rules for the products on the Order Bumps: Apply the discount type and discount amount for the products that appeared on the WooCommerce Order bump.
  •  Cart conditions for displaying the Order Bump: Create the cart condition applied to display the WooCommerce Order Bump such as cart total, Cart items, applied coupon, billing address, shipping address.
  •  Customer conditions for displaying the Order Bump: Limit per day, only logged in, include/exclude user role, include/exclude user. O
  • Design the WooCommerce Order Bump: Many options to design the background, title, messages, content, product images on the WooCommerce Order Bumps. In addition, you can use the available shortcode to make the content, messages on the WooCommerce order bump become more flexible.

Report

The plugin provides the reports for all items sold from Upsell Funnel and WooCommerce Order Bumps.

  • Total sales: Report about the rate of Sales from WooCommerce Order Bump and Upsell Funnel over the total Sale.
  • Best-selling products: Report about the products which are best-selling through Upsell Funnel or  WooCommerce Order Bumps.
  • Statistics Filter:  the statistics based on the filters such as the order status, dates, month.

Compatibility

With displaying the Upsell Funnel on the popup and redirected page, the plugin is compatible with the payment Gateway below:

Required: 

  1. WordPress 5.0+
  2. PHP 7.0+
  3. WooCommerce 7.0+


Go Dashboard/ Plugins/ Add New and install the plugin using the installable zip file.

Video How to install and use the plugin:

After  install successful the plugin, go to Dashboard/ Checkout funnel to config its settings.

1. Go to Upsell Funnel settings to configure the Upsell Funnel as you want.

In the General settings, enable the Upsell Funnel.

2. Go to Rules & Products tab to set all the rules for displaying Upsell funnel

3. Design the Upsell Funnel in the Design Tab


If you want to have Order Bumps on the Checkout page, Go to the Order Bump settings and configure it.

In Order Bumps Tab.

To find more detail about to use all the options, please read the section “HOW DOES IT WORK”.

UPSELL FUNNEL

General settings

1. Enable option: Enable the Upsell Funnel.

2. Apply Coupon: enable it to apply the coupon to the recommended products on the checkout funnel

3. Redirect to single products: enable it to redirect to the single product pages when the customers click on the images or the titles of the products on checkout funnel.

4. Hide added products: Enable it to hide the added products by the customers from the recommended products on checkout funnel.

5. Style to display recommended products: Choose the style to display recommended products on checkout funnel. There are three styles: On checkout page, On popup after clicking “place order button”, redirect to another page after clicking “Place order” button.

6. Product position on checkout page: In the case of choosing the on checkout page style, please choose the products position on checkout page. There are six positions to choose: before and after billing details, before order details, before and after payment gateways, after checkout form.

In the case of choosing redirect to another page after clicking “Place order” button, please insert the endpoint page of the URL

In the case of choosing the style “On popup after clicking ‘Place Order’ button” – there is a popup showing the recommended products after clicking on place order button.

7. Mobile enable: Enable it to display the Upsell funnel on mobile.

8. Style to display recommended products on mobile: Choose the style to display recommended products on checkout funnel on mobile. There are three styles: On checkout page, On popup after clicking “place order button”, redirect to another page after clicking “Place order” button.

9. Products position on checkout page on mobile: Choose the position of recommended products on mobile checkout page.


Rules & Products

General settings of Rules & Products

1. Name: Give the name for the upsell Funnel

2. Days: Choose the days to display the upsell Funnel in the week

Recommended products

1. Types: Choose the type of recommended products displayed on Upsell Funnel. There are 15 types to choose from: Recently published products, Recently viewed products, Related products of the products in the cart, Up-sells of products in the cart, Cross-sell of products in the cart, Products from Billing, Most expensive product from Billings…

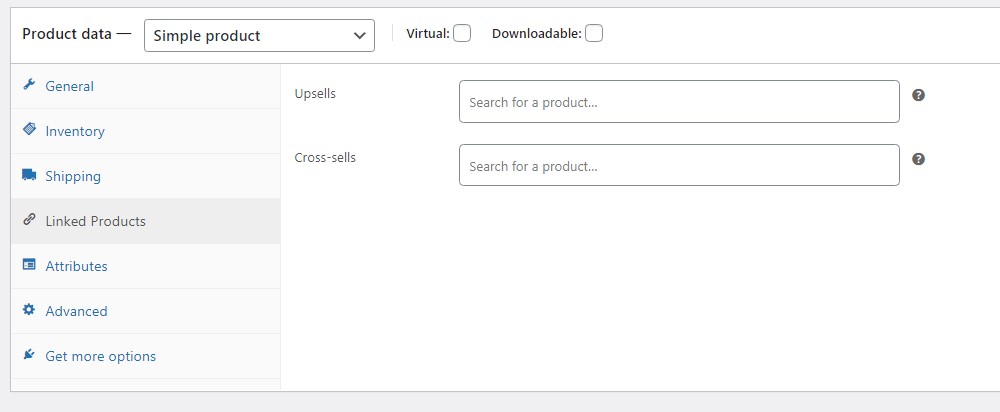
If you choose the types of Cross-sell and Upsell  of products in the cart, please go the edit product pages and insert the upsell and cross-sell product for them:

2. Discount amount: Choose the type and the number for the discount amount applied on the Upsell Funnel. You can choose None or one of four types of discounts.

3. Products limit: Set the limitation for the number of recommended products displayed on Upsell Funnel

4. Product quantity limit: Set the limitation for the number of the items the customers can add to cart for each product from the upsell funnel.

5. Order product by: Choose the way to order products on Upsell Funnel. You can order the products by one in 8 types: date, ID, Menu order, popularity, Price, Random, rating, title.

Conditions of Products

Those settings help to add the conditions for the products chosen to displayed on the Upsell Funnel.

1. Add Conditions (And): Click to add the condition, the plugin will apply all the condition you created.

2. Product Price: Set up the Min ($) and the Max ($) in Price of the recommended Products. The upsell Funnel will not show the products which are not in that rage.

3. Show Variation: Choose  “Yes” or “No” to show or not the Variations on the upsell Funnel.

4. Product visibility:  Choose the product visibility type for the recommended products to display.

5. Include products: Set the specific products to display on Upsell Funnel.

6. Exclude products: Set the specific products not to display on Upsell Funnel.

7. Include Categories: Set the specific categories to display on Upsell Funnel.

8. Exclude Categories: Set the specific categories not to display on Upsell Funnel.

Cart Conditions

Those settings help to add the conditions for the Carts chosen to display  the Upsell Funnel.

1 and 2: Set the range for the Cart Subtotal and Cart Total chosen to display the Upsell Funnel.  The Recommended Product will be not shown with the carts having the Subtotal or Total be not in these ranges.

3. Include all Products: Always show the Recommended products, regardless of the items present in the cart.

4. Include any Products: Set the specific products which the carts must have them to be displayed the Recommended products.

5. Exclude any Products: Set the specific Products which the carts must not have them to be displayed the Recommended products.

6. Include Cart items by categories: Set the specific categories which the carts must have the items of these categories to be displayed the Recommended products.

7. Exclude Cart items by categories: Set the specific categories which the carts must not have the items of these categories to be displayed the Recommended products.

8. Include Cart items by tags: Set the specific tags which the carts must have these tags to be displayed the Recommended products.

9. Exclude Cart items by tags: Set the specific tags which the carts must not have these tags to be displayed the Recommended products.


10. Include Coupon: Set the specific Coupons which the carts must have them to be displayed the Recommended products.

11. Exclude Coupon: Set the specific Coupons which the carts must have them to be displayed the Recommended products.


12. Include Billing Countries: Set the specific countries which the carts must have these Billing countries to be displayed the Recommended products

13. Exclude Billing Countries: Set the specific countries which the carts must not have these Billing countries to be displayed the Recommended products

14. Include Shipping Countries: Set the specific countries which the carts must have these Shipping countries to be displayed the Recommended products

15. Exclude Shipping Countries: Set the specific countries which the carts must not have these shipping countries to be displayed the Recommended products.


Customer Conditions

1. Limit per day: Set the limitation per day for the customers to see the Recommended products.

2. Only logged: Set up for only the customers who log in to see the Recommended products or not.

3. Include user role: Set up for the specific user roles to see the recommended products.

4. Exclude user role: Set up for the specific user roles not to see the recommended products.

5. Include user: Set up for the specific users to see the recommended products.

6. Exclude user: Set up for the specific users to not see the recommended products.

Design

Layout

1. Content: The content is created by two parts, the countdown timer to count the time for adding to cart the recommended products and the content is all the recommened products.

2. Border Color: Set up the color of the  border around the box of recommended products

3. Border Style: Set up the style of the  border around the box of recommended products. There are five styles: None, dashed, Double, Dotted, Solid.

4. Border width: Set up the width of the  border around the box of recommended products

5. Border radius: Set up the radius of the  border around the box of recommended products.

Content in pop up

This section helps to design the popup which is displayed when you choose Style to display recommended products: On popup after clicking ‘Place Order’ button

Header

1. Content: The content of the popup header.

2. Background color: Choose the color of the header background.

3. Padding: The padding of header background.

Container

4. Content: the content of the popup. It is the list of the recommended products.

5. Background: Choose the color for the content background in popup.

6. Padding: Choose the Padding for the container.

Footer:

7. Content: The content of the Popup footer.

8. Background: Choose the color for the footer background in popup.

9. Padding: Choose the Padding for the Popup footer.

Title

1. Message: You can change the message as you want on the box, and you can use two shortcode below in the message.

2. Color: Set up the color of the text

3. Font size: Set up the size of the text.

Continue Button

1. Title: you can use the title as you want in the Continue button or use the available icons with shortcode below.

2. Background: Set up the background color  for the continue button.

3. Color: Set up the color for the text or the icons.

4. Border color: Set up the color for the continue button border.

5. Border width: Set up the width for the continue button border.

6. Border radius: Set up the radius for the continue button border.

7. Font size: Set up the font size for the continue button title.

8. Skip icons: Choose the icons you want for the continue button.

9. Color: Choose the color for the icon.

10. Font size : Set up the font size for the icon.

Countdown timer

Those settings help to design the countdown timer on the checkout funnel.

1. Checkout page enable: Enable this option to display and apply the countdown timer for buying recommended on checkout page or the popup.

2. Display time:  Set up the time for counting down. After the countdown timer end, the customers can not buy the recommended products.

3. Reset time: Set time for reappear recommend popup when the Cart is not checkout and popup is timed out.

4. Message: Set up the message for the countdown timer. You can use the shortcode below it.

5. Color: Choose the color of the text.

6. Font size: set up the font size of the text.

7. Enable the pause button: Enable this option to display the pause button which allows the customers to stop the countdown timer.

8. Border width: Set up the width for the pause button.

9. Diameter: Set up the diameter for the pause button.

10. Background: Set up the background color  for the pause button.

11. Border color 1: Set up  color  for the outside border of pause button.

12. Border color 2: Set up  color  for the inside border of pause button.

13. Title: The title of the pause button, or you can use the icon for it.

14,15,16: Set up  color  for the background, title, border of pause button.

17,18: Border width, border radius: Set up the width and the radius for the pause button border.

19. Font size: Set up the size for the title.

20. Pause icon: Choose the icon for the pause button.

21,22: Color, Font size: Choose the color and font size for the icon.

Product list

1. Design the display of product list on desktop.

2. Design the display of product list on mobile.

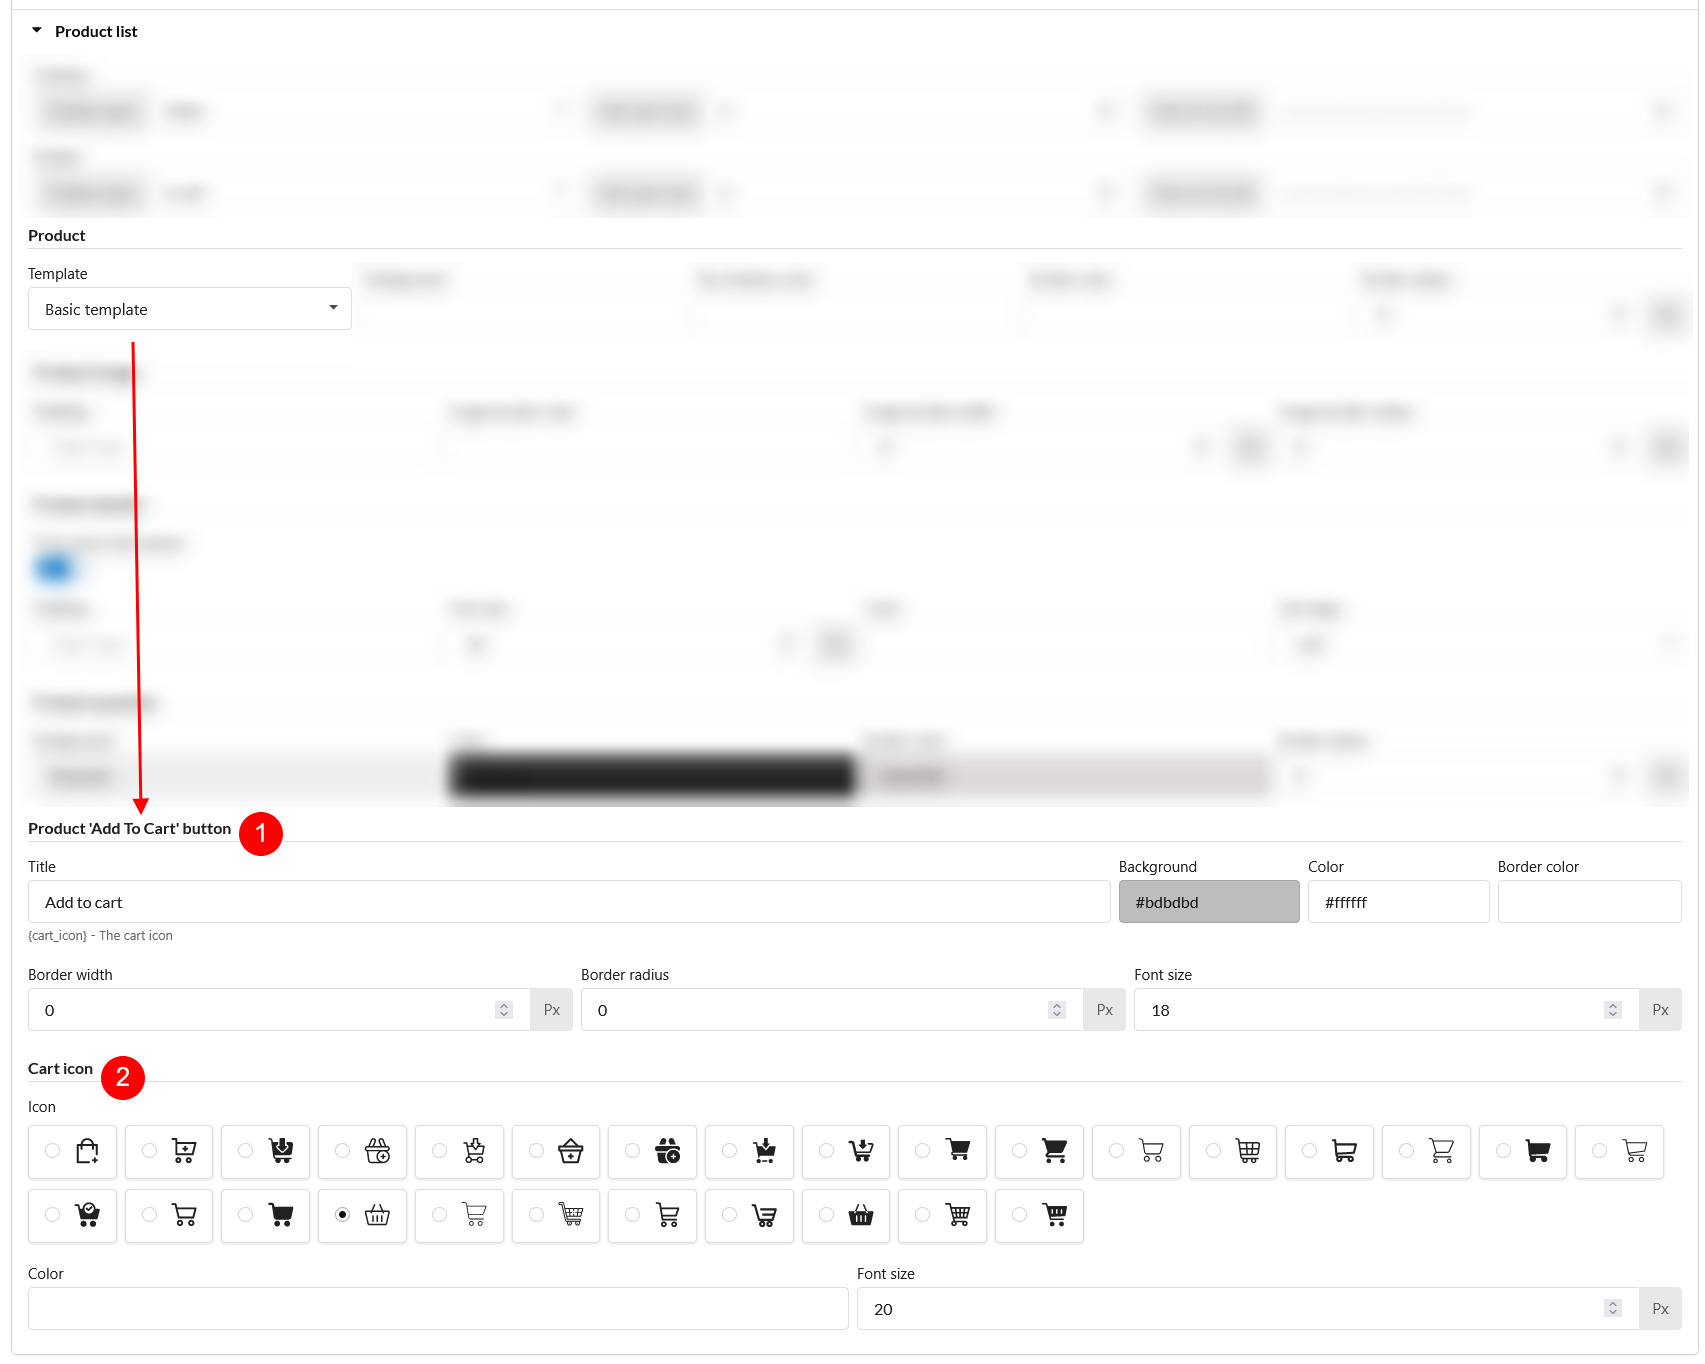
3. Product: Design the template, background color, Box Shadow color, Border color and border radius for the product list on the checkout funnel.

4. Product image: Design the padding, image border color, image border width, image border radius for the product image on the checkout funnel.

5. Product detail: Design the padding, font size, color, text align for the product detail on the checkout funnel.

6. Product Quantity: Design the background color, color, Border color, Border radius for product quantity box on the checkout funnel.

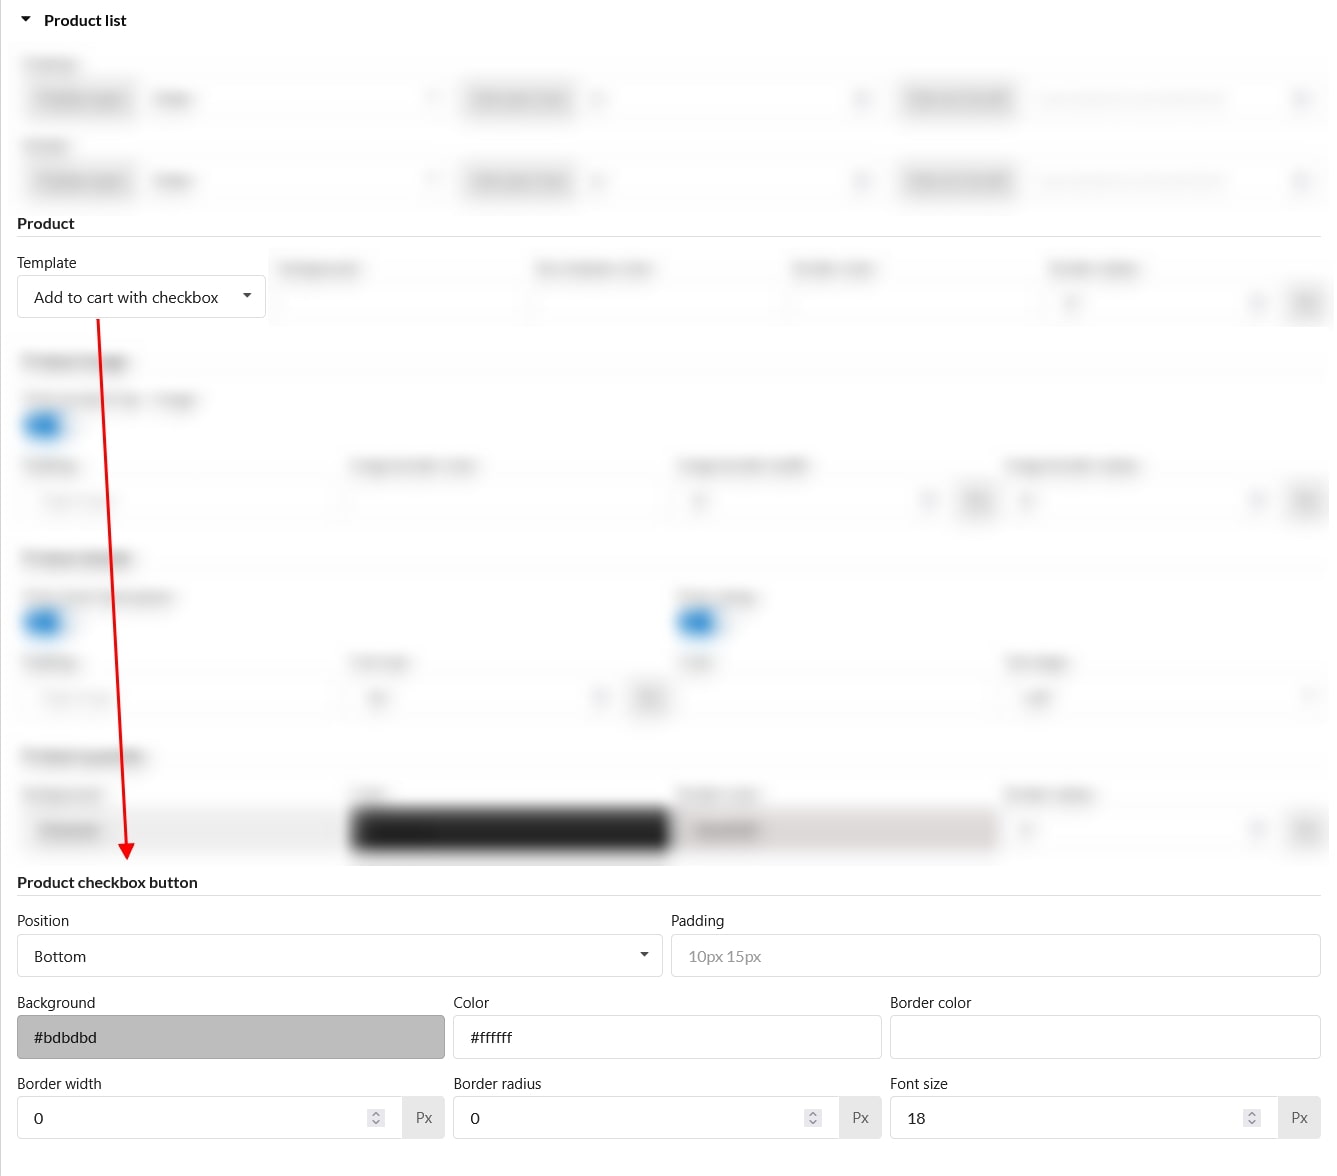
7. Product checkbox button: Design the background color, color, border color, border width, border radius, font size for the product checkbox button on checkout funnel.

ORDER BUMP

Custom CSS

You can add your own CSS code to custom the checkout funnel as you want.

General settings

1. Enable the Oder Bumps on checkout page.

2. Mobile Enable: Enable the Order Bump on Mobile

3. Apply Coupon: Enable it to apply the coupon to the products added to cart from order bumps.

4. Application of rules: Choose how to apply the rules: all matched rules or the first  matched rule.

4. Position on checkout page: Choose the position for the Order Bumps on checkout page. There are five position to choose: Before and after billing detail, before order details, before and after payment gateways.

Order Bumps

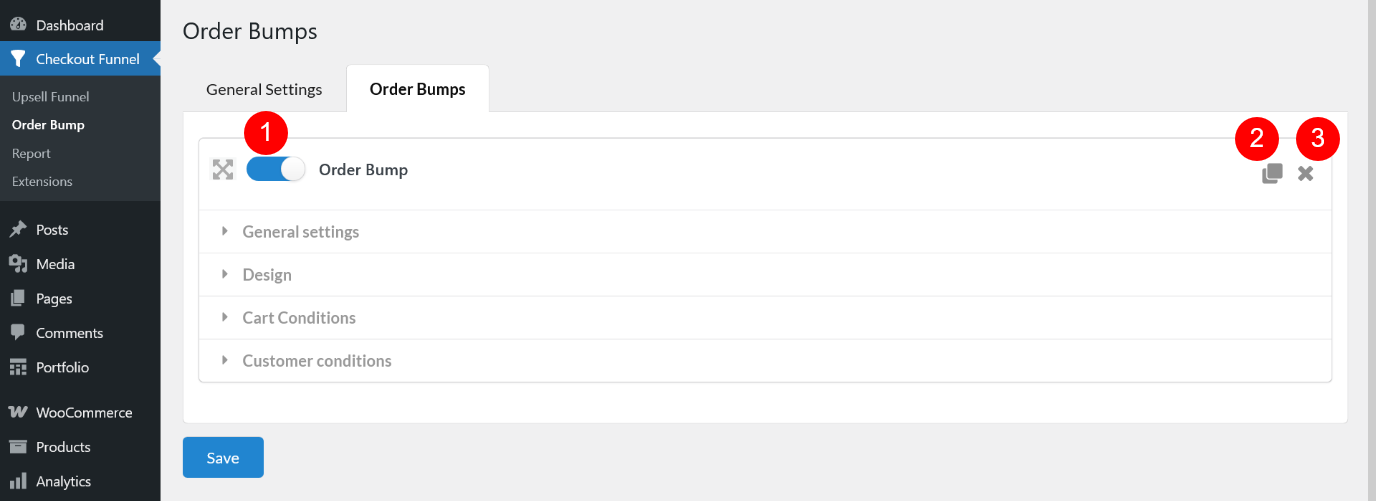
1. Enable the specific Order Bumps. You can create many order Bumps with different rules and designs, enable it to make the plugin run the order bump you choose.

2. Duplicate the Order Bumps.

3. Remove  the Order Bumps.

General settings

1. Name: Create a name for the Order Bumps.

2. Days: Choose the days in the week to display the Order Bumps to the Customers.

3. Timer per day: Set timer to show Order Bump per day.

4. Discount amount: Choose the type and the number for the discount amount applied on the Upsell Funnel.

  • None: The order bump item has no discount, sold with its initial price
  • Percentage (%) regular price: The discounted price is calculated by subtracting this percentage amount from the regular price.
  • Fixed($) regular price: The discounted price is calculated by subtracting this fixed amount from the regular price.
  • Percentage (%) price: The discounted price is calculated by subtracting this percentage amount from the sale price. If the product has no sale price, use regular price instead.
  • Fixed($) price: The discounted price is calculated by subtracting this fixed amount from the sale price. If the product has no sale price, use regular price instead.
  • New fixed($) price: Set a specific price for the order bump, no calculation.

5. Product quantity: Set up the number of products, which  customers can buy each time on order bump.

  • Fixed: Customer must buy the exact quantity set up in “Product quantity”, they’re unable to change this quantity on their end if they decides to buy orderbump
  • Max quantity that customers can buy: They can adjust quantity of orderbumps they can buy, but no higher than the value set in here.

6. Products: Choose the product to display on the Order Bumps.

Design

1. Choose the background color for the Order Bumps.

2. Padding: Choose the padding for the Order Bumps.

3. Border style: Set up the style of the  border around the box of recommended products. There are five styles: None, dashed, Double, Dotted, Solid.

4.  Border Color: Set up the color of the  border around the Order Bumps.

5. Border width: Set up the width of the  border around the Order Bumps.

6. Border radius: Set up the radius of the  border around the Order Bumps.

Title

1. Message: You can change the message as you want on the Order Bumps.

2. Background Color: Set up the background color of the title box.

3. Color: Set up the color of the text in message.

3. Font size: Set up the size of the text.

Content

1. Message:  You can add the message for the content of Order Bumps. You can use the shortcode below it.

2. Enable product image: Enable the product image in the Order Bumps.

3. Choose the color of the content background.

4. Choose the color of the text,

5. Padding: Set up the padding of the content.

6. Font size: Set up the font size of the text.

7. Max content length: Change the max length of the content.

Cart Conditions

1 and 2: Set the range for the Cart Subtotal and Cart Total chosen to display the Order Bumps.  The Order Bumps will be not shown with the carts having the Subtotal or Total be not in these ranges.

3. Include Cart Items: Set the specific products which the carts must have them to be displayed the Order Bumps.

4. Exclude Cart items: Set the specific Products which the carts must not have them to be displayed the Order Bumps.

5. Include Cart items by categories: Set the specific categories which the carts must have the items of these categories to be displayed the Order Bumps.

6. Exclude Cart items by categories: Set the specific categories which the carts must not have the items of these categories to be displayed the Order Bumps.

7. Include Coupon: Set the specific Coupons which the carts must have them to be displayed the Order Bumps.

8. Exclude Coupon: Set the specific Coupons which the carts must have them to be displayed the Order Bumps.

9. Include Billing Countries: Set the specific countries which the carts must have these billing countries to be displayed the Order Bumps.

10. Exclude Billing Countries: Set the specific countries which the carts must not have these billing countries to be displayed the Order Bumps.

11. Include Shipping Countries: Set the specific countries which the carts must have these shipping countries to be displayed the Order Bumps.

12. Exclude Shipping Countries: Set the specific countries which the carts must not have these shipping countries to be displayed the Order Bumps.

Customer conditions

1. Limit per day: Set the limitation per day for the customers to see the Order Bumps.

2. Only logged: Set up for only the customers who log in to see the Order Bumps or not.

3. Include user role: Set up for the specific user roles to see the Order Bumps.

4. Exclude user role: Set up for the specific user roles not to see the Order Bumps.

5. Include user: Set up for the specific users to see the Order Bumps.

6. Exclude user: Set up for the specific users to not see Order Bumps.

REPORTS

Orders Report

Products Report

With displaying the Upsell Funnel on popup and redirected page, the plugin is compatible with the payment Gateway below:

Plugin Author Compatible
Stripe For WooCommerce
WooCommerce Cart All in One VillaTheme Fully
REDIS – WooCommerce Dynamic Pricing and Discounts VillaTheme Fully
WooCommerce Boost Sales VillaTheme Fully


Watch this video for integrating WooCommerce Checkout Upsell Funnel and multilingual plugins

Template Usage
/checkout-order-bump.php Order bump form
/checkout-upsell-funnel.php Upsell funnel form


Follow this guide on how to override VillaTheme plugins’ templates via a theme.

Extra Information


Thank you for your attention!

If you have any question, please create a topic at our FORUM, we will support within 24 hours.