WooCommerce Coupon Box


Created: 09/2018
Latest updated: 10/2023 – Updated version: 2.1.1

By: VillaTheme

Thank you for purchasing our plugin. If you have any questions that are beyond the scope of this documentation, please feel free to request support at our Support Forum. Thanks so much!

WooCommerce Coupon Box is a WooCommerce and WordPress email subscription plugin that helps you collect emails from your visitor. Don’t waste your traffic, Email marketing is an old-but-gold marketing channel. The WooCommerce and WordPress email subscription plugins help you turn traffic into email subscribers. The WooCommerce and WordPress email subscription plugins display a subscribe email pop-up to new visitors, offering coupons and asking them to subscribe email, generating and sending a coupon code to the subscribed email address. You can check the subscribed email addresses in the plugin back-end or sync with your email marketing platforms through API.

  • Display Coupon Box pop-up, allowing users to subscribe to their email.
  • Sync email with Mailchimp; Sendgrid; Active campaign; Hubspot; MailPoet; Klaviyo; SendinBlue email platforms.
  • Automatically generate and send coupons to subscribers.
  • Various subscription forms.
  • Multilanguage coupon box

DISPLAY COUPON BOX POP-UP 

A popup will appear when users visit your site, offer a discount when they subscribe on the coupon box.

  • Pop-up trigger: You can select to display the coupon box pop-up after a selected time after customers scroll their mouse when customers are about to leave your site (hover mouse on close button)
  • Minimize the bar: If customers skip the pop-up, you can select to hide the pop-up or minimize it into the top bar or button of your page. Note: Because of UI restrictions, this feature is not available in mobile mode.
  • Subscribe Reminder time: Schedule a time for the pop-up to reappear if a user skips it.
  • Display only on Homepage: the option that allows you to display the pop-up only on the homepage of your site.
  • Conditional tags: Configure which page where the coupon box will appear using WordPress conditional tags.
  • Multilanguage coupon box: This plugin is compatible with WMPL and Plolylang which allow displaying coupon boxes in the customer’s language.


GENERATE AND SEND COUPON

The WooCommerce and WordPress email subscription plugin can send discount coupons to subscribers. You can select to send existing coupons or generate unique coupons.

  • Generate unique coupon:  Whenever a visitor subscribes to an email, the plugin will generate a unique coupon and send it to his/her email address. You can set up the coupon type, amount, prefix, and all other settings like a WooCommerce coupon.
  • Existing coupons: With this option, you will choose an existing coupon to send to subscribers. You can choose to allow only subscribed emails to use the coupon.
  • Custom: Sending a custom code to subscribers.
  • Do not use coupons: With this option, visitors will not receive coupons when they subscribe to emails.


EMAIL API

This plugin integrates some email marketing platforms, allowing subscribed emails to sync to these platforms and perform other marketing strategies as needed. The email marketing platforms available:

  • Mailchimp
  • Sendgrid
  • Active campaign
  • Hubspot
  • MailPoet
  • Klaviyo
  • SendinBlue

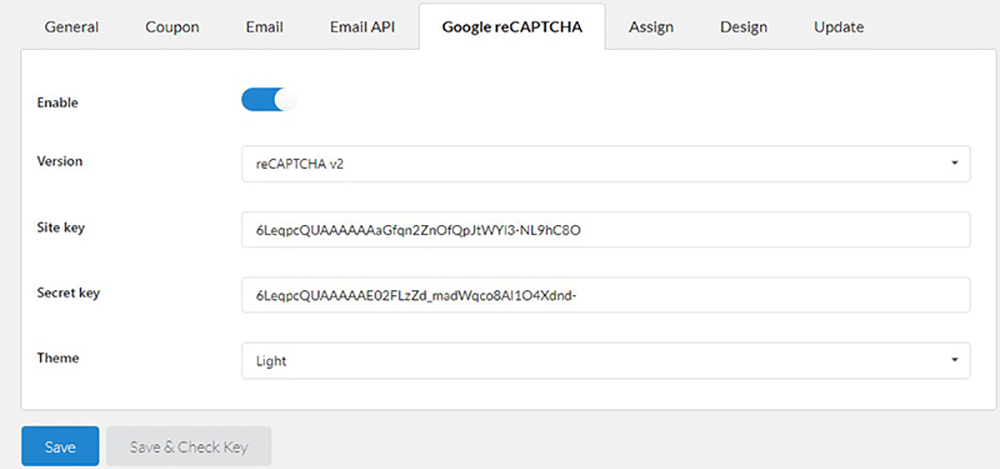
GOOGLE RECAPTCHA

ReCaptcha 2: “I’m not a robot” Checkbox. This requires the user to click a checkbox indicating the user is not a robot. This will either pass the user immediately (with No CAPTCHA) or challenge them to validate whether or not they are human. This is the simplest option to integrate with and only requires two lines of HTML to render the checkbox.

ReCaptcha 3: reCAPTCHA v3 allows you to verify if an interaction is legitimate without any user interaction. It is a pure JavaScript API returning a score, giving you the ability to take action in the context of your site: for instance requiring additional factors of authentication, sending a post to moderation, or throttling bots that may be scraping content.


SEND COUPON EMAIL

The WooCommerce and WordPress email subscription plugin will automatically send emails to subscribers. Configure the email content as you want.

  • Email content: Write the emails that will be sent to subscribers with email heading, subject, content.
  • Shortcode: The plugin provides you shortcodes to display necessary information in the email{coupon_value} – The value of the coupon, can be percentage or currency amount depending on coupon type{coupon_code} – The code of coupon that will be sent to your subscribers{date_expires} – From the date that given coupon will no longer be available{last_valid_date} – That last day that coupon is valid{site_title} – The title of your website{shop_now} – The Shop Now button
  • Shop now button: the button that helps the customer to use the coupon you’ve just sent to them. You can set up the title, the URL, and the design of the button.


EMAIL CAMPAIGN

Subscribed emails from this WooCommerce and WordPress email subscription plugin will be saved in email campaigns.

  • Export emails: export your subscribed emails as an excel file. Then you can select to export from a selected subscribe time or export from a selected campaign.
  • List subscribed emails: check the subscribed emails list in your backend. The list includes email address, subscribe time, email campaign, given coupon, MailChimp/Active Campaign/SendGrid list.
  • Email Campaign: manage to subscribe email using email campaigns.


COUPON BOX SHORTCODE

You can use the coupon box shortcode:  [wcb_widget always_visible=1 show_coupon_code=1] that helps to display subscription forms anywhere you want, this can be substituted for the popup style.


DESIGN

The front-end style of the Coupon Box pop-up to match your site’s style.

  • Templates: 4 templates with 4 different element arrangement ways.
  • Message: Display welcome, congratulation, thankyou-message.
  • GDPR Checkbox: Display a checkbox that allows customers to agree with your site policy, terms of use.
  • Close button styles: 6 different icon styles for the close button, size, position.
  • Header Style: Configure the header style with title and background. You can use images as your background.
  • Body style: Configure the Coupon Box body style with text font, background image.
  • Social Network icons: Display your social network on the Coupon Box pop-up.
  • Subscribe Button: Design your subscribe button with text, text color, and background color.
  • Custom CSS: The plugin allows you to add your own Custom CSS code to change the front-end as you want.


AUTO-UPDATE

Within your support period, you can automatically update the plugin from your Dashboard. After that, you are still able to update the plugin manually.


Required

It is recommended using

1. WordPress 5.0+

2. PHP 7.0+

3. WooCommerce 7.0+


Download Plugin

Get the plugin installation package from your account download page and save it to your desktop.

Install & Active plugin

Go to PluginAdd NewUpload PluginChoose file/ select the plugin zip file woocommerce-coupon-box.zip/ click “Install Now“/ click “Active plugin“.

Video Install and Set up WooCommerce Coupon Box:

Done! Let’s start using the plugin.

To start using WooCommerce Coupon Box, please go to Dashboard/ Woo Coupon Box/ Settings

In Coupon Tab, set up the coupon type and amount you would like to give to subscribe and save.

Now the coupon box should appear on your homepage.

General

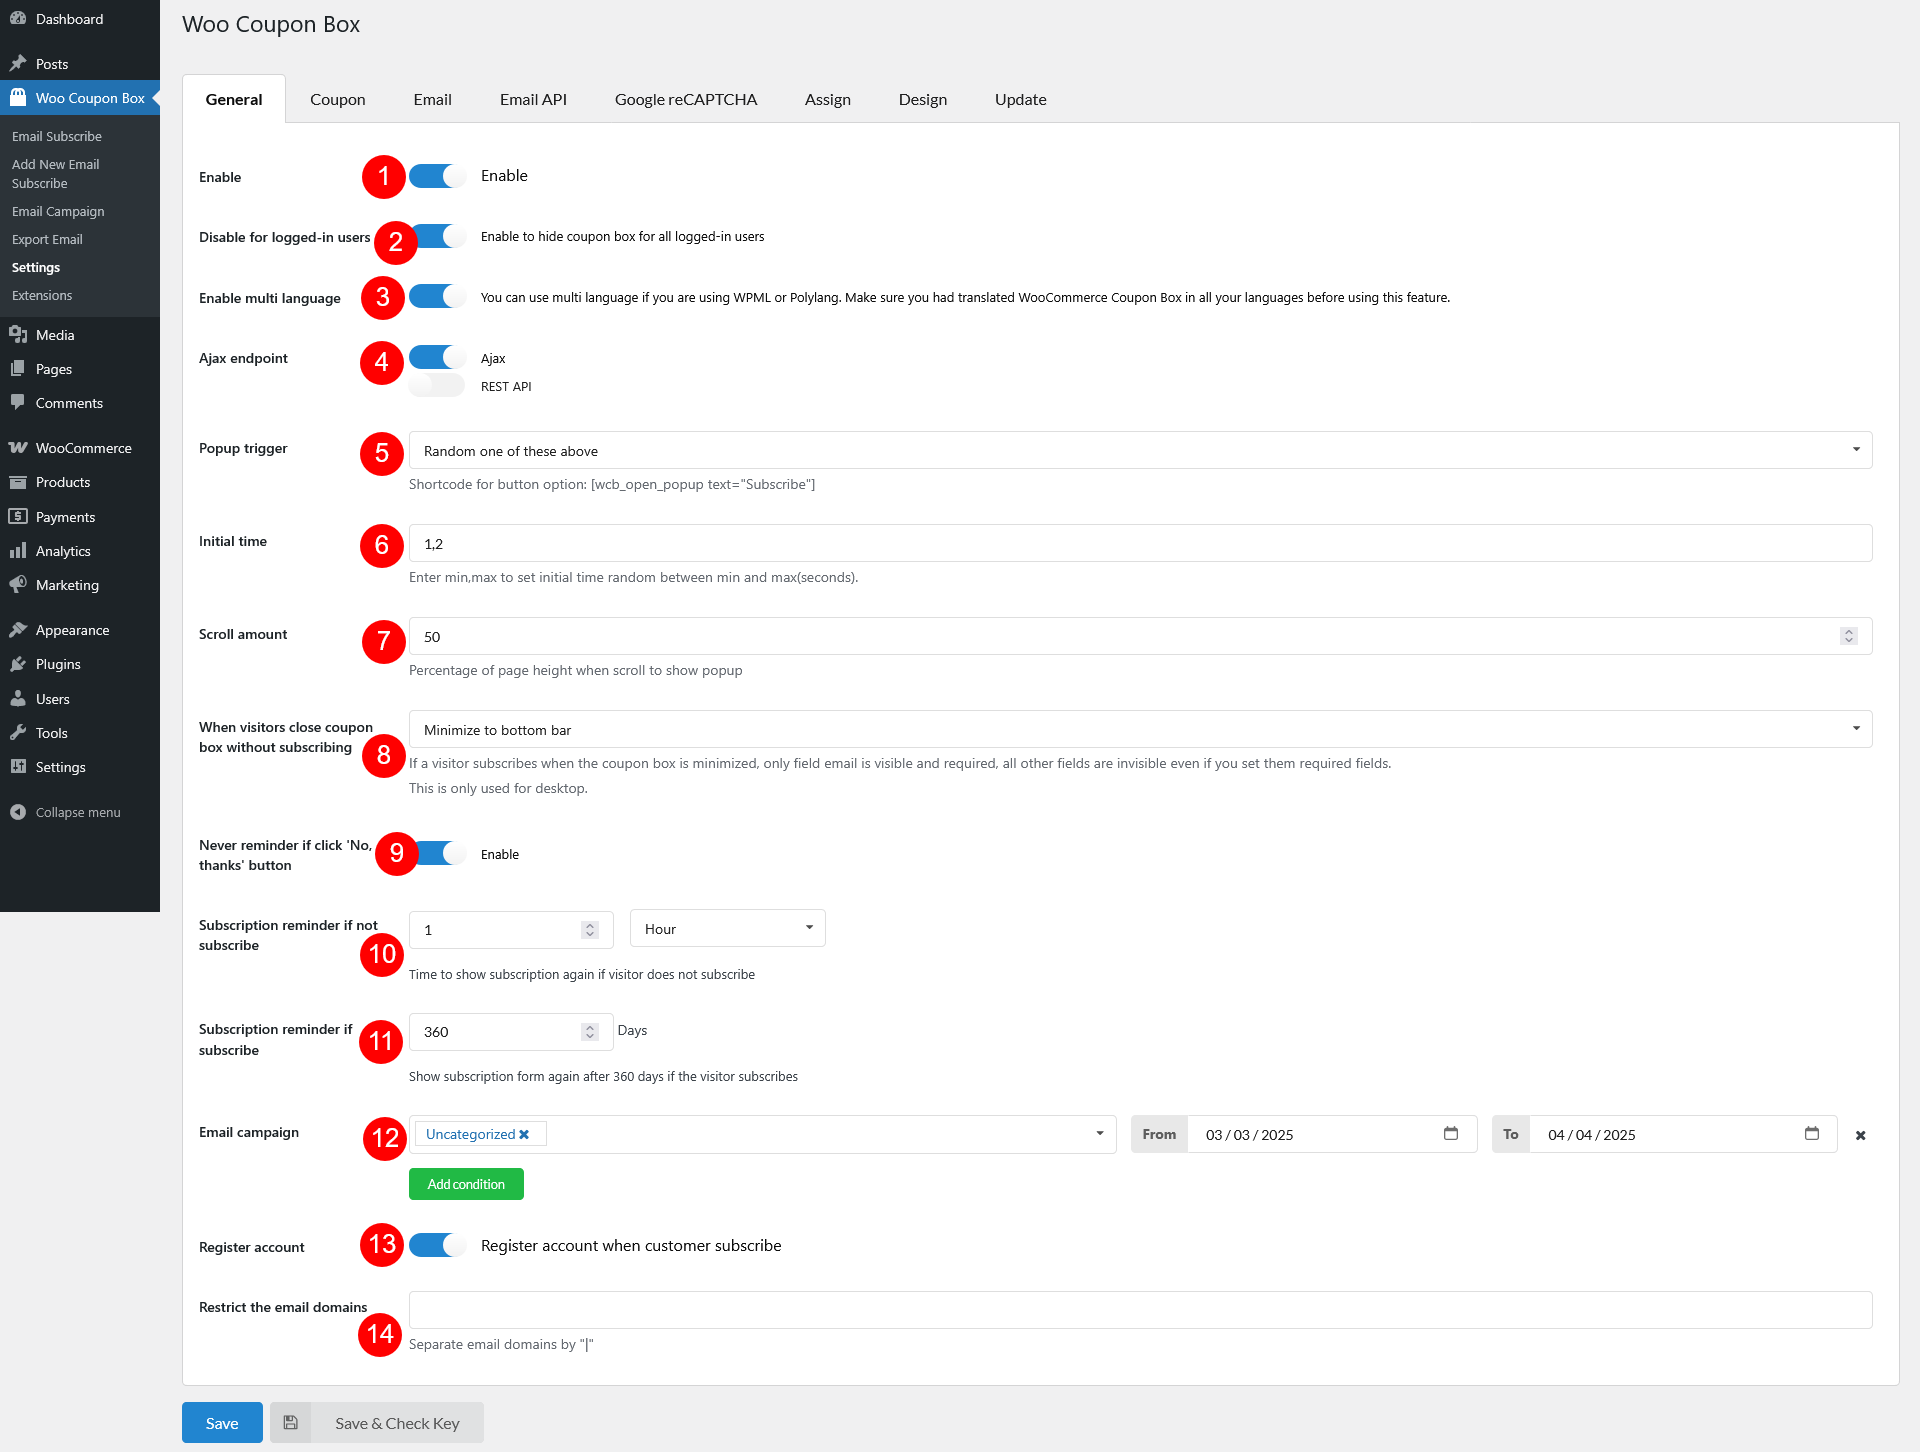
Go to Dashboard/ Woo Coupon Box/ Settings/ General to configure common settings of Woo Coupon Box.

1. Enable: allow you to enable/disable the plugin.

2. Disable for logged-in users: this option allows you to hide the pop-up from logged-in users. You have already had email addresses of those users.

3. Enable multi language: this option allows you to display the coupon box in multiple languages. This option works with WPML and Polylang now. You need to use that plugin to translate the plugin before enabling this option.

You can see this video on how to show multilanguage for a coupon box with WPML:

4. Ajax endpoint: select the AJAX endpoint. It should be AJAX in most sites.

5. Pop-up trigger: decide which act will make the pop-up appear, there are 4 options for you to choose from

5.1. After initial time: The pop-up will automatically appear after a selected time. Example: with the following settings, the coupon box will appear after a random time between 3 and 10 seconds.

5.2.When users scroll: The pop-up will appear after users scroll the page an amount of the page height.

5.3. When users are about to exit: the pop-up will appear when visitors hover their mouse on the close button of browsers.

5.4. Random one of these above: The plugin will get randomly one trigger.


6. When visitors close coupon box without subscribing: Select how will the coupon box work if visitors close the pop-up without subscribing. There are 2 option for you to choose from:
6.1. Hide the coupon box pop-up
6.2. Minimize the pop-up to the top bar/ bottom bar.

  • Note: Because of UI restrictions, this feature is not available in mobile mode.


The coupon box bar on front-end

7. Subscription reminder if not subscribe: schedule a time for the pop-up to reappear when visitors close the pop-up without subscribing to their emails.


8. Subscription reminder if subscribe: schedule a time for the pop-up to appear again if visitors have already subscribed to their email.

9. Email campaigns: Select an email campaign where you would like to save the emails. We will talk more about the emails campaign in the next chapters of this guide.

Coupon

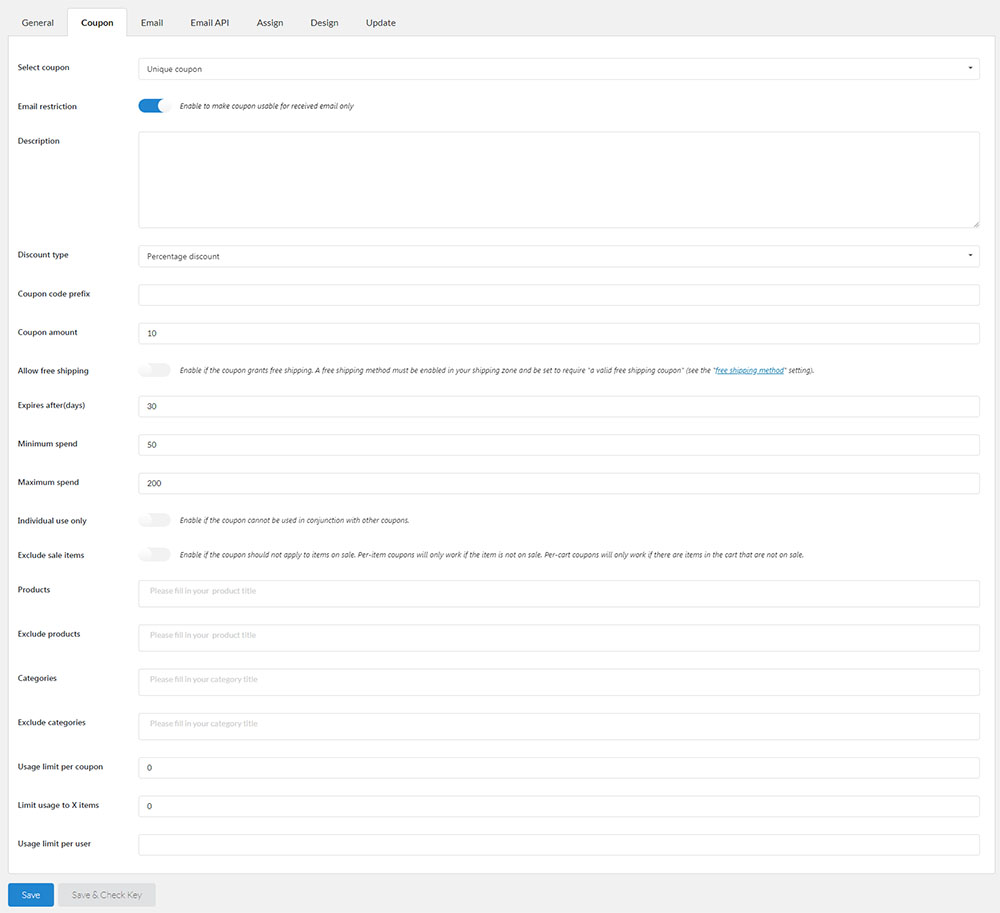
In Coupon tab, you can set up coupons you will send to visitors who subscribe emails in Woo Coupon Box.

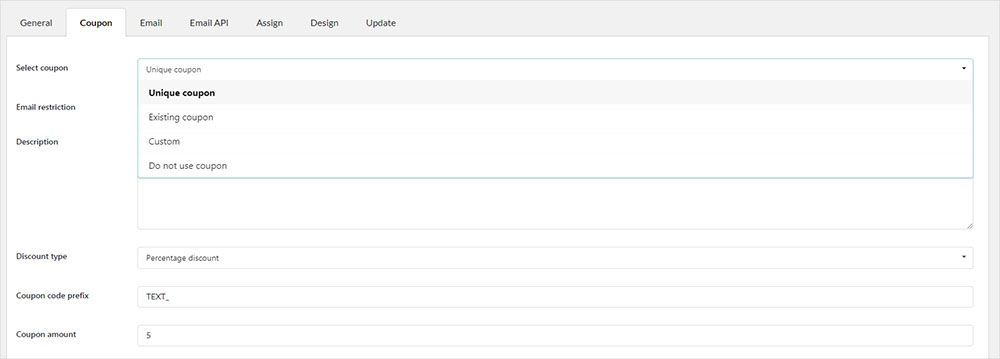
  1. Unique coupon: with this option, the plugin will generate unique coupons for each email subscribed. The coupons will have type, value, and settings as you set it up. Check our WooCommerce Tutorial about coupons to learn more about WooCommerce coupon.
  2. Existing coupon: Select existing coupon to send to customers when their subscribe emails. You can create coupon at WooCommerce/ Coupons
    1. Make the coupon only available with subscribe emails. Customers can not share the coupon code for other emails address.
    2. Select a coupon code to send to customers.
  3. Custom: This option allows you to send a custom code to email subscribers.
  4. Do not use coupon: with this option, you will not send coupons to subscribers. Just a thank you message when they subscribe emails.

Email

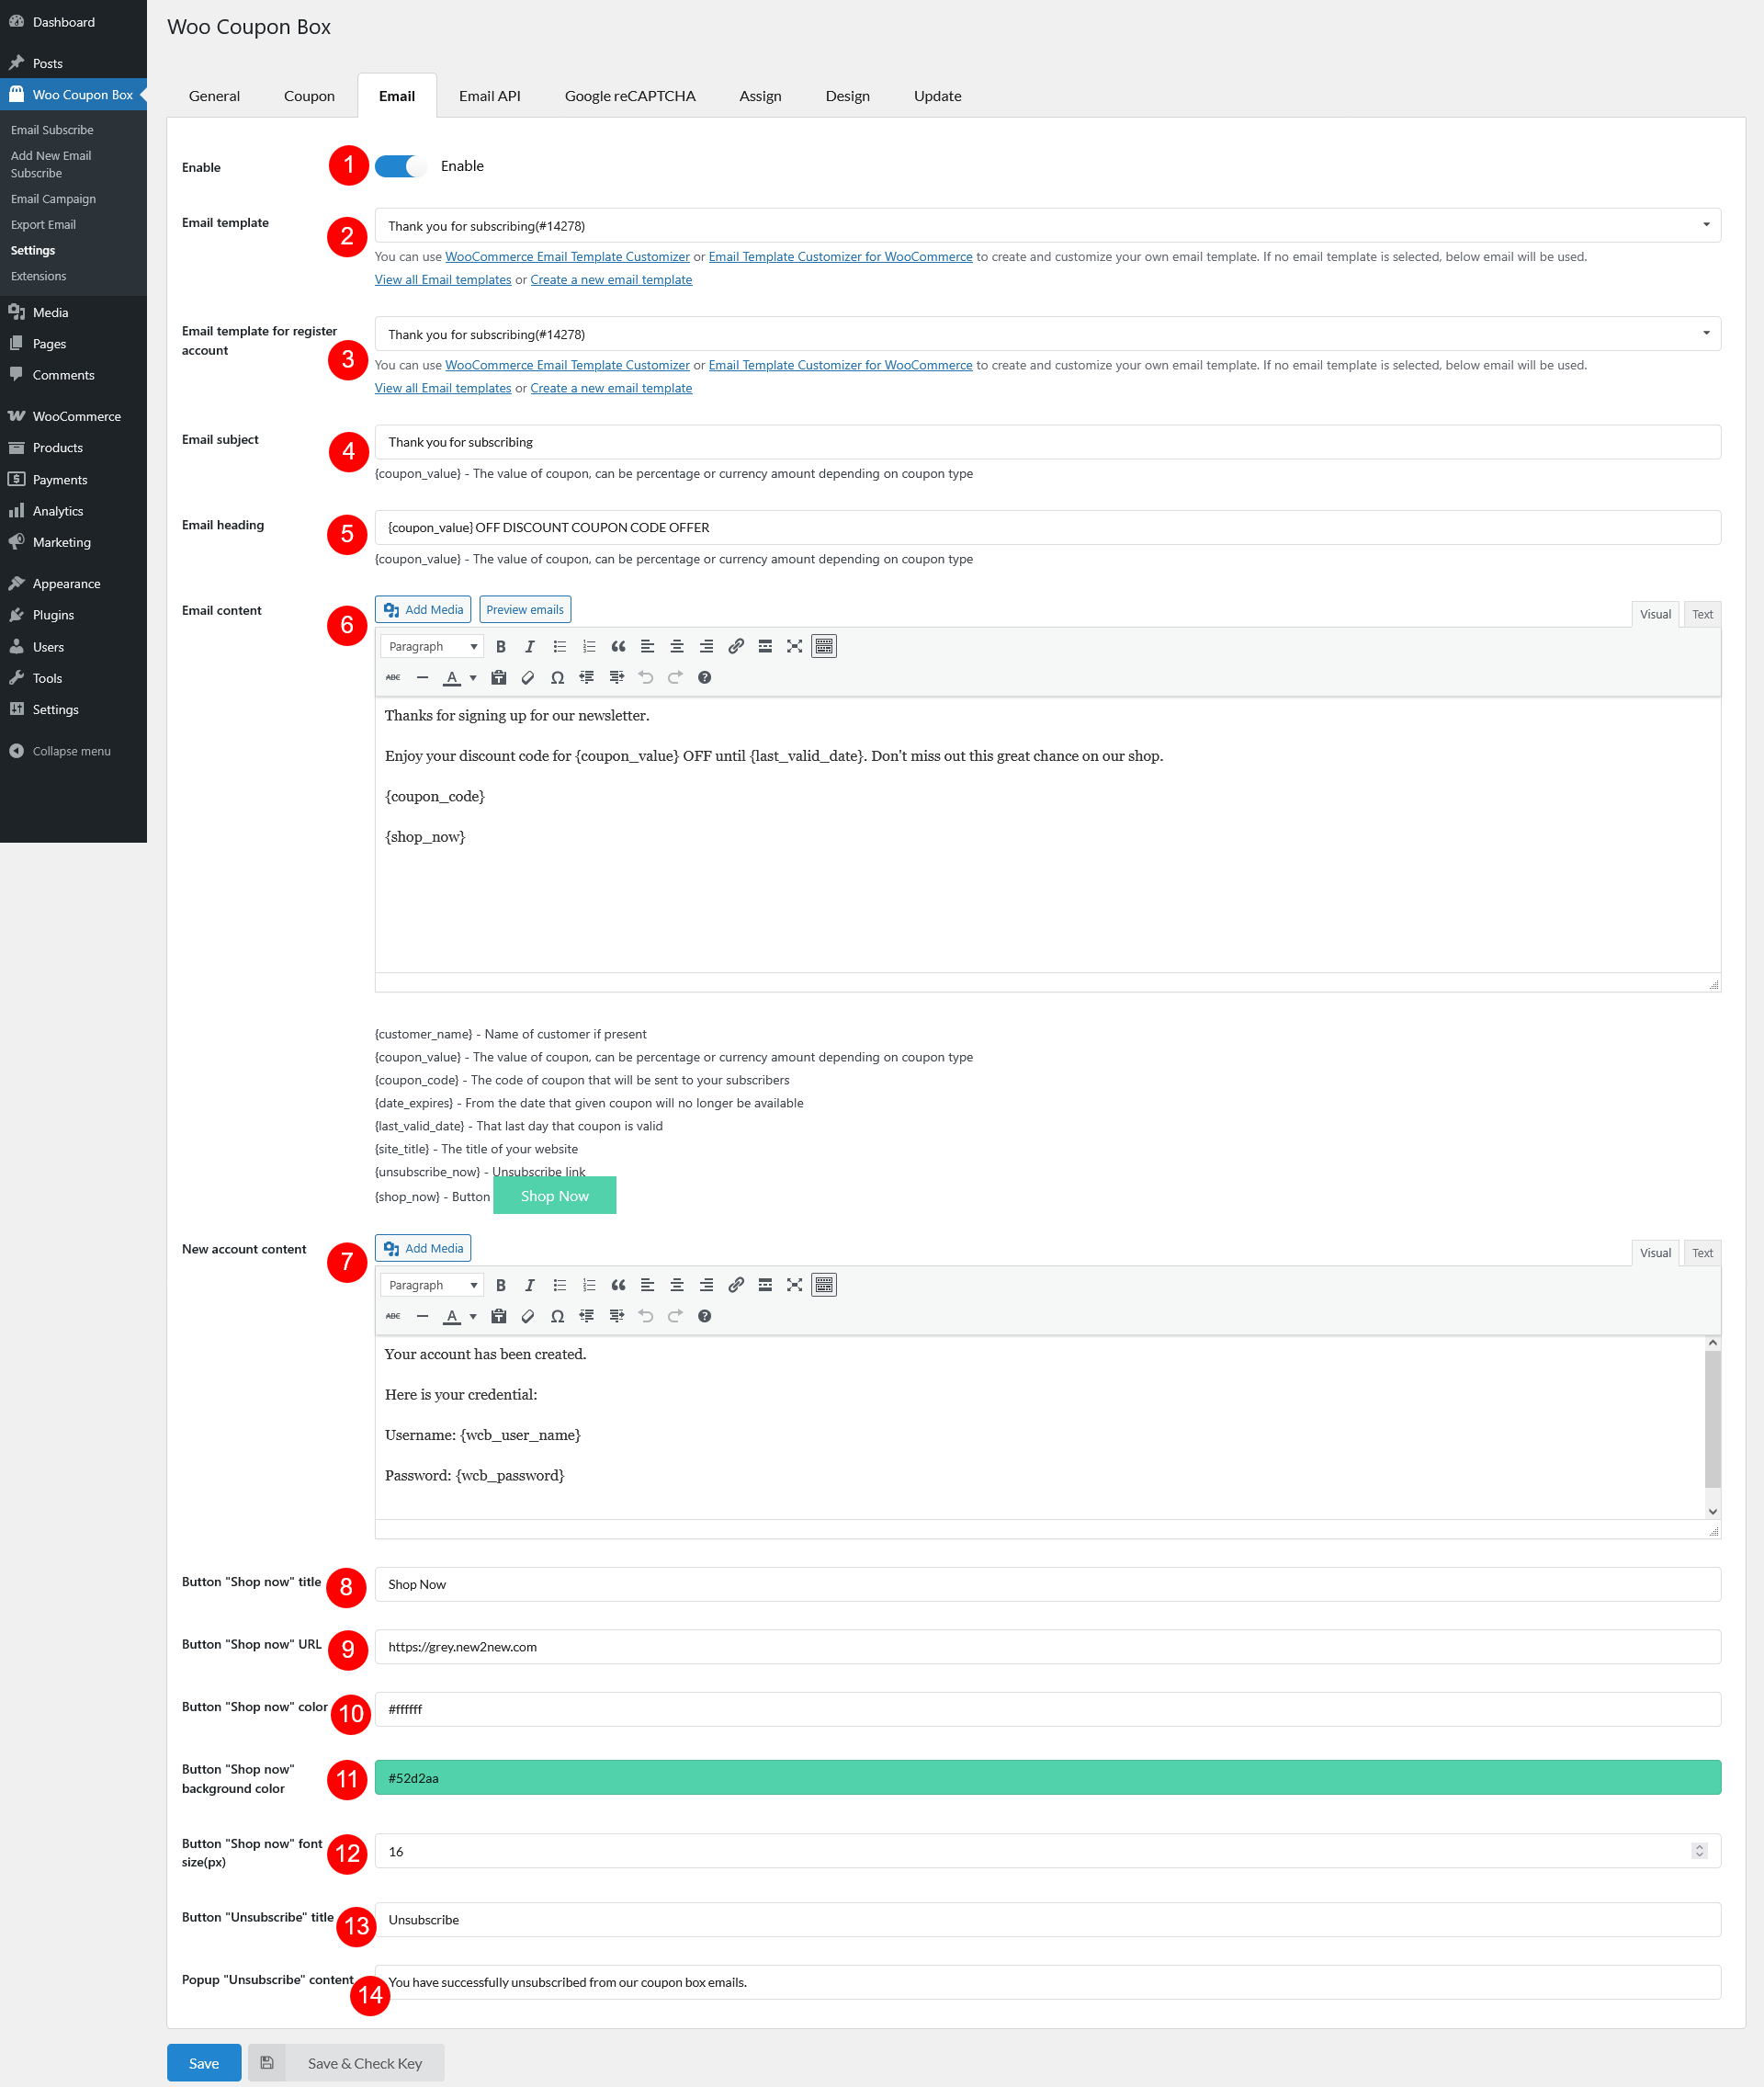
In the Email tab, you can configure the email will send to subscribers after they subscribe emails.

1. Enable: To send an email when a customer subscribes on our site with WooCommerce Coupon Box.

2. Email template: Choose available email templates to send different emails for each prize, please use WooCommerce Email Template Customizer or Email Template Customizer for WooCommerce to create and customize your own email template.


If there is no template chosen, default template will be sent out.

1. Fill in your email subject.

2. Fill in the email heading.

3. Set up the email content, you can use shortcodes here.
{coupon_value} – The value of the coupon, can be percentage or currency amount depending on coupon type
{coupon_code} – The code of coupon that will be sent to your subscribers
{date_expires} – From the date that given coupon will no longer be available
{last_valid_date} – That last day that coupon is valid
{site_title} – The title of your website
{shop_now} – The shop now button

4. The shop now button text. Change it as you need, “USE COUPON NOW” maybe

5. The shop now URL, it can be the shop URL.

6. 7. 8. Design the shop now button in emails with text color, font size, and background color.

Email API

In the Email API tab, you can sync subscribing emails to some email marketing platforms such as:

  • Mailchimp
  • Active Campaign
  • Sendgrid
  • Hubspot
  • Klaviyo
  • Sendinblue
  • MailPoet
  • GetResponse
  • Mailster


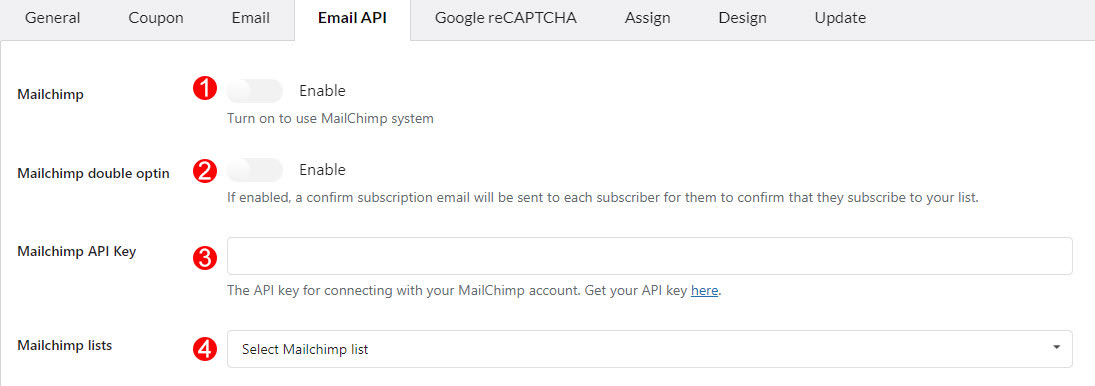
A. Email API configuration for Mailchimp.


1. Enable/Disable MailChimp API.

2. Enable Mailchimp double option to send email to each subscriber to confirm that they subscribe to your list successfully. If they agree to subscribe, the data will be allowed to sync to the Mailchimp contact list.

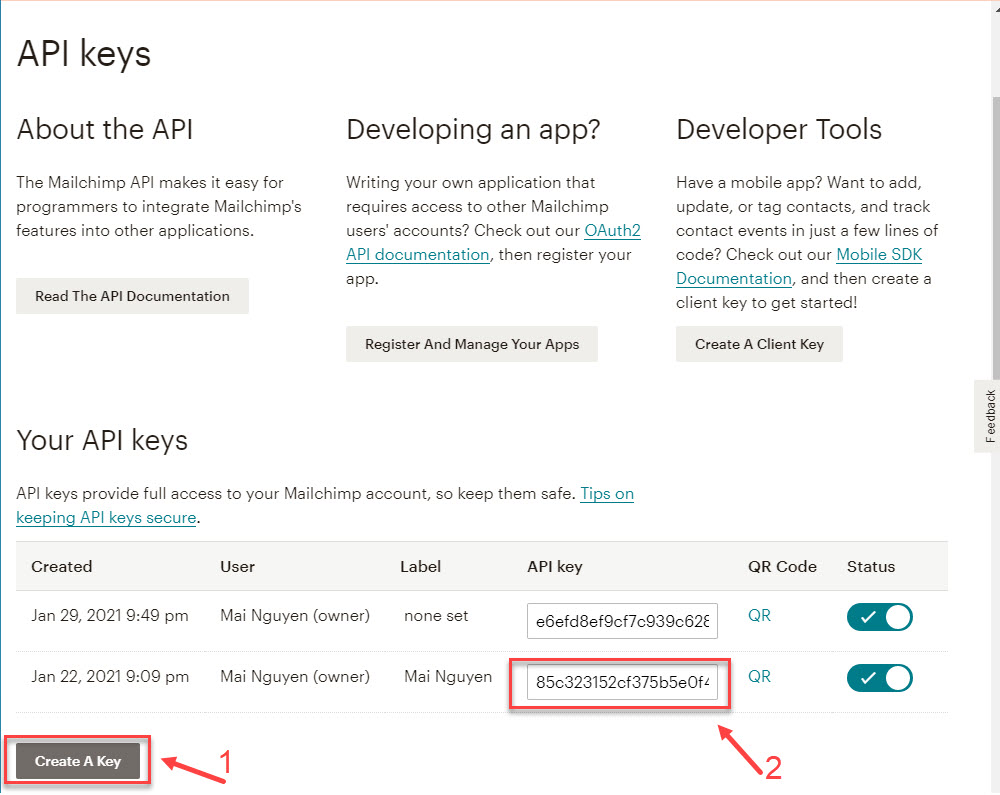
3. Mailchimp API Key: You need to enter the Mailchimp API key to make it work. Click on the “here” to direct to the page you can create an API key on your Mailchimp account. Copy the API key to the “Mailchimp API Key” box in Woo Coupon Box Setting. Then, Click on the Save button.

4. Choose the Mailchimp list you want to work with Woo Coupon Box and save it again.


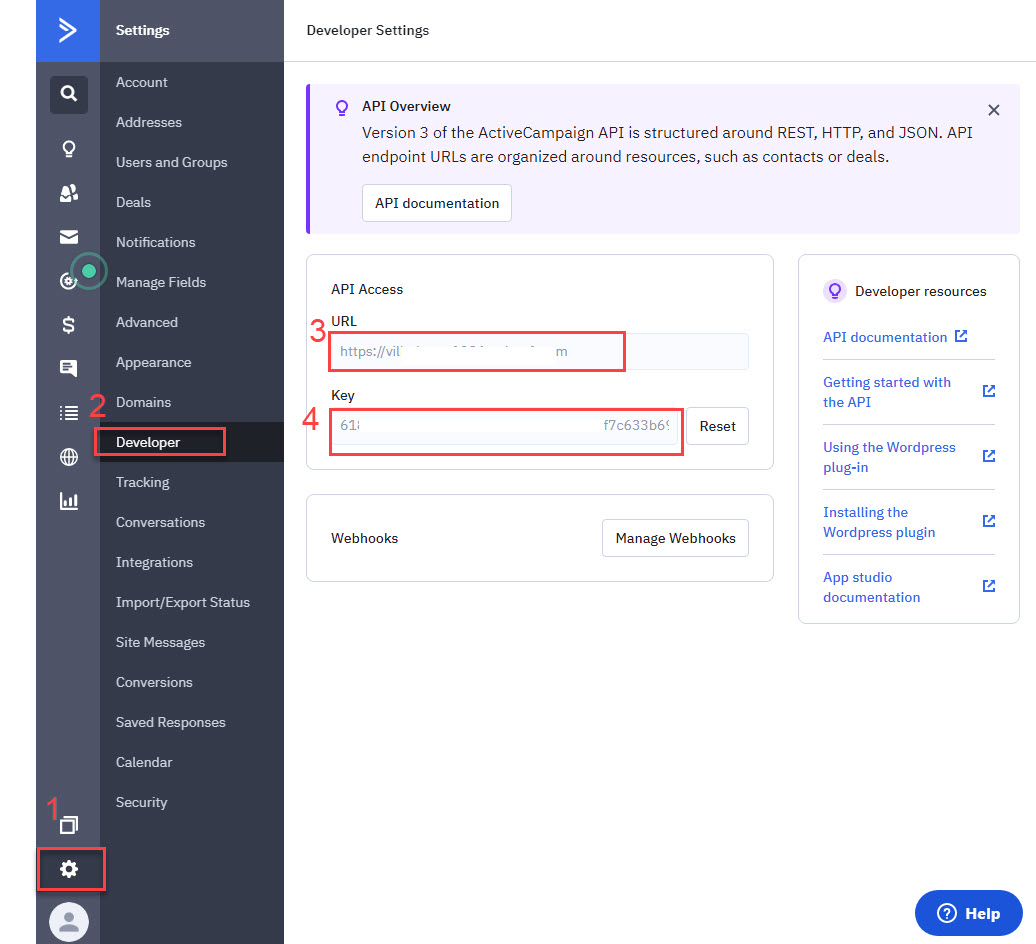
B. Email API configuration for Active Campaign.


1. Enable/Disable  Active Campaign API.

2 and 3: Sign in to your Active campaign account, Go to settings/Dashboard/ Developer/ Copy the URL and Key to the Active Campaign API key and Active Campaign API URL boxes in the Woo Coupon Box Settings then click on the Save button.

4. Choose the active campaign list you want to work with Woo Coupon Box.


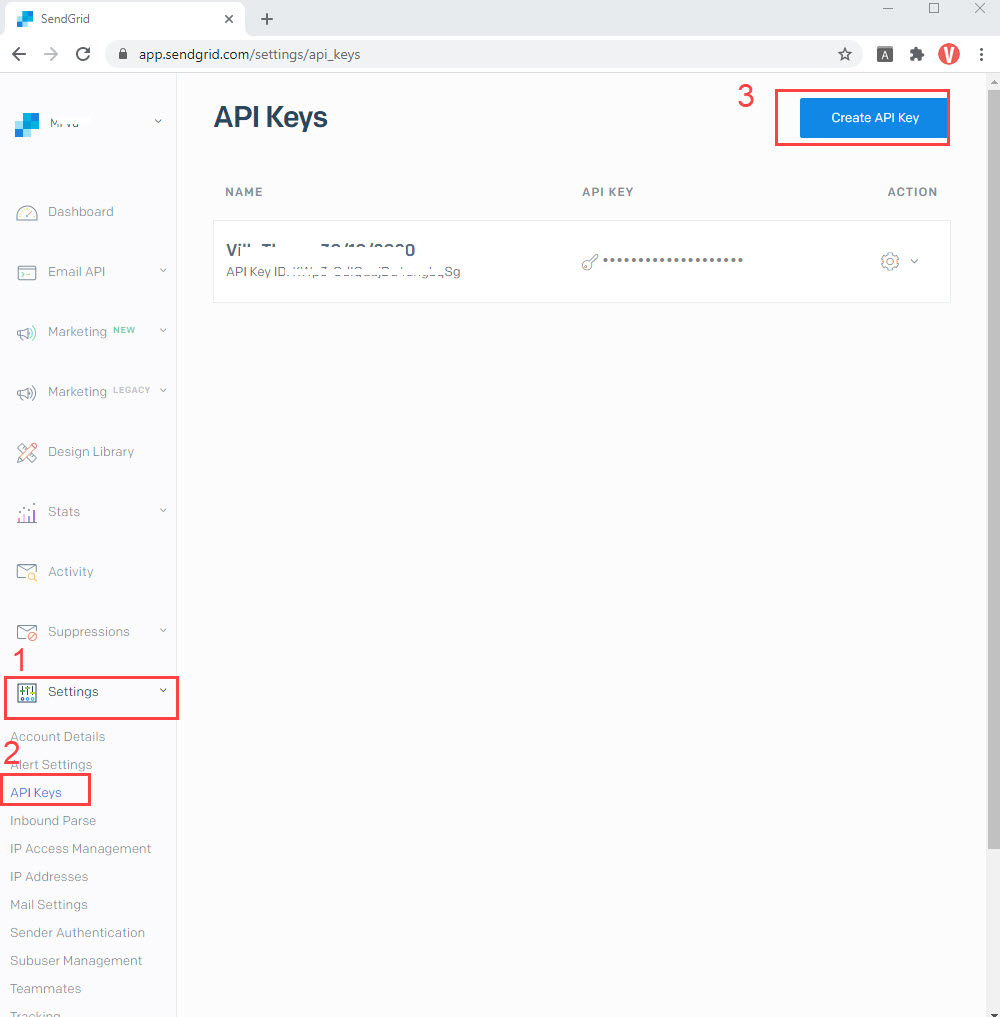
C. Email API configuration for Sendgrid.


1. Enable/Disable SendGrid API.

2. Log in your SendGrid account, go to settings/API keys/ Create an API Key then copy the key which has just been created to the SendGrid API Key box in the Woo Coupon Box  Enter your SendGrid API Key then click on the Save button,

3. Select a SendGrid list, subscribing emails will be added to this list.

D. Email API configuration for Hubspot

1. Enable/Disable Hubspot API.

2. Hubspot API key: You need to enter the Hubspot API key to make it work. Please follow these steps:

  • In your HubSpot account, click the settings icon in the main navigation bar.
  • In the left sidebar menu, navigate to Integrations > API key.
    • If a key has never been generated for your account, click Generate API key.
    • If you’ve already generated an API key, click Show to display your key.

  • With the key displayed, click Copy to copy the key. You can then paste the key to provide it to your developers or use it in your applications.

For further information about Access your HubSpot API key

E. Email API configuration for Klaviyo

1. Enable/Disable Klaviyo API.

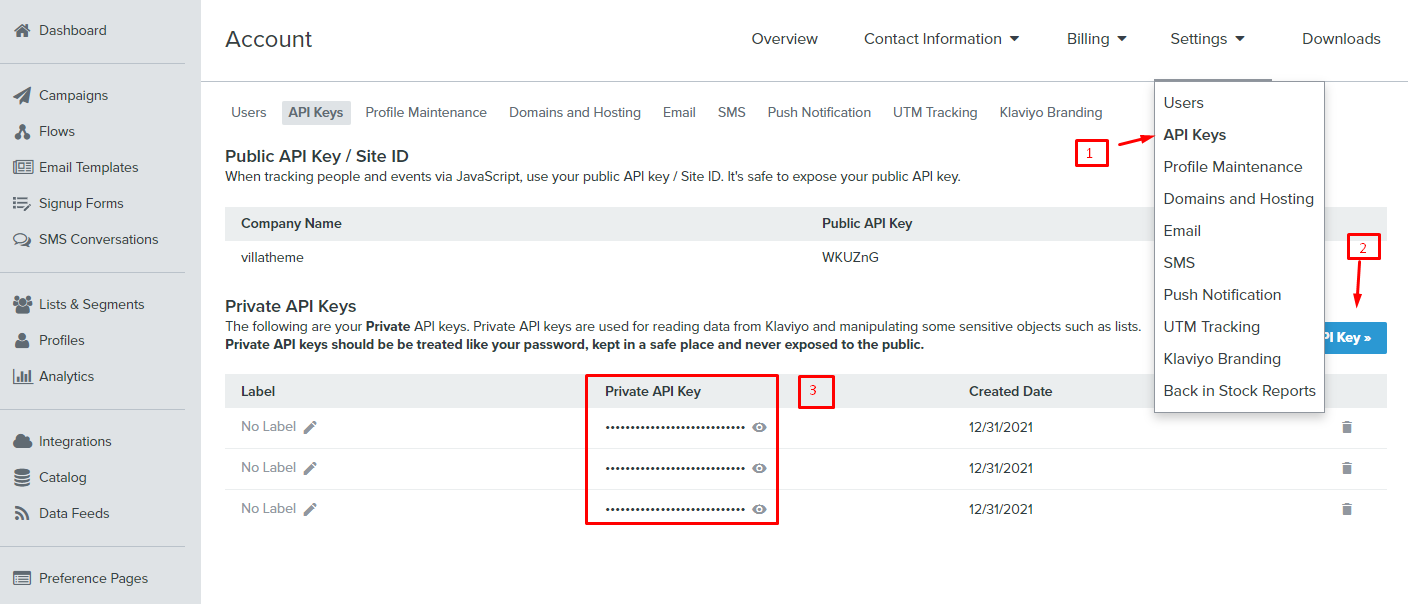
2. Klaviyo API key: You need to enter the Klaviyo API key to make it work. Go to get the API key here.

3. Klaviyo list: Choose the Klaviyo list you want to work with Woo Coupon Box and save it again.


F. Email API configuration for Sendinblue

1. Enable/Disable Sendinblue API.

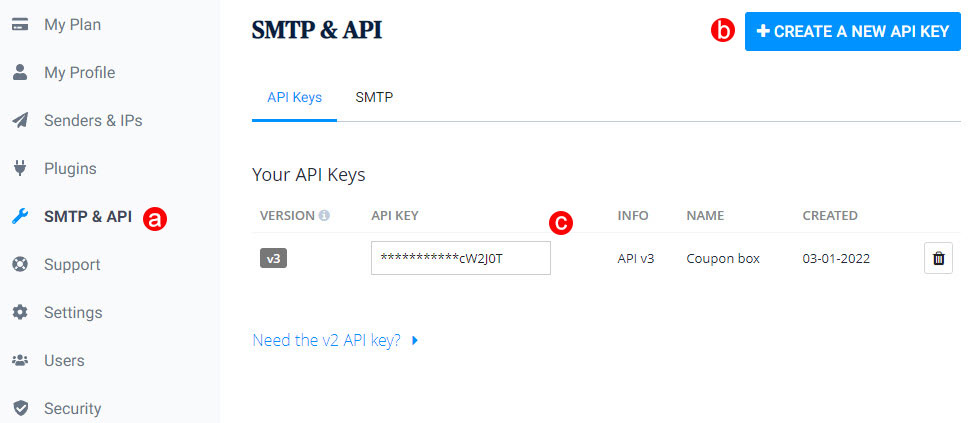
2. Sendinblue API key: You need to enter the Sendinblue API key to make it work.

a. Go to SMTP & API section

b. Create a new API key

c. Copy API key and paste to the Sendinblue API key field in the plugin.

3. Sendinblue list: Choose the Sendinblue list you want to work with Woo Coupon Box and save it again.

G. Email API configuration for MailPoet

To let the MailPoet settings appear on the Email API tab of the WooCommerce Coupon Box plugin, you must install the MailPoet plugin. These steps below:

Step 1: Install the MailPoet plugin

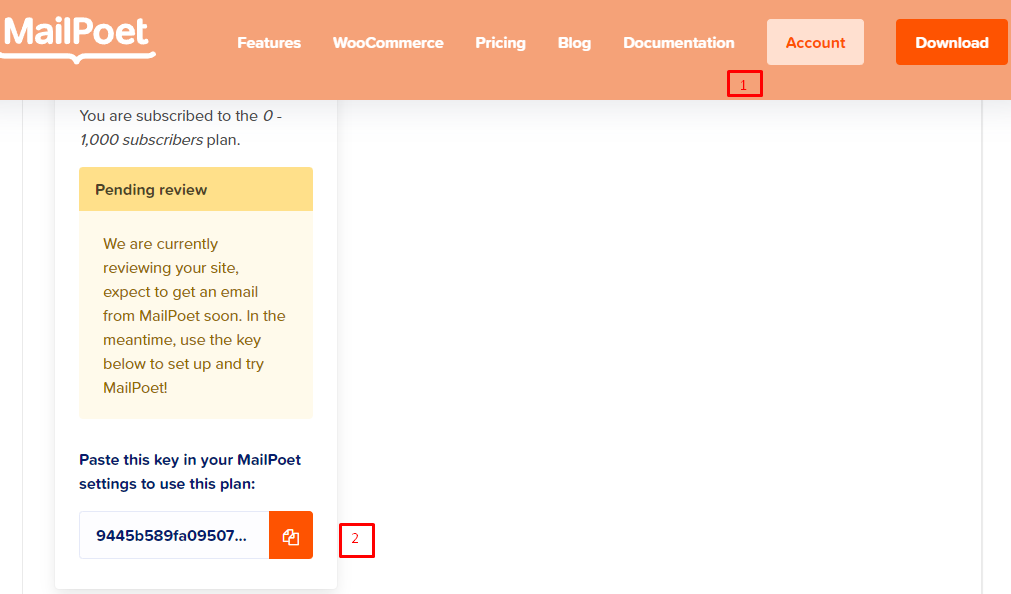
Step 2: Go to the MailPoet website: mailpoet.com and sign up for a plan. Go to Account, Copy the key in your MailPoet settings to use the plan.

Step 3: Go to the MailPoet’s setting in WooCommerce, paste that key.

Step 4: Go to Woo Coupon Box > Mail API, the MailPoet settings will appear there.

Step 5: Enable/Disable Mailpoet API.

Step 6: Choose the Mailpoet list you want to work with Woo Coupon Box and save it again.

H. Email API configuration for Mailster

To let the Mailster settings appear on the Email API settings, you must install and activate the Mailster plugin. This plugin does not have a free version. The steps are as follows:

Step 1: Install the Mailster – Email Newsletter Plugin for WordPress plugin

Step 2: Now the Mailster settings are available in the Email API settings. You don’t need an API key to use, simply enable Mailster API   .

Step 3: Select one Mailster list in  

There’ll always be a Default list.


I. Email API configuration for GetResponse

To connect GetResponse, you must have an active GetResponse account. Then follow steps below:

  1. Enable “GetResponse” in 
  2. Go to this link: https://app.getresponse.com/api
  3. Copy an existing API key there or Generate a new one
  4. Paste the copied API key to  
  5. Hit “Save” button

Now you’ll be able to select a campaign list in your GetResponse account in 

Then the subscription email will go to your selected list.


Google reCAPTCHA

This setting helps you protect your website from spam and abuse.

Google reCAPCHA

ReCaptcha 2: “I’m not a robot” Checkbox. This requires the user to click a checkbox indicating the user is not a robot. This will either pass the user immediately (with No CAPTCHA) or challenge them to validate whether or not they are human. This is the simplest option to integrate with and only requires two lines of HTML to render the checkbox.

ReCaptcha 3: reCAPTCHA v3 allows you to verify if an interaction is legitimate without any user interaction. It is a pure JavaScript API returning a score, giving you the ability to take action in the context of your site: for instance requiring additional factors of authentication, sending a post to moderation, or throttling bots that may be scraping content.

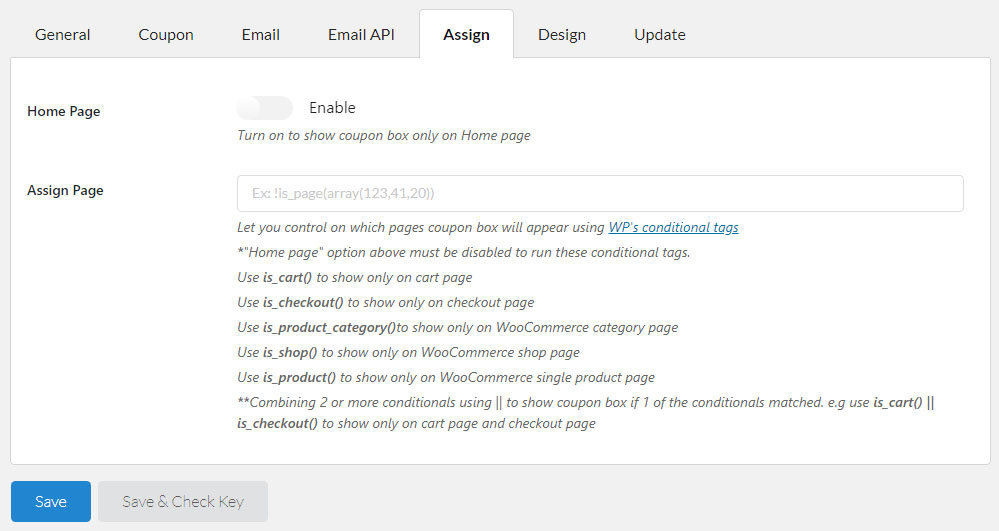
Assign

In the Assign tab, you can select which page where will the Coupon Box pop-up appear.

  1. Home Page: turn on this option, the pop-up will only appear on your homepage/front-page
  2. Assign Page: using WordPress conditional tags to configure which page where the Coupon Box pop-up will appear.

Important note:

To handle WP’s Conditional Tags, this plugin uses eval() which is very dangerous because it allows the execution of arbitrary PHP code. Therefore, please only fill this field with proper conditional tags which are validated and/or provided by trusted developers.

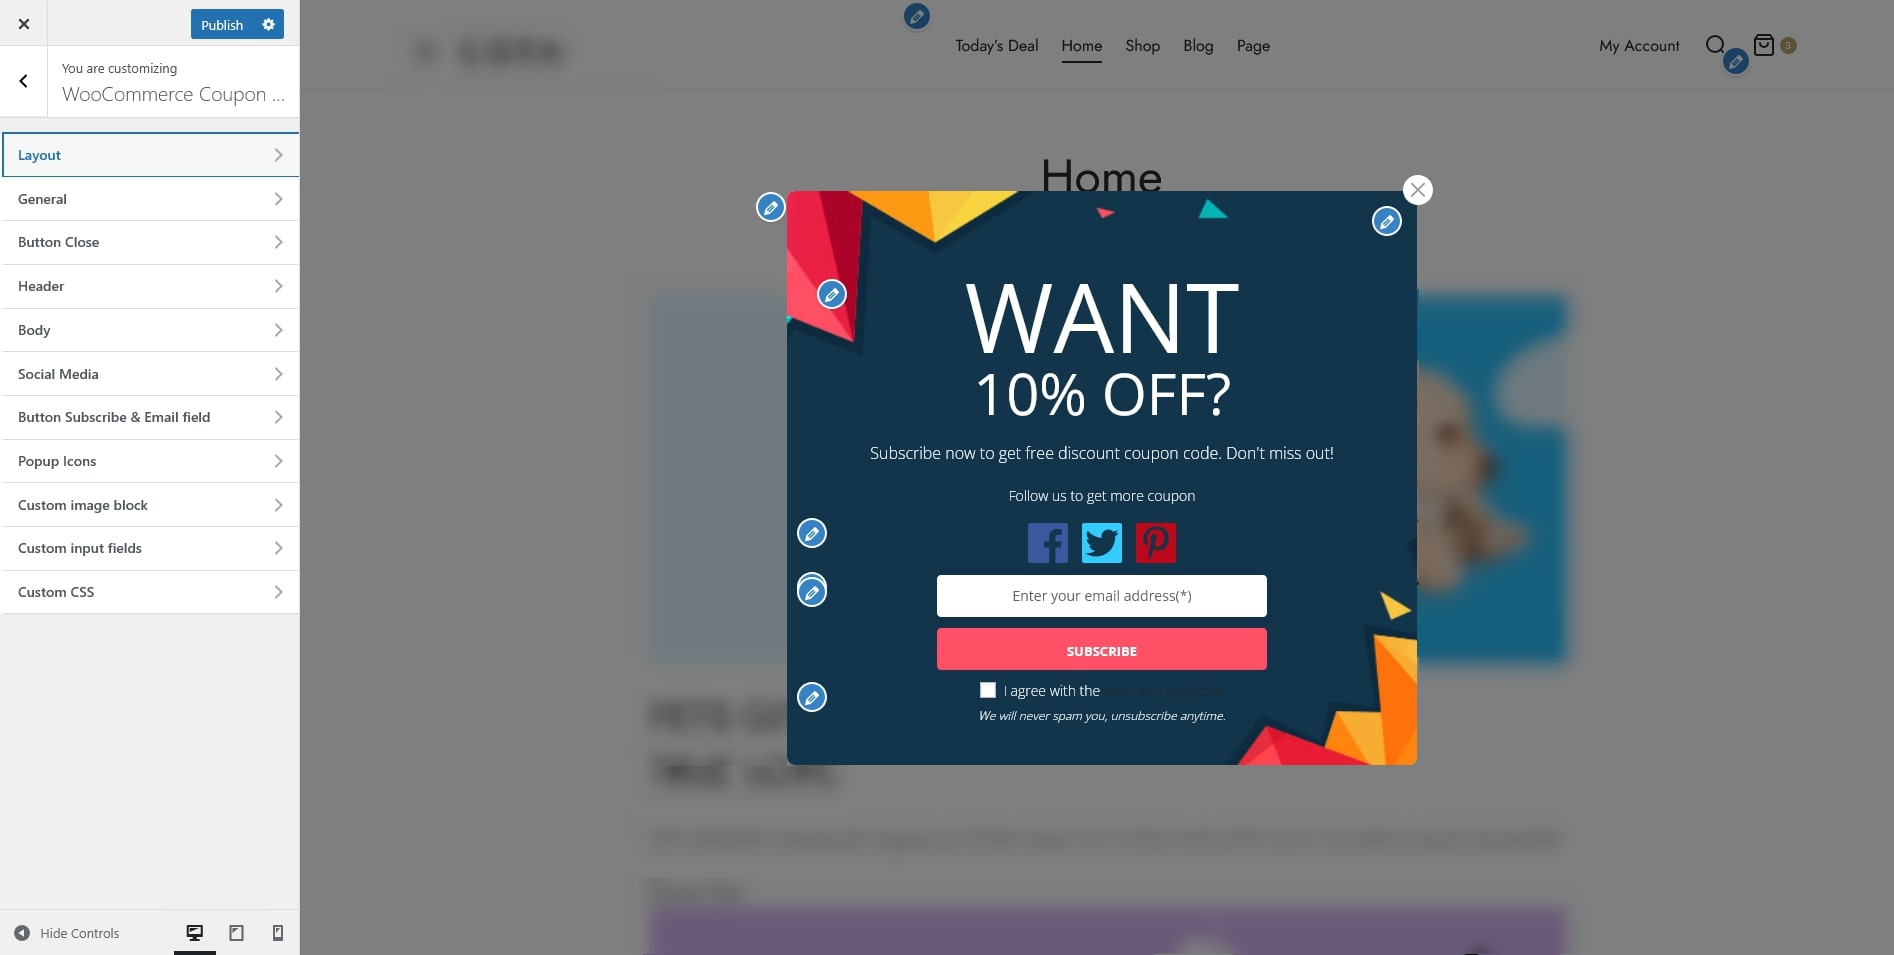
Design

In the Design tab, click on Go to design now to go the Design page of WooCommerce Coupon Box.

In the Design page

  1. Layout: select a layout for the pop-up. There are 4 built-in layouts for you to choose from.
  2. General: on this page, you can set up the pop-up before subscribe and after subscribe with options for:
    Show coupon after subscribing.
    Front-end messages.
    GDPR checkbox and message.
    Background effect.
  3. Button Close: Configure the close button with icons, color, background color, position.
  4. Header: design the pop-up header with font, title, color, background color/image.
  5. Body: design the pop-up body with font, title, color, background color/image.
  6. Social Media: select social network icons and add it to your Coupon Box pop-up.
  7. Button Subscribe & Email Field: design the subscribe button with options for title, text color, and background color. And the email field with Emai Input Rounded Corner, Email Input Text Color, Email Input Background Color.
  8. Pop-up Icons: this option will display a small icon after closing the pop-up, allows users to call out the pop-up again.
  9. Custom Input fields: this option allows you to add more information field to the pop-up. The available custom fields are first name, last name, mobile, birthday, gender. You can choose which field is required.
  10. Custom CSS: add your own custom CSS code to design the front-end of the Coupon Box pop-up.

Update

In Update tab, fill in your Envato purchase code to active the auto-update feature.

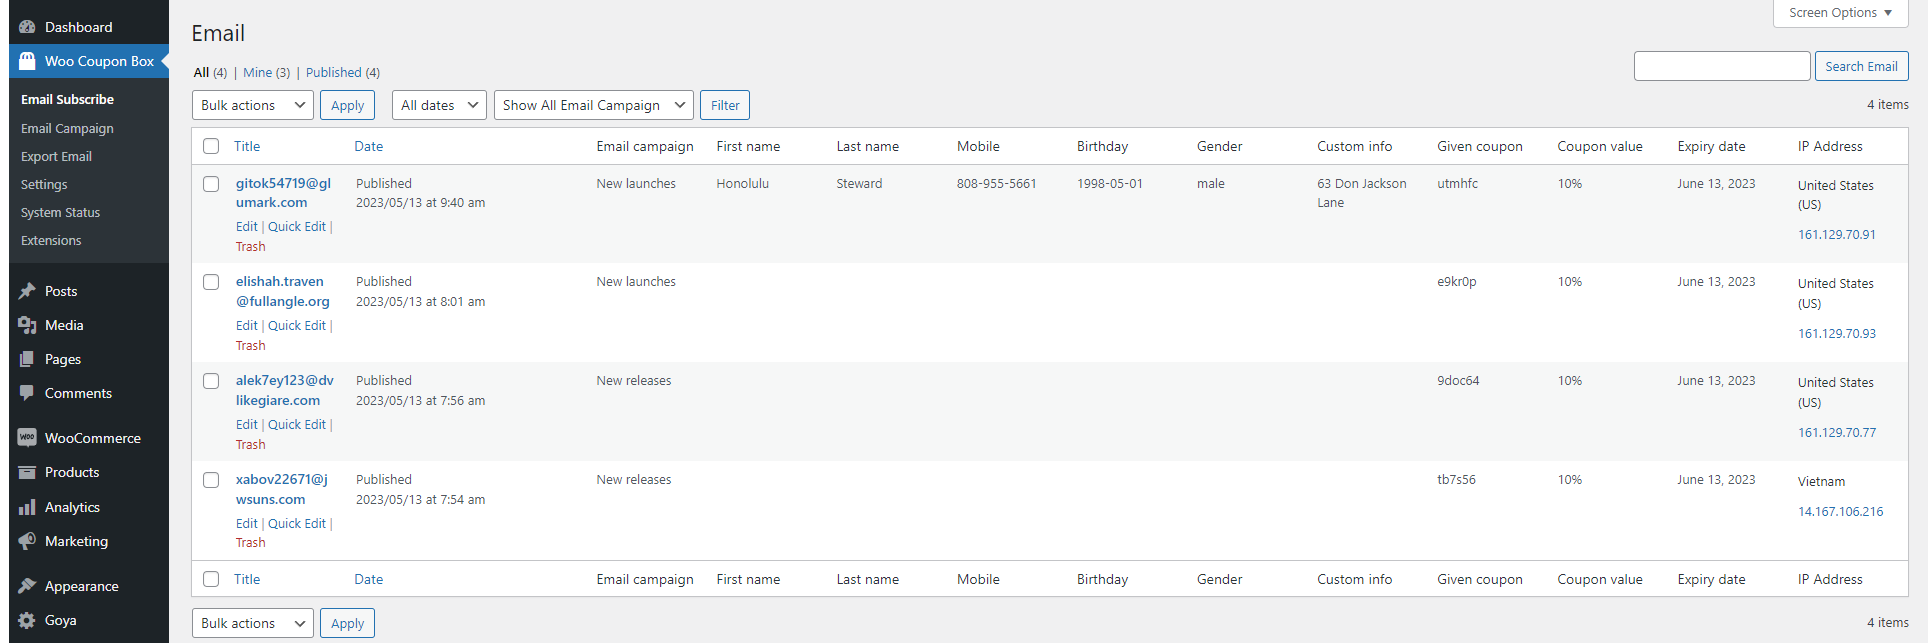
Email Subscribe and Email Campaign

In Woo Coupon Box/ Email Subscribe, you can check subscribed emails with information for the email address, subscribing time, email campaign, given coupon, info of custom fields (if any) MailChimp list and Active Campaign list, and customer’s IP address.

In Woo Coupon Box/ Email Campaign, you can create new/delete/edit email campaign. By default, you will have an Uncategorized campaign


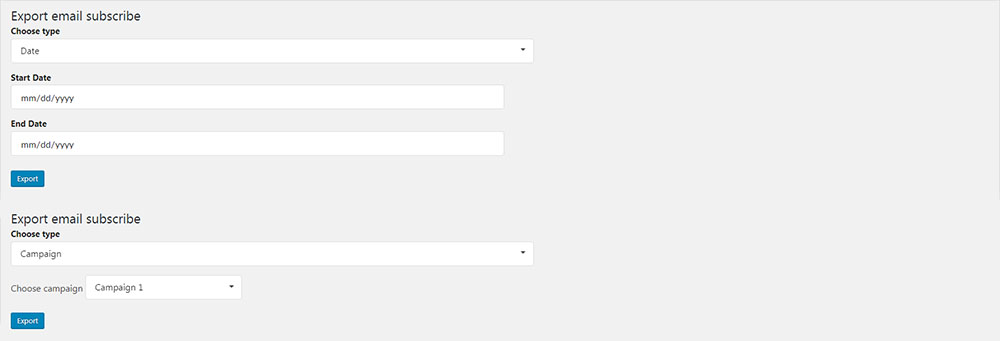
Export emails

In Woo Coupon Box/ Export Email, you can export emails by date or by campaigns. Emails addresses will be exported as an excel file.

Shortcode

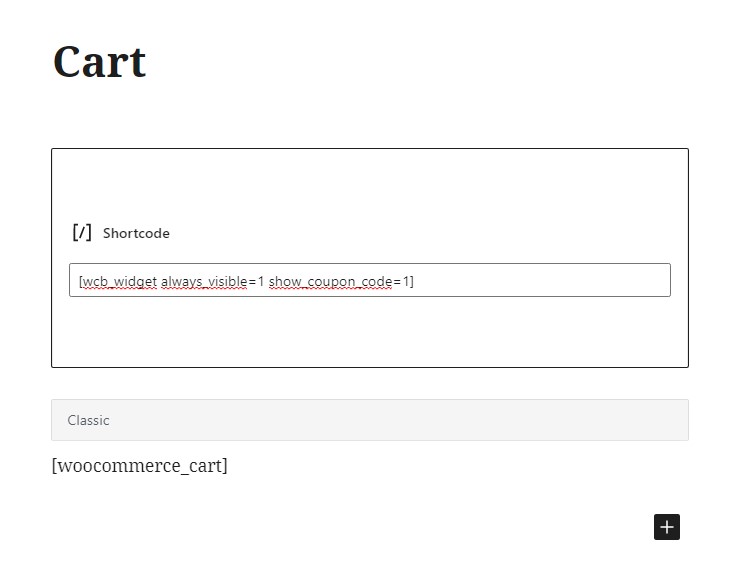
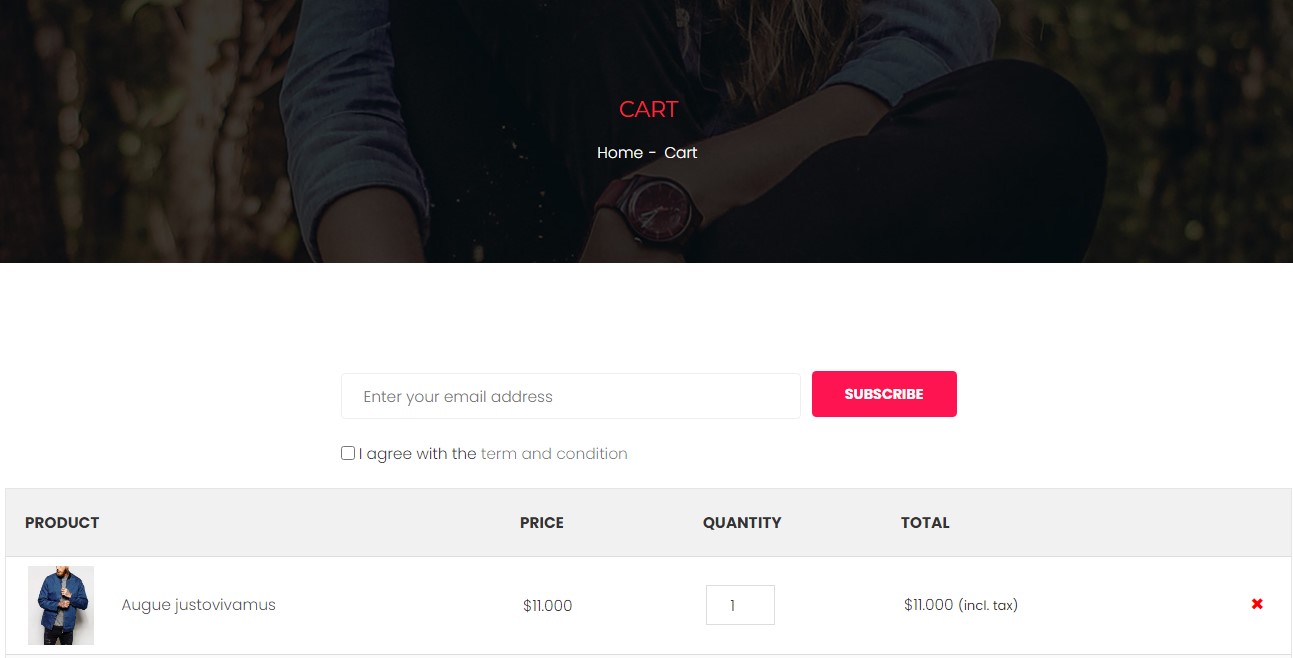
You can use a shortcode [wcb_widget always_visible=1 show_coupon_code=1] to display subscription form everywhere.

All parameters:

type: There’re 2 templates, fill value “1” or “2”

always_visible: Fill “1” to always show the form, even with logged-in/subscribed users (checked using browser cookies). Otherwise fill “0”

bt_color: Button color, add color code as value for this parameter

bt_bg_color: Background color of the button, add color code as value for this parameter

bt_border_radius: Adjust the corner round, add number of pixel as value for this parameter

input_border_radius: Border radius of the input field, add number of pixel as value for this parameter

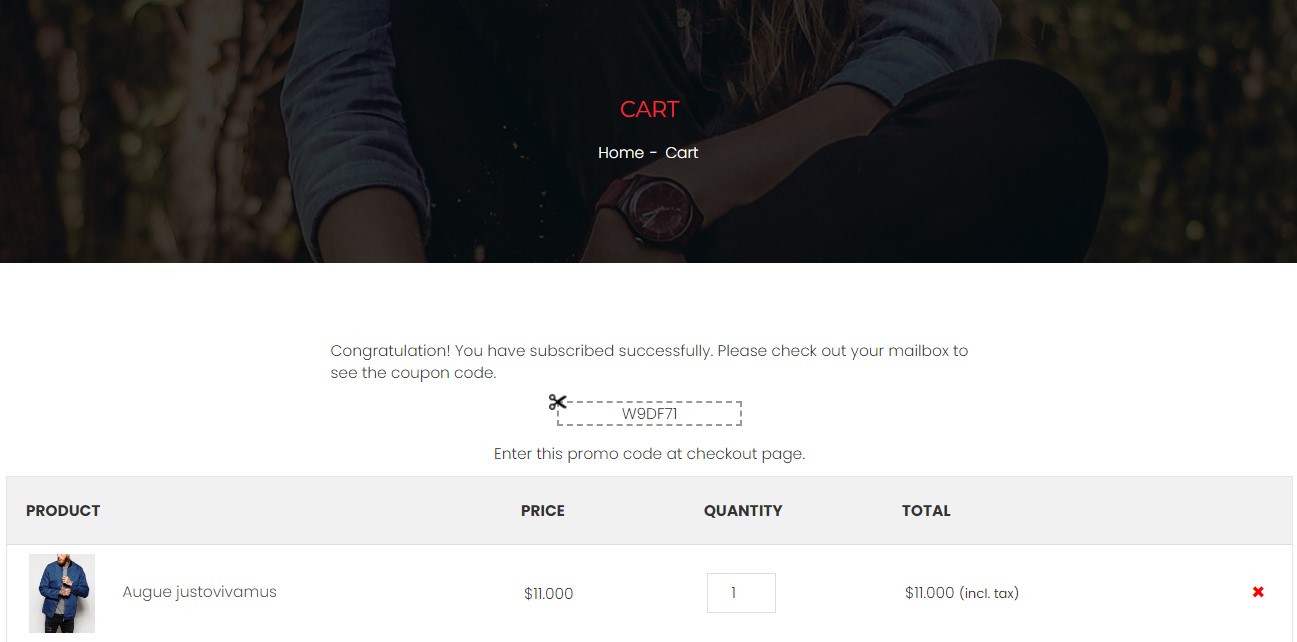
show_coupon_code: Fill value “1” if you want to show coupon code below Message After Subscribing

show_first_name: Fill value “1” if you want to show custom field “First name”

show_last_name: Fill value “1” if you want to show custom field “Last name”

show_mobile: Fill value “1” if you want to show custom field “Mobile”

show_birthday: Fill value “1” if you want to show custom field “Birthday”

show_gender: Fill value “1” if you want to show custom field “Gender”

show_additional: Fill value “1” if you want to show custom field “Additional field”

An example for a shortcode with full parameter: [wcb_widget always_visible=1 show_coupon_code=1 type=1 show_first_name=1 show_last_name=1 show_mobile=1 show_birthday=1 show_gender=1 show_additional=1 bt_color=#FFFFFF bt_bg_color=#990C31 input_border_radius=20 bt_border_radius=20]

1


Plugin Author Compatible
WooCommerce Email Template Customizer  VillaTheme Fully
Elementor for shortcode Elementor Fully
WPML OnTheGoSystems Fully
Polylang WP SYNTEX Fully

Extra Information


Thank you for your attention!

If you have any question, please create a topic at our FORUM, we will support within 24 hours.