Input fields
By default, only the email address field is required and visible, as it’s necessary for prize delivery. However, you have the option to enable two additional fields to collect more user information: the user’s name and phone number.
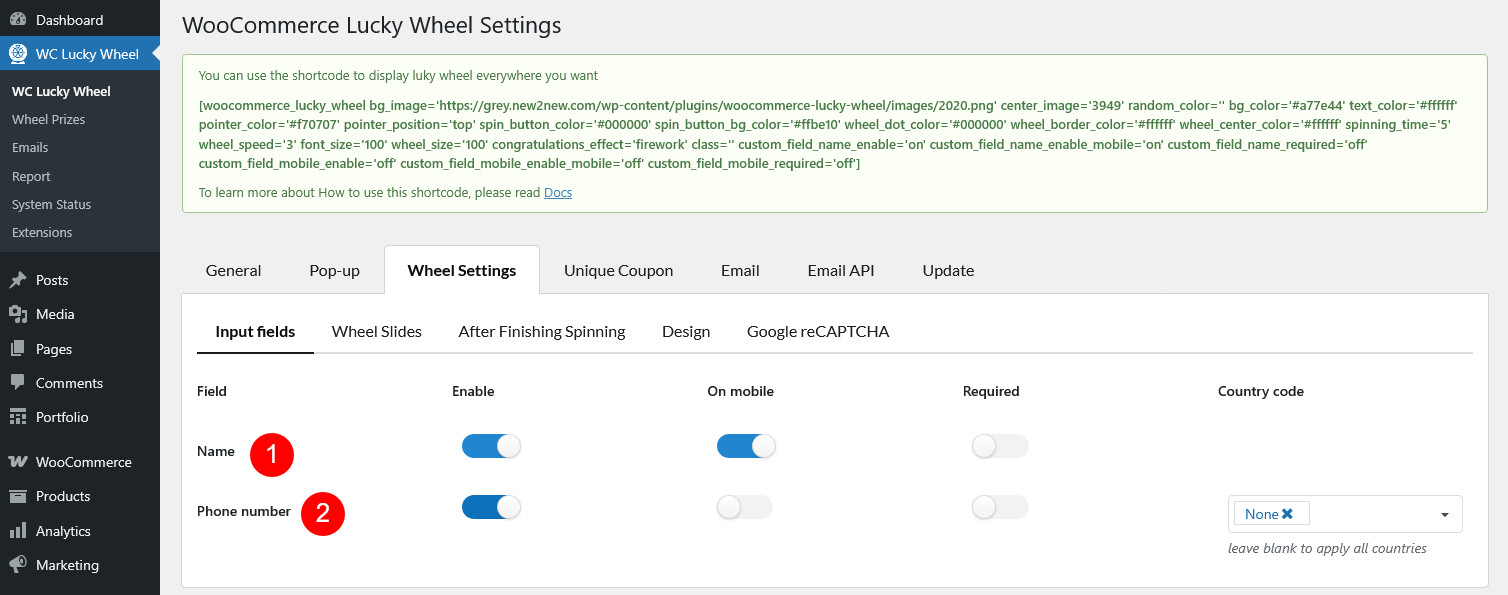
- “Name” field:
- Enable a field for users to enter their name before spinning
- Enable a field for users to enter their name before spinning on the mobile
- Make this field mandatory. User must enter their name before spinning
- “Phone number” field:
- Enable a field for users to enter their phone number before spinning
- Enable a field for users to enter their phone number before spinning on the mobile
- Make this field mandatory. User must enter their phone number before spinning
- Enable to display the country code on the phone number field. Select “None” to disable this feature
Wheel Slides
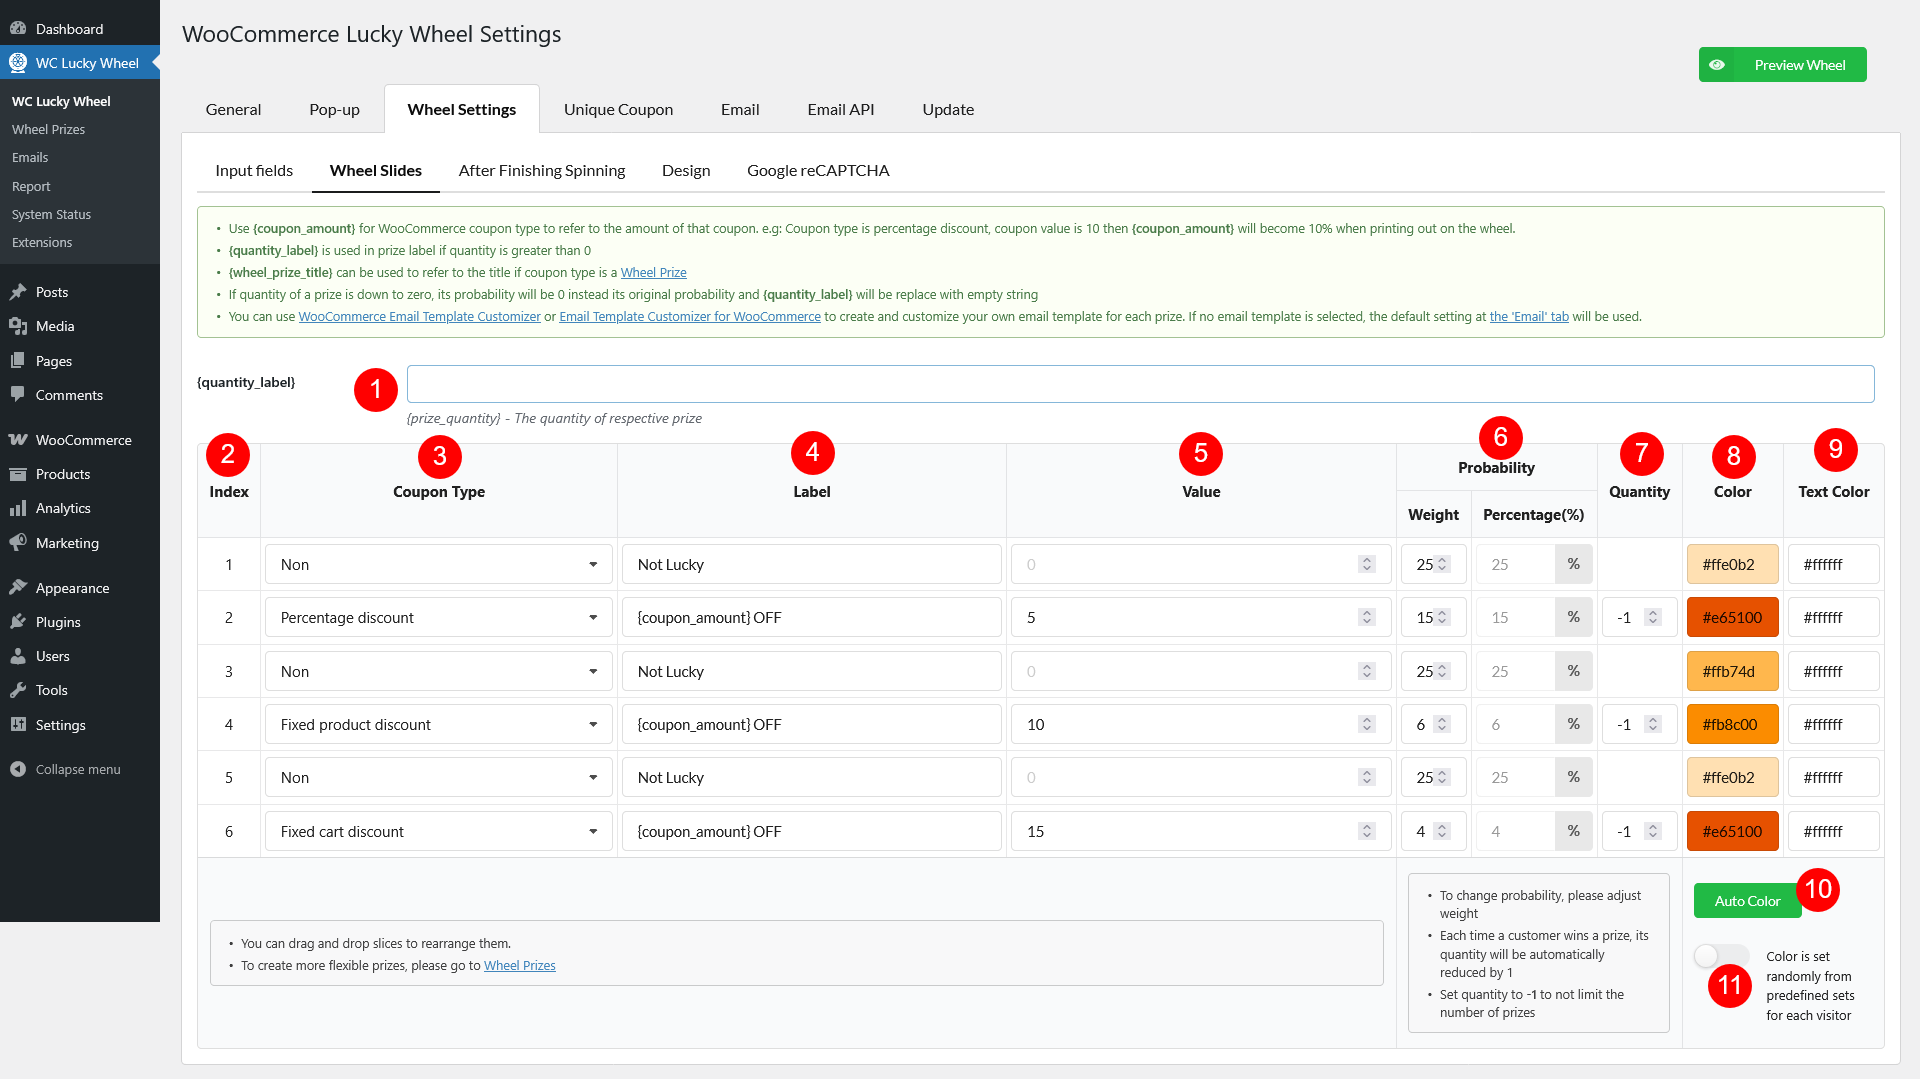
1. {quantity_label} is used in prize label if quantity is greater than 0
2. Index: The number of wheel parts with each prize on the lucky wheel.
3. The coupon type: There are 6 coupon types you can select:
– Non: the visitor wins nothing.
– Existing coupon: choose an existing coupon to give.
– Percentage discount: the plugin will generate a coupon with your select value to give.
– Fixed product discount: discount a specific amount on a product price.
– Fixed cart discount: discount a specific amount on cart total.
– Custom: give a custom prize to customers. Anything you want to give.
4. Label: Set up coupon labels, and prize labels that you offer to your customers. You can use:
– The shortcode {coupon_amount} to display the coupon value in labels.
– The shortcode {quantity_label} to display in prize label if quantity is greater than 0. For example: An Iphone {quantity_label}, if there are 3 Iphone prizes left, the wheel part will show: Iphone (3 left).
– To create more flexible prizes, please go to Wheel Prizes section in the plugin setting.
5. Values: Value of prizes can be coupon codes with respective minus amount with coupon value and/or physical prizes.
– For existing coupon type, you can search for available WooCommerce coupons, you can learn how to create and manage WooCommerce Coupon here.
– For generated coupon type, you can add the coupon value.
6. Probability: You can change the probability to get a prize. To change probability, please adjust weight, weight total must be 100%.
7. Quantity: The Number of prizes available in stock to give customers. Set quantity to -1 to not limit the number of prizes. Each time a customer wins a prize, its quantity will be automatically reduced by 1.
8. Color: Select the slide background color of each slide.
9. Text color: Select the text color of each wheel slide.
10. Auto color: set up slide color automatically.
11. Enable option to Color is set randomly from predefined sets for each visitor.
After Finishing Spinning

- Automatically hide wheel after: Hide the wheel in how many seconds after one spin. Leave 0 to disable this feature
- Winning effect: Select one winning effect when the user wins a prize.
- Winning message if prize is WooCommerce coupon: Show the content built in this box when the user wins a WooCommerce coupon.
- Winning message if prize is custom type: Show this message in this box when the user wins a custom prize.
- “Apply Coupon” button: Enable this option to show the “Apply Coupon” button
- “Apply Coupon” button redirect: Add the URL the user will be redirected to once they click “Apply Coupon”
- “Apply Coupon” button color: Color of the text “Apply Coupon”
- “Apply Coupon” button background color: Background color of the button.
- “Apply Coupon” button font size: Size of the text “Apply Coupon”
- “Apply Coupon” button rounded corner: Round the 4 corners of the button.
- Frontend message if lost: Show this message when the user does not win.
Design
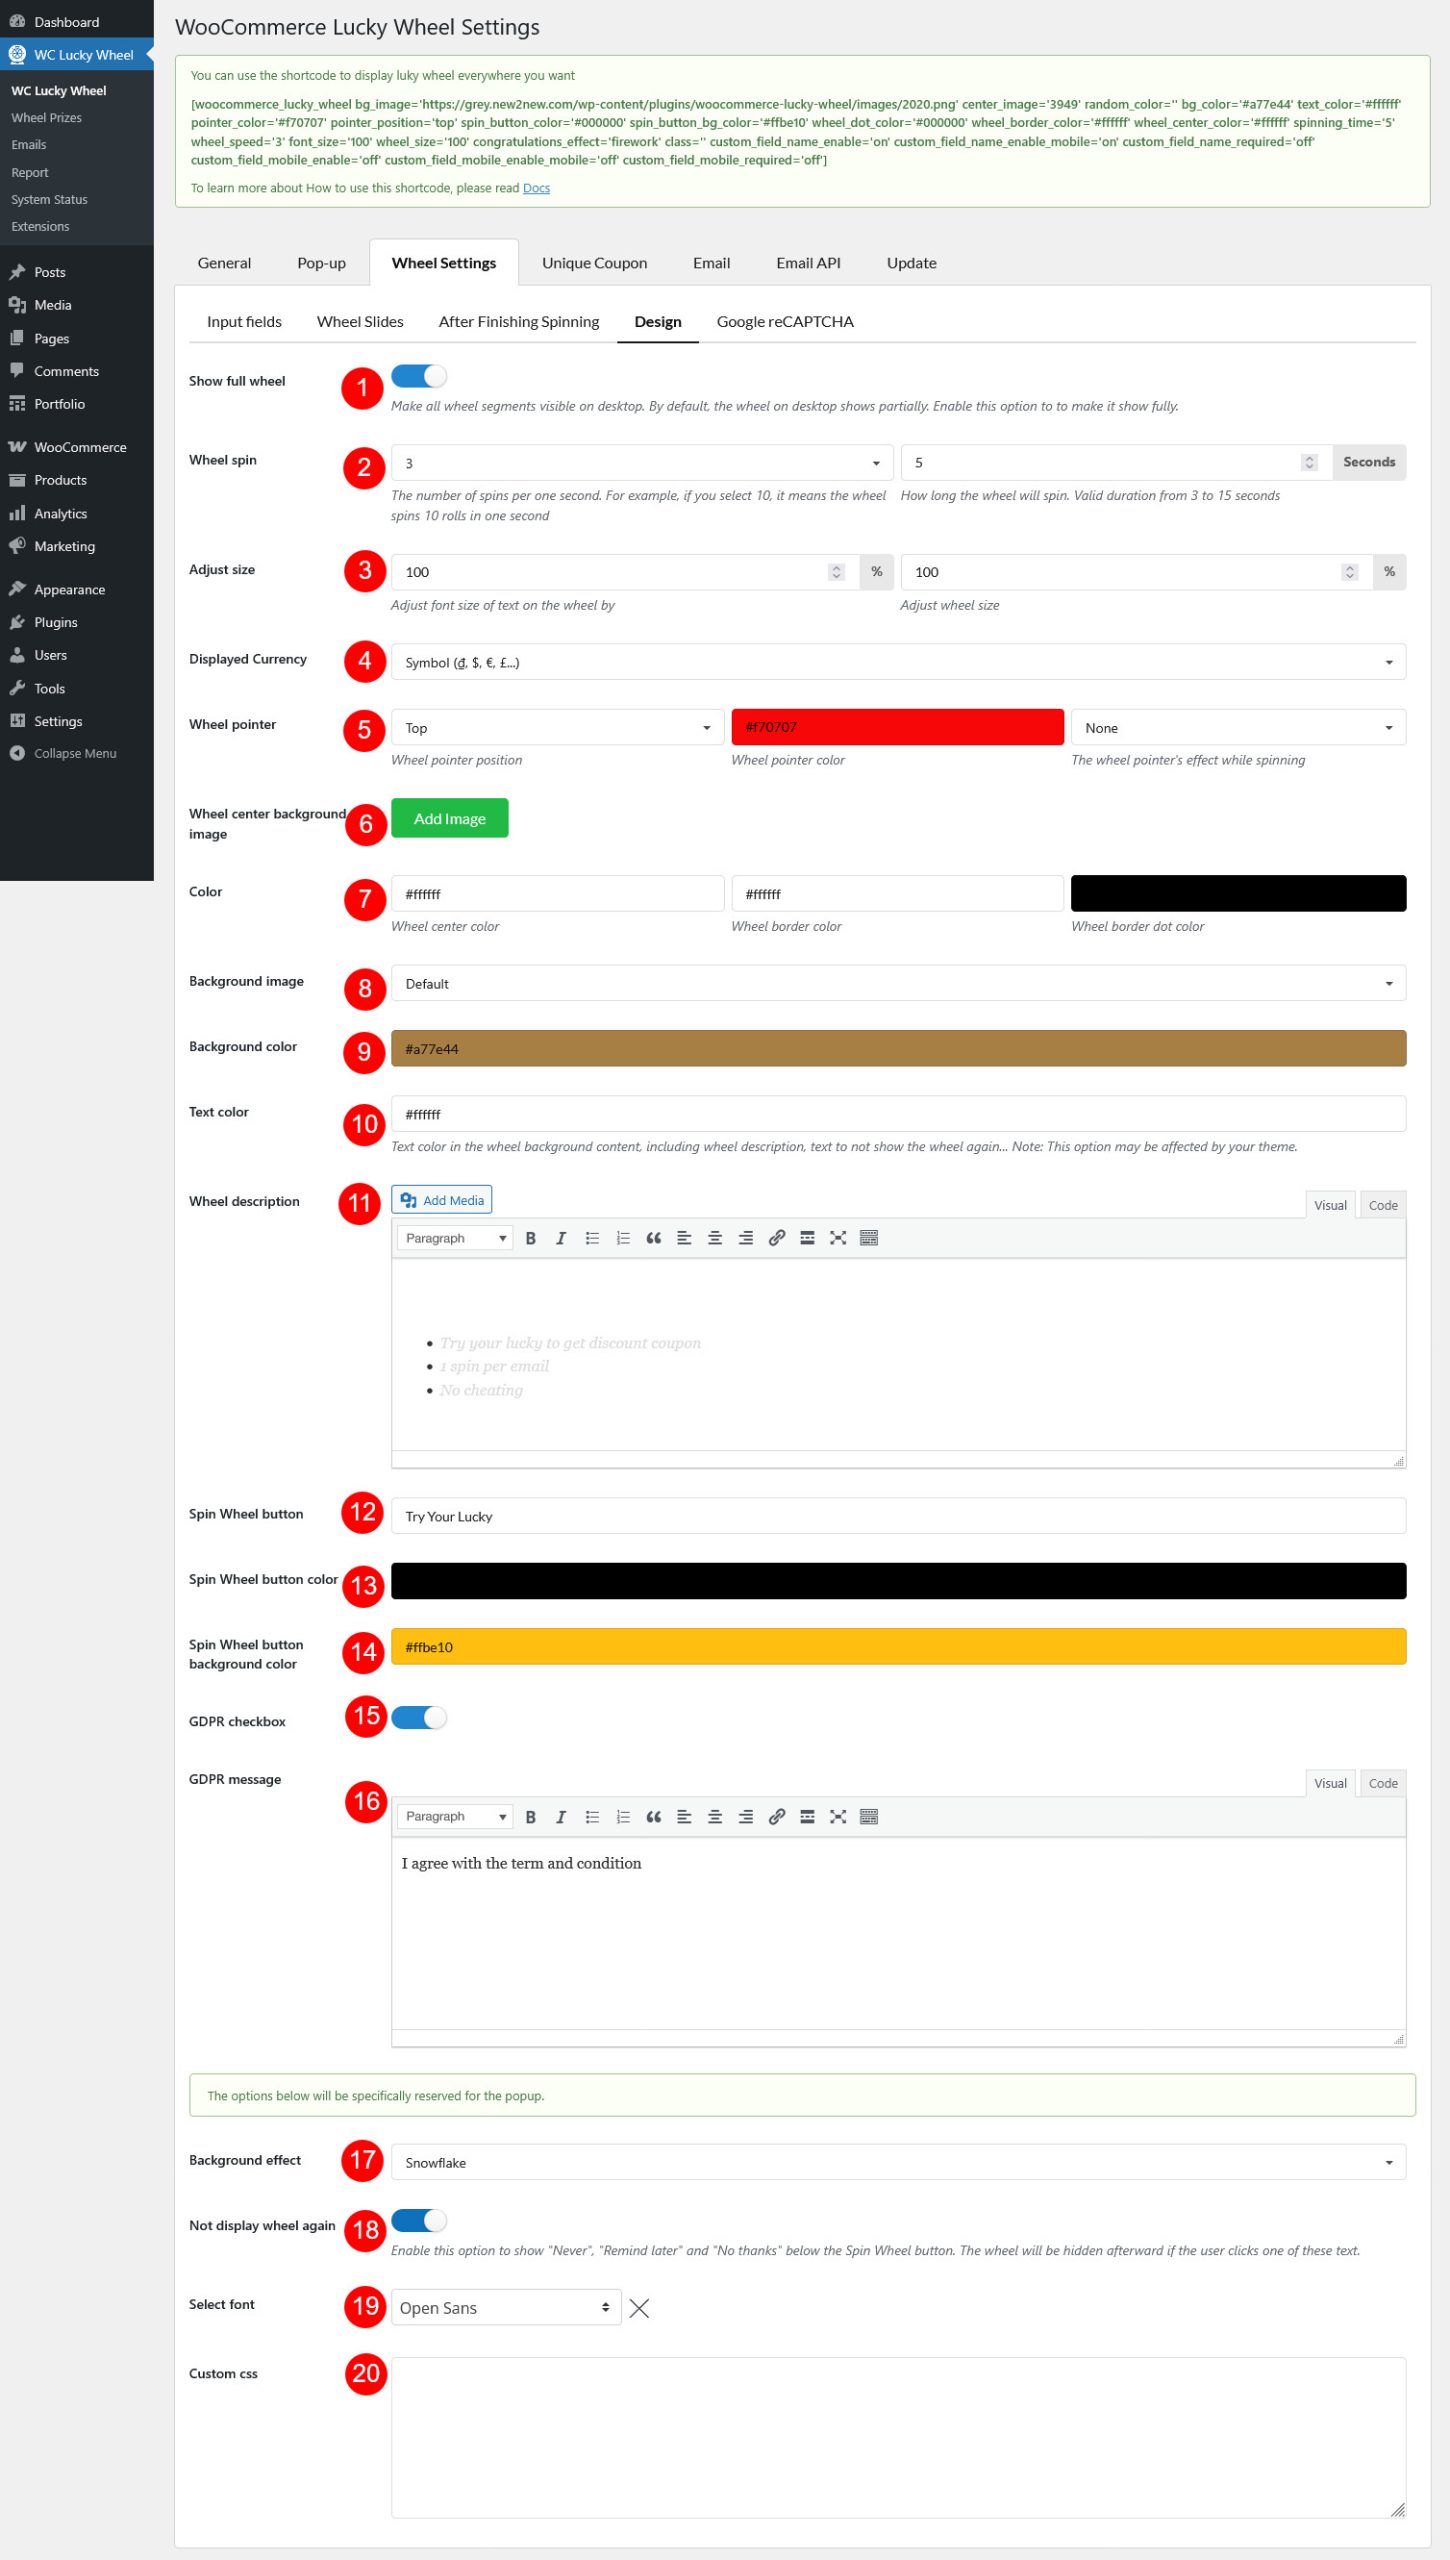
- Show full wheel: Choose the front-end size of the lucky wheel. You can choose to display full wheel or half on front-end.
- Wheel spin: The number of spins per one second. Choose the speed/spin per second in the left field and the spinning duration in the right field
- Adjust size
- Adjust font size of text on the wheel by: Adjust font size of the text in the wheel.
- Adjust wheel size by: Adjust the wheel size.
- Displayed Currency: Select if you want to display the currency symbol ($) or currency code (USD) on the wheel.
- Wheel pointer
- Wheel pointer position: Select the position of the lucky wheel pointer: Center, top, right, bottom, random.
- Wheel pointer color: Choose color for the pointer.
- The wheel pointer’s effect while spinning: Choose the wheel pointer effect while spinning – None, Change color, or Move
- Wheel center background image: Add an image for the wheel center area
- Color: Adjust the color for the wheel center area, wheel border and the dots inside wheel border
- Background image: Select the wheel background image.
- Default
- Custom image
- Background color: Select wheel background color.
- Text color: Text color in the wheel background content, including wheel description, text to not show the wheel again. This option may be affected by your theme.
- Wheel description: Create the description for your wheel.
- Spin Wheel button: Add the label for the Spin Wheel button.
- Spin Wheel button color: Select the color for the label above.
- Spin Wheel button background color: Select the background color for the Spin Wheel button
- GDPR checkbox: Enable GDPR checkbox.
- GDPR message: Add your GDPR message.
- Background effect: Select one effect for the wheel background.
- Not display wheel again: This option shows a few text, allow user to hide the wheel after clicking one of them.
- Select font: Font of the wheel background text content.
- Custom CSS: Add your custom CSS if there’s no customization above match your need.
Google reCAPTCHA
Google reCAPTCHA helps protect websites from spam and abuse. A “CAPTCHA” is a turing test to tell human and bots apart. It is easy for humans to solve, but hard for “bots” and other malicious software to figure out. By adding reCAPTCHA to a site, you can block automated software while helping your welcome users to enter with ease.
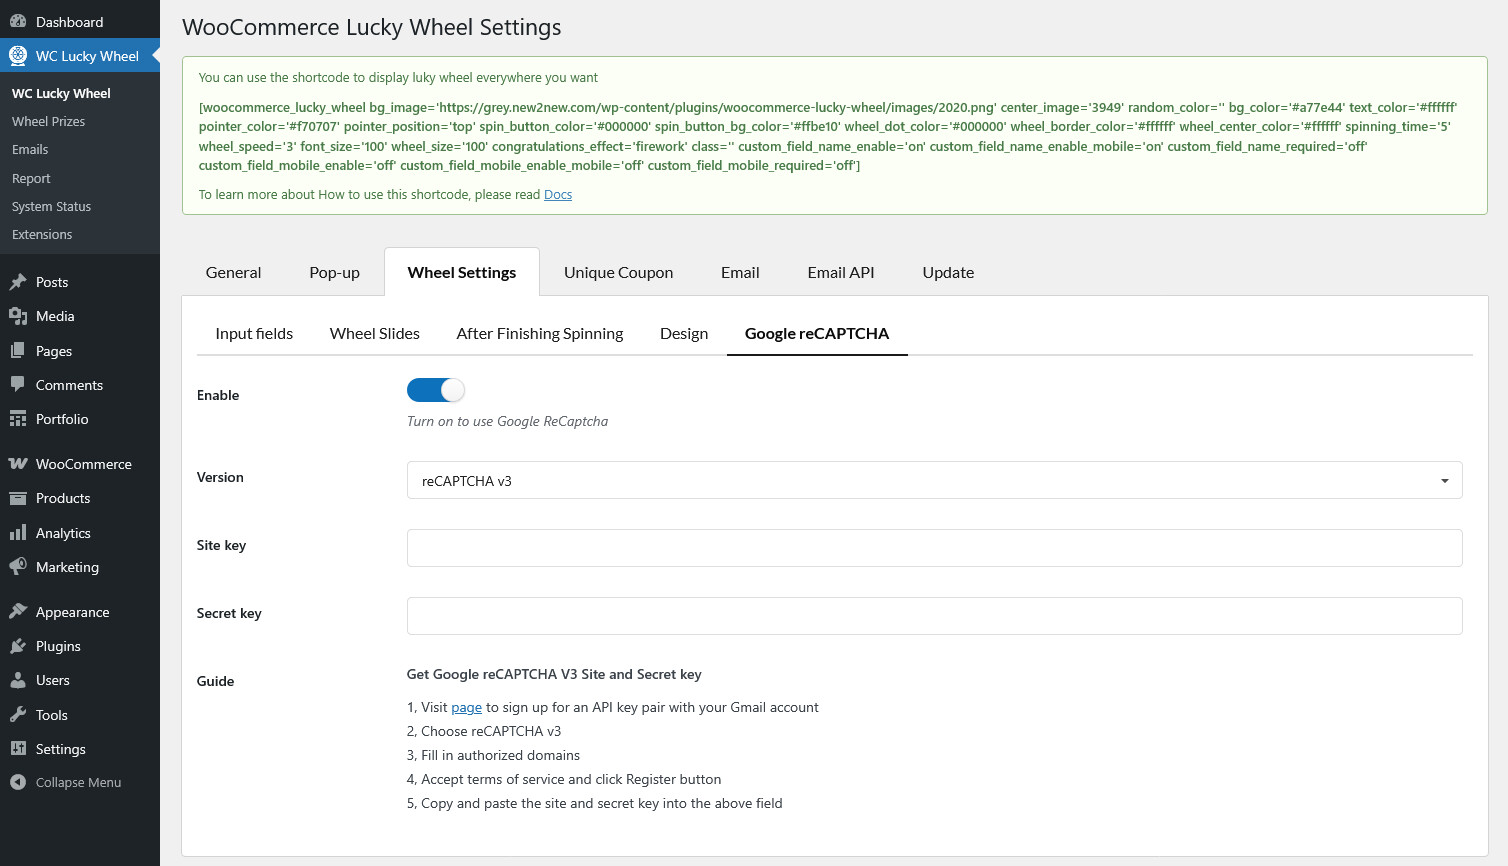
- ReCaptcha 2: “I’m not a robot” Checkbox. This requires the user to click a checkbox indicating the user is not a robot. This will either pass the user immediately (with No CAPTCHA) or challenge them to validate whether or not they are human. This is the simplest option to integrate with and only requires two lines of HTML to render the checkbox.
- ReCaptcha 3: reCAPTCHA v3 allows you to verify if an interaction is legitimate without any user interaction. It is a pure JavaScript API returning a score, giving you the ability to take action in the context of your site: for instance requiring additional factors of authentication, sending a post to moderation, or throttling bots that may be scraping content.
* Note: Follow the Guide to get Google reCAPTCHA V3 Site and Secret key.