- Start
- FILE INCLUDES
- Download and Install
- Introduction
- How to use
- How does it work
- Compatibility
- Extra Information
Copyright Villatheme 2015-2026
Created: 2024.07
Last updated: 2026.03 – Updated version: 1.0.8
By: VillaTheme
Thank you for using our plugin. If you have any questions that are beyond the scope of this documentation, please feel free to request support at our Support Forum. Thanks so much!
Make sure that those limits are to a minimum as follows for free-trouble while installing:
Go to Dashboard >> Plugins >> Add Plugin
depart-deposit-and-part-payment-for-woo.zip downloaded from this official source
Watch this tutorial video for installation and more.
Once you install DEPART, the plugin creates:
And, there are 2 types of deposit you can configure:
For customers, they can view the assigned payment plans for products on the front end and create deposit orders as desired. Visit this documentation for details.
For admins, learn about global deposit rules, general settings, and how to configure them as suggested above.
When a product has deposit rules applied, customers will see a dedicated section on the product page, above the “Add to cart” button, that includes:
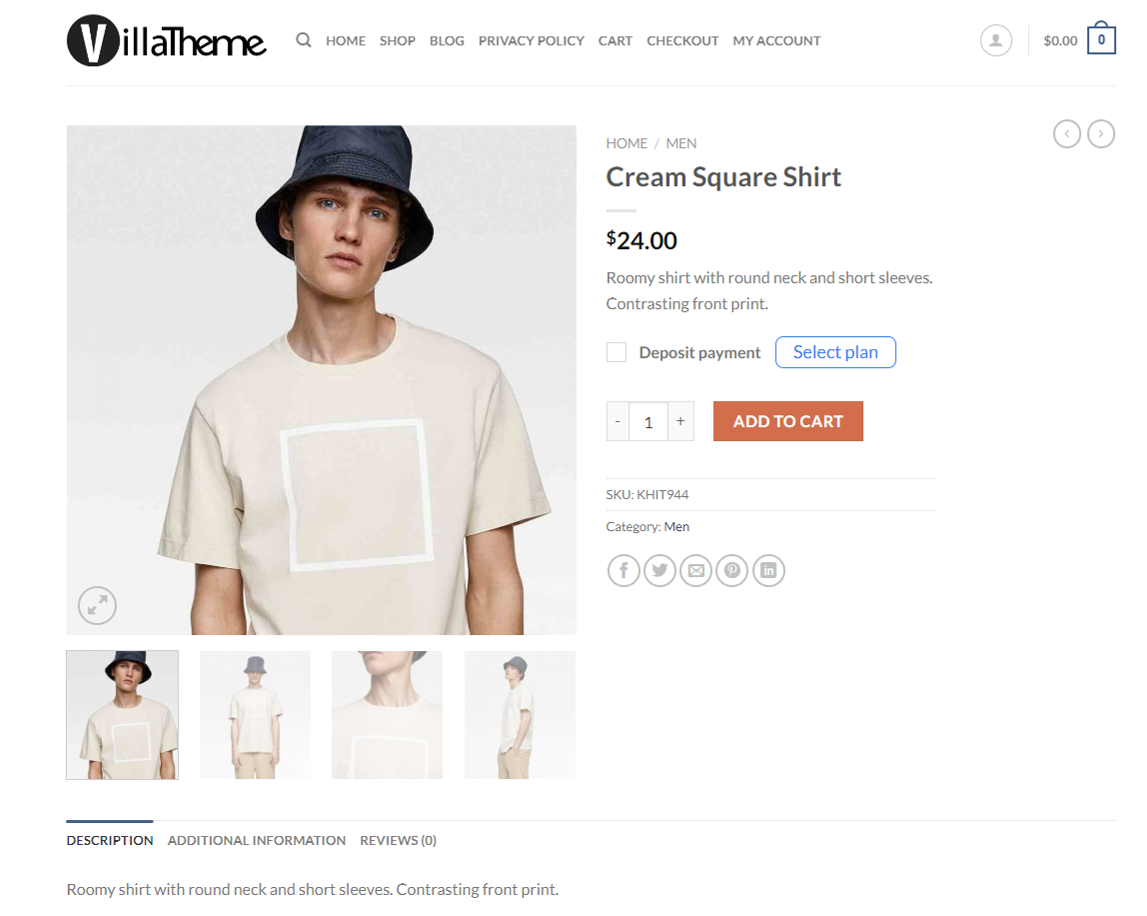
Either you check the “Deposit payment” checkbox or click the “Select plan” button, a popup that shows available plans will appear, simply choose your ideal plan:
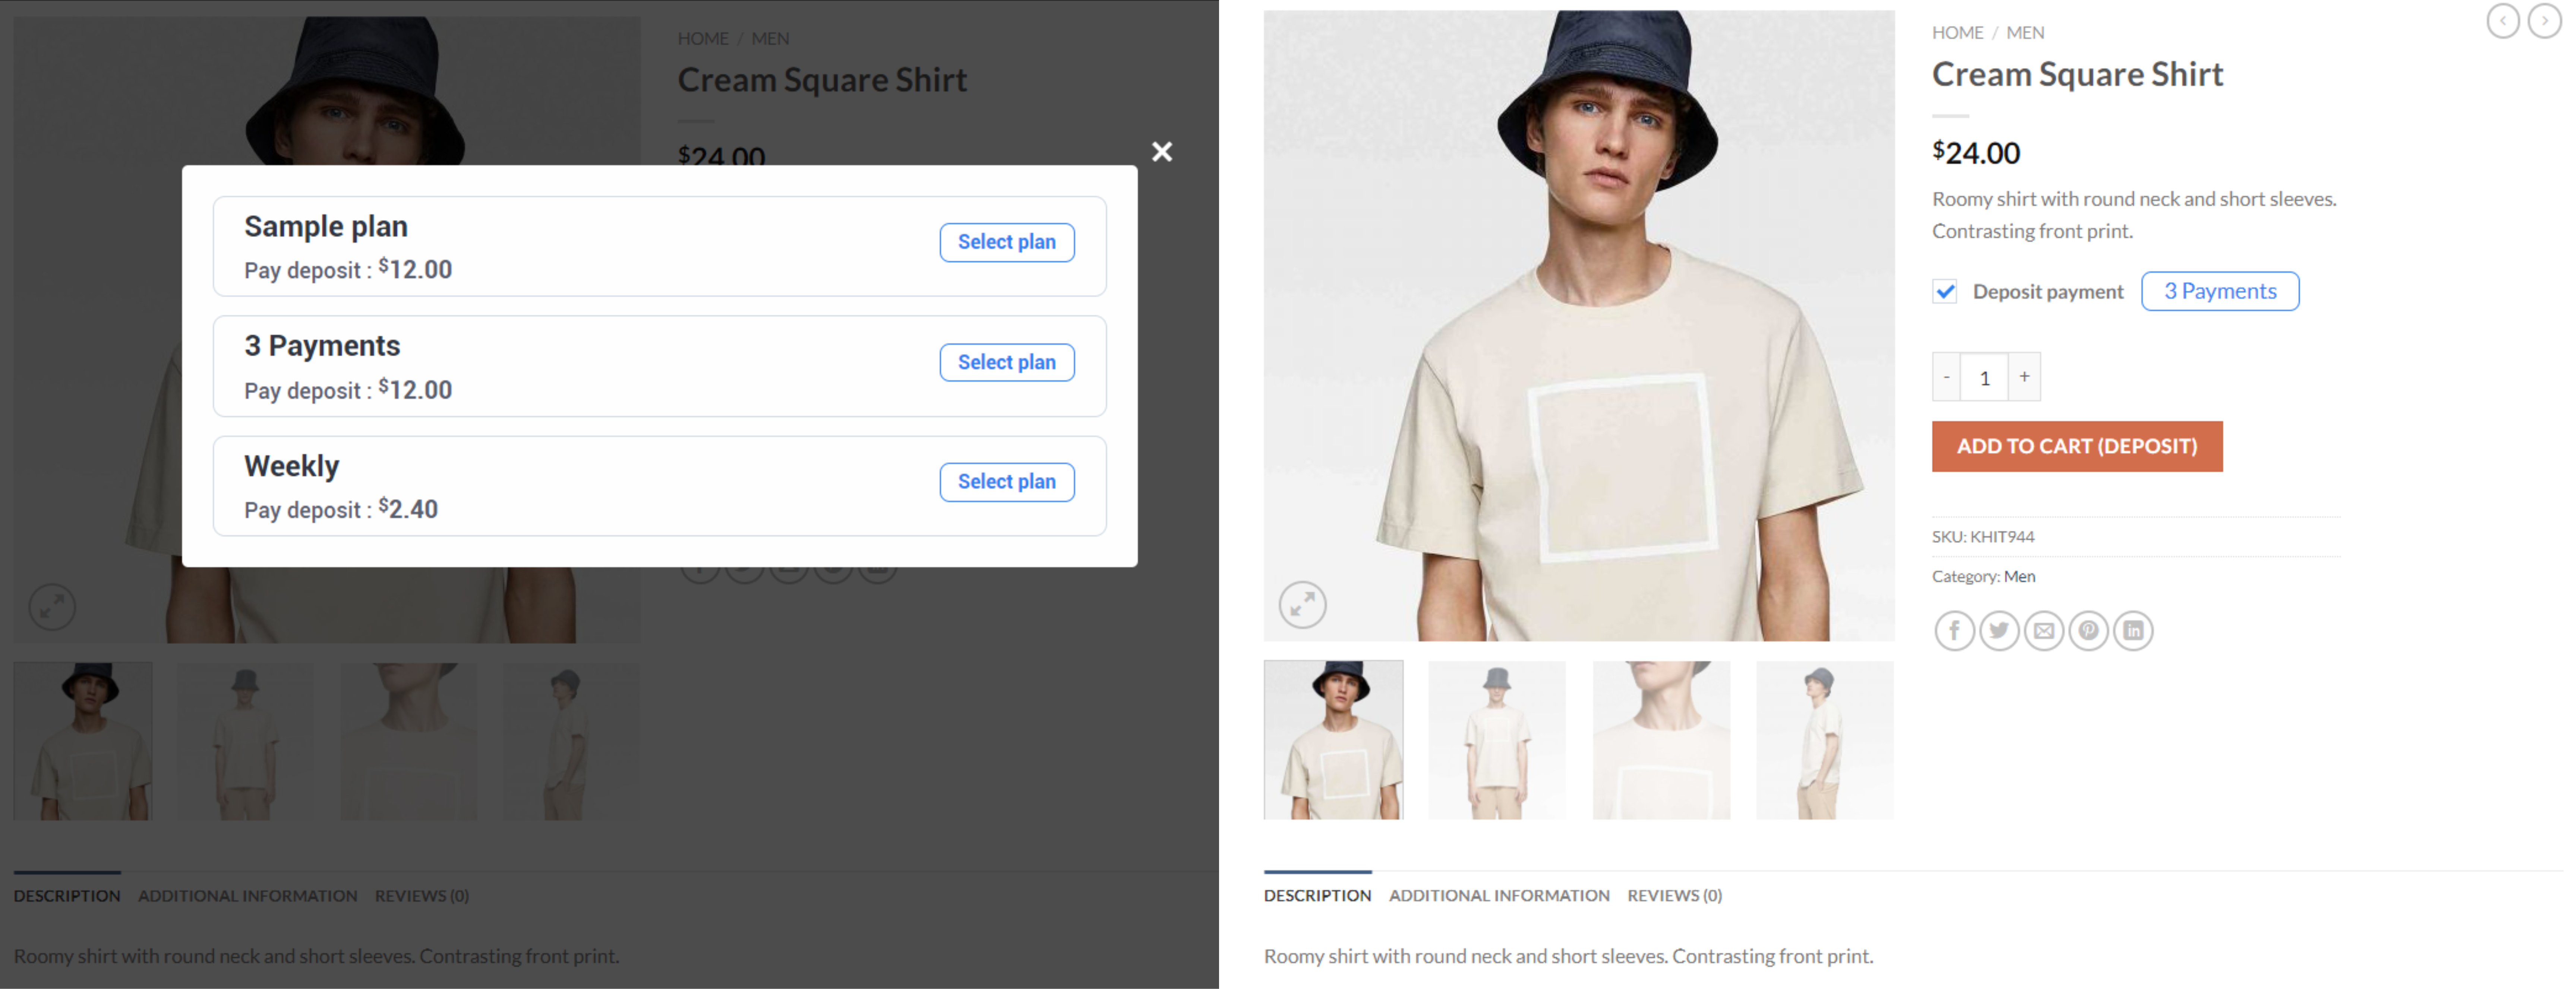
Now the “Add to Cart” button changes to “Add to Cart (Deposit).” This indicates that the product will include a deposit, and if you place an order with this product, it will become a deposit order. However, the workflow remains the same as for a regular order.
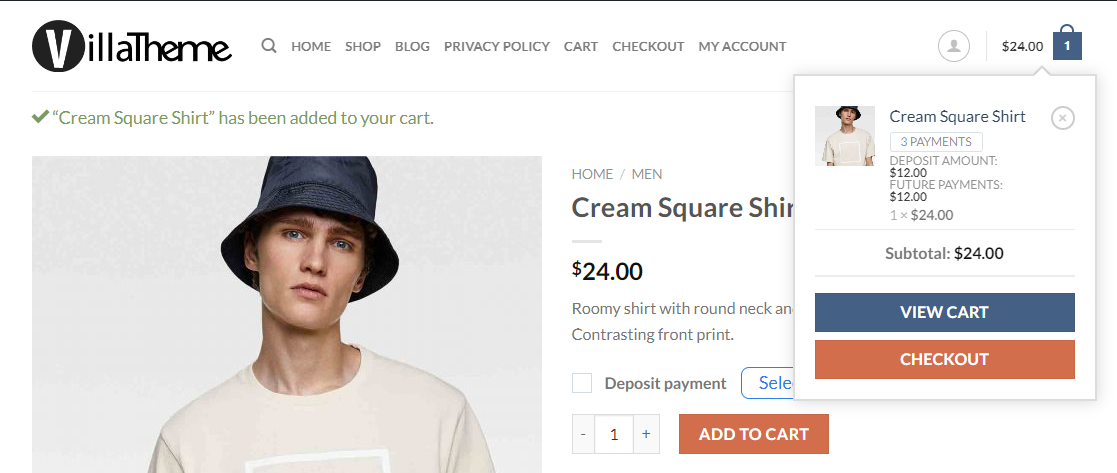
On mini cart
On Cart page
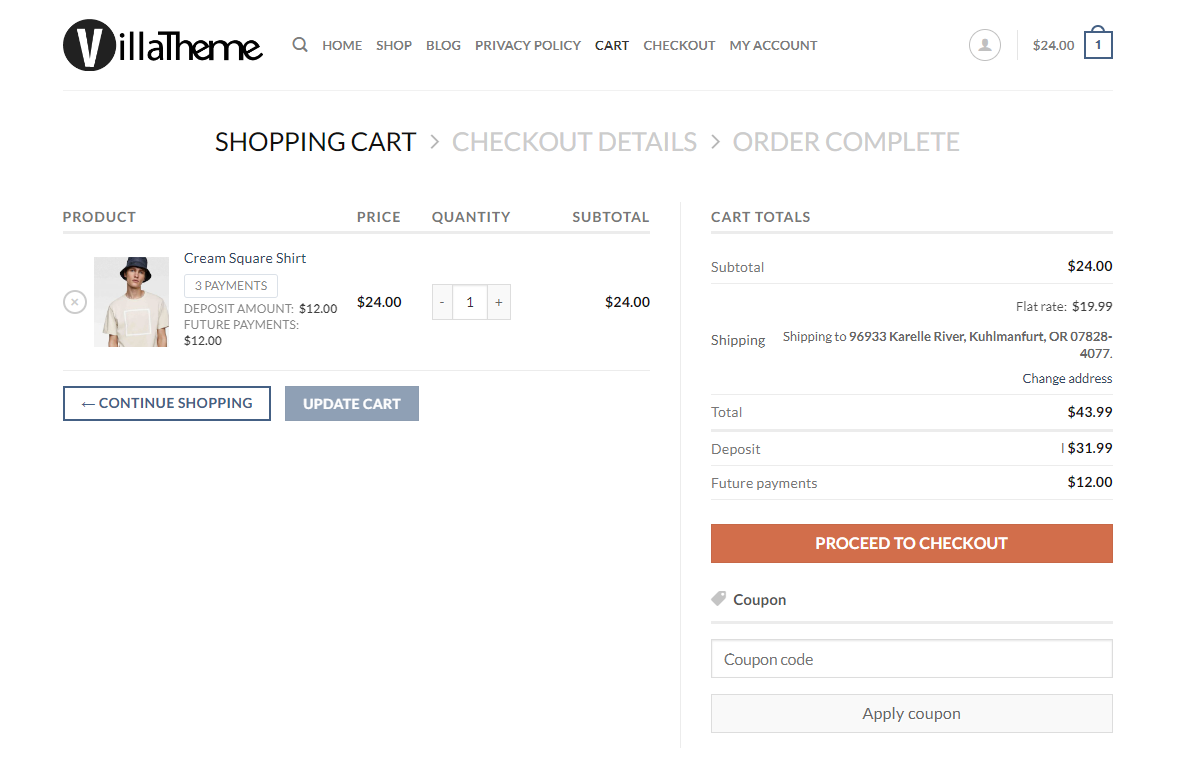
On Checkout page

On Order received page
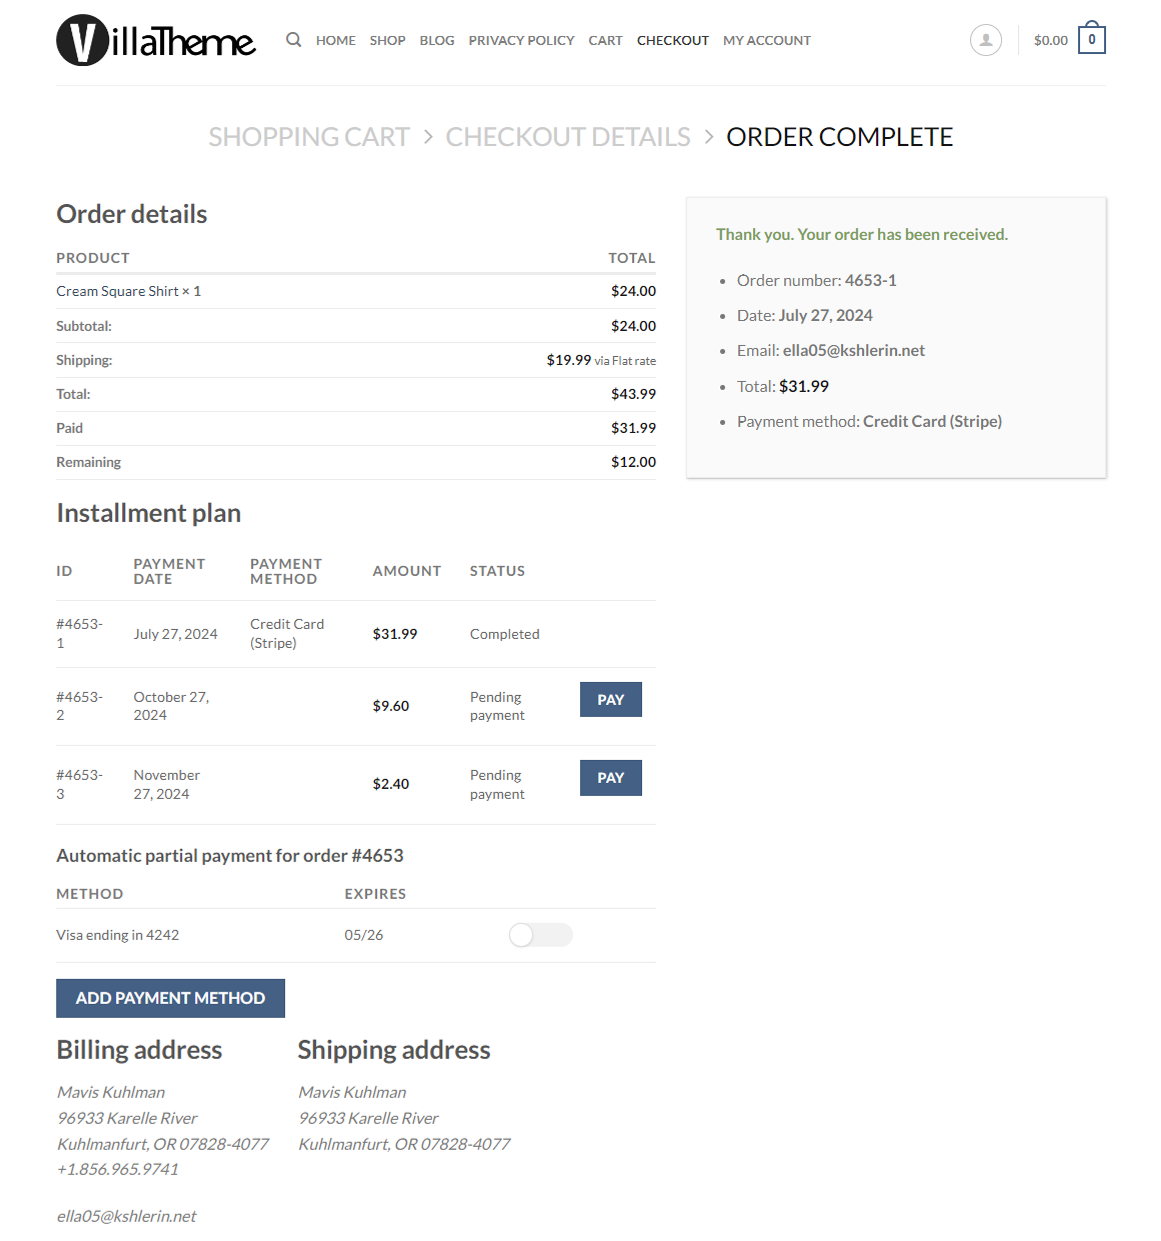
That would be it. Now that the deposit order is placed, the customer can see its details in their My account >> Orders page.
DEPART ‘s core functionality is to break the total amount of a product into smaller payments that can be paid multiple times instead of all at once. Payment Plans settings allow you to customize your payment plan options, including deposit amounts, installment schedules, and other related settings.
First, access the list of Payment Plans by going to Dashboard >> DEPART >> Payment Plans
All the payment plans you create are listed here.

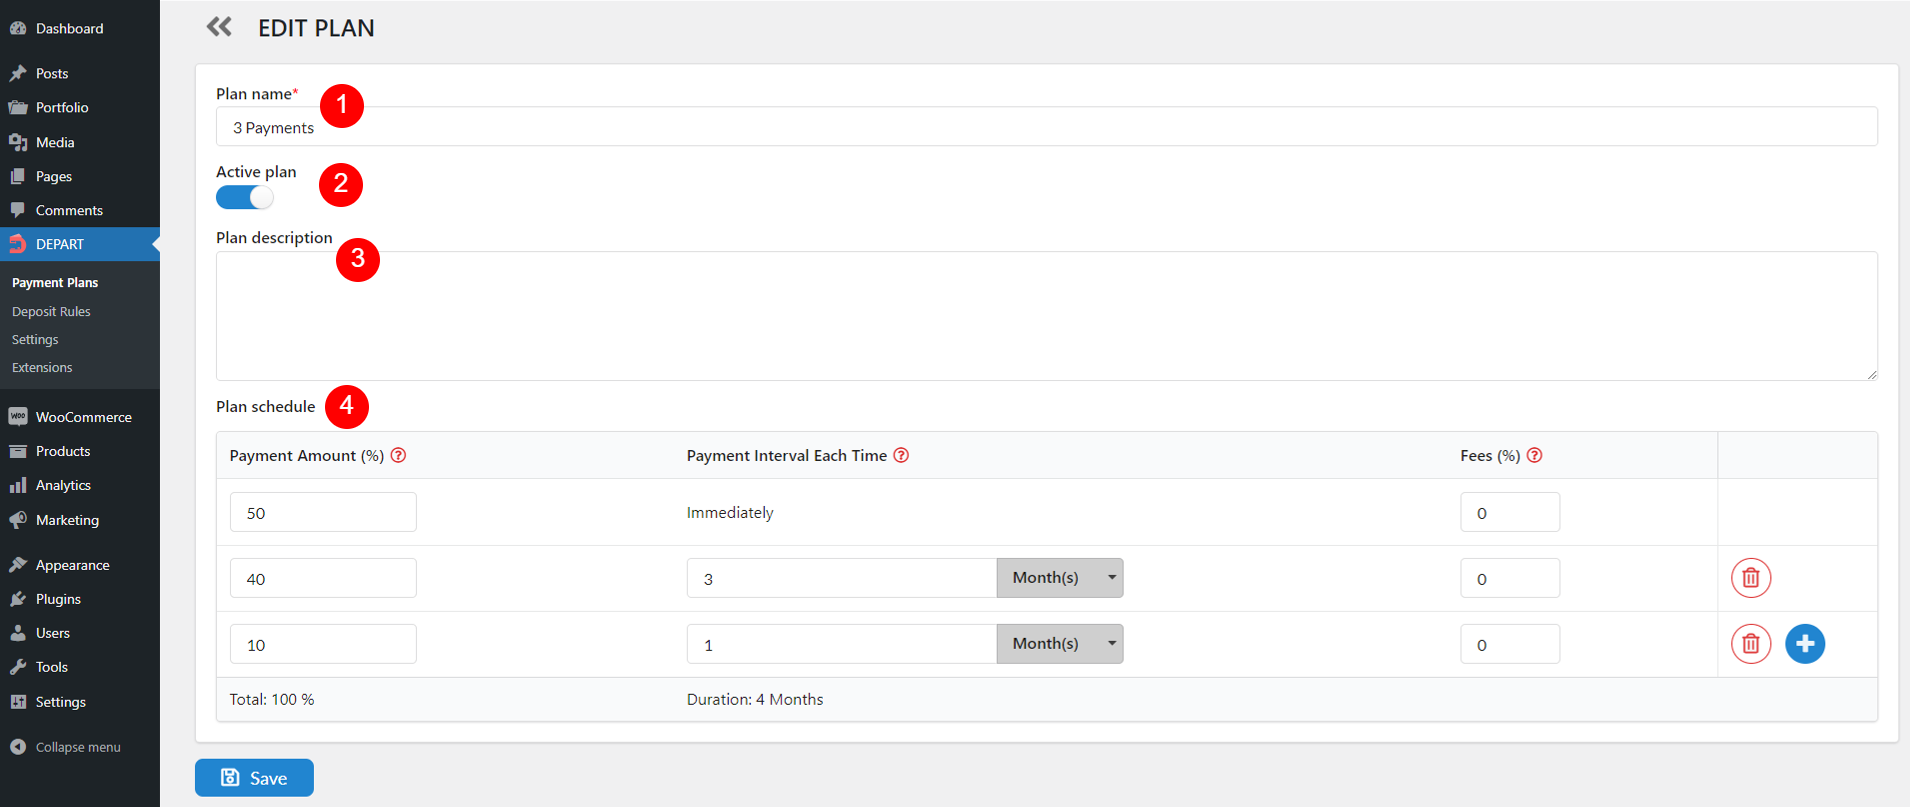
This is the plan editor where you are directed to after clicking the edit icon under “Action” column above.
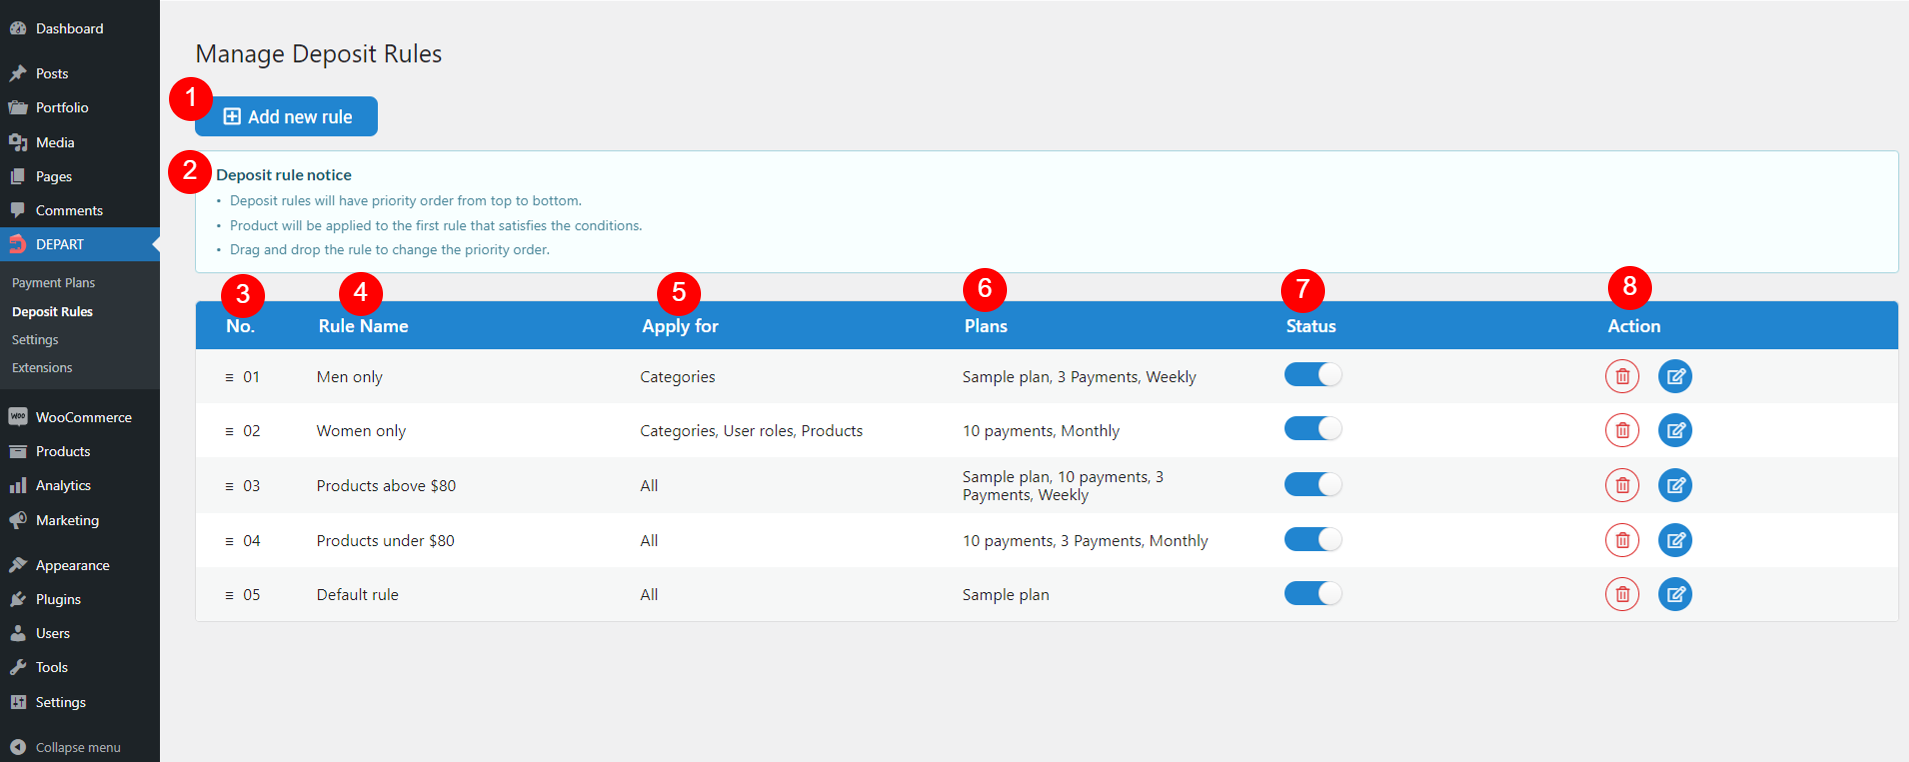
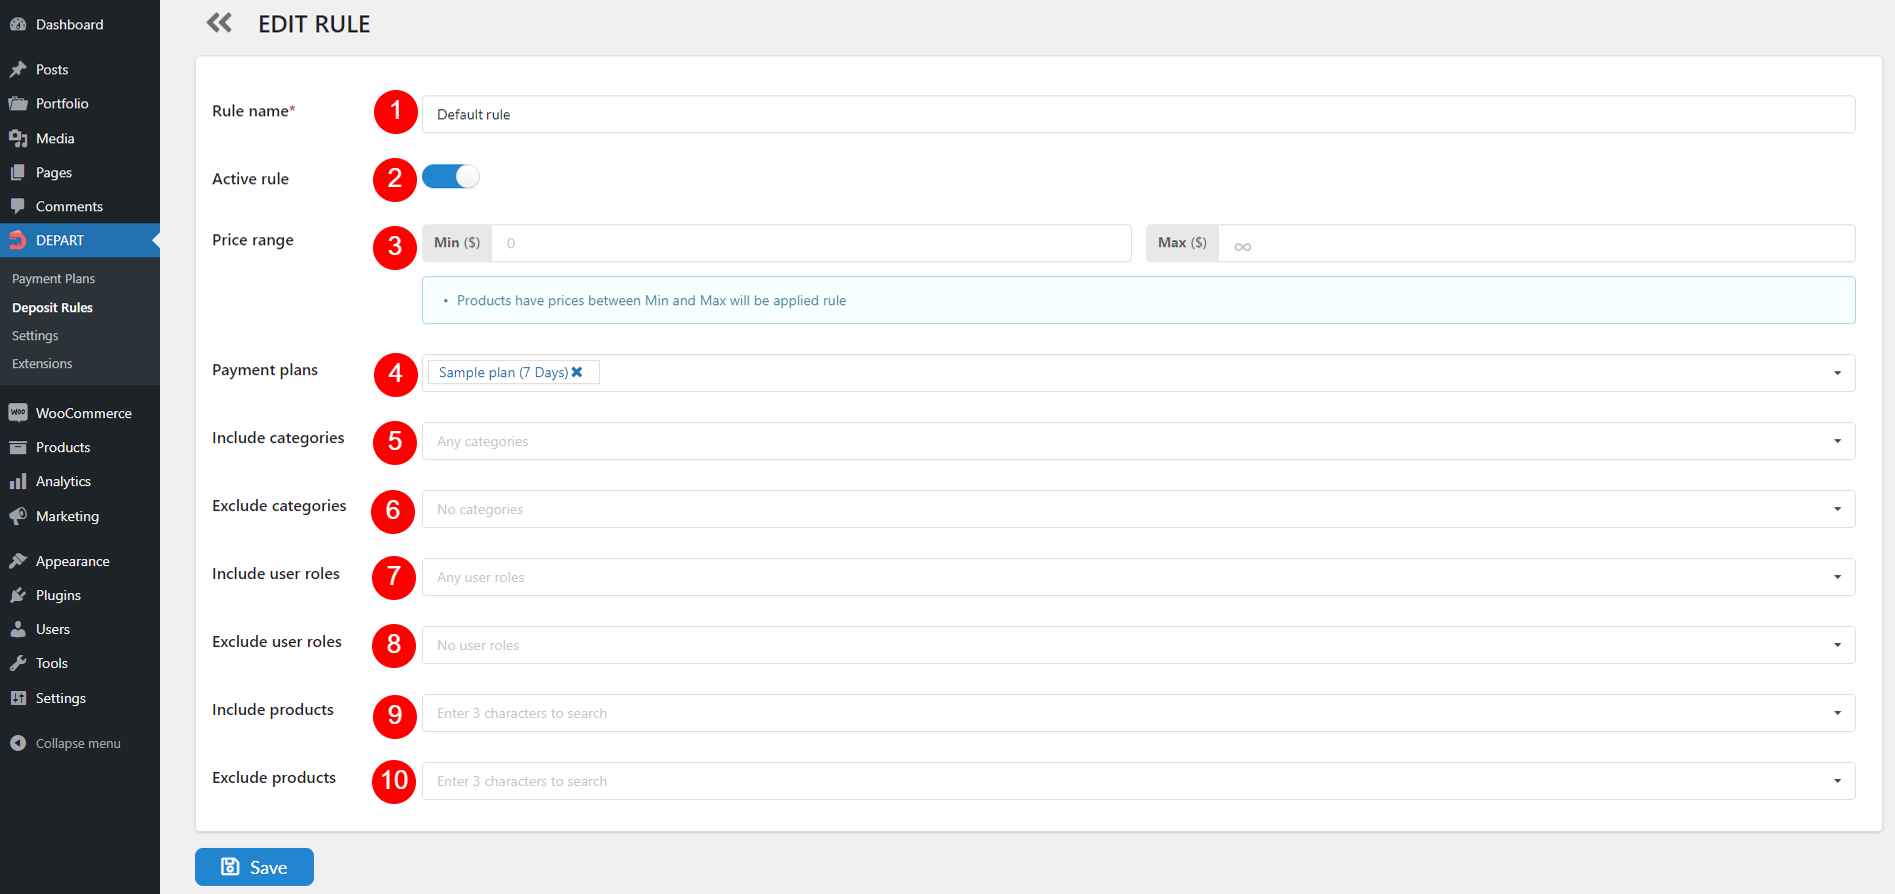
Go to Dashboard >> DEPART >> Deposit Rules
In this section, you can create and manage global rules for deposit payments. Each rule specifies conditions, under which certain payment plans apply, based on criteria such as product categories, user roles, or individual products.
Note: Unlike Global Deposit Rules with multiple conditions, Custom Deposit works based on products.
There are deposit settings available for each simple and variable product in WooCommerce, allowing the admin to create unique payment plans specific to that product.
This means that a product can have its own payment plans independent of global deposit rules.
Custom deposit settings in individual products always take the highest priority. If a product has a custom deposit rule and payment plan set up on its editing page, those settings will override any global deposit rules.
Under Product data >> Deposit:
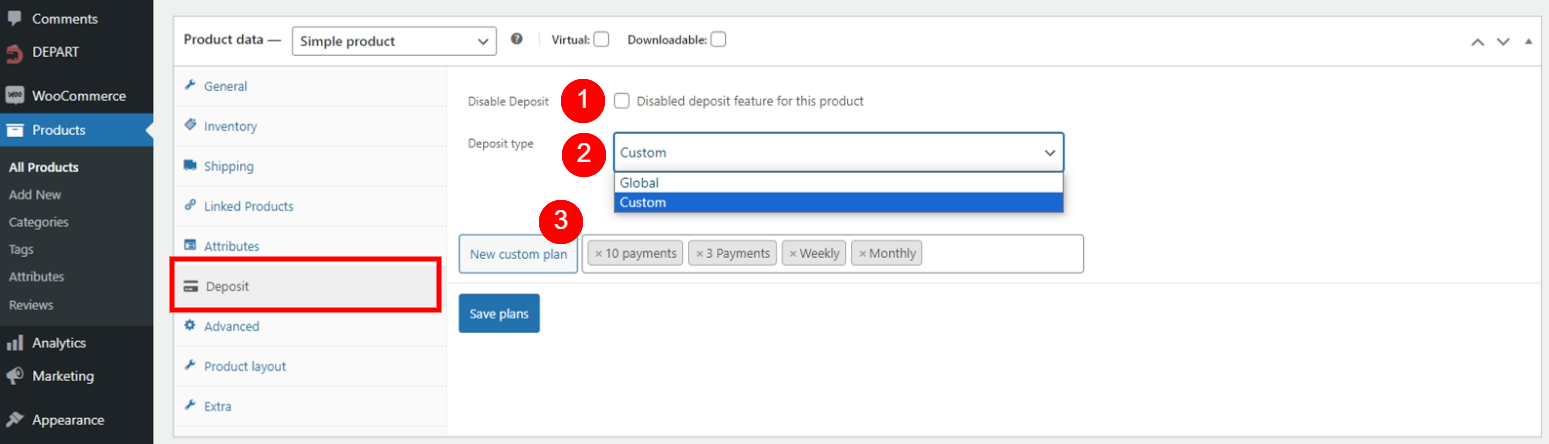
>> Then hit the “Save plans” button before updating product.
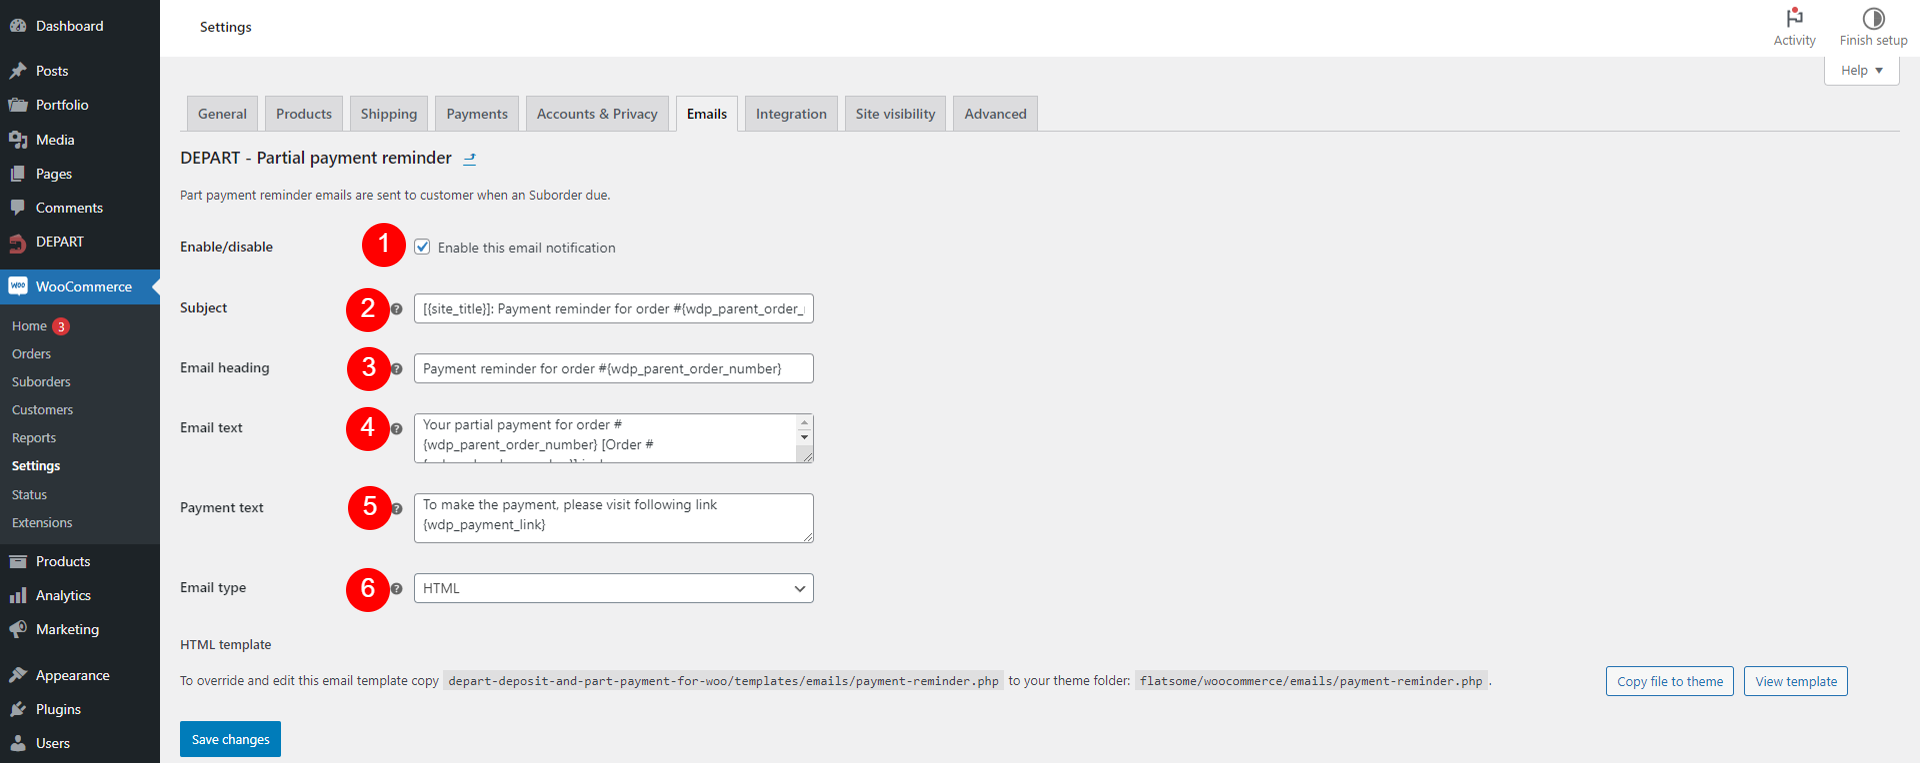
Go to Dashboard >> DEPART >> Settings >> General
You will see the table below for the general settings. Scroll down to read explanation for each option in this setting page. 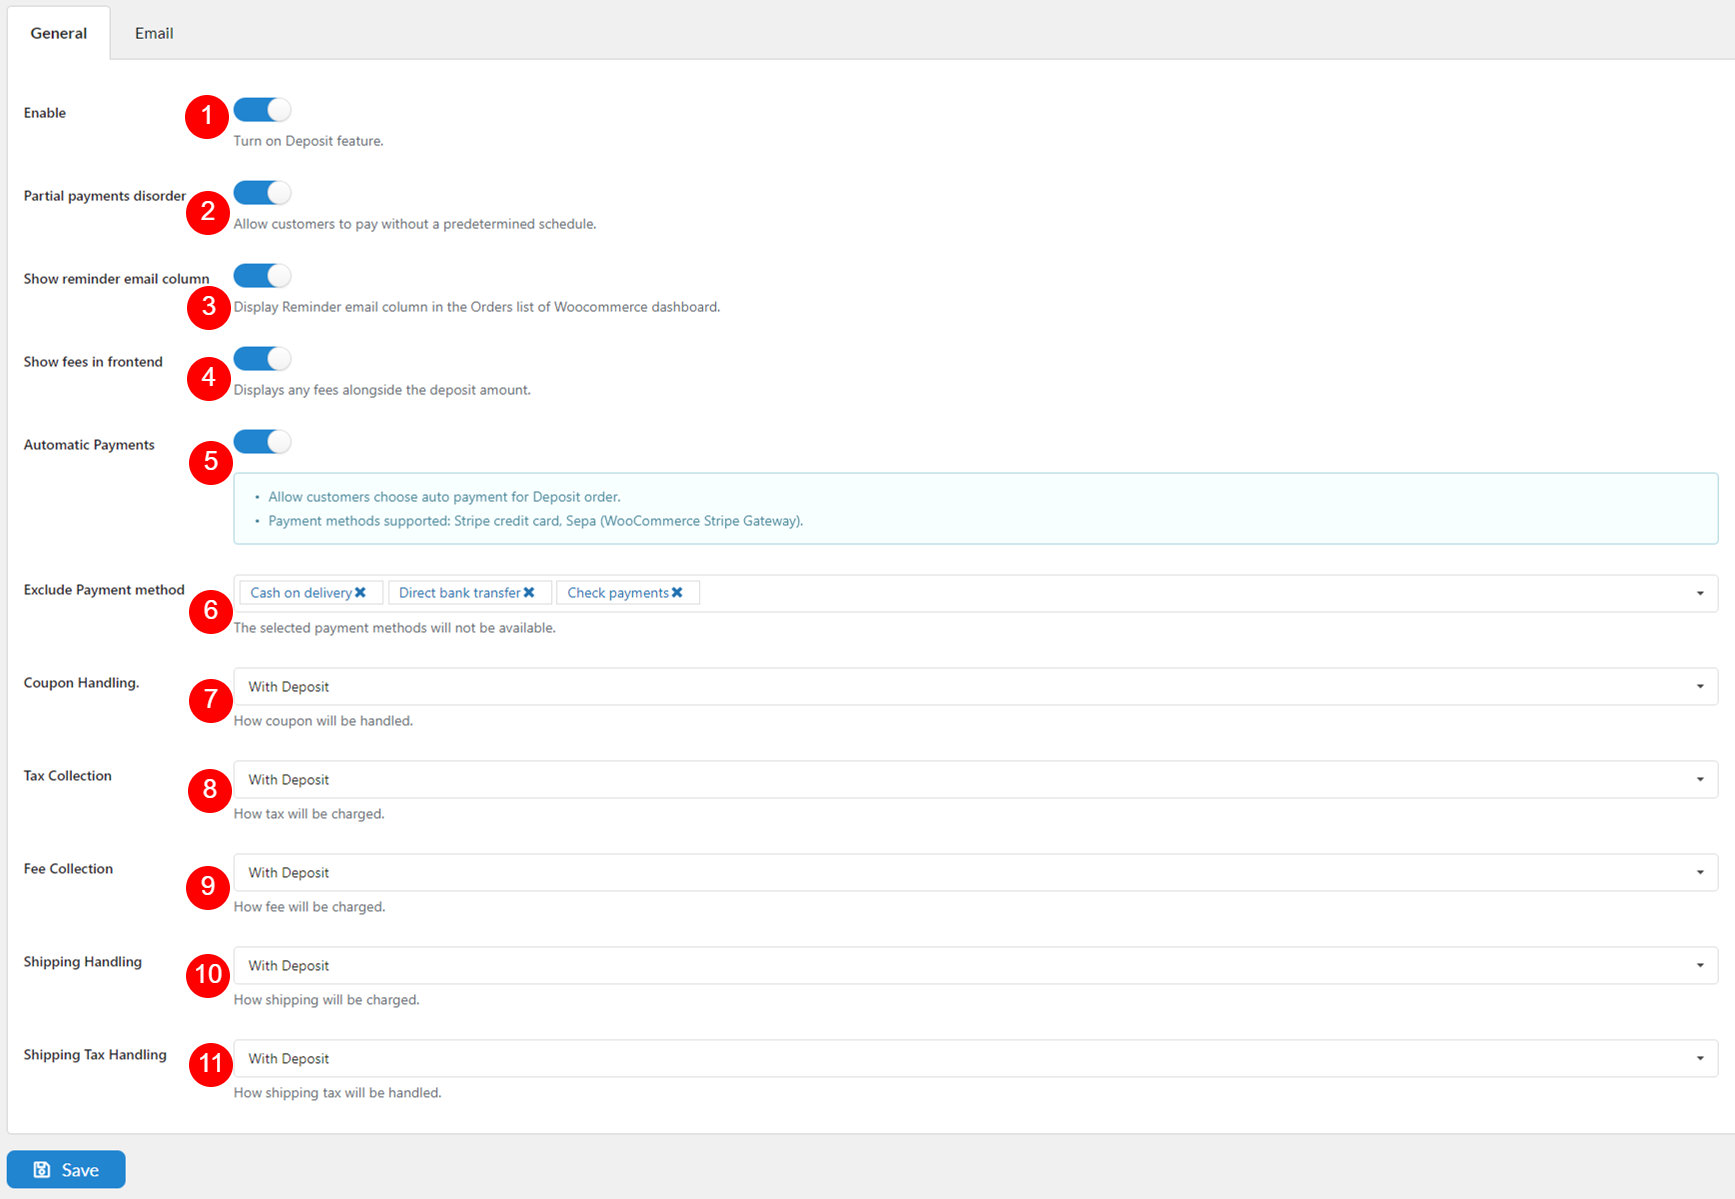
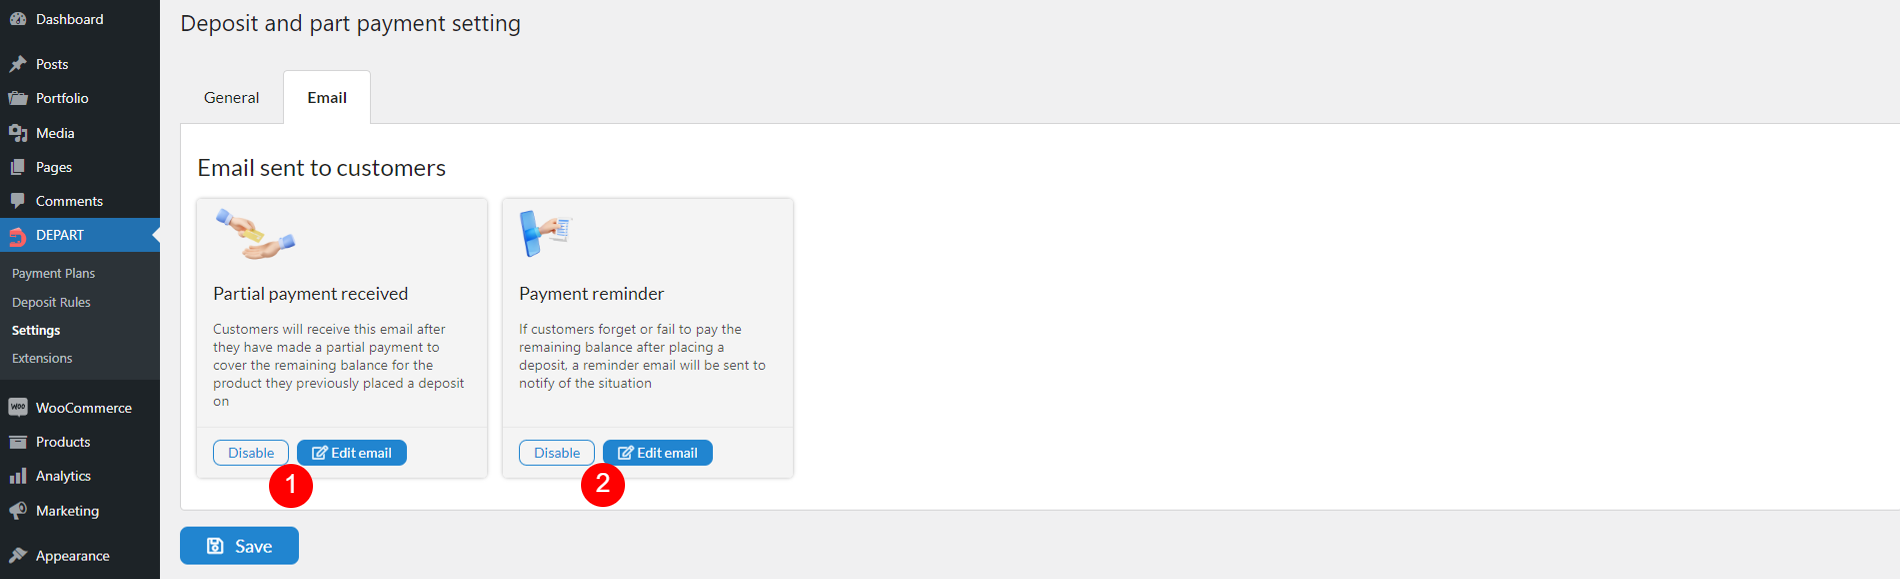
DEPART offers two email types for customer communication. You can enable or disable these emails or adjust their settings by navigating to Dashboard >> DEPART >> Settings >> Email
Scroll down to view the details.
In this part, we will see what we can do with deposit orders in:
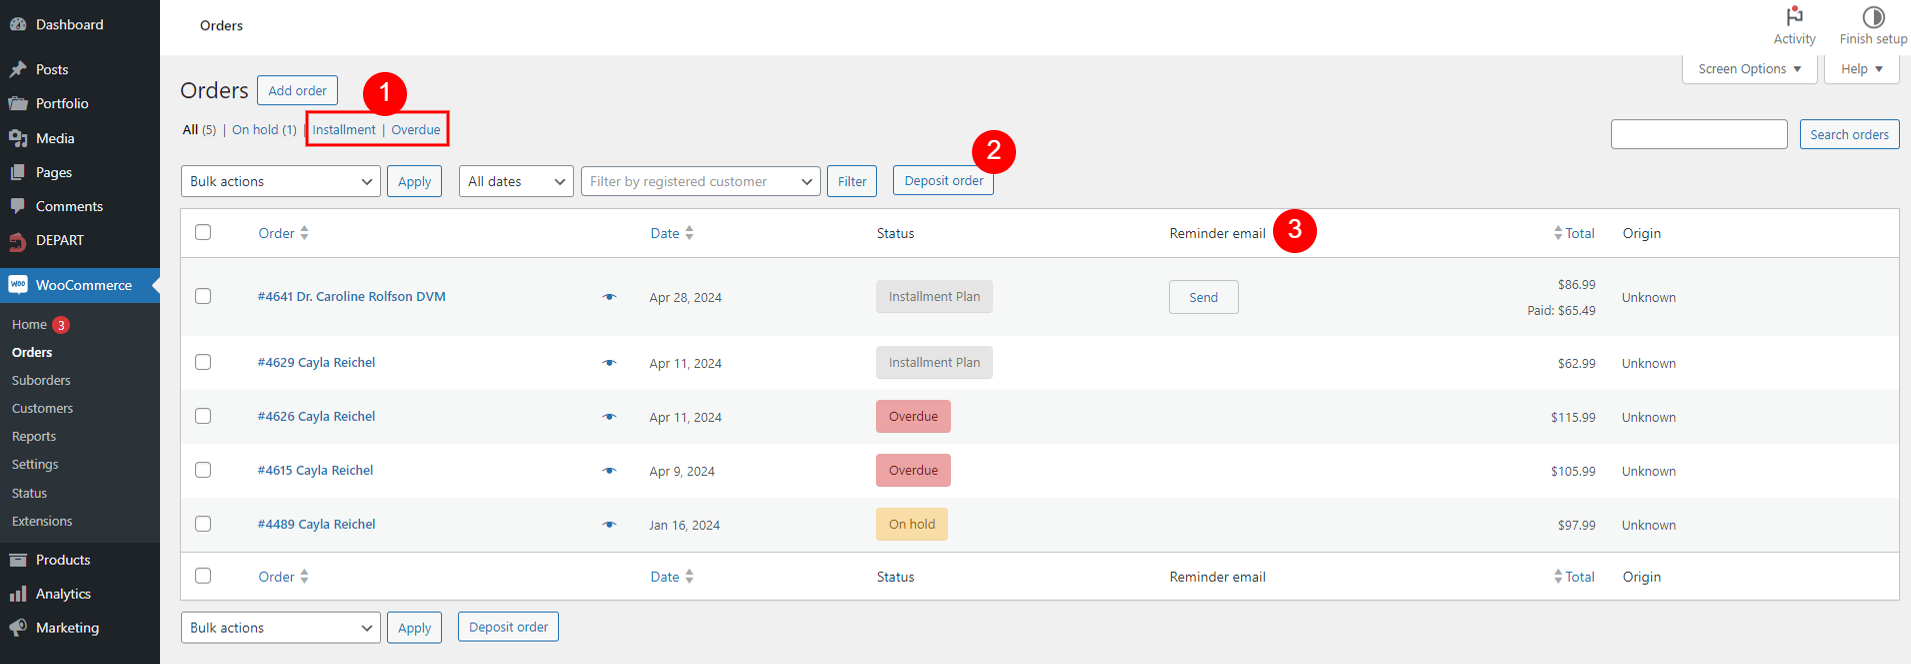
In Orders list under WooCommerce dashboard, scroll down to see what you can do:
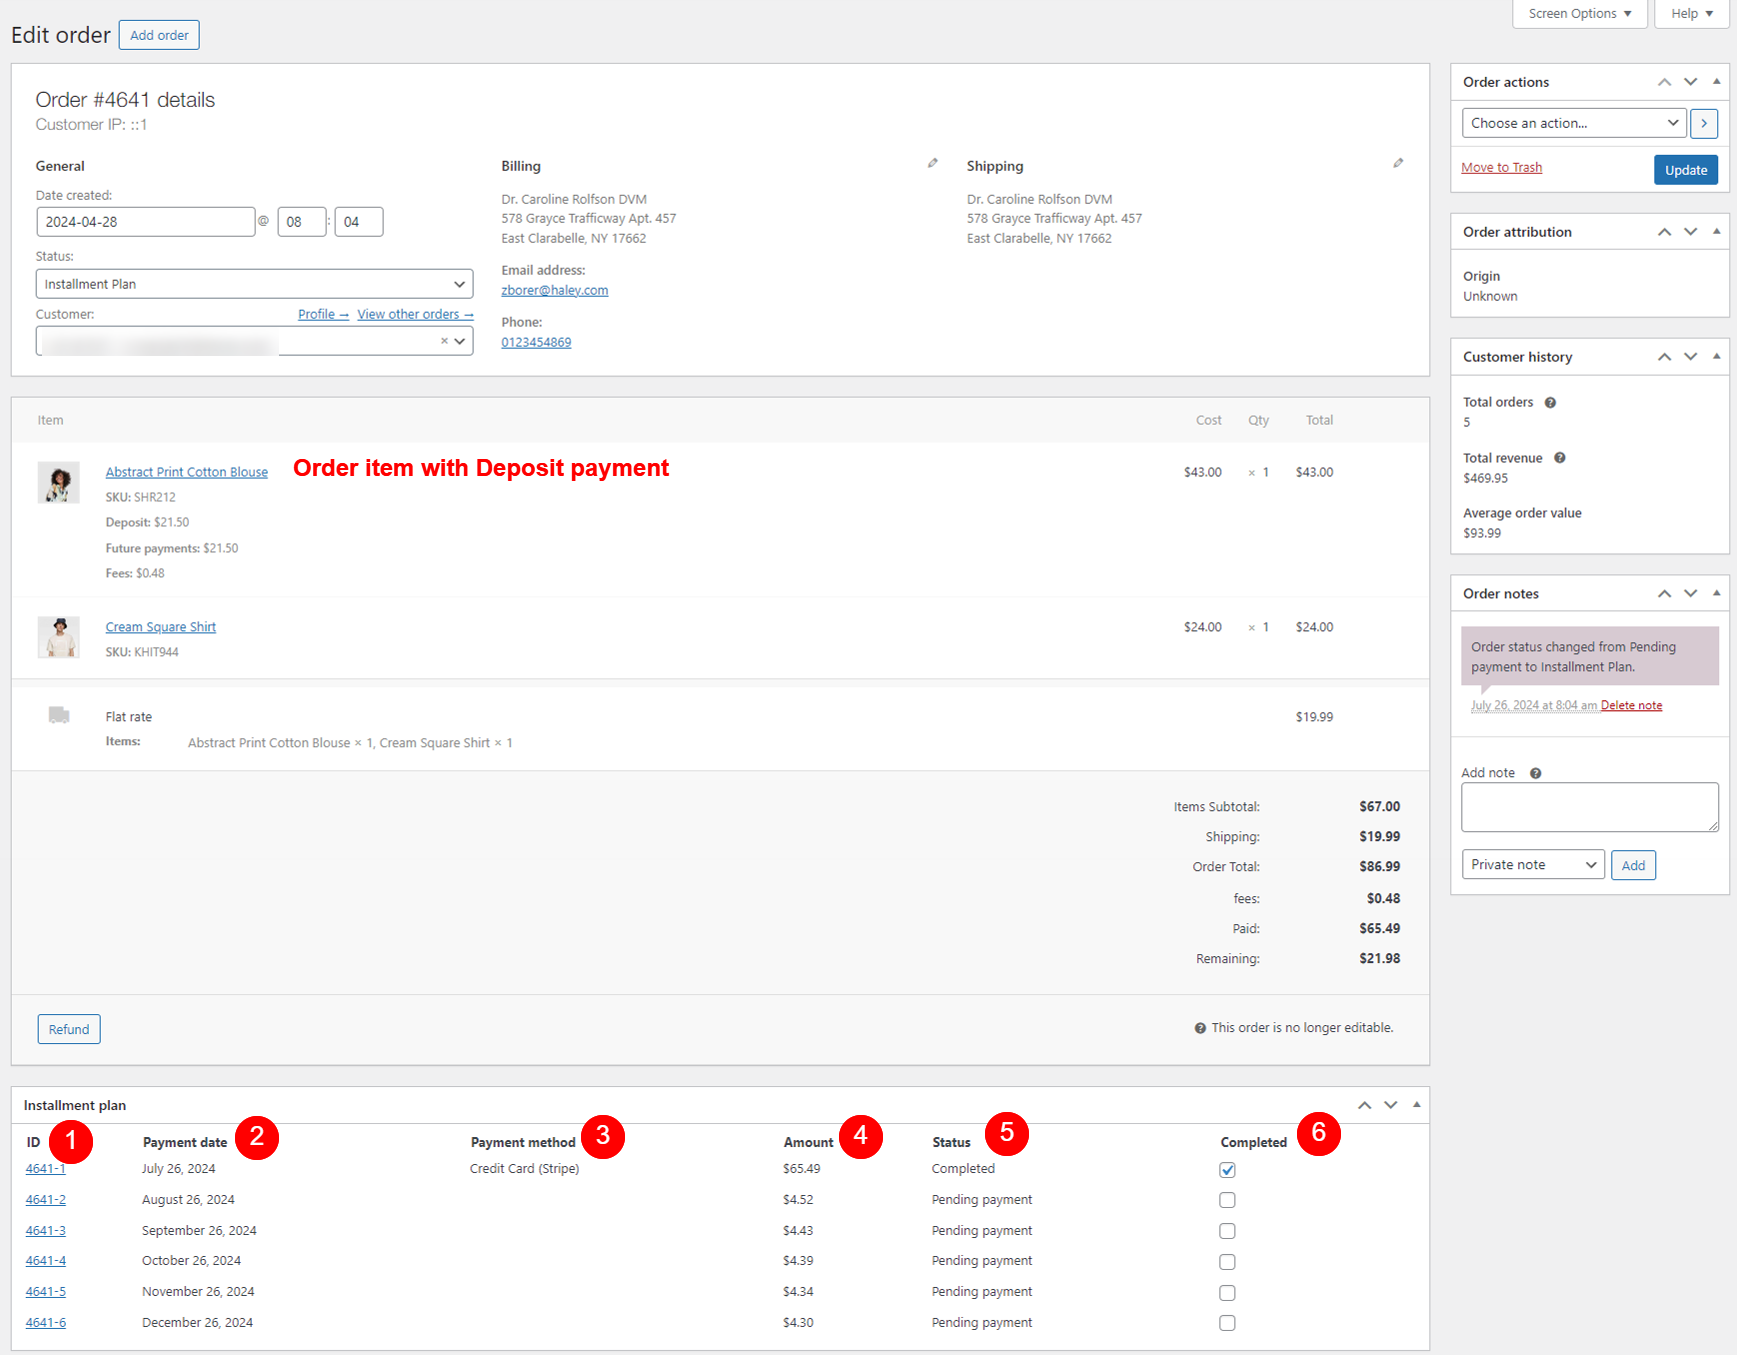
When you access the order editing page of a deposit order, you can see the deposit amount, the future payment amount, and any fees for order items with a payment plan.
And scroll down to the “Installment Plan” table below to see the details.
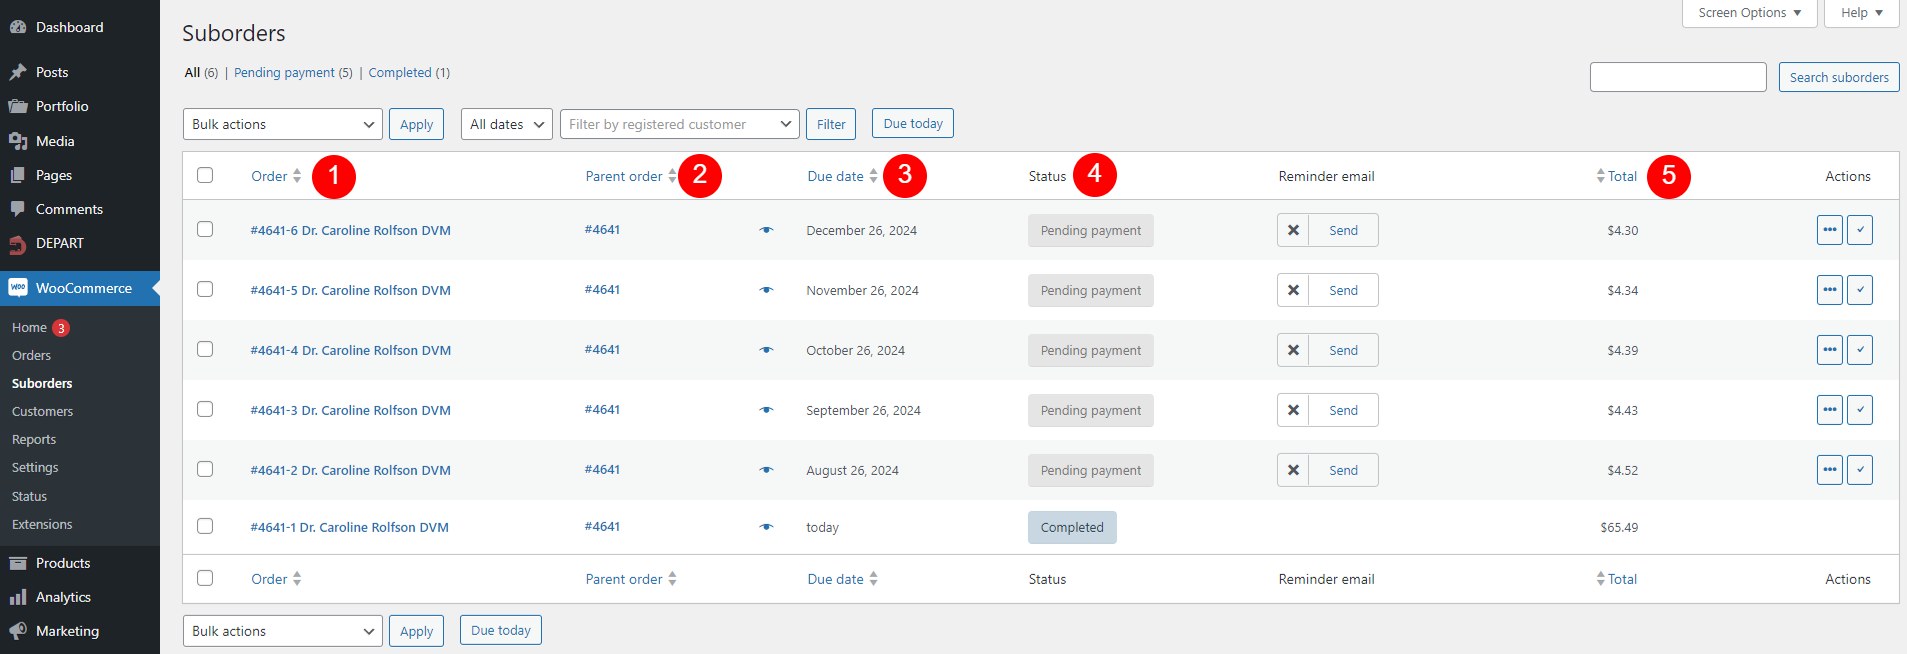
DEPART creates a menu called “Suborders” under WooCommerce dashboard.
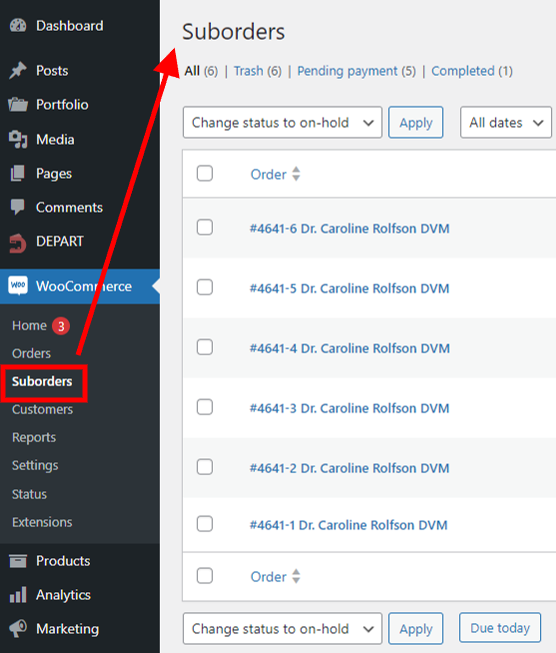
A suborder refers to the individual installment orders created as part of a payment plan. Each suborder represents a specific payment that is part of the overall payment plan for a product or service.
Basically, the Suborder menu functions similarly to the WooCommerce Orders menu:
This page displays all suborders associated with your deposit parent orders. Scroll down to see what you can do in this page, and the overview info of each suborder it can give you.
You can:
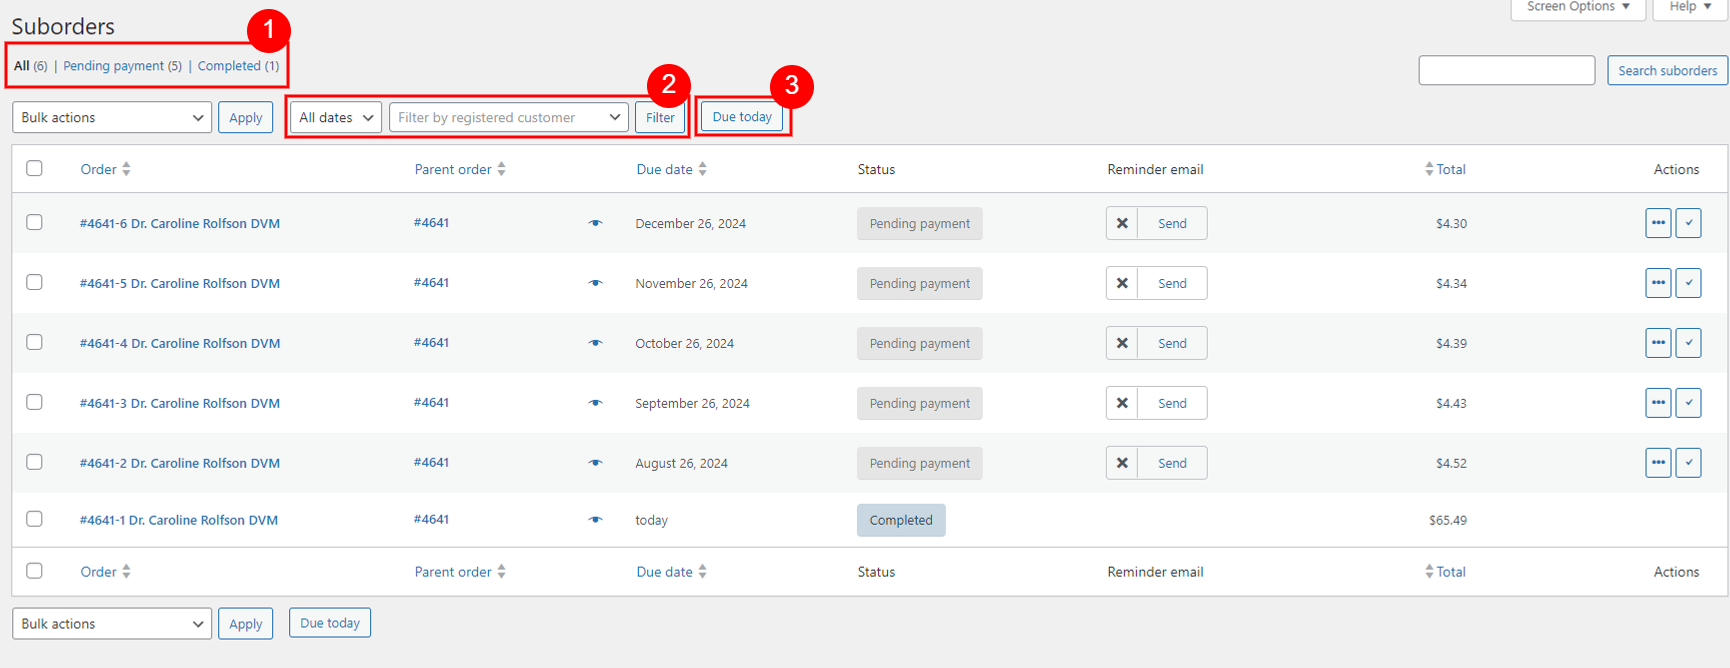
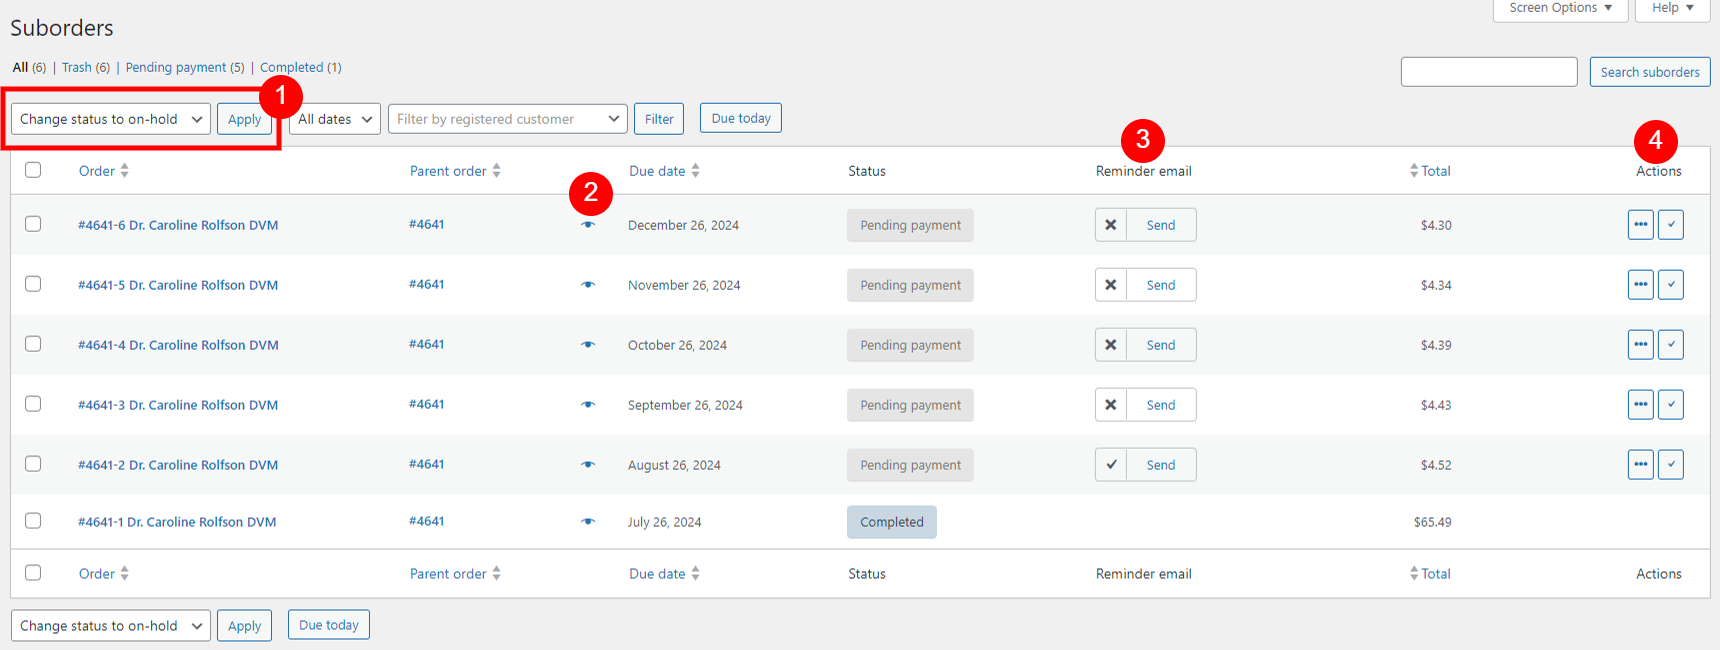
And you have a overview of these details in a suborder:
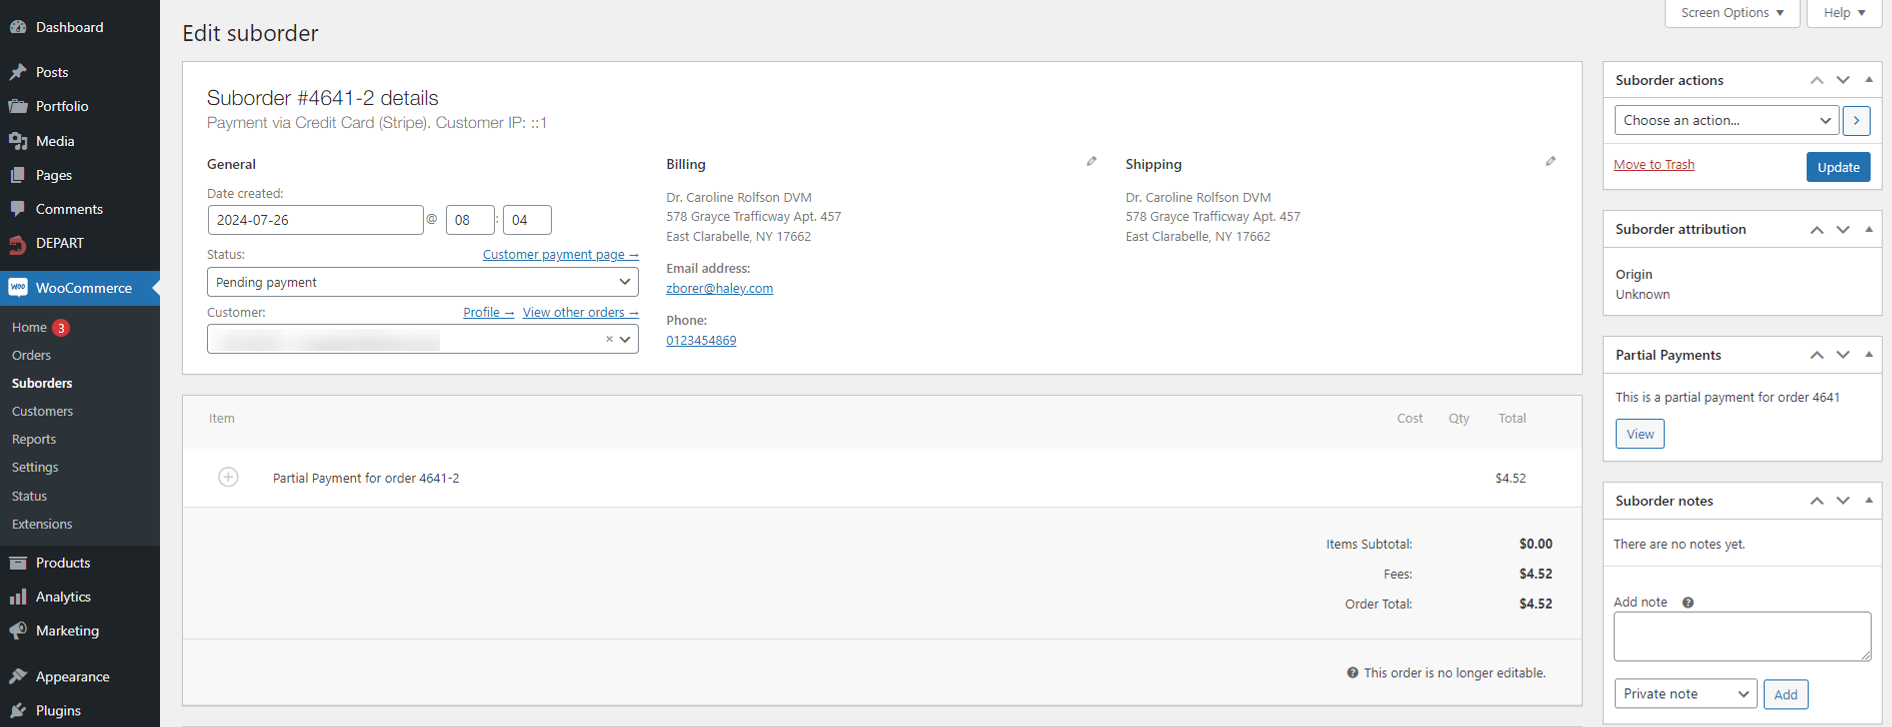
This page allows you to view and manage the details of a specific suborder. Use the options to update and review the suborder information just like a WooCommerce order.
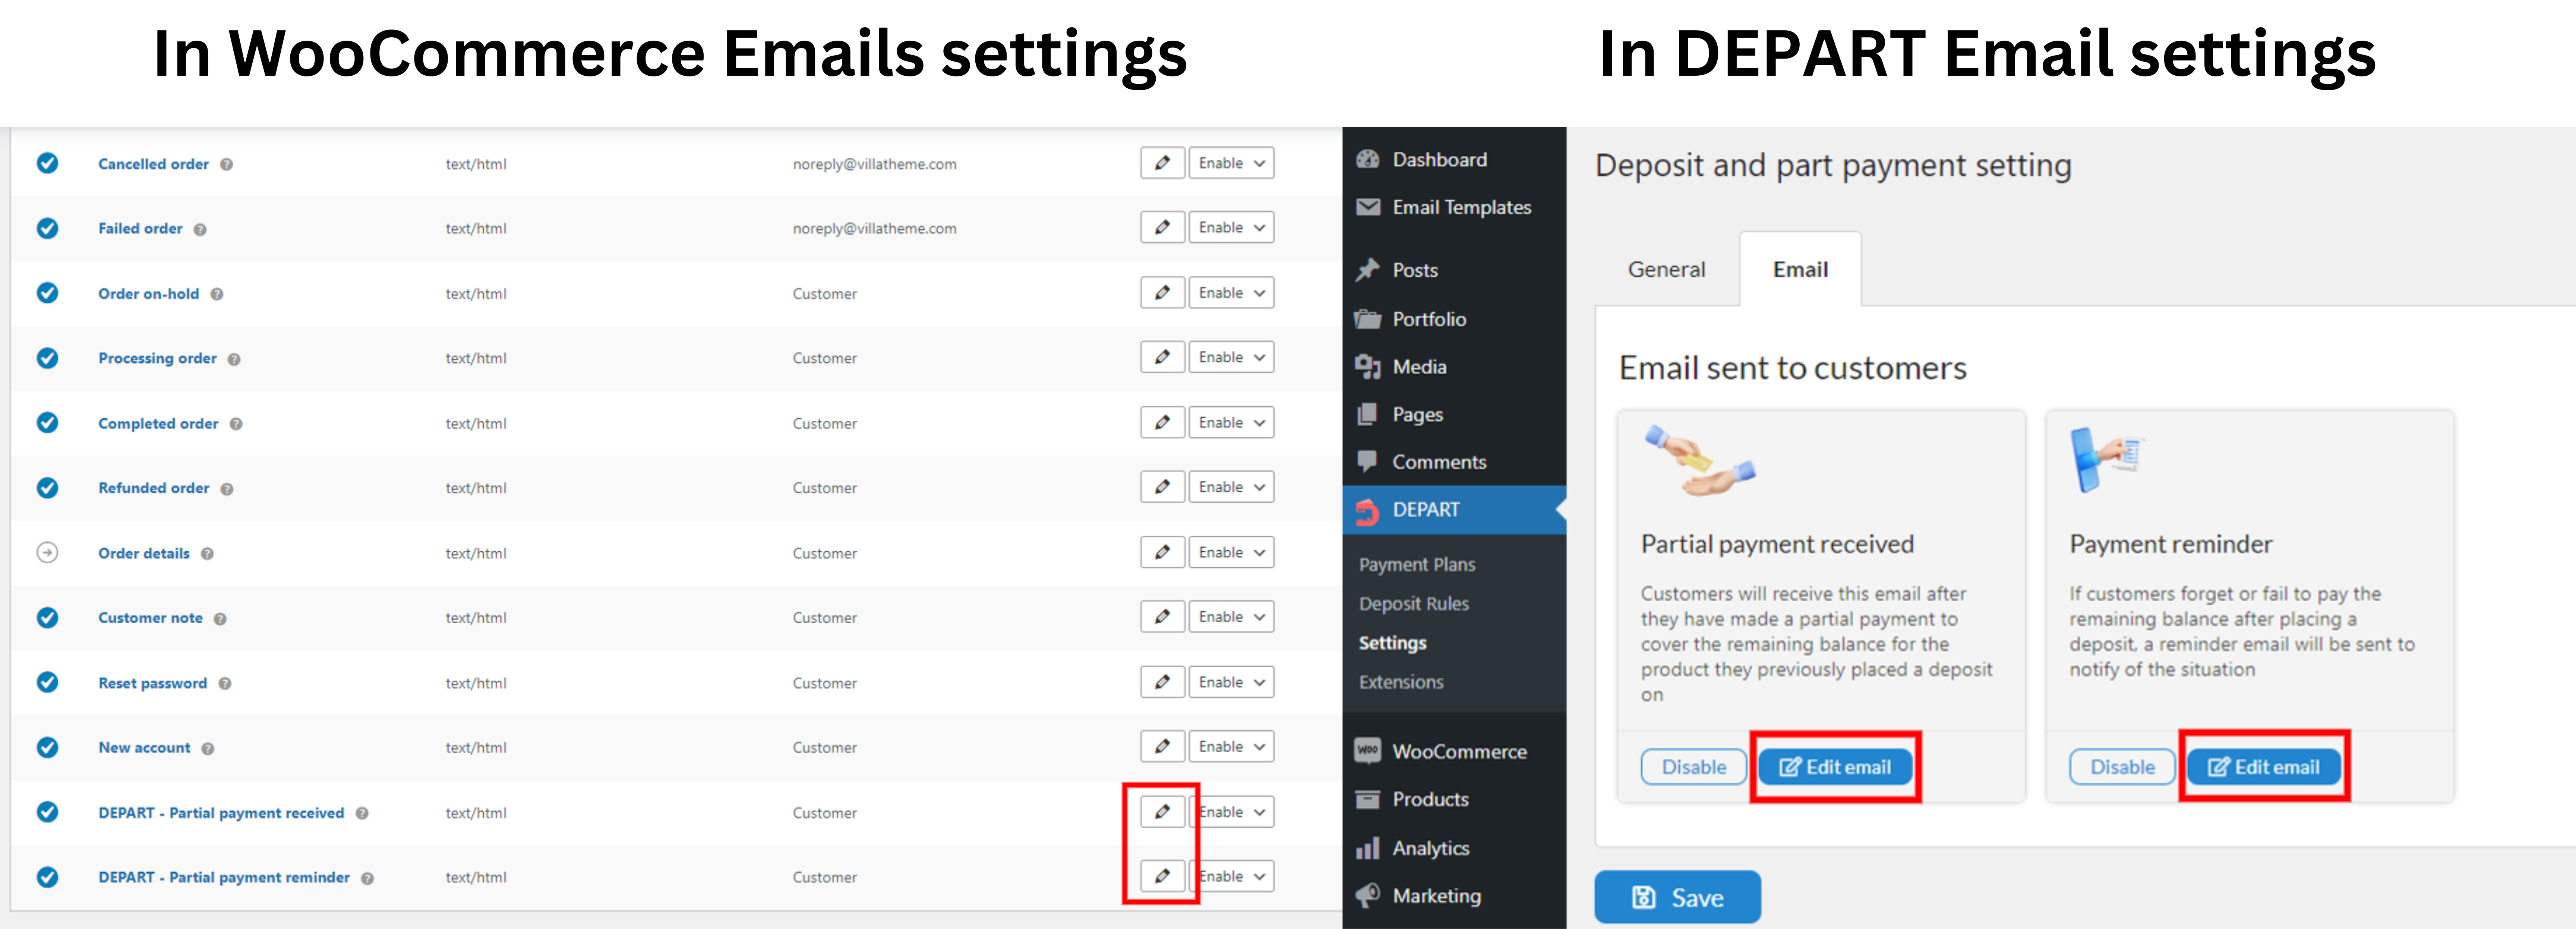
Once you install DEPART, the plugin offers 2 email types, which are DEPART – Partial payment received and DEPART – Partial payment reminder. In this part, we will learn about:
Configure them under Email settings of DEPART, or Emails settings of WooCommerce (go to Dashboard >> WooCommerce >> Settings >> Emails)
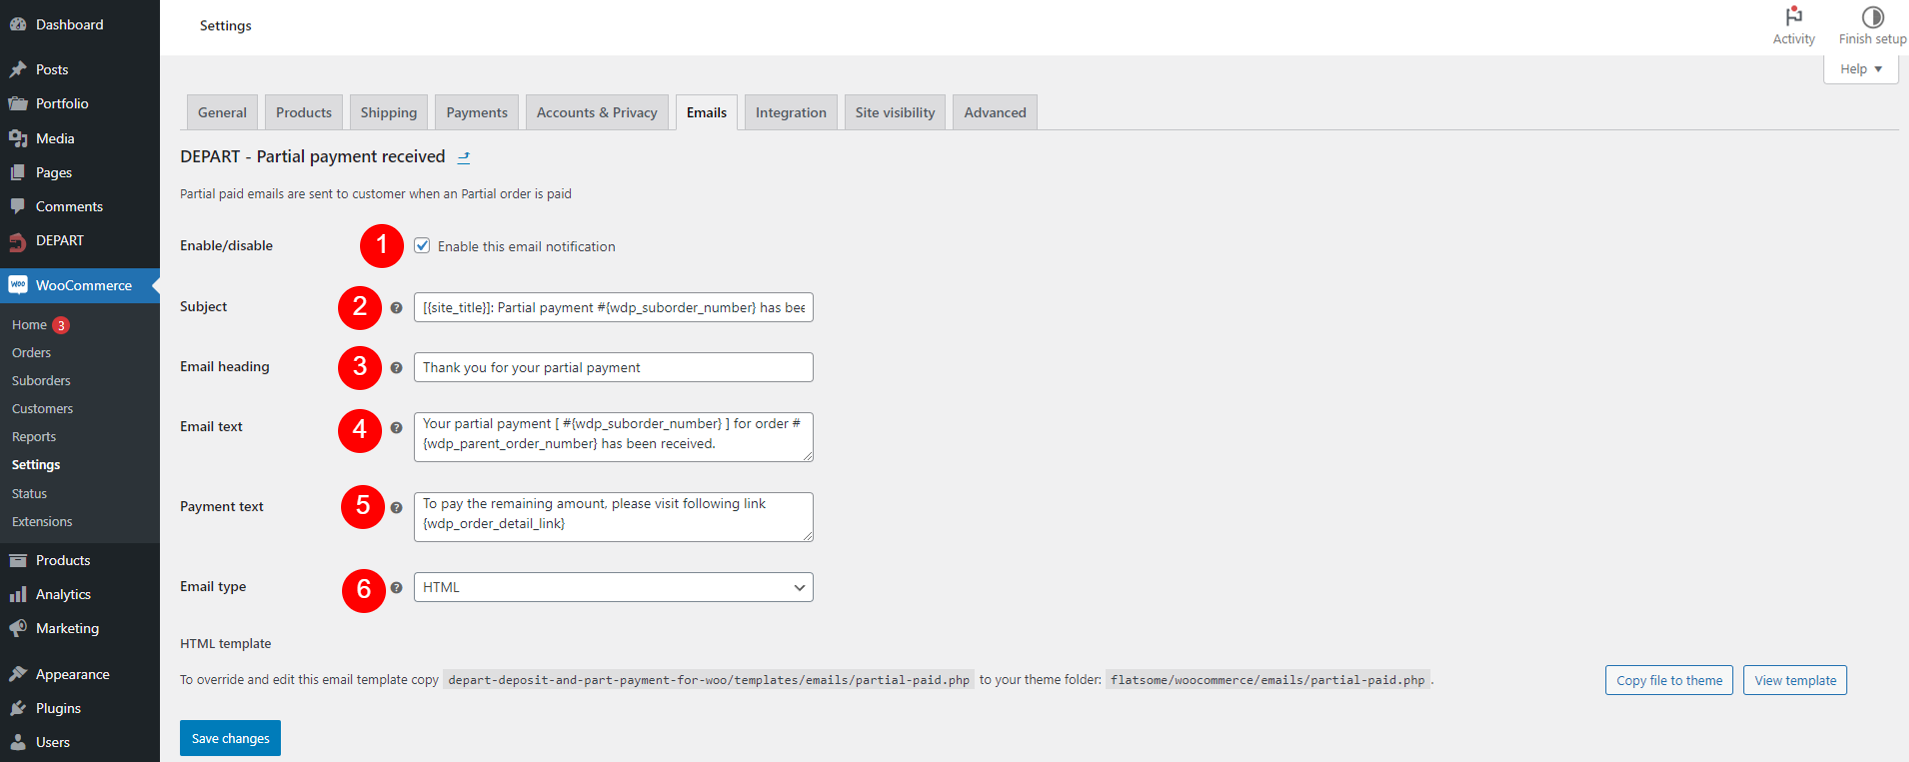
{site_title}, {site_address}, {site_url}, {order_date}, {wdp_parent_order_number}, {wdp_suborder_number}, {wdp_part_payment_link}, {wdp_payment_due_date}, {wdp_deposit_amount}, {wdp_partial_amount}, {wdp_full_payment}, {wdp_paid_amount}, {wdp_remaining_amount}, {wdp_fee_total}{site_title}, {site_address}, {site_url}, {order_date}, {wdp_parent_order_number}, {wdp_suborder_number}, {wdp_part_payment_link}, {wdp_payment_due_date}, {wdp_deposit_amount}, {wdp_partial_amount}, {wdp_full_payment}, {wdp_paid_amount}, {wdp_remaining_amount}, {wdp_fee_total}{site_title}, {site_address}, {site_url}, {order_date}, {wdp_parent_order_number}, {wdp_suborder_number}, {wdp_part_payment_link}, {wdp_payment_due_date}, {wdp_deposit_amount}, {wdp_partial_amount}, {wdp_full_payment}, {wdp_paid_amount}, {wdp_remaining_amount}, {wdp_fee_total}{site_title}, {site_address}, {site_url}, {order_date}, {wdp_parent_order_number}, {wdp_suborder_number}, {wdp_part_payment_link}, {wdp_payment_due_date}, {wdp_deposit_amount}, {wdp_partial_amount}, {wdp_full_payment}, {wdp_paid_amount}, {wdp_remaining_amount}, {wdp_fee_total}Here’s an example of a real DEPART – Partial payment received email with the sample content above: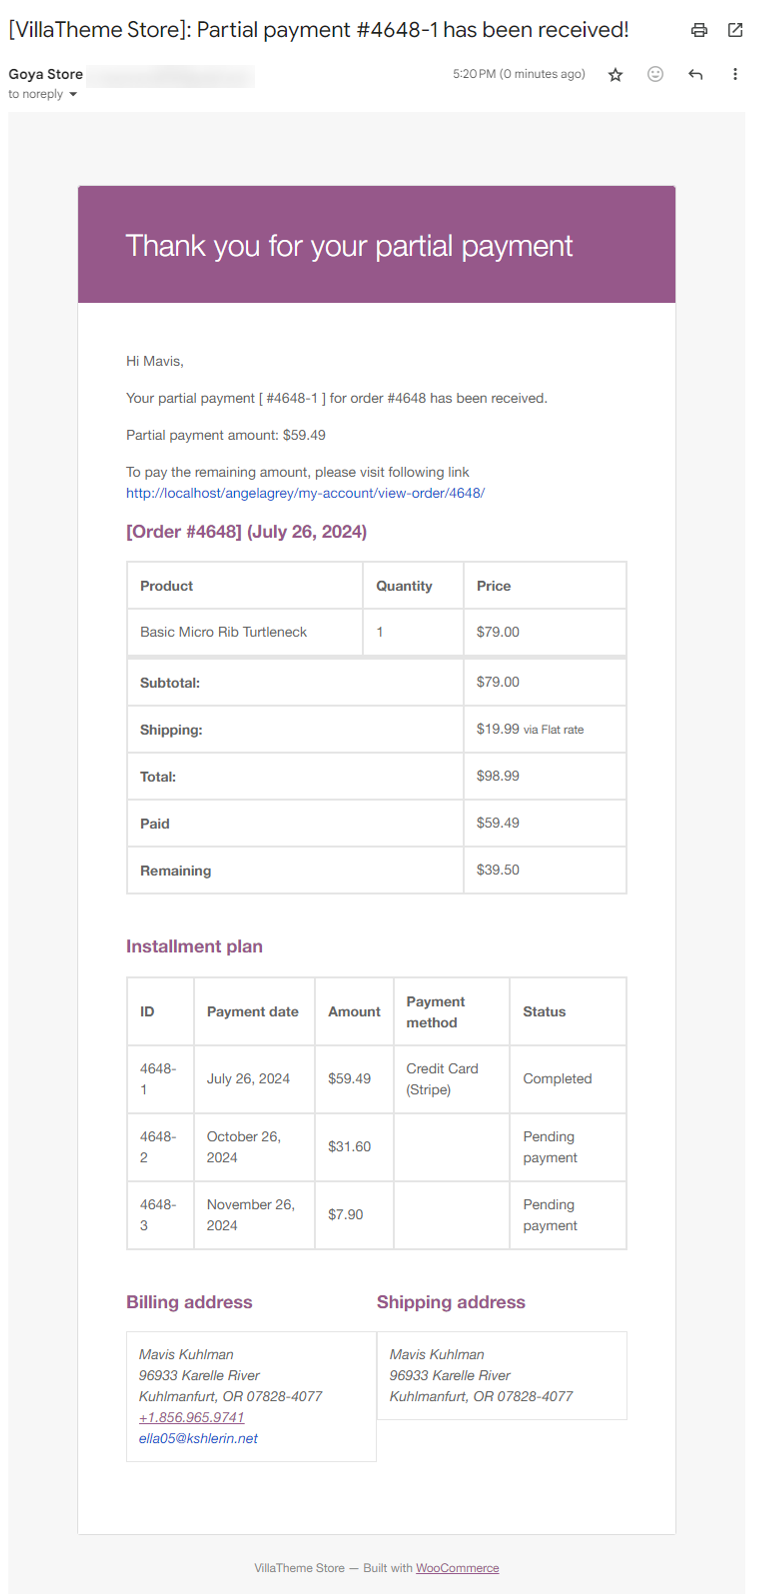
{site_title}, {site_address}, {site_url}, {order_date}, {wdp_parent_order_number}, {wdp_suborder_number}, {wdp_part_payment_link}, {wdp_payment_due_date}, {wdp_deposit_amount}, {wdp_partial_amount}, {wdp_full_payment}, {wdp_paid_amount}, {wdp_remaining_amount}, {wdp_fee_total}{site_title}, {site_address}, {site_url}, {order_date}, {wdp_parent_order_number}, {wdp_suborder_number}, {wdp_part_payment_link}, {wdp_payment_due_date}, {wdp_deposit_amount}, {wdp_partial_amount}, {wdp_full_payment}, {wdp_paid_amount}, {wdp_remaining_amount}, {wdp_fee_total}{site_title}, {site_address}, {site_url}, {order_date}, {wdp_parent_order_number}, {wdp_suborder_number}, {wdp_part_payment_link}, {wdp_payment_due_date}, {wdp_deposit_amount}, {wdp_partial_amount}, {wdp_full_payment}, {wdp_paid_amount}, {wdp_remaining_amount}, {wdp_fee_total}{site_title}, {site_address}, {site_url}, {order_date}, {wdp_parent_order_number}, {wdp_suborder_number}, {wdp_part_payment_link}, {wdp_payment_due_date}, {wdp_deposit_amount}, {wdp_partial_amount}, {wdp_full_payment}, {wdp_paid_amount}, {wdp_remaining_amount}, {wdp_fee_total}Here’s an example of a real DEPART – Partial payment reminder email with the sample content above: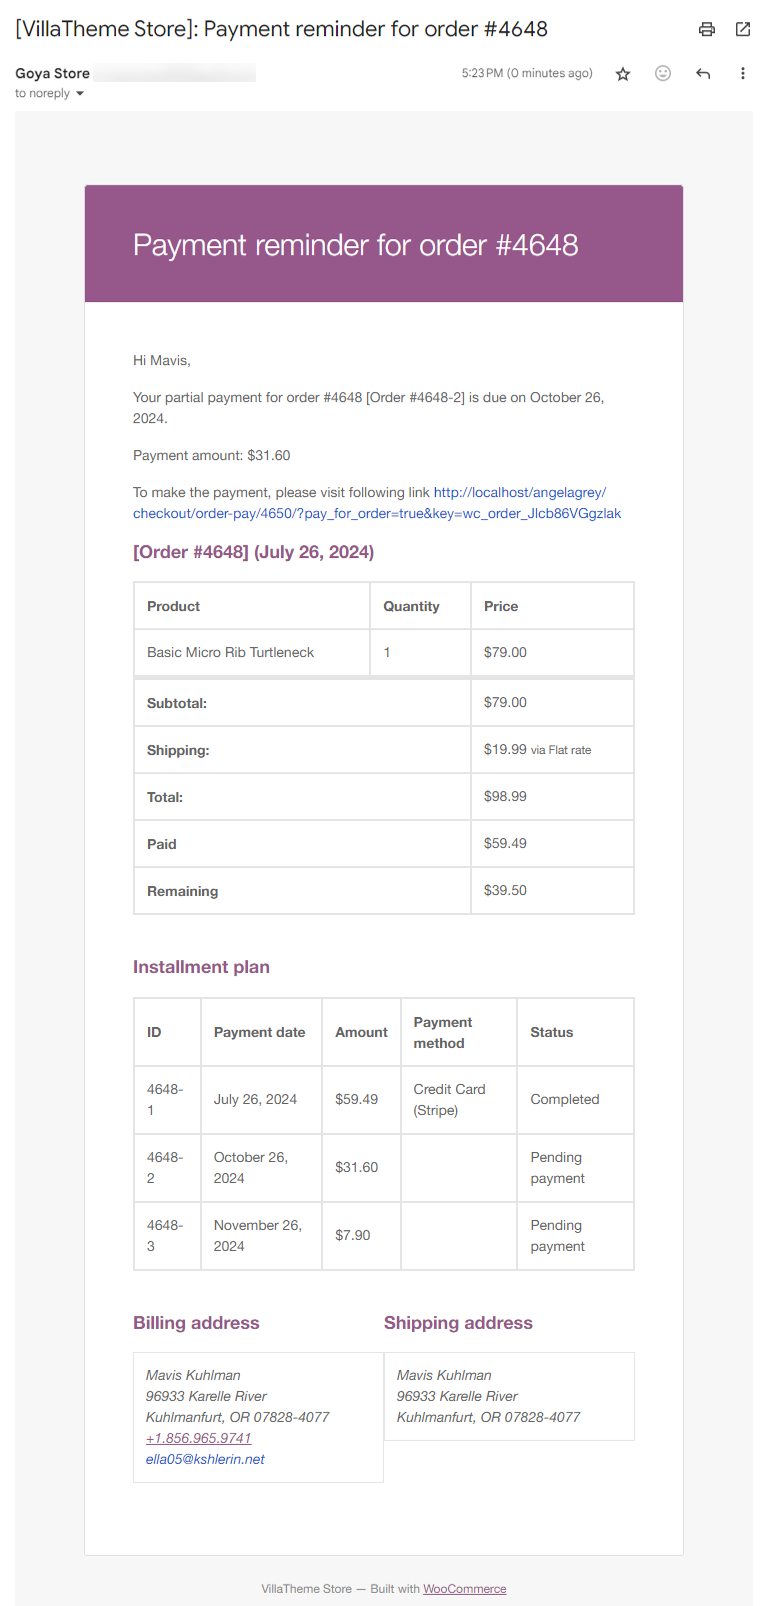
DEPART is compatible with both WooCommerce Email Template Customizer and Email Template Customizer for WooCommerce
When you install DEPART and one of the two email template customizer plugins above, you can edit emails created by DEPART in their template:
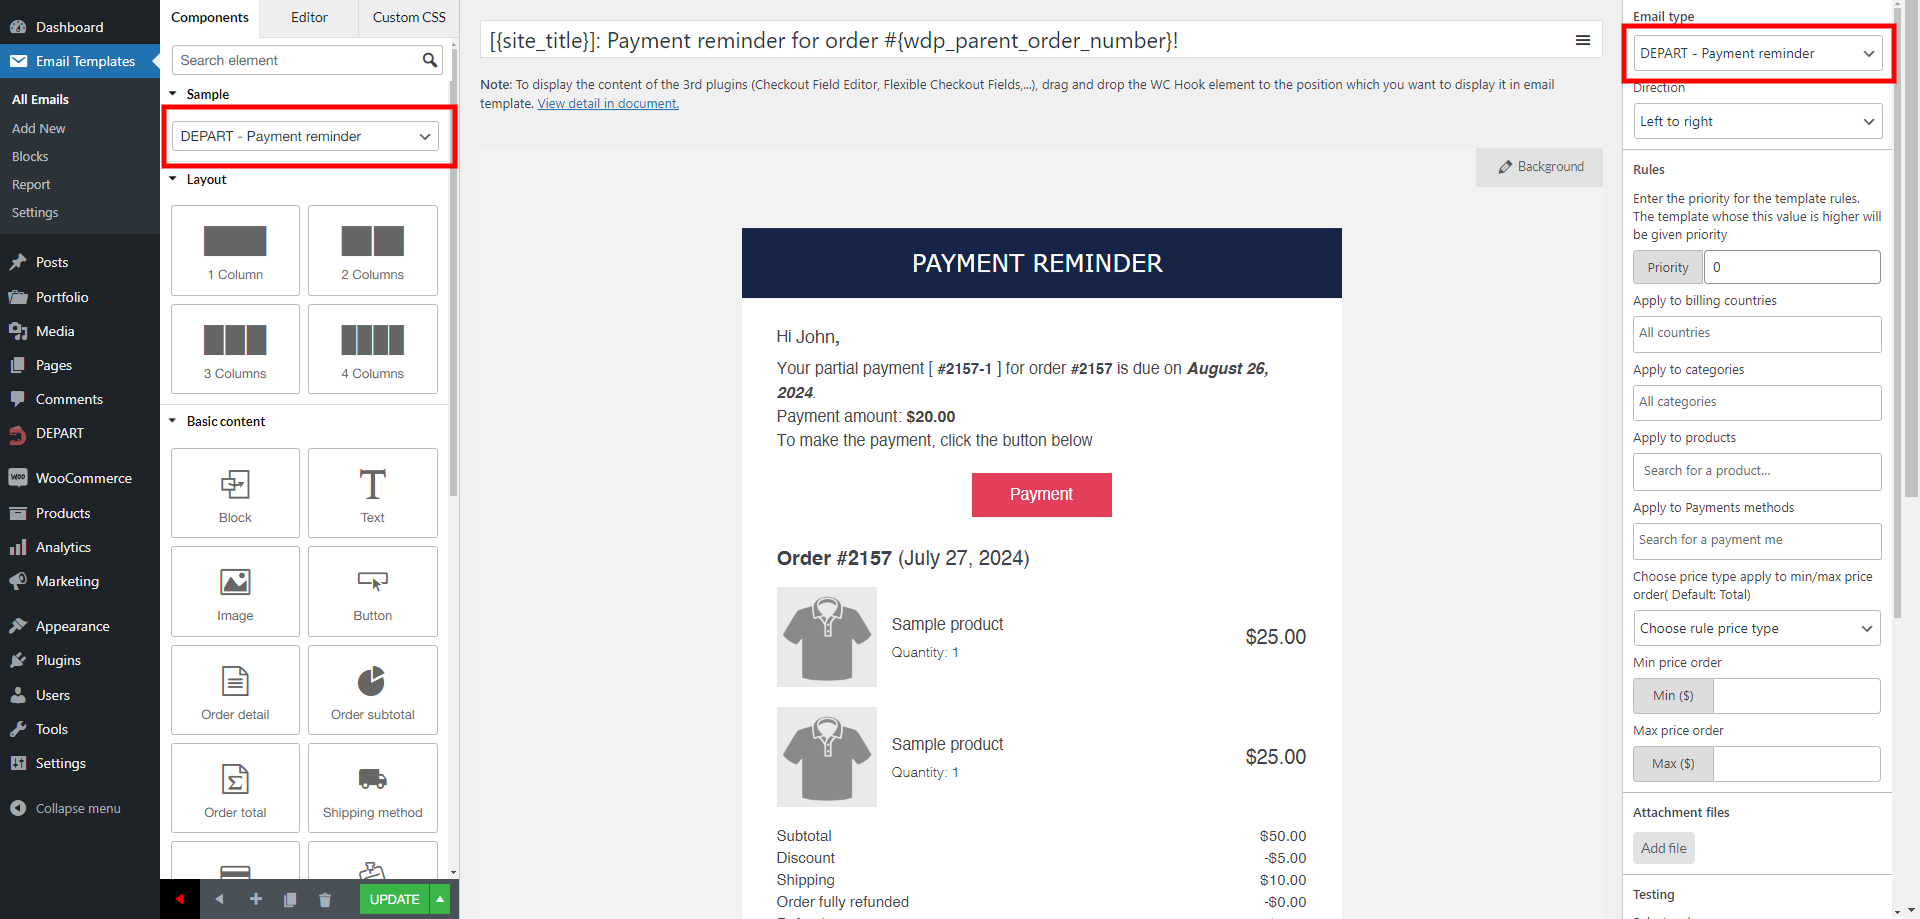
You can access the template either from WooCommerce Emails settings or under DEPART Email settings
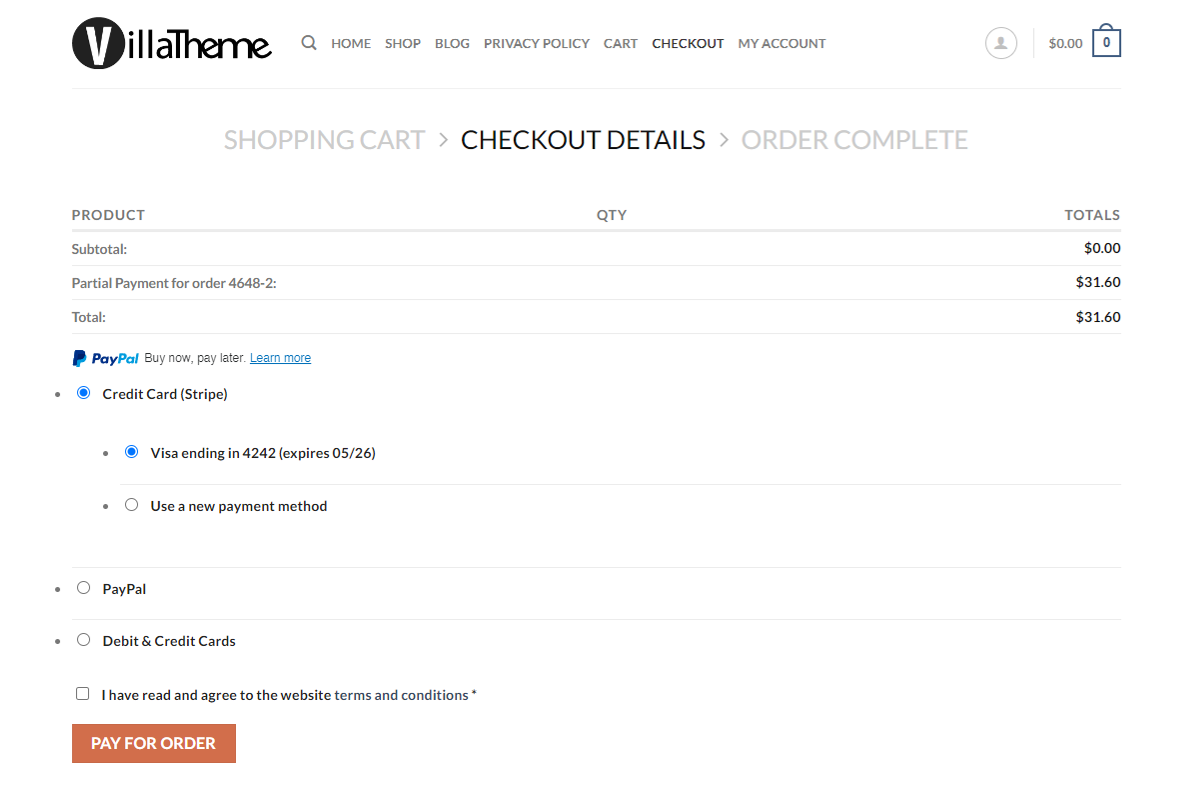
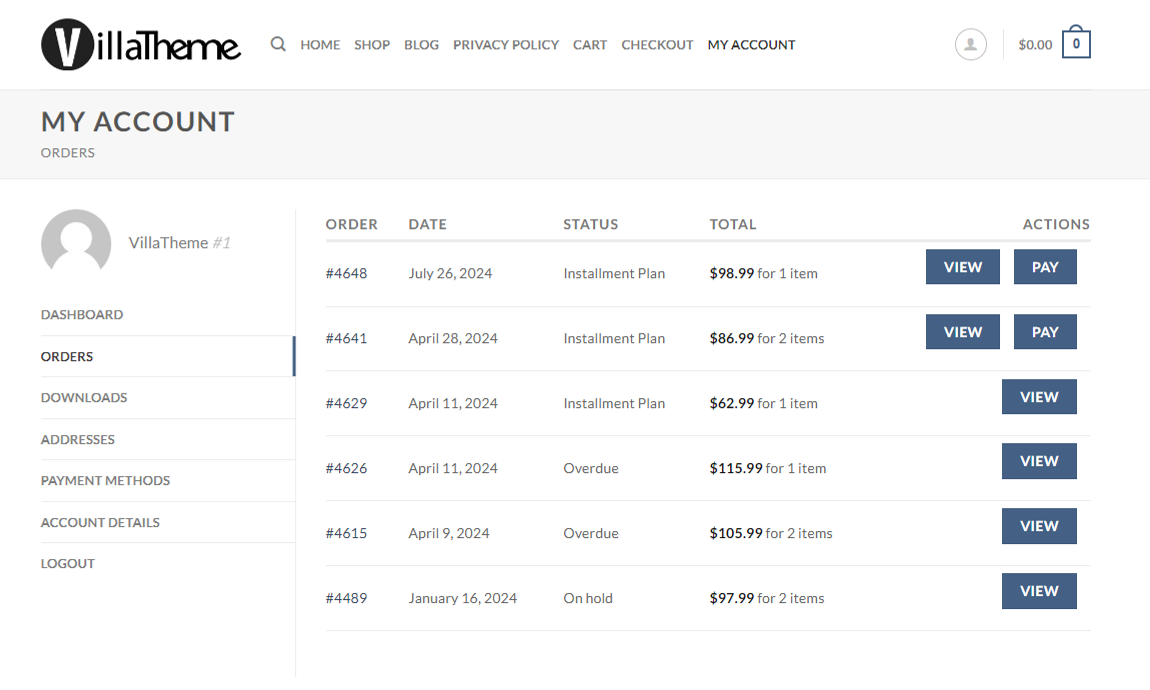
Customer can view their deposit orders and complete the installment plans in their Orders list under My account page.
1. Go to My account >> Orders: Deposit orders are assigned a specific status – Installment Plan or Overdue
2. They can also see that in the order details page
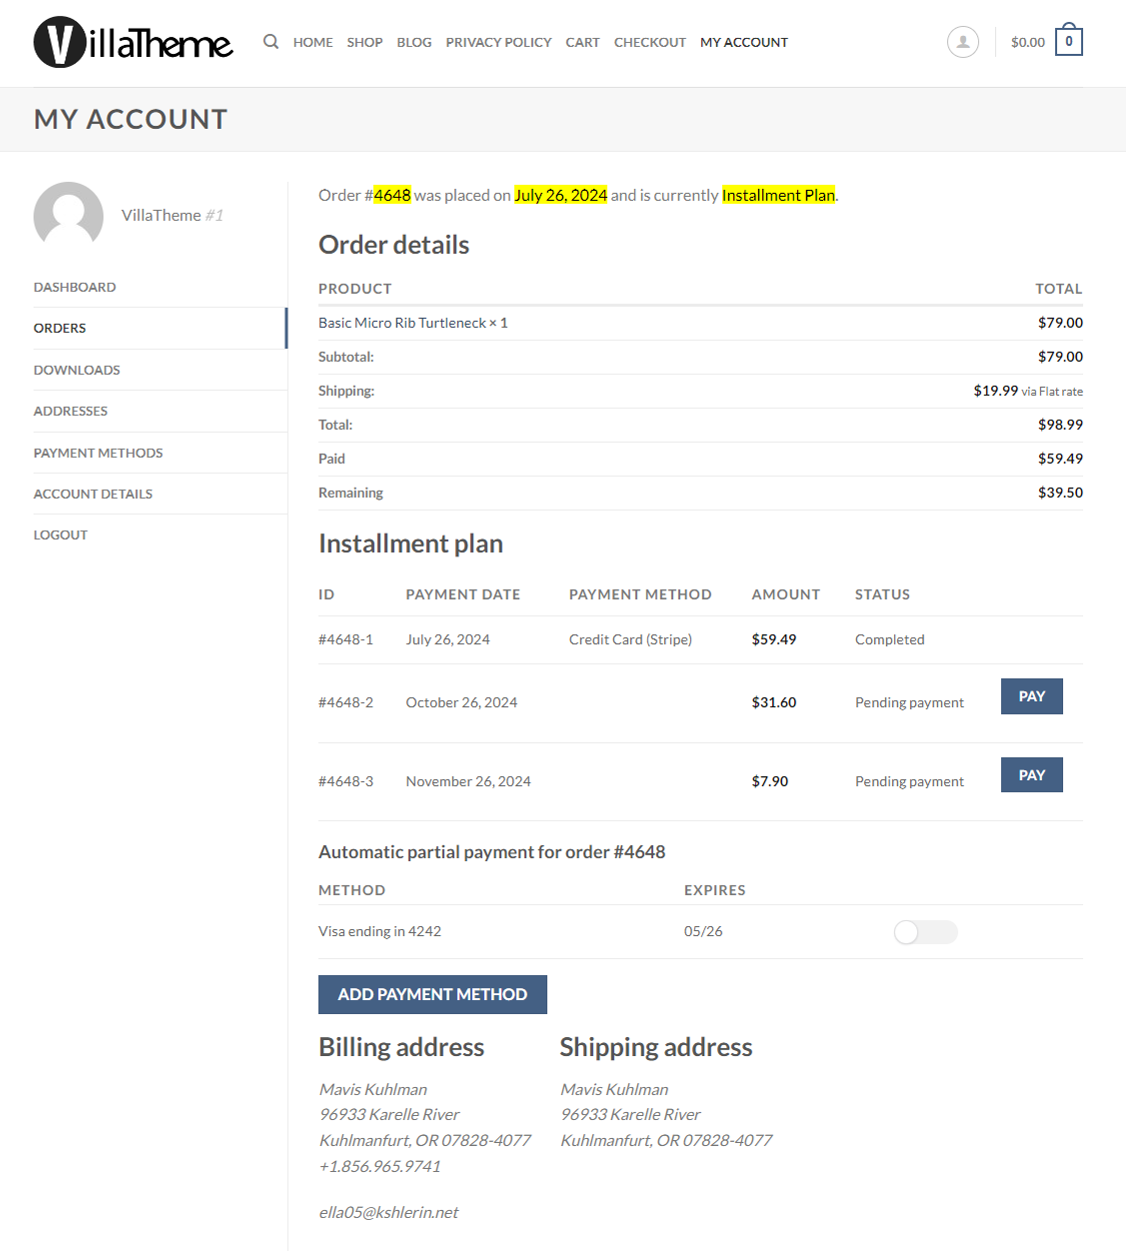
3. Simply click that “PAY” button, then the customer is redirected to the checkout page to complete their installment.