Copyright Villatheme 2015-2026
Created: 01/2025
Latest updated: 09/2025 – Updated version: 1.0.2
By: VillaTheme Thank you for purchasing our plugin. If you have any questions that are beyond the scope of this documentation, please feel free to request support at our Support Forum. Thanks so much!
Step 1: Install and Activate AFFI Plugin
Step 2: Configure General Settings
Step 3: Define Commission Rules
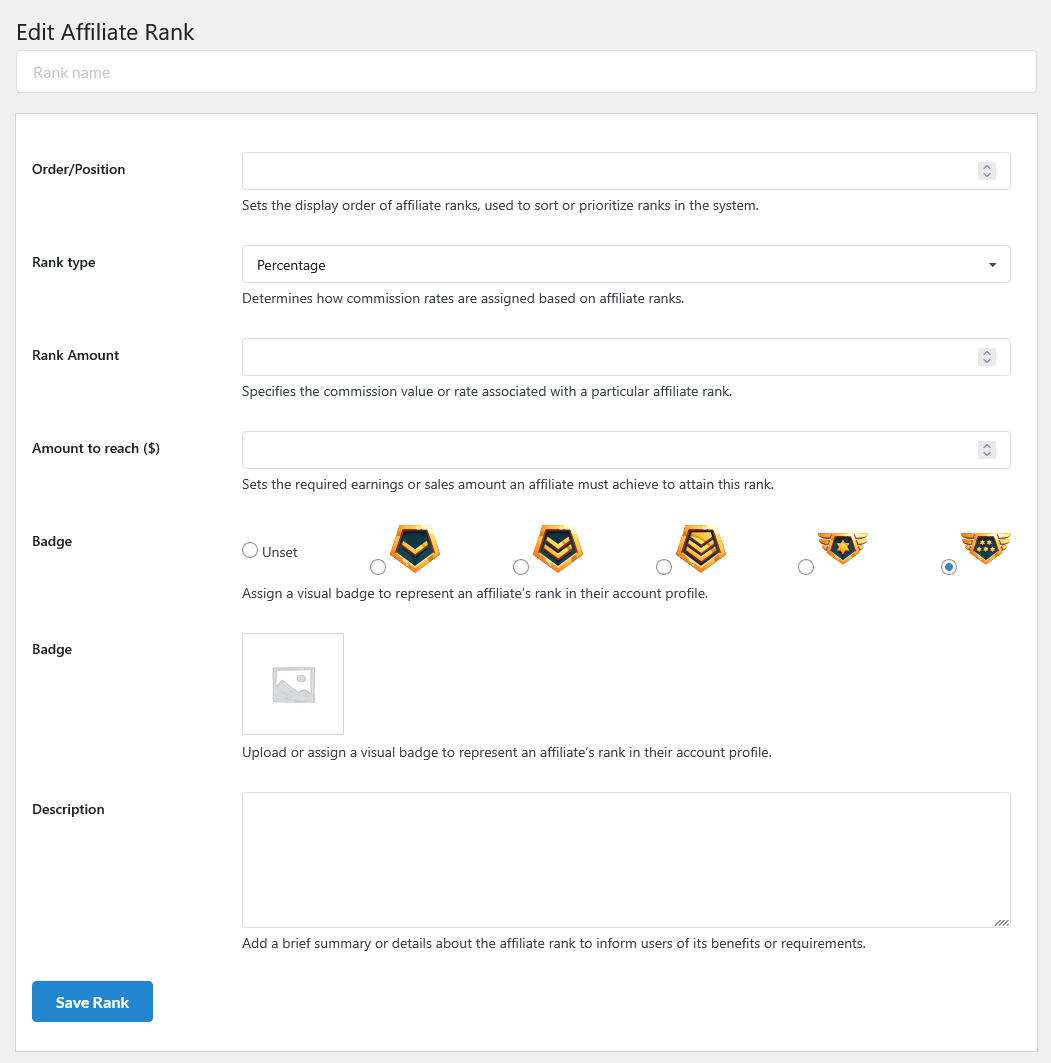
Step 4: Set Up Affiliate Ranks
Access the Ranks page. Create rank levels with specific details:
Step 5: Add Affiliates
Step 6: Enable Sharing Tools
After you’re happy with the setup and things start working, monitor and analyze reports
And manage payouts
Control whether affiliates can promote all products or only selected ones. Go to the General settings tab and toggle the “Restrict affiliate” option

Related Options (also under General setting tab – available when Restrict affiliate is enabled):

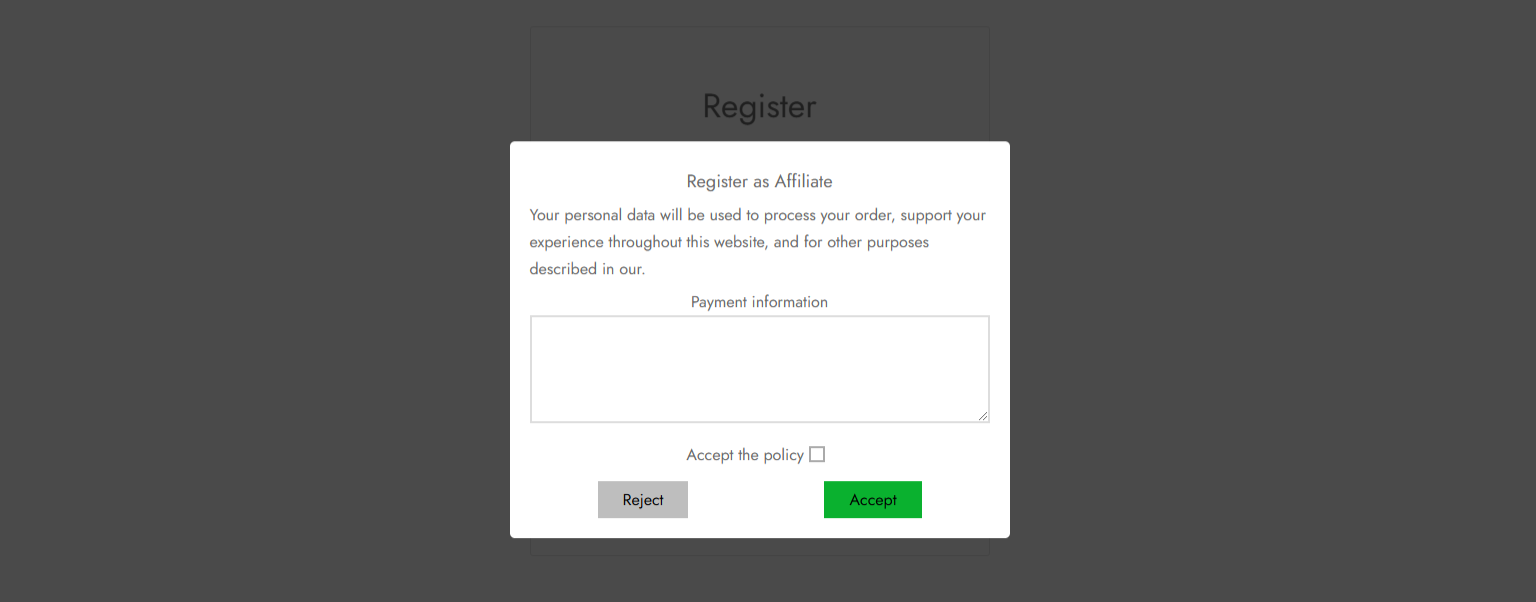
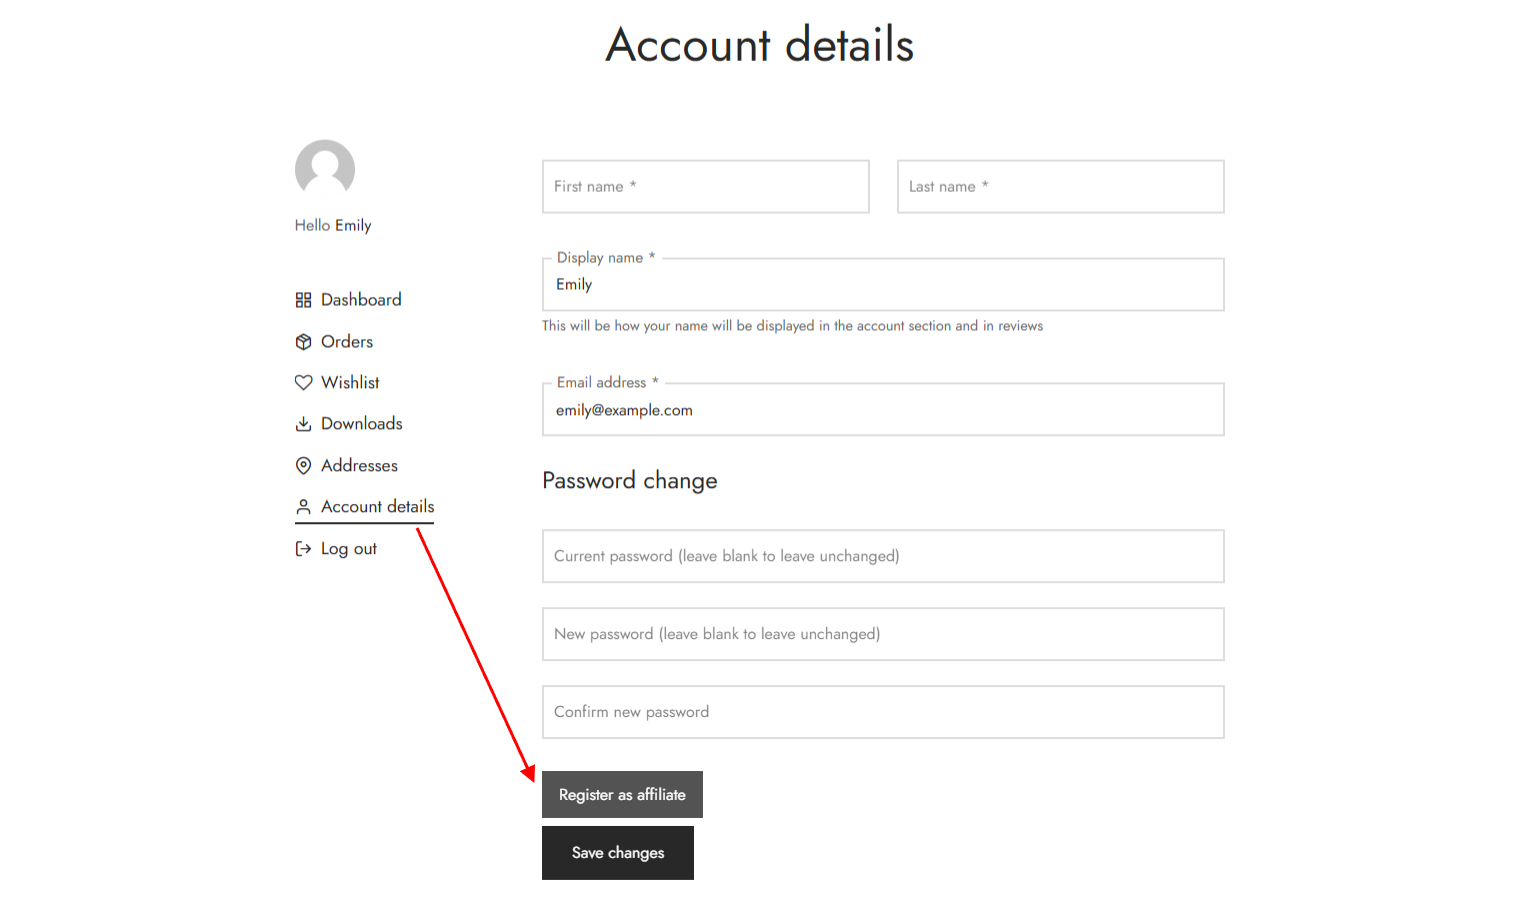
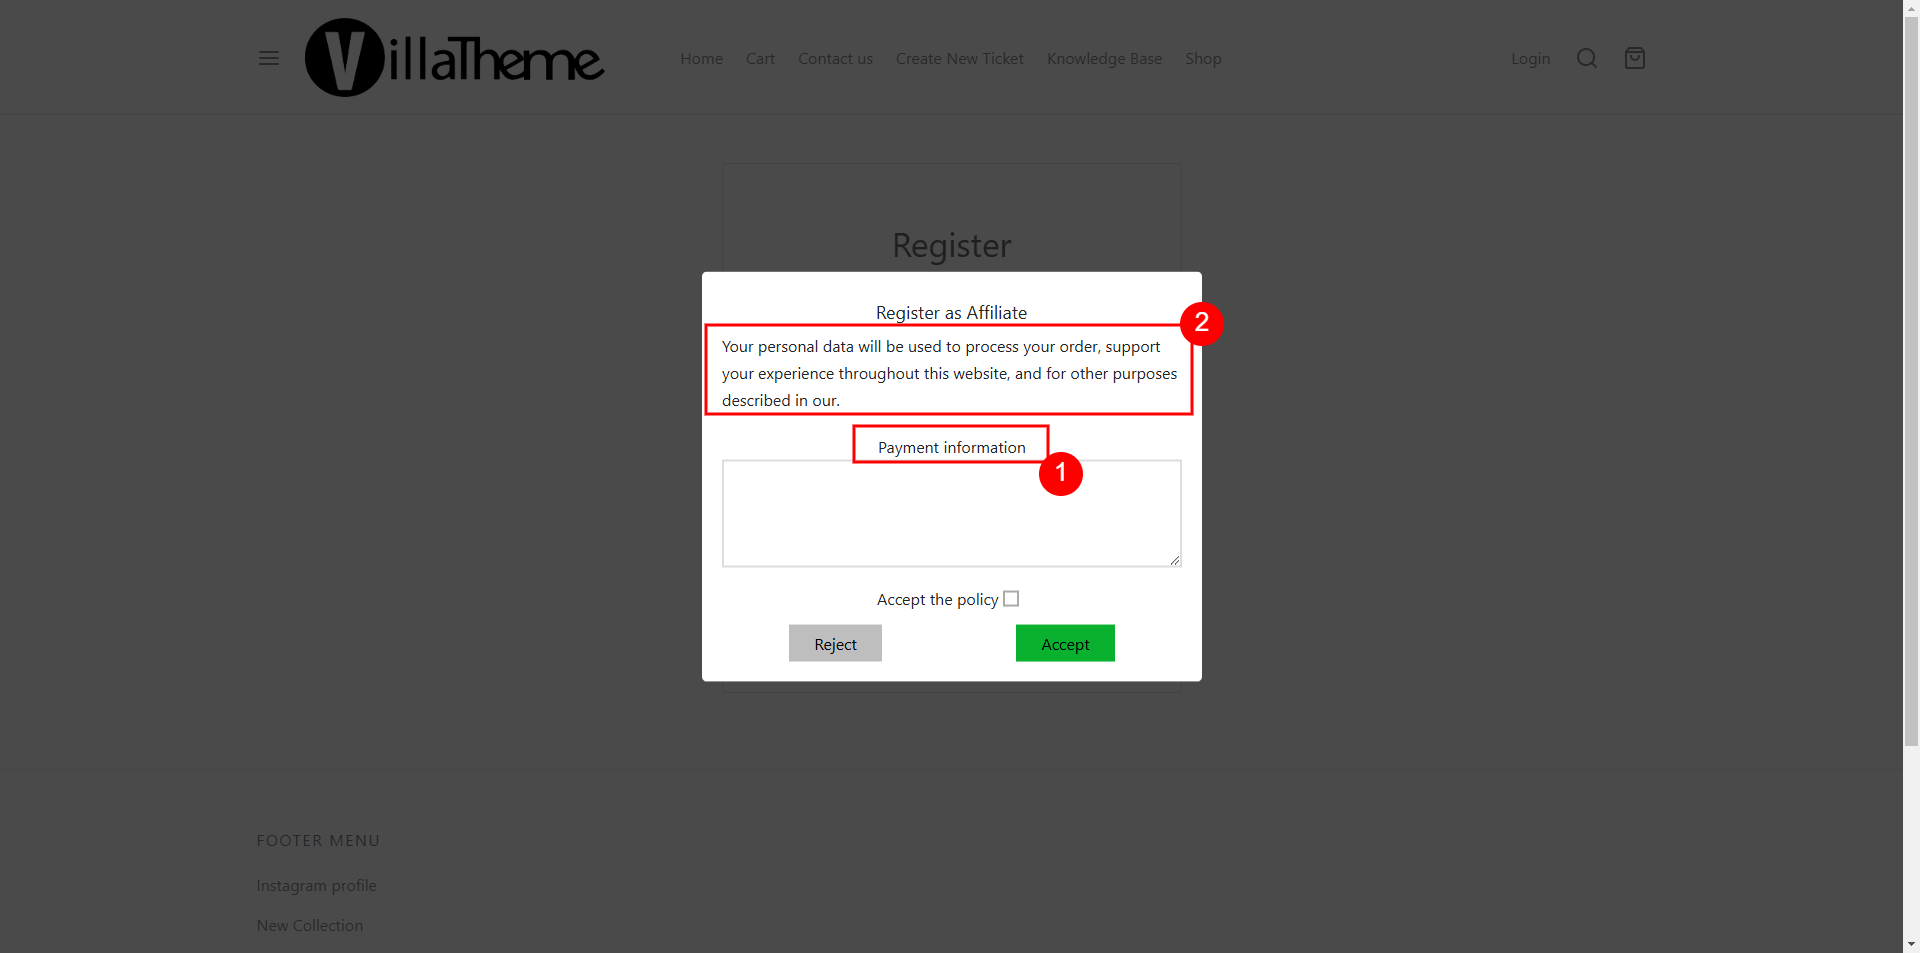
Step 1: Register as an Affiliate
Once the Enable register affiliate option under General settings is enabled, user can register as affiliate in 2 ways:
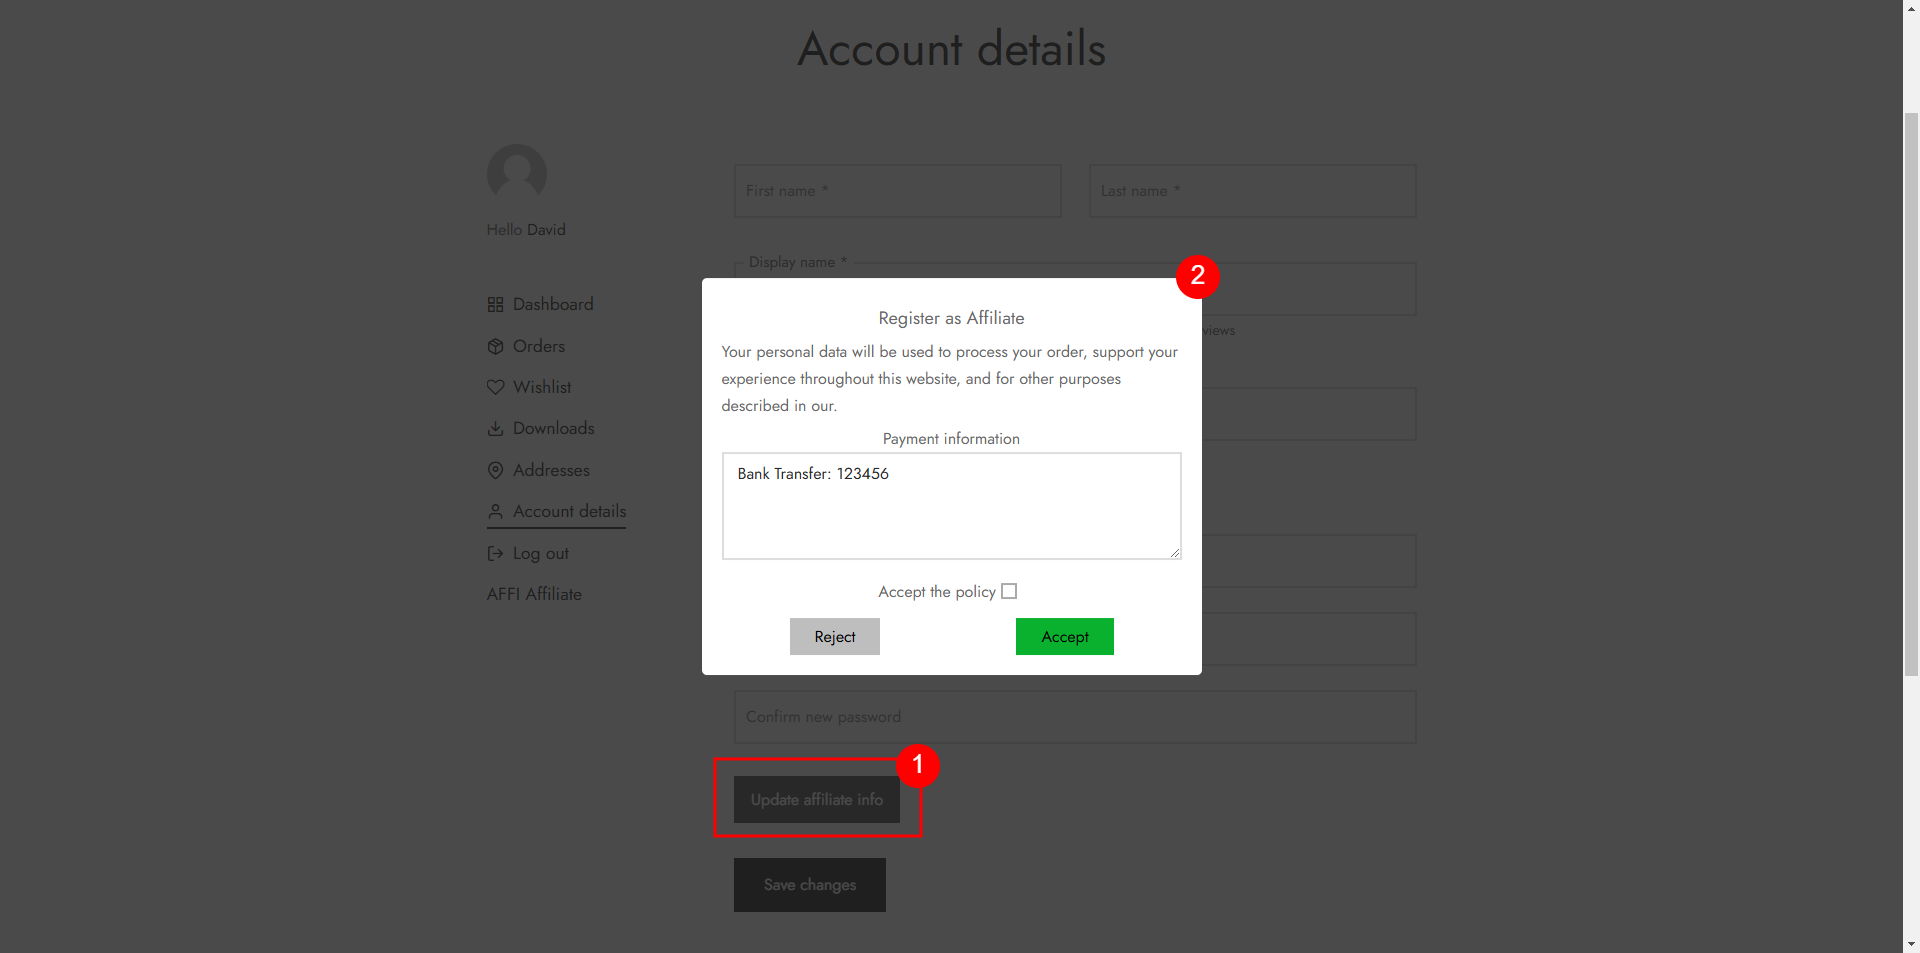
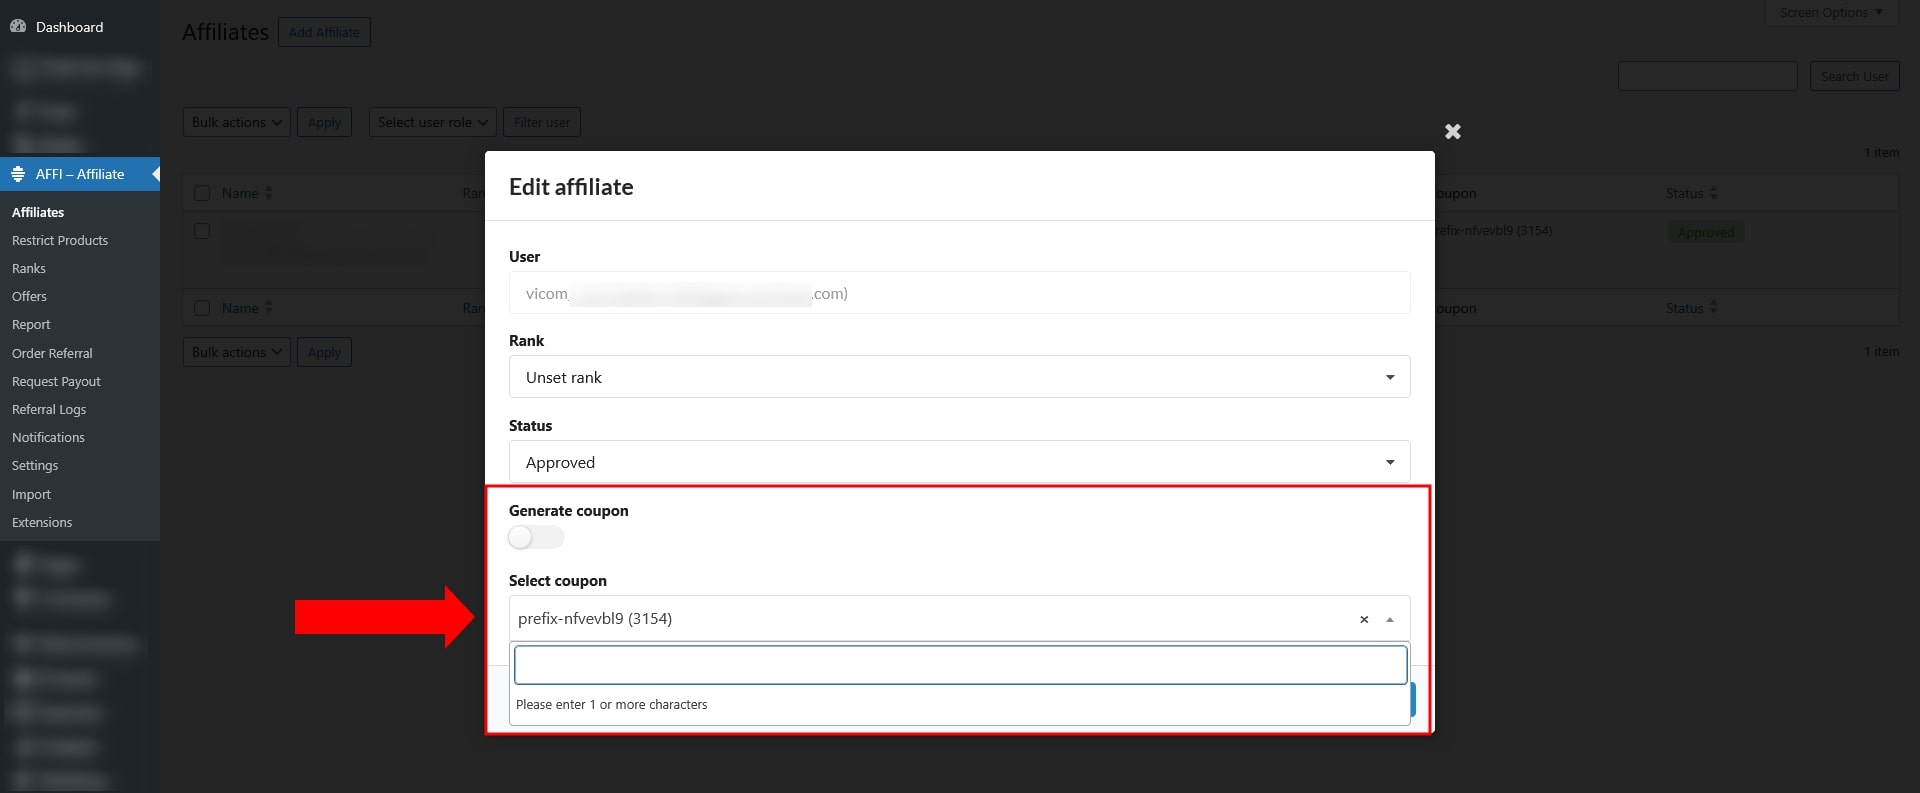
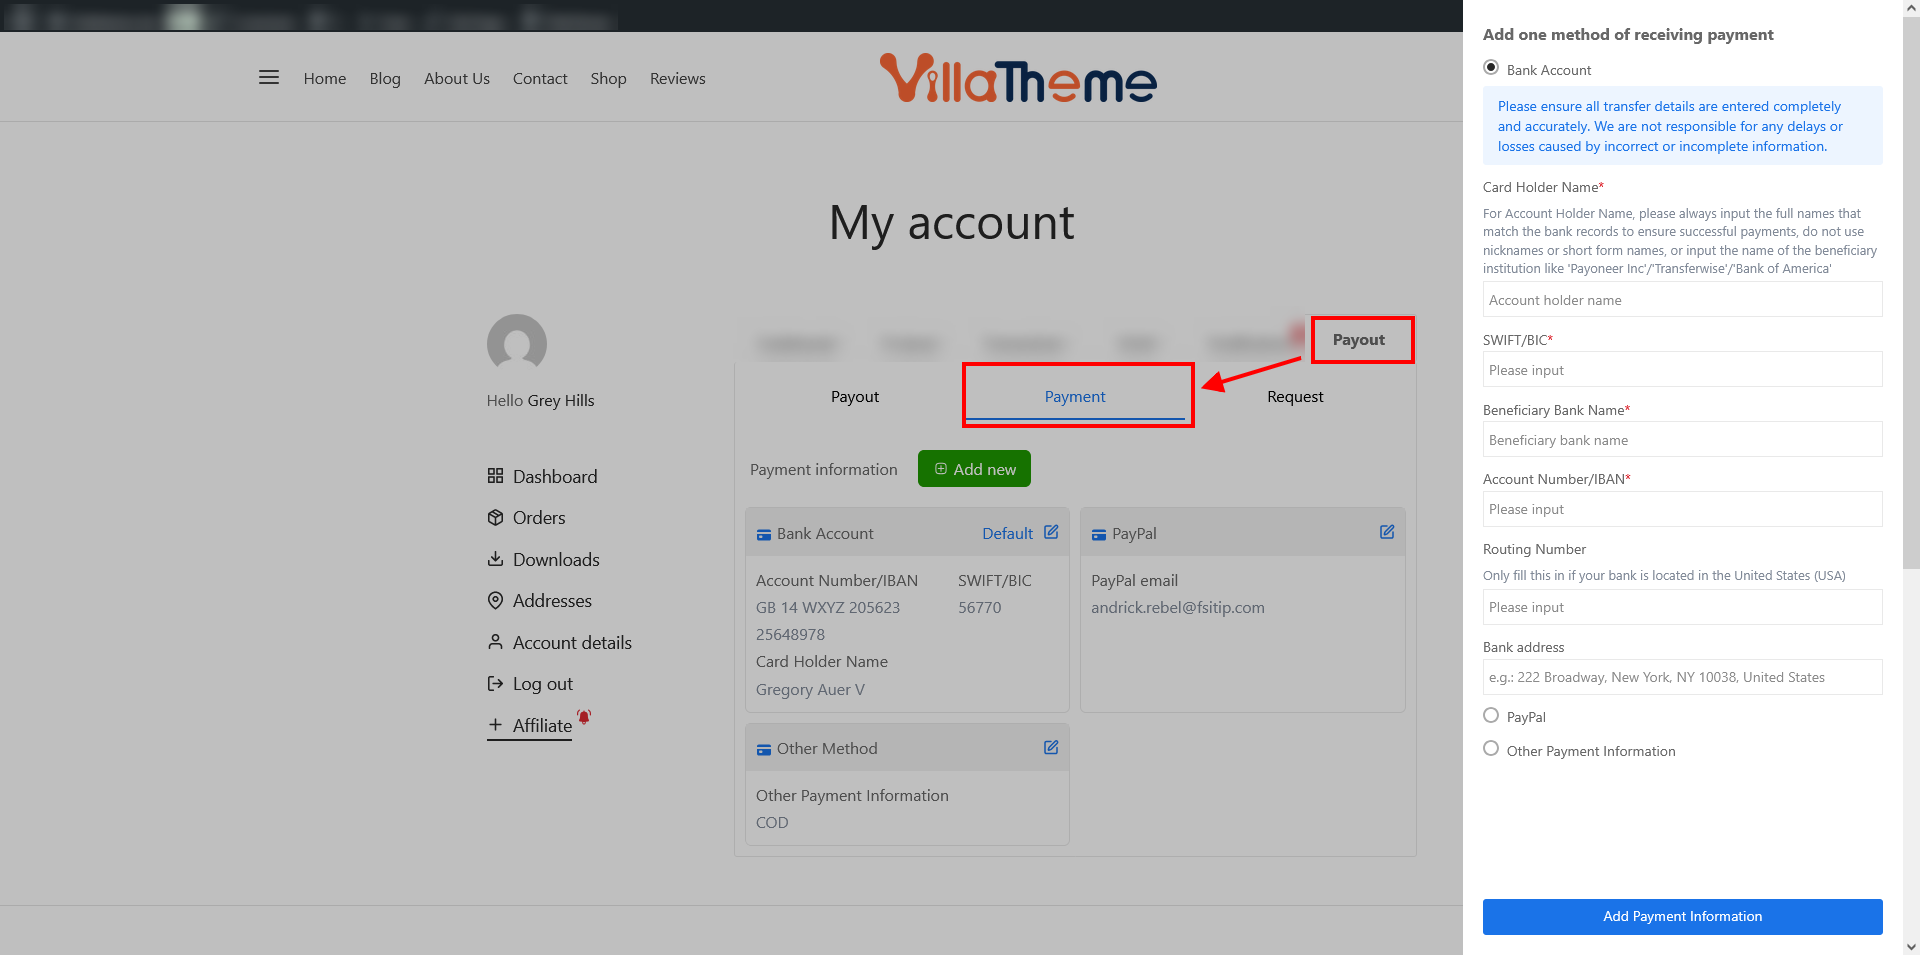
Step 2: Edit affiliate’s payment details after registration. There’re 2 ways:
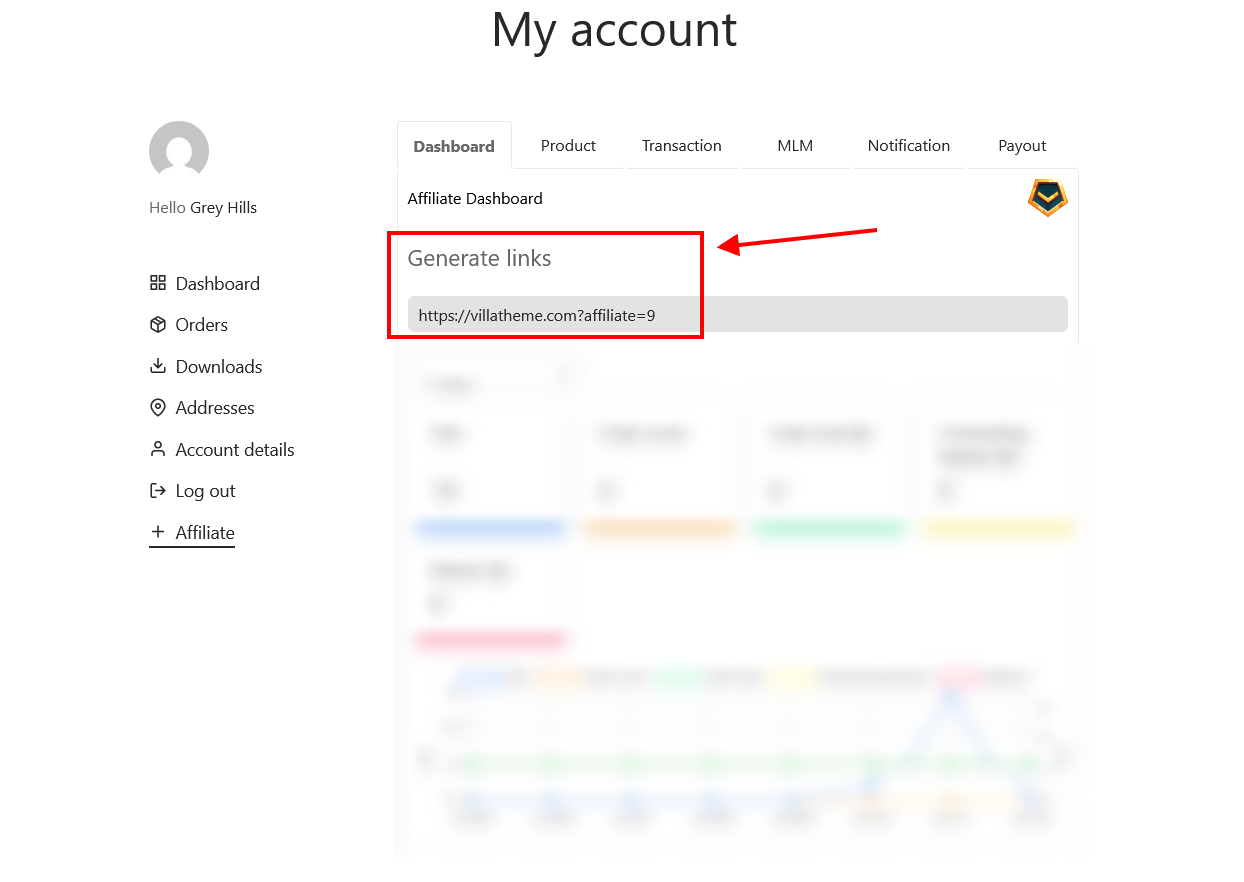
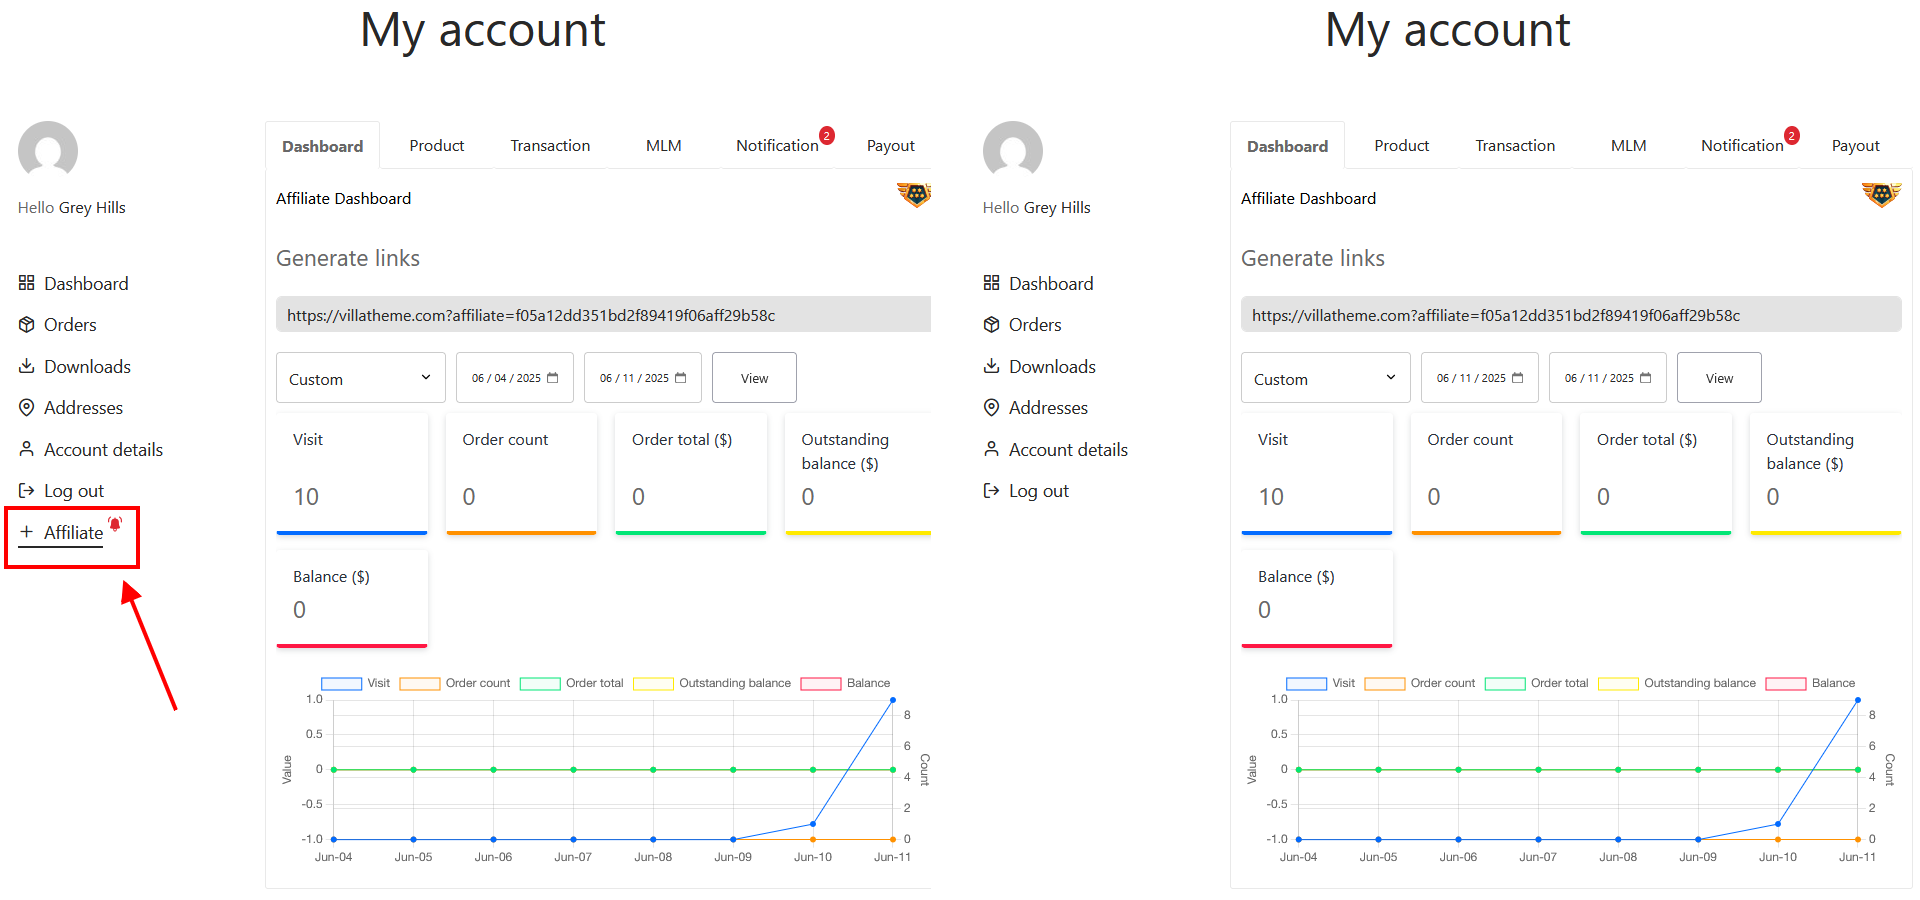
Step 3: Access the Affiliate Dashboard
Once approved, log in to your account and access the Affiliate Dashboard at the URL /affi-affiliate/ or from the My Account section.
Dashboard Features:
Payouts:
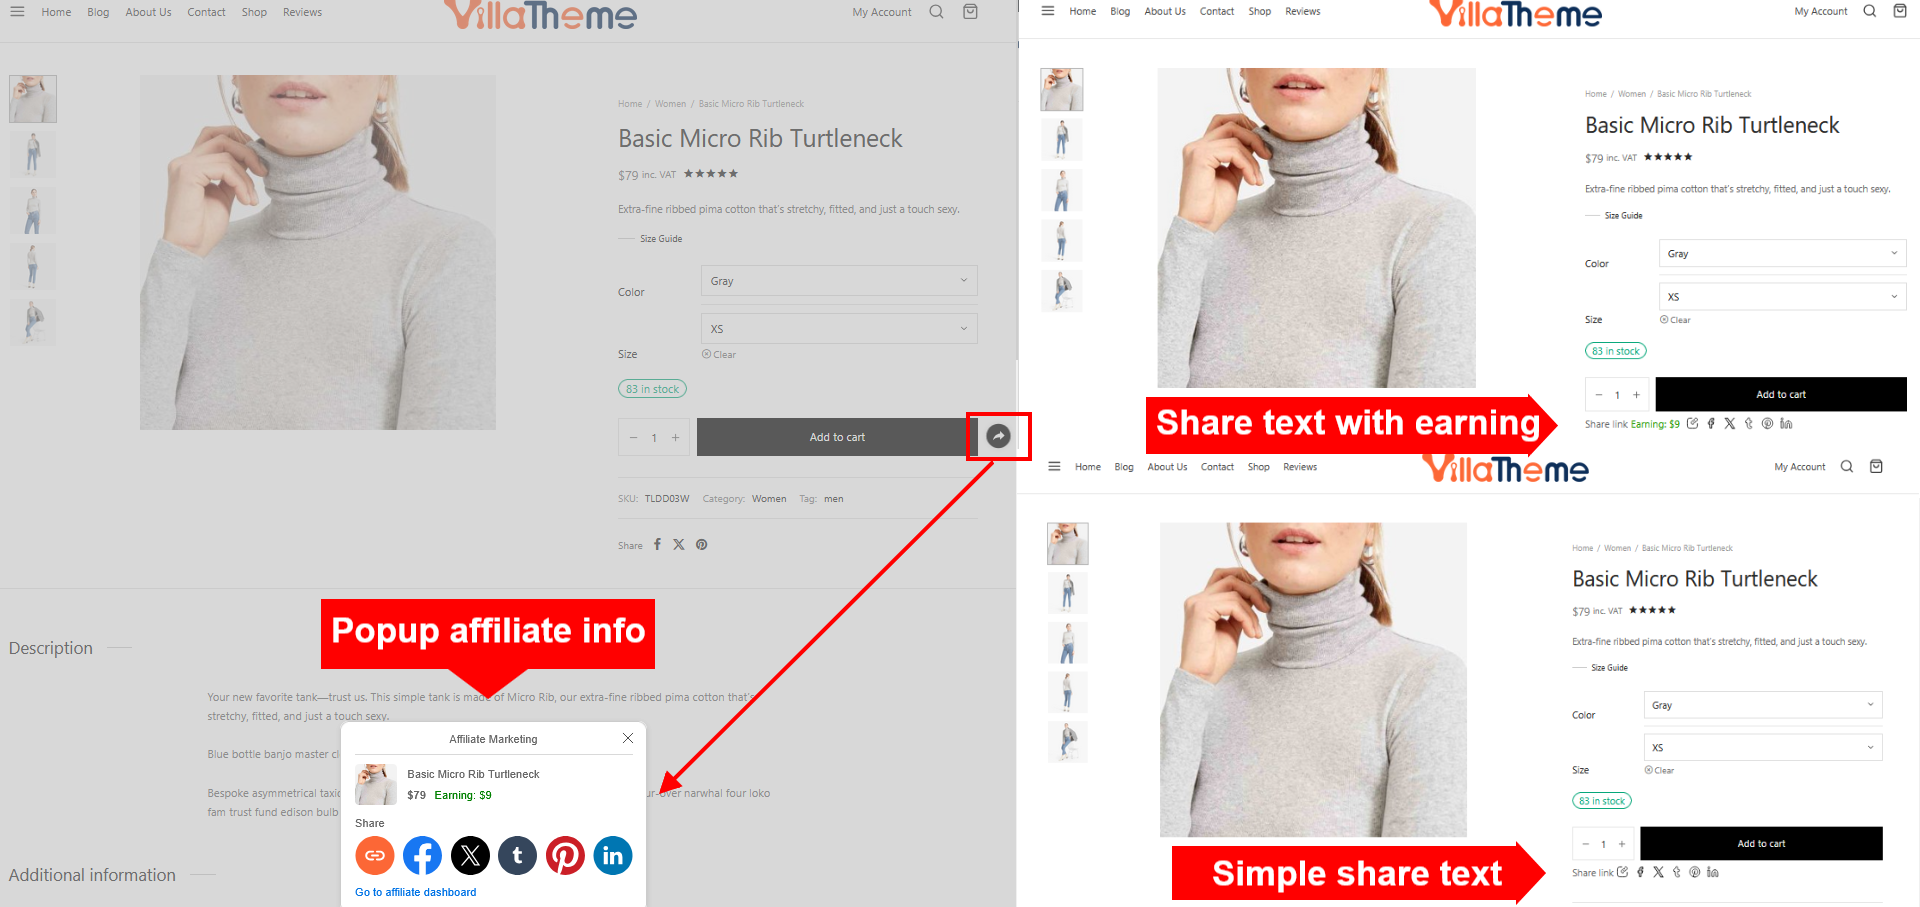
Step 4: Share Your Affiliate Links
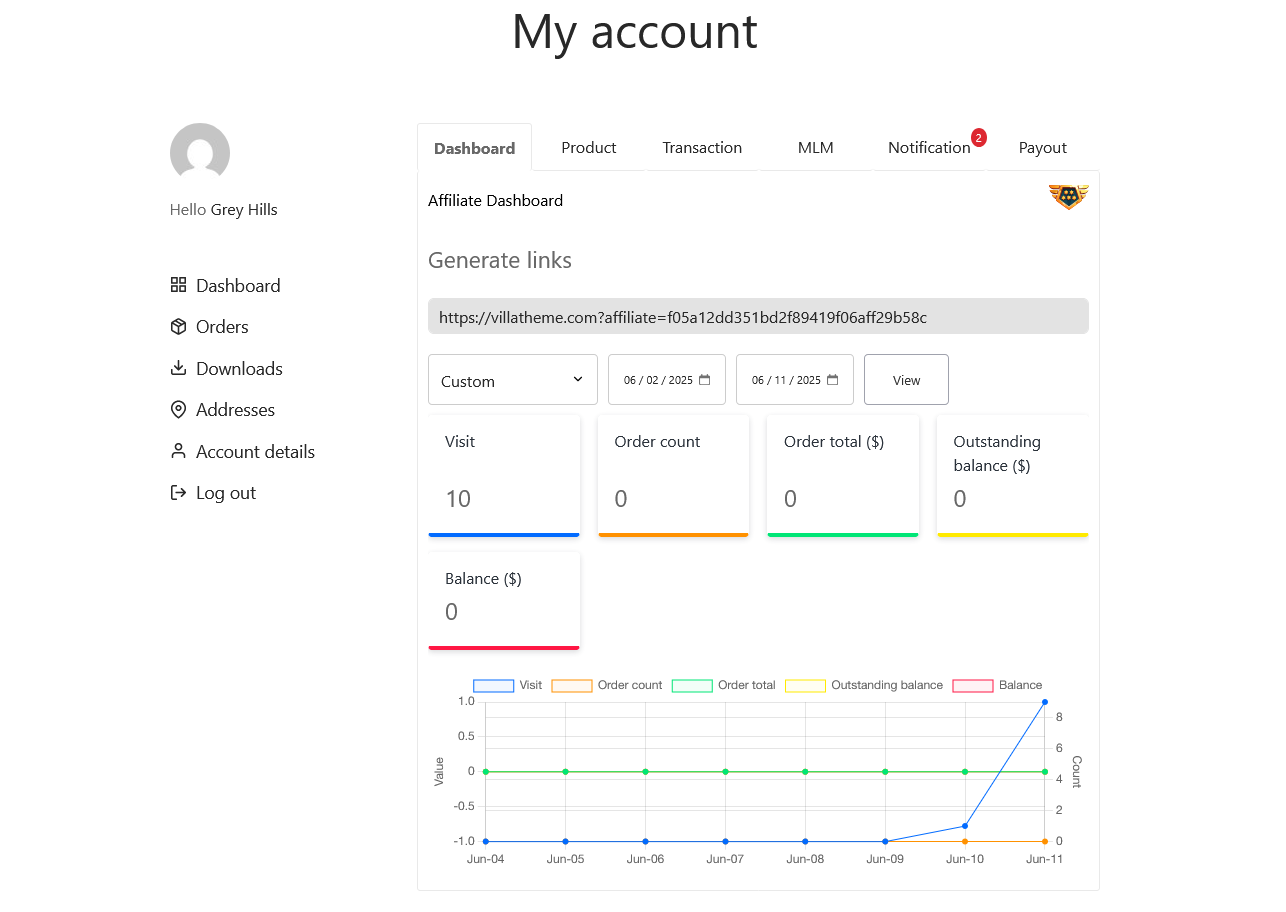
Step 5: Monitor Your Performance
Use the reporting tools in the Affiliate Dashboard to review: Total visits, orders, earnings, outstanding balance and paid commissions.
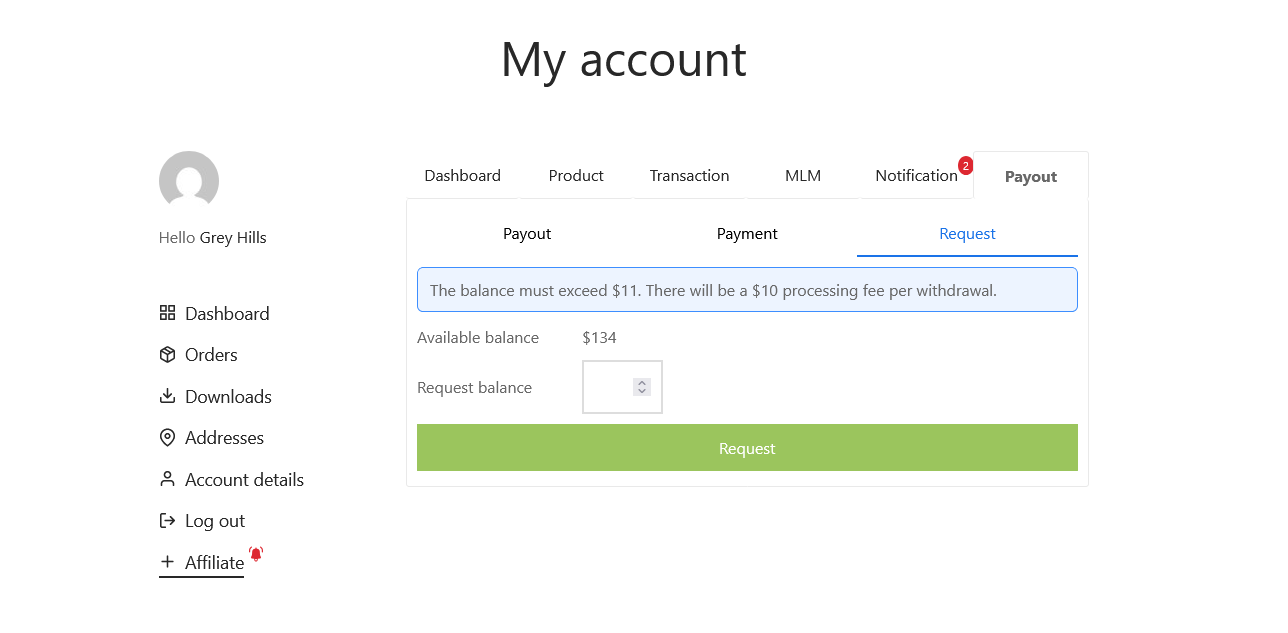
Step 6: Request Payouts
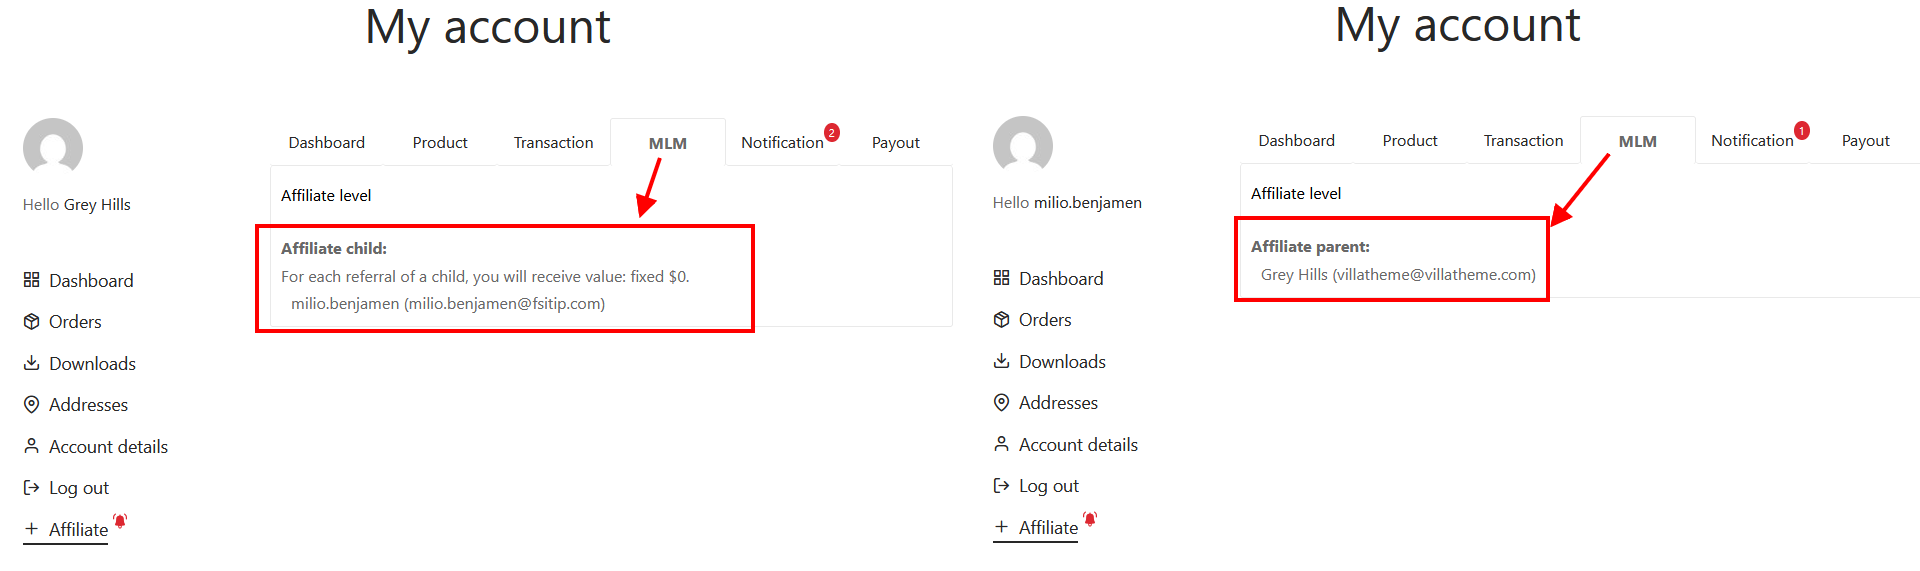
The multilevel feature in AFFI allows affiliates to earn not only from their own referrals, but also from the sales generated by affiliates they recruit – known as child affiliates.
A child affiliate relationship is created at the moment a new user registers through an existing affiliate’s referral link. This referral link contains a unique affiliate ID or username, or encrypted username, which the system uses to establish the connection.
An affiliate shares their referral link >> A new user signs up through it >> That user becomes their child affiliate.
Whether or not the parent affiliate earns commissions from their child affiliates is determined by the admin’s settings.
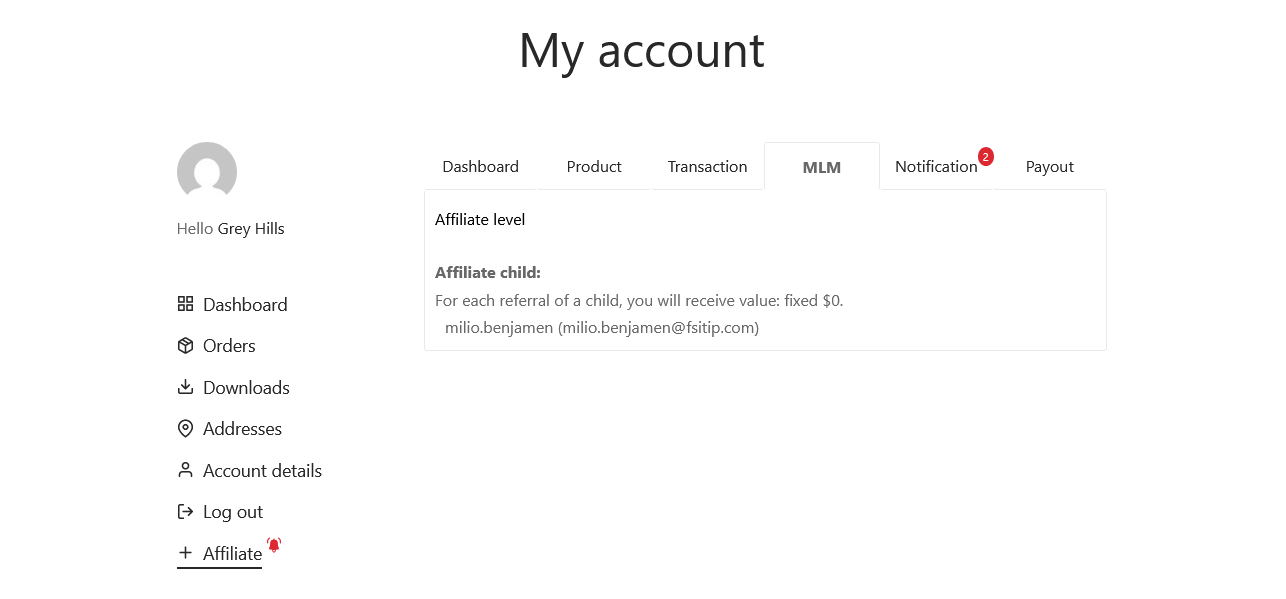
Affiliates can view their multilevel structure and referral relationships directly on the MLM dashboard.
The Affiliates setting page is designed for administrators to manage all registered affiliates. This page provides a comprehensive list of affiliates with the following details:
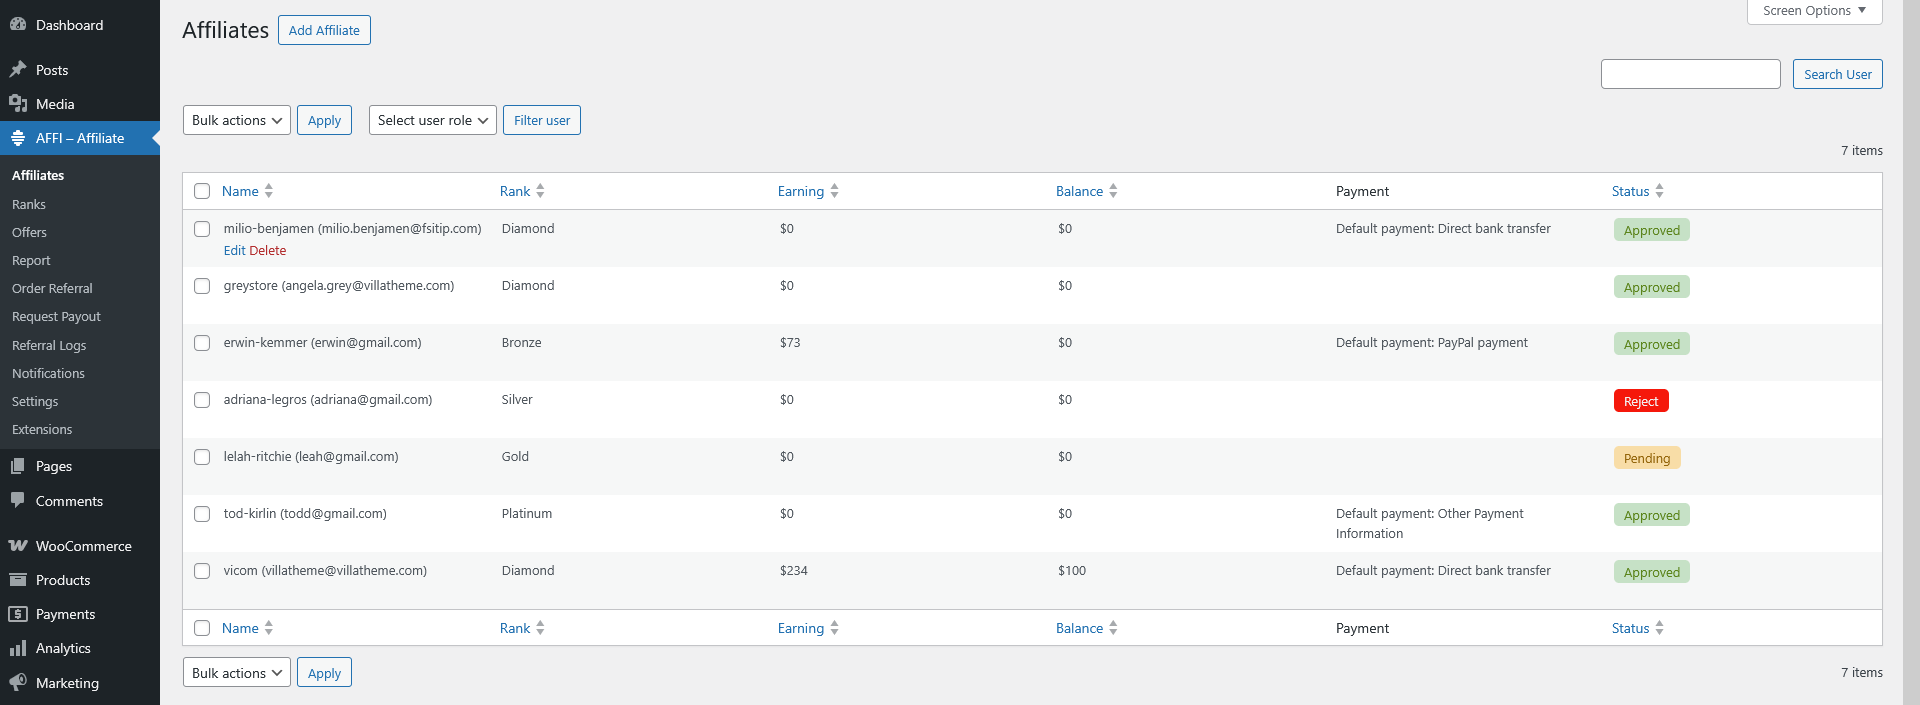
Admin Capabilities
This tab appears only when the “Restrict Affiliate” option is enabled in the General Settings.
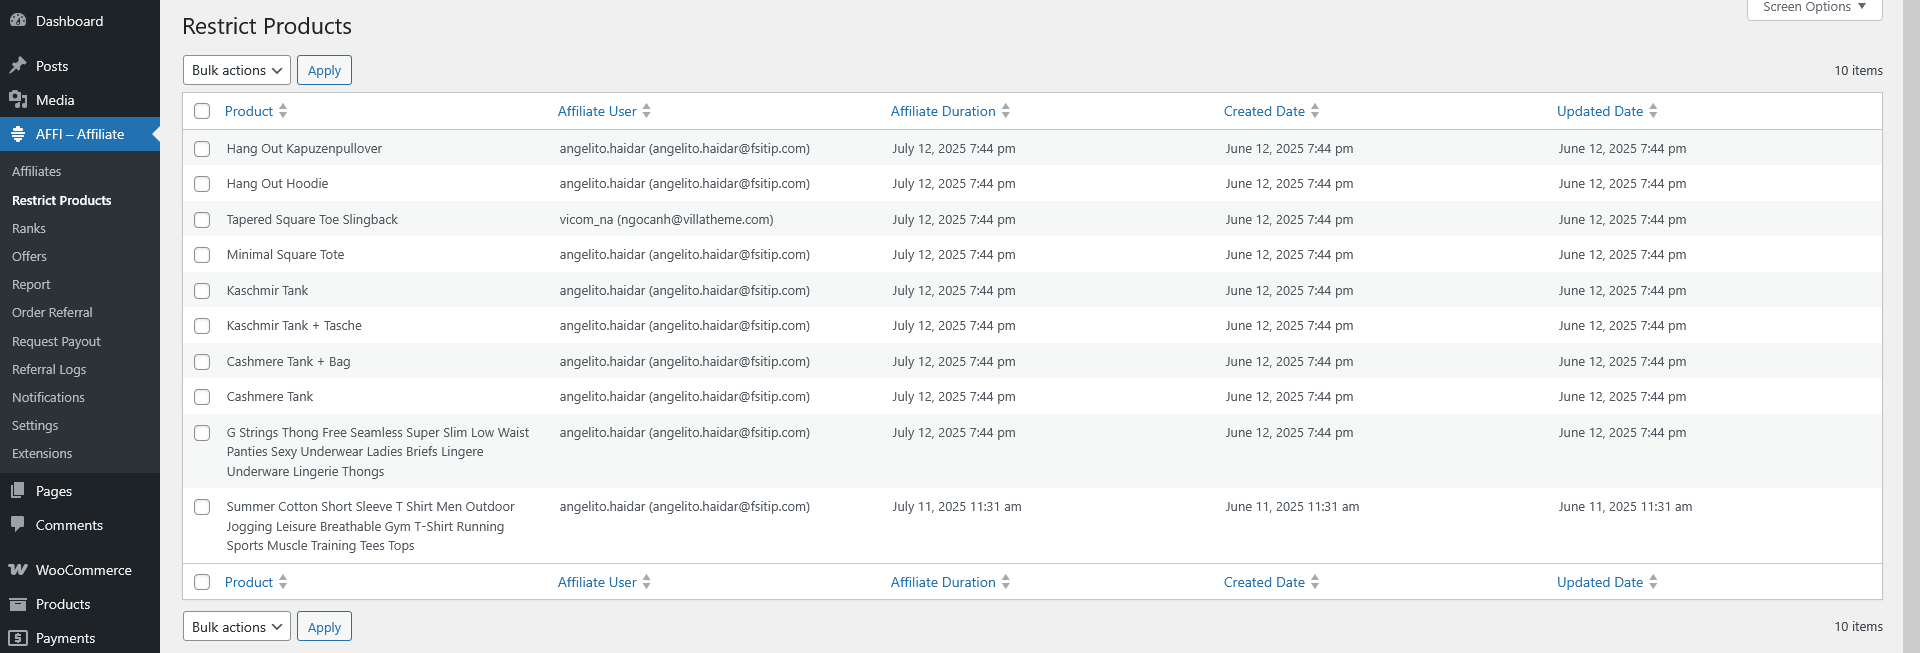
When enabled, affiliates can only promote specific products that have been shared with them. These assigned products are visible under My Account > Affiliate > Products > Restricted Products
However, in this tab (visible to admins), you can view all restricted products assigned to every affiliate in one place. It provides a centralized view of who is allowed to promote which products.
This page allows administrators to manage the affiliate rank system, you can to group affiliates into levels or tiers based on their earning amount
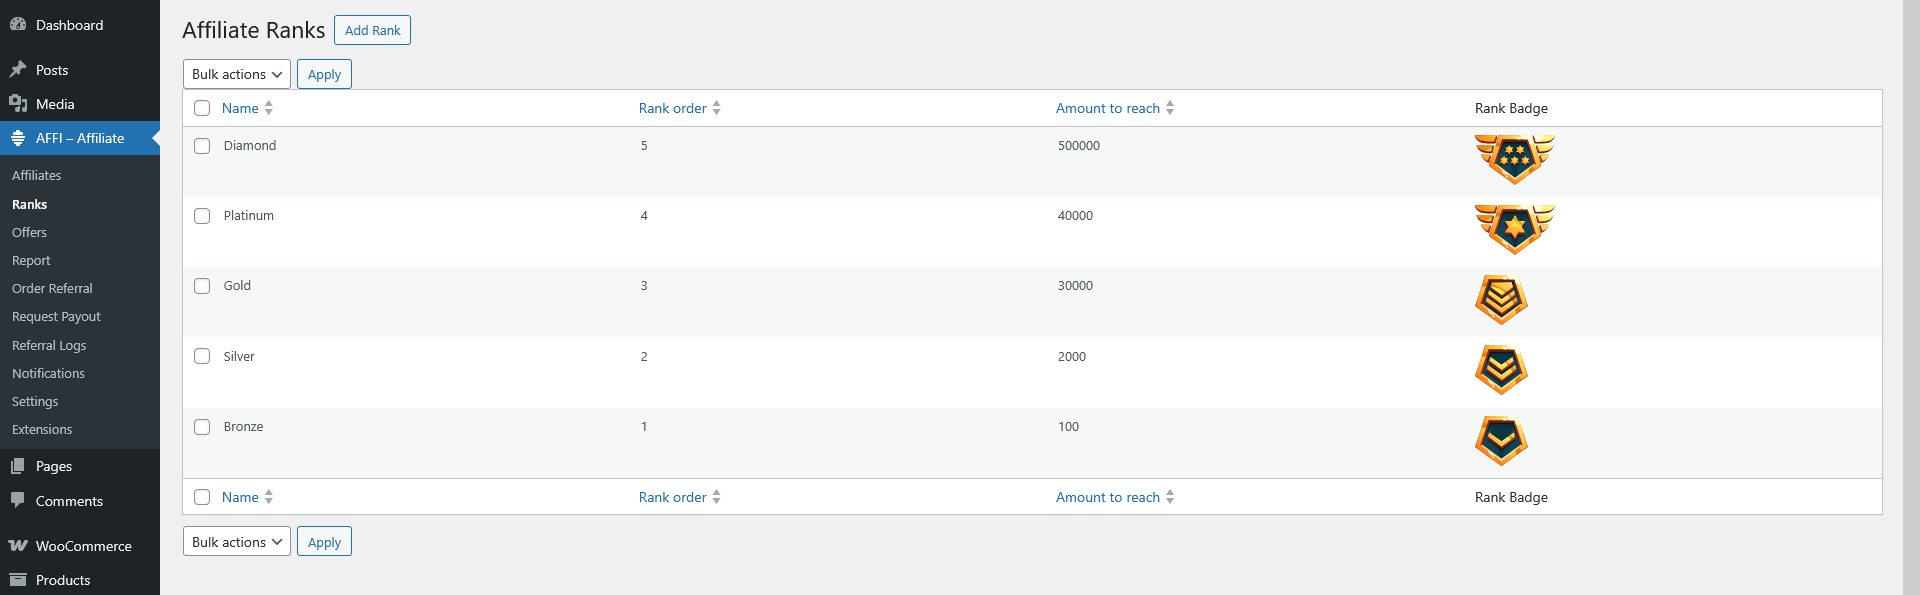
On this page, admins can:
This a powerful tool to reward or motivate affiliates in a more flexible, targeted way.
Step 1: Go to Dashboard >> AFFI – Affiliate >> Offers. This dashboard displays all existing offers
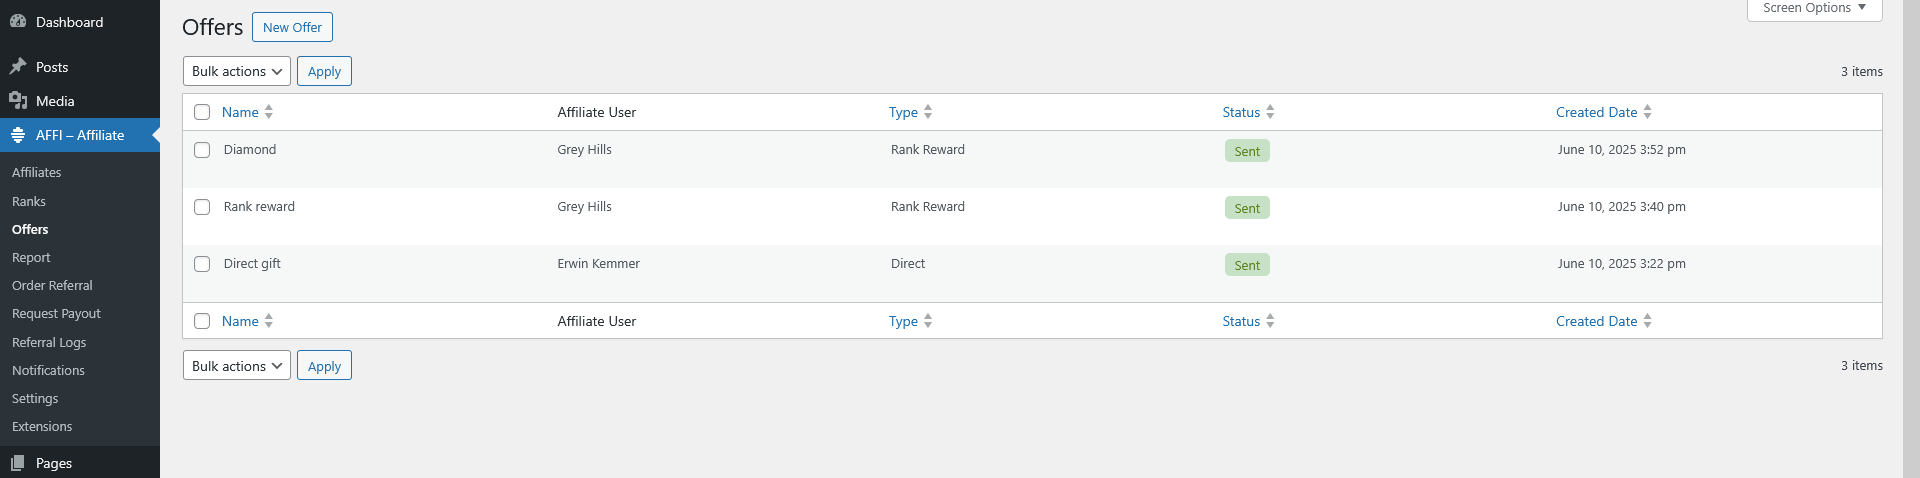
Step 2: Add new offer. Click “New Offer”
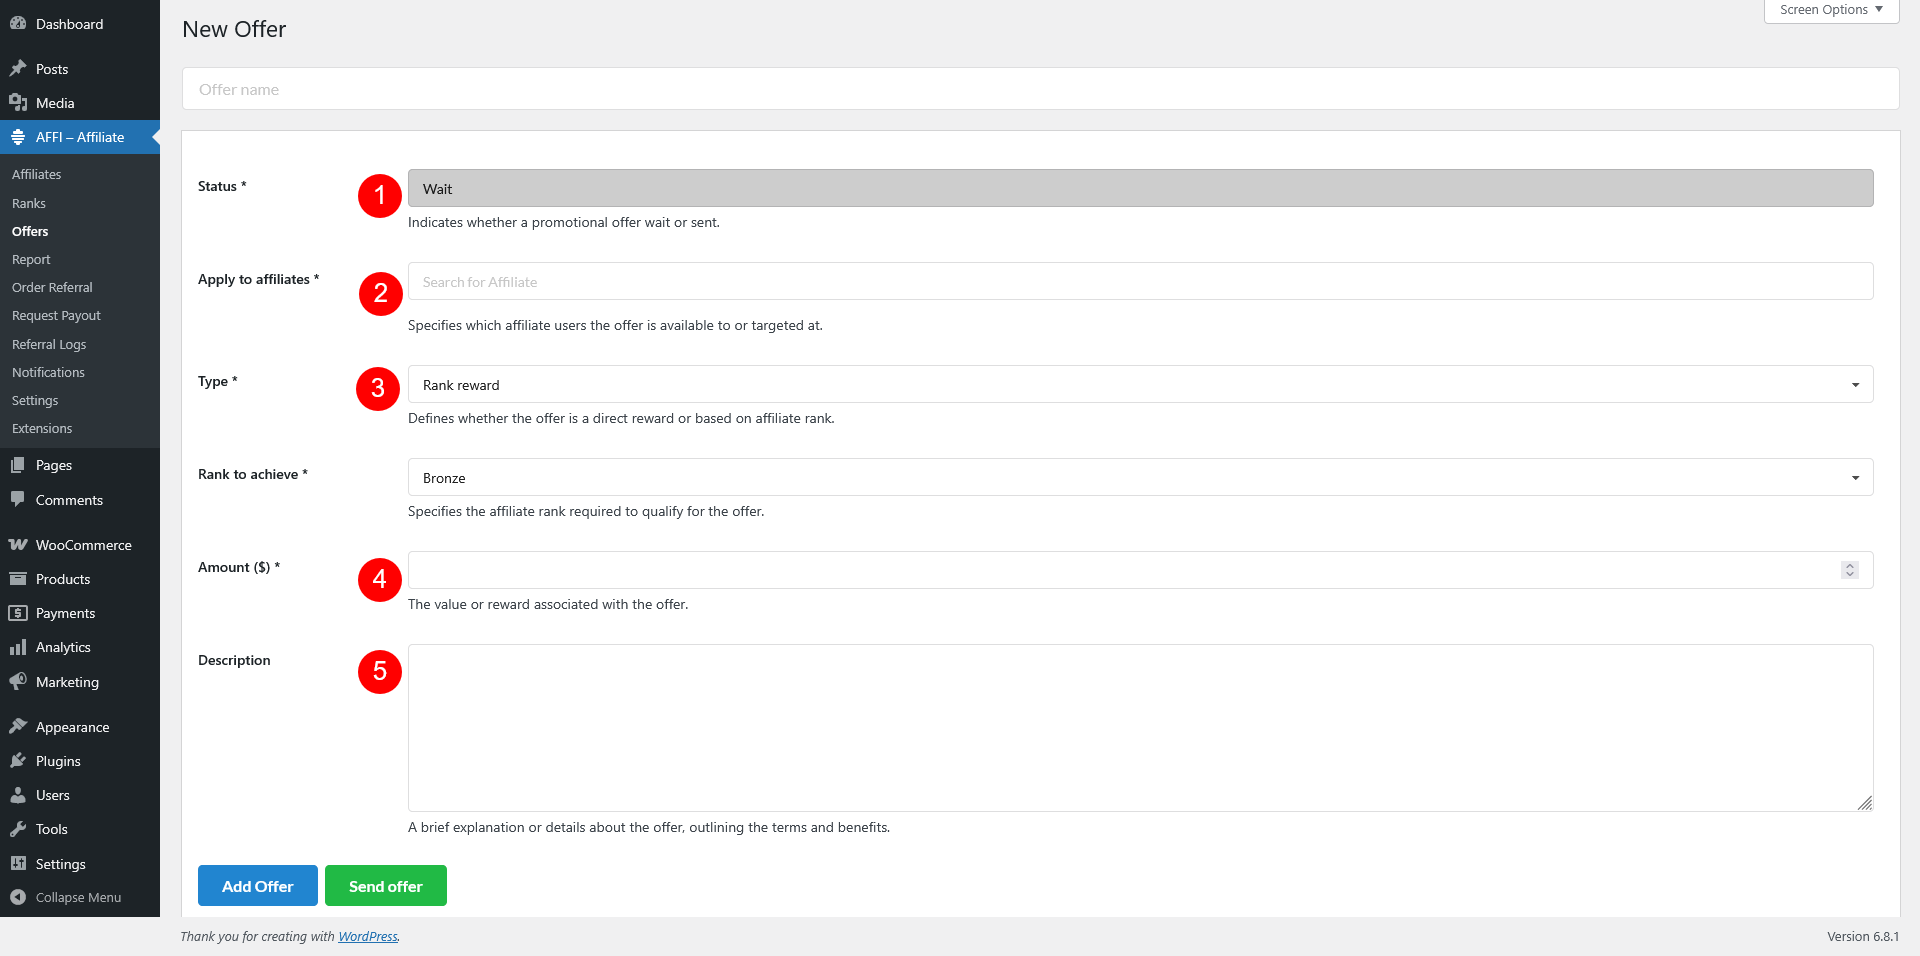
Step 3: Click “Add Offer”. Now the offer appears under the Offers dashboard as “Wait”
Step 4: Click “Send Offer” to deliver the gift to your affiliates
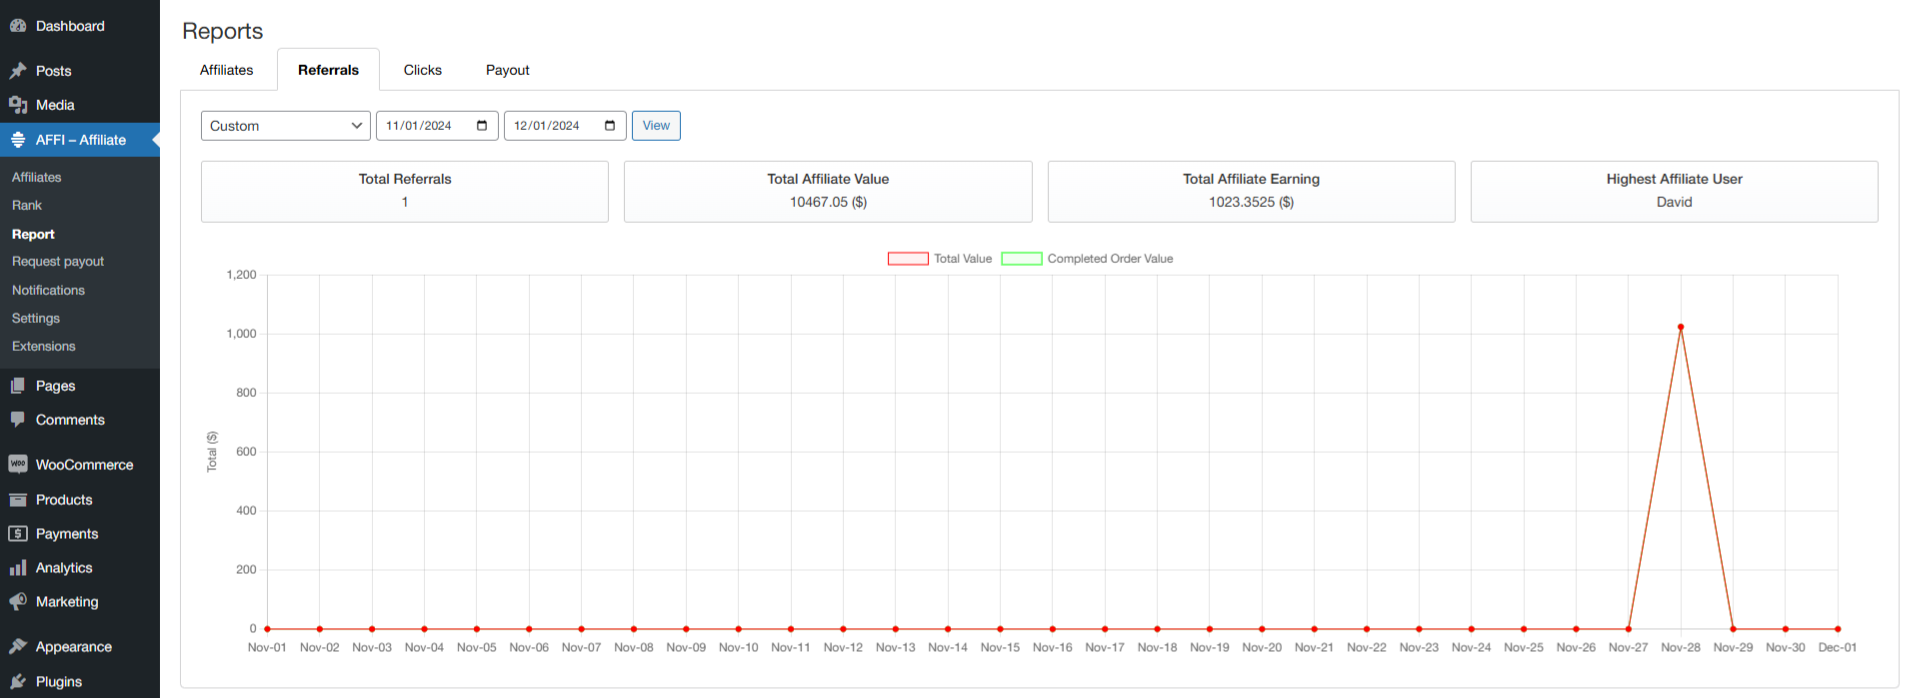
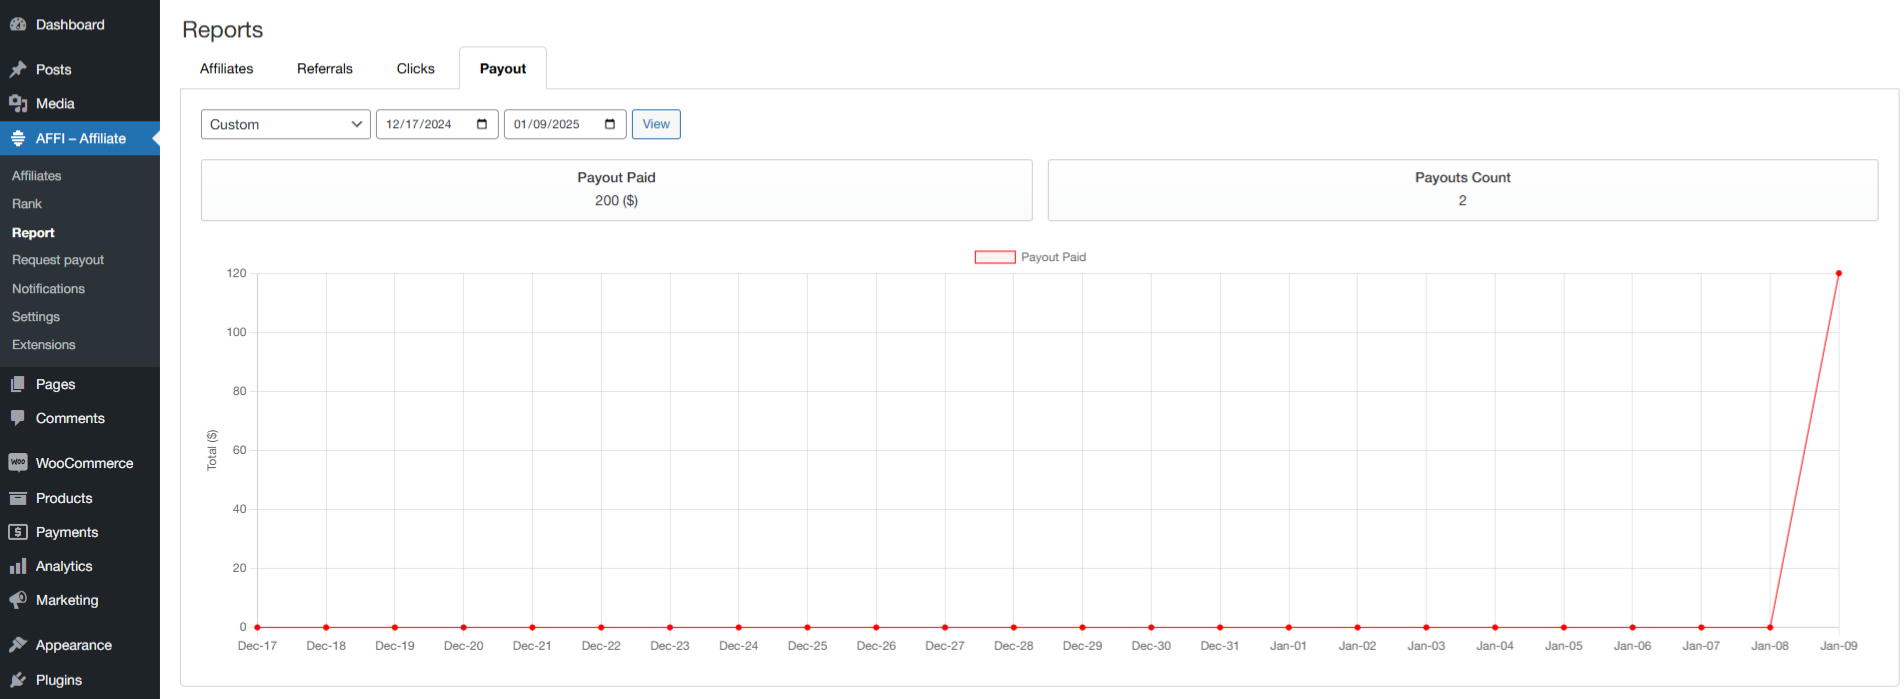
The Reports page provides detailed analytics and insights into the affiliate program. It is divided into four tabs, and users can select a custom date range to view the relevant data:
Affiliates
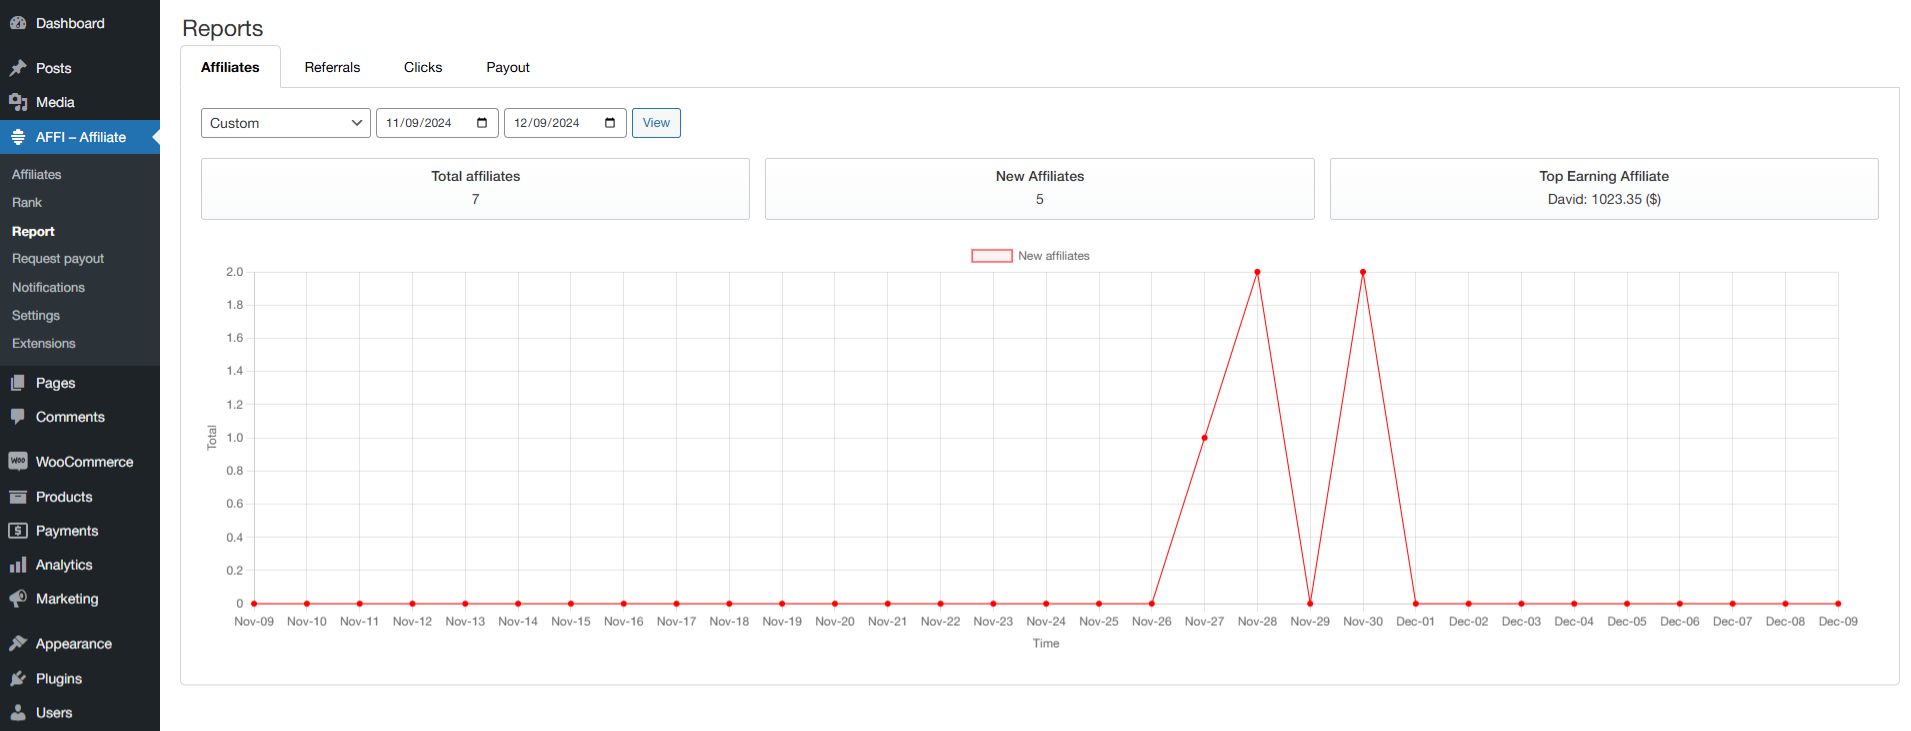
Referrals
Clicks

Payout
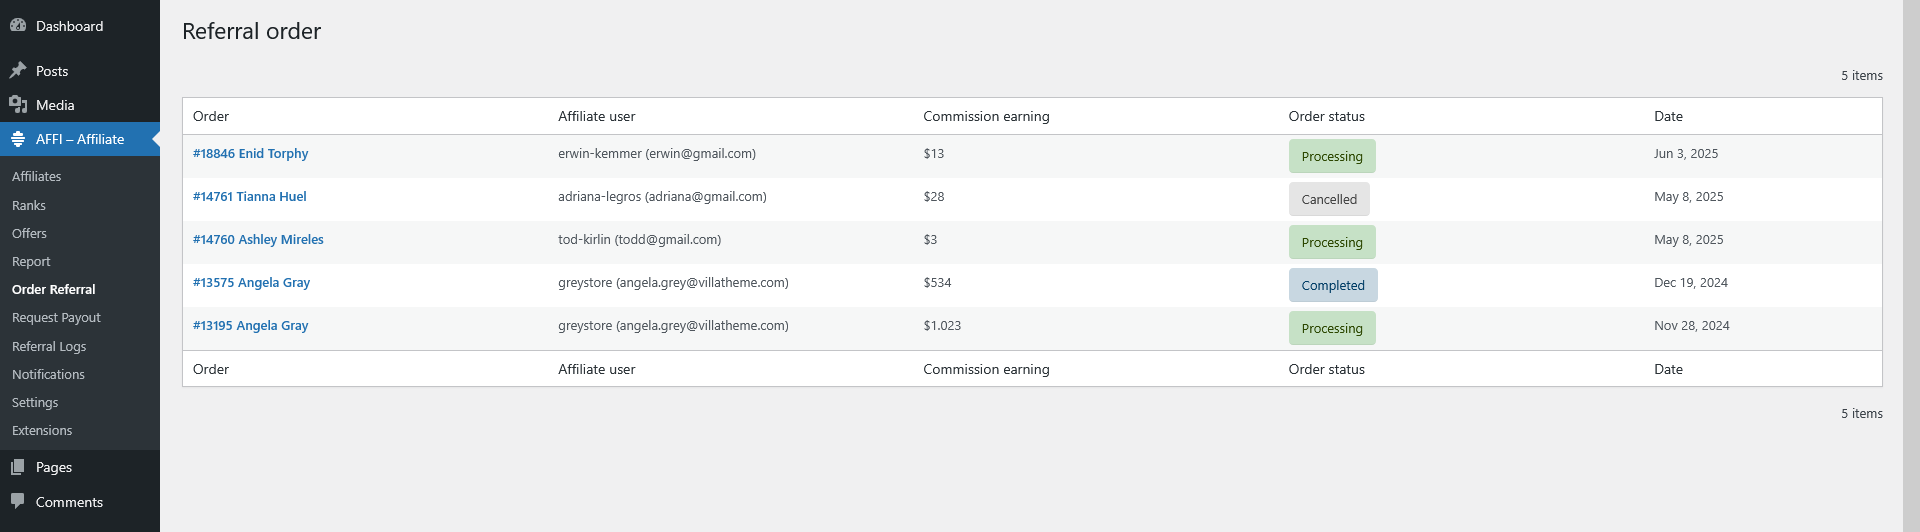
An order referral refers to a customer purchase that has been successfully attributed to a specific affiliate. Under Dashboard >> AFFI – Affiliate >> Order Referral, you’ll find who the order was attributed to, their earned commission (based on the commission amount and their rank), the order’s current status, and when the order was created.
The Request payout page allows admins to manage all payout requests, created by admin or submitted by affiliates. They can view, edit, approve, or delete requests based on the provided details.
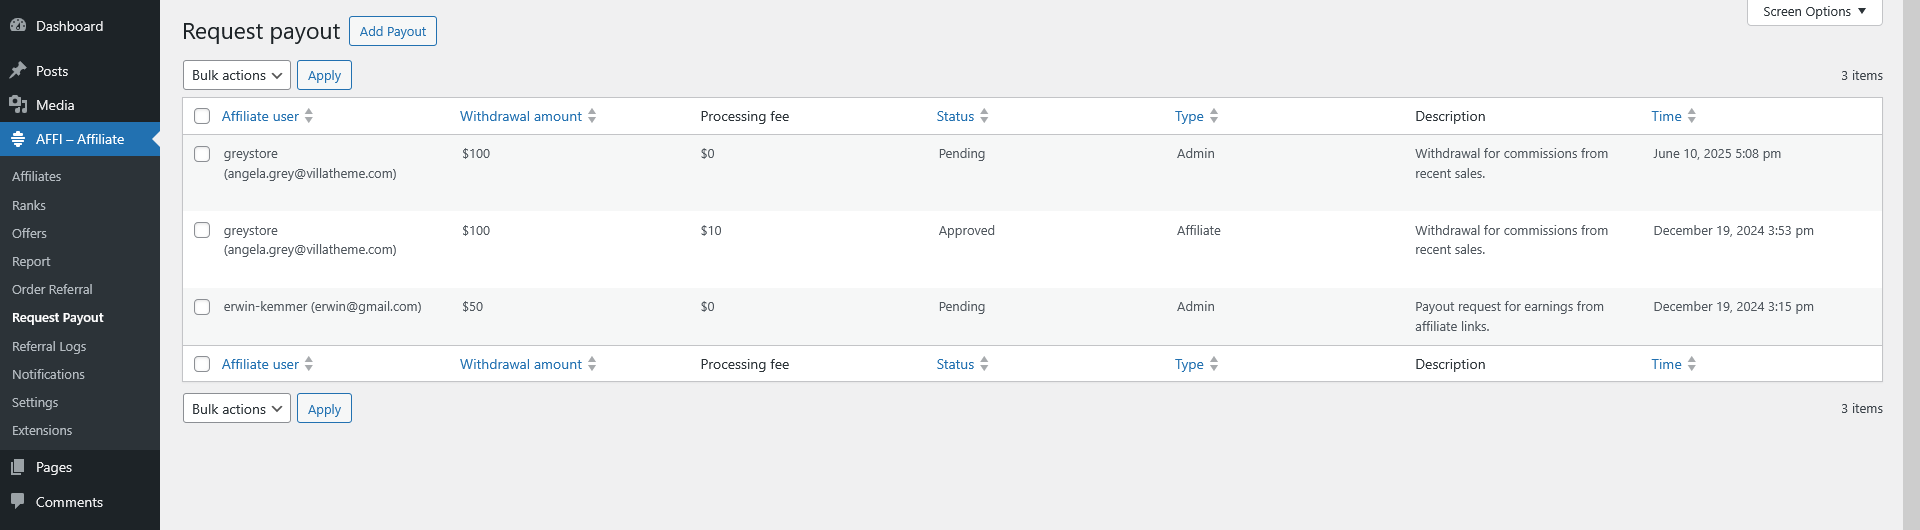
This page displays the following details for each request:
Actions for Admin
Add a New Request:

Edit a Request:
Delete a Request: To remove a request, simply click the Delete button next to the request.
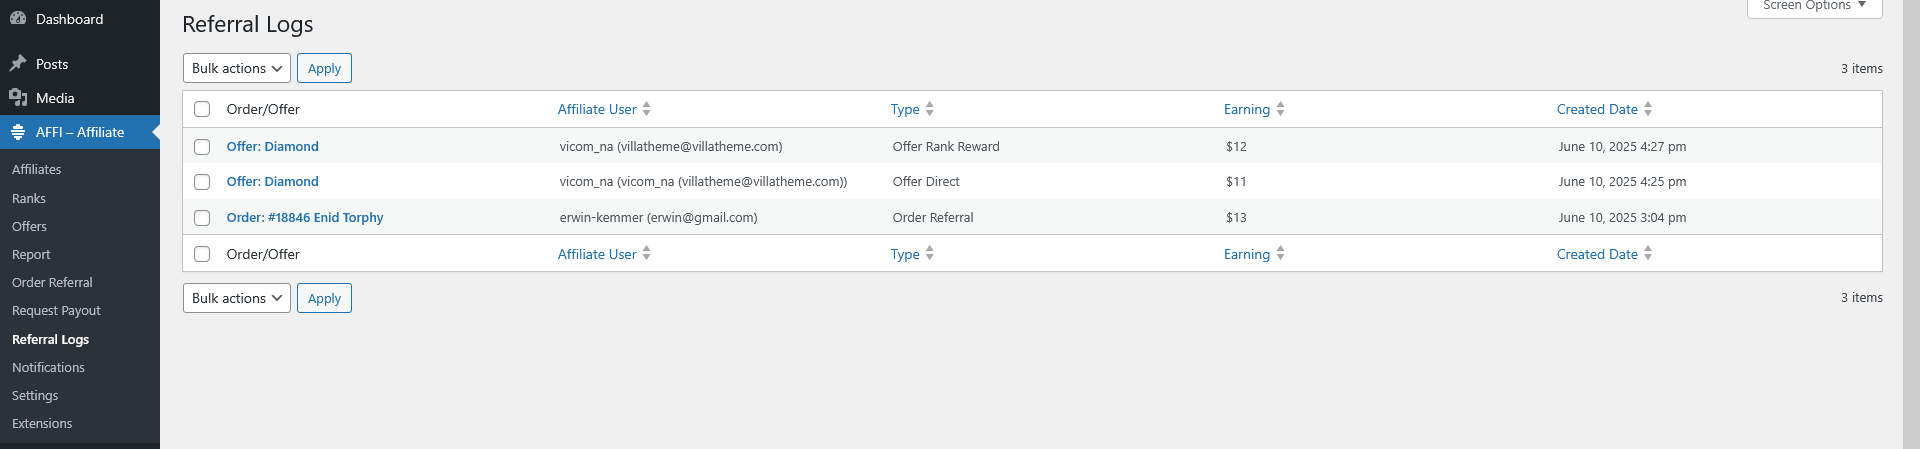
This page shows all referral records, including: Order Referral; Order MLM Commission; Refund Order Referral; Refund Order MLM Commission; Offer Direct; Offer Rank Reward
On this page, all notifications are shown. The Notifications page allows admins to configure and send email notifications for various events in the affiliate system. These notifications are essential for keeping both admins and affiliates informed about key actions related to their account activities.
Admins can configure them and view their details. This includes:
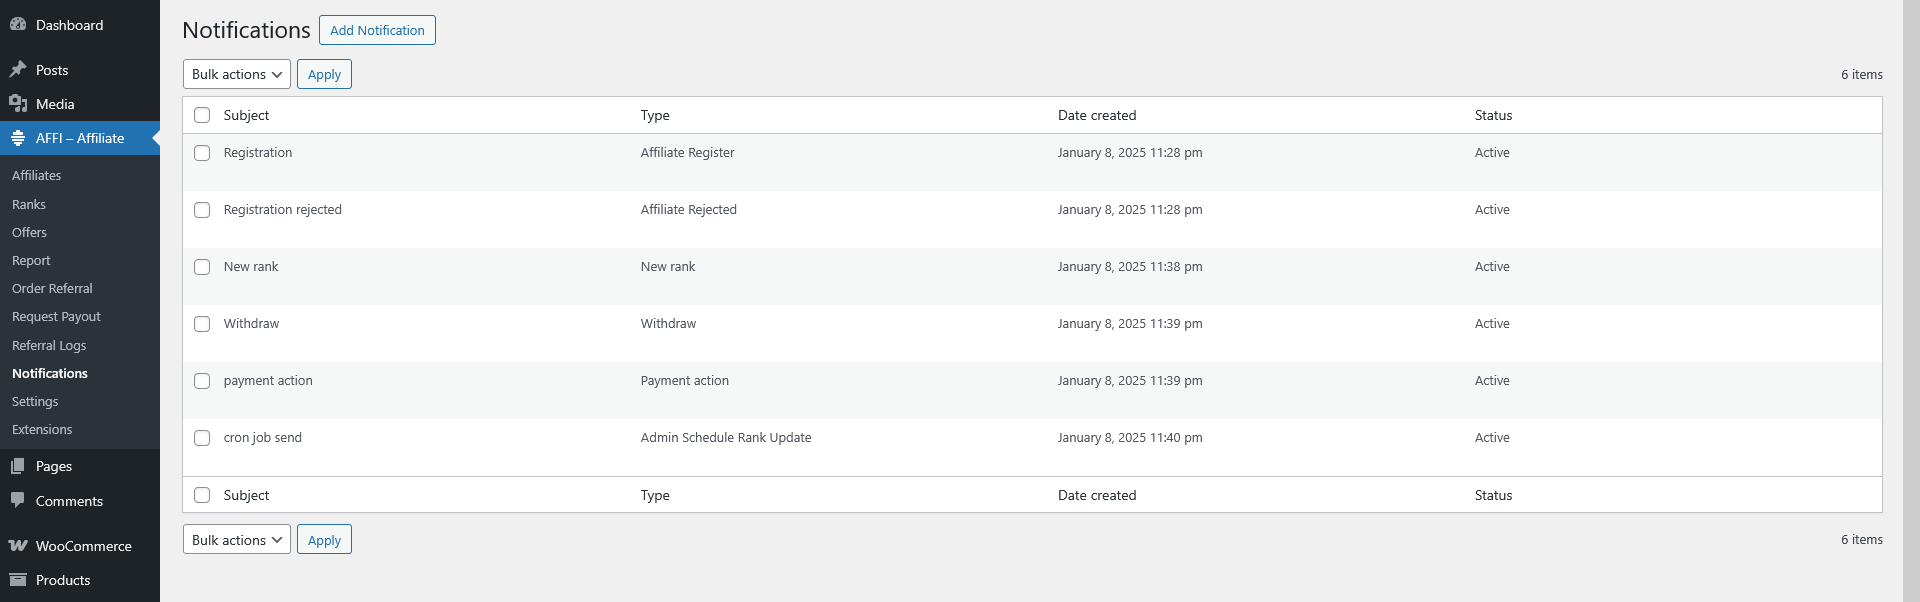
Admins can create personalized, automated email messages to streamline communication with affiliates and ensure timely updates are provided.

{name} – The display name of the affiliate, as set on the affiliate’s user profile{user_name} – The user name of the affiliate on the site{user_email} – The email address of the affiliate{website} – The website of the affiliate{amount} – The amount of a given referral
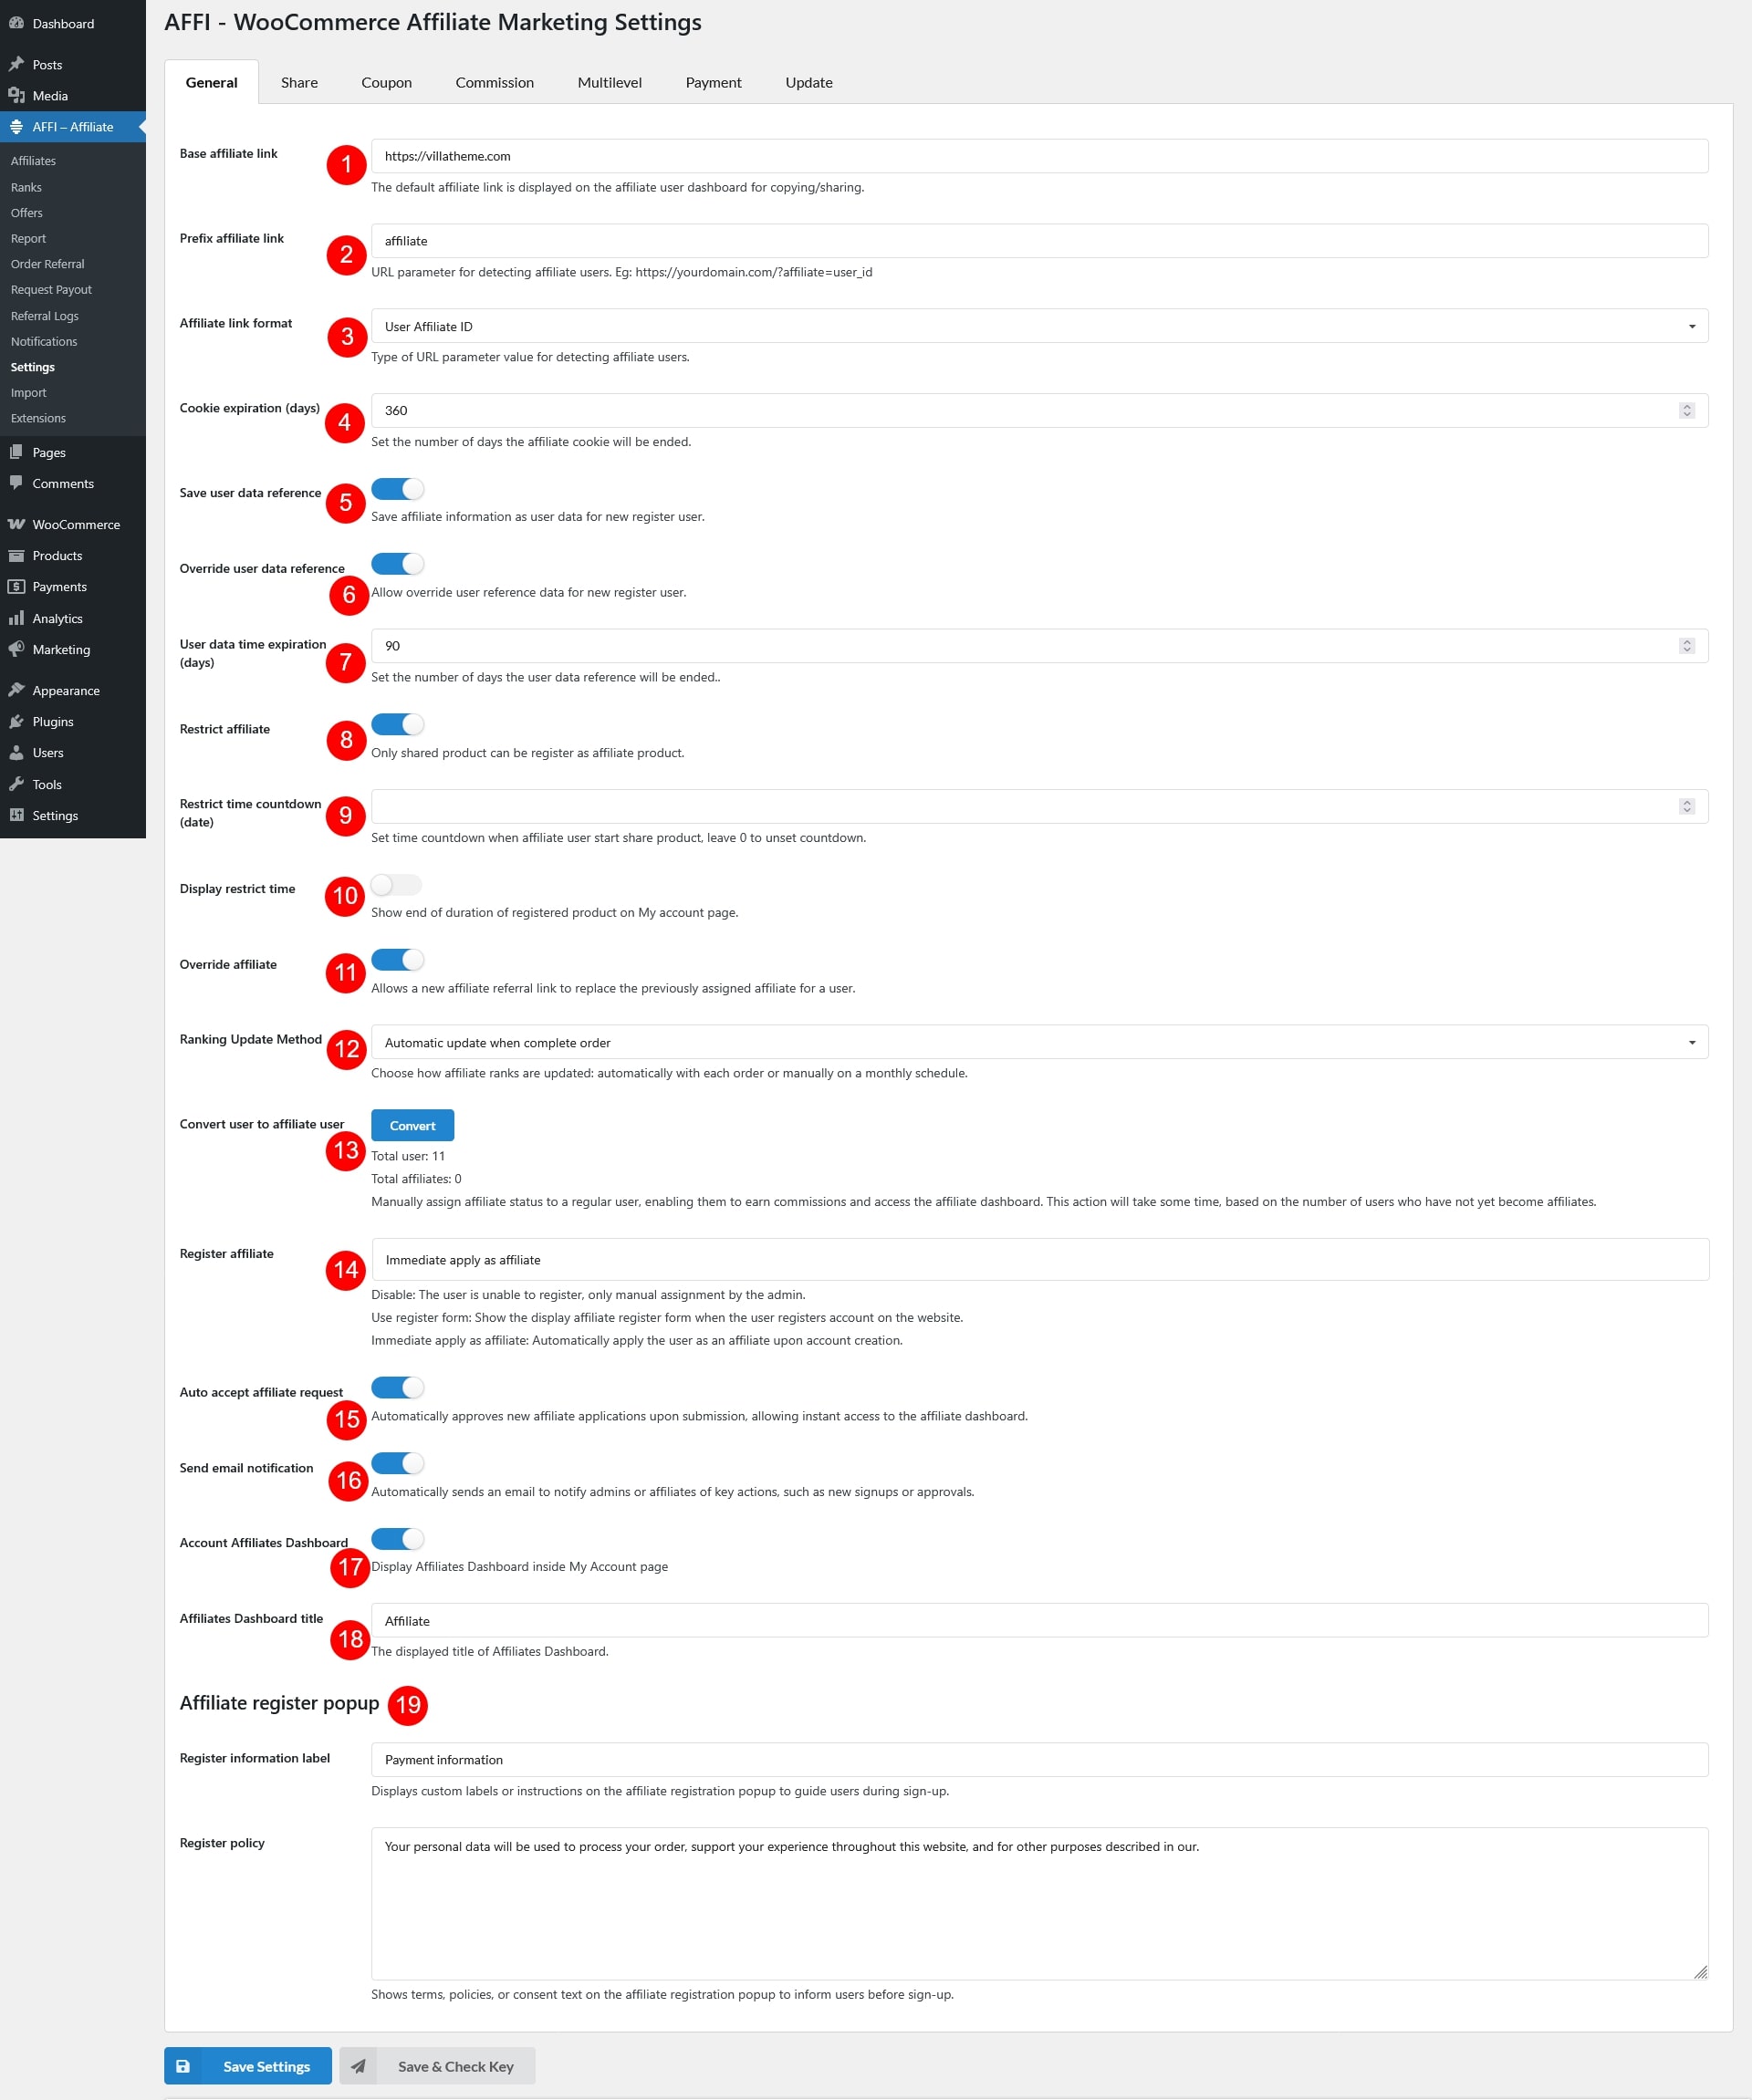
The General Settings page allows administrators to configure the core functionality of the affiliate program. Below are the available options:
The Share settings page includes options for enabling and customizing sharing functionalities:

Single product page:
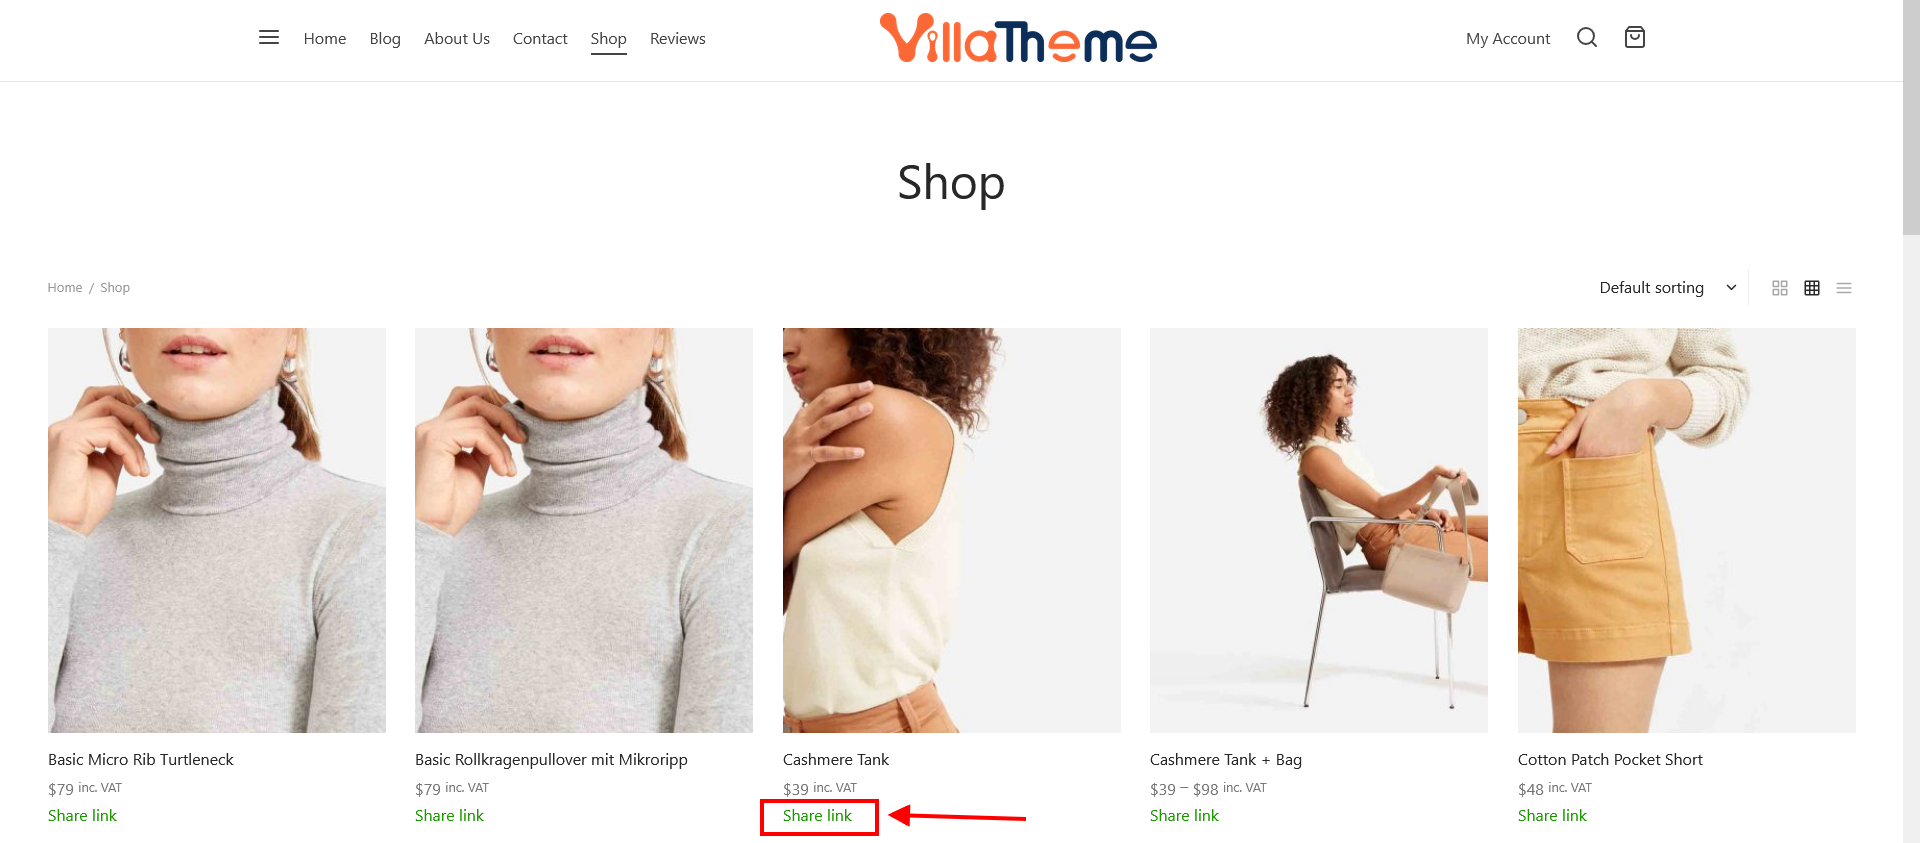
Product List:
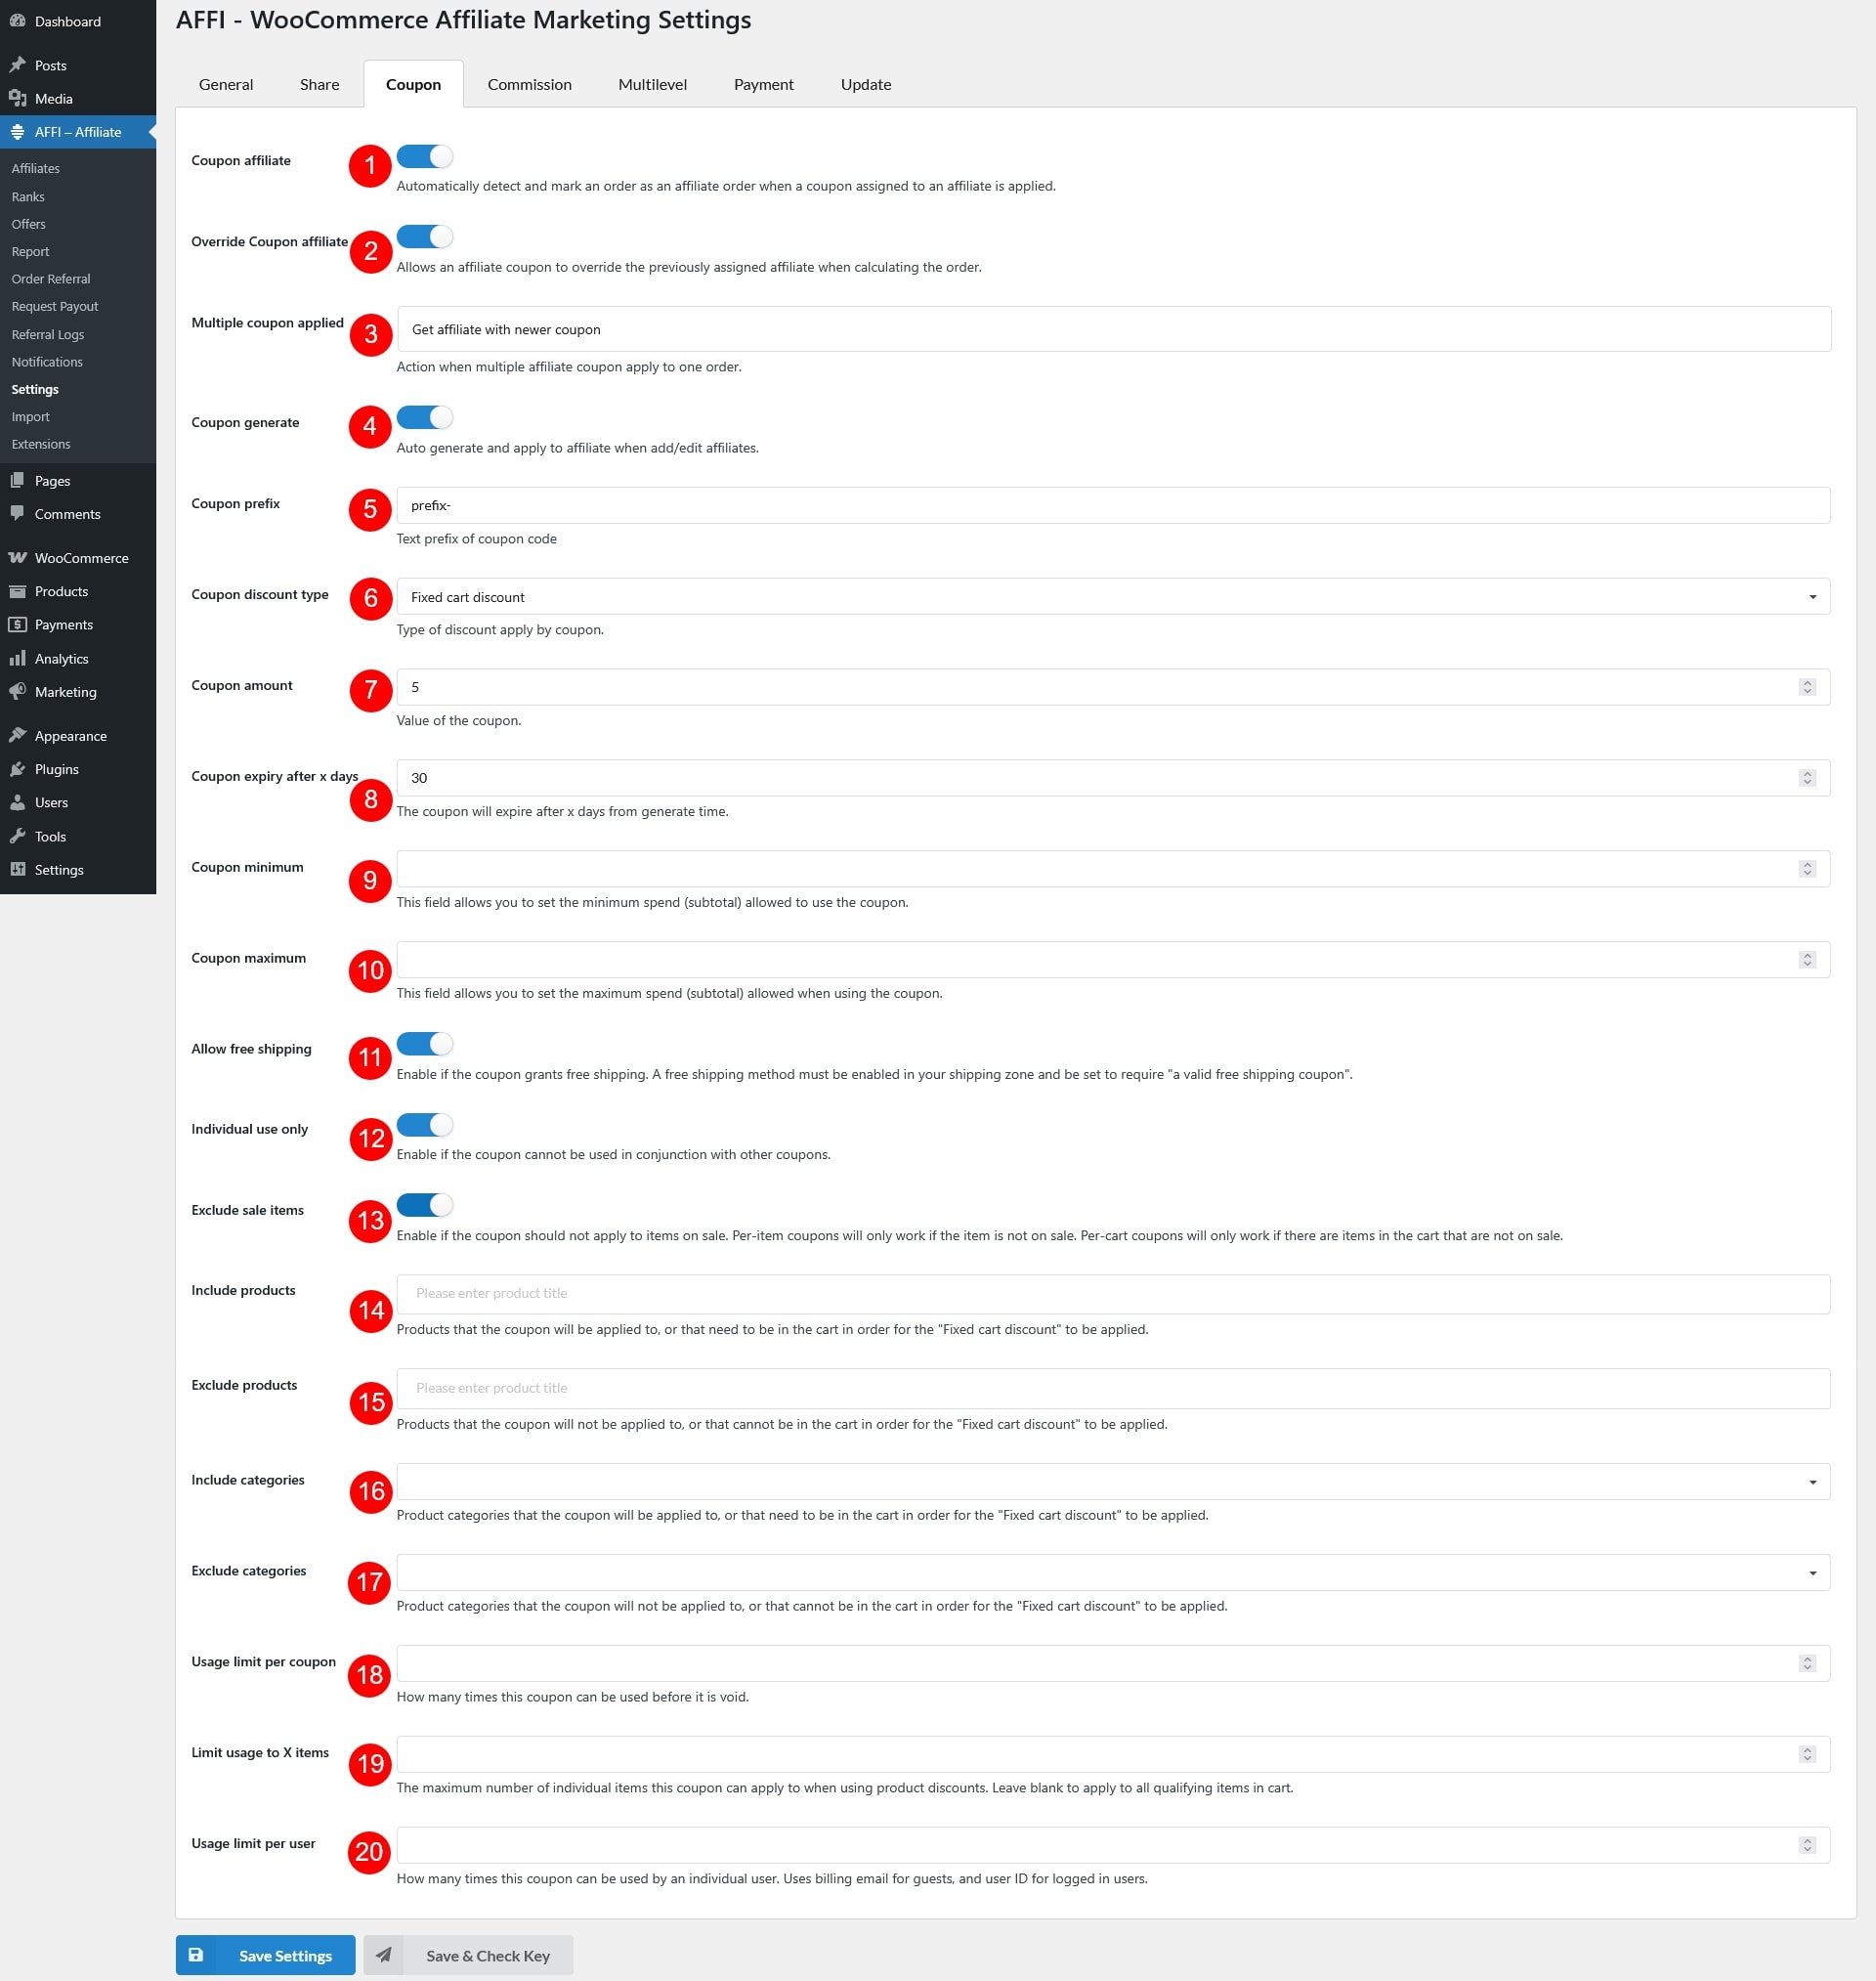
The affiliate coupon feature lets you assign coupons to affiliates. When a customer applies one at checkout, the order will automatically be detected and recorded as an affiliate order.
Enable the option to generate coupons automatically. When this is enabled, each new affiliate will receive a coupon that follows the settings you configure.
The available coupon settings include:
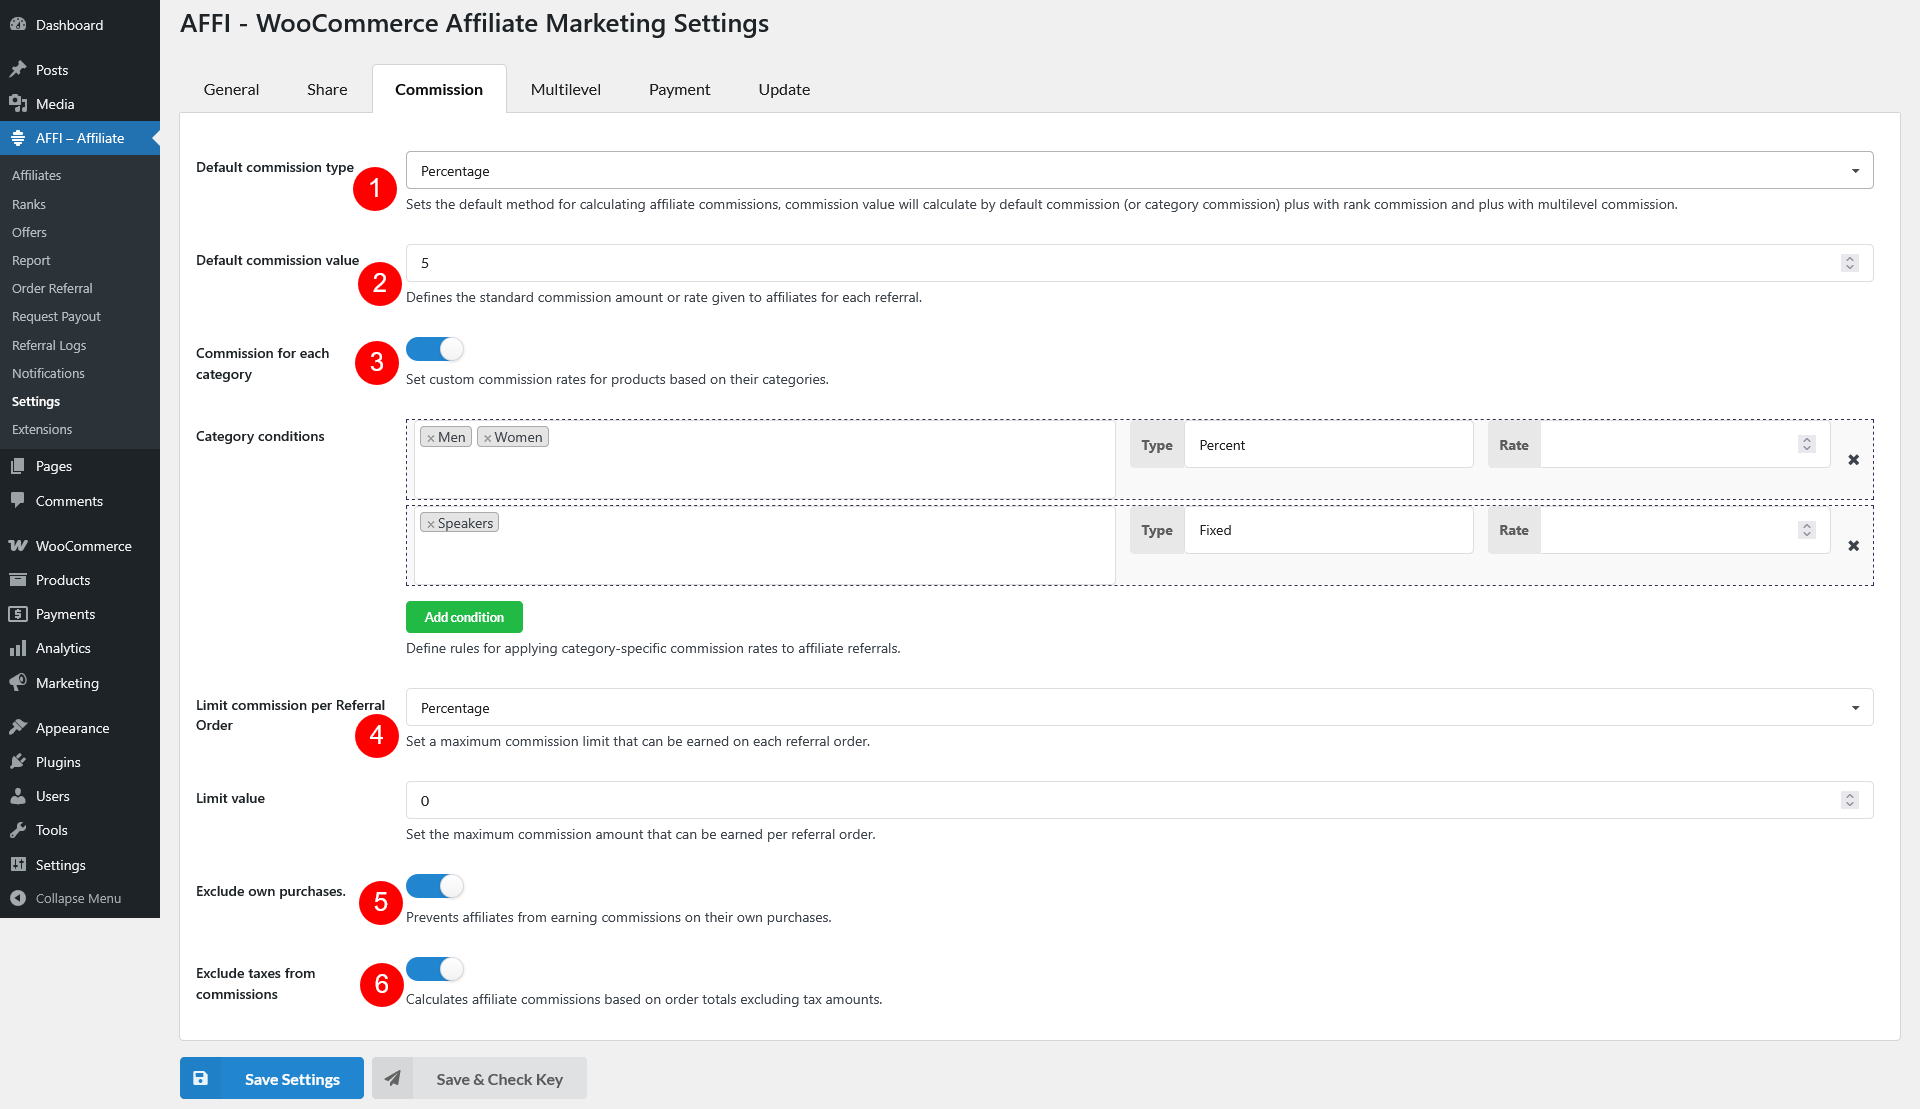
The Commission settings page provides a detailed overview of how commissions are structured and calculated for affiliates. The available options include:
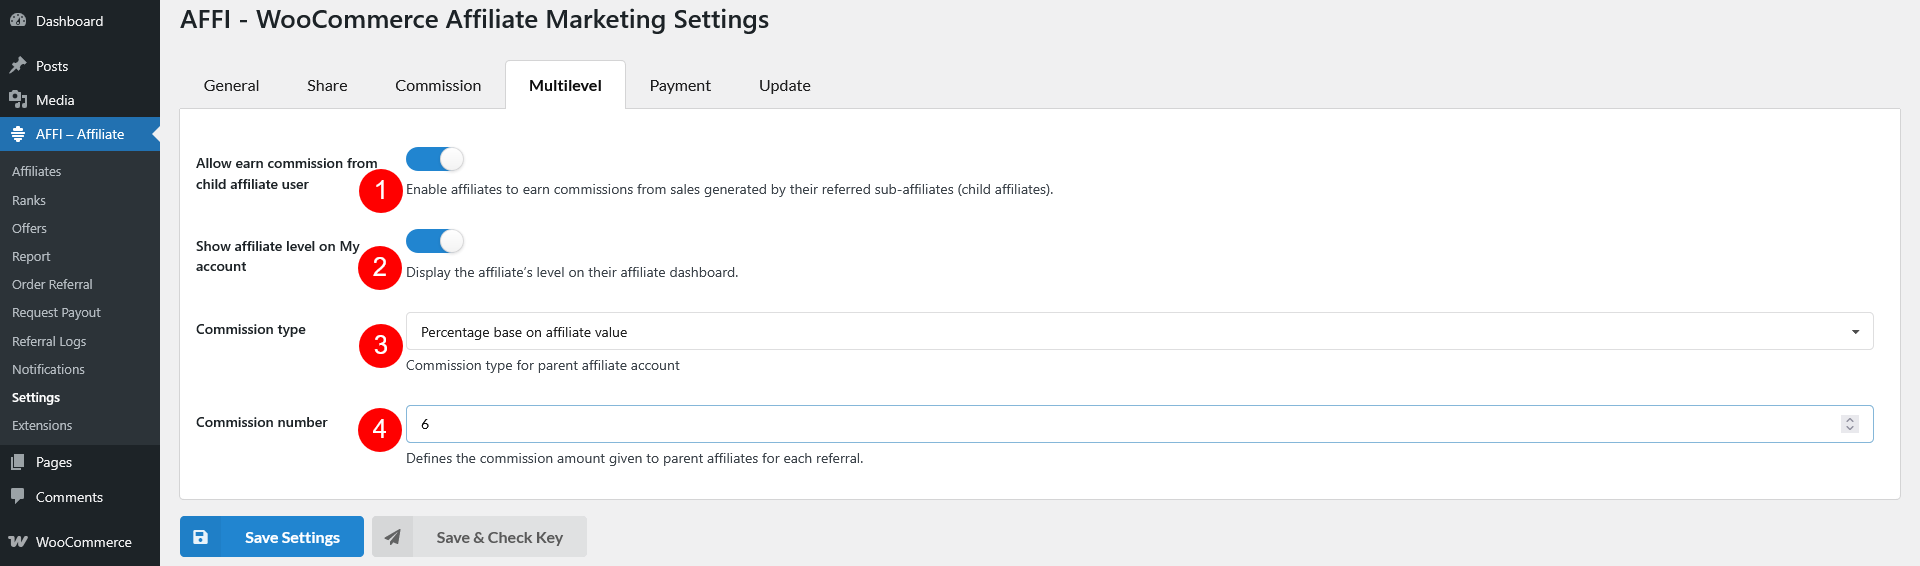
Multilevel functionality allows affiliates to earn not only from their own referrals but also from the referrals made by other affiliates they recruited – their child affiliates. Learn how to create child affiliate user in this document.
Setup for parent affiliate under Dashboard >> AFFI – Affiliate >> Settings >> Multilevel
This page lets you configure payment-related details.
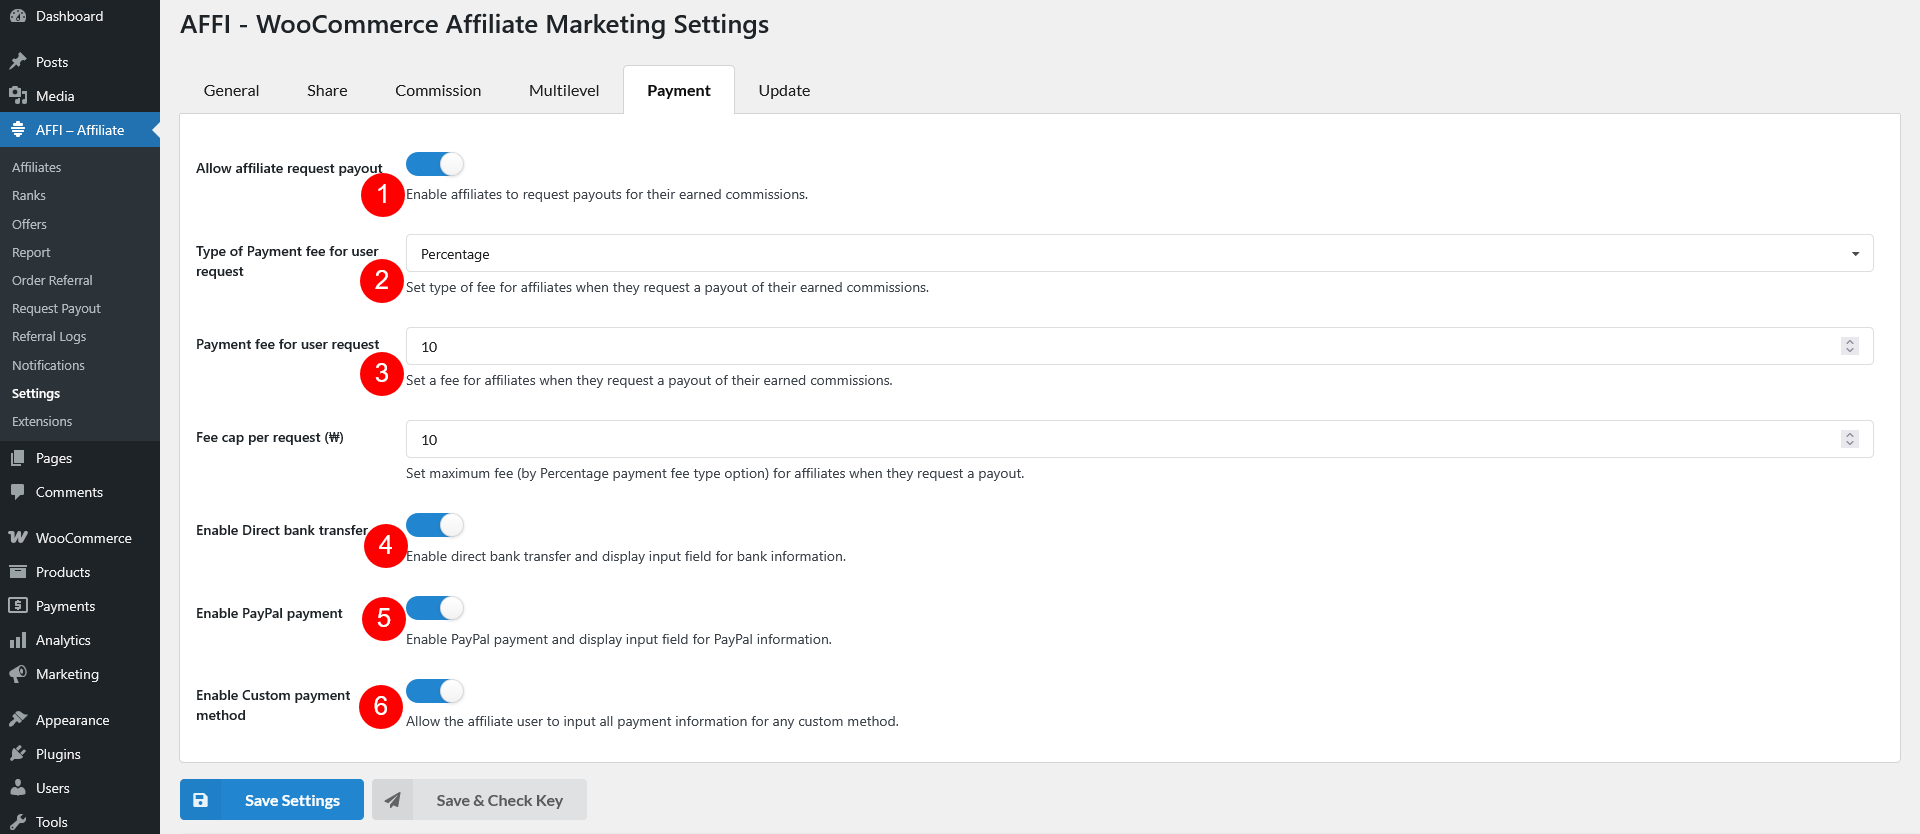
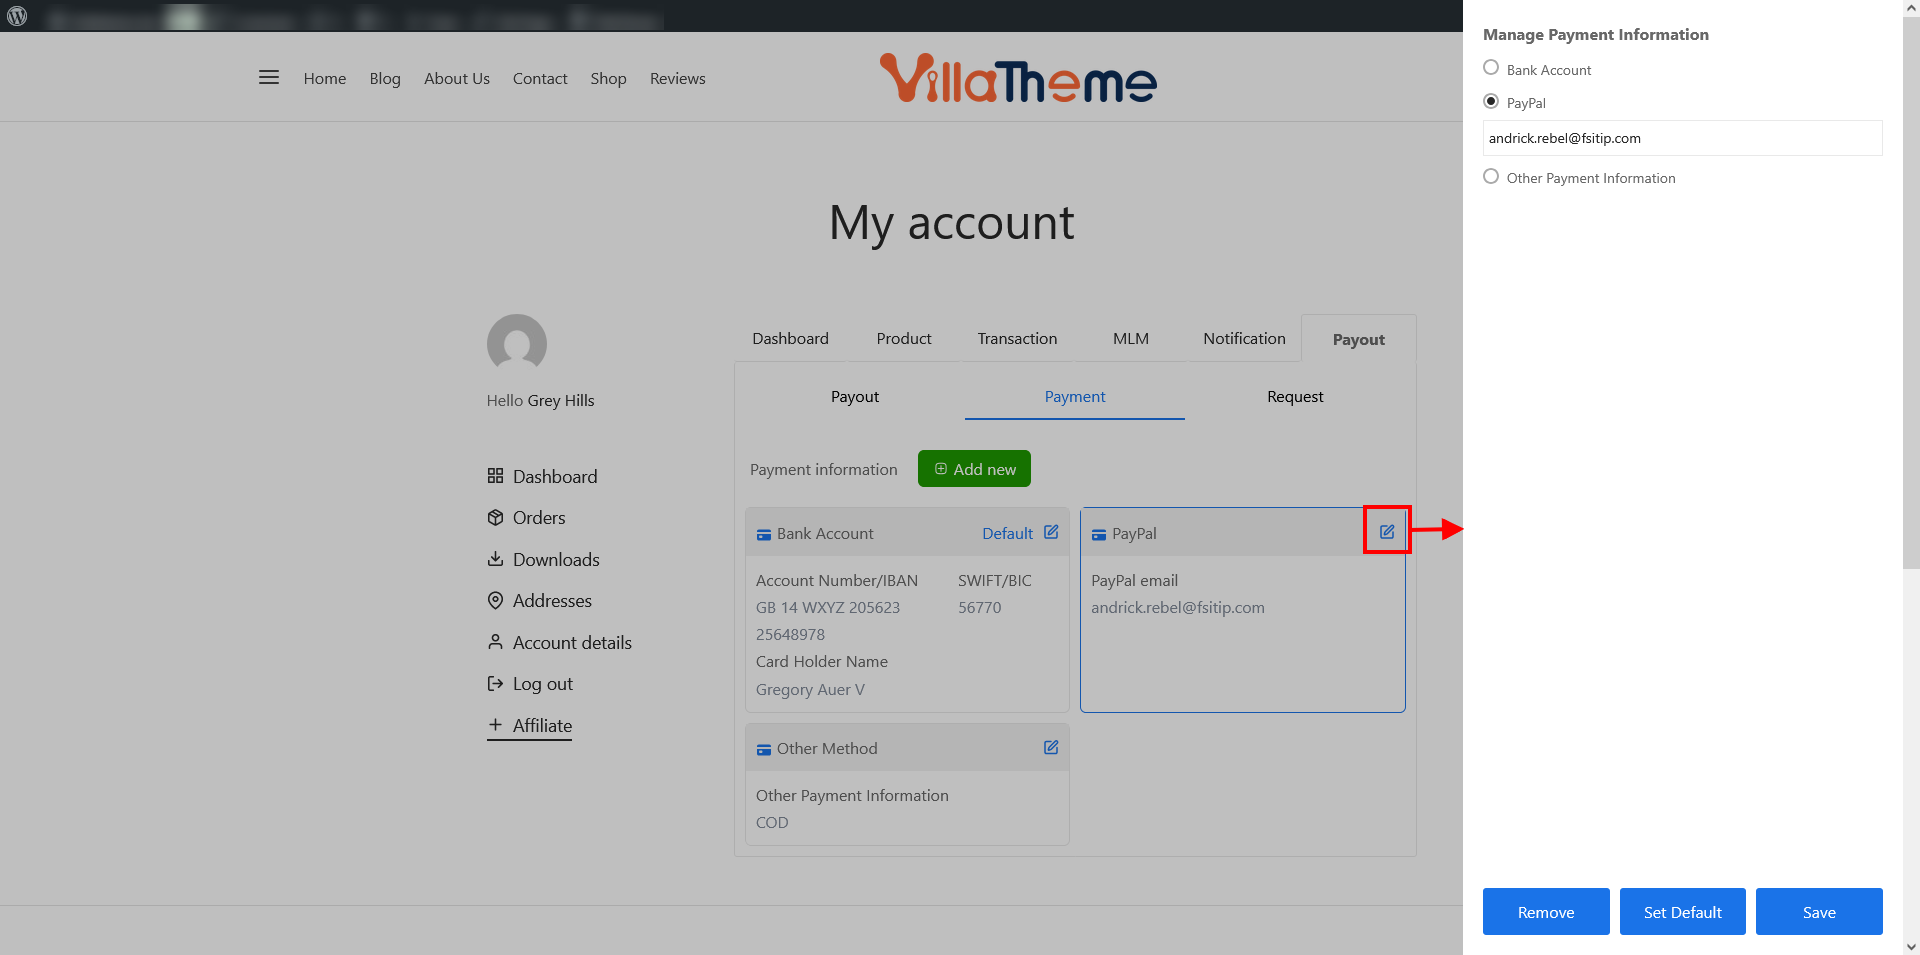
Payment methods supported are available when the affiliate add their info under My account >> Affiliate >> Payout >> Payment >> Add new
Inside Affiliate Dashboard, there are tabs as follows:
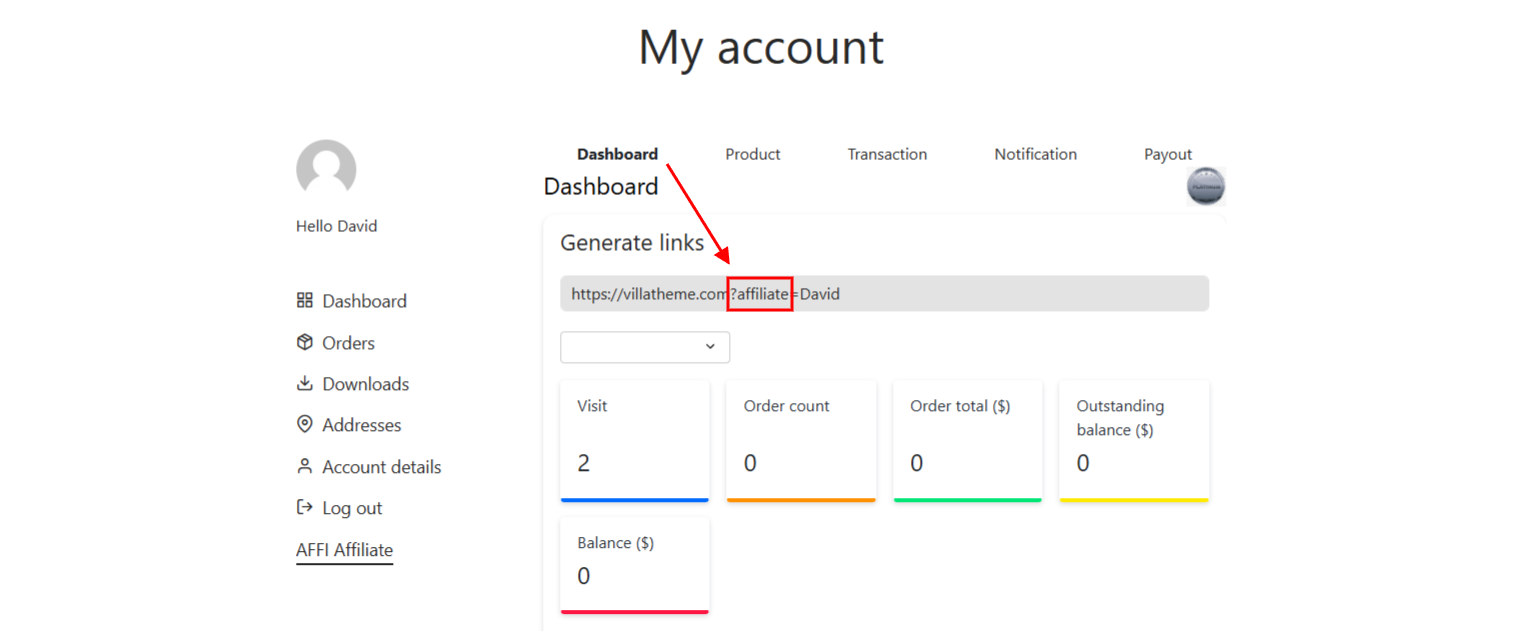
Affiliate Dashboard is for affiliates to manage their activities, track performance, and handle payouts. They can access the dashboard directly via their My Account page if the “Affiliates Dashboard inside My Account page” under General settings is enabled.
Alternatively, they can use the following endpoint in the URL: /affi-affiliate/
E.g. https://villatheme.com/my-account/affi-affiliate/
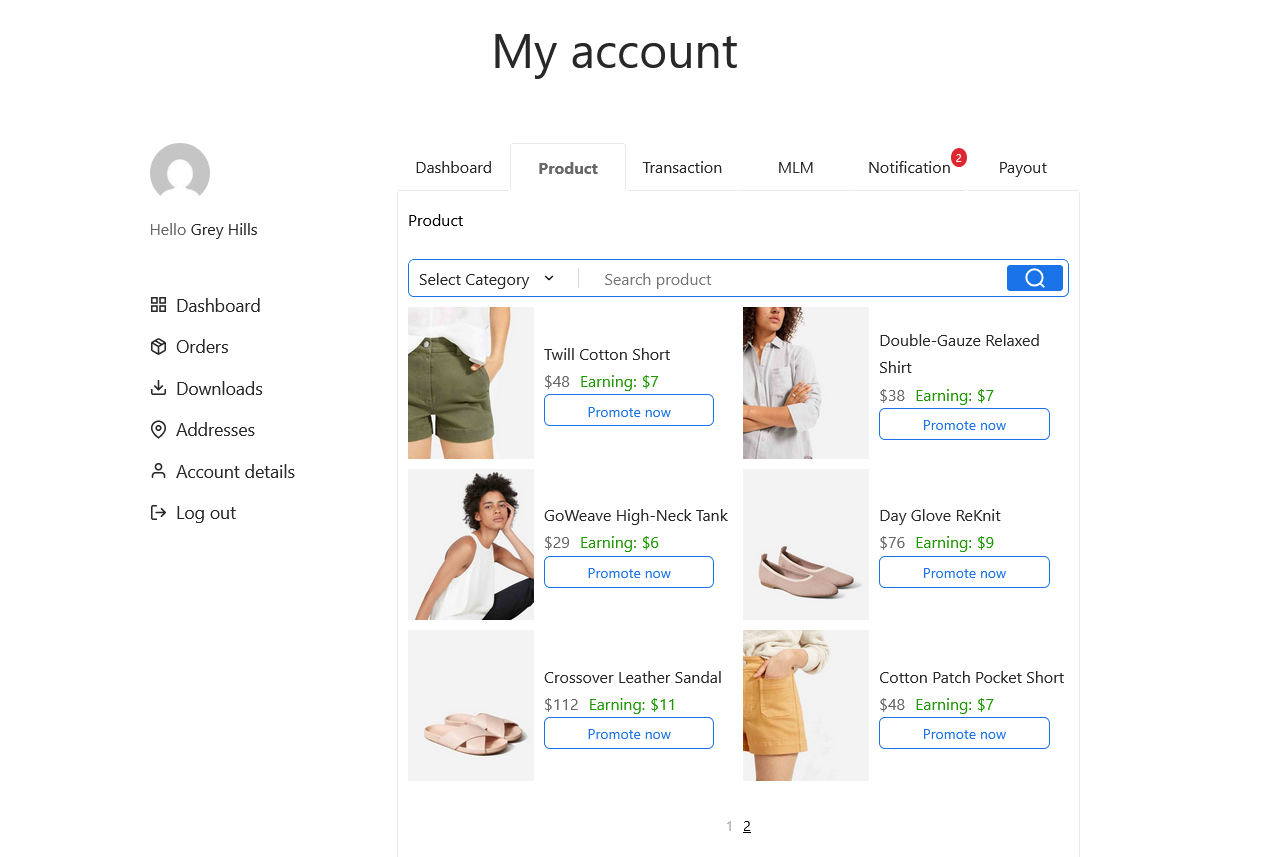
Affiliates can browse a list of all products available on the site. Each product includes the affiliate’s unique link displayed below it.
Search Products: Affiliates can filter product by category and use a search field to quickly find specific products and their corresponding affiliate links.
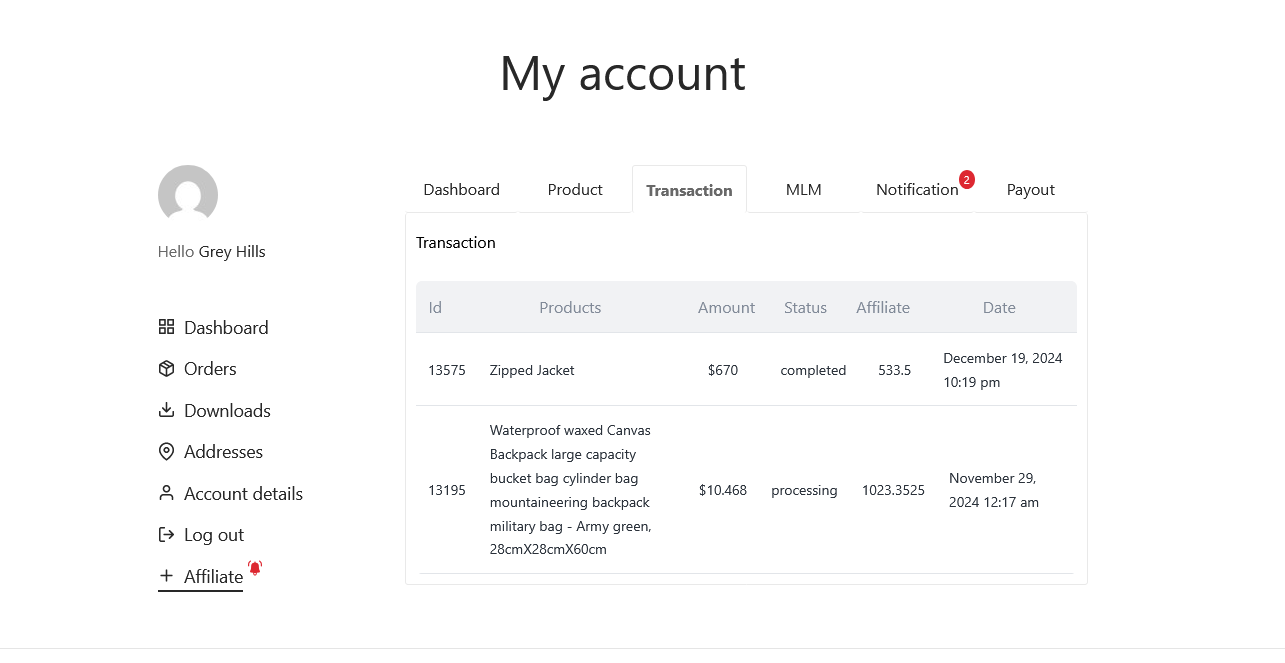
The Transaction section provides a detailed record of all orders placed via the affiliate’s link. The following details are displayed for each transaction:
This page displays the affiliate’s parent and child relationships
The Notification page in the Affiliate Dashboard displays all recent notifications relevant to the affiliate, provides them with a centralized location to view important updates and alerts related to their account. This ensures affiliates stay informed about their activities, earnings, and any actions required.
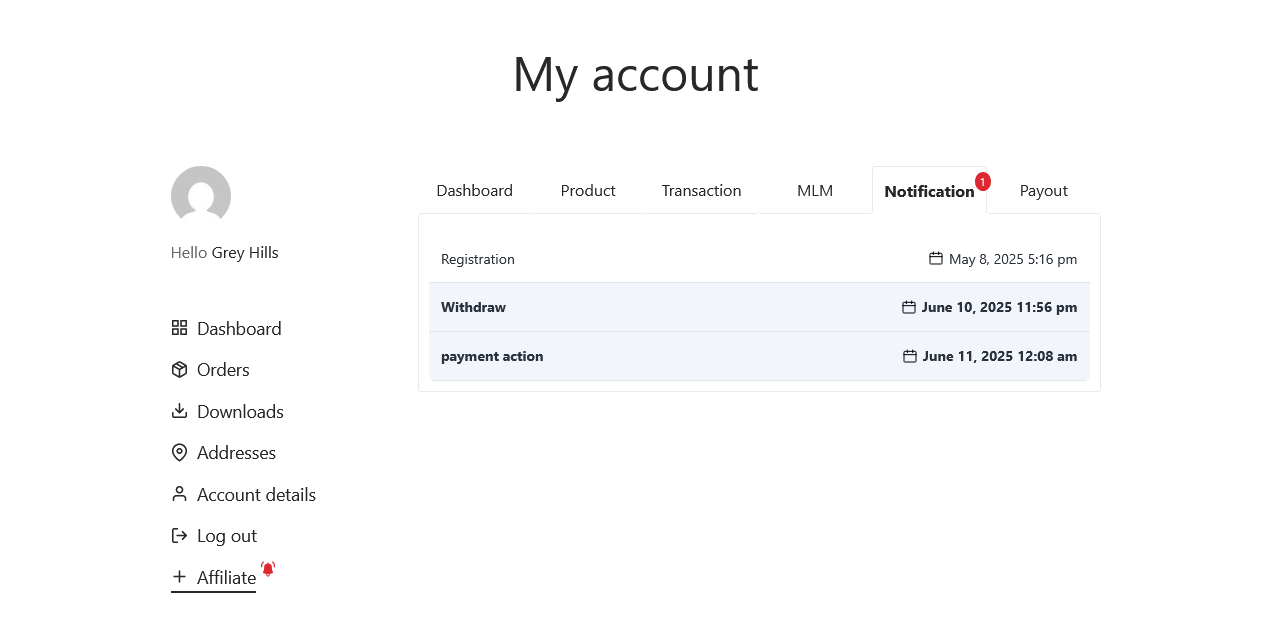
Simply click it to read the email details.

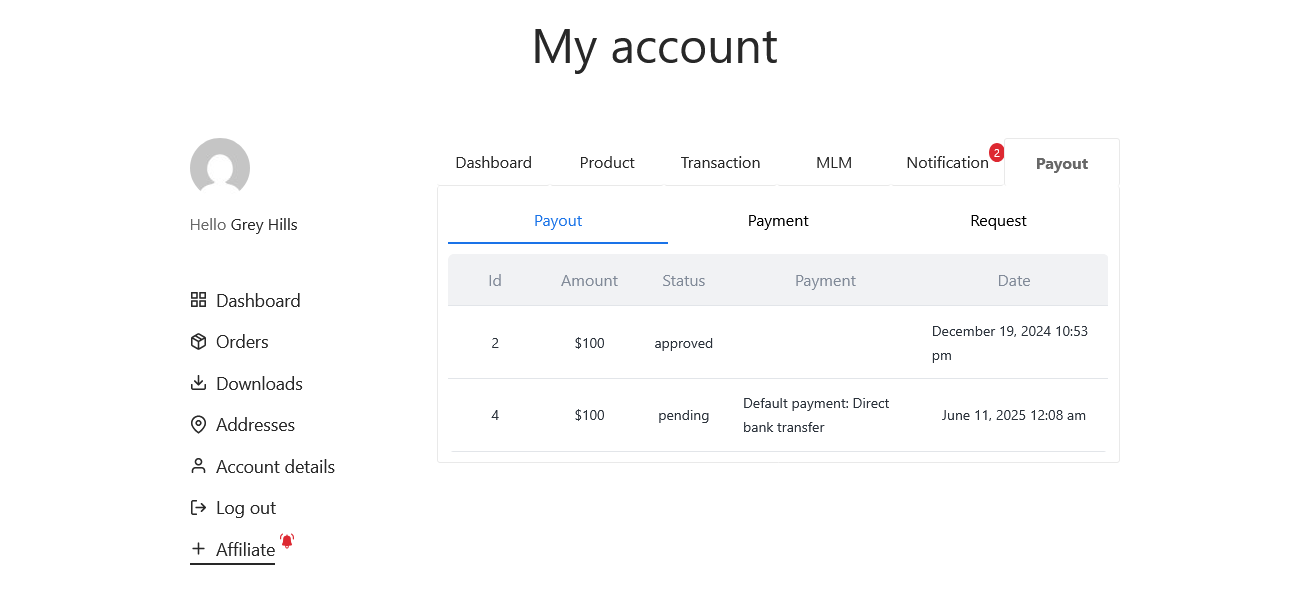
Payout Activity: This section displays a detailed history of all payout activities and requests, including:
Payment Information
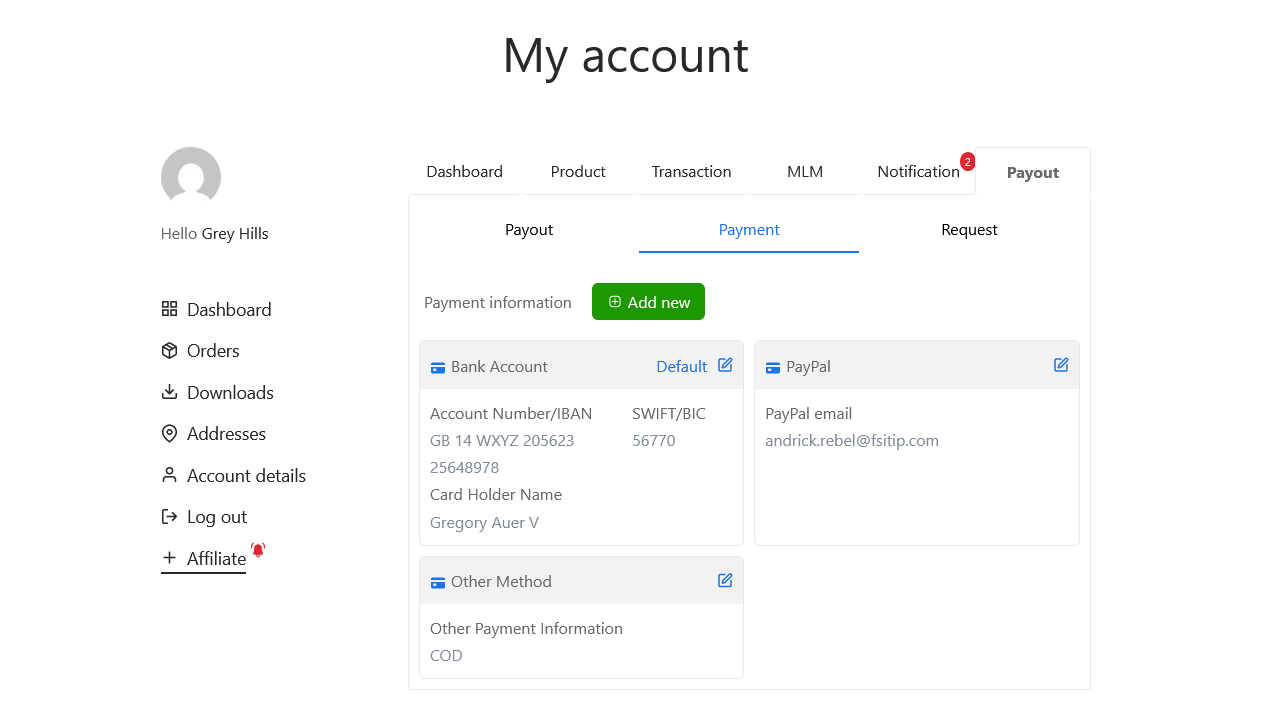

Once added, the payment method will be listed on the page. From there, affiliates can:
Request Payout: Affiliates can request payouts directly from their dashboard. This section includes: