The first thing to do after activating the plugin, is to create/customize your own email templates.
To build your own email template, click “Add new” in the plugin settings like in this image

You’ll be redirected to a new blank email editor page. Build your email here by dragging and dropping layouts/elements and configuring them.
Email elements overview
First, let’s take a look at the elements that play important parts in making a complete email
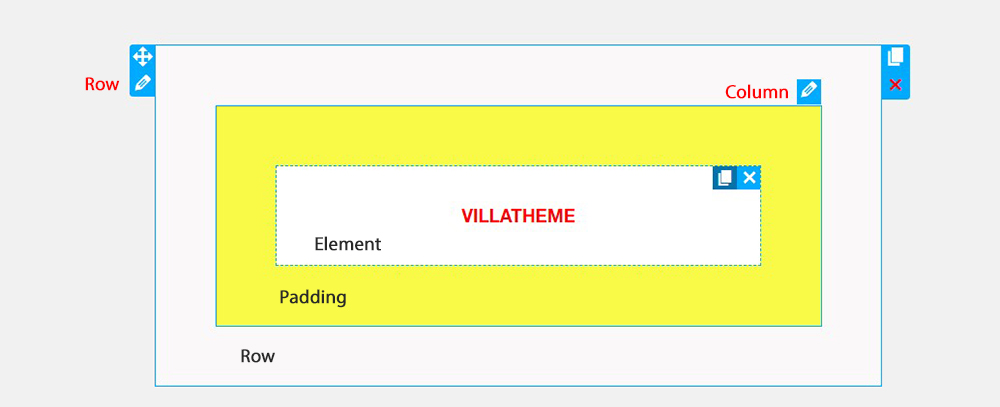
WooCommerce Email Template Customizer uses 3 main building blocks: Row, Column and elements. Row are the largest building blocks, and inside them are groups of Columns. Columns are to cover outside elements. Elements are placed inside of columns.
You control, edit duplicate, remove row, Columns with their handles.
![]() To remove row, column and element.
To remove row, column and element.
Now, for the Layout, you need to select the layout according to necessity. These layouts are from 1 to 4 column in one rows, based on your requirements, select one to add elements into.
Simply drag the Layout from the Widget panel, or click the “Plus” button to add the layout you need.

Then start adding the element and edit the content, as well as its appearance: size, outline, style…
To add the element, drag them from the Widget panel to the place you want, like the image below:
These are the general steps for how to build a new template. To customize one, it’s almost the same, it’s just you have an available template with lots of components, all you need is to modify them to meet your expectation.

![]() Drag and drop: Left click and hold this button, and drag the layout to your ideal place, and drop it there
Drag and drop: Left click and hold this button, and drag the layout to your ideal place, and drop it there
![]() Edit: Clicking this button will lead you to the Editor area of that layout/component
Edit: Clicking this button will lead you to the Editor area of that layout/component
![]() Duplicate: Clicking this button will double the current layout/component
Duplicate: Clicking this button will double the current layout/component
![]() Copy: Click this button to copy the layout/component
Copy: Click this button to copy the layout/component
![]() Paste: Place the layout/component you just copied
Paste: Place the layout/component you just copied
![]() Remove: Delete the current layout/component
Remove: Delete the current layout/component
You can watch this tutorial video below for how to build a new email template/customize an available template.
Assign template to email type
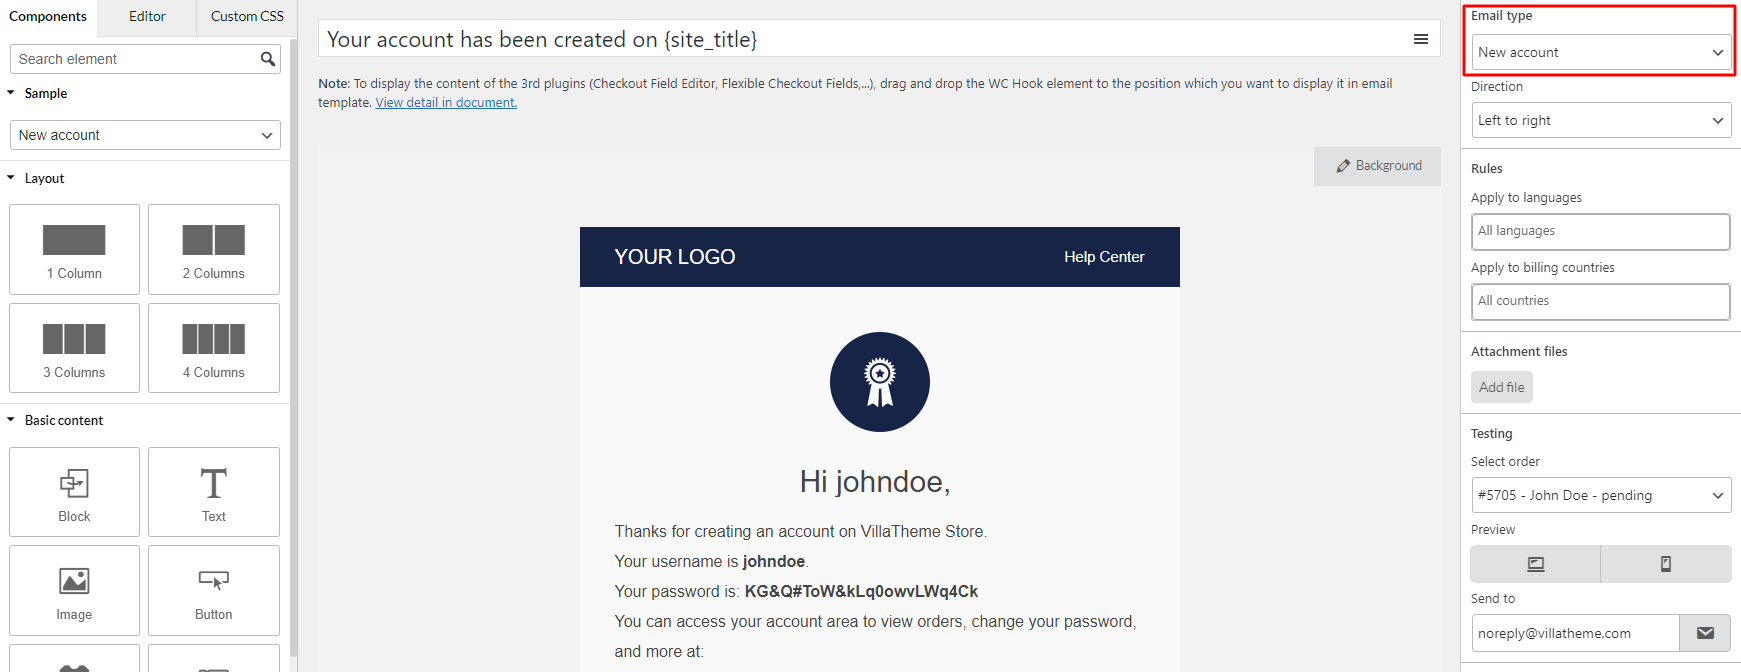
After you build an email, you may need to take care of the email type attached to it. Once the action to trigger the email is done, you can make sure the template assigned to that email type will be sent. Supported types include built-in WooCommerce email templates and Default template for third-party plugins:
- Default template
Admin
- Cancelled order
- Failed order
- New order
Customer
- Cancelled order
- Completed order
- Customer note
- Failed order
- New account
- Order details (paid)
- Order details (pending)
- Order on-hold
- Processing order
- Refunded order (full)
- Refunded order (partial)
- Reset password
Rules for template
These rules will let you control which template is sent in different conditions.
Rules for transaction email – From rules 4 to 10: These rules will be available for WooCommerce transaction emails – New order, Failed order, Cancelled order, Order on-hold, Customer invoice/Order details (both paid and pending), Processing order, Completed order, and Refunded order (both full and partial).
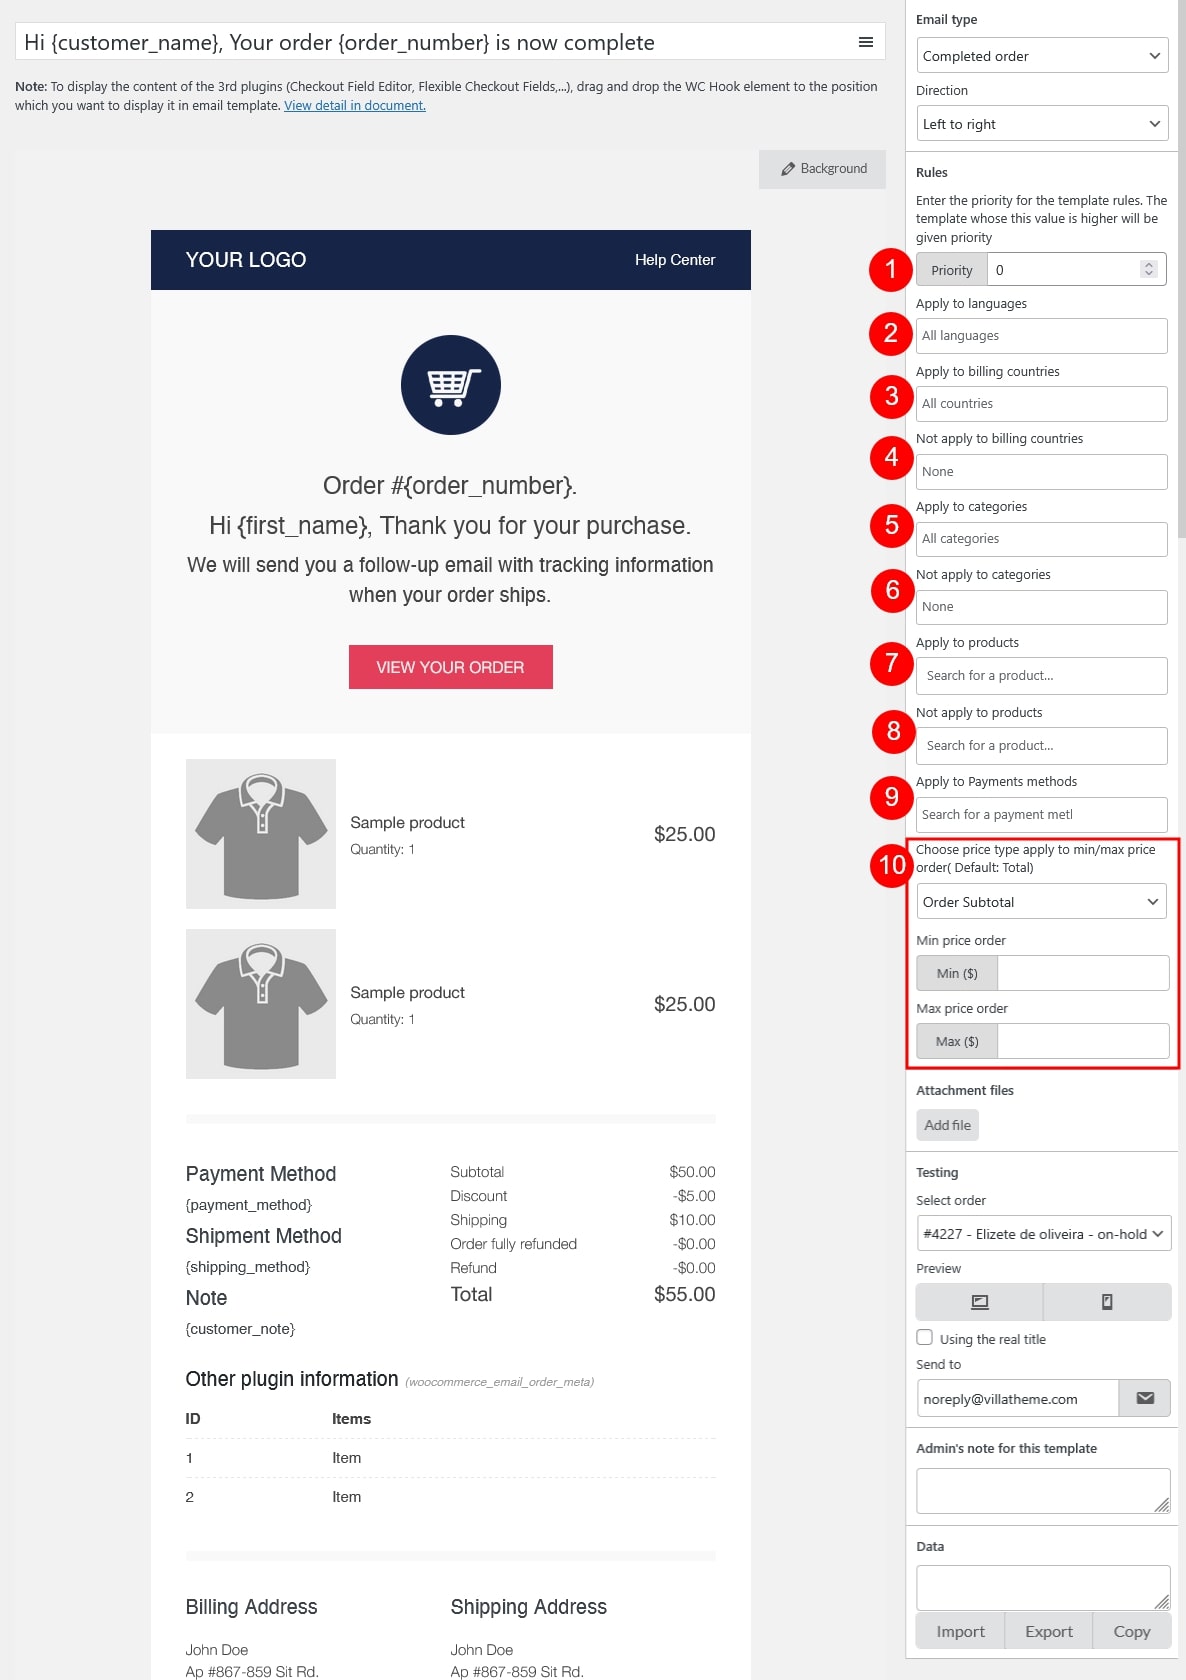
- Priority: The plugin checks rules from top to bottom of the Email template list to find a matching template. When filtering email templates by type on the email list, templates with higher priority rules will be arranged to the higher position and are applied first. Go to each email template editing page to add priority for each one.
Important note: If a template includes multiple rules, for example: products, categories, and language rules…. set it with a higher priority than the templates which is applied to the global cases. - Apply to languages: This option becomes available when using a multilingual plugin like WPML, Polylang, or TranslatePress. It allows you to create different email template templates for multiple languages and assign them to specific languages. You can view our guide video on how to send multilingual email notifications with WPML for a better view.
- Apply to billing countries: Select the countries. The template will be sent when the user’s billing country is one of the selected.
- Not apply to billing countries: Exclude specific billing countries. If the customer’s billing country is in this list, the template will not be sent.
- Apply to categories: Select the categories applied to this template. When the user makes an order with items belong to these categories, the template will be sent.
- Not apply to categories: Exclude certain categories. Orders containing items from these categories will not use this template
- Apply to products: Select the products to apply this template. When a user places an order for these items, the template will be sent. The Product Categories rule also works with variations.
- Not apply to products: Exclude specific products. If the order contains these items, the template will not be applied
- Apply to payment methods: Select the payment methods applied to this template. When the user makes an order with these payment methods, the template will be sent.
- Choose the price type that is applied to min/max price orders: Select the price type to apply this template, they can be Order subtotal, Order total.
- Apply to min price order: Add the minimum order. Once the order reaches this minimum amount or higher, the template will be sent.
- Apply to max price order: Enter the maximum amount for the order. The template will be sent to when the user makes an order with the price lower or equal to this value.
Attach file
You can add file(s) to the template. Once the template is sent, the file(s) will be sent along as the attachment(s).
Note: This function can’t be used along with dynamic data files. For example: If you use another plugin that can generate file with data based on each user’s particular order, those files generated can’t be attached.
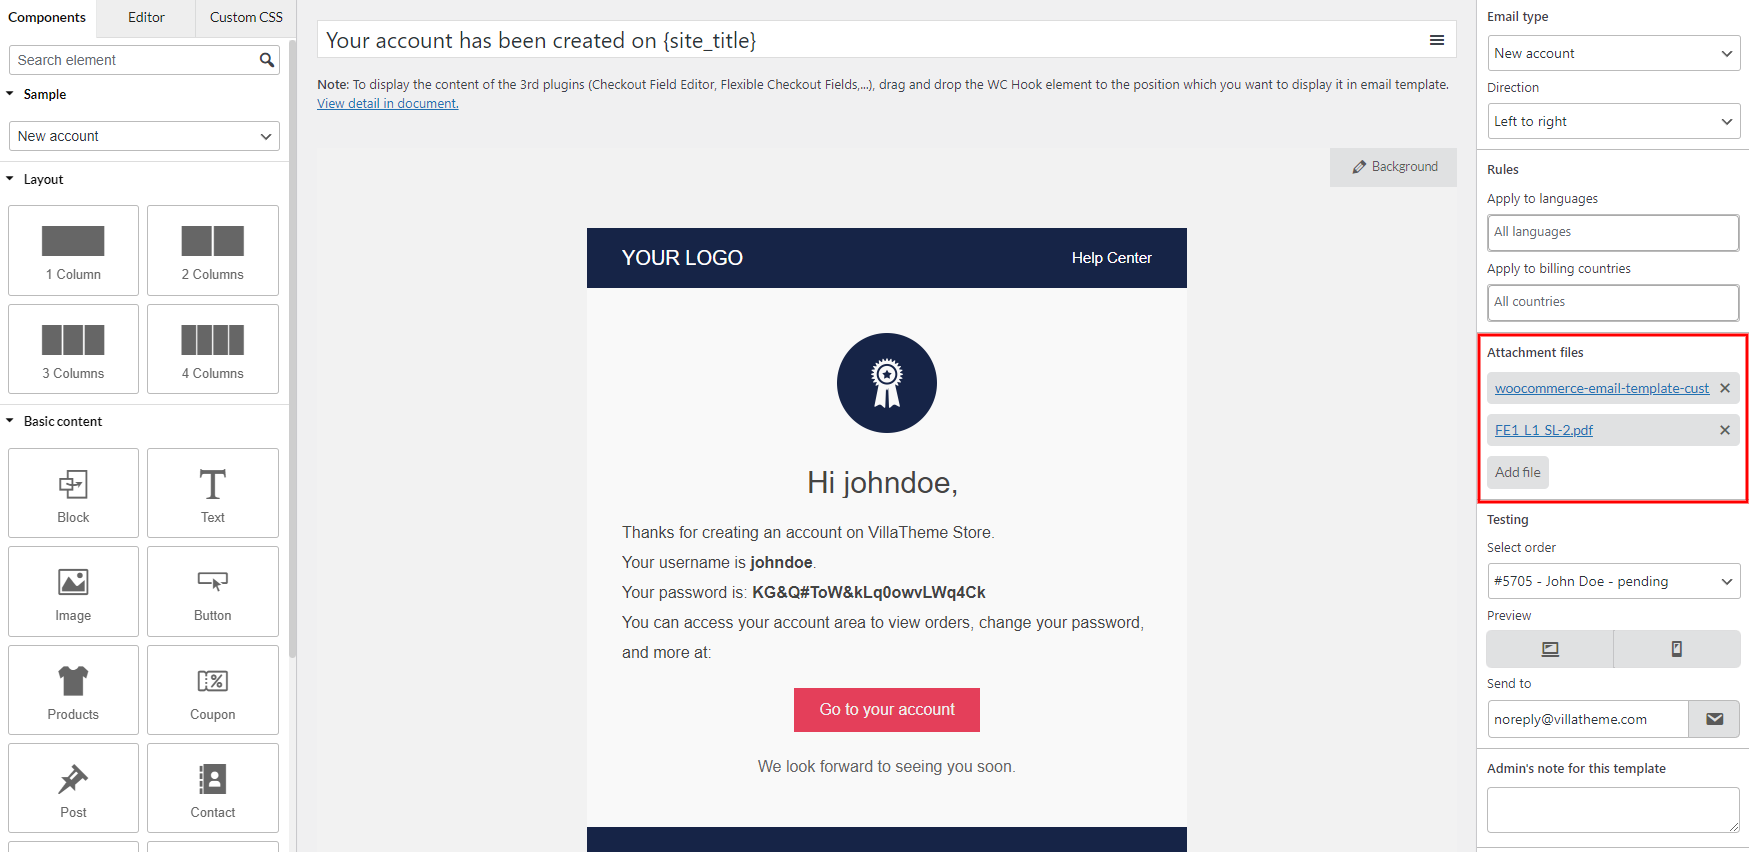
Simply click the “Add file” button, then select the file(s) to attached.
Preview & Send test email
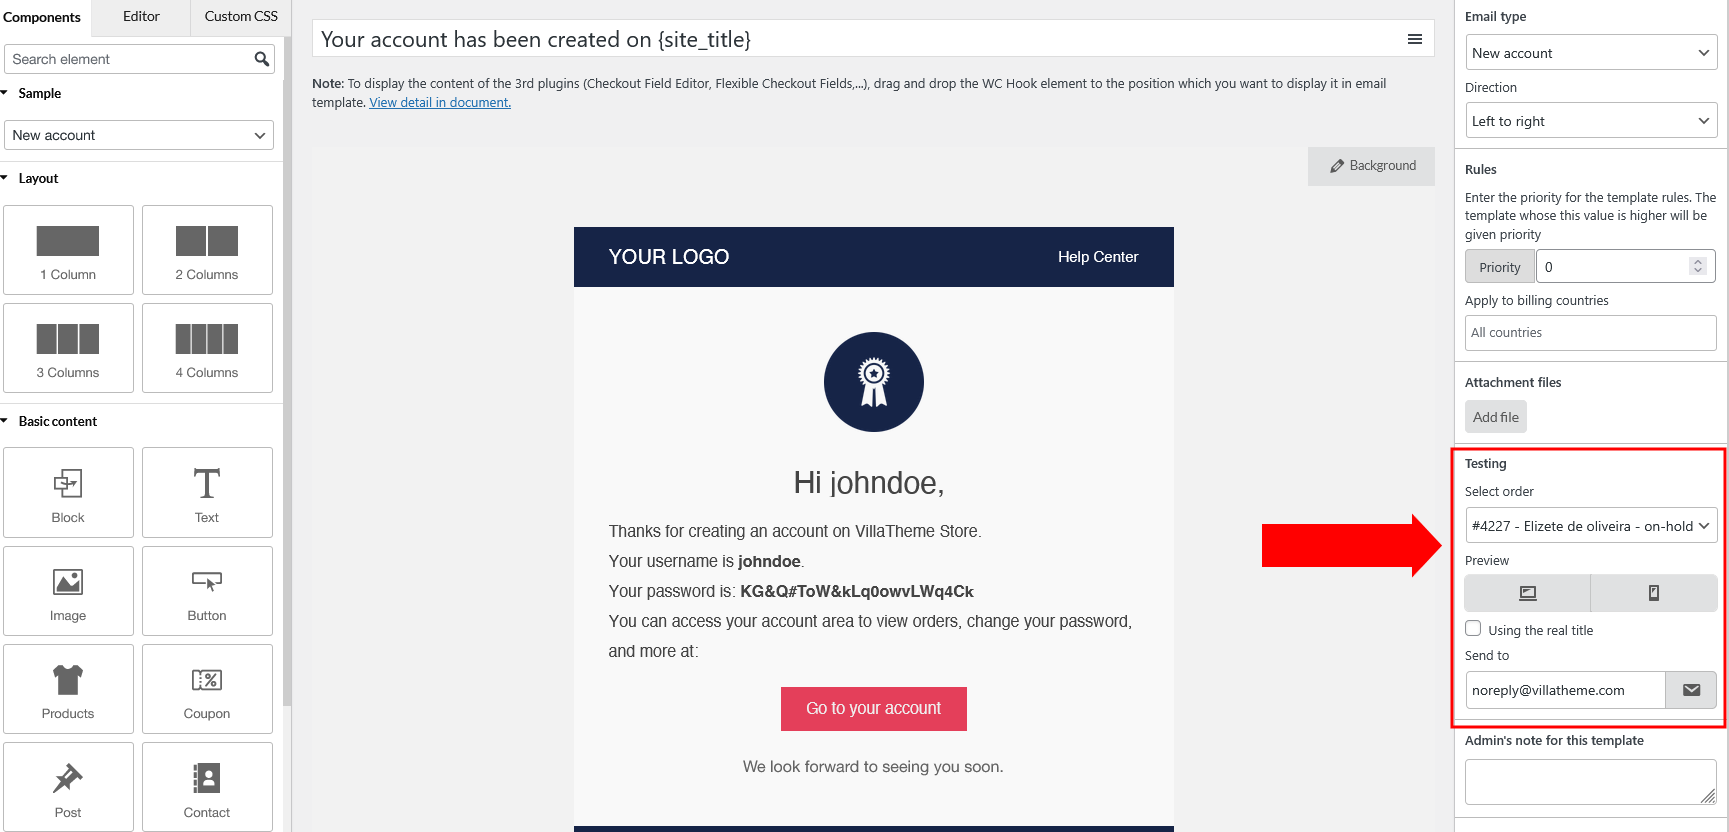
When you build a new template and want to see how this template works when it’s sent, especially in a particular situation. These functions in the Testing field can help.
PREVIEW
First, to preview the email, simply click these 2 buttons to view the template on Desktop and Mobile devices in “Preview”
SEND TEST EMAIL
If you’re not certain with the Preview, send a test email so you can see how email works.
Step 1: Select a particular order in the “Select order” field. The real latest order for each status on your site will be updated here. Only one for each status for testing purpose.
Step 2 (optional): Check the “Using the real title” option if you want the test email to show the actual email subject instead of the default test title “WooCommerce Email Customizer test email template” (which is normally used to help distinguish test emails).
Step 3: Enter your email to send the test email to the “Send to” field.
Step 4: Click the “Send test email” button.
Note:
Normally, the test email can be sent properly. Once it’s sent, you’ll see a green message letting you know the test email is sent successfully.
If it’s not sent, there’ll be a red message letting your know which reason caused this issue. You would need to check if the problem happens to only test email, or even the real email. In that case, please try these trouble shooting steps.
Import & Export Templates
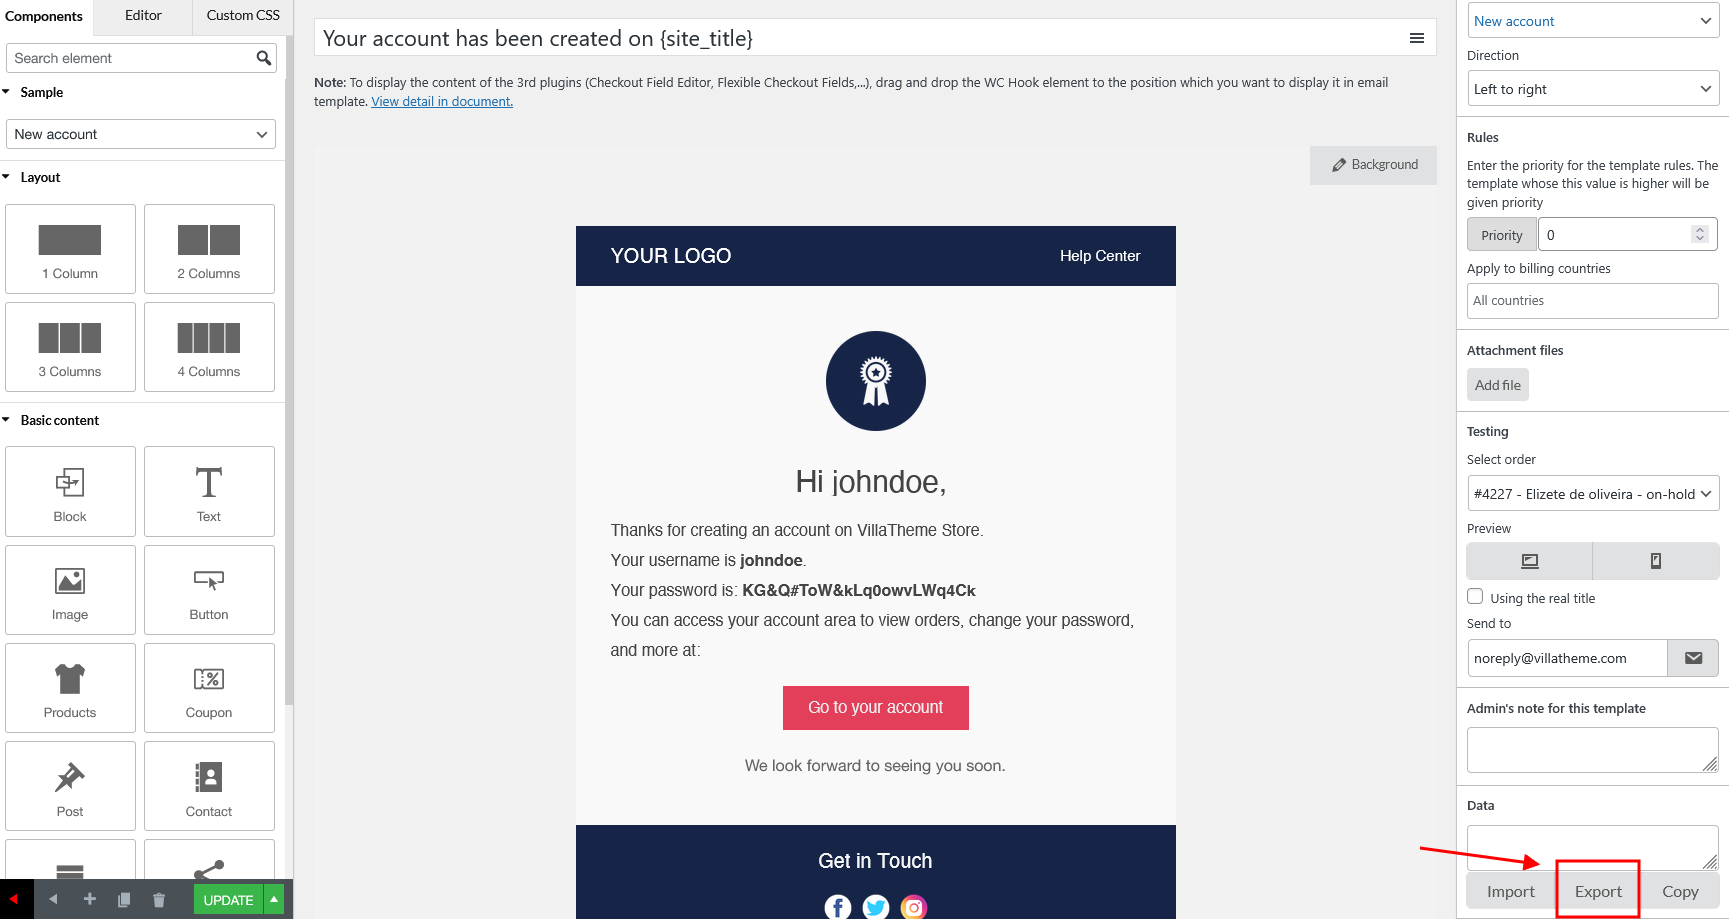
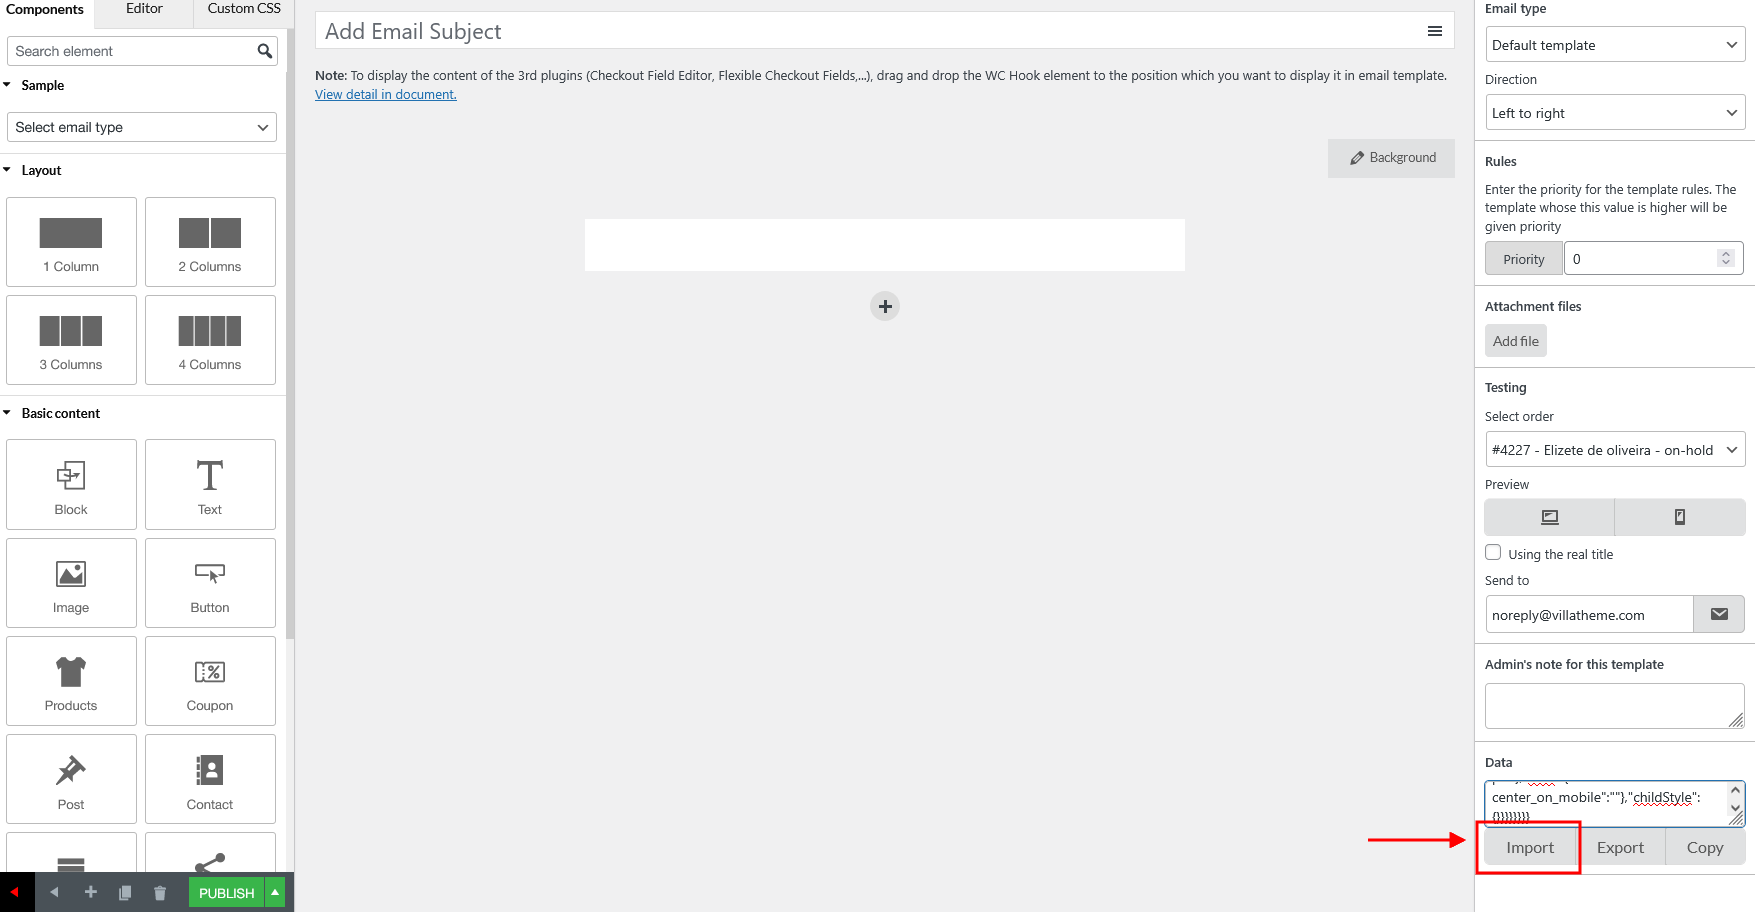
These settings allow the admin to export a template, and import it back to another blank template, on the current website or on other websites (there must be WooCommerce Email Template Customizer installed and activated on those websites).
This function saves your time, you needn’t re-make another similar template.
Step 1: In the Editor page of an email template, click “Export”
Step 2: Copy the exported data.
Step 3: Go to a blank template, paste the copied data to the “Data” field. >> Click “Import”
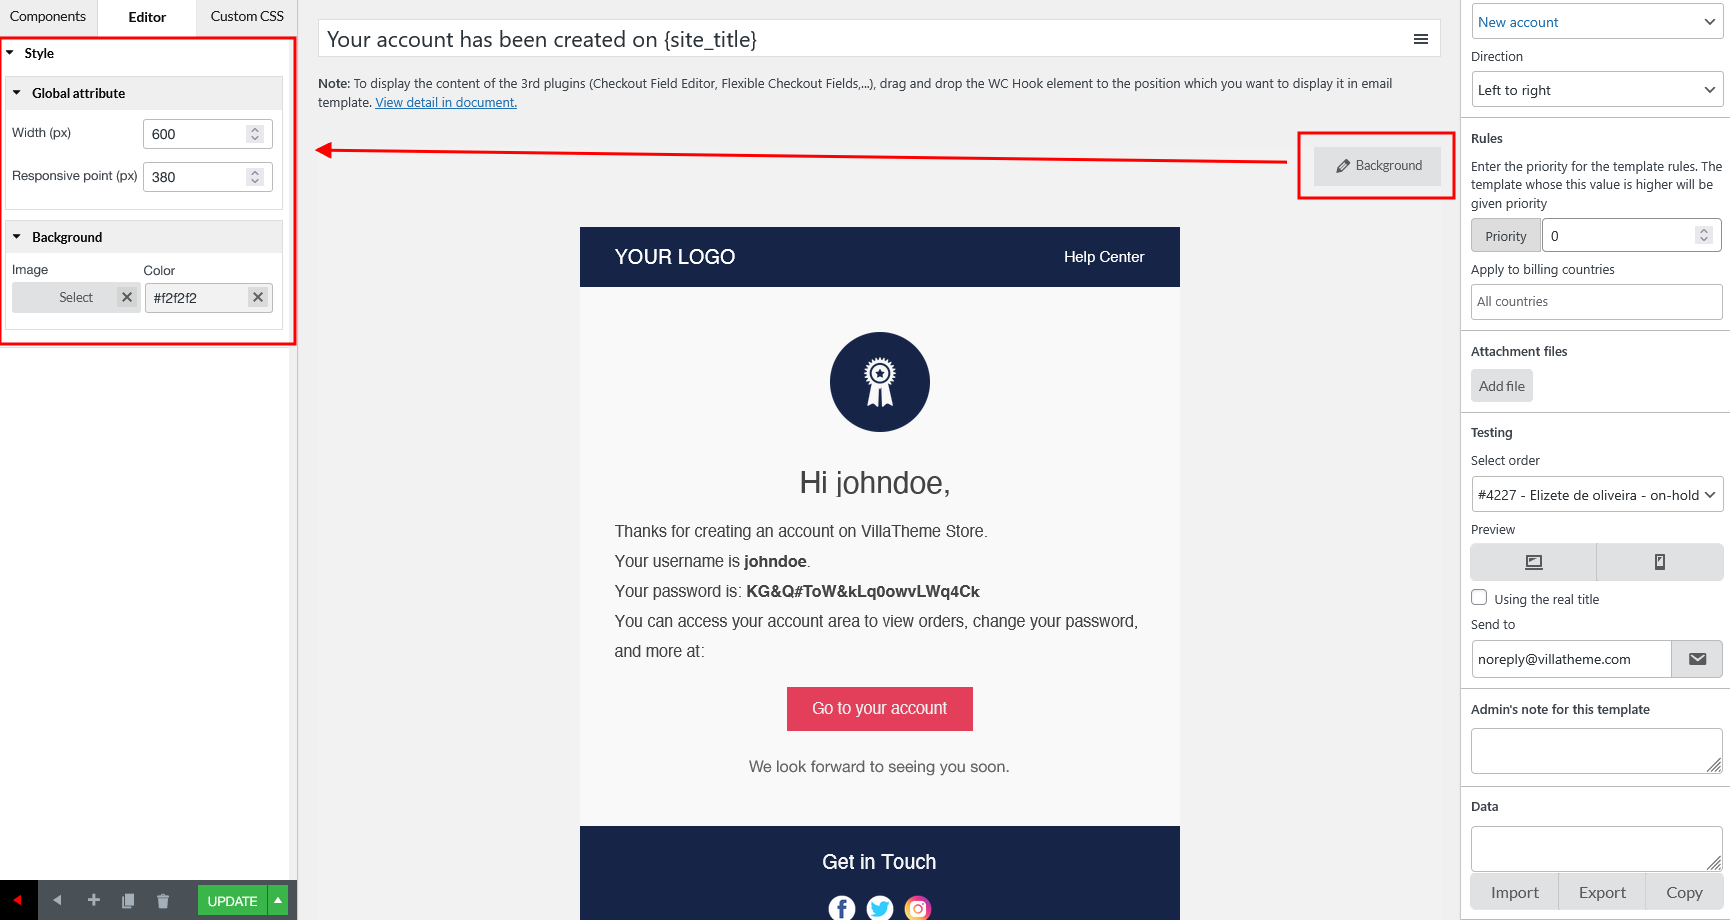
Background & Responsive point
In this part, we’ll learn how to edit the email background and make it display responsively on any device.
First, click “Background”.
In the Editor zone, you’ll see options to customize the email background and the responsive point.
Email Background
There’re 3 options to edit the email background – Width, Image and Color.
- Width (px): Make the background width fit your screen size. The change is applied instantly after you enter a new value here.
- Image: Click the “Select” button to choose the image for the email background from your media. Click the “x” button to remove the background image
- Color: Similar to Background Image. Choose the color for the email background.
Responsive point (px)
If you view the email template via Preview mode, but you’re still not happy with how it looks on different screen. You may want to make the email on the desktop and mobile look the same, or perhaps you want elements on mobile look bigger than how they look on desktop.
Responsive point will help you with that. It allows your email content to flow freely across all screen resolutions and sizes, and renders it to look great on all devices. The higher responsive point, the bigger element.

