WooCommerce Thank You Page Customizer


Created: 11/2018

Latest updated: 2/2024 – Updated version: 1.2.3

By: VillaTheme

Thank you for purchasing our plugin. If you have any questions that are beyond the scope of this documentation, please feel free to request support at our Support Forum. Thanks so much!

What is WooCommerce Thank you Page Customizer?

GIVE COUPON

WooCommerce Thank You Page Customizer will give a coupon after a successful order. Moreover,  you can choose to give an existing coupon or let the plugin generate unique coupons.

Coupon rules: Each coupon will have its own rules and you can configure these rules to give different coupons for different orders.
  • Minimum order total: The coupon will be given if the order total is bigger than this amount.
  • Maximum order total: Similarly, the coupon will be given if the order total is smaller than this amount.
  • Include products: Only give coupon if the order includes these products.
  • Exclude products: Do not give coupon if the order includes these products.
  • Include categories: Only give coupon if the order includes products in selected categories.
  • Exclude categories: Do not give coupon if the order includes products in selected categories.
  • Existing Coupon: Choose an existing WooCommerce Coupon to give to customers after they successful order an order.
  • Select WooCommerce coupon: Create a coupon in WooCommerce/ Coupon and use in WooCommerce Thank You Page Customizer.
  • Email restriction: Make the coupon be usable on with the billing email address.


Unique Coupon: The plugin will generate unique coupons for each order and display it on the Thank You page. You can set up the generated coupon with the same options with WooCommerce coupons.
  • Email restriction: Make the coupon be usable with the billing email only.
  • Discount type: Select the coupon discount type percentage discount, fixed cart discount and fixed product discount.
  • Coupon code prefix: Type in the coupon code prefix.
  • Coupon amount: The amount of the coupon you will give.
  • Allow free shipping: Select if this coupon grants free shipping.
  • Expires after: Select the usable time of the coupon.
  • Individual use only: Choose if the coupon can be used in conjunction with other coupons.
  • Exclude sale items: Choose if the coupon can be used on sale items.
  • Usage limit per coupon: How many times a coupon can be used by all customers before being invalid.
  • Limit usage to X items: How many items the coupon can be applied to before being invalid.
  • Usage limit per user: How many times a coupon can be used by each customer before being invalid for that customer.
  • Coupon limit: Limit number of coupons for each customer per day/week/month/year.
  • Coupon email: Create your own email to send coupon to your customers
  • Preview email: Preview the coupon email sending to customers using a button in back end.


DESIGN THANK YOU PAGE

The plugin allows you to drag and drop elements to build your own Thank You page in customize mode so every change you make will affect immediately for you to preview, which could save a lot of time.

  • Preview: You can select a real order to preview your design on front-end, therefore it’s so easy to customize the design as you expect without wasting a lot of time trying changing the design in backend, save settings then go to frontend to refresh the page to see the changes and repeat those steps again and again until you are so tired and think “Uhm, this looks fine”.
  • Drag & Drop: drag and drop elements to build the Thank you page as you want. Elements include the Thank you message, Order Confirmation, Order details, Customer information, Social icons, Coupon codes, Google map, text… and there are more to be added in future updates.
  • Custom CSS: The plugin provides a Custom CSS option allow you to add your own CSS code to change the front-end style of the plugin. And what is cool is that the css code you enter also affect immediately which make it so easy to find if your custom code is correct or not. Imagine you try to add custom css code in plugin backend, save the settings then go to frontend and refresh the page to check if your code you enter works but nothing changes and talk to yourself “What the hell am i doing wrong???”, that’s really annoying.
  • Element Design: Each element has its own design page which allows you to change that element style such as color, background color …
  • Create multiple templates of Thank you page and assign them to product groups


ADD NEW ELEMENT

There are 18 built-in elements for you to custom your thank you page.

  • Thank you message:  Display a thank you message, confirm the order have been received.
  • Coupon: Give customers a coupon for their order. Customizing the element with shortcodes for the coupon code, coupon amount, expiry date.
  • Text editor: Allow you to add a text to the thank you page with HTML editor. You can add shortcode from 3rd parties here.
  • Order information: Display order information with the Order number, purchase date, order total, purchased email address, payment method.
  • Customer information: Display billing address and shipping address.
  • Order detail: Display the order details with product names, subtotal, total, shipping price, payment method.
  • WooCommerce products: Display up-sell products, cross-sell products, featured products, on sale products, best selling products, recently viewed products, recent products, top rated product, related products on thank you page. You have an option to select the product limit and product column.
  • Order products by: Order product in the product element by title, published date, ID, menu order, order quantity, rating and random.
  • Product visibility: Choose the problem visible status to display visible, catalog, search, hidden, hidden, menu.
  • Product quantity: Choose product total and number of column.
  • Social networks icons: Display social network icon, allow customers to connect with your store. You can change the description, icon style, add social network link.
  • Google Maps: Display your store address on google maps with options for marker color, google map style, description, address, map zoom level. This option requires a valid Google map API key.


SHORTCODES

The plugin provides shortcodes for you to display order information in elements in Thank You page and below is a list of available shortcodes:

  • Some properties of order: Which are Order Number, Order Status, Order Date, Order Total and Items Count
  • Payment Method
  • Shipping information: There are Shipping Method, Shipping Address and Formatted Shipping Address
  • Billing details: Including Billing Address, Formatted Billing Address, Billing Country, Billing City, Billing First Name, Billing Last Name, Formatted Billing Full Name and Billing Email
  • Site identification: Like Shop Title, Home Url and Shop Url


MORE OTHER FEATURES

  • Compatible with WooCommerce Email Template Customize: That allows to design and customize coupon email of WooCommerce Thank You Page.
  • Support RTL.
  • Compatible with Polylang.
  • Compatible with WPML.
  • Responsive on any devices.
  • Friendly user interface.


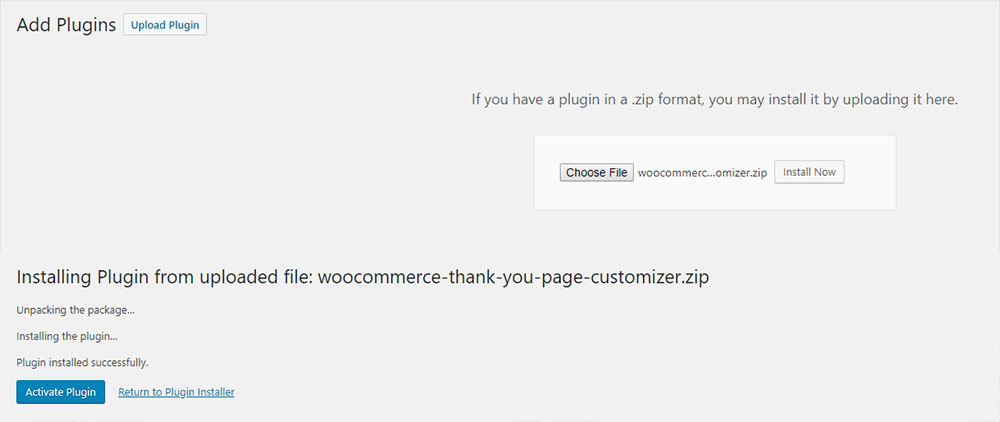
In Dashboard/Plugins/Add New /Upload Plugin/Choose file/ select plugin file zip/ Install Now/Active Plugin


You can follow this video on how to install and use WooCommerce Thank You Page Customizer

After successful install the plugin, you need to configure some simple settings to make it works.

  • Go to Dashboard/ Woo Thank you page/ 
  • General tab, make sure you have enabled the plugin here.
  • Design your Thank you page. You can create multiple templates of this page for different products/categories.
  • In Coupon tab, select if you want to give an existing coupon to customers or let the plugin generate unique coupon with your given settings.
  • Configure Coupon email, and decide to attach that coupon to WooCommerce order emails if you want.

Create multiple Thank you page templates

In the pro version, you can create various template with different designs, and assign specific template to products/categories.

If you don’t have multiple templates, the default template in Thank You Page plugin general settings (6) will be applied.

Step 1: Go to Dashboard >> Thank You Page >> Templates >> click “Add Templates

At this step, the link to Customize page – (2) in the next step – is not available yet. You need to publish the template once to see the link.


Step 2: Configure the the template

  1. Fill in the template title
  2. Click “Go to design” to reach the Customize page, where you design your Thank you page template. Visit this documentation for how to design Thank you page and this documentation for all elements you can use.
  3. Enable this option to redirect customer to this Thank you page ONLY when their order items meet all the condition in “Display Conditions (4)
    Disable this option to redirect customer to this Thank you page when one of their order items meet the condition in “Display Conditions (4)
  4. Add or remove, set up rules with products and/or product categories for the template.
  5. Post Attributes works as the priority of the template. The higher Order value, the higher priority the template has. E.g. You have 2 Thank you page templates with the same settings and condition >> The template with higher value in Order will be applied.


General

  1. Enable: This option allows you to turn on/off the plugin.
  2. Show coupon gift: Show coupon gift on the My Account > Orders page
  3. Order status: Usually, the order status will be set to “Processing” after checking out and customers will be lead to a thank you page but it could be different for some payments that you are using. So please select your order status here.
  4. Google map API key: Add API key of Google map if you use Google map API  you can look for the API key here.
  5. Bing map API key: Add API key of Bing map if you use Bing map API  you can look for the API key here.
  6. Design: A link lead you to the Design of the Thank You page.

Design

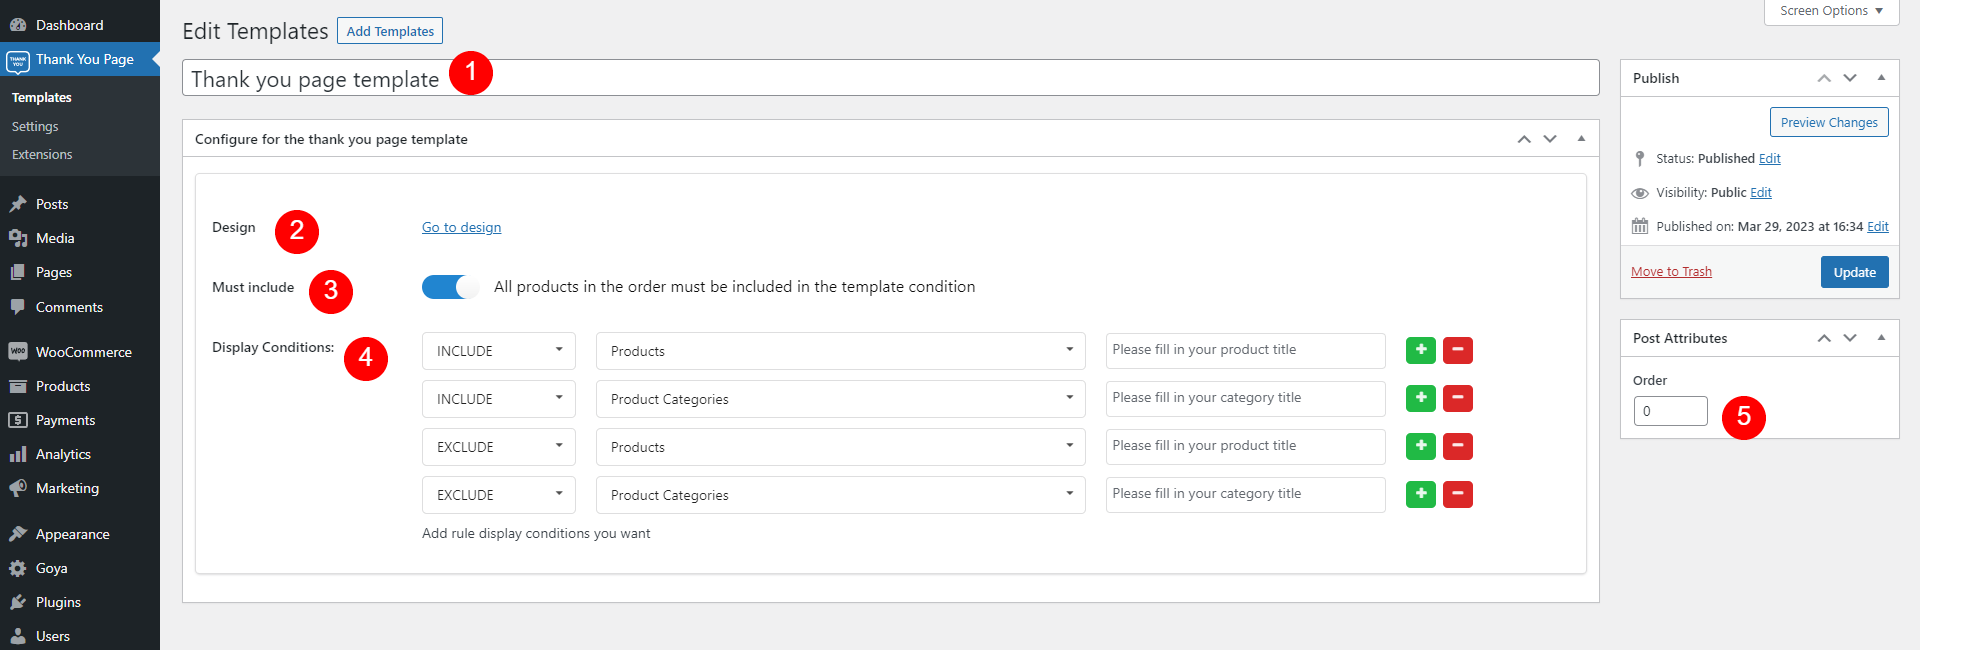
In the General tab, when you click on “Go to Design“, the plugin will direct you to the design page of WooCommerce Thank You page customizer.

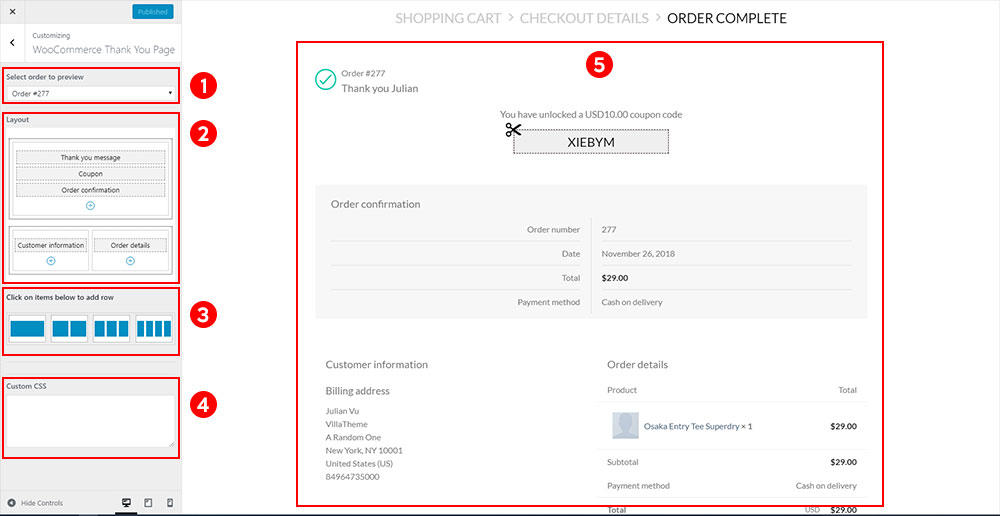
1. Select an order load in preview page.

2.  The layout of the preview page. You can drag and drop element in the Layout area to change its position on front-end.

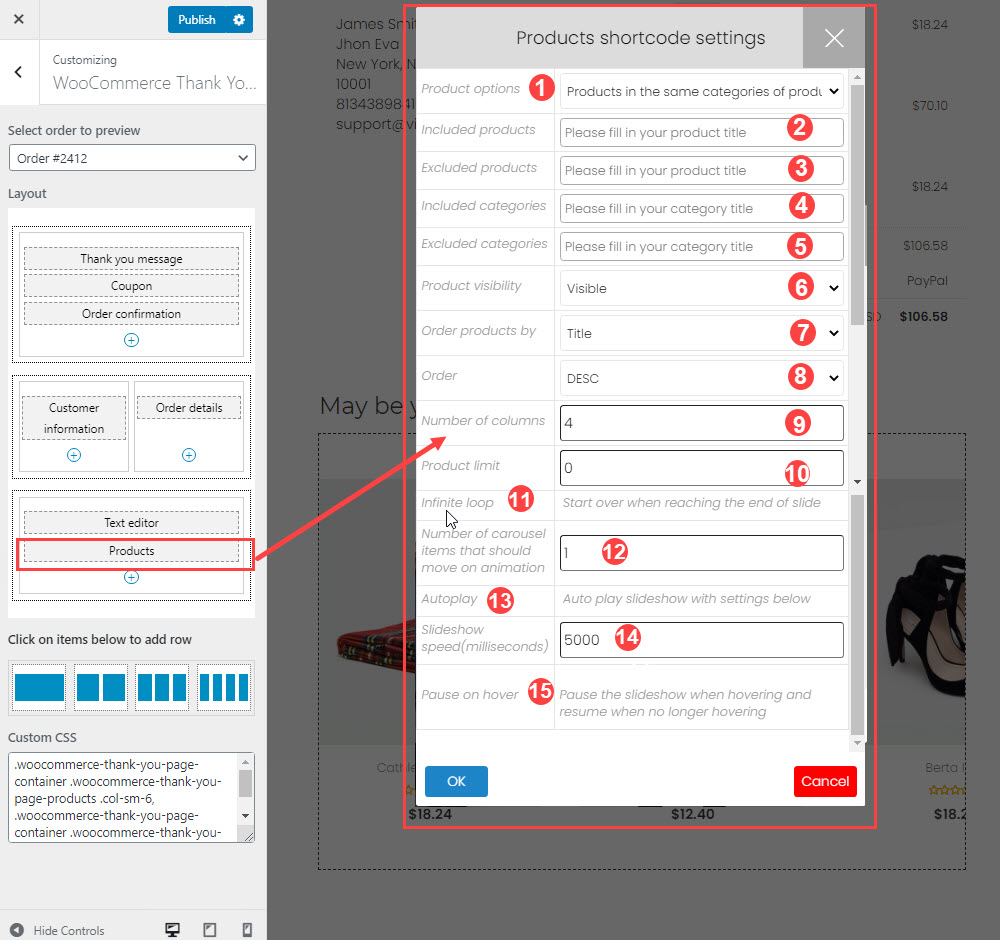
3. Click on item on this area to add it into Lay out area.

4. Custom CSS: you can add CSS code here on change the front-end style.

5. The preview area. When you change the element style or change the layout style. The change will be applied on the preview area, you can see how will you change look like on front end.

6. You can add the other elements by clicking the “+” button on the editing area.


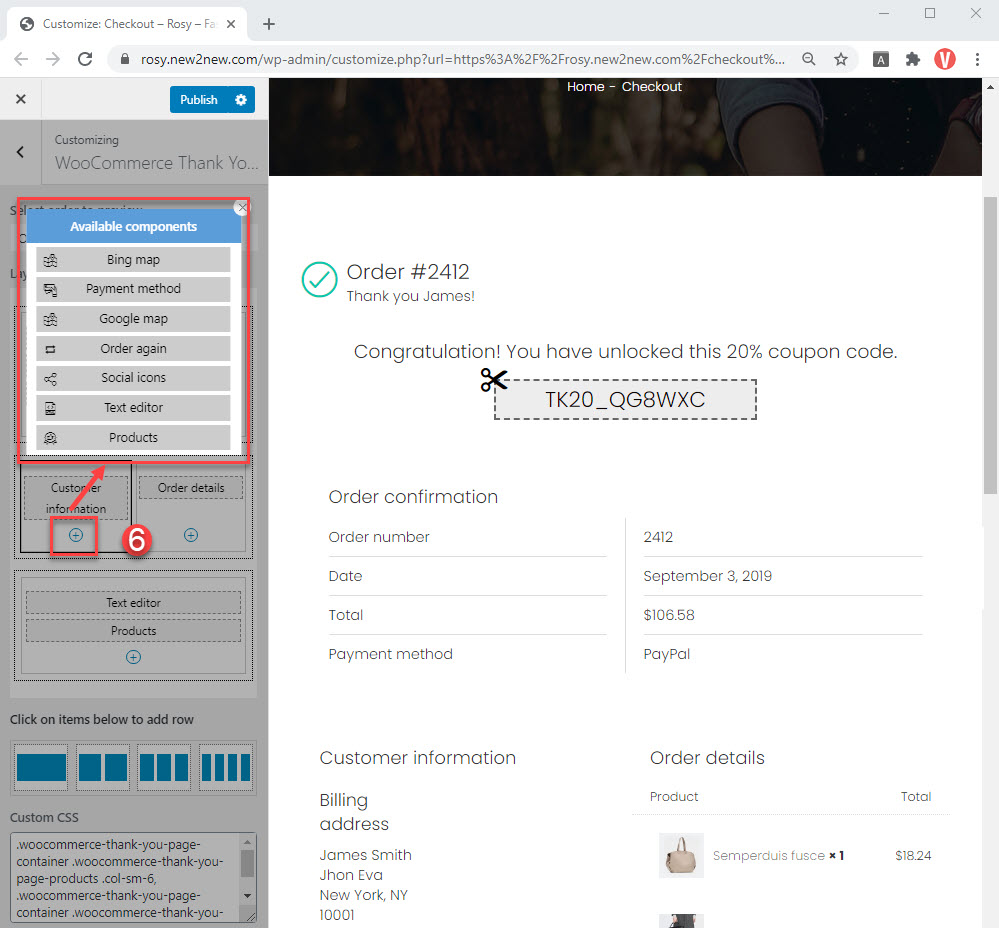
To change an element design, just hover your mouse on that element on the layout area or on the preview page. And click on the pencil icon. You will be redirected to the design page of that element.

To understand more about the option for designing in each element, Please access the tab: DESIGN ELEMENTS

Coupon

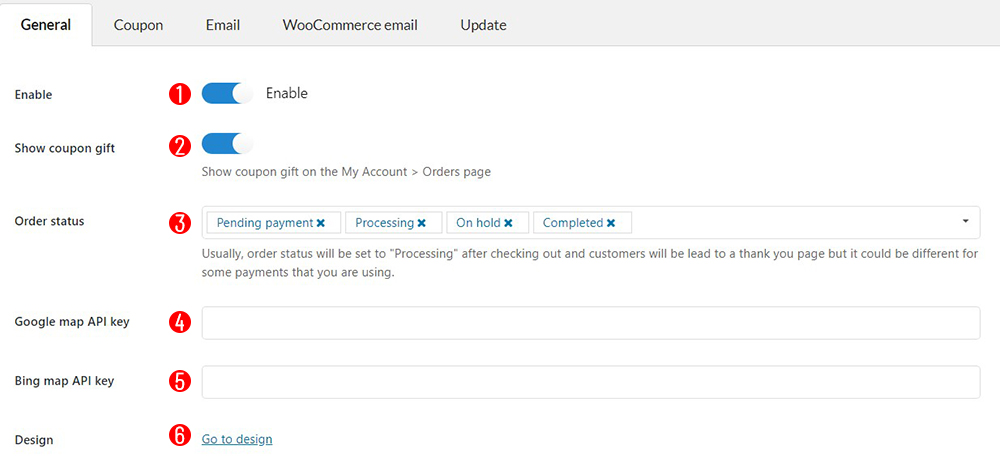
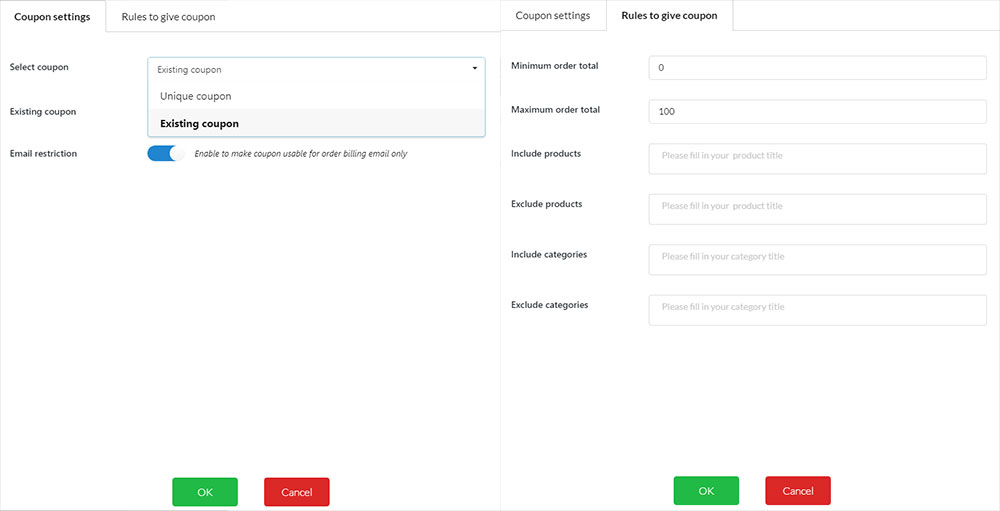
In the Coupon tab, you can choose to give to customers an existing coupon or generate unique coupons.

coupon

  1. Limit coupons per day: The maximum number of coupons given to each customer per day(based on email if not logged-in). Set to 0 to not limit this.
  2. Limit coupons per week: The maximum number of coupons given to each customer per week(based on email if not logged-in). Set to 0 to not limit this.
  3. Limit coupons per month: The maximum number of coupons given to each customer per month(based on email if not logged-in). Set to 0 to not limit this.
  4. Limit coupons per year: The maximum number of coupon given to each customer per year(based on email if not logged-in). Set to 0 to not limit this.
  5. Coupon type: There are 2 types of coupon you can give to customers. Unique coupon (auto-generated by the plugin) or Existing coupon.
  6. Discount type: There 3 type of discount Percentage discount, Fixed cart discount and Fixed product discount.
  7. Coupon amount: The coupon amount you will give to customers in thank you page.
  8. Min order total:
  9. Max order total: Min and max order total help you to create “rules” to give coupons. Example: 10% coupon for orders from $0 to $100 and 20% coupon for orders above $100.
  10. Actions: Click on “Edit” to configure coupon settings of each row, “Clone” to add a new row, “Remove” to remove the current row.

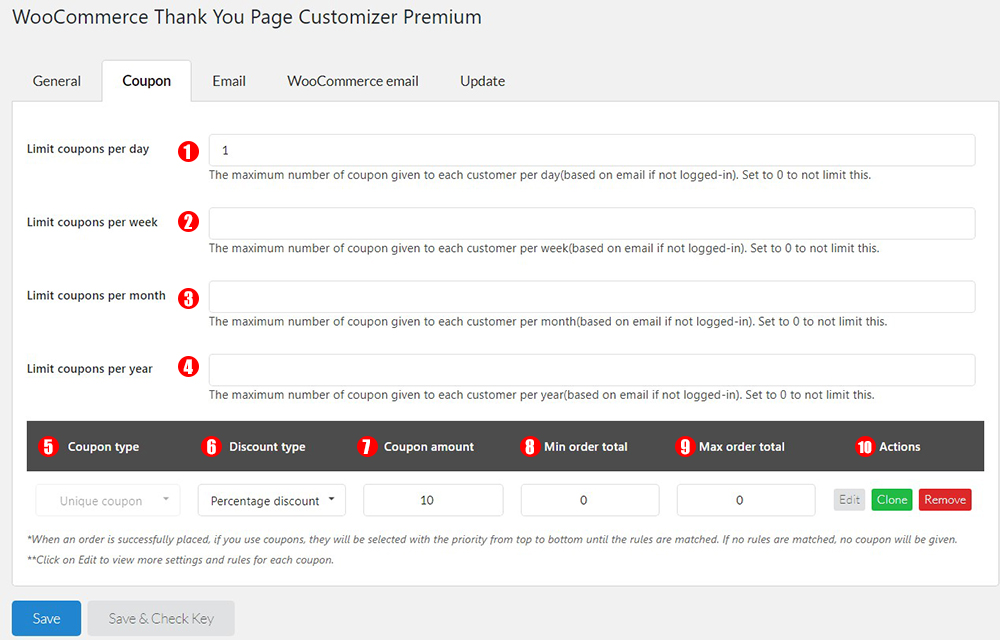
If you click on Edit button, a pop-up will appear. Allowing to change coupons and rules settings

Email

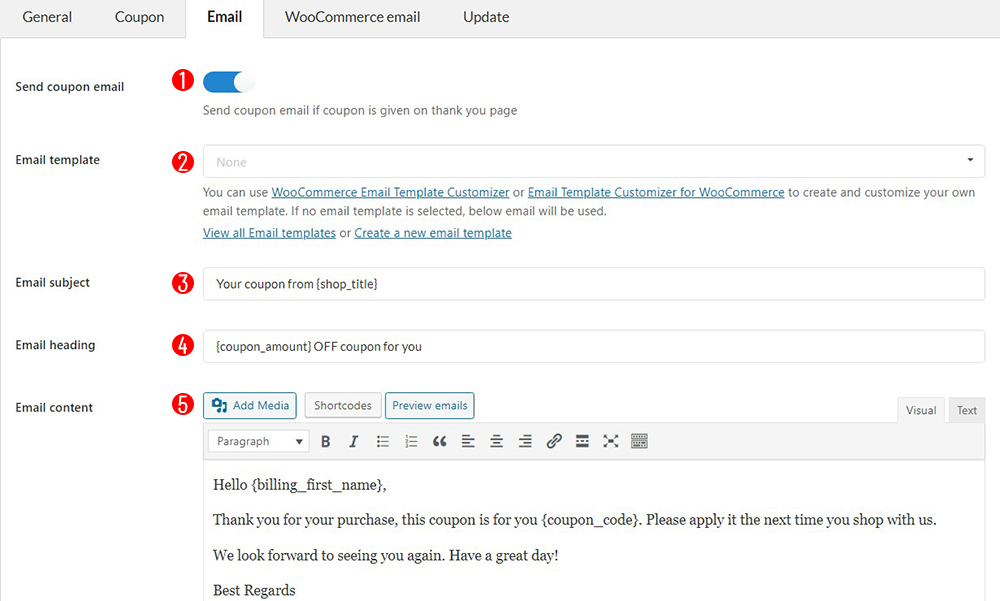
1. Send coupon email: A coupon email will be sent to your customers if they are offered a coupon on the thank you page.

2. Email template: 

If  you are using WooCommerce Email Template Customizer premium or free version, you can create or use coupon email templates generated uniquely for WooCommerce Thank You Page plugin.

A. How to send a coupon template for WooCommerce Thank You Page Customizer premium version using the WooCommerce Email Template Customizer.

1. Activate the WooCommerce Thank You Page Customizer premium version and WooCommerce Email Template Customizer free or premium version.

2. Choose available coupon templates in the Email template option that are designed in the WooCommerce Email Template Customizer plugin.


The following template is designed for the coupon email of WooCommerce Thank You Page Customizer.


B. How to build and customize coupon email templates for WooCommerce Photo Reviews in the WooCommerce Email Template Customizer plugin.

You can build unlimited coupon email templates for WooCommerce Thank You Page Customizer using layouts and elements of WooCommerce Email Template Customizer, you can read how to build email templates here and how to customize available email templates here. After building a coupon template for WooCommerce Thank You Page Customizer, save that email template under WooCommerce Thank You Page Customizer type.

3. Email subject; Email heading; Email content: If you don’t use WooCommerce Email Template Customizer plugin to design the coupon email, default email will be used. You can customize the content of the coupon email including: Email subject, Email heading, Email content, and use a variety of shortcode, It is also integrated with preview emails.

WooCommerce Email

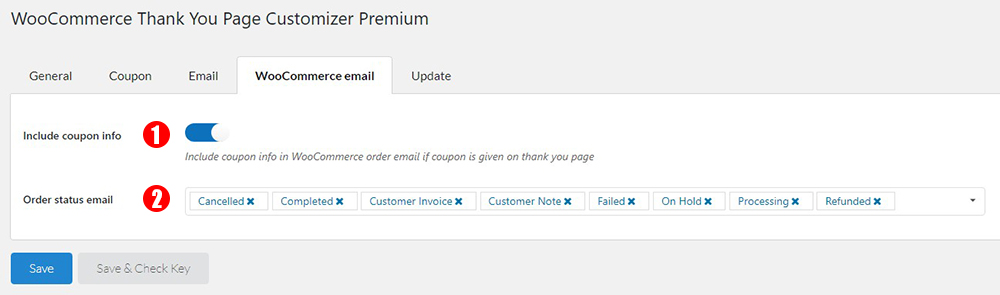
This feature allows you to include in WooCommerce email with the coupon information.

  1. Include coupon info: Enable this option to include in WooCommerce email with the coupon information.
  2. Order status email: Select order statuses should be sent the coupon information in WooCommerce email.

“Order again” button

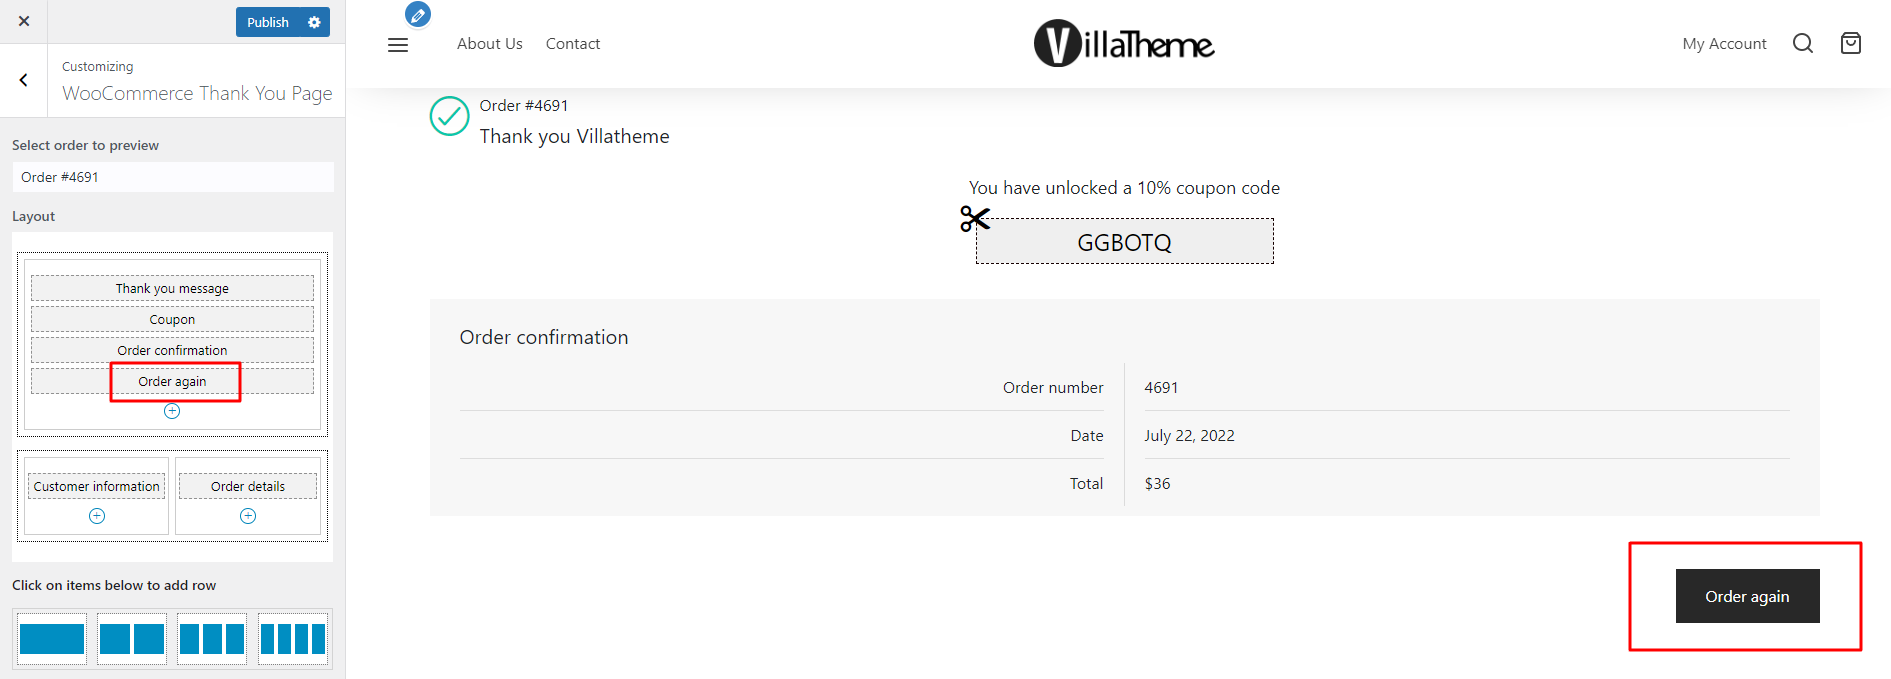
This component adds an “Order again” button which redirects user to the cart page. The cart has been filled with the items from their previous order.


Thank you page message

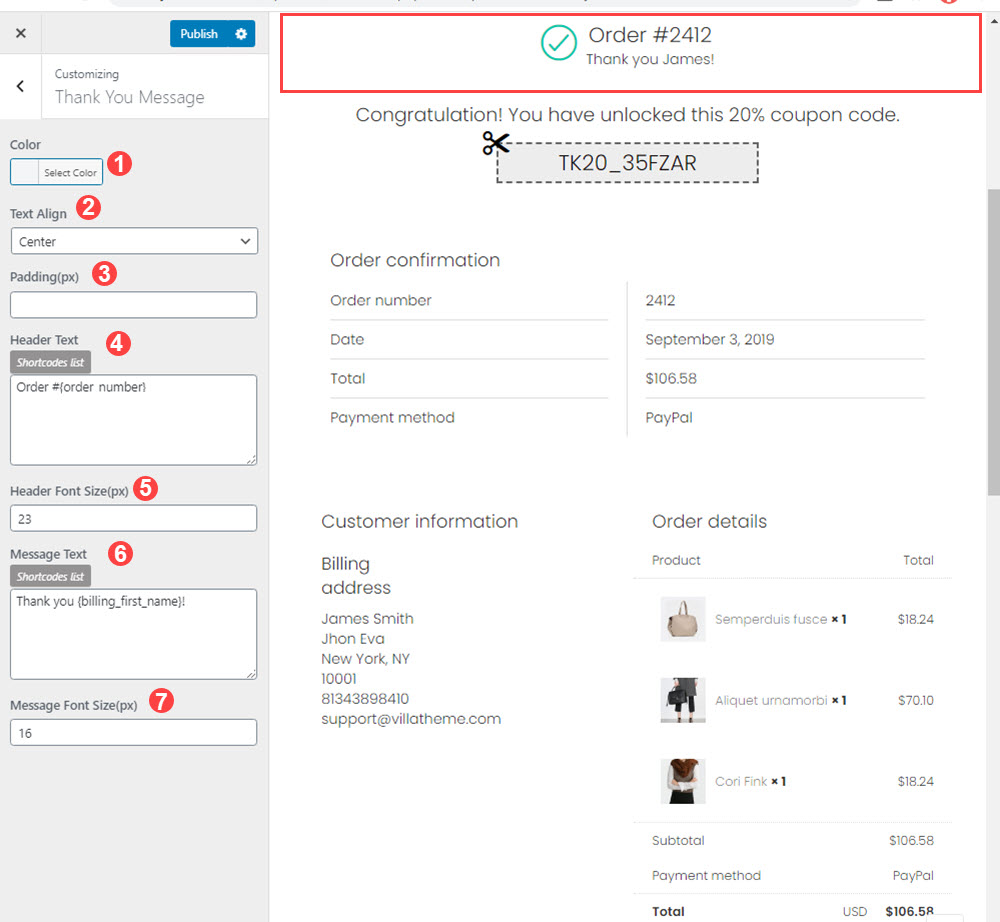
1. Color: select the color of the “Thank You” message

2. Text Align: The Alignment of the text with three options: Center, Right or Justify

3. Padding (px): Set the padding parameter for the message.

4. Header text: Insert or change the header text as you want, you can use the available shortcode for the header text:

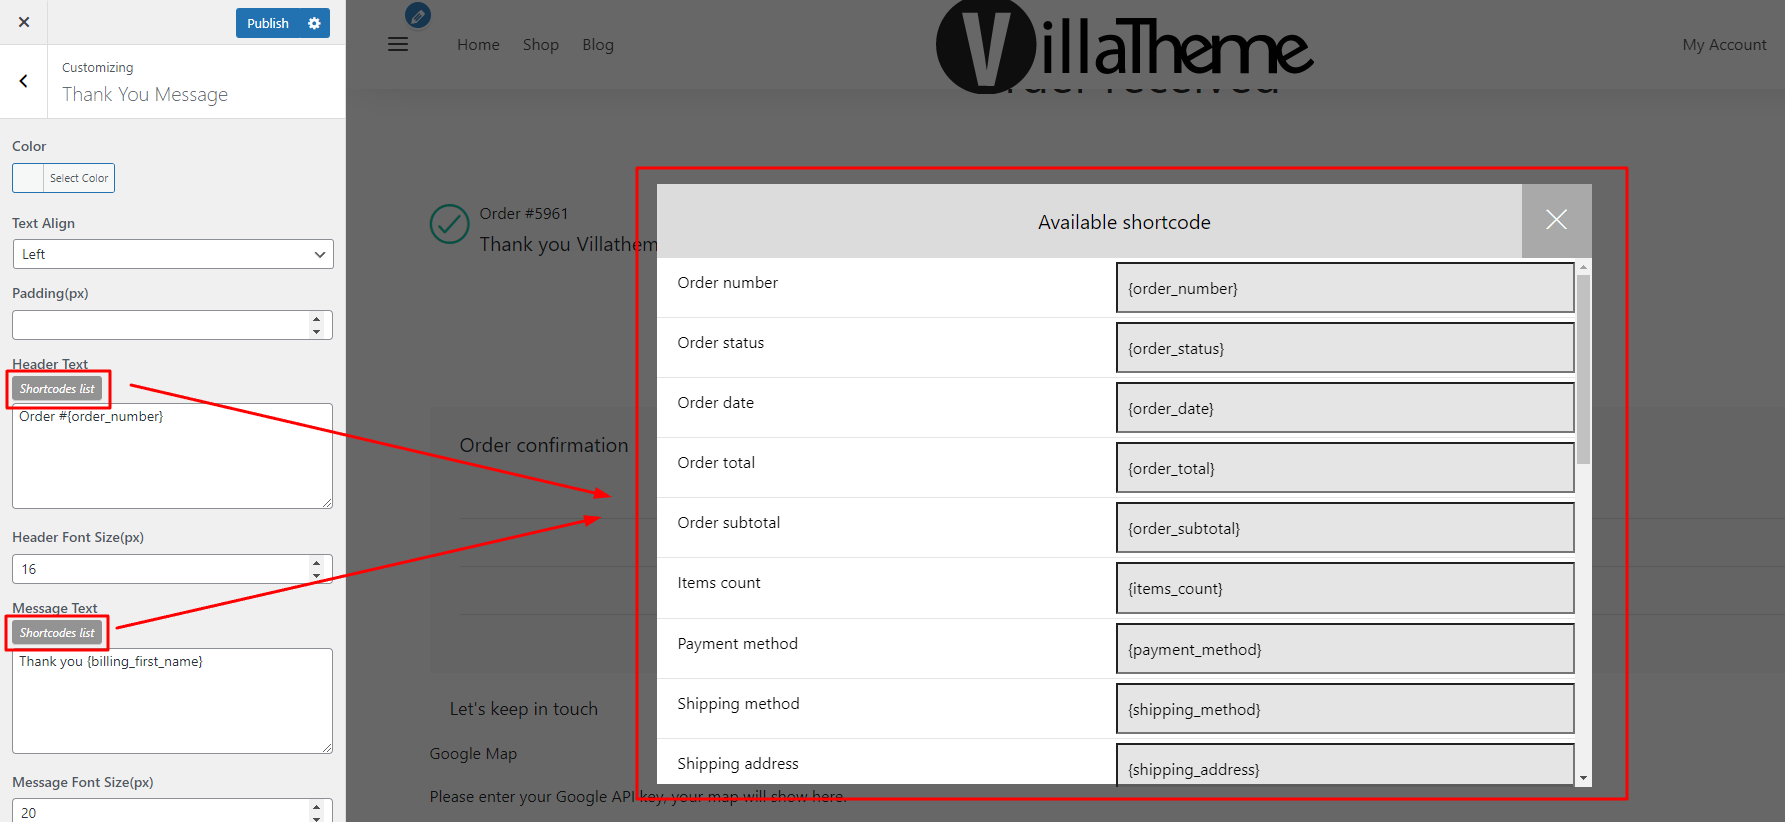
5.  Header Font Size(px): Set up the font size for the Header

6. Message Text: Insert or change the message text as you want, you can use the available shortcode as mentioned above.

7. Message Font Size(px): Set up the font size for the Header.


Coupon

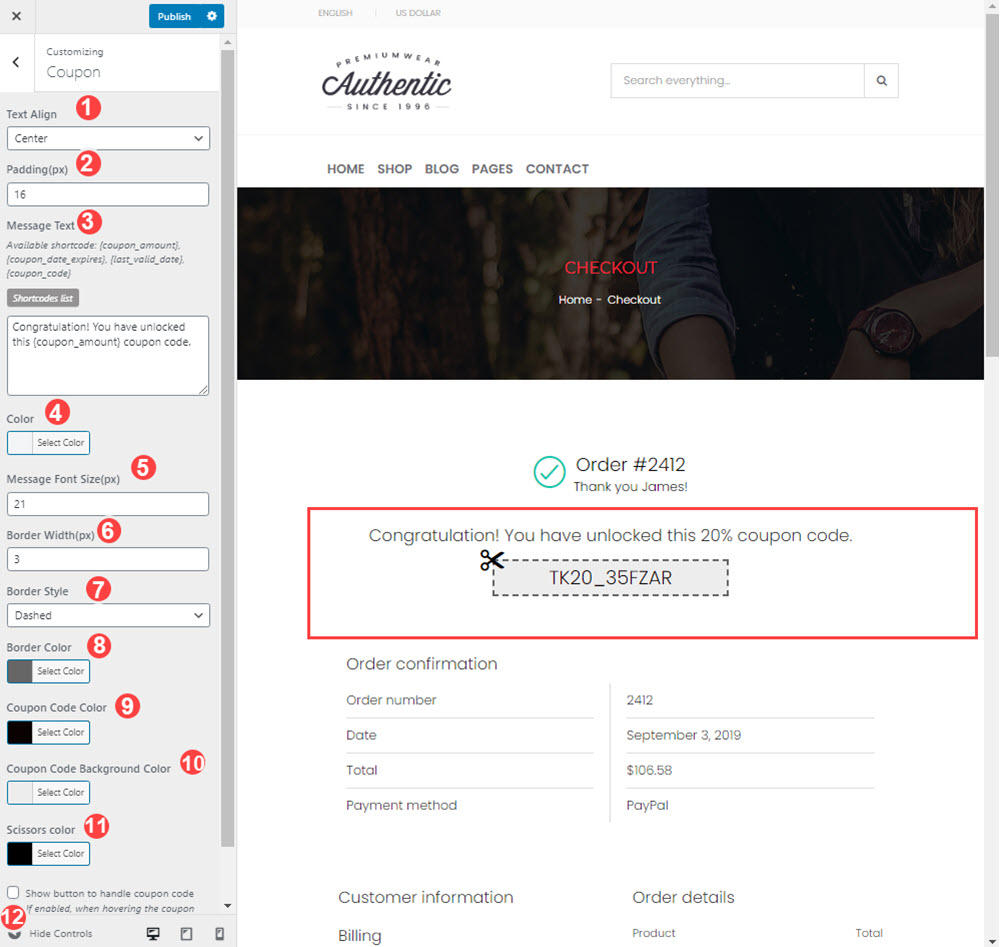
1. Text Align: The Alignment of the Coupon with three options: Center, Right or Justify

2. Padding (px): Set the padding parameter for the Coupon.

3. message text: Insert or change the message as you want, you can use the available shortcode for the message:

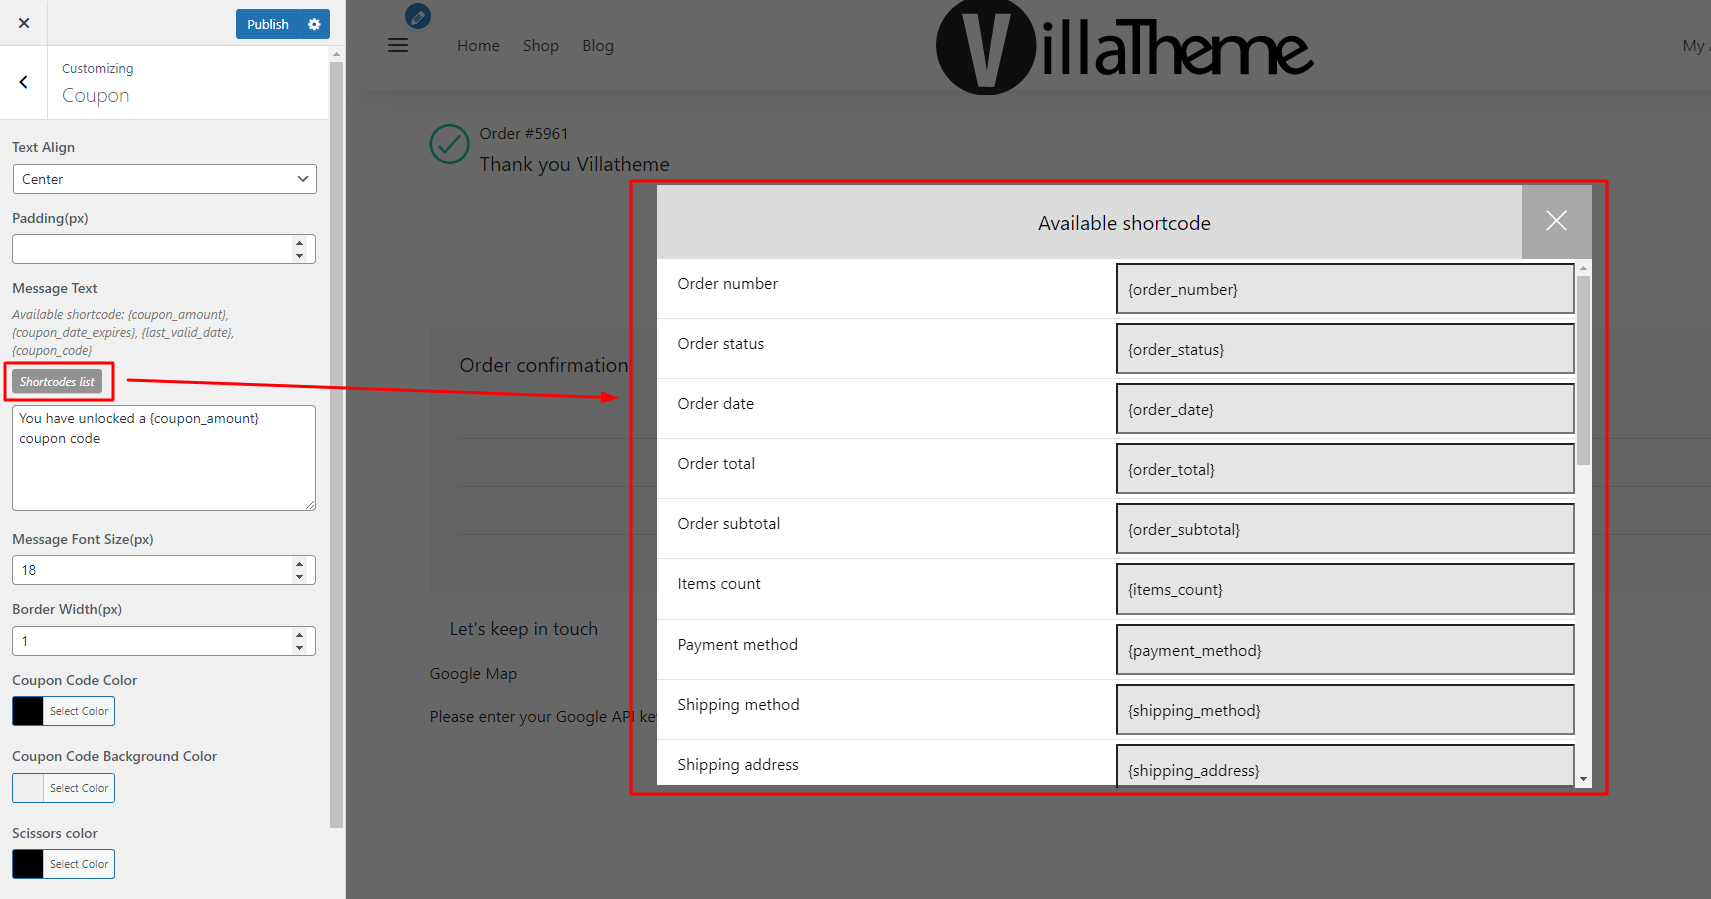
4. Color: Choose the color from the color picker for the message.

5. Message Font Size (px): Set up the font size for the message.

6,7,8:  Border width (px): Set up the width, style, color of coupon box border.

9. Coupon Code Color: Set up the color of Coupon Code

10. Coupon Code Background Color: Set up the Color of Coupon Code Background.

11. Scissors Color: Set up the Color of Scissor.

12. Check on the box to show the button to handle coupon code.


Order Confirmation

1. Set up the background color of the Order Confirmation.

2. Padding (px): Set up the padding of Order Confirmation.

3,4 Round Corner (px) and Border width (px):  Set up the Round Corner and Border width for Order Confirmation.

5,6. Border style and Border color: Set up the style and color of the Border.

8,9,10. Vertical Separator Width (px), Style, Color: Set up the width, Style and Color for Vertical Separator.

11,12,13: Horizontal Separator width (px), Horizontal Separator Style, Horizontal Separator Color: Set up the width, Style, Color for Horizontal Separator.

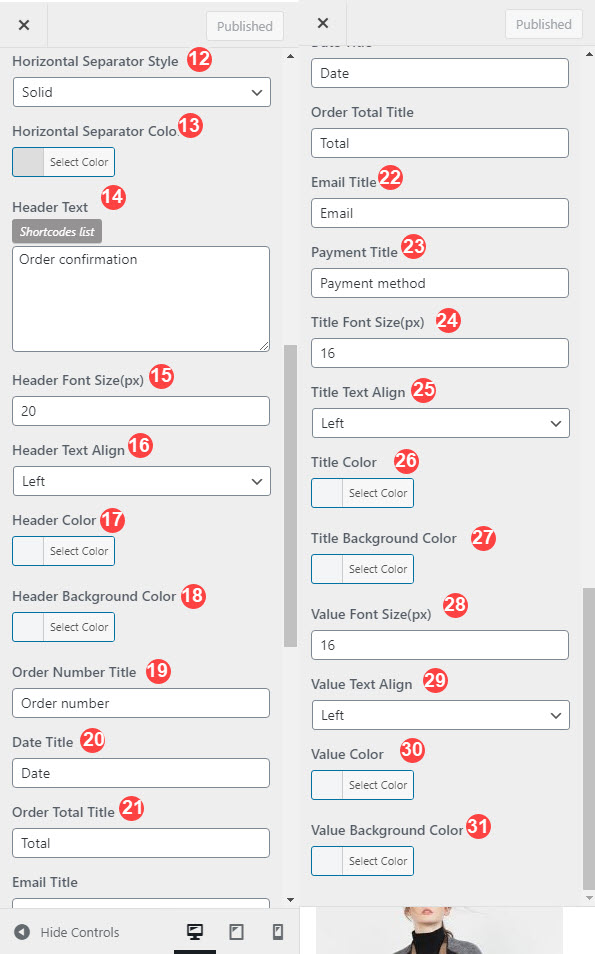
14. Header text: Insert or change the header text as you want, you can use the available shortcode for the header text.

15,16,17,18: Set up the Font-size, Text Alignment, Color, Background Color for the header.

19,20,21,22,23: Set up the title for the order number, date, total, email, payment method.

24,25,26,27: Set up the font-size, text alignment and color, background color for the titles.

29,30,31: Set up the text alignment, color, background color for the values.

Customer Information

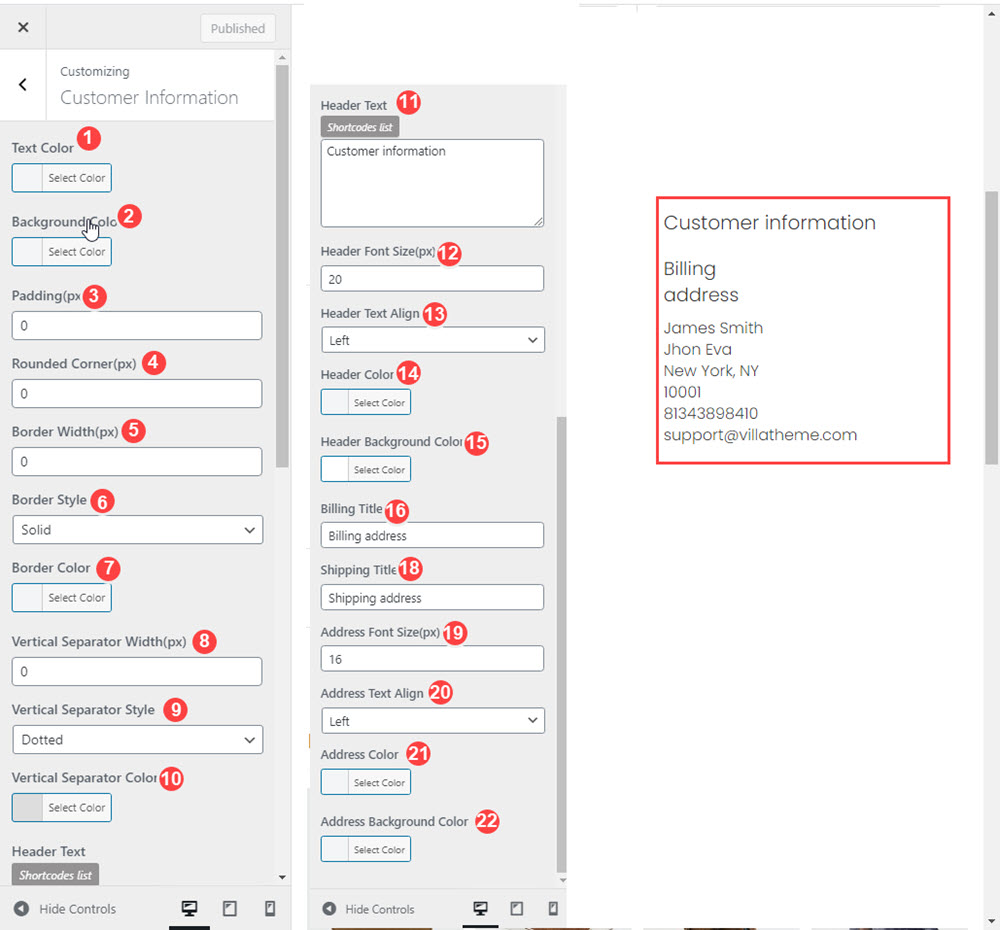
1,2: Set up the text and background color of the Customer information.

3. Padding (px): Set up the padding of Customer information.

4,5 Round Corner (px) and Border width (px):  Set up the Round Corner and Border width for Customer information

6,7. Border style and Border color: Set up the style and color of the Border.

8,9,10. Vertical Separator Width (px), Style, Color: Set up the width, Style and Color for Vertical Separator.

11. Header text: Insert or change the header text as you want, you can use the available shortcode for the header text – hover over the shortcode and click the icon to copy

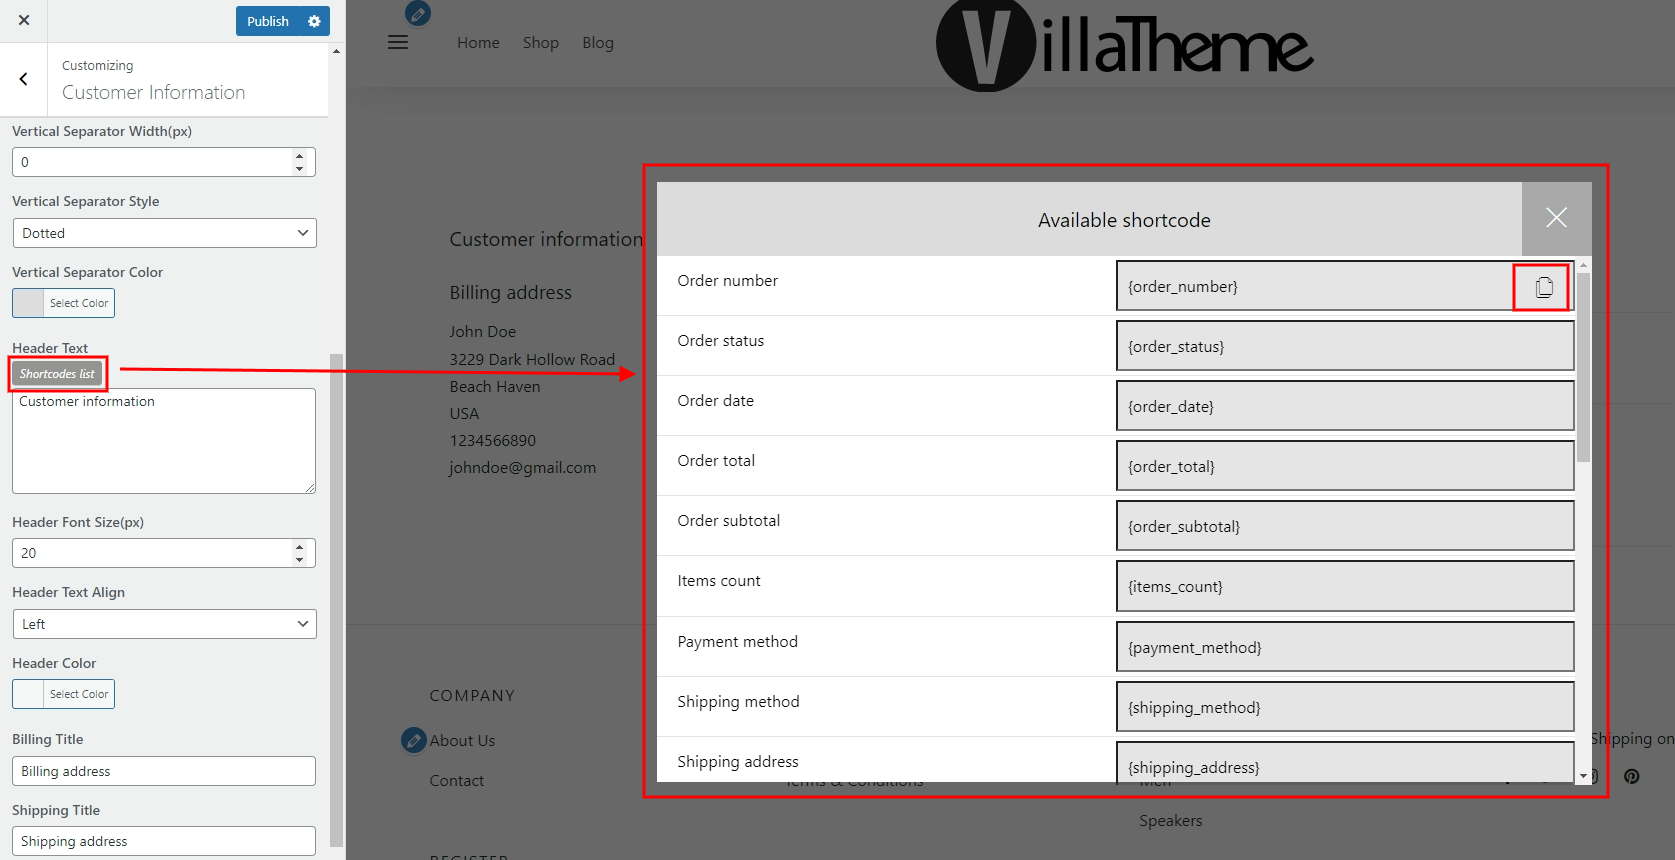
12,13,14,15. Set up the font -size, alignment, color and background color for the header.

16,18: Set up the label for the billing title and shipping title.

19. Address font size: Set up the font size for address.

20. Address text align: Set up the Alignment for Address text.

21,22: Set up the color for address and address background.

Order Details

1,2:  Set up the text and background color of the order details.

3. Padding (px): Set up the padding of Order detail.

4,5. Round Corner (px) and Border width (px):  Set up the Round Corner and Border width for Order detail.

6,7. Border style and Border color: Set up the style and color of the Border.

8,9,10. Horizontal Separator Width (px), Style, Color: Set up the width, Style and Color for Horizontal Separator.

11. Header text: Insert and change the Header text. You can also add the available shortcode as following.  Hover  over  the  shortcode  and  click  the  icon  to  copy

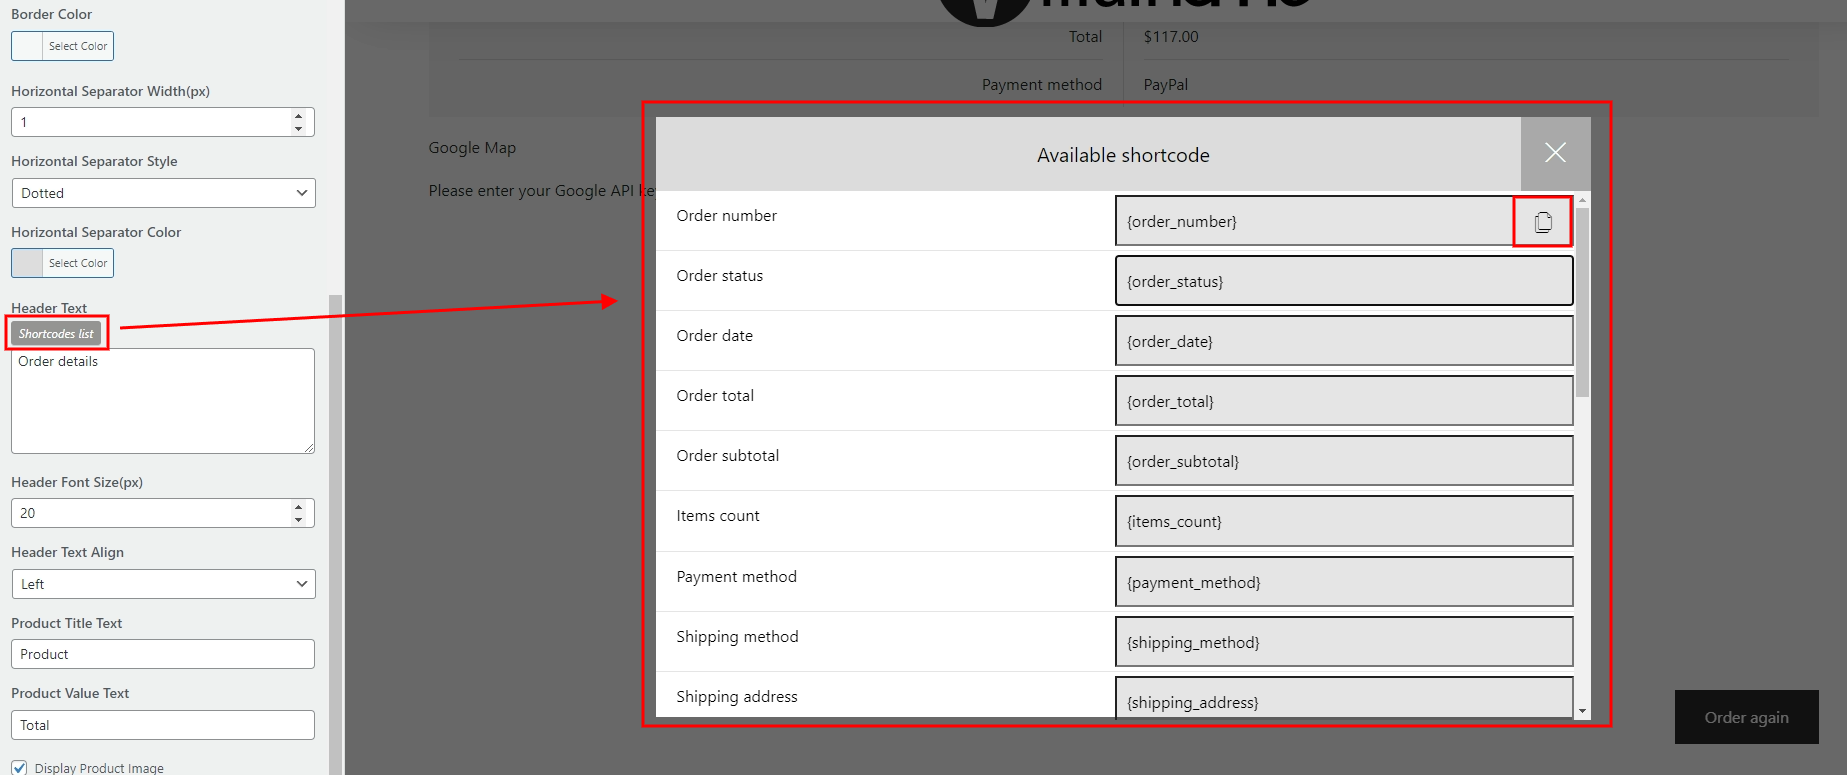
12,13,14,15: Set up the font size, text alignment, color, background color for the header.

16,17: Enter the title for the product text and product value.

18. Check on the box to display the product images in the order details

19. Set up the Product image width (px).

Text Editor

Products

Google and Bing Map

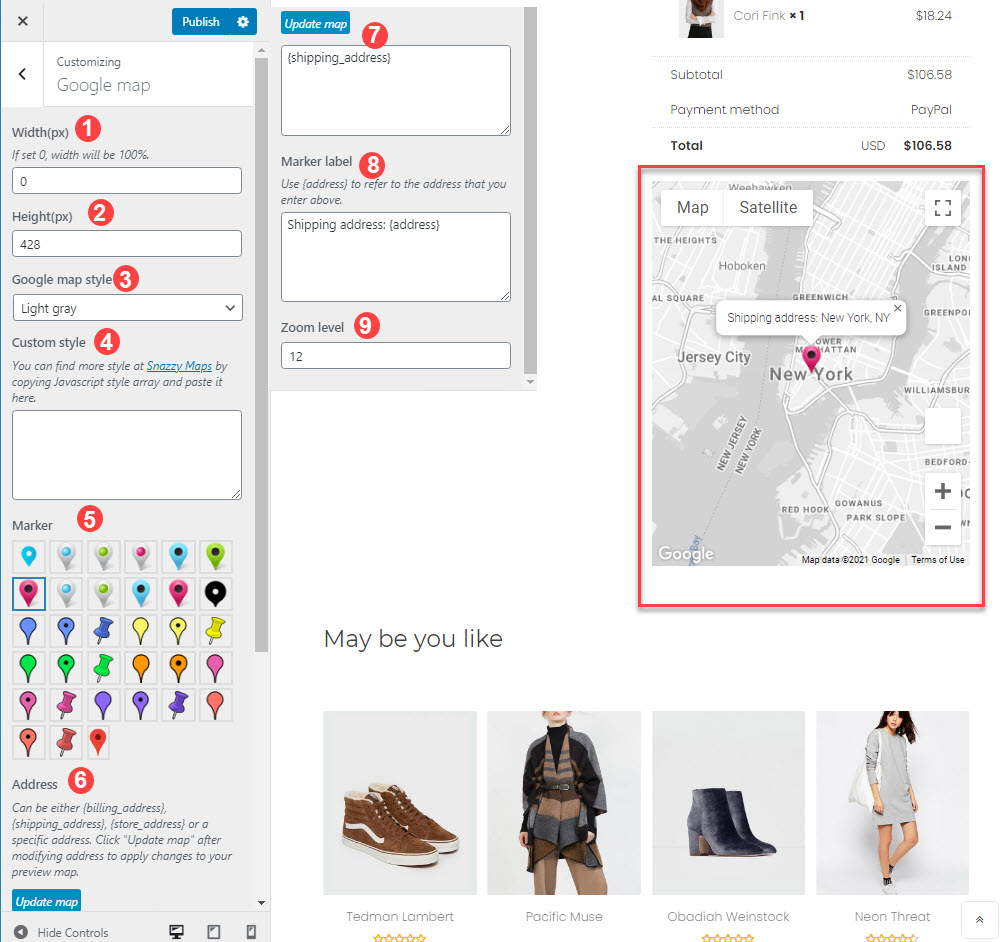
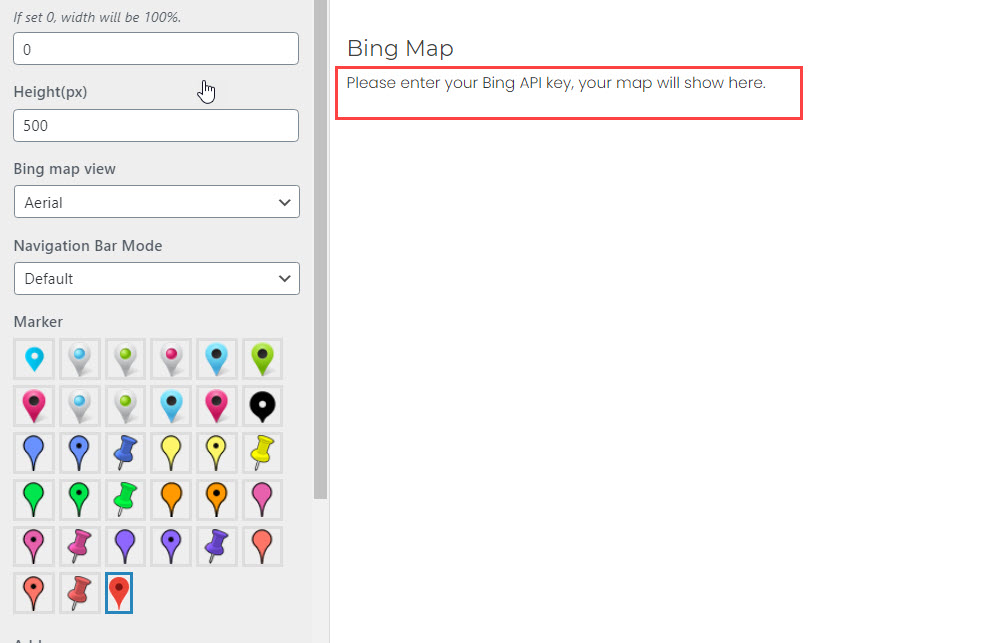
Design the Google map elements:


With Bing Map element, all the designs are same to the Google map, but you need to add the Bing API key first to make it work on your site. You can learn about the way of getting a Bing maps key here 

Social Media

  • Currently, the plugin supports showing social media and link to your social page
  • Social icons supported: TikTok, Facebook, Twitter, Pinterest, Instagram, Dribbble, Tumblr, Google Plus, VKontakte, Linkedin, and Youtube
  • Add URL to make the icon show up
  • Fill custom message and customize with other options


Plugin Author Compatible
Gravity Form Gravity Forms
WooCommerce Email Template Customizer VillaTheme Fully
WPML OnTheGoSystems Fully
Polylang WP SYNTEX Fully

Extra Information


Thank you for your attention!

If you have any question, please create a topic at our FORUM, we will support within 24 hours.