Cart All In One for WooCommerce


Created: 06/2019

Latest updated: 10/2023 – Updated version: 1.1.1

By: VillaTheme

Thank you for purchasing our plugin. If you have any questions that are beyond the scope of this documentation, please feel free to request support at our Support Forum. Thanks so much!  

One Click Checkout WooCommerce and boost your sales with WooCommerce Cart All in One plugin is intended to help customers fulfill their orders with a single click. One Click Checkout WooCommerce saves customers time by checking out directly on the sidebar cart, bypassing the cart page. Customers are not distracted in the ordering process. When a customer registers, One Click Checkout WooCommerce saves all of their important and relevant information. This also aids in the elimination of repetitive manual data entry. You will be surprised at how sales and revenues increase to take advantage of this plugin using the one Click Checkout WooCommerce technique.

WooCommerce Cart All In One Plugin is a powerful extension that helps to innovate the functions of the Cart on the WooCommerce Store. The plugin also provides users with many useful tools to design all the elements relating such as Sidebar Cart, Menu Cart, Sticky Add To Cart button, Checkout on Sidebar Cart, one click checkout WooCommerce, which will make your WooCommerce Store work more effectively.

THE PLUGIN FEATURES

SIDEBAR CART

Display Sidebar cart pop-up with all features of the cart page. Customers can add coupons, select quantity, remove items, go to the checkout page directly from the sidebar cart with just one click checkout WooCommerce. This option helps to reduce the checkout time and increase the conversion rate of your store.

  • Sidebar cart icon: display a small sidebar cart icon at the corner of the screen. Let the customer know how many products they have in their cart. And allow them to open the sidebar car pop-up.
  • Sidebar cart pop-up: the sidebar cart pop-up appear when a customer adds a product to the cart or click on the sidebar cart icon. The pop-up allows them to view their cart, use coupons or go to the check-out page directly.
  • Product information: the sidebar cart pop-up displays the information about products in the customer’s cart including product name, product image, price, quantity.
  • Change quantity: customers can change the quantity of each product directly in their cart.
  • Remove Product: a remove button appear next to each product name, allowing the customer to remove that product from their cart.
  • Cart Subtotal: display the subtotal amount, this amount does not include tax, shipping… and be the same as the subtotal amount on your cart page.
  • Cart total: display the cart total amount.
  • Update Cart button: when customers change the product quantity in their cart, the update button allows them to update the cart total amount.
  • Use Coupon: Coupons can be applied on the sidebar cart pop-up. If the coupon is added successfully, the cart total amount will be reduced and the plugin will display a successful message. If the coupon can not be used, the plugin will display an unsuccessful message with the reason.
  • Checkout: a checkout button allows customers to directly one click checkout WooCommerce if they decide to purchase your items.
  • View Cart: go to the cart page directly with the View Cart button.
  • Related products: the related product option allows to display of related products at the bottom of the sidebar cart. You can choose to display the best-selling products, recently viewed products, or top-rated products.
  • Assign page: choosing the pages which display the sidebar cart.

MENU CART

The plugin adds a cart icon to the menus. It allows the customer to view the cart by hovering their mouse on the menu bar.

  • Menu Cart icon: the plugin will display a cart icon on selected menus. The icon will display the number of items in the cart.
  • Dropdown cart: display cart dropdown when customers hover their mouse over the menu cart icon. The dropdown display information about products, variation, image, quantity, subtotal.

AJAX ADD TO CART

The AJAX Add to Cart option allows customers to add products to the cart from single product pages or quick view pop-ups without reloading the page. Besides that, the user can choose the products which are not to be applied to ajax add them to the cart.

ADD TO CART FOR VARIABLE PRODUCT

The plugin offers a custom Add to Cart button for the variable product. The customers can select variations and add the product to the cart in archive pages without going to the single product page.

  • Select option pop-up: in archive pages, when a customer clicks on the add to cart button of a variable product, a pop-up will appear allowing them to select the product variations. With the variation, pop-up customers can select product variations, quantity and then add the product to the cart.
  • Change the add to cart button label: change the label of the add to cart button to “select options” or any text you want. This option applies to variable products only.

STICKY ADD TO CART BUTTON

The plugin can display the Sticky add to Cart on single pages which helps to increase the rate of adding products to the cart from customers because Customers can add products without scrolling the bar to find the add to cart button.  Moreover, there are options for excluding products or categories from showing the Sticky add to Cart.

RECENTLY VIEWED PRODUCTS

The plugin has an option for adding recently views products to the WooCommerce stores to remind customers about what they are interested in and helps them to buy the items they want quickly. Recently viewed products can add to the single product page or anywhere with the shortcode.

ONE CLICK CHECKOUT WOOCOMMERCE ON THE SIDEBAR CART

With the plugin, Checkout steps are integrated into Sidebar Cart. Customers can checkout directly on the sidebar cart without going to the checkout page. The one click checkout WooCommerce feature will encourage the customers to complete their orders quickly and boost your sales.

DESIGN

The plugin allows you to design the front-end of the sidebar cart,  menu cart and Sticky add to Cart button to match with your website. The designs can be visible in the settings area before publishing.

Sidebar Cart

  • 2 styles: there are 2 sidebar cart styles full height and pop-up.
  • 4 position: you can put the sidebar cart in 4 positions.
  • 8 styles of Sidebar trigger Event
  • 12 loading type and change the color loading bar
  • Automatically open sidebar cart when adding products to the cart.
  • Open the sidebar cart when adding products to the cart.
  • Add to cart animation: display an animation of the product “fly” to cart when clicking the add to cart button.
  • Header: change background change, title, title color, apply coupon button color in the header area.
  • Product list: background color, product image radius, product title color, remove icon color. Change the title color when hovering the mouse on the product.
  • Footer: change the background color, checkout button text, checkout button color, view cart button text, view cart button color, cart total text color in the footer area.

Sidebar Cart icon

  • 5 front-end styles: The styles of sidebar icons are designed creatively to have more choices for users.
  • 45 cart icons: There are many cart icon types from simple to eye-catching to suitable with many styles.
  • Customize the size of the cart icon: Change the Sidebar cart icon size with the adjusting ruler.
  • Customize the position of the cart icon: Choose the positions for the sidebar cart icon on the site by the Sidebar Cart Horizontal and Sidebar Cart Vertical.
  • Shadow for the box: Create the box-shadow to make it more impressed
  • Color Settings: Easily set the color of sidebar cart icon, background,  product counter, Border Radius. The users can choose the colors from the color picker or enter the color hex.
  • Product counter type: Display on the sidebar cart icon one of the information: Cart item count; Product count; Cart subtotal.

Menu Cart

  • Navigation page: choose to redirect to the cart page or checkout page when clicking on the menu cart icon.
  • Show content: display the content of the cart when hover mouse on the menu cart icon.
  • 45 cart icons for you to select.
  • Change the color of the cart icon and cart hover color.
  • Cart icon text: choose to display product quantity, total price, or both quantity and total price on the cart menu.
  • Choose to show the subtotal or total price on the menu cart
  • Change the text color of the menu cart.

Sticky Add To Cart Button

  • Select Product to Preview: Help user design sticky add to Cart button easily and effectively
  • Templates: There are four templates of sticky add to cart buttons to choose
  • Positions: Set the positions for the sticky add to Cart button.
  • Display of Product ratings and Product Quantity.
  • Set up the colors by color picker of text, background, icon…
  • Adjust the Border radius, image width, size of buttons…

Checkout area on Sidebar Cart – One click checkout WooCommerce

  • Customize the steps of checkout: The plugin can convert all checkout steps to the sidebar Cart. It helps the Customer to save time to one click checkout WooCommerce without going to the check-out page.
  • Change the title of steps: Change the title of check-out steps to be suitable for the site.
  • Choose the icons available on checkout area on sidebar Cart: There are many available icons with different styles to choose
  • Set up the color for background, icon, button, and border-radius: The picker color and radius adjusting rules help to design the checkout out area easily and quickly.
  • The plugin is now compatible with WooCommerce Stripe Payment Gateway, WooCommerce Square, WooCommerce PayPal Checkout Payment Gateway, Elementor menu cart.


Required: 

  1. WordPress 6.0+
  2. PHP 7.4+
  3. WooCommerce 7.0+


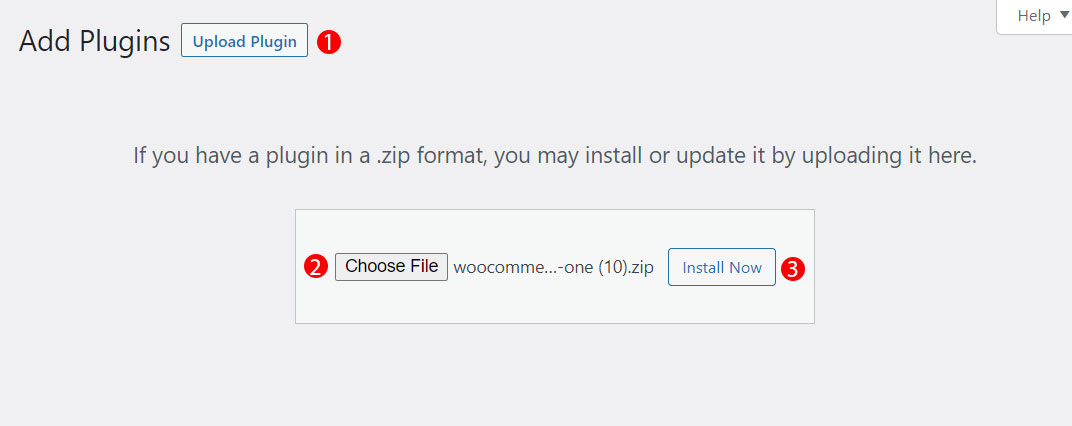
Go Dashboard/ Plugins/ Add New and install the plugin using the installable zip file.

Guiding video on how to install and set up:


After successfully installing the plugin, go to Dashboard/ Cart All In One to config its settings.

The plugin offers features: the sidebar cart, the menu cart, AJAX Add to Cart button and then select variation pop-up for variable products.

You just need to enable these options to use, assign the pages you want to display sidebar cart.


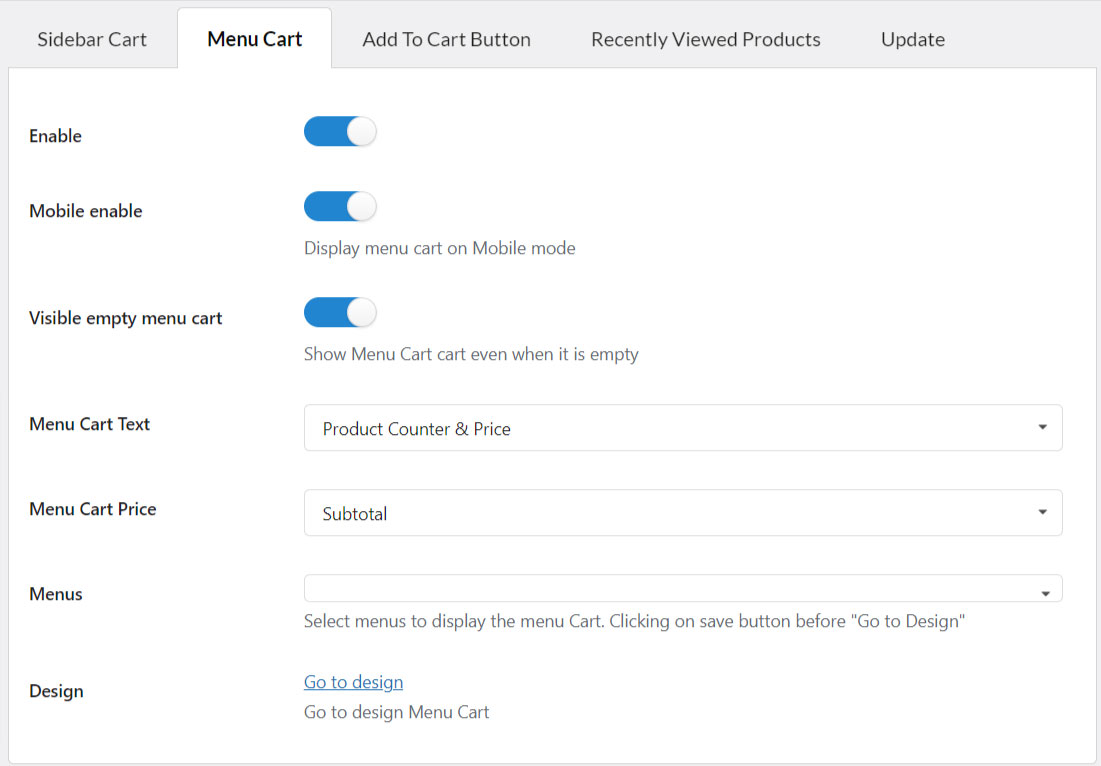
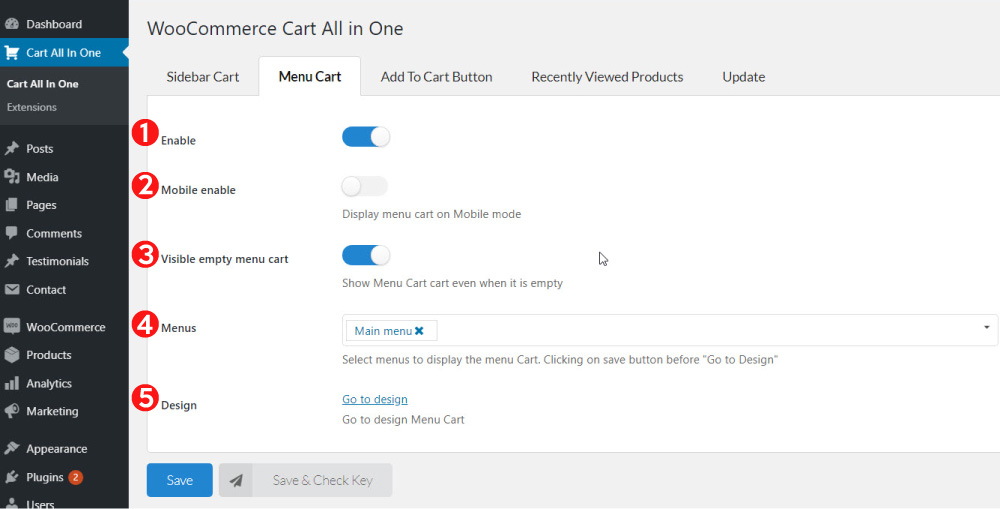
In Menu Cart Tab, enable it and select the menu to display the Menu Cart

In Add To Cart Button Tab, do all settings relating to AJAX add to Cart, Add to Cart for variable products and Sticky Add to Cart on a single product page.

Go to design to customize all the designs relating to Sidebar Cart, Sidebar Cart Icon, Sidebar Cart header and footer, Sidebar Cart List Products, Menu Cart, Sticky Add to Cart Button. To get more detail, please read the “How does it work” section.

Sidebar Cart

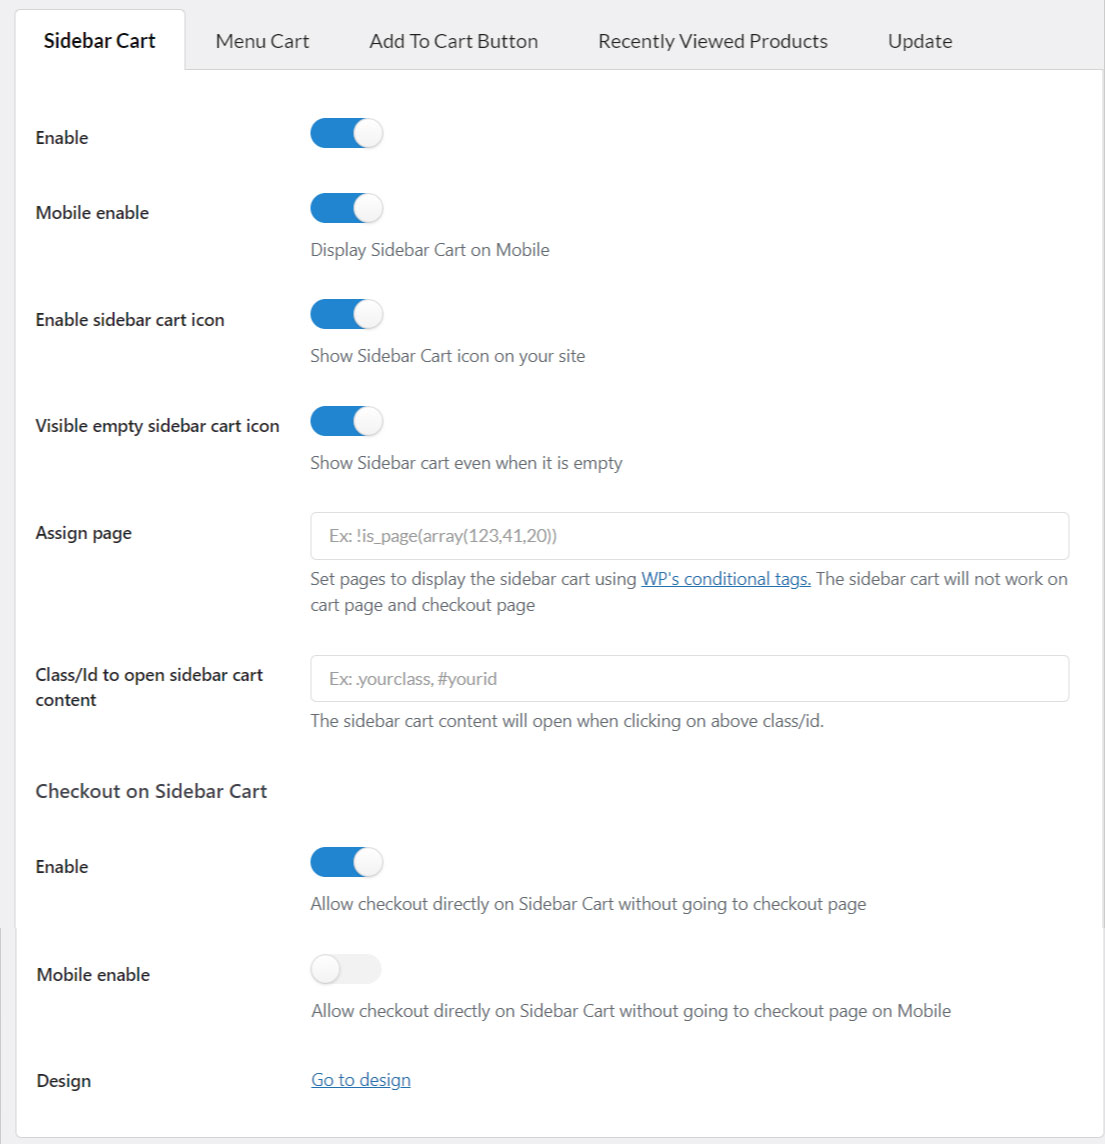
You can config the settings of the side cart at Dashboard/ Cart All In One/ Sidebar Cart

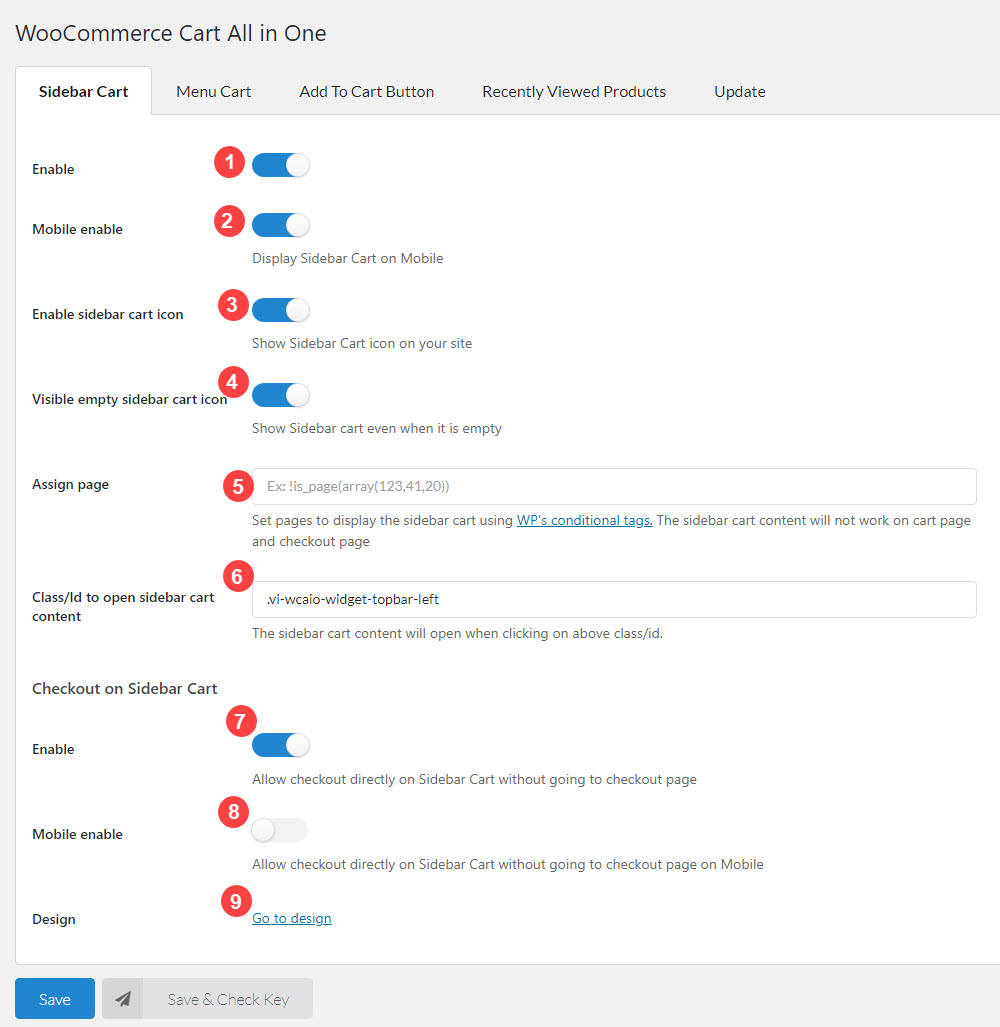
1. Enable the sidebar cart on front-end.

2. Enable it to display sidebar cart on Mobile

3. Enable sidebar cart icon: Enable the sidebar cart icon on your site

4. Visible empty sidebar cart icon: this option allows you to choose if you want to display the sidebar cart icon when the cart is empty.

5. Assign page: This option allows you to assign the pages which display the Sidebar Cart.

Important note:

To handle WP’s Conditional Tags, this plugin uses eval() which is very dangerous because it allows the execution of arbitrary PHP code. Therefore, please only fill this field with proper conditional tags which are validated and/or provided by trusted developers.

6. Class/ID to open the sidebar cart content: Insert the class or ID of the items/icons you want to click on it and display sidebar cart on your site, use the structure  .class or #id,  Example for the class:  .elementor-element-8f30976

7. Design: Clicking on “go to design” will navigate to a page that helps you to design the Sidebar Cart. Visit this documentation for details


Menu Cart

  1. Enable the Menu cart on front-end. This option will add a menu cart to your selected menus.
  2. Mobile enable: Enable this option to display menu cart to your selected menu on the mobile
  3. Visible empty menu cart: enable it to display the menu cart even when it is empty
  4. Menus: choose menus which you want to display the menu cart, all your menus will appear here to choose.  Remeber to click on save button before going to design to ensure all your settings on design page are also updated to the  menu you assigned.
  5. Go to design: Click on the link to go to design page for  designing the menu cart

The options for designing Menu Cart:

  1. Navigation Page: Choose the Cart page and checkout page to redirect when customers click on Menu Cart
  2.  Show content cart:  enable it to show the content of cart in menu cart.
  3. Cart icon type: Choose the icon for Menu cart
  4. Cart icon color: Select color for the cart icon
  5. Cart icon hover color: Select the color for cart icon when hovering mouse over
  6. Menu Cart Text: Choose the type of text next to cart icon. You can choose one of three types: Price, product counter, product counter and price
  7. Menu Cart price: Choose the price displayed on Menu Cart: Total or Subtotal
  8. Text  color: Select color for the text of Menu cart
  9. Text Color hover: Select color for the text of Menu cart when hovering mouse over

Add to Cart Button

BUTTON EFFECT WHEN HOVER

This add an effect to the “Add to cart” button on both product page and product list, when you hover over them.

The supported types are:

  • Jump & Shake
  • Shake Horizontal
  • Shake Vertical
  • Gentle Tilt & Move
  • None (no affect)


AJAX ADD TO CART

  1. Enable AJAX Add to Cart button. This option allows your customers to add products to cart in product pages, pop-up… without reloading the page.
  2. Exclude products: Add the product which are not applied ajax add to cart.


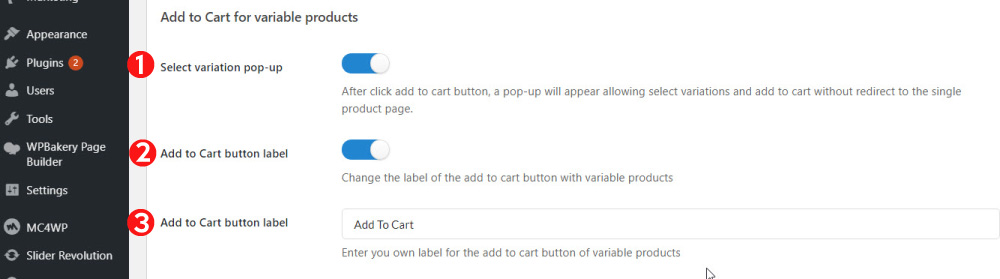
ADD TO CART FOR VARIABLE PRODUCTS

  1. Select variation pop-up: This option will display a “select variation pop-up” when customers add a variable product to cart in the shop, categories pages.
  2. Add to cart label: Enable this option to edit the add to cart button label of variable products.
  3. Add to Cart button label: Change the label of add to cart button with variable products. Write your own label “select variations” “select options”…

STICKY ADD TO CART ON SINGLE PRODUCT PAGE

  1. Enable sticky add to cart on single product page: Enable this to display sticky add to cart on single product page.
  2. Mobile enable: Display sticky add to cart on mobile.
  3. Exclude products: This option allows you to add the products which are not displayed sticky add to cart
  4. Exclude Categories: This option allows you to add the Categories which are not displayed sticky add to cart
  5. Design: Click on the link ” Go to design” to design “Sticky add to Cart”


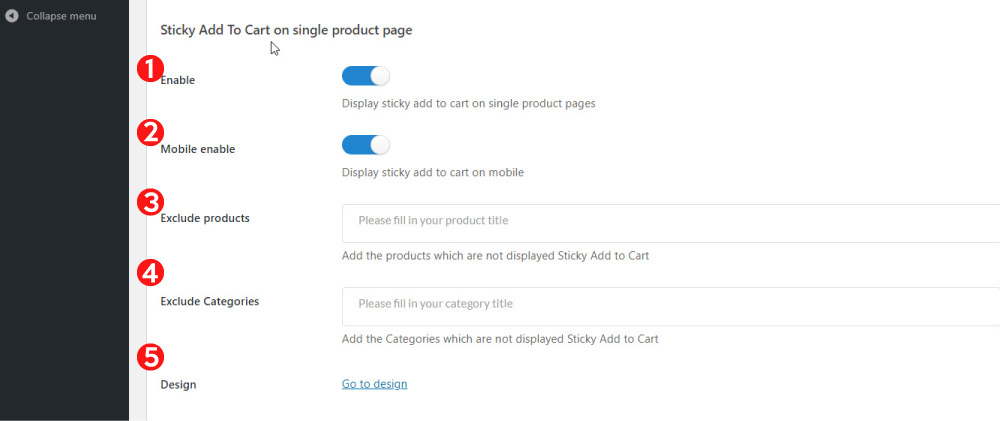
1. Select product to preview: This option allow you to select a product to go with sticky add to cart to preview and do settings.
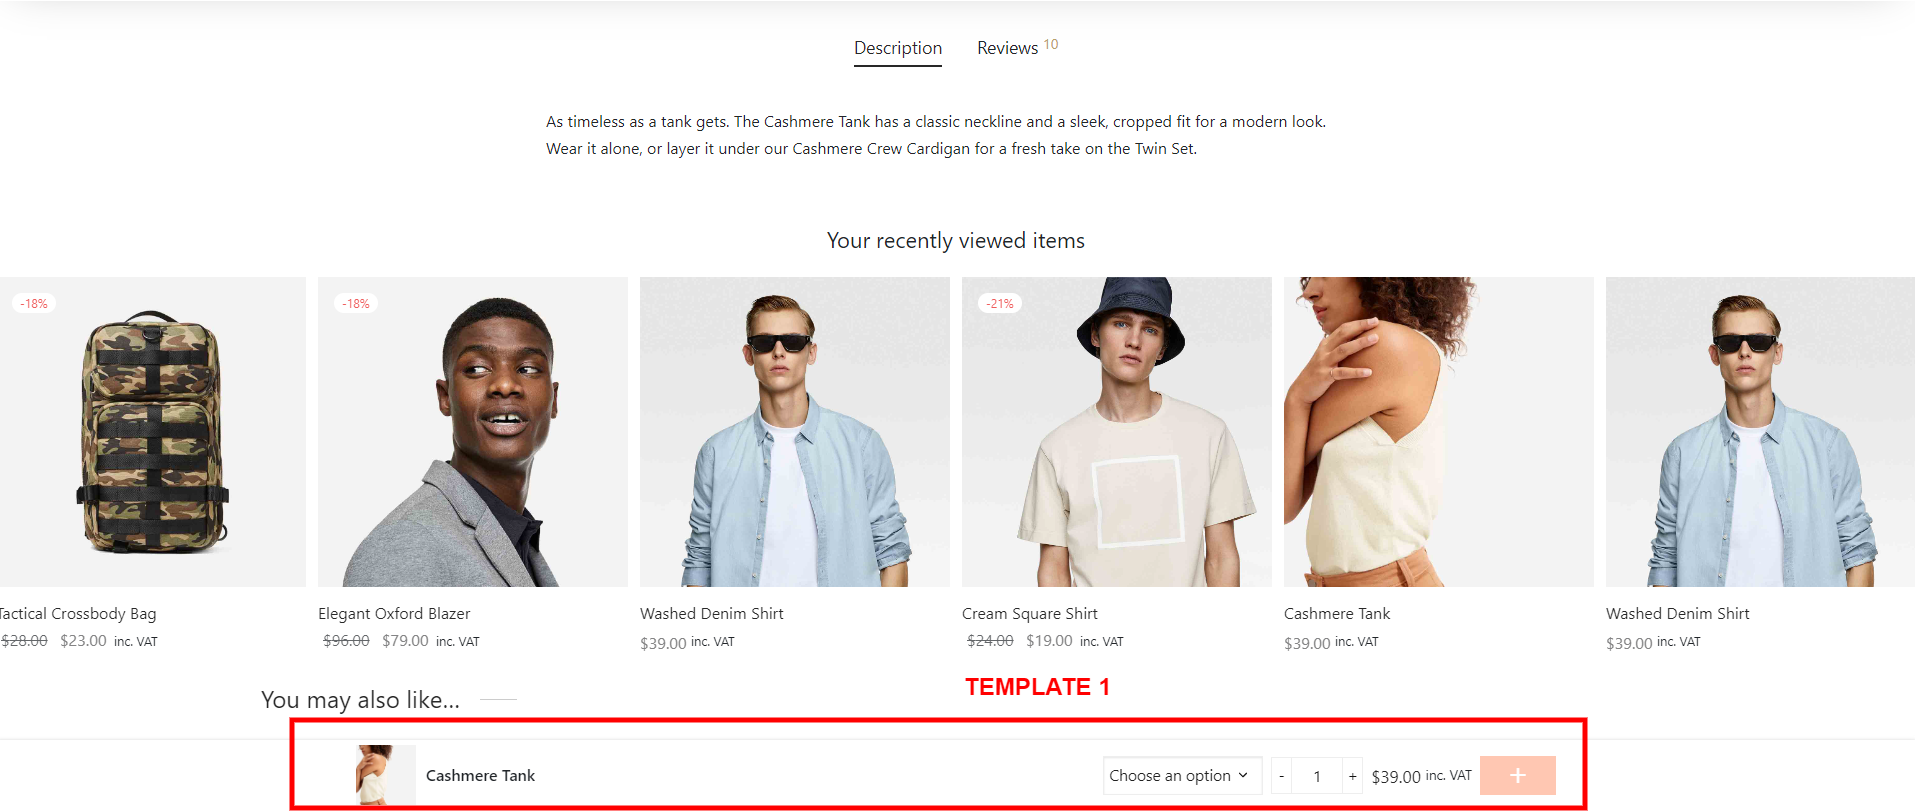
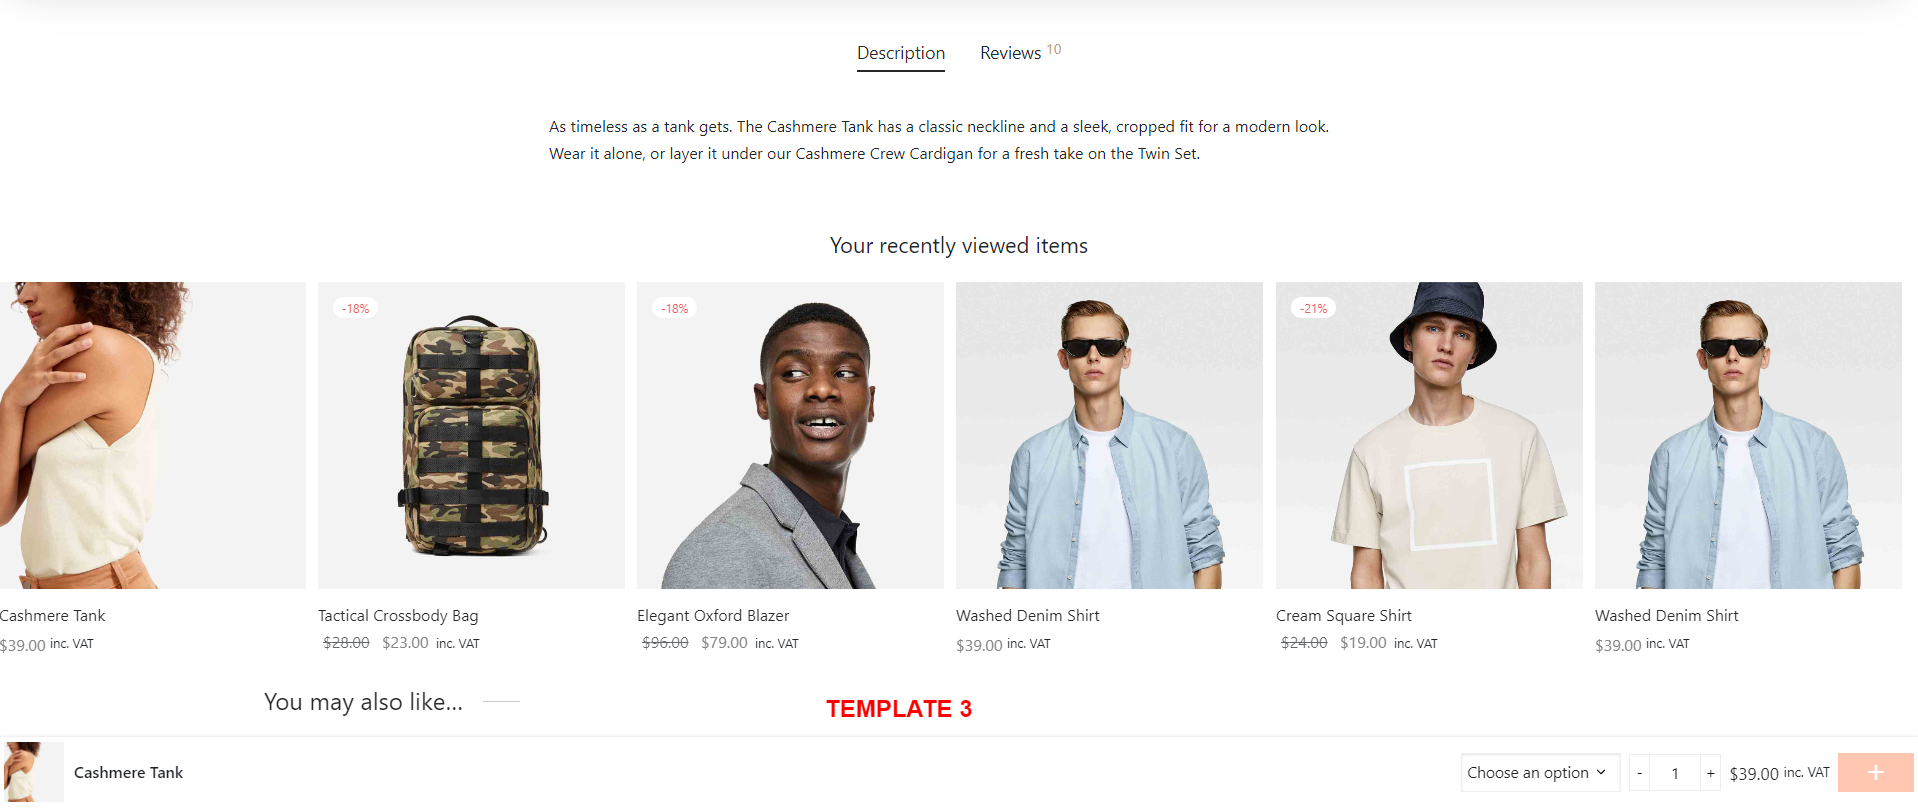
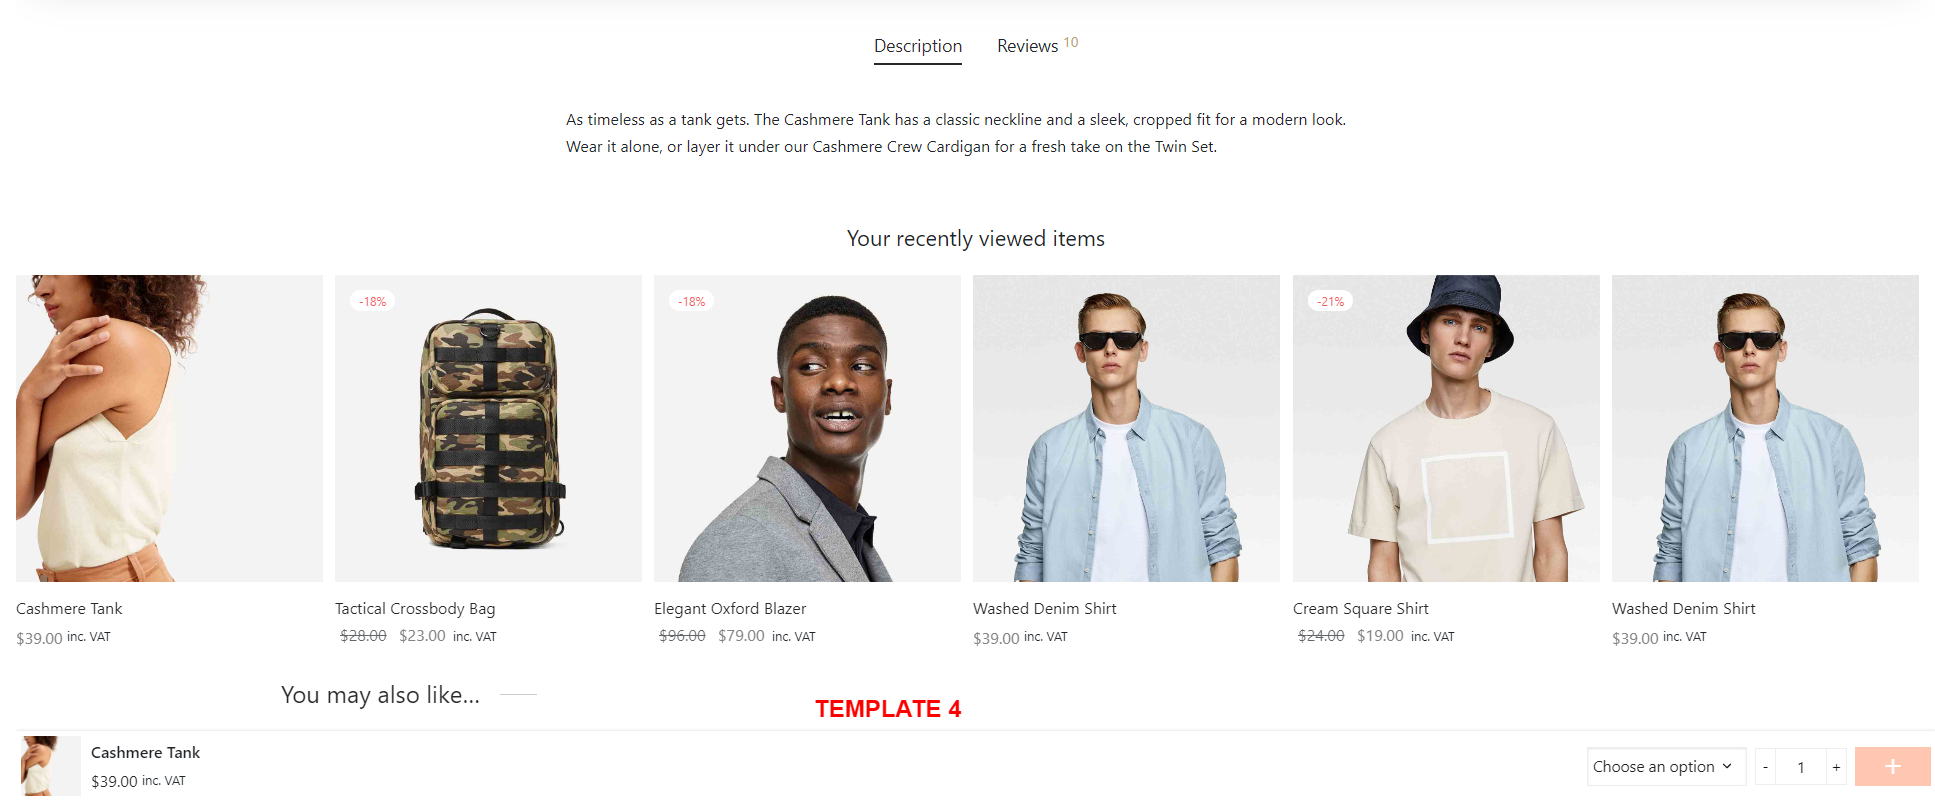
2.Template: There are four templates of sticky add to cart for you to choose

  • Template 1
  • Template 2
  • Template 3
  • Template 4:

3.Position: Choose the position of sticky add to cart on single product page on desktop bottom or top
4. Position on mobile: Choose the position of sticky add to cart on single product page on mobile: bottom or top
5. Box Shadow color: choose the color of shadow  sticky add to cart box
6. Sticky bar background color: Choose the color of sticky bar background
7. Padding: Set the padding for sticky add to cart bar
8. Border Radius: Change the Border radius of sticky add cart barProduct ratings: Enable it to display product rating on sticky add to cart

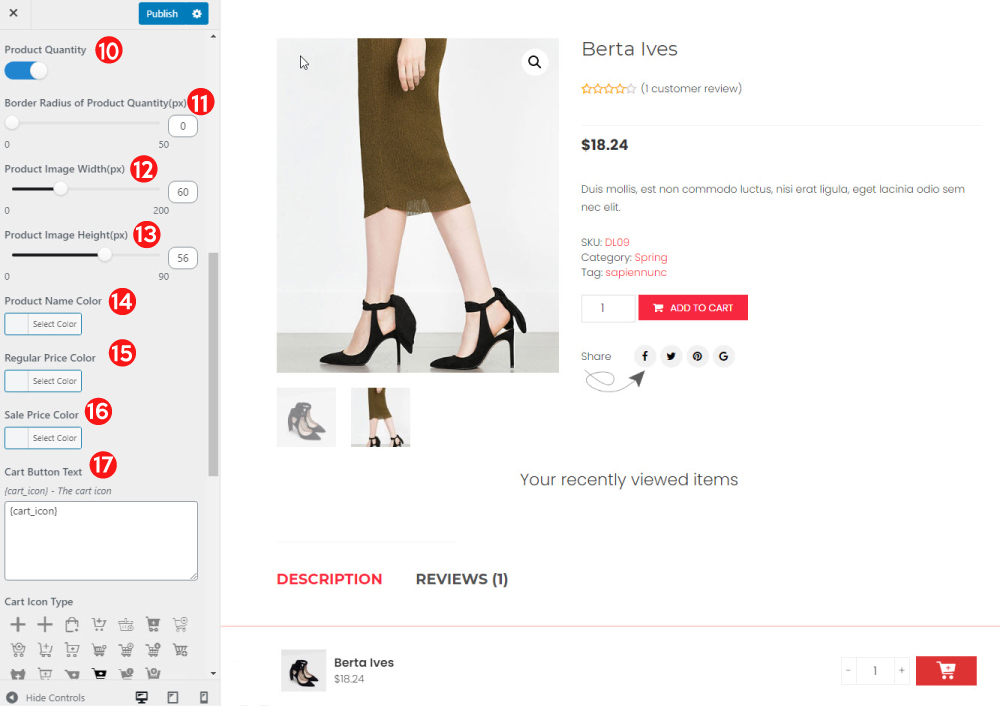
9. Product quantity: Enable it to display product quantity selection on sticky add to cart bar
10. Border Radius of Product Quantity (px):Set the Radius of Product Quantity Border
11. Product image Width (px): Change the product image (width)  on sticky add to cart
12. Product image Height(px): Set the Height of Product image.
13. Product Name Color: Set the Color of Product name
14. Regular Price Color: Set the Color of Regular Price
15. Sale Price Color: Set the Color of Sale Price
16. Cart Button Text: Enter the Cart Button Text, you can set the text as you want.

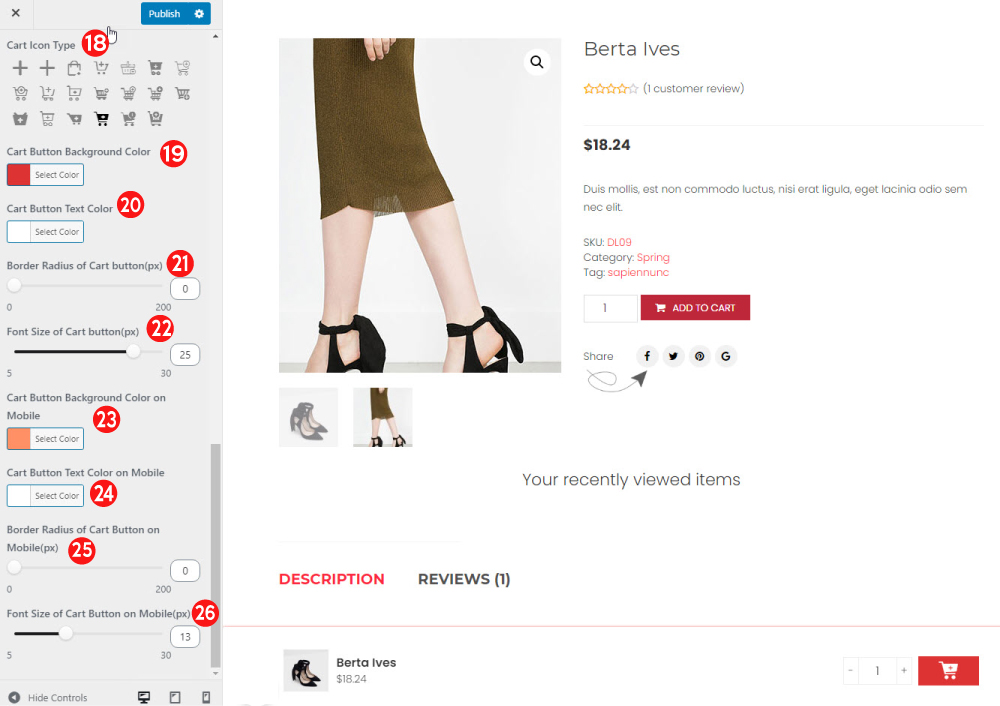
17. Cart icon Type: There are many types of cart icon in sticky add to cart to choose
18. Cart Button Background Color: Set the Color of Cart button Background
19. Cart Button Text Color: Set the Color of Cart button Text
20. Border Radius of Cart Button(px): Set the Radius of Cart button Border
21. Font size of Cart Button(px): Set the font size of Cart Button on sticky add to cart
22. Cart Button Background Color on Moblie: Set the Color of Cart button Background on Mobile
23. Cart Button Text Color on mobile: Set the Color of Cart button Text on mobile
24. Border Radius of Cart Button(px) on mobile: Set the Radius of Cart button Border on mobile
25.Font size of Cart Button(px) on mobile: Set the font size of Cart Button on sticky add to cart on mobile.

Recently Viewed Products

  1.  Shortcode: You can copy and paste the shortcode to any page you want to display the recently viewed products by customers
  2. Enable it to display recently viewed products on single product pages
  3. Mobile enable: Enable it to display recently viewed products on single product pages on mobile
  4. Position on single product page: Choose position of recently previewed products on single product pages. There are three positions to choose: Before and after single product summary
  5. Tilte: You can change the title of recently viewed products
  6. Products limit: Enter the number of products which you want to show. The maximum number of recently viewed products displayed is 15
  7. Number of columns:  The columns of recently viewed products on single product pages.
  8. Infinite loop: Enable it to start over when reaching the end of slide
  9. Number of carousel items that should move on animation: enter the number of items you want to move each time carousel moves on slideshow
  10. Auto play: Enable it to play slideshow automatically
  11. Slideshow speed: You can adjust the speed of slideshow by adding the slideshow speed (milliseconds as you want)
  12. Pause on hover: Enable it to pause the slideshow when customers hover mouse over it

Import/Export Settings

The import/export settings feature allows you to quickly transfer settings from one website to another. By following the steps outlined in this guide, you can easily export your website’s settings, import them to another website, and ensure that the settings are correctly applied.

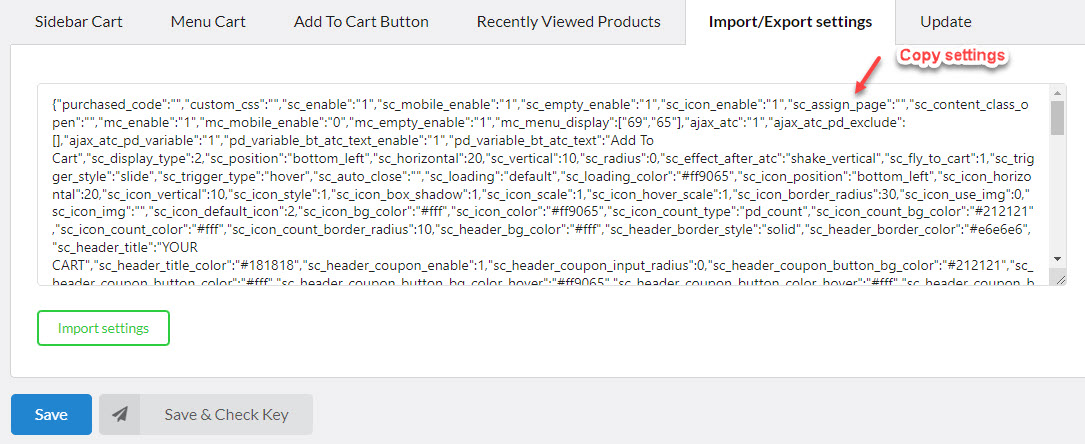
Step 1: Go to Cart All in One > Import/Export settings. Copy the settings from a site.

Step 2: Go to another site > Cart All in One > Import/Export settings. Paste the settings.

Step 3: Click to the Import settings button and save.

Sidebar Cart

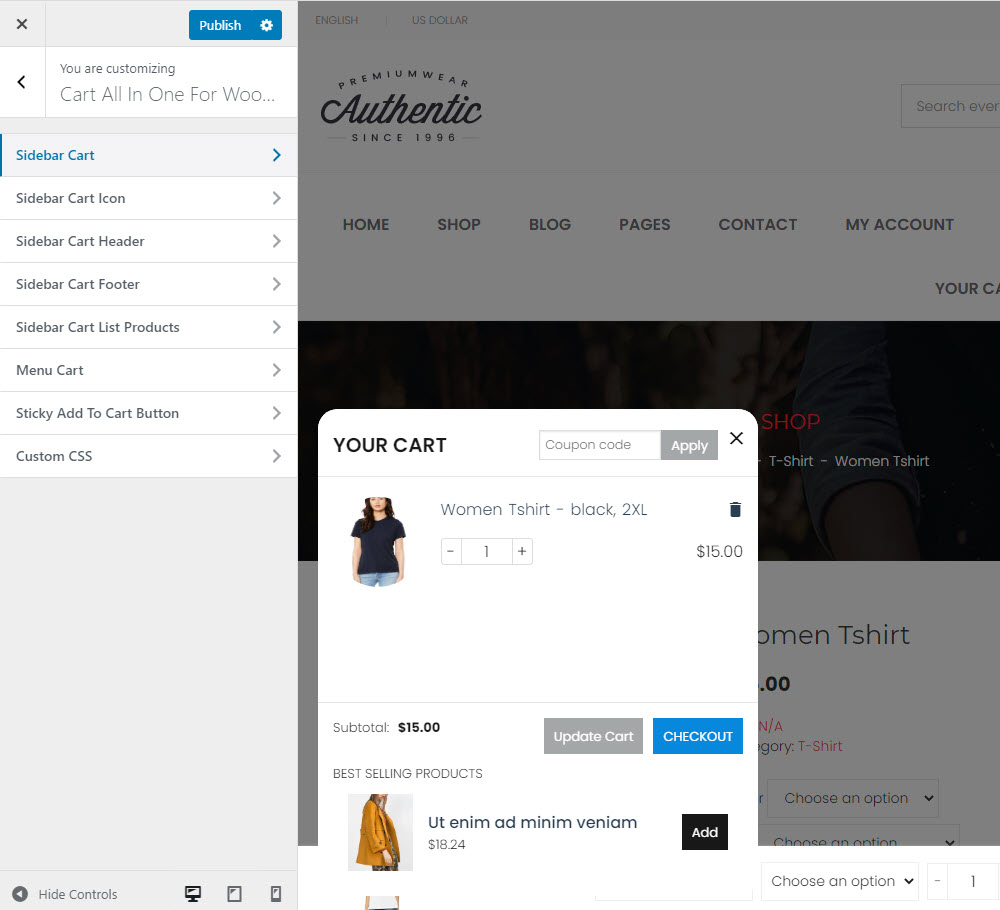
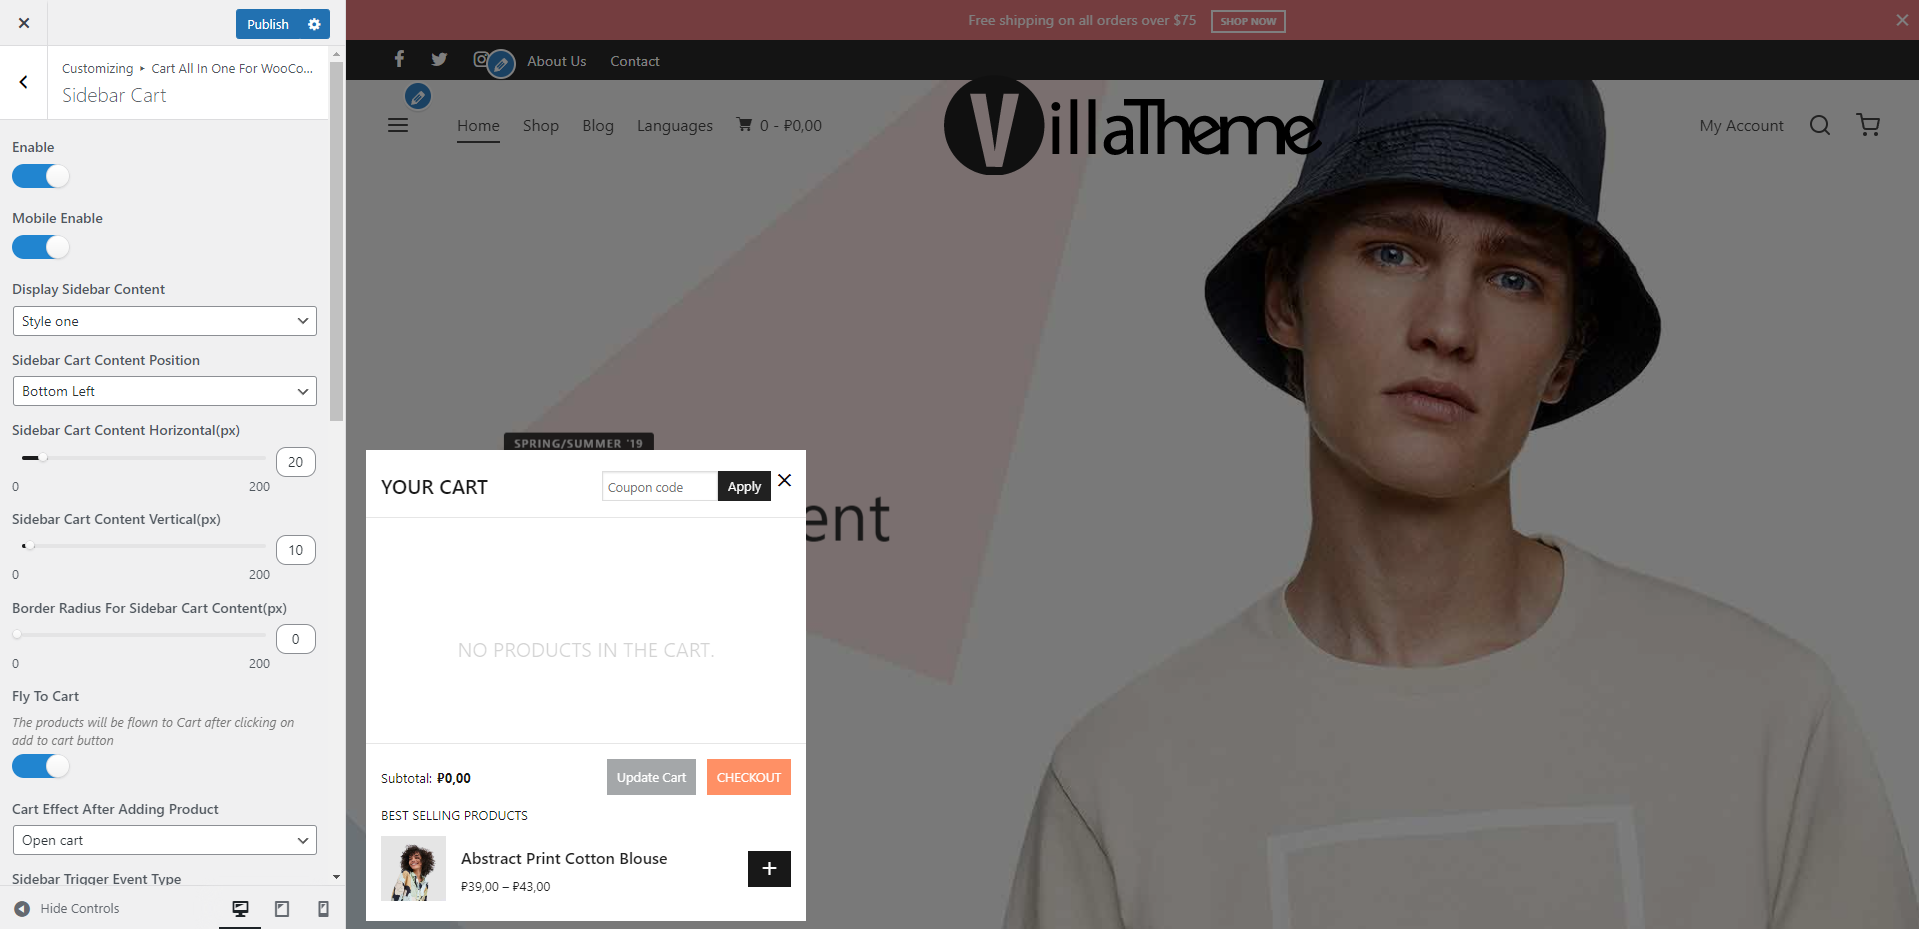
Design settings for Sidebar Cart is in your Customize settings. Go to Dashboard >> Appearance >> Customize >> Cart All In One For WooCommerce >> Sidebar Cart

Or use the option “Go to Design” in Sidebar Cart settings – number (7) in Sidebar Cart setting guide

  • Enable: Enable sidebar cart
  • Mobile Enable: Enable sidebar cart on mobile devices
  • Display Sidebar Content: 2 styles
    • Style one:
    • Style two:
  • Sidebar Cart Content Horizontal(px) (only available with style 1): Adjust Sidebar Cart style 1 horizontally by dragging the range slider
  • Sidebar Cart Content Vertical(px) (only available with style 1): Adjust Sidebar Cart style 1 vertically by dragging the range slider
  • Sidebar Cart Content Position: 4 positions on screen:
    • Top left corner
    • Bottom left corner
    • Top right corner
    • Bottom right corner
  • Border Radius For Sidebar Cart Content(px): Adjust cart border radius of both styles by dragging the range slider
  • Fly To Cart: Enable it to create an effect that make the products fly to the Cart when customers click on add to cart button
  • Cart Effect After Adding Product: Choose the effect of Cart after adding product to the Cart
  • Sidebar Trigger Event Type: The Sidebar Cart content will be shown after click on the Cart icon or hover mouse on it
  • Auto Close Sidebar(seconds): Auto close sidebar after how long (seconds) with no events. Leave blank to not set this feature.
  • Sidebar Trigger Event Style: Choose a style for appearing of Sidebar Cart
  • Loading Type: Choose the type of loading for Sidebar Cart
  • Loading Color: Choose the color of loading


Sidebar Cart icon

1. Enable: To activate sidebar cart icon on the front end.

2. Position: There are 4 positions of cart icon: Top left, top right, bottom left, bottom right.

3. Cart icon horizontal (px): The distance between cart icon and side margin.

4. Cart icon vertical (px): The distance between cart icon and bottom.

5. Cart icon style: available styles of cart icon.


6. Enable Box Shadow: Enable it to display the shadow of sidebar cart icon

7. Sidebar Cart size: You can set the size for sidebar cart. This new size parameter need to be the a ratio compared with original icon size, example: 1.5- It means that the new size will be 1.5 times bigger than the original one.

8. Sidebar Cart size when hovering: You can set the size of sidebar cart size when hovering. This new size parameter need to be the a ratio compared with  icon size when not hovering over.

9. Cart Icon radius (px): Change the radius of Cart icon

10. Use an image for the cart icon

11. Cart icon background


12. Product counter type: Display on the cart icon one of these selections: Product count, cart icon count, cart subtotal.

13. Product counter background color: Set background color for product counter.

14. Product counter color: Set color for product counter.

15. Product counter border radius (px): Set border radius for product counter.


8.Cart  icon Type: There are 45 cart icon types for you to choose.
9.Cart Icon background color: Set the color of Icon background
10. Cart icon color: Set the color of sidebar cart icon.
11.Product counter Background color: Set the color of product counter Background.
12.Product Counter border radius (px):  Set the radius of Product Counter border

Sidebar Cart Header

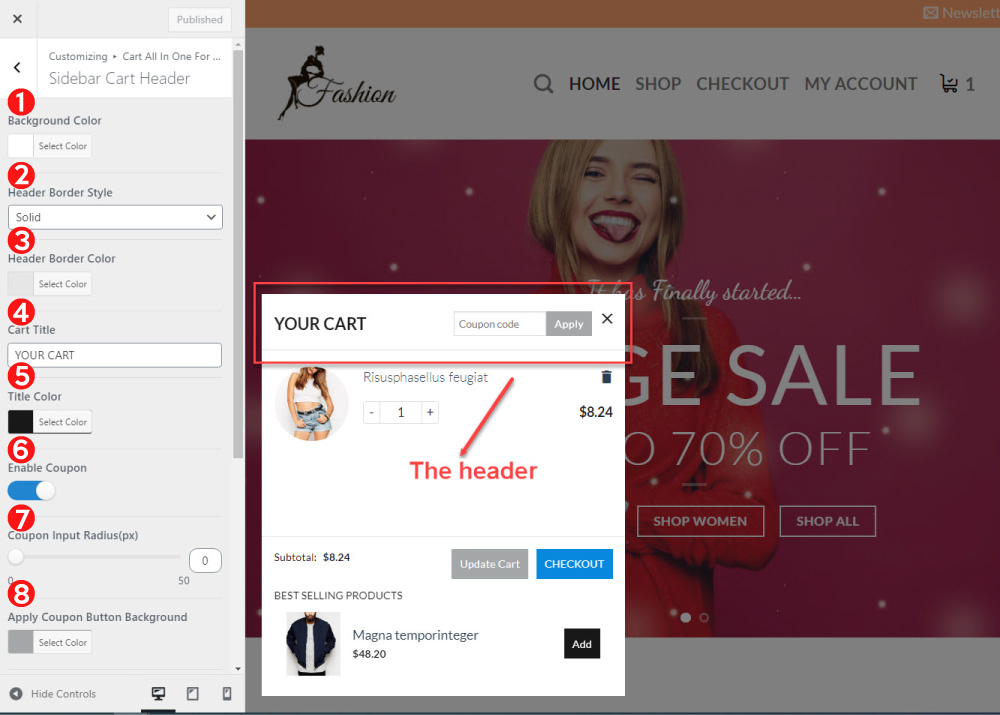
Design Sidebar Cart Header

  1. Background color: set the color of header background.
  2. Header Border Style: Set the style of Header Border. There are four styles: No border, Solid, Dotted, Dashed
  3. Header Border Color: Set the color of header border
  4. Cart Title: Set the title of the Cart on sidebar header
  5. Title color: Set the color of the title on sidebar header
  6. Enable Coupon: Enable this option to allow customers apply the coupon code directly on Sidebar Cart
  7. Coupon Input Radius(px): set the radius of Coupon input
  8. Apply coupon button background color: Set the Color of  apply coupon button background
  9. Apply coupon button hover background color: Set the Color of  apply coupon button background when hovering
  10. Apply coupon button Radius (px): Set the radius of Apply coupon button
  11. Apply Coupon Button Hover Text Color: Set the color of of Apply coupon text when hovering
  12. Apply Coupon Button Radius: Ajust the Button Radius of Apply Coupon Button


Sidebar Cart List Products

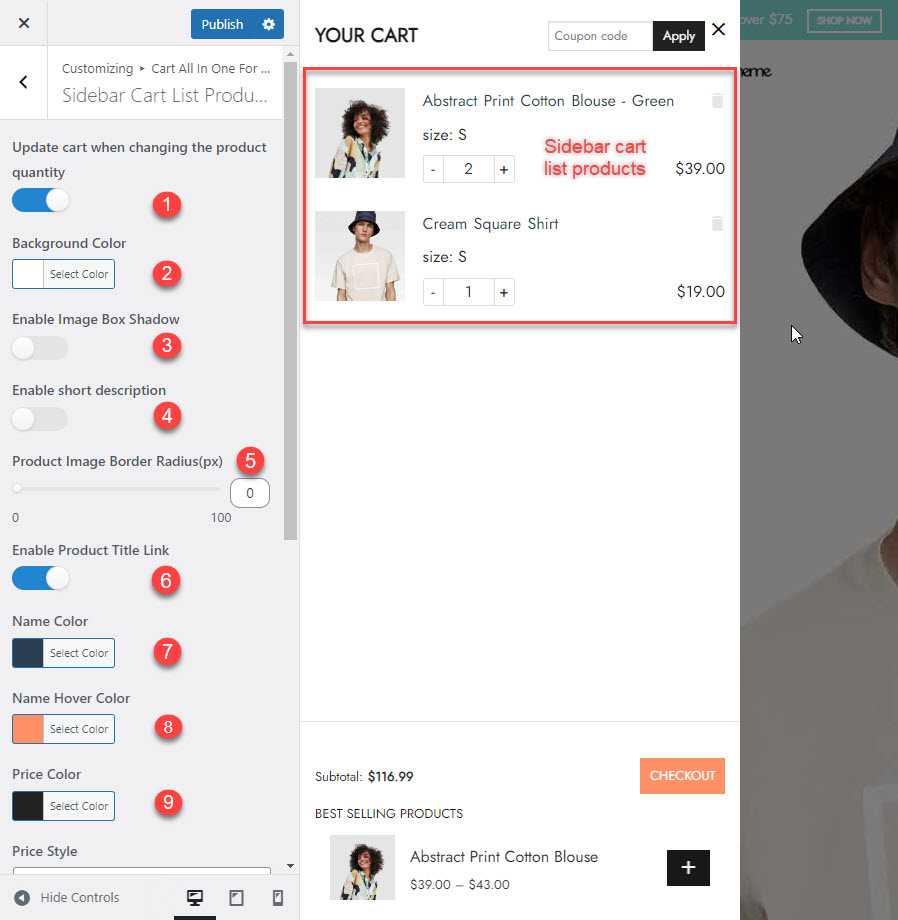
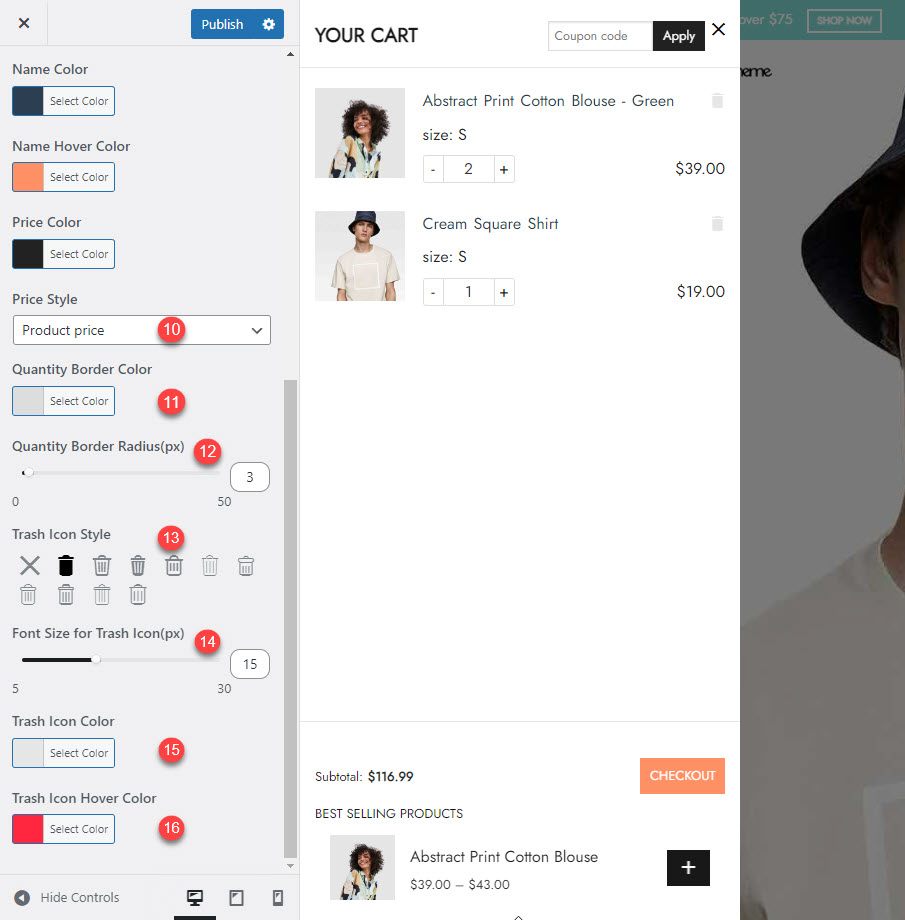
Design the list products on sidebar cart

  1. Update Cart when changing the product quantity: Enable it to update the cart when changing product quantity
  2. Background Color: Set the color of list products background
  3. Enable image Box shadow: Enable it to display the shadow of image box.
  4. Enable short description: Enable to display the short description of the added to cart products
  5. Product image border radius (px): set the border radius of product image
  6. Enable product title link: Provides you with the choice to tag or not to tag the link in the product title for redirection to the product’s single page. By selecting the tag option, clicking on the product title will take you directly to the product’s page and reverse
  7. Name color: Set the color of product title
  8. Name hover color: Set the color of product title when hovering over
  9. Price color: Set the color of price displayed
  10. Price style: Options to display the price style of the selected items in the cart: Product price; Quantity & Price; Product Subtotal
  11. Quantity border color: Set the color of quantity border
  12. Quantity border radius (px): Set the radius of quantity border
  13. Trash icon styles: choose the trash icons.There are 11 trash icons to choose
  14. Font Size for Trash icon: Set the size of Trash icon
  15. Trash icon color: Set color of trash icon
  16. Trash icon hover color: Set color of trash icon when hovering over

Sidebar Cart Footer

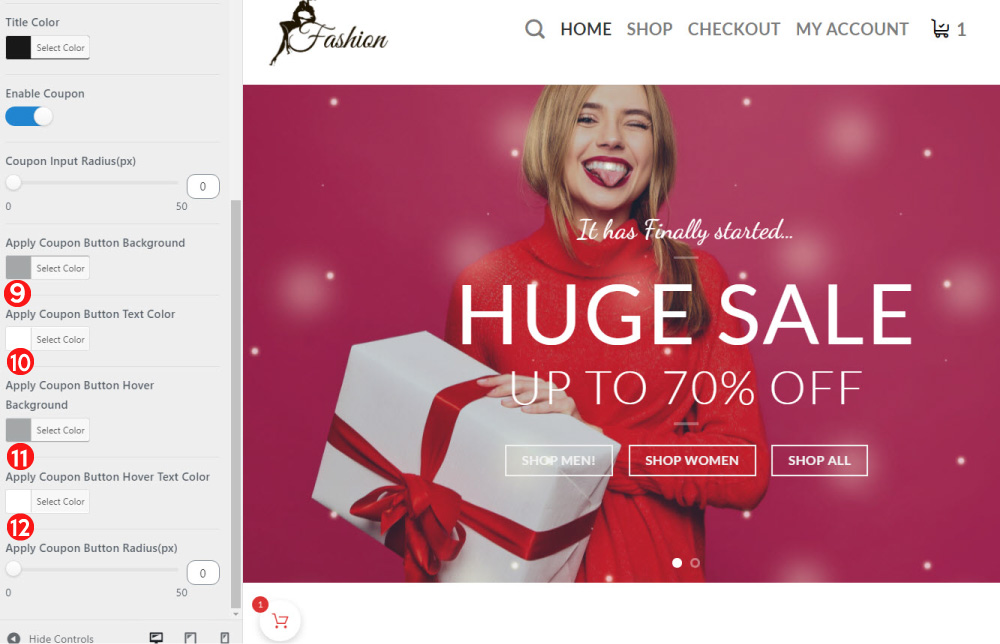
Design Sidebar Cart Footer:

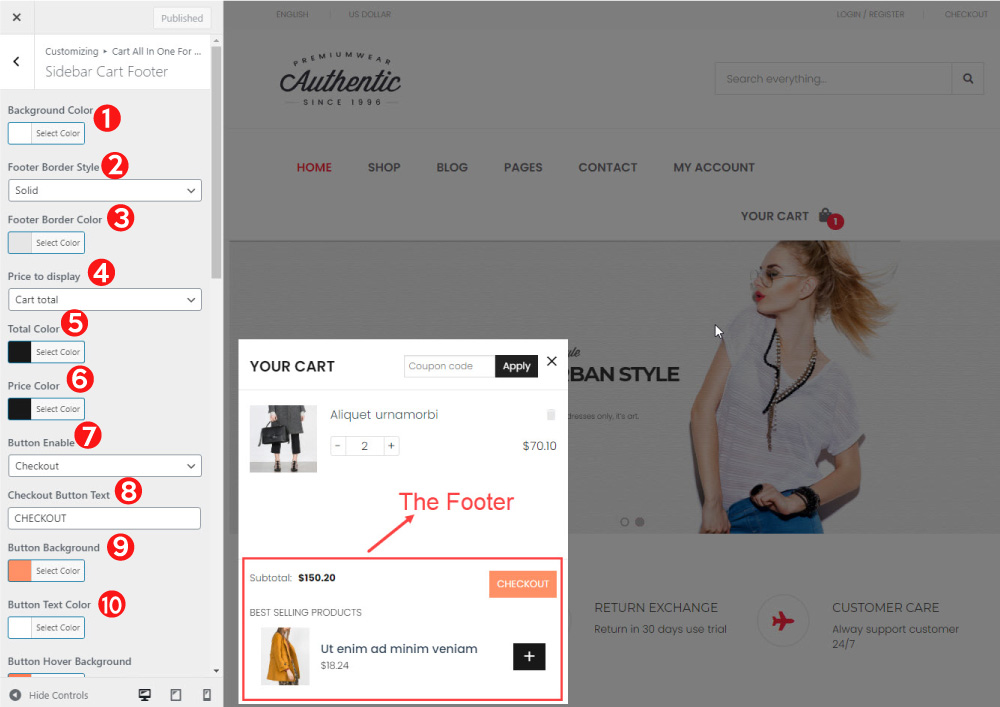
1. Background color: set the color of footer background.
2.Footer Border Style: Set the style of Footer Border. There are four styles: No border, Solid, Dotted, Dashed
3.Footer Border Color: Set the color of Footer border
4.Price to display:  Choose the price to dislay: Total or Subtotal
5. Total Color: Set the color of Total
6. Price Color: Set the color of price
7.Button Enable:  Choose to enable the View cart button or checkout button.
8.Checkout Button Text: You can add the text of checkout button as you want
9.Button background color: set the color of checkout button background
10.Button text color: set the color of checkout button text

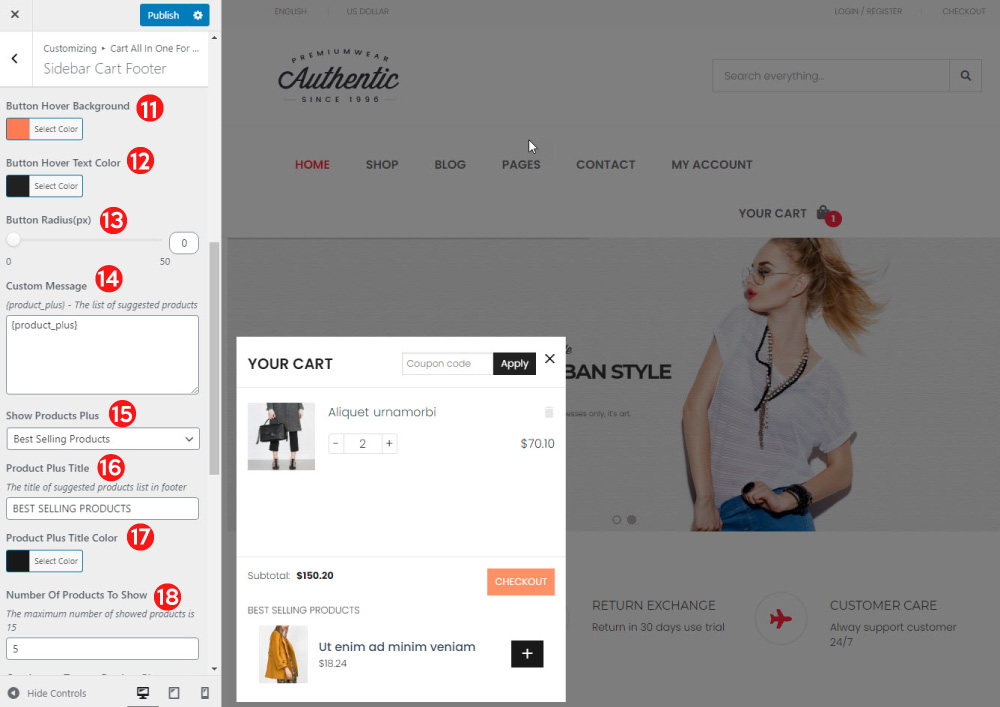
11. Button Hover Background: Set the color of  background button when hovering over
12. Button Hover Text Color: set color of button text when hovering
13. Button radius: Set the radius of update cart button
14. Custom message: add the message you want to display, it also supports the shortcode.
15. Show products Plus: choose the type  of suggested products: Best selling products, Recently viewed products or top-rated products.
16. Product Plus title: Enter the name of suggested product title on sidebar cart footer
17. Product Plus Title Color: Set the color of product plus title
18. Number of  products to show: Add the maximum number of suggested products you want to show. You can not display the number of products bigger than 15

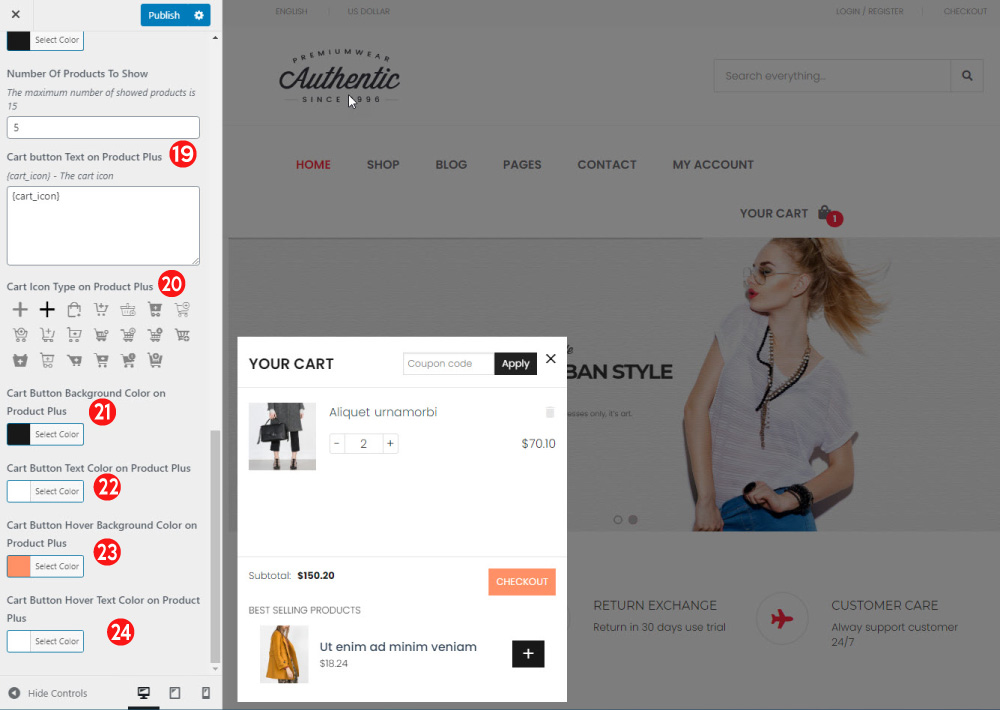
19. Cart button text on Product Plus:  Change the text of Add button on Product plus as you want. You also use the shortcode {cart_icon} to add cart icon to the button
20. Cart icon Type on Product Plus: Choose the type of icon for the the Add button. There are 20 icons to choose
21. Cart button background Color on Product Plus: Set the color of Cart button background on Product Plus
21. Cart button text Color on Product Plus: Set the color of Cart button text on Product Plus
22. Cart button hover Color on Product Plus: Set the color of Cart button on Product Plus when hovering over
23. Cart button hover text Color on Product Plus: Set the color of Cart button text on Product Plus when hovering over


Menu Cart

Design the Menu Cart

Go to the Menu Cart Settings instruction to read the guide for designing the Menu Cart

Sticky Add to Cart Button

Design the Sticky add to Cart button.

Go to Add to Cart setting instruction to read the guide for designing sticky add to cart button

Checkout

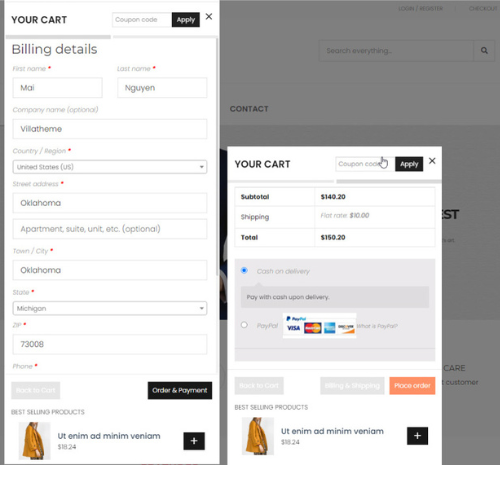
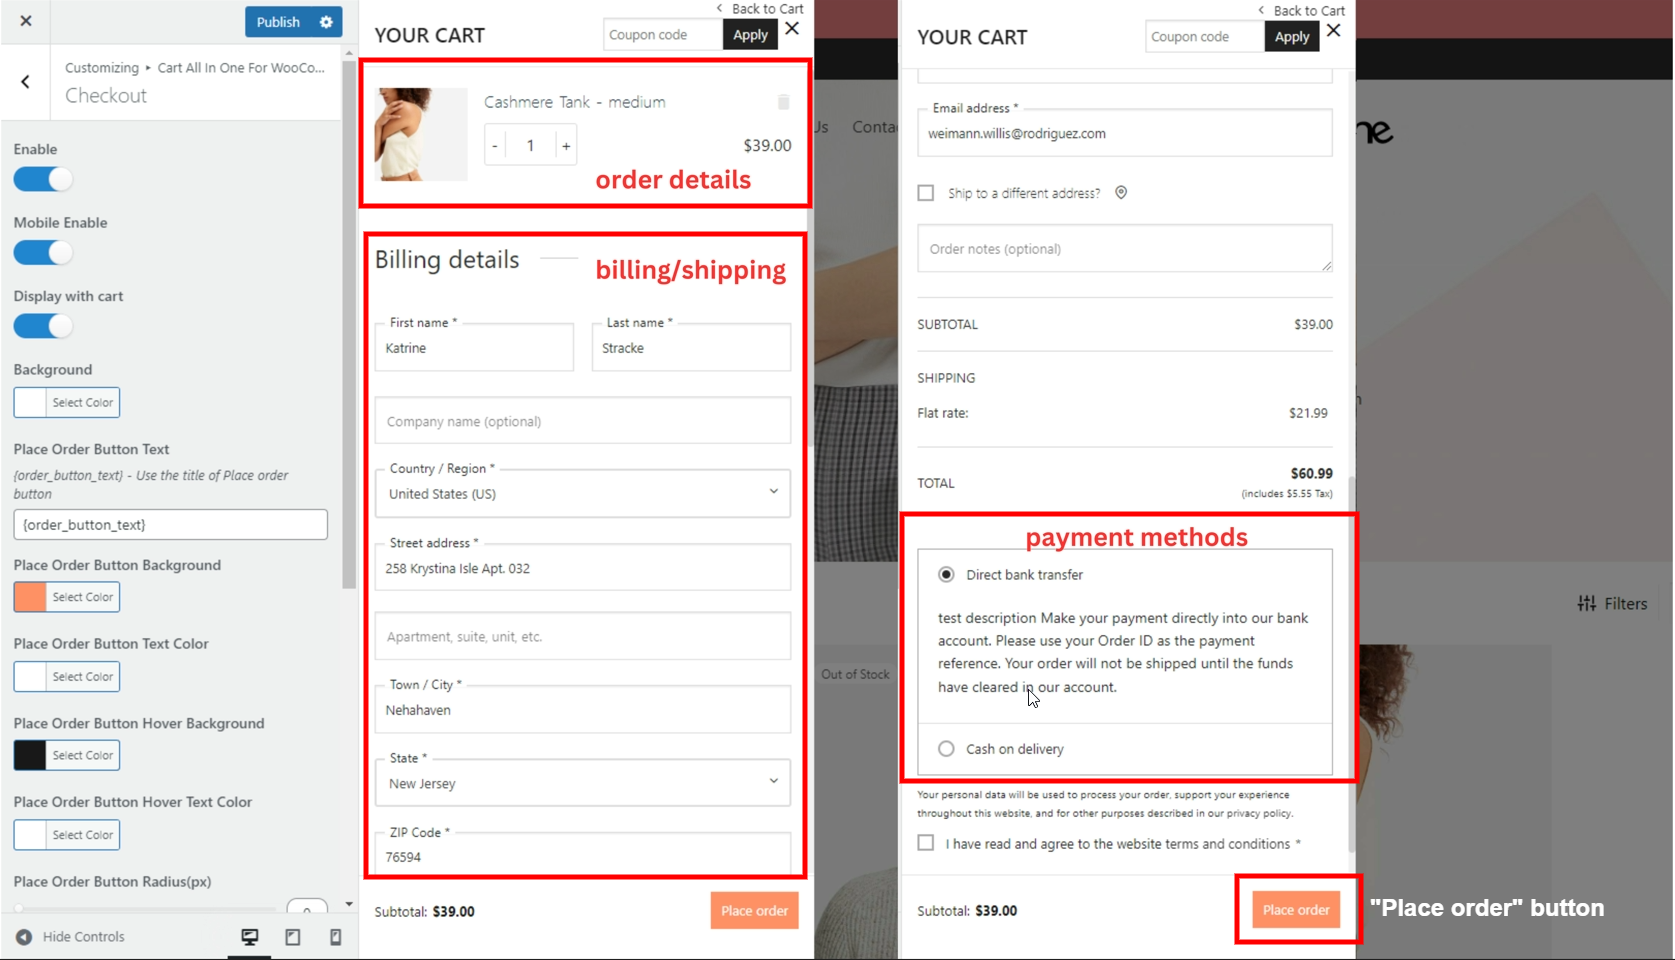
This function is to allow user to finish their order right in Sidebar Cart widget instead of being redirected to Cart/Checkout page.

This can be done in Customize settings. Go to Dashboard >> Appearance >> Customize >> Cart All In One For WooCommerce >> Checkout

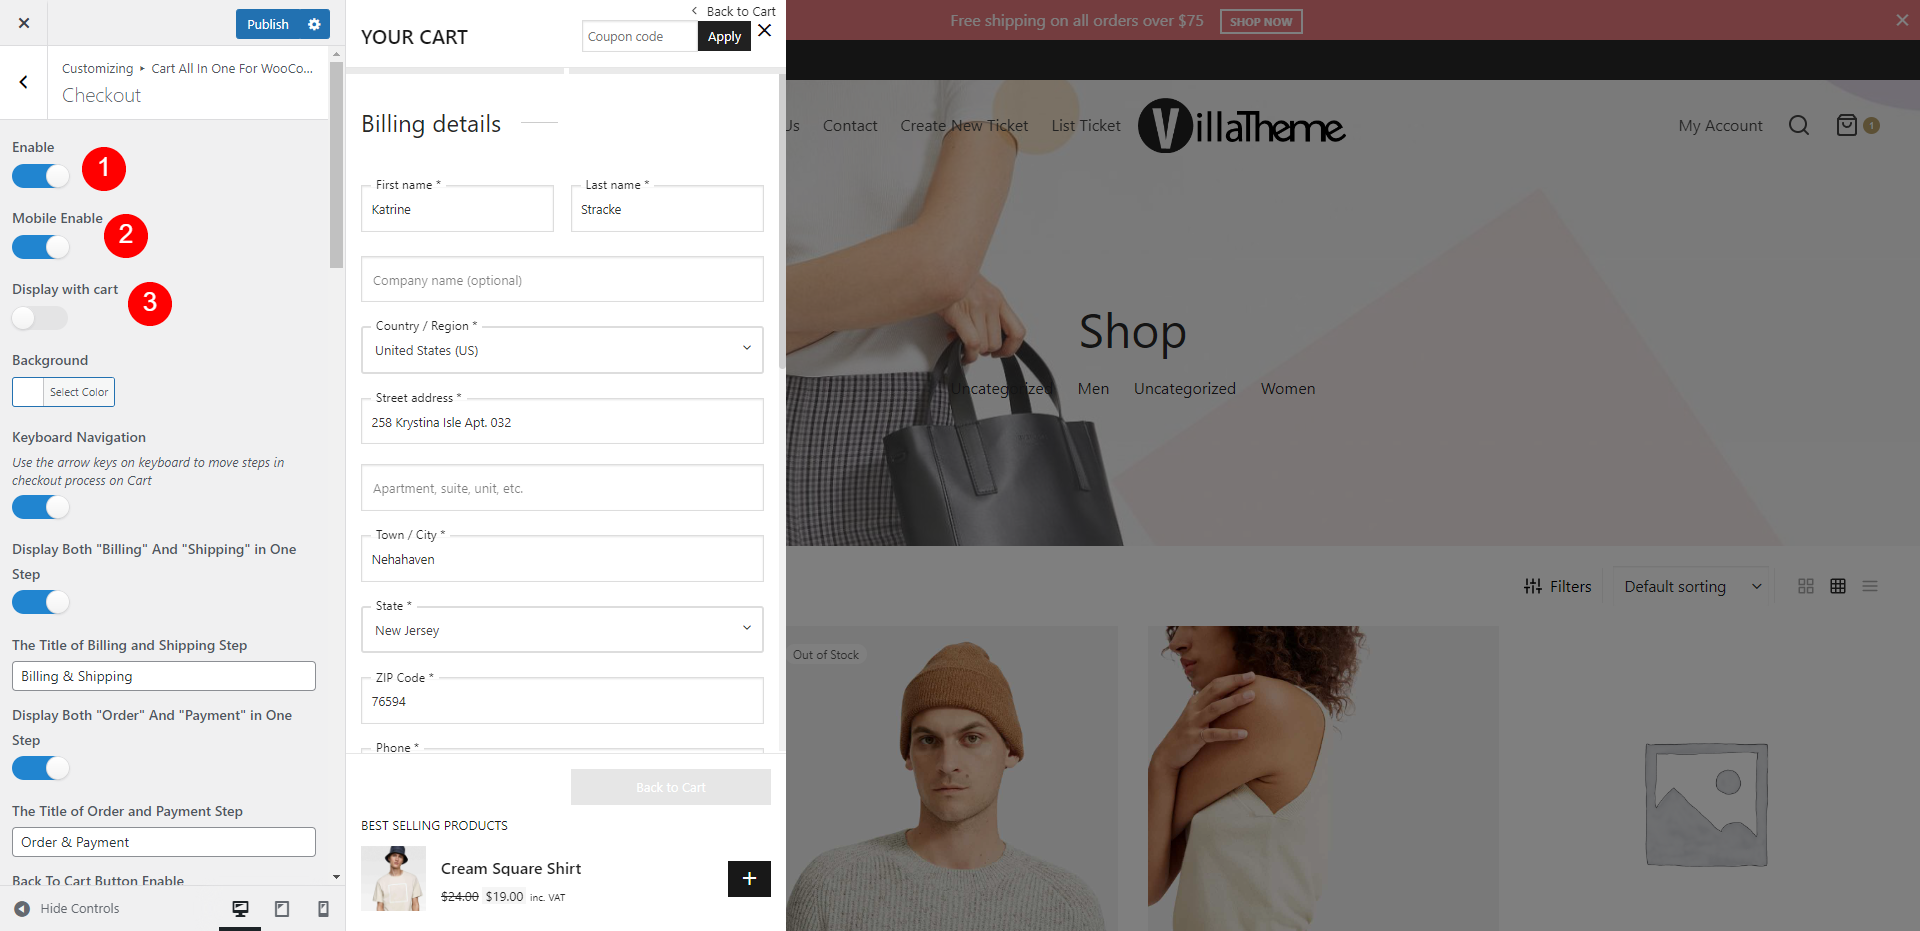
1. Enable: Enable it to allow customers to check out directly without going checkout page
2.Mobile enable: Enable it to allow customers to check out directly without going checkout page on checkout
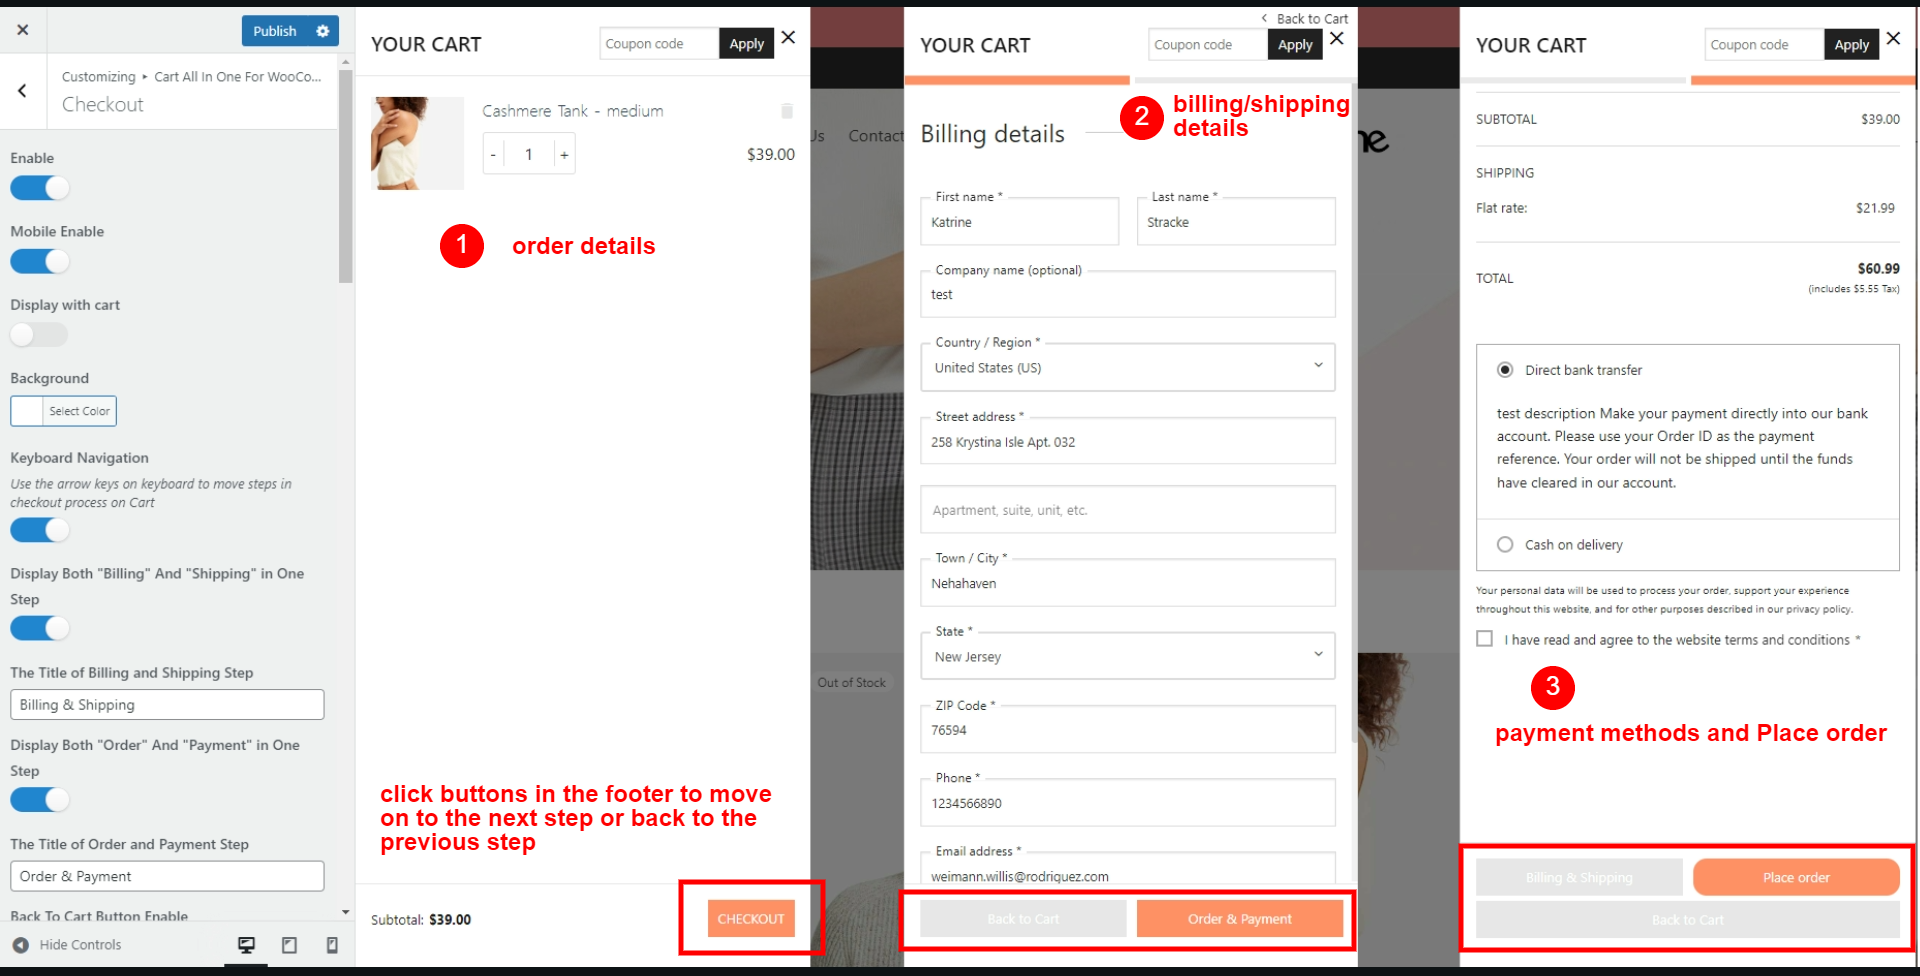
3. Display with cart: This option will handle the whole order – the order details, billing/shipping details and payment methods… – on the same tab or on different tabs

  • If enabled: Checkout form is available right below order details on Sidebar Cart. Details of all customizing options are as followings:
    • Background: Set up background color for the whole Sidebar Cart
    • Place Order Button Text: Button title of the “Place order” button
    • Place Order Button Background: Set up background color for the “Place order” button
    • Place Order Button Text Color: Set up text color for the button title above
    • Place Order Button Hover Background: Background color of “Place order” button on hover
    • Place Order Button Hover Text Color: Text color on hover of “Place order” button title
    • Place Order Button Radius(px): Drag the range slider to edit the round corner of the button
  • If disabled: Order details, billing/shipping details and checkout form are displayed in different tabs. Details of all customizing options as followings:
    • Background color: Set color of background
    • Keyboard Navigation: Enable it to allow customer to use arrow keys in checkout process
    • Display “Billing” and  “Shipping”  in the same time: Enable it to display both “Billing” and “shipping” information in one step
    • The Title of Billing and Shipping Step: Enter the button title
    • Display Both “Order” and “Payment” in One step: Combine or separate 2 steps
    • The title of Order And Payment Step: Enter the button title
    • Back to Cart button enable: Enable it to display the back to cart button
    • Back to Cart button text: Enter the button title
    • Back icon type:
    • Back to Cart button background color
    • Back to cart button color
    • Back to Cart button hover background color
    • Back to cart button hover color
    • Back to cart button radius(px)
    • Next button text
    • Next button background
    • Next button  color
    • Next button hover background color
    • Next button hover color
    • Next button text Radius
    • Previous button text
    • Previous button background
    • Previous button color
    • Previous button hover background color
    • Previous button hover color
    • Previous button text Radius
    • Place order button text
    • Place order button background
    • Place order button color
    • Place order hover background color
    • Place order button hover color
    • Place order button Radius
    • Display the Bar for moving between steps
    • Moving bar color
    • Moving bar color when hovered mouse in
    • Moving bar color when selected.


Custom CSS

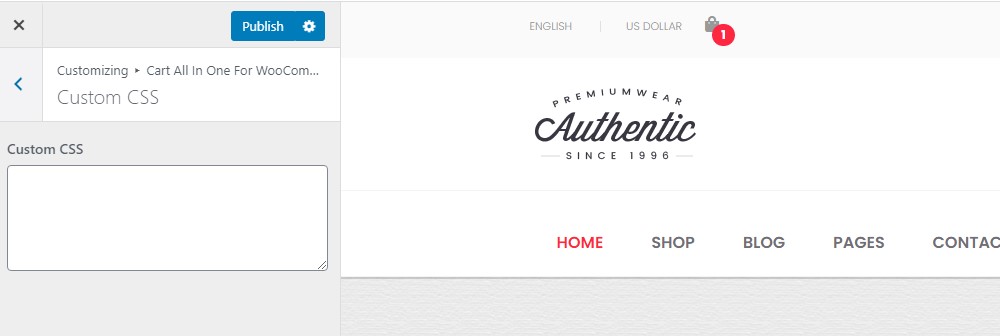
You can customize CSS yourself here (Cart All In One Settings > Sidebar Cart> Go to design> Cart All in One for WooCommerce> Custom CSS)

If you are using the Elememtor page builder, we provide the Menu cart(Villatheme) element to display the menu cart wherever you want on the Elementor builder page where it is supported.

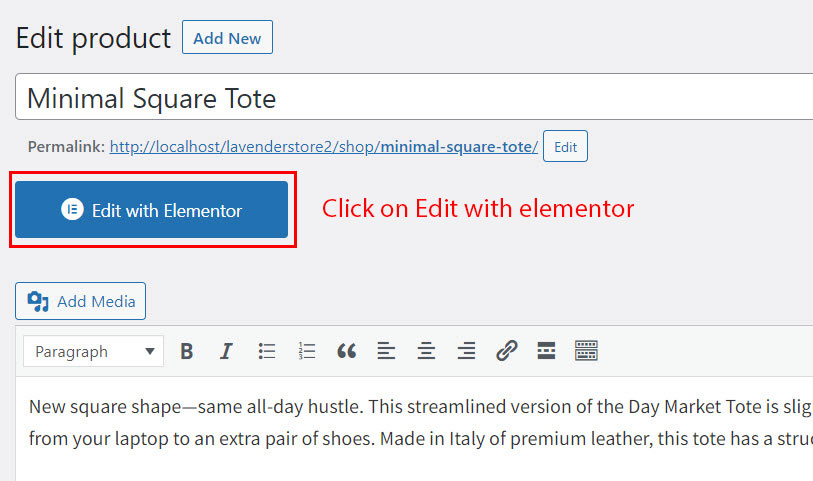
Step 1: Open a product page using Elementor page builder.

Step 2: Search for the Menu cart (VillaTheme) on the search bar.

Step 3: Drag and drop the Menu cart (VillaTheme) element to the position you want.

Step 4: Configure the Menu cart options

In the content section, you can configure the general design of the menu cart.

A. General

1. Display on mobile: Enable to display the menu cart on mobile

2. Visible empty menu cart: Enable to display the menu cart even the cart is empty.

3. Navigation page: When clicking on the menu cart, you will be redirected to the None; Cart page, or Checkout page.

4. Show content cart: Enable to display cart the cart content when hovering over the menu cart.
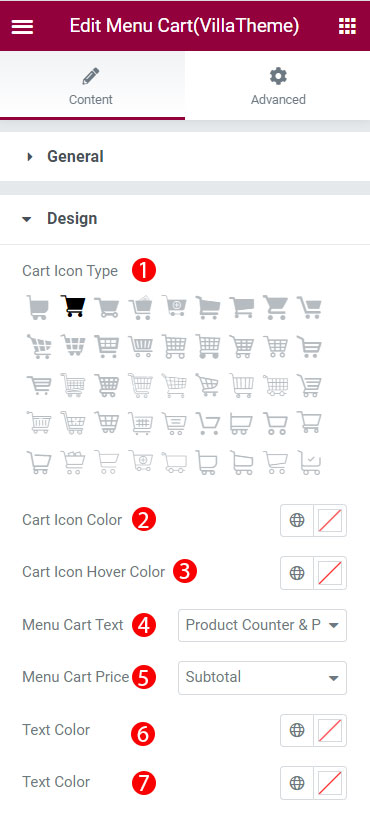


B. Design


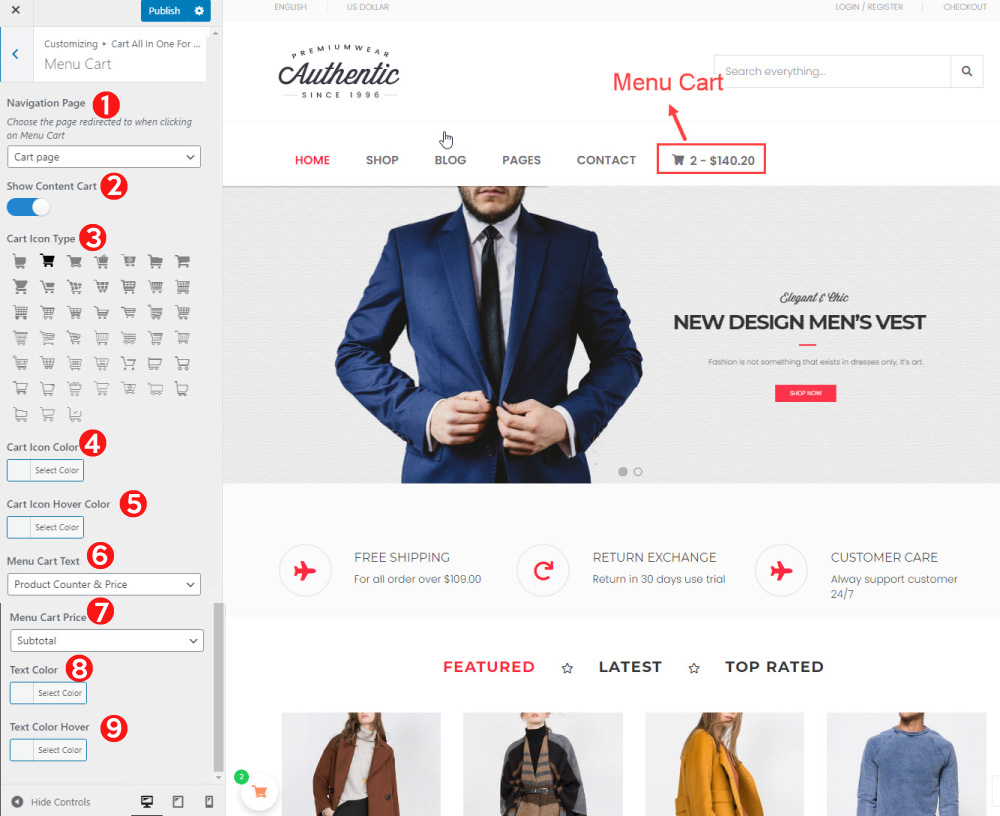
1. Cart icon type: Choose the icon for the Menu cart

2. Cart icon color: Select color for the cart icon

3. Cart icon hovers color: Select the color for the cart icon when hovering over the mouse.

4. Menu Cart Text: Choose the type of text next to the cart icon. You can choose one of three types: Price, product counter, product counter, and price

5. Menu Cart price: Choose the price displayed on Menu Cart: Total or Subtotal

6. Text  color: Select color for the text of the Menu cart

7. Text Color hover: Select color for the text of the Menu cart when hovering the mouse over

The plugin is compatible with:


Plugin Author Compatible
WooCommerce PayPal Payments WooCommerce
WooCommerce Stripe Payment Gateway WooCommerce Fully
WooCommerce Square WooCommerce Fully
WooCommerce PayPal Checkout Payment Gateway WooCommerce
Payment Plugins for Stripe WooCommerce
Elementor – Menu Cart Elementor
REDIS – WooCommerce Dynamic Pricing and Discounts VillaTheme
GTM4WP – Version 1.16.1 Thomas Geiger
High-Performance Order Storage WooCommerce
WooCommerce Delivery & Pickup Date Time v:1.4.15 CodeRockz
Elementor v:3.15 https://elementor.com/
Facebook for WooCommerce v:3.0 WooCommerce
Nextend Social Login Nextendweb
Template Usage
/sidebar-cart/sc-content.php Sidebar cart
/sidebar-cart/sc-form-checkout.php Checkout form in the sidebar cart
/sidebar-cart/sc-product-list-html.php Cart items in the sidebar cart
/sidebar-cart/sc-product-plus-html.php Recommeded products in the footer of the sidebar cart
/sidebar-cart/sidebar-cart.php Sidebar cart
/sticky-bar.php Sticky add-to-cart on single product page
/sticky-bar-mobile.php Sticky add-to-cart on single product page on mobile
/variation-popup.php add-to-cart form popup for variable products in product list
/vicaio-product-quantity-html.php Quantity of cart items in the sidebar cart


Follow this guide on how to override VillaTheme plugins’ templates via a theme.


Extra Information


Thank you for your attention!

If you have any question, please create a topic at our FORUM, we will support within 24 hours.